display TOYOTA HIGHLANDER 2014 XU50 / 3.G Navigation Manual
[x] Cancel search | Manufacturer: TOYOTA, Model Year: 2014, Model line: HIGHLANDER, Model: TOYOTA HIGHLANDER 2014 XU50 / 3.GPages: 356, PDF Size: 28.61 MB
Page 115 of 356
115
3. MEDIA OPERATION
3
AUDIO/VISUAL SYSTEM
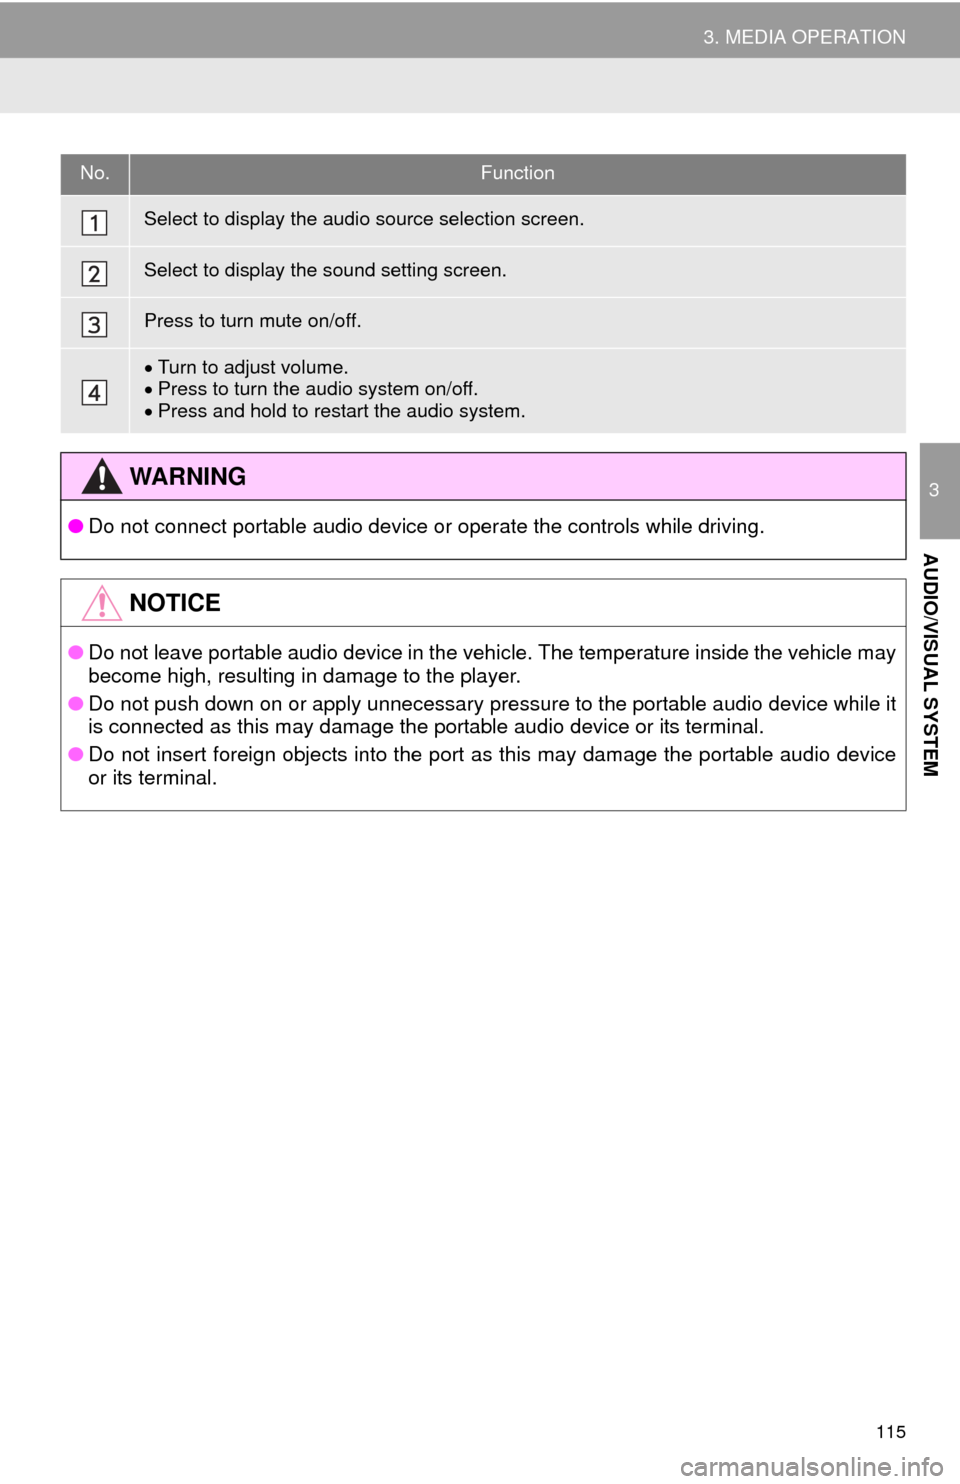
No.Function
Select to display the audio source selection screen.
Select to display the sound setting screen.
Press to turn mute on/off.
Turn to adjust volume.
Press to turn the audio system on/off.
Press and hold to restart the audio system.
WA R N I N G
●Do not connect portable audio device or operate the controls while driving.
NOTICE
●Do not leave portable audio device in the vehicle. The temperature inside the vehicle may
become high, resulting in damage to the player.
●Do not push down on or apply unnecessary pressure to the portable audio device while it
is connected as this may damage the portable audio device or its terminal.
●Do not insert foreign objects into the port as this may damage the portable audio device
or its terminal.
Page 117 of 356
117
3. MEDIA OPERATION
3
AUDIO/VISUAL SYSTEM
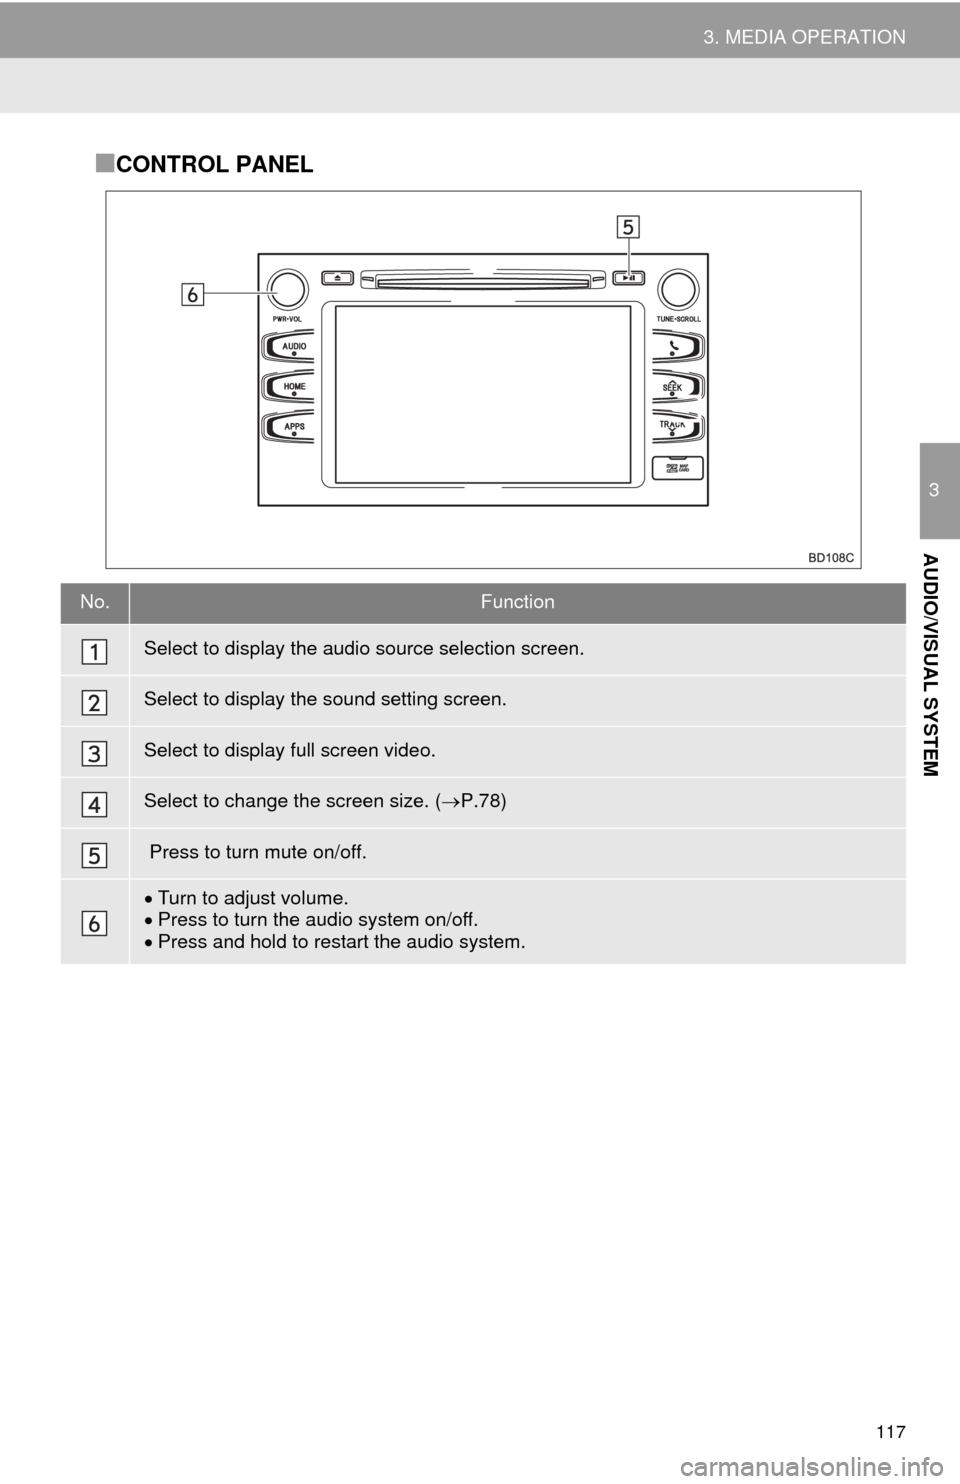
■CONTROL PANEL
No.Function
Select to display the audio source selection screen.
Select to display the sound setting screen.
Select to display full screen video.
Select to change the screen size. (P.78)
Press to turn mute on/off.
Turn to adjust volume.
Press to turn the audio system on/off.
Press and hold to restart the audio system.
Page 122 of 356
122
5. SETUP
1Display the “Audio Settings” screen.
(P.121)
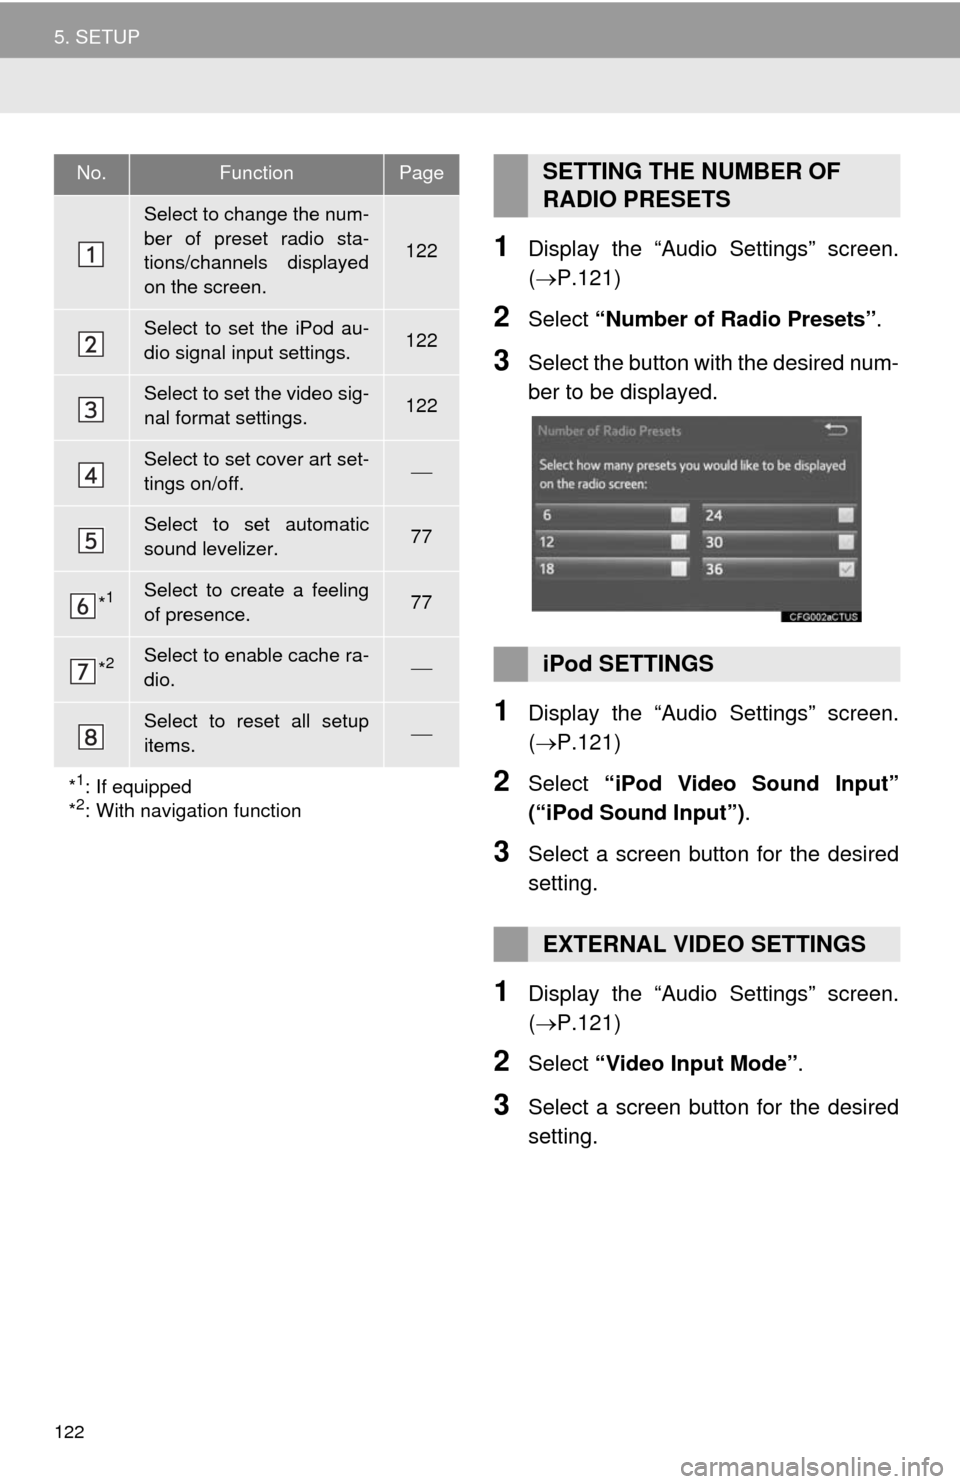
2Select “Number of Radio Presets”.
3Select the button with the desired num-
ber to be displayed.
1Display the “Audio Settings” screen.
(P.121)
2Select “iPod Video Sound Input”
(“iPod Sound Input”).
3Select a screen button for the desired
setting.
1Display the “Audio Settings” screen.
(P.121)
2Select “Video Input Mode”.
3Select a screen button for the desired
setting.
No.FunctionPage
Select to change the num-
ber of preset radio sta-
tions/channels displayed
on the screen.
122
Select to set the iPod au-
dio signal input settings.122
Select to set the video sig-
nal format settings.122
Select to set cover art set-
tings on/off.
Select to set automatic
sound levelizer.77
*1Select to create a feeling
of presence.77
*2Select to enable cache ra-
dio.
Select to reset all setup
items.
*
1: If equipped
*2: With navigation function
SETTING THE NUMBER OF
RADIO PRESETS
iPod SETTINGS
EXTERNAL VIDEO SETTINGS
Page 128 of 356
128
6. TIPS FOR OPERATING THE AUDIO/VISUAL SYSTEM
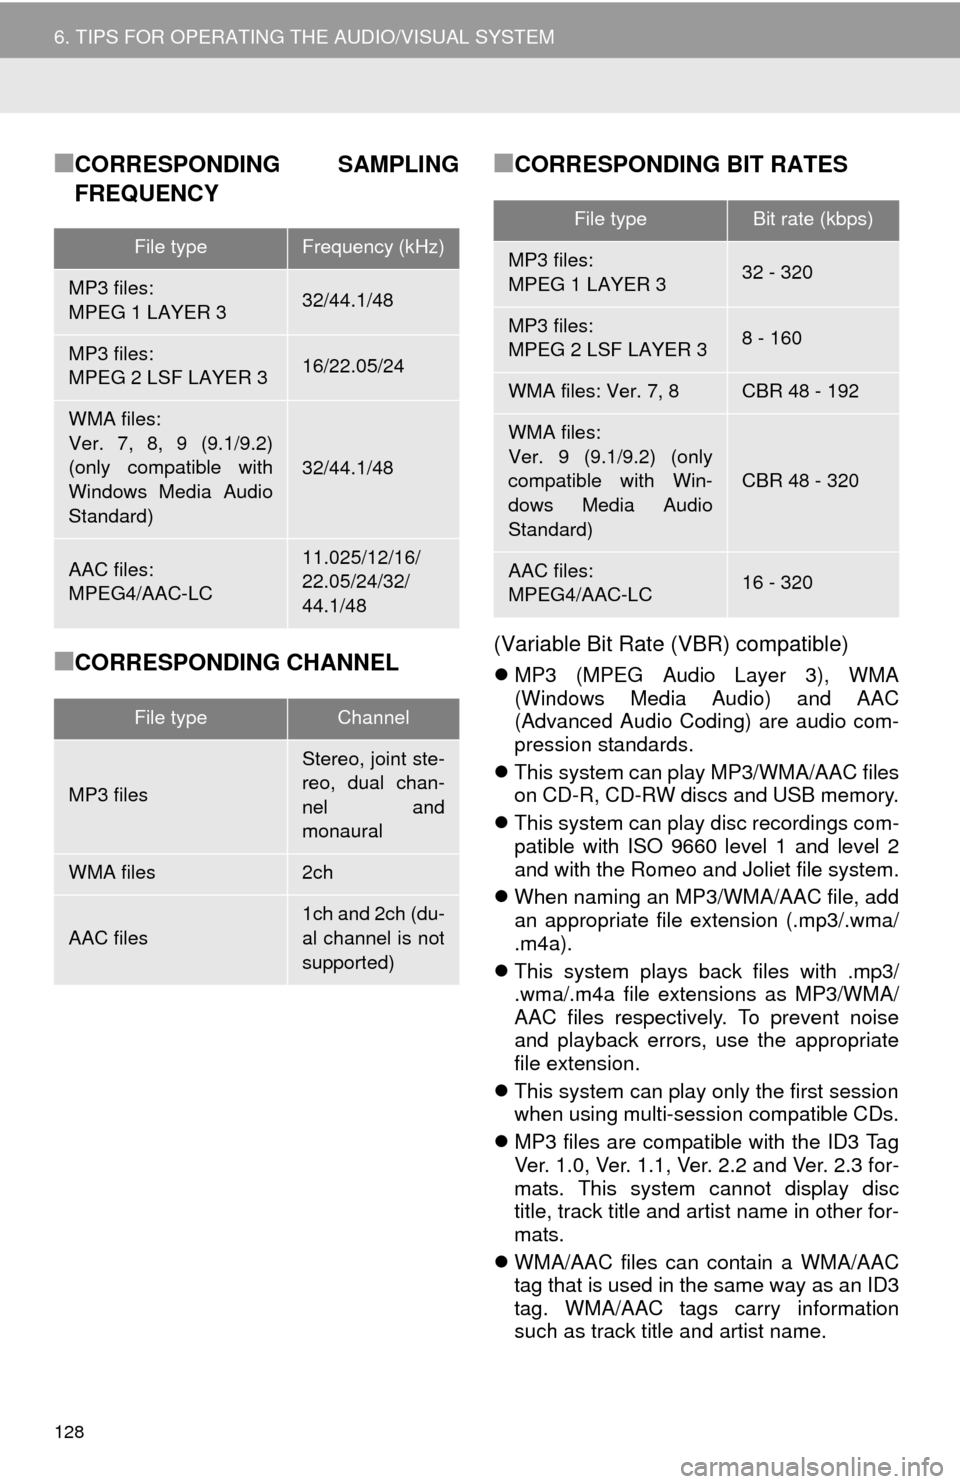
■CORRESPONDING SAMPLING
FREQUENCY
■CORRESPONDING CHANNEL
■CORRESPONDING BIT RATES
(Variable Bit Rate (VBR) compatible)
MP3 (MPEG Audio Layer 3), WMA
(Windows Media Audio) and AAC
(Advanced Audio Coding) are audio com-
pression standards.
This system can play MP3/WMA/AAC files
on CD-R, CD-RW discs and USB memory.
This system can play disc recordings com-
patible with ISO 9660 level 1 and level 2
and with the Romeo and Joliet file system.
When naming an MP3/WMA/AAC file, add
an appropriate file extension (.mp3/.wma/
.m4a).
This system plays back files with .mp3/
.wma/.m4a file extensions as MP3/WMA/
AAC files respectively. To prevent noise
and playback errors, use the appropriate
file extension.
This system can play only the first session
when using multi-session compatible CDs.
MP3 files are compatible with the ID3 Tag
Ver. 1.0, Ver. 1.1, Ver. 2.2 and Ver. 2.3 for-
mats. This system cannot display disc
title, track title and artist name in other for-
mats.
WMA/AAC files can contain a WMA/AAC
tag that is used in the same way as an ID3
tag. WMA/AAC tags carry information
such as track title and artist name.
File typeFrequency (kHz)
MP3 files:
MPEG 1 LAYER 332/44.1/48
MP3 files:
MPEG 2 LSF LAYER 316/22.05/24
WMA files:
Ver. 7, 8, 9 (9.1/9.2)
(only compatible with
Windows Media Audio
Standard)
32/44.1/48
AAC files:
MPEG4/AAC-LC11.025/12/16/
22.05/24/32/
44.1/48
File typeChannel
MP3 files
Stereo, joint ste-
reo, dual chan-
nel and
monaural
WMA files2ch
AAC files1ch and 2ch (du-
al channel is not
supported)
File typeBit rate (kbps)
MP3 files:
MPEG 1 LAYER 332 - 320
MP3 files:
MPEG 2 LSF LAYER 38 - 160
WMA files: Ver. 7, 8CBR 48 - 192
WMA files:
Ver. 9 (9.1/9.2) (only
compatible with Win-
dows Media Audio
Standard)
CBR 48 - 320
AAC files:
MPEG4/AAC-LC16 - 320
Page 129 of 356
129
6. TIPS FOR OPERATING THE AUDIO/VISUAL SYSTEM
3
AUDIO/VISUAL SYSTEM
This system can play back AAC files
encoded by iTunes.
The sound quality of MP3/WMA files gen-
erally improves with higher bit rates. In
order to achieve a reasonable level of
sound quality, discs recorded with a bit
rate of at least 128 kbps are recom-
mended.
The MP3/WMA player does not play back
MP3/WMA files from discs recorded using
packet write data transfer (UDF format).
Discs should be recorded using “pre-mas-
tering” software rather than packet-write
software.
M3u playlists are not compatible with the
audio player.
MP3i (MP3 interactive) and MP3PRO for-
mats are not compatible with the audio
player.
The player is compatible with VBR (Vari-
able Bit Rate).
When playing back files recorded as VBR
(Variable Bit Rate) files, the play time will
not be correctly displayed if the fast for-
ward or reverse operations are used.
It is not possible to check folders that do
not include MP3/WMA/AAC files.
MP3/WMA/AAC files in folders up to 8 lev-
els deep can be played. However, the
start of playback may be delayed when
using discs containing numerous levels of
folders. For this reason, we recommend
creating discs with no more than 2 levels
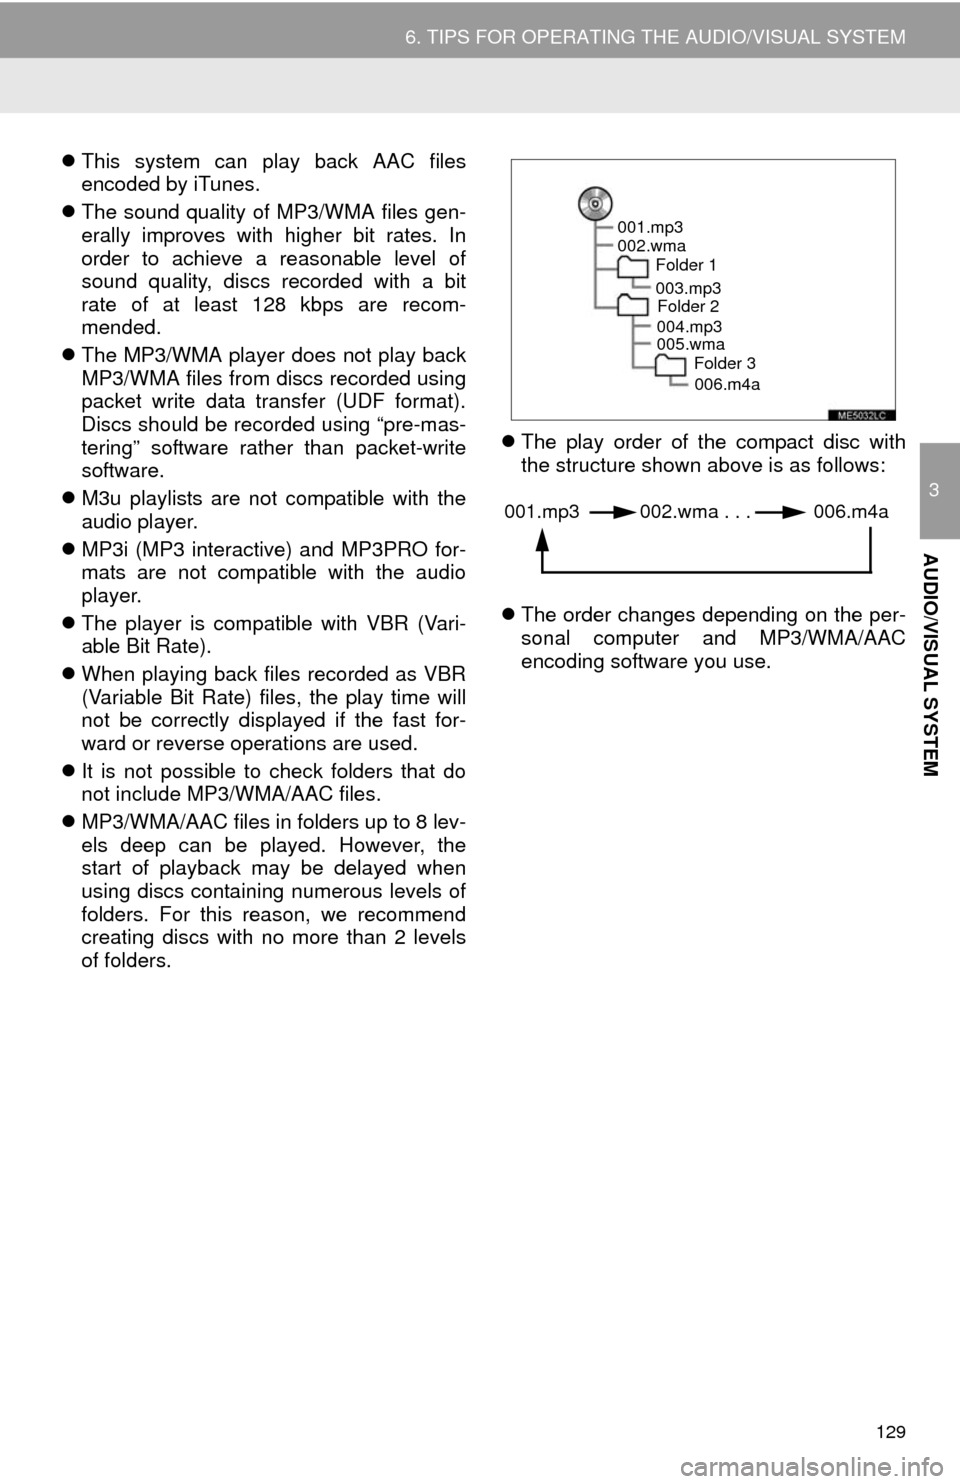
of folders.The play order of the compact disc with
the structure shown above is as follows:
The order changes depending on the per-
sonal computer and MP3/WMA/AAC
encoding software you use.
001.mp3
002.wma
Folder 1
003.mp3
Folder 2
004.mp3
005.wma
Folder 3
006.m4a
001.mp3 002.wma . . . 006.m4a
Page 132 of 356
132
7. REAR SEAT ENTERTAINMENT SYSTEM OPERATION
1. REAR SEAT ENTERTAINMENT SYSTEM FEATURES*
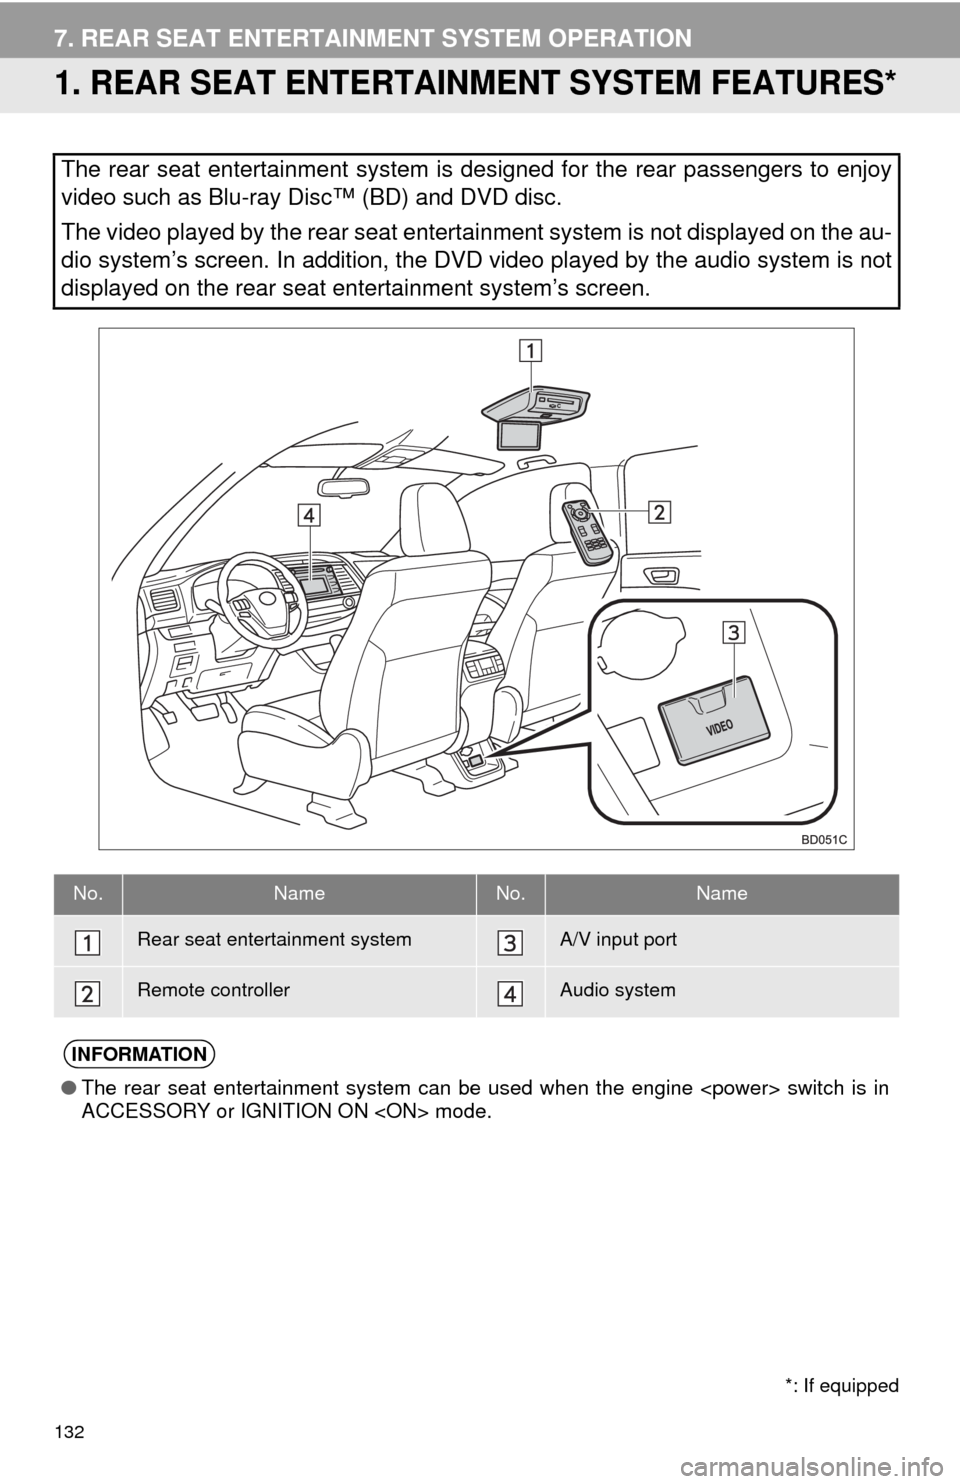
The rear seat entertainment system is designed for the rear passengers to enjoy
video such as Blu-ray Disc™ (BD) and DVD disc.
The video played by the rear seat entertainment system is not displayed on the au-
dio system’s screen. In addition, the DVD video played by the audio system is not
displayed on the rear seat entertainment system’s screen.
No.NameNo.Name
Rear seat entertainment systemA/V input port
Remote controllerAudio system
INFORMATION
●The rear seat entertainment system can be used when the engine
ACCESSORY or IGNITION ON
*: If equipped
Page 133 of 356
133
7. REAR SEAT ENTERTAINMENT SYSTEM OPERATION
3
AUDIO/VISUAL SYSTEM
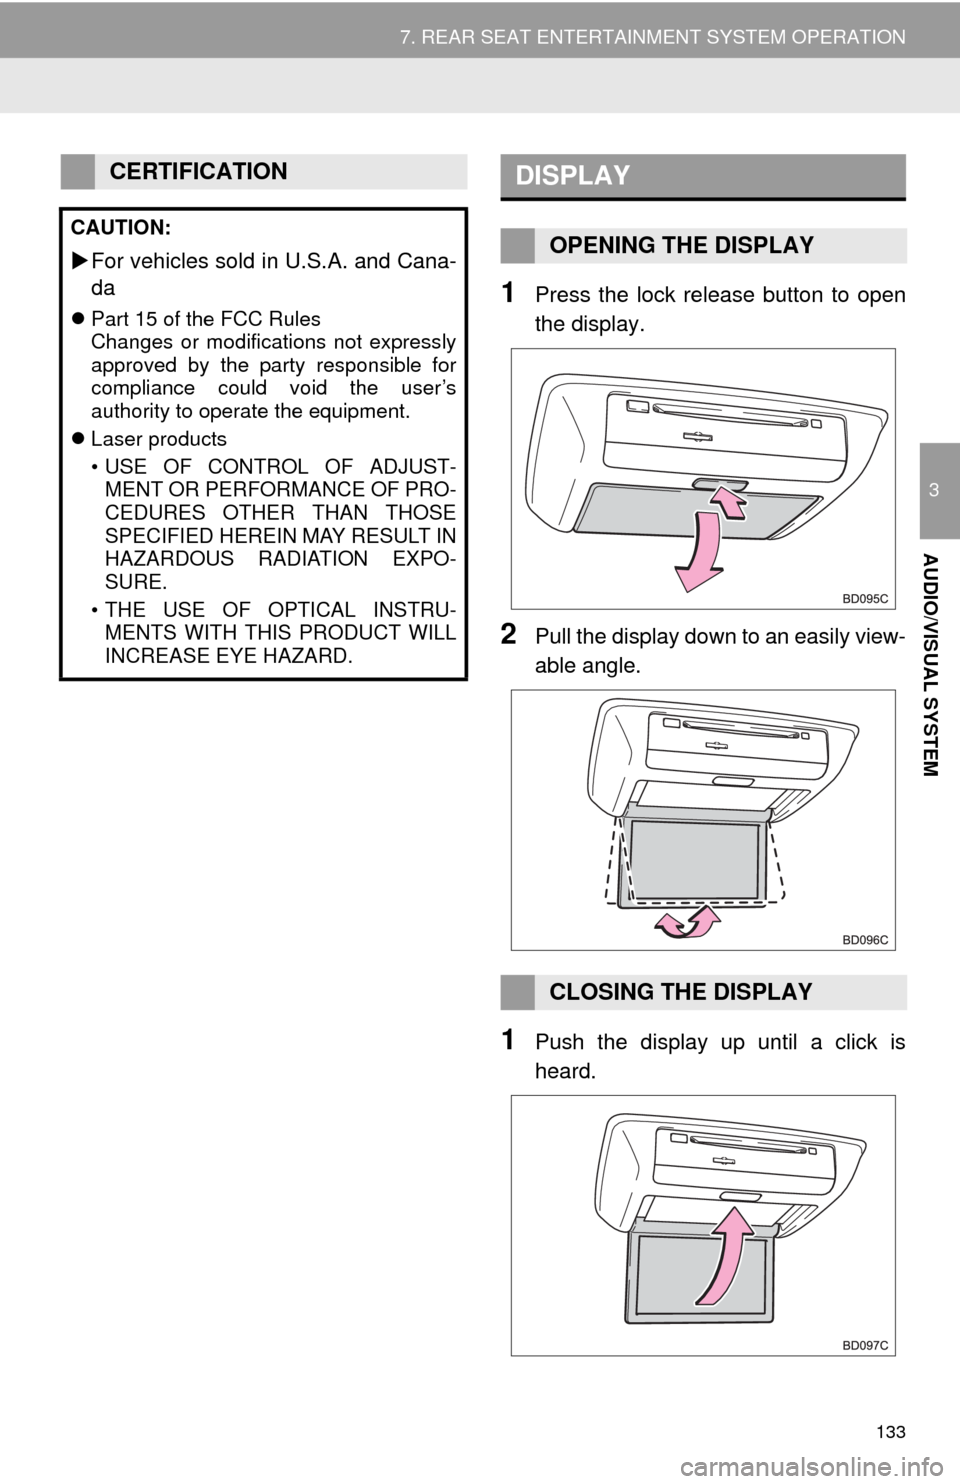
1Press the lock release button to open
the display.
2Pull the display down to an easily view-
able angle.
1Push the display up until a click is
heard.
CERTIFICATION
CAUTION:
For vehicles sold in U.S.A. and Cana-
da
Part 15 of the FCC Rules
Changes or modifications not expressly
approved by the party responsible for
compliance could void the user’s
authority to operate the equipment.
Laser products
• USE OF CONTROL OF ADJUST-
MENT OR PERFORMANCE OF PRO-
CEDURES OTHER THAN THOSE
SPECIFIED HEREIN MAY RESULT IN
HAZARDOUS RADIATION EXPO-
SURE.
• THE USE OF OPTICAL INSTRU-
MENTS WITH THIS PRODUCT WILL
INCREASE EYE HAZARD.
DISPLAY
OPENING THE DISPLAY
CLOSING THE DISPLAY
Page 134 of 356
134
7. REAR SEAT ENTERTAINMENT SYSTEM OPERATION
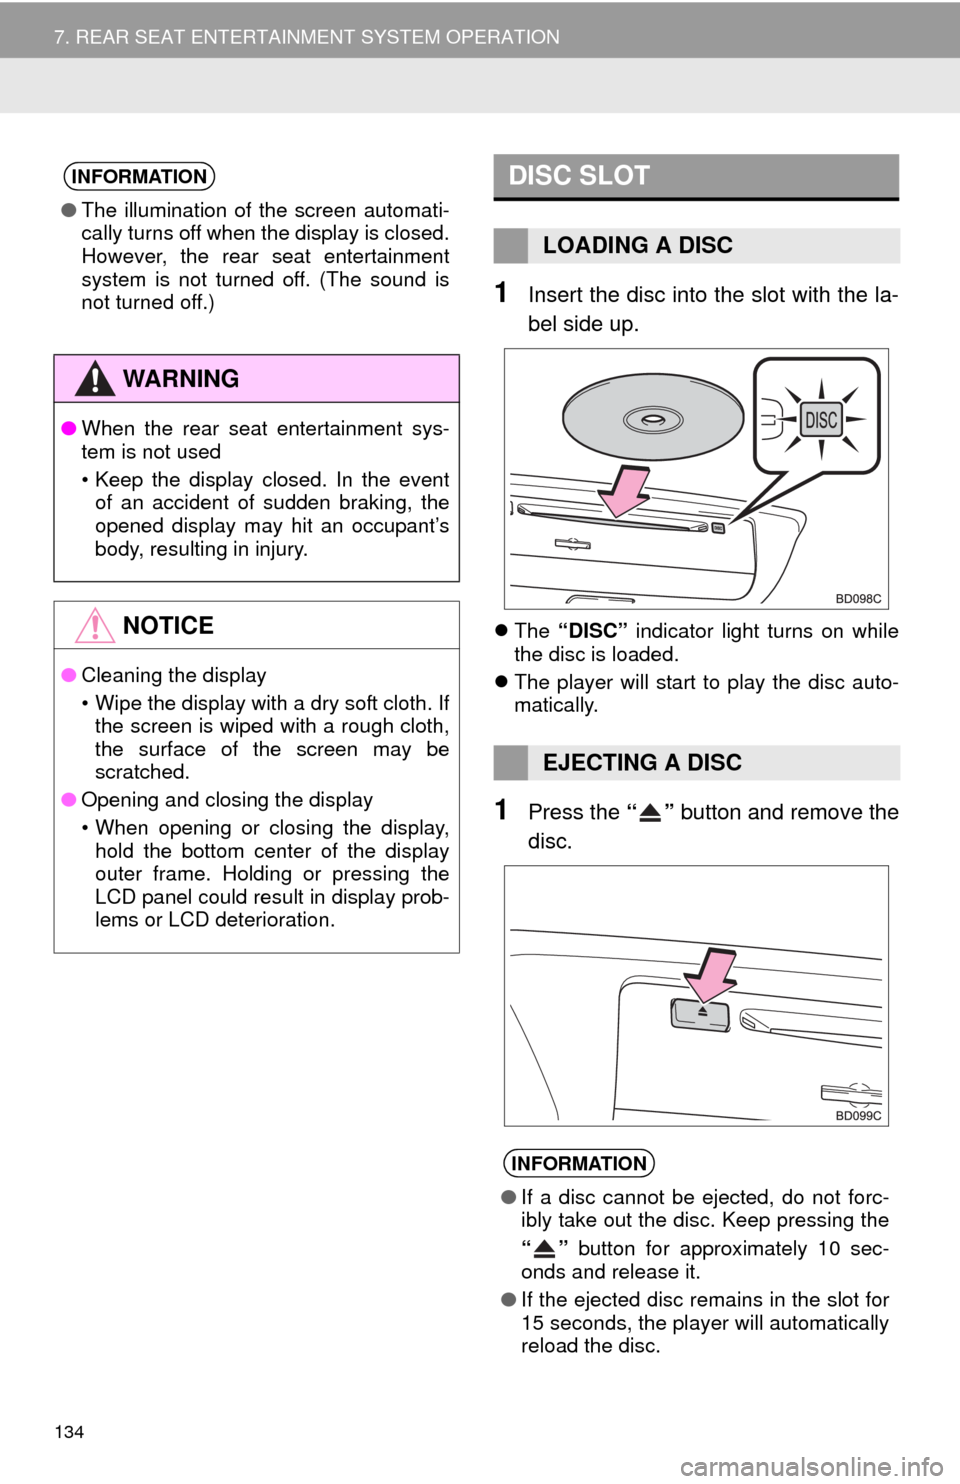
1Insert the disc into the slot with the la-
bel side up.
The “DISC” indicator light turns on while
the disc is loaded.
The player will start to play the disc auto-
matically.
1Press the “” button and remove the
disc.
INFORMATION
●The illumination of the screen automati-
cally turns off when the display is closed.
However, the rear seat entertainment
system is not turned off. (The sound is
not turned off.)
WA R N I N G
●When the rear seat entertainment sys-
tem is not used
• Keep the display closed. In the event
of an accident of sudden braking, the
opened display may hit an occupant’s
body, resulting in injury.
NOTICE
●Cleaning the display
• Wipe the display with a dry soft cloth. If
the screen is wiped with a rough cloth,
the surface of the screen may be
scratched.
●Opening and closing the display
• When opening or closing the display,
hold the bottom center of the display
outer frame. Holding or pressing the
LCD panel could result in display prob-
lems or LCD deterioration.
DISC SLOT
LOADING A DISC
EJECTING A DISC
INFORMATION
●If a disc cannot be ejected, do not forc-
ibly take out the disc. Keep pressing the
“” button for approximately 10 sec-
onds and release it.
●If the ejected disc remains in the slot for
15 seconds, the player will automatically
reload the disc.
Page 136 of 356
136
7. REAR SEAT ENTERTAINMENT SYSTEM OPERATION
1Press the button to turn on the
rear seat entertainment system.
Press the button once again to turn
off the system.
1Press “+” or “-” on the “VOL” button
to adjust the volume.
When the speaker output is off, the vol-
ume cannot be adjusted.
1Press the button to turn on/off
the speaker output.
On: The sound is available from both vehi-
cle speakers and headphones.
Off: The sound is available from the head-
phones only.
1Press the “DISC”, “SD” or “VIDEO”
button to change the audio/video
source.
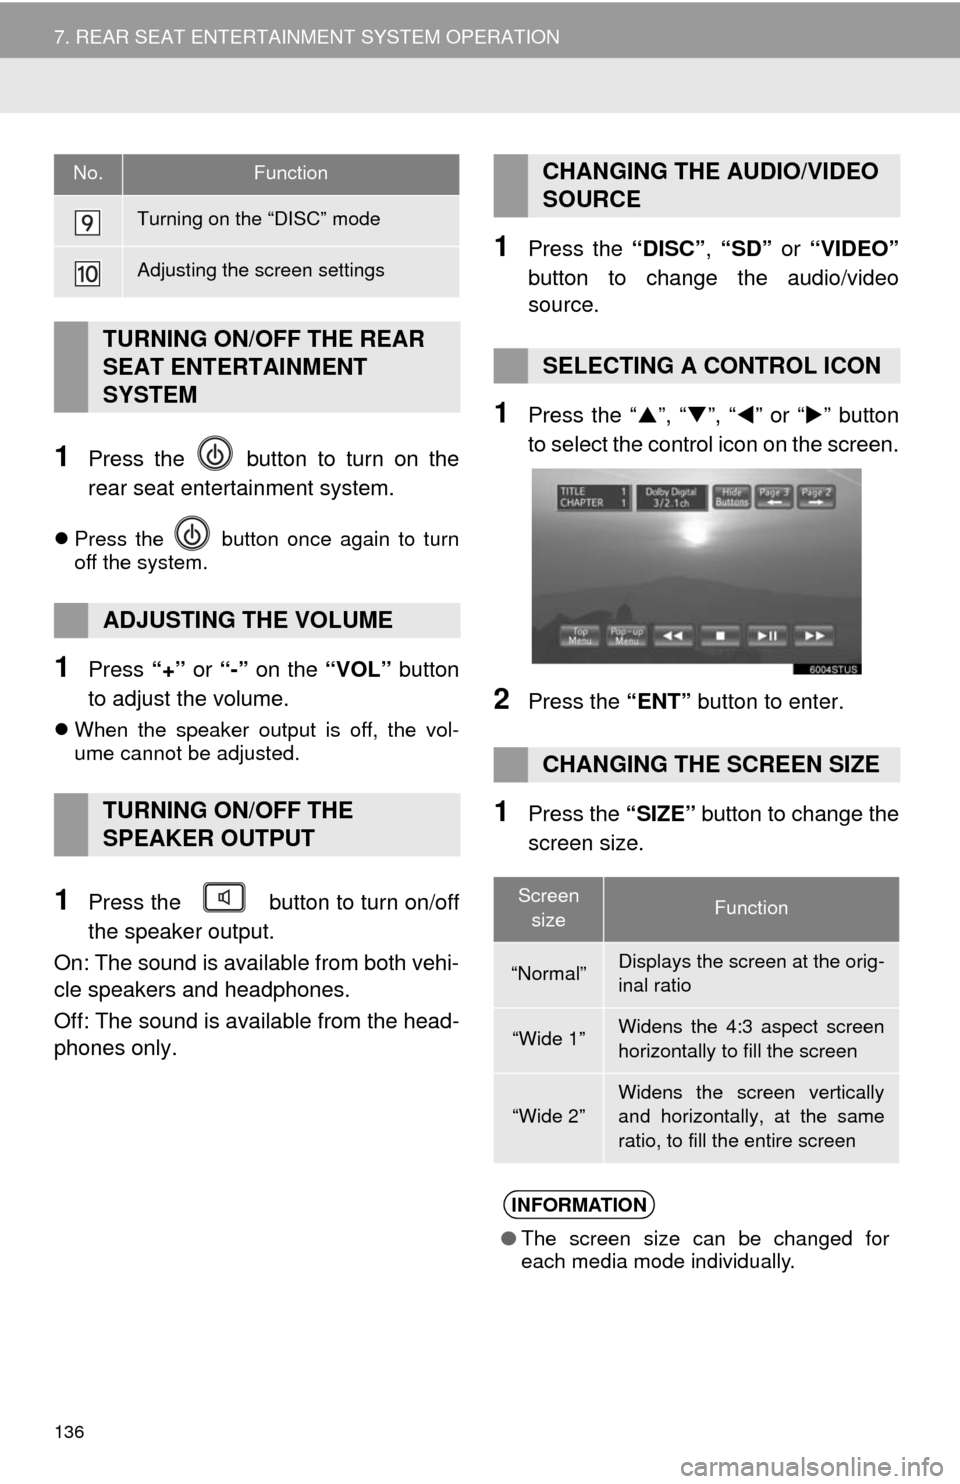
1Press the “”, “”, “” or “” button
to select the control icon on the screen.
2Press the “ENT” button to enter.
1Press the “SIZE” button to change the
screen size.
Turning on the “DISC” mode
Adjusting the screen settings
TURNING ON/OFF THE REAR
SEAT ENTERTAINMENT
SYSTEM
ADJUSTING THE VOLUME
TURNING ON/OFF THE
SPEAKER OUTPUT
No.FunctionCHANGING THE AUDIO/VIDEO
SOURCE
SELECTING A CONTROL ICON
CHANGING THE SCREEN SIZE
Screen
sizeFunction
“Normal”Displays the screen at the orig-
inal ratio
“Wide 1”Widens the 4:3 aspect screen
horizontally to fill the screen
“Wide 2”
Widens the screen vertically
and horizontally, at the same
ratio, to fill the entire screen
INFORMATION
●The screen size can be changed for
each media mode individually.
Page 137 of 356
137
7. REAR SEAT ENTERTAINMENT SYSTEM OPERATION
3
AUDIO/VISUAL SYSTEM
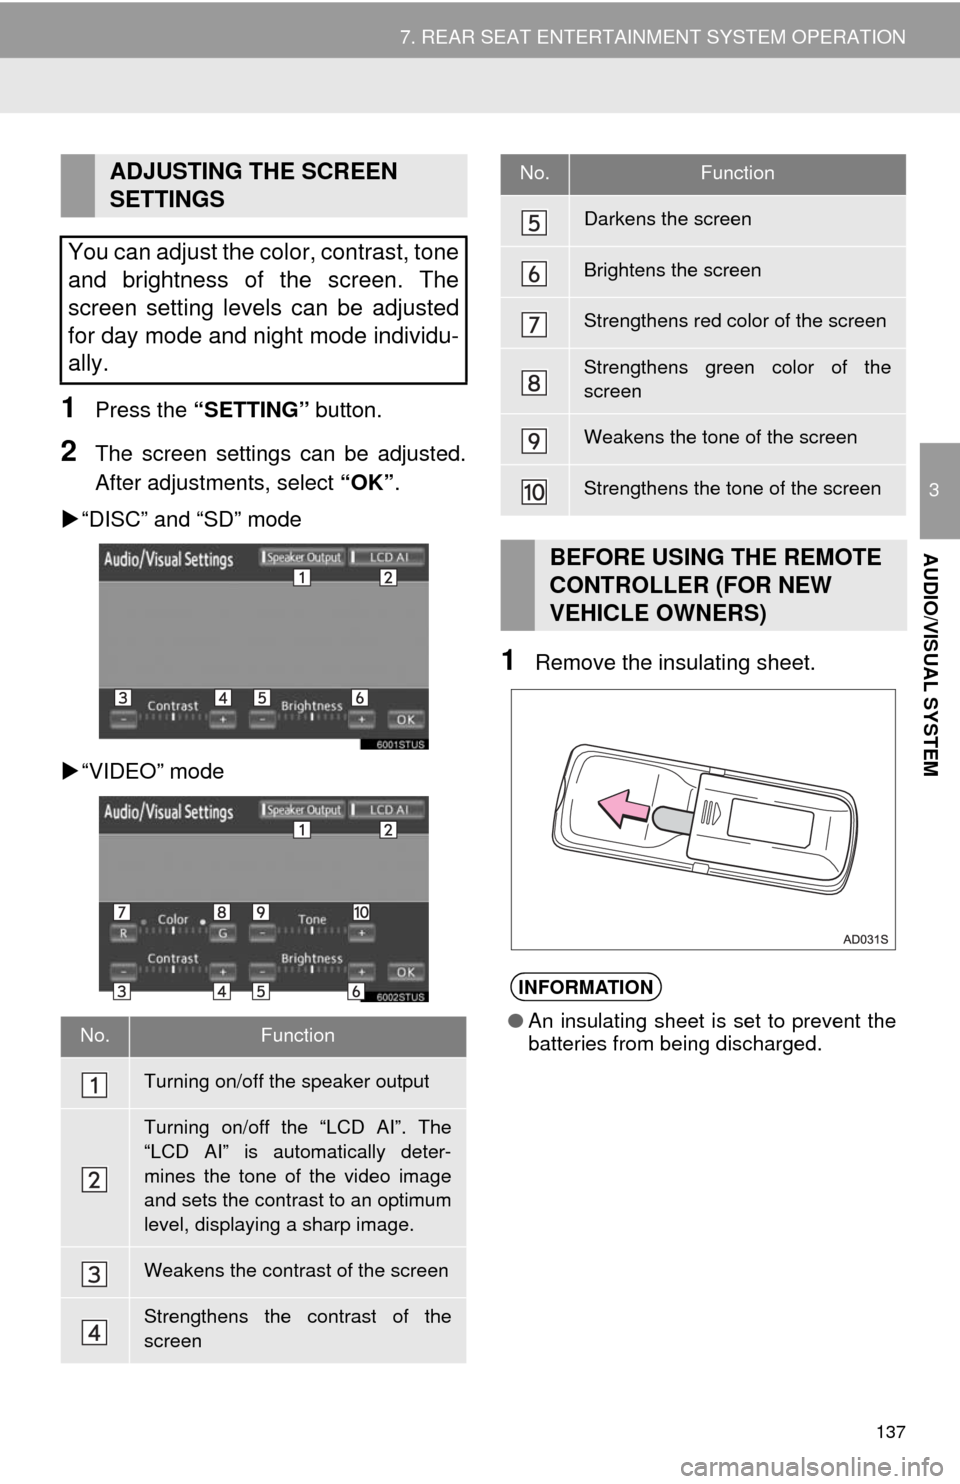
1Press the “SETTING” button.
2The screen settings can be adjusted.
After adjustments, select “OK”.
“DISC” and “SD” mode
“VIDEO” mode
1Remove the insulating sheet.
ADJUSTING THE SCREEN
SETTINGS
You can adjust the color, contrast, tone
and brightness of the screen. The
screen setting levels can be adjusted
for day mode and night mode individu-
ally.
No.Function
Turning on/off the speaker output
Turning on/off the “LCD AI”. The
“LCD AI” is automatically deter-
mines the tone of the video image
and sets the contrast to an optimum
level, displaying a sharp image.
Weakens the contrast of the screen
Strengthens the contrast of the
screen
Darkens the screen
Brightens the screen
Strengthens red color of the screen
Strengthens green color of the
screen
Weakens the tone of the screen
Strengthens the tone of the screen
BEFORE USING THE REMOTE
CONTROLLER (FOR NEW
VEHICLE OWNERS)
INFORMATION
●An insulating sheet is set to prevent the
batteries from being discharged.
No.Function