wheel TOYOTA HIGHLANDER 2018 (in English) User Guide
[x] Cancel search | Manufacturer: TOYOTA, Model Year: 2018, Model line: HIGHLANDER, Model: TOYOTA HIGHLANDER 2018Pages: 732, PDF Size: 14.5 MB
Page 47 of 732

471-1. For safe use
1
For safety and security
HIGHLANDER_U (OM0E031U)
WARNING
■SRS airbag precautions
● If the areas where the SRS airbags are stored, such as the steering wheel
pad and front and rear pillar garnishes, are damaged or cracked , have
them replaced by your Toyota dealer.
● Do not place anything, such as a cushion, on the front passenger’s seat.
Doing so will disperse the passenger’s weight, which prevents t he sensor
from detecting the passenger’s weight properly. As a result, th e SRS front
airbags for the front passenger may not deploy in the event of a collision.
■ Modification and disposal of SRS airbag system components
Do not dispose of your vehicle or perform any of the following modifications
without consulting your Toyota dealer. The SRS airbags may malfunction or
deploy (inflate) accidentally, causing death or serious injury.
● Installation, removal, disassembly and repair of the SRS airbag s
● Repairs, modifications, removal or replacement of the steering wheel,
instrument panel, dashboard, seats or seat upholstery, front, s ide and rear
pillars or roof side rails
● Repairs or modifications of the front fender, front bumper or s ide of the
occupant compartment
● Installation of a grille guard (bull bars, kangaroo bar, etc.), snow plows,
winches or roof luggage carrier
● Modifications to the vehicle’s suspension system
● Installation of electronic devices such as mobile two-way radio s and CD
players
● Modifications to your vehicle for a person with a physical disa bility
Page 48 of 732

481-1. For safe use
HIGHLANDER_U (OM0E031U)
■If the SRS airbags deploy (inflate)
●Slight abrasions, burns, bruising etc., may be sustained from S RS airbags,
due to the extremely high speed deployment (inflation) by hot g ases.
● A loud noise and white powder will be emitted.
● Parts of the airbag module (steering wheel hub, airbag cover an d inflator) as
well as the front seats, parts of the front and rear pillars, and roof side rails
may be hot for several minutes. The airbag itself may also be h ot.
● The windshield may crack.
● For U.S.A.: For Safety Connect subscribers, if the SRS airbags deploy or in
the event of a severe rear-end collision, the system is designed to send an
emergency call to the response center, notifying them of the ve hicle's loca-
tion (without needing to push the “SOS” button) and an agent wi ll attempt to
speak with the occupants to ascertain the level of emergency an d assis-
tance required. If the occupants are unable to communicate, the agent auto-
matically treats the call as an emergency and helps to dispatch the
necessary emergency services. ( P. 490)
■ SRS airbag deployment condi tions (SRS front airbags)
● The SRS front airbags will deploy in the event of an impact tha t exceeds the
set threshold level (the level of force corresponding to an approximately 12 -
18 mph [20 - 30 km/h] frontal collision with a fixed wall that does not move or
deform).
However, this threshold velocity will be considerably higher in the following
situations:
• If the vehicle strikes an object, such as a parked vehicle or sign pole,
which can move or deform on impact
• If the vehicle is involved in an underride collision, such as a collision in
which the front of the vehicle “underrides”, or goes under, the bed of a
truck
● Depending on the type of collision, it is possible that only th e seat belt pre-
tensioners will activate.
● The SRS front airbags for the front passenger will not activate if there is no
passenger sitting in the front passenger seat. However, the SRS front air-
bags for the front passenger may deploy if luggage is put in the seat, even if
the seat is unoccupied. ( P. 53)
● The SRS seat cushion airbag on the front passenger’s seat will not operate
if the occupant is not wearing a seat belt.
Page 52 of 732
521-1. For safe use
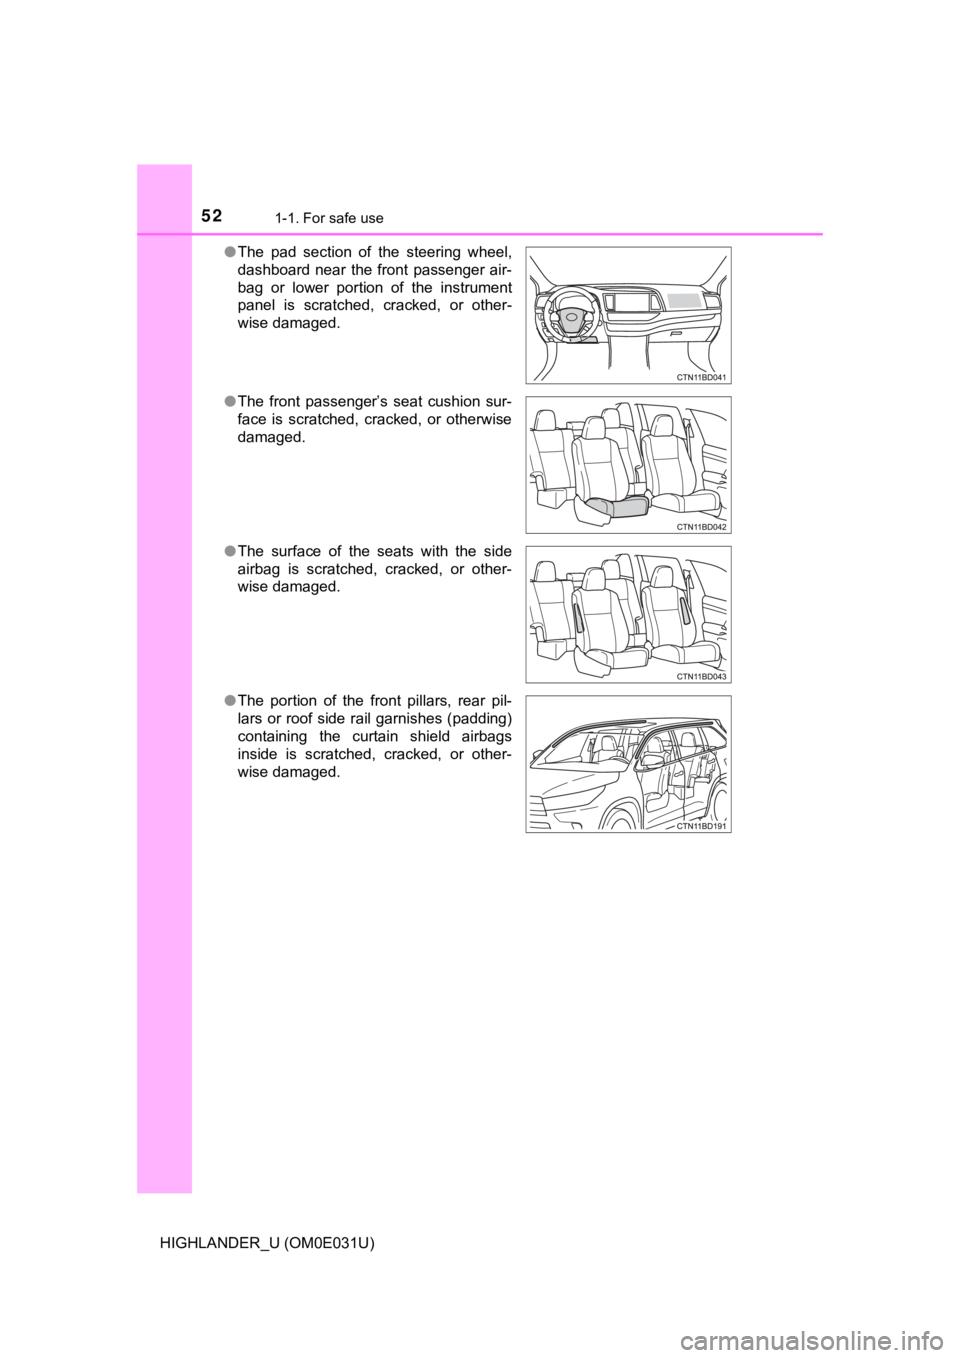
HIGHLANDER_U (OM0E031U)●
The pad section of the steering wheel,
dashboard near the front passenger air-
bag or lower portion of the instrument
panel is scratched, cracked, or other-
wise damaged.
● The front passenger’s seat cushion sur-
face is scratched, cracked, or otherwise
damaged.
● The surface of the seats with the side
airbag is scratched, cracked, or other-
wise damaged.
● The portion of the front pillars, rear pil-
lars or roof side rail garnishes (padding)
containing the curtain shield airbags
inside is scratched, cracked, or other-
wise damaged.
Page 89 of 732
892. Instrument cluster
2
Instrument cluster
HIGHLANDER_U (OM0E031U)
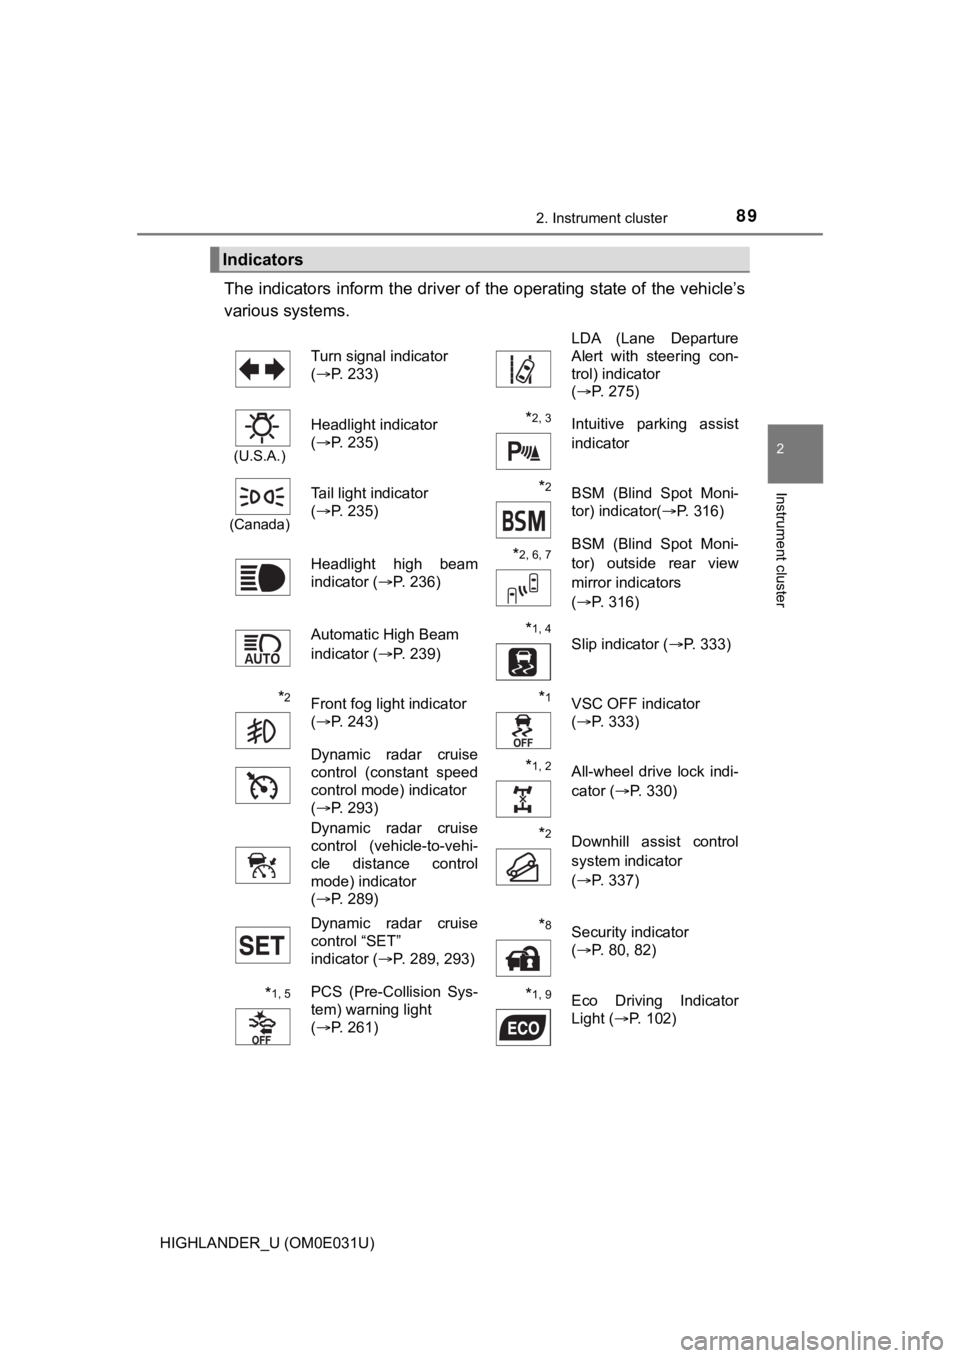
The indicators inform the driver of the operating state of the vehicle’s
various systems.
Indicators
Turn signal indicator
( P. 233) LDA (Lane Departure
Alert with steering con-
trol) indicator
(
P. 275)
(U.S.A.)
Headlight indicator
(P. 235)*2, 3 Intuitive parking assist
indicator
(Canada)
Tail light indicator
(P. 235) *2BSM (Blind Spot Moni-
tor) indicator( P. 316)
Headlight high beam
indicator ( P. 236)
*2, 6, 7BSM (Blind Spot Moni-
tor) outside rear view
mirror indicators
(P. 316)
Automatic High Beam
indicator ( P. 239)
*1, 4 Slip indicator ( P. 333)
*2Front fog light indicator
(P. 243)*1VSC OFF indicator
(P. 333)
Dynamic radar cruise
control (constant speed
control mode) indicator
( P. 293)
*1, 2All-wheel drive lock indi-
cator ( P. 330)
Dynamic radar cruise
control (vehicle-to-vehi-
cle distance control
mode) indicator
( P. 289)
*2Downhill assist control
system indicator
(P. 337)
Dynamic radar cruise
control “SET”
indicator ( P. 289, 293)
*8Security indicator
(P. 80, 82)
*1, 5PCS (Pre-Collision Sys-
tem) warning light
(P. 261)*1, 9Eco Driving Indicator
Light ( P. 102)
Page 107 of 732
107
3
Operation of
each component
HIGHLANDER_U (OM0E031U) 3-1. Key information
Keys .................................. 108
3-2. Opening, closing and locking the doors
Side doors ......................... 115
Back door .......................... 123
Glass hatch ....................... 136
Smart key system ............. 141
3-3. Adjusting the seats Front seats ........................ 149
Rear seats......................... 151
Driving position memory ... 158
Head restraints.................. 162
3-4. Adjusting the steering wheel and mirrors
Steering wheel .................. 166
Inside rear view mirror .............................. 168
Outside rear view mirrors ............................. 170
3-5. Opening and closing the windows
Power windows ................. 172
Moon roof .......................... 176
Panoramic moon roof .................................. 180
Page 161 of 732

1613-3. Adjusting the seats
3
Operation of each component
HIGHLANDER_U (OM0E031U)■
Cancelation procedure
Carry only the key you want to cancel and then close the driver
’s
door.
If 2 or more keys are in the vehicle, the driving position cann ot be
canceled properly.
Check that the shift lever is in P.
Turn the engine switch to IGNITION ON mode.
While pressing the “SET” button, press and hold the door lock
switch (either lock or unlock) until the buzzer sounds twice.
If the button could not be canceled, the buzzer sounds continuo usly for
approximately 3 seconds.
■ Recalling the driving position u sing the memory recall function
● Different driving positions can be registered for each electronic key. There-
fore, the driving position that is recalled may be different de pending on the
key being carried.
● If a door other than the driver’s door is unlocked with the sma rt key system,
the driving position cannot be recalled. In this case, press the driving posi-
tion button which has been set.
■ Customization
The unlock door settings of the memory recall function can be customized.
(Customizable features: P. 687)
WARNING
■Seat adjustment caution
Take care during seat adjustment so that the seat does not stri ke the rear
passenger or squeeze your body against the steering wheel.
1
2
3
Page 166 of 732
166
HIGHLANDER_U (OM0E031U)
3-4. Adjusting the steering wheel and mirrors
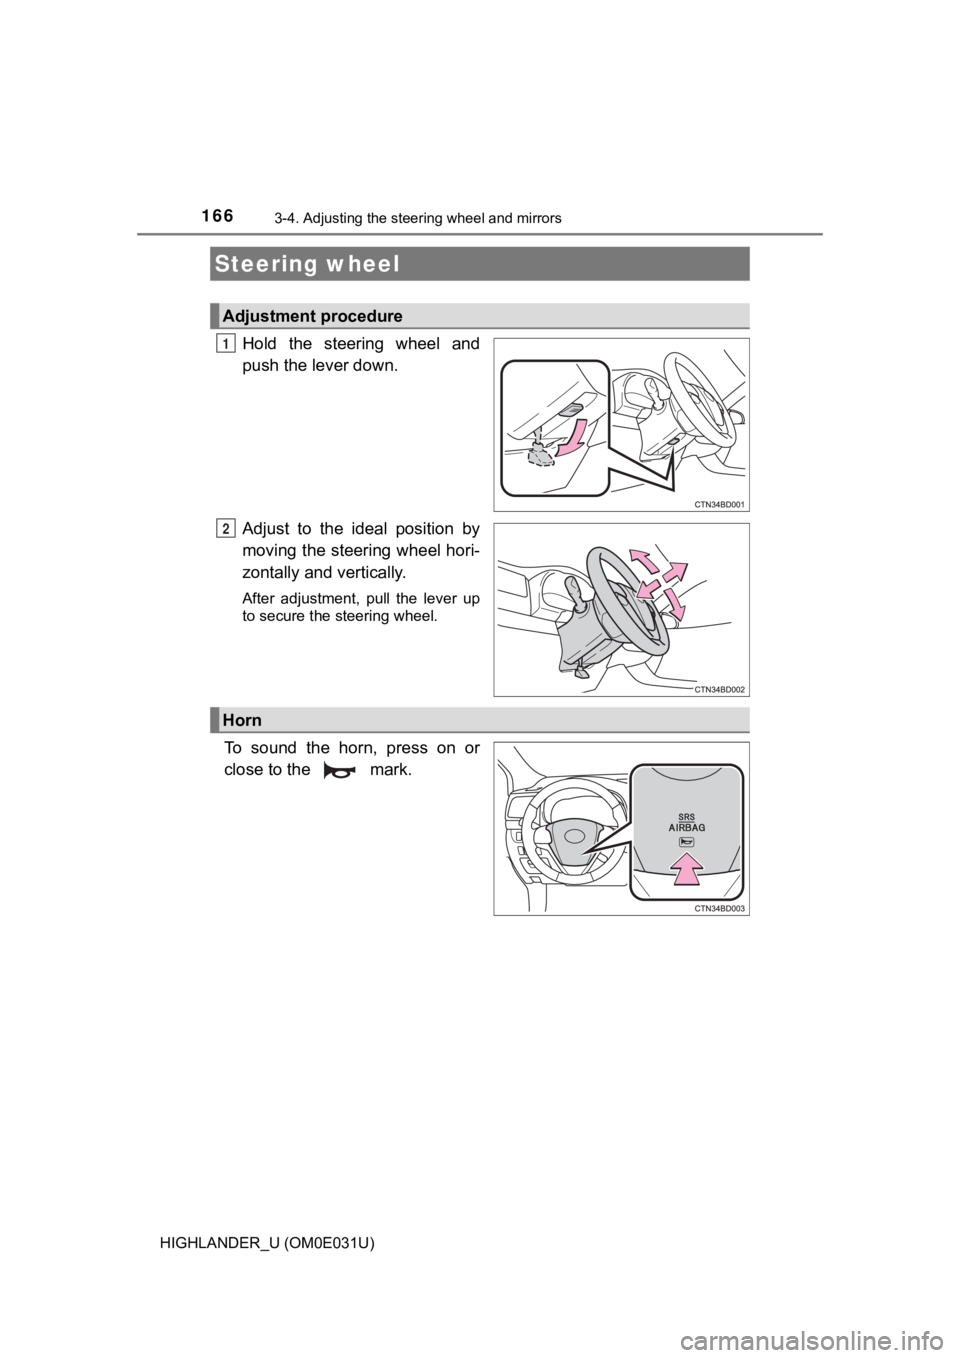
Hold the steering wheel and
push the lever down.
Adjust to the ideal position by
moving the steering wheel hori-
zontally and vertically.
After adjustment, pull the lever up
to secure the steering wheel.
To sound the horn, press on or
close to the mark.
Steering wheel
Adjustment procedure
1
2
Horn
Page 167 of 732

1673-4. Adjusting the steering wheel and mirrors
3
Operation of each component
HIGHLANDER_U (OM0E031U)
WARNING
■Caution while driving
Do not adjust the steering wheel while driving.
Doing so may cause the driver to mishandle the vehicle and caus e an acci-
dent, resulting in death or serious injury.
■ After adjusting the steering wheel
Make sure that the steering wheel is securely locked.
Otherwise, the steering wheel may move suddenly, possibly causi ng an
accident, and resulting in death or serious injury. Also, the h orn may not
sound if the steering wheel is not securely locked.
Page 168 of 732
1683-4. Adjusting the steering wheel and mirrors
HIGHLANDER_U (OM0E031U)
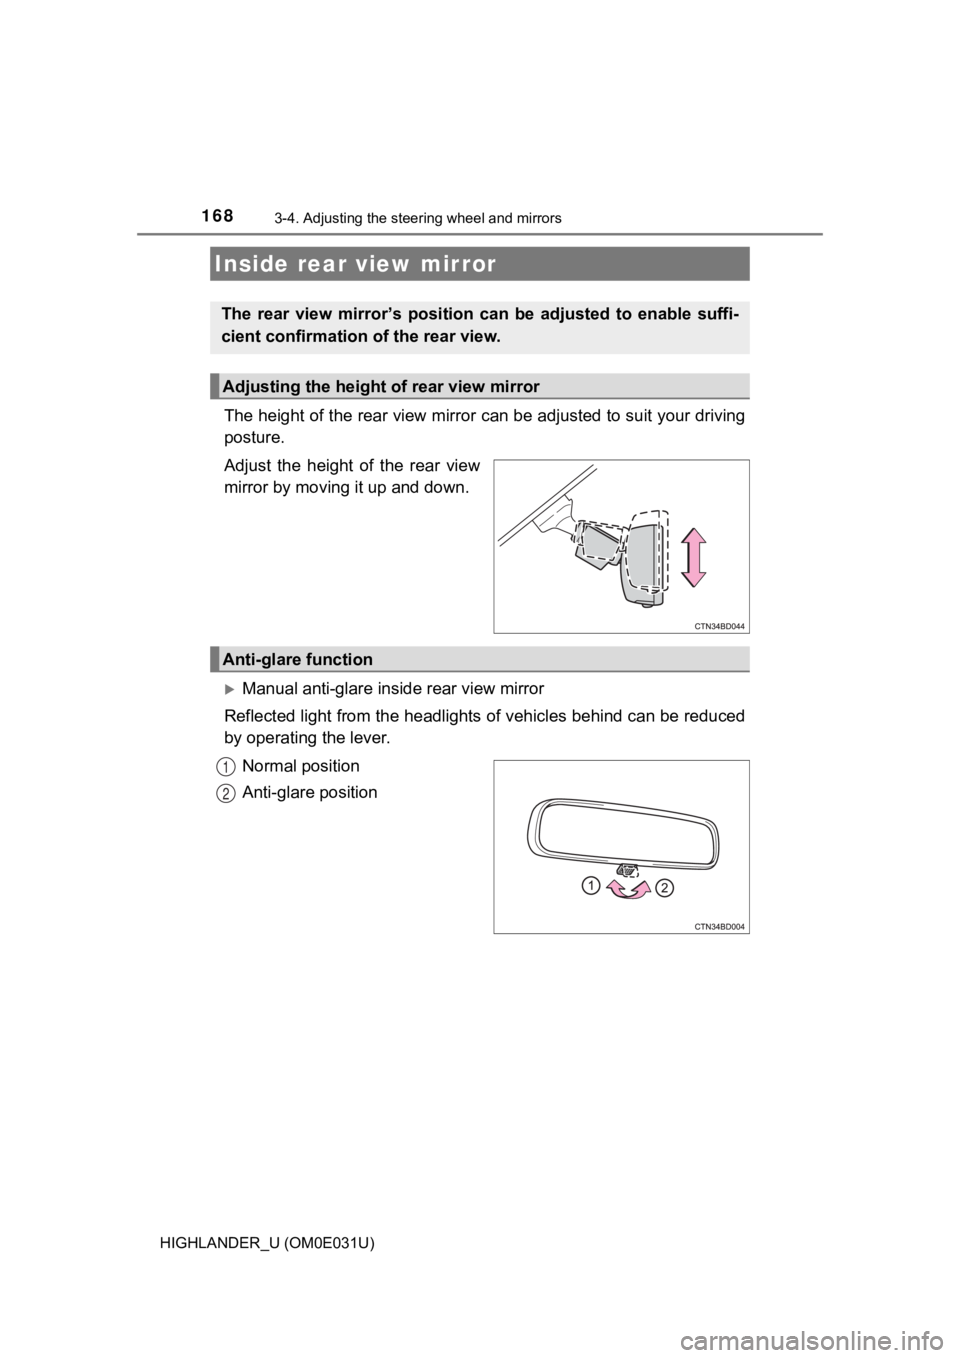
The height of the rear view mirror can be adjusted to suit your driving
posture.
Adjust the height of the rear view
mirror by moving it up and down.
Manual anti-glare inside rear view mirror
Reflected light from the headlights of vehicles behind can be r educed
by operating the lever.
Normal position
Anti-glare position
Inside rear view mirror
The rear view mirror’s position ca n be adjusted to enable suffi-
cient confirmation of the rear view.
Adjusting the height of rear view mirror
Anti-glare function
1
2
Page 169 of 732
1693-4. Adjusting the steering wheel and mirrors
3
Operation of each component
HIGHLANDER_U (OM0E031U)
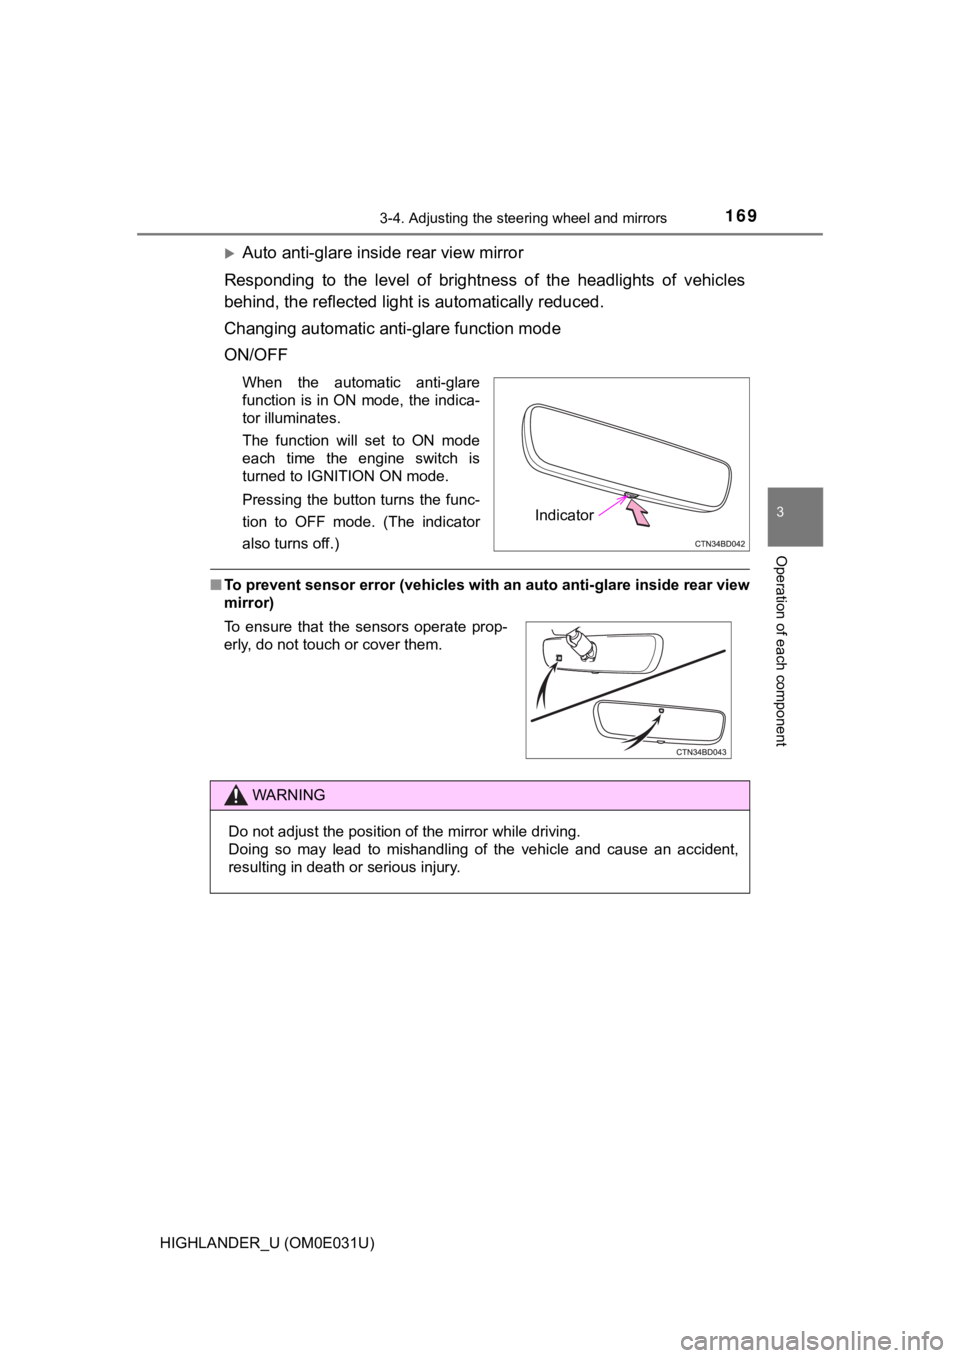
Auto anti-glare inside rear view mirror
Responding to the level of brightness of the headlights of vehi cles
behind, the reflected light is automatically reduced.
Changing automatic anti- glare function mode
ON/OFF
When the automatic anti-glare
function is in ON mode, the indica-
tor illuminates.
The function will set to ON mode
each time the engine switch is
turned to IGNITION ON mode.
Pressing the button turns the func-
tion to OFF mode. (The indicator
also turns off.)
■ To prevent sensor error (vehicles with an auto anti-glare insid e rear view
mirror)
Indicator
To ensure that the sensors operate prop-
erly, do not touch or cover them.
WARNING
Do not adjust the position of the mirror while driving.
Doing so may lead to mishandling of the vehicle and cause an ac cident,
resulting in death or serious injury.