TOYOTA HIGHLANDER 2018 (in English) Repair Manual
HIGHLANDER 2018
TOYOTA
TOYOTA
https://www.carmanualsonline.info/img/14/42541/w960_42541-0.png
TOYOTA HIGHLANDER 2018 (in English) Repair Manual
Page 555 of 732

5557-3. Do-it-yourself maintenance
7
Maintenance and care
HIGHLANDER_U (OM0E031U)
■After a fuse is replaced
●If the lights do not turn on even after the fuse has been repla ced, a bulb may
need replacement. ( P. 556)
● If the replaced fuse blows again, have the vehicle inspected by your Toyota
dealer.
■ If there is an overload in a circuit
The fuses are designed to blow, protecting the wiring harness f rom damage.
■ When replacing light bulbs
Toyota recommends that you use genuine Toyota products designed for this
vehicle. Because certain bulbs are connected to circuits designed to prevent
overload, non-genuine parts or parts not designed for this vehicle may be
unusable.
WARNING
■ To prevent system breakdowns and vehicle fire
Observe the following precautions.
Failure to do so may cause damage to the vehicle, and possibly a fire or
injury.
● Never use a fuse of a higher amperage rating than that indicate d, or use
any other object in place of a fuse.
● Always use a genuine Toyota fuse or equivalent.
Never replace a fuse with a wire, even as a temporary fix.
● Do not modify the fuses or fuse boxes.
NOTICE
■Before replacing fuses
Have the cause of electrical overload determined and repaired b y your
Toyota dealer as soon as possible.
Page 557 of 732
5577-3. Do-it-yourself maintenance
7
Maintenance and care
HIGHLANDER_U (OM0E031U)■
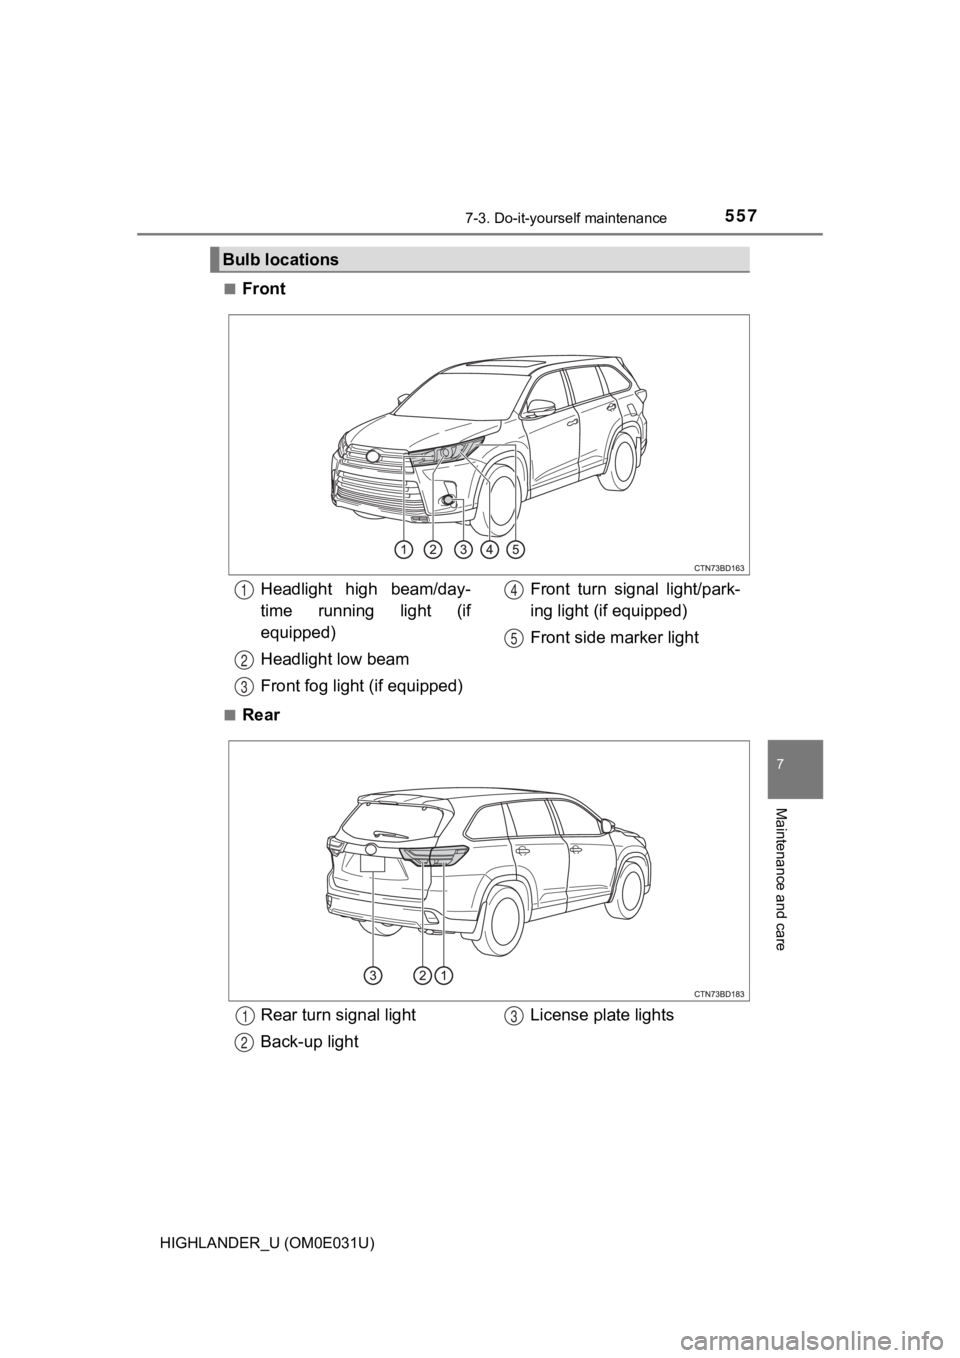
Front
■Rear
Bulb locations
Headlight high beam/day-
time running light (if
equipped)
Headlight low beam
Front fog light (if equipped)
Front turn signal light/park-
ing light (if equipped)
Front side marker light1
2
3
4
5
Rear turn signal light
Back-up light
License plate lights1
2
3
Page 560 of 732
5607-3. Do-it-yourself maintenance
HIGHLANDER_U (OM0E031U)■
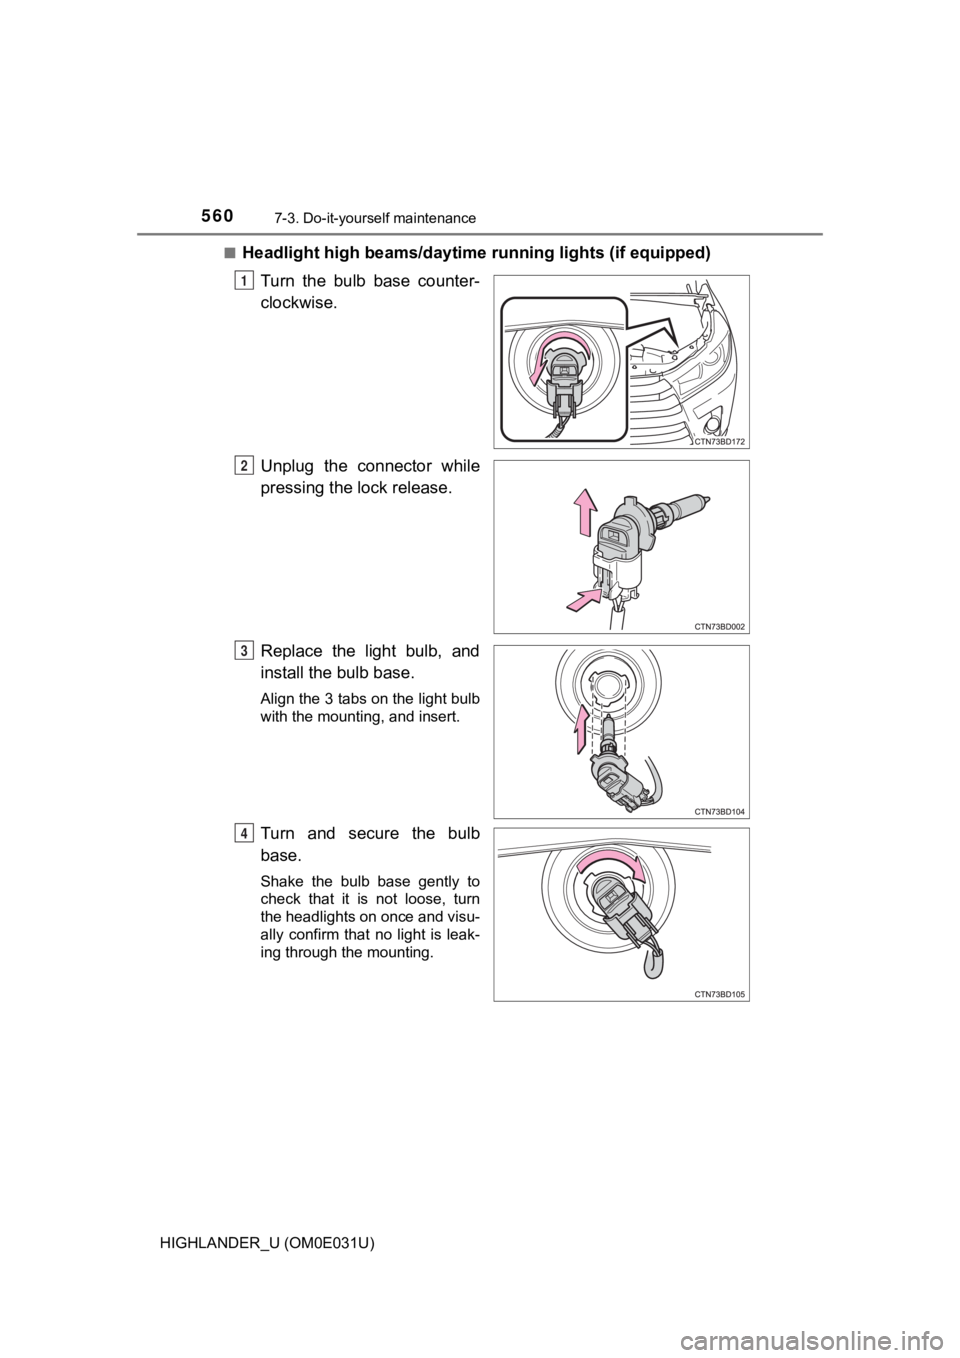
Headlight high beams/daytime
running lights (if equipped)
Turn the bulb base counter-
clockwise.
Unplug the connector while
pressing the lock release.
Replace the light bulb, and
install the bulb base.
Align the 3 tabs on the light bulb
with the mounting, and insert.
Turn and secure the bulb
base.
Shake the bulb base gently to
check that it is not loose, turn
the headlights on once and visu-
ally confirm that no light is leak-
ing through the mounting.
1
2
3
4
Page 561 of 732
5617-3. Do-it-yourself maintenance
7
Maintenance and care
HIGHLANDER_U (OM0E031U)■
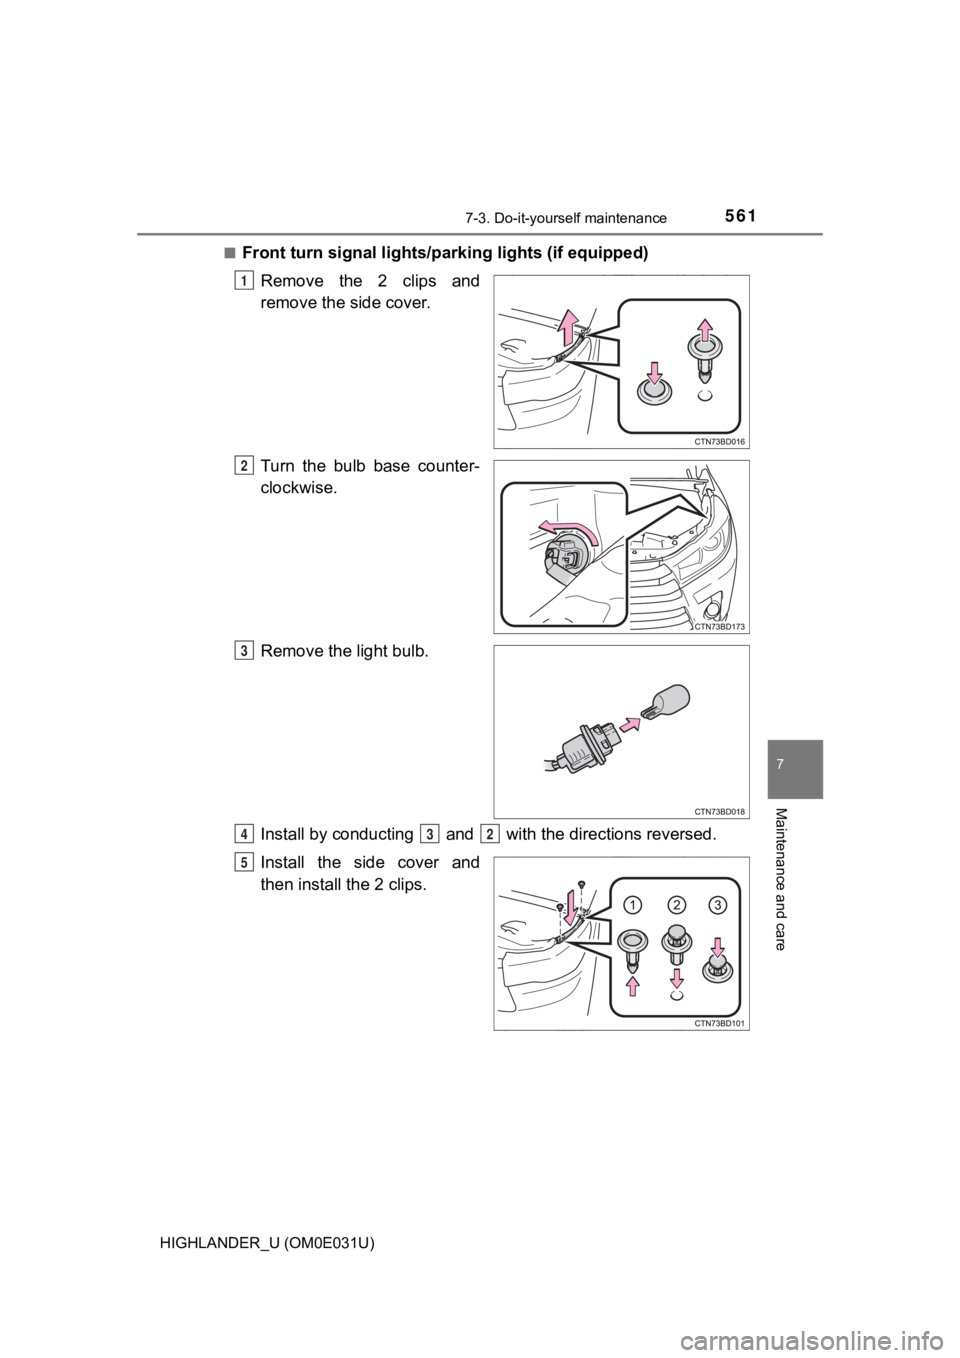
Front turn signal lights/pa
rking lights (if equipped)
Remove the 2 clips and
remove the side cover.
Turn the bulb base counter-
clockwise.
Remove the light bulb.
Install by conducting and wi th the directions reversed.
Install the side cover and
then install the 2 clips.
1
2
3
432
5
Page 562 of 732
5627-3. Do-it-yourself maintenance
HIGHLANDER_U (OM0E031U)■
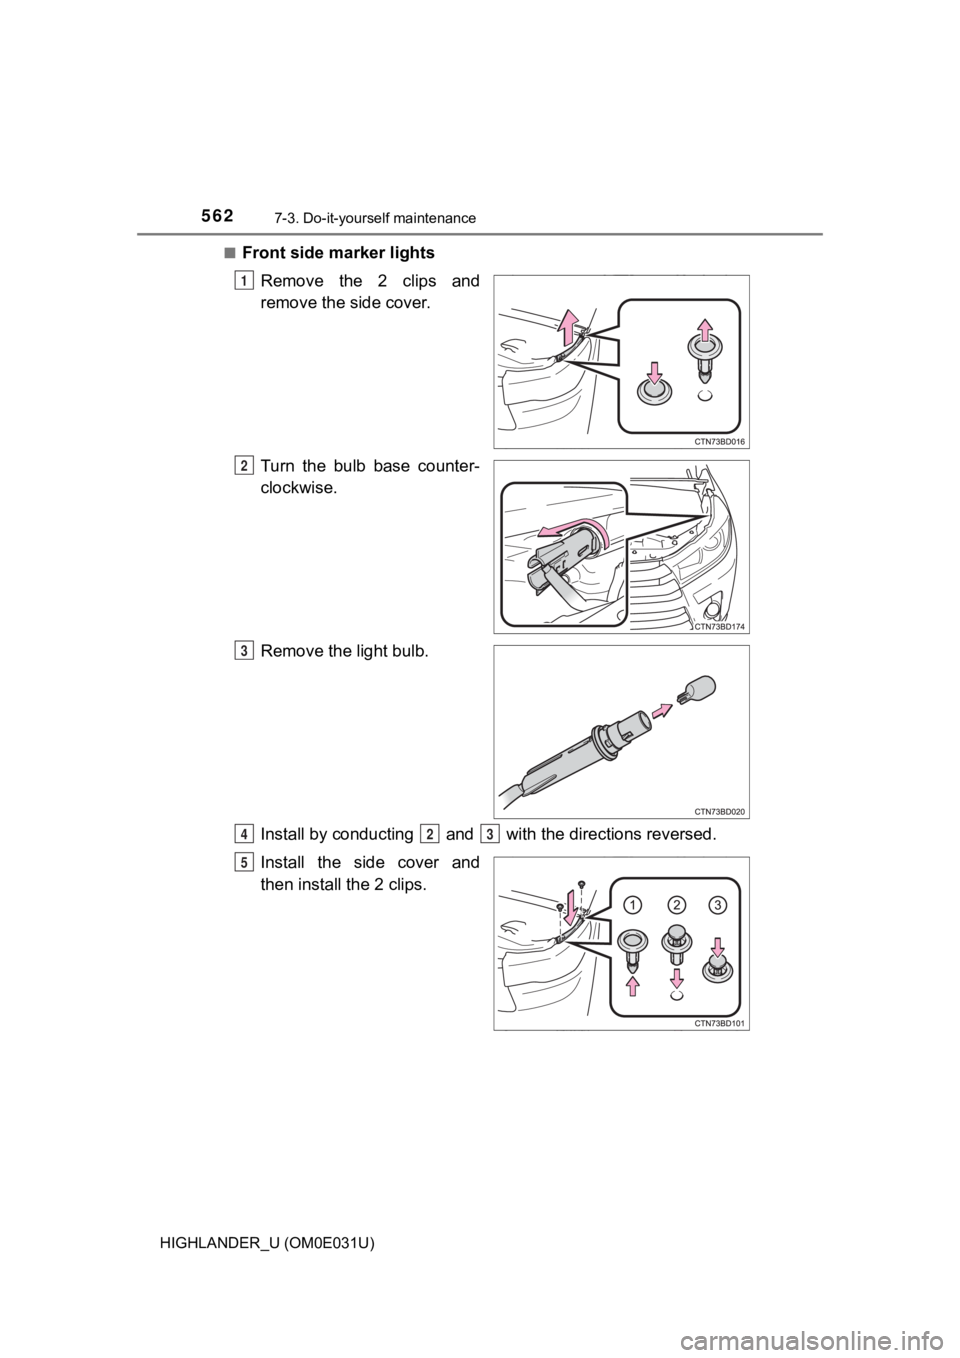
Front side marker lights
Remove the 2 clips and
remove the side cover.
Turn the bulb base counter-
clockwise.
Remove the light bulb.
Install by conducting and wi th the directions reversed.
Install the side cover and
then install the 2 clips.
1
2
3
423
5
Page 563 of 732
5637-3. Do-it-yourself maintenance
7
Maintenance and care
HIGHLANDER_U (OM0E031U)■
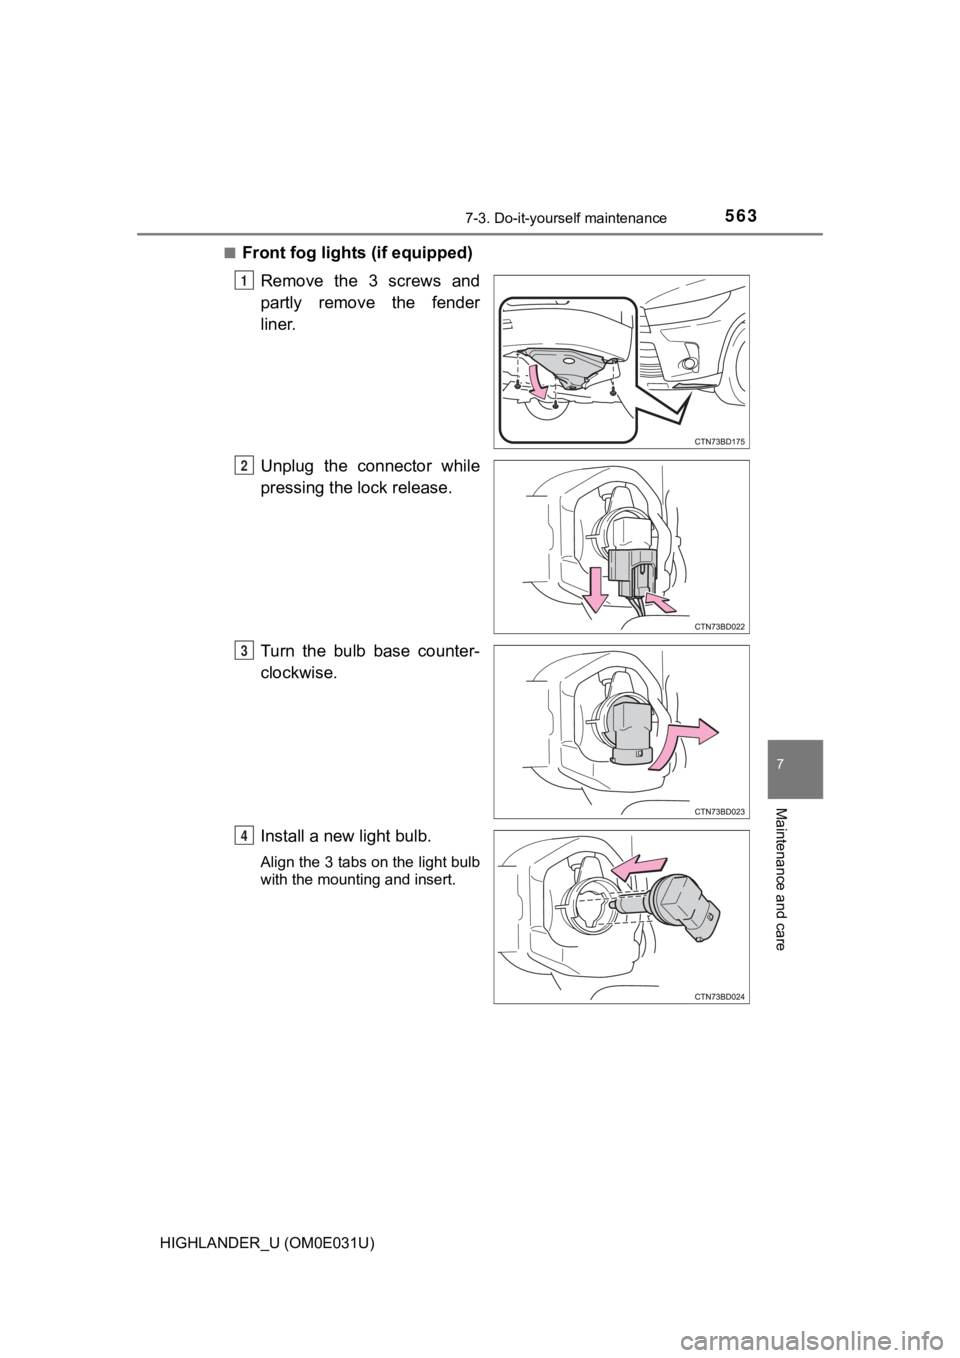
Front fog lights (if equipped)
Remove the 3 screws and
partly remove the fender
liner.
Unplug the connector while
pressing the lock release.
Turn the bulb base counter-
clockwise.
Install a new light bulb.
Align the 3 tabs on the light bulb
with the mounting and insert.
1
2
3
4
Page 564 of 732
5647-3. Do-it-yourself maintenance
HIGHLANDER_U (OM0E031U)
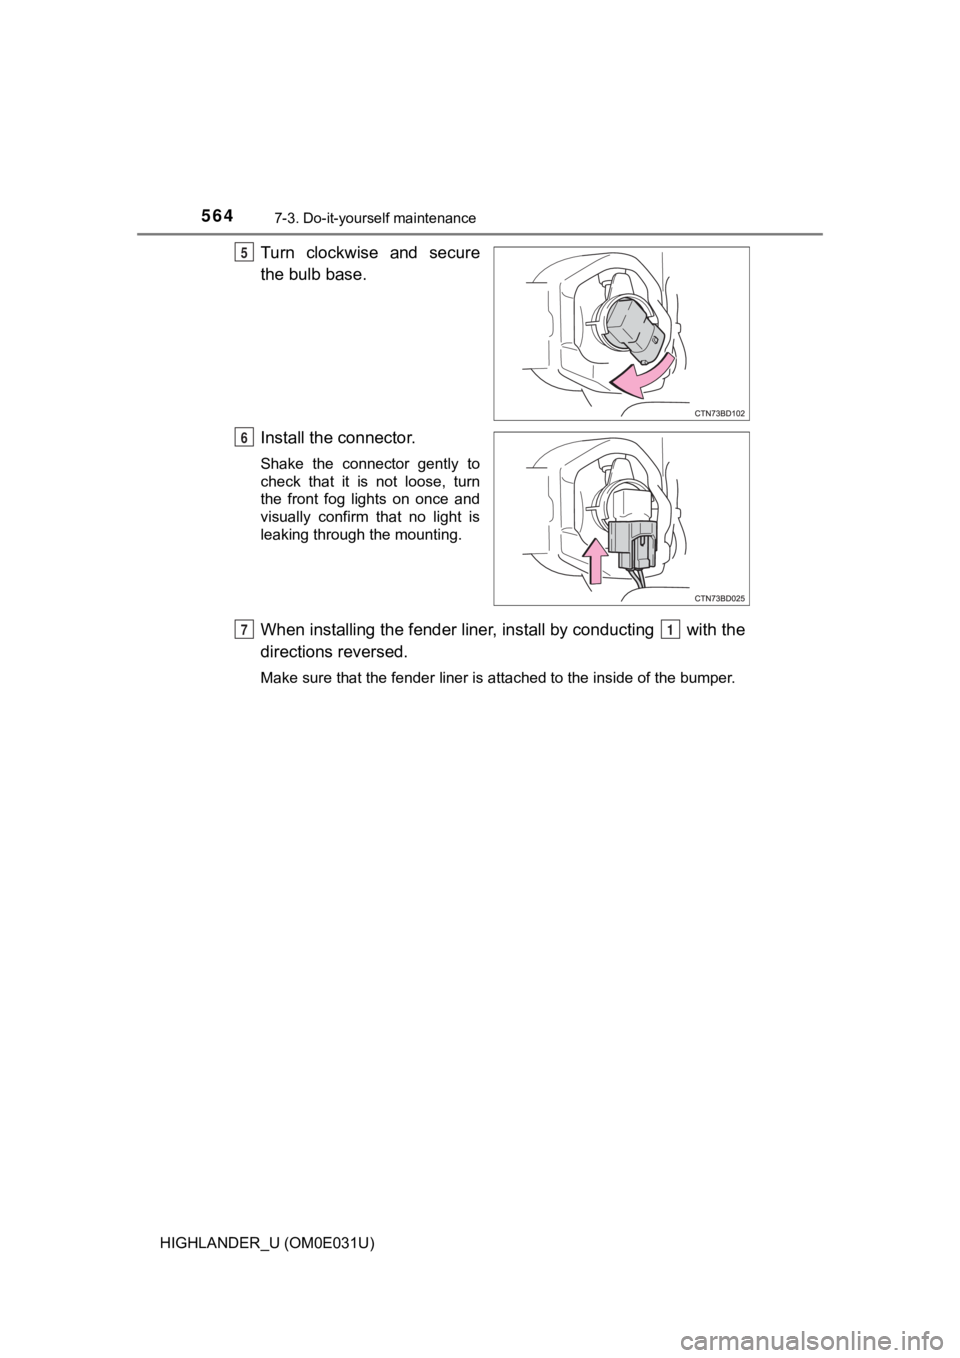
Turn clockwise and secure
the bulb base.
Install the connector.
Shake the connector gently to
check that it is not loose, turn
the front fog lights on once and
visually confirm that no light is
leaking through the mounting.
When installing the fender liner, install by conducting with the
directions reversed.
Make sure that the fender liner is attached to the inside of th e bumper.
5
6
71
Page 565 of 732
5657-3. Do-it-yourself maintenance
7
Maintenance and care
HIGHLANDER_U (OM0E031U)■
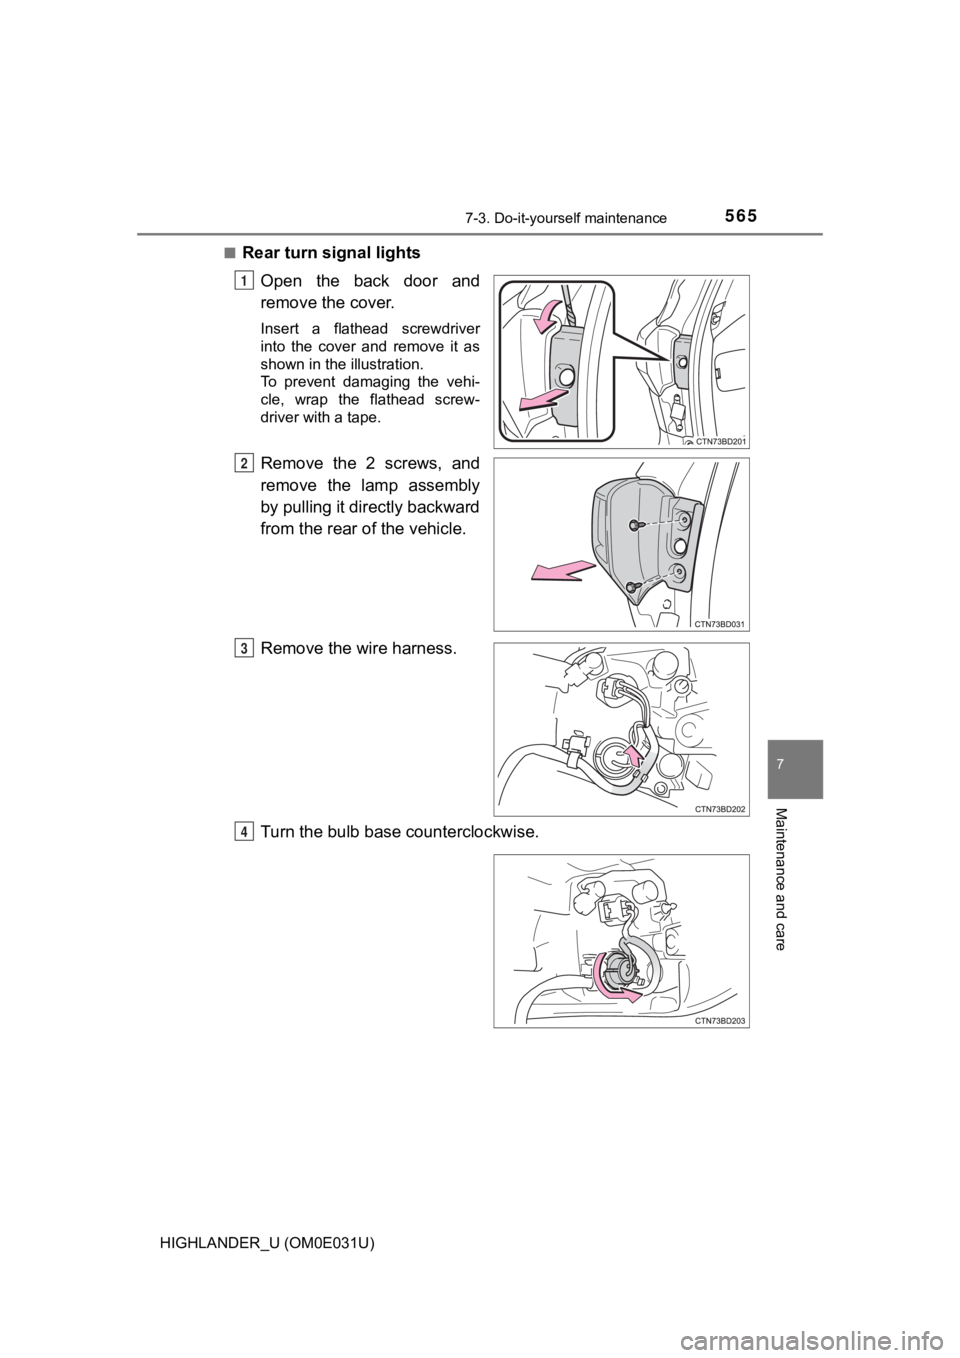
Rear turn signal lights
Open the back door and
remove the cover.
Insert a flathead screwdriver
into the cover and remove it as
shown in the illustration.
To prevent damaging the vehi-
cle, wrap the flathead screw-
driver with a tape.
Remove the 2 screws, and
remove the lamp assembly
by pulling it directly backward
from the rear of the vehicle.
Remove the wire harness.
Turn the bulb base counterclockwise.
1
2
3
4
Page 567 of 732
5677-3. Do-it-yourself maintenance
7
Maintenance and care
HIGHLANDER_U (OM0E031U)■
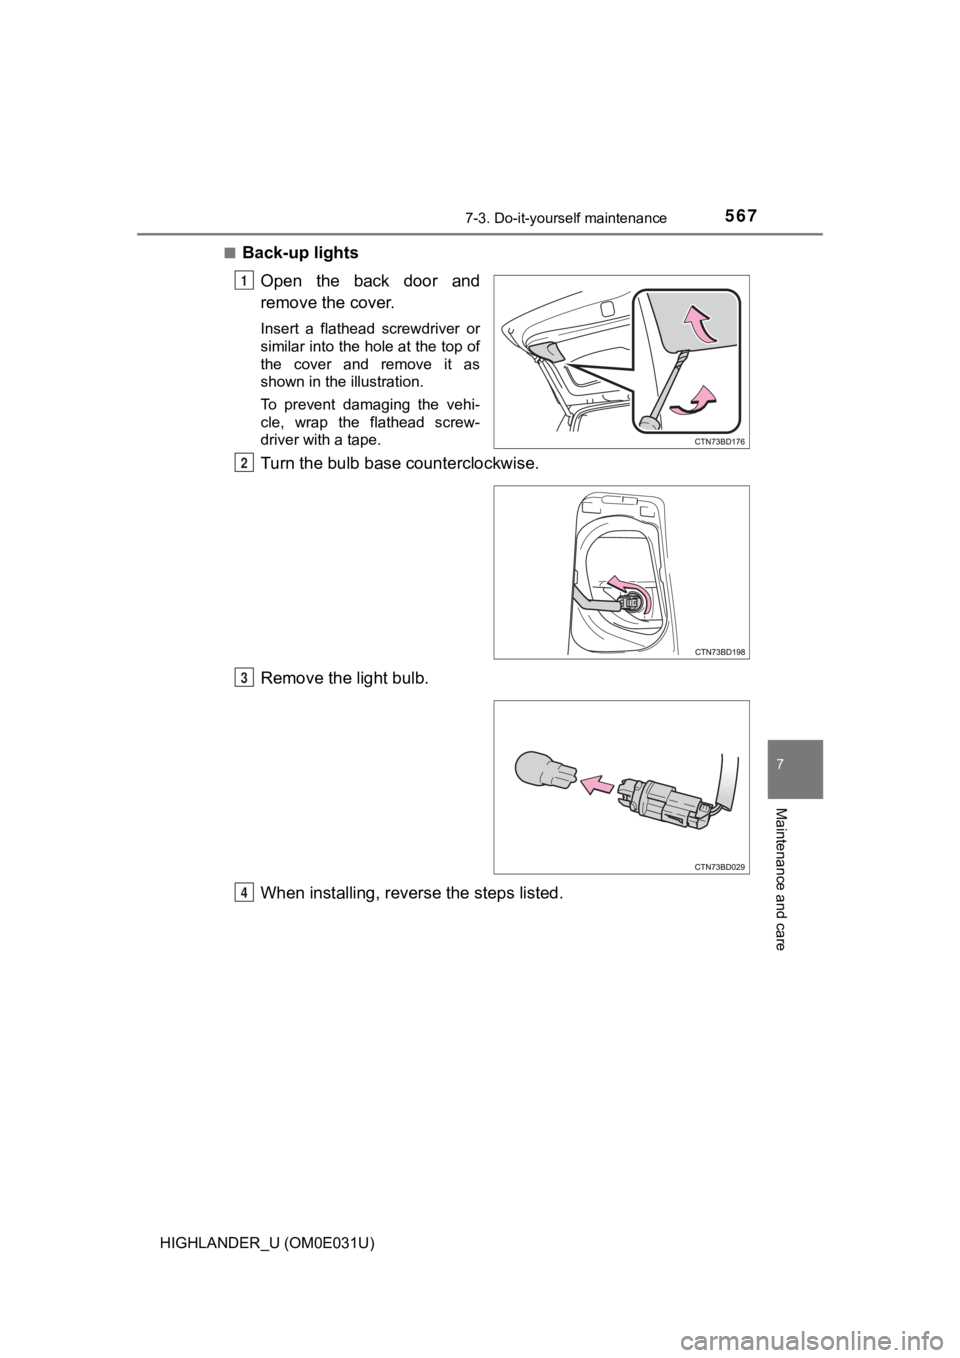
Back-up lights
Open the back door and
remove the cover.
Insert a flathead screwdriver or
similar into the hole at the top of
the cover and remove it as
shown in the illustration.
To prevent damaging the vehi-
cle, wrap the flathead screw-
driver with a tape.
Turn the bulb base counterclockwise.
Remove the light bulb.
When installing, reverse the steps listed.
1
2
3
4
Page 568 of 732
5687-3. Do-it-yourself maintenance
HIGHLANDER_U (OM0E031U)■
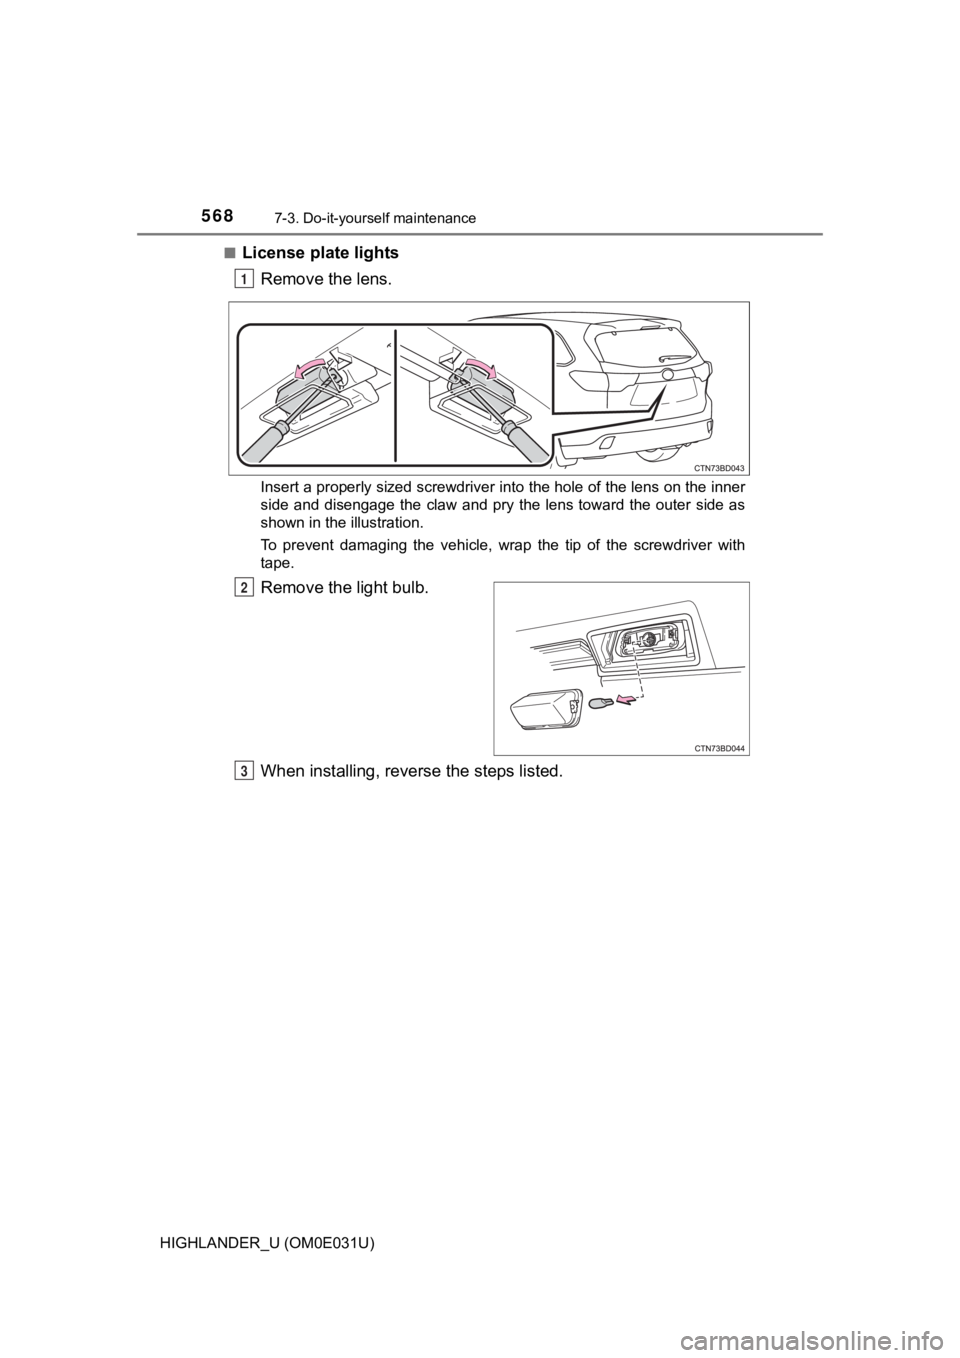
License plate lights
Remove the lens.
Insert a properly sized screwdriver into the hole of the lens o n the inner
side and disengage the claw and pry the lens toward the outer s ide as
shown in the illustration.
To prevent damaging the vehicle, wrap the tip of the screwdriver with
tape.
Remove the light bulb.
When installing, reverse the steps listed.
1
2
3