Screen size TOYOTA HIGHLANDER 2019 Accessories, Audio & Navigation (in English)
[x] Cancel search | Manufacturer: TOYOTA, Model Year: 2019, Model line: HIGHLANDER, Model: TOYOTA HIGHLANDER 2019Pages: 392, PDF Size: 7.38 MB
Page 135 of 392
135
7. REAR SEAT ENTERTAINMENT SYSTEM OPERATION
HIGHLANDER_Navi_U
AUDIO/VISUAL SYSTEM
3
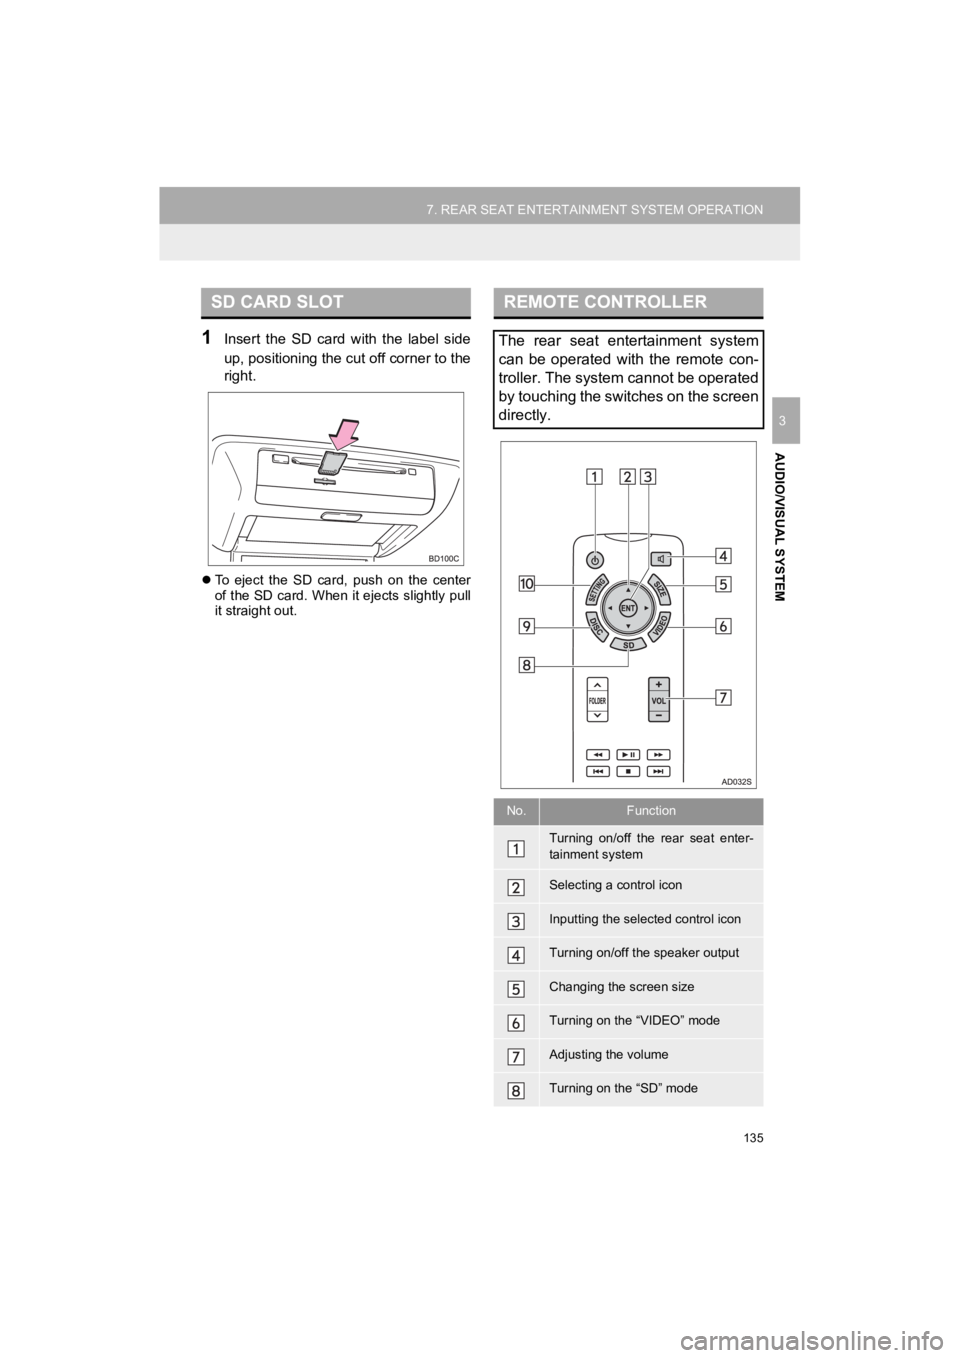
1Insert the SD card with the label side
up, positioning the cut off corner to the
right.
To eject the SD card, push on the center
of the SD card. When it ejects slightly pull
it straight out.
SD CARD SLOTREMOTE CONTROLLER
The rear seat entertainment system
can be operated with the remote con-
troller. The system cannot be operated
by touching the switches on the screen
directly.
No.Function
Turning on/off the rear seat enter-
tainment system
Selecting a control icon
Inputting the selected control icon
Turning on/off the speaker output
Changing the screen size
Turning on the “VIDEO” mode
Adjusting the volume
Turning on the “SD” mode
Page 136 of 392
136
7. REAR SEAT ENTERTAINMENT SYSTEM OPERATION
HIGHLANDER_Navi_U
1Press the button to turn on the
rear seat entertainment system.
Press the button once again to turn
off the system.
1Press “+” or “-” on the “VOL” button
to adjust the volume.
When the speaker output is off, the vol-
ume cannot be adjusted.
1Press the button to turn on/off
the speaker output.
On: The sound is available from both vehi-
cle speakers and headphones.
Off: The sound is available from the head-
phones only.
1Press the “DISC”, “SD” or “VIDEO”
button to change the audio/video
source.
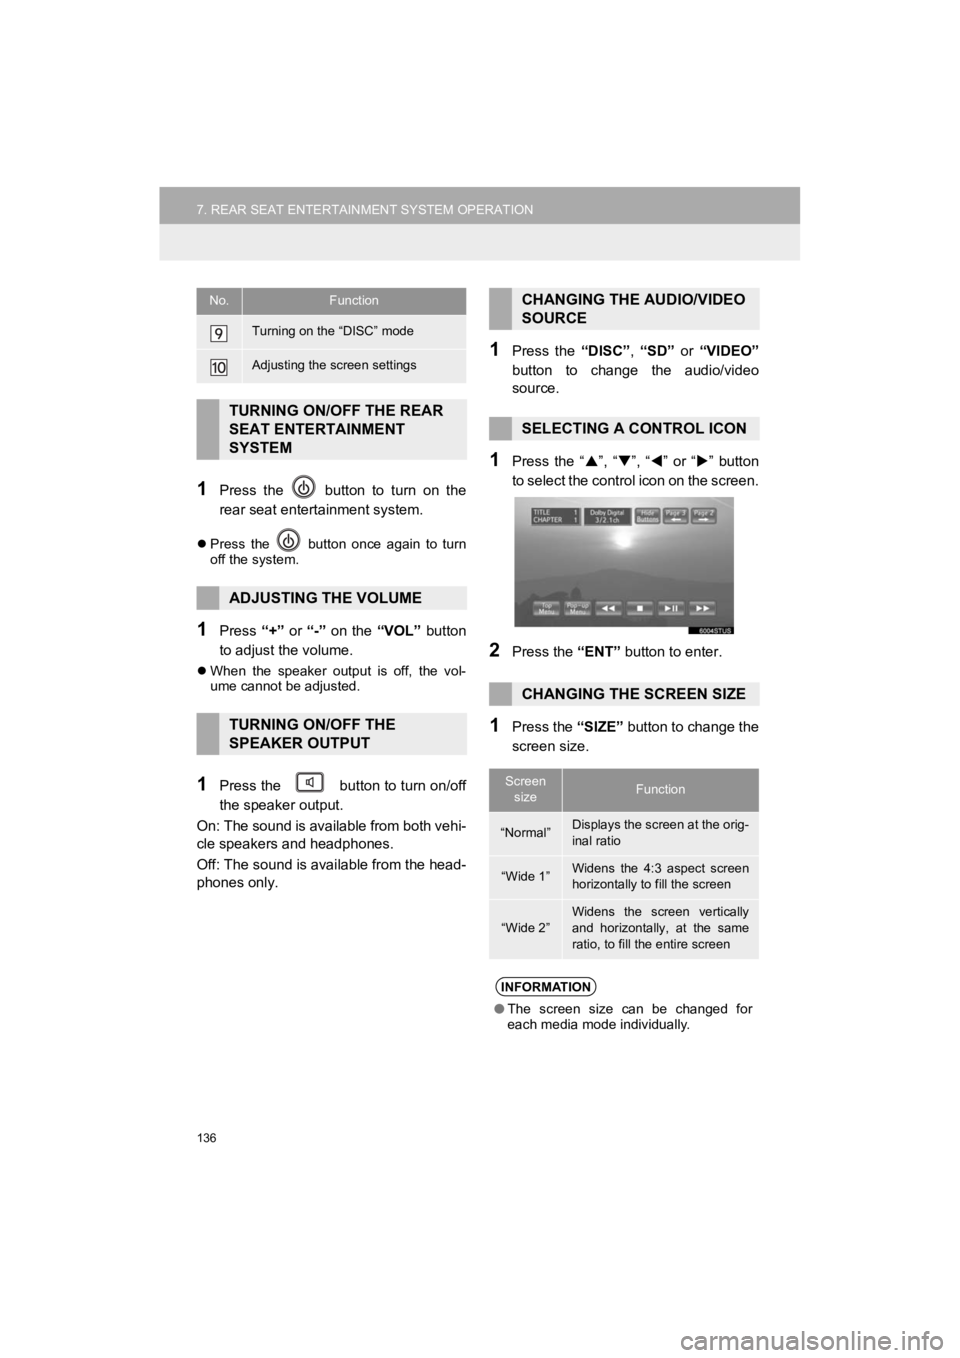
1Press the “ ”, “ ”, “ ” or “ ” button
to select the control icon on the screen.
2Press the “ENT” button to enter.
1Press the “SIZE” button to change the
screen size.
Turning on the “DISC” mode
Adjusting the screen settings
TURNING ON/OFF THE REAR
SEAT ENTERTAINMENT
SYSTEM
ADJUSTING THE VOLUME
TURNING ON/OFF THE
SPEAKER OUTPUT
No.FunctionCHANGING THE AUDIO/VIDEO
SOURCE
SELECTING A CONTROL ICON
CHANGING THE SCREEN SIZE
Screen sizeFunction
“Normal”Displays the screen at the orig-
inal ratio
“Wide 1”Widens the 4:3 aspect screen
horizontally to fill the screen
“Wide 2”Widens the screen vertically
and horizontally, at the same
ratio, to fill the entire screen
INFORMATION
● The screen size can be changed for
each media mode individually.
Page 145 of 392
145
7. REAR SEAT ENTERTAINMENT SYSTEM OPERATION
HIGHLANDER_Navi_U
AUDIO/VISUAL SYSTEM
3
2. PLAYING A Blu-ray Disc™ (BD) AND DVD DISCS
This system can play Blu-ray Disc™
(BD) videos with digital sound. In addi-
tion to commercial BD and DVD titles,
AVCHD and BDAV videos can be
played on this system, so digital TV re-
corded by home digital video recorders
and BD/DVD home videos recorded by
home digital video cameras can also
be played on this system.
Press the “DISC” button if a disc has
already been loaded in the disc slot.
WA R N I N G
● BD/DVD video precaution
• Conversational speech on some BDs/
DVDs is recorded at a low volume to
emphasize the impact of sound effects.
If you adjust the volume assuming that
the conversations represent the maxi-
mum volume level that the BD/DVD
will play, you may be startled by louder
sound effects or startled when you
change to a different audio source.
Loud sounds may have a significant
impact on the human body or pose a
driving hazard. Keep this in mind when
you adjust the volume.
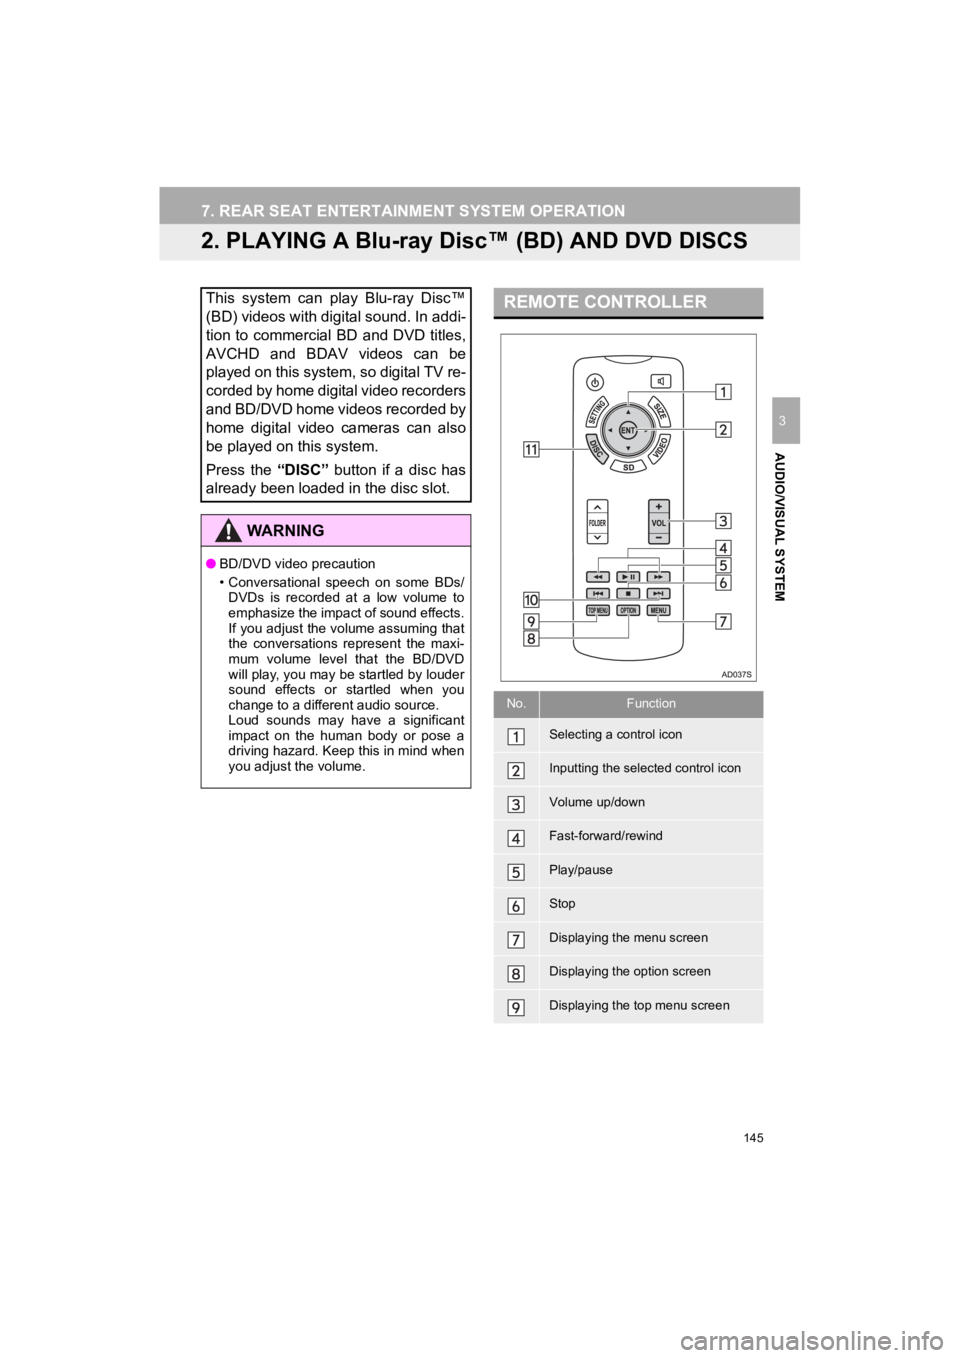
REMOTE CONTROLLER
No.Function
Selecting a control icon
Inputting the selected control icon
Volume up/down
Fast-forward/rewind
Play/pause
Stop
Displaying the menu screen
Displaying the option screen
Displaying the top menu screen
Page 163 of 392
163
7. REAR SEAT ENTERTAINMENT SYSTEM OPERATION
HIGHLANDER_Navi_U
AUDIO/VISUAL SYSTEM
3
■ROTATING THE STILL PICTURES
1Select or to rotate a
still picture.
The rotate information will be maintained
until the system is turned off or the SD
card is removed.
■ZOOM OUT THE STILL PICTURES
1Select to zoom ou t the still pic-
tures.
Select again to cancel zoom out.
This function is only available for small-
sized still pictures.
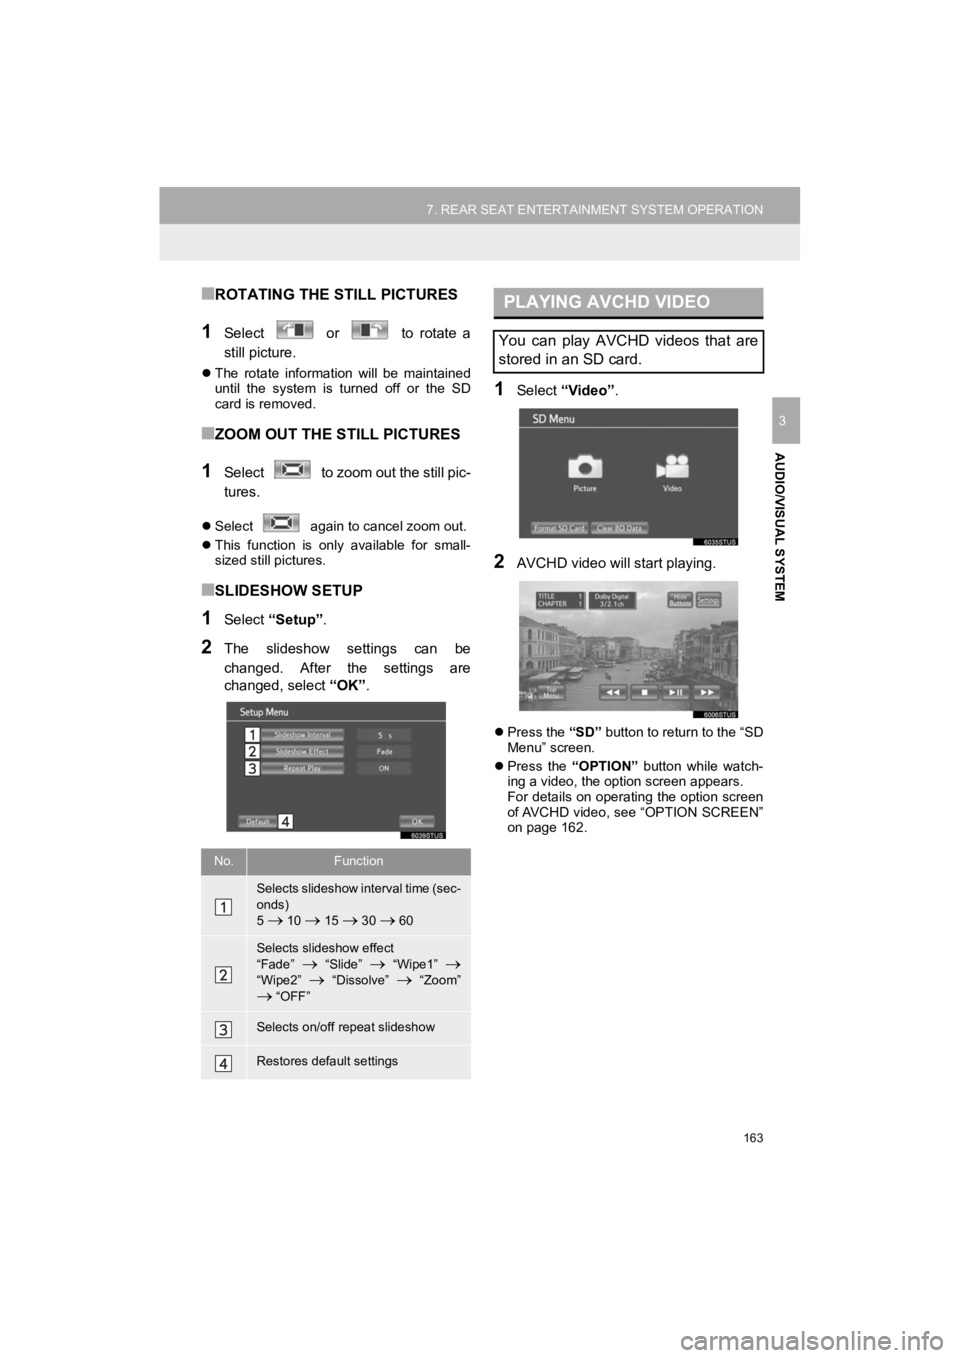
■SLIDESHOW SETUP
1Select “Setup” .
2The slideshow settings can be
changed. After the settings are
changed, select “OK”.
1Select “Video”.
2AVCHD video will st art playing.
Press the “SD” button to return to the “SD
Menu” screen.
Press the “OPTION” button while watch-
ing a video, the option screen appears.
For details on operating the option screen
of AVCHD video, see “OPTION SCREEN”
on page 162.
No.Function
Selects slideshow interval time (sec-
onds)
5
10 15 30 60
Selects slideshow effect
“Fade” “Slide” “Wipe1”
“Wipe2” “Dissolve” “Zoom”
“OFF”
Selects on/off repeat slideshow
Restores default settings
PLAYING AVCHD VIDEO
You can play AVCHD videos that are
stored in an SD card.
Page 190 of 392
190
HIGHLANDER_Navi_U
1. REAR VIEW MONITOR SYSTEM
1. REAR VIEW MONITOR SYSTEM*
The rear view monitor system assists
the driver by displaying an image of the
view behind the vehicle with fixed
guide lines on the screen while backing
up, for example while parking.
INFORMATION
●The screen illustrations used in this text
are intended as examples, and may dif-
fer from the image that is actually dis-
played on the screen.
DRIVING PRECAUTIONS
The rear view monitor system is a sup-
plemental device intended to assist the
driver when backing up. When backing
up, be sure to visually check all around
the vehicle both directly and using the
mirrors before proceeding. If you do
not, you may hit another vehicle, and
could possibly cause an accident.
Pay attention to the following precau-
tions when using the rear view monitor
system.
*: If equipped
WA R N I N G
●Never depend on the rear view monitor
system entirely when backing up. The
image and the position of the guide lines
displayed on the screen may differ from
the actual state.
Use caution, just as you would when
backing up any vehicle.
● Be sure to back up slowly, depressing
the brake pedal to control vehicle speed.
● The instructions given are only guide
lines. When and how much to turn the
steering wheel will vary according to
traffic conditions, road surface condi-
tions, vehicle condition, etc. when park-
ing. It is necessary to be fully aware of
this before using the rear view monitor
system.
● When parking, be sure to check that the
parking space will accommodate your
vehicle before maneuvering into it.
● Do not use the rear view monitor system
in the following cases:
• On icy or slick road surfaces, or in
snow
• When using tire chains or emergency tires
• When the back door is not closed com- pletely
• On roads that are not flat or straight,
such as curves or slopes
● In low temperatures, the screen may
darken or the image may become faint.
The image could distort when the vehi-
cle is moving, or you may become
unable to see the image on the screen.
Be sure to visually check all around the
vehicle both directly and using the mir-
rors before proceeding.
● If the tire sizes are changed, the position
of the fixed guide lines displayed on the
screen may change.
● The camera uses a special lens. The
distances between objects and pedestri-
ans that appear in the image displayed
on the screen will differ from the actual
distances.( P.193)
Page 199 of 392
199
2. TOYOTA PARKING ASSIST MONITOR
HIGHLANDER_Navi_U
PERIPHERAL MONITORING SYSTEM
6
WA R N I N G
●The instructions given are only guide-
lines. When and how much to turn the
steering wheel will vary according to
traffic conditions, road surface condi-
tions, vehicle condition, etc. when park-
ing. It is necessary to be fully aware of
this before using the parking assist sys-
tem.
● When parking, be sure to check that the
parking space will accommodate your
vehicle before maneuvering into it.
● Do not use the parking assist monitor in
the following cases:
• On icy or slick road surfaces, or in
snow
• When using tire chains or emergency
tires
• When the back door is not closed com- pletely
• On roads that are not flat or straight, such as curves or slopes
● In low temperatures, the screen may
darken or the image may become faint.
The image could distort when the vehi-
cle is moving, or you may become
unable to see the image on the screen.
Be sure to visually check all around the
vehicle both directly and using the mir-
rors before proceeding.
● If the tire sizes are changed, the position
of the guide lines displayed on the
screen may change.
● The camera uses a special lens. The
distances between objects and pedestri-
ans that appear in the image displayed
on the screen will differ from the actual
distances. ( P.209)
Page 215 of 392
215
3. PANORAMIC VIEW MONITOR
HIGHLANDER_Navi_U
PERIPHERAL MONITORING SYSTEM
6
WA R N I N G
●Depending on the circumstances of the
vehicle (number of passengers, amount
of luggage, etc.), the position of the
guide lines displayed on the screen may
change. Be sure to check visually
around the vehicle before proceeding.
● Do not use the panoramic view monitor
system in the following cases:
• On icy or slick road surfaces, or in
snow
• When using tire chains or emergency
tires
• When the back door is not closed com- pletely
• On roads that are not flat or straight, such as curves or slopes
● In low temperatures, the screen may
darken or the image may become faint.
The image could distort when the vehi-
cle is moving, or you may become
unable to see the image on the screen.
Be sure to visually check all around the
vehicle both directly and using the mir-
rors before proceeding.
● If the tire sizes are changed, the position
of the guide lines displayed on the
screen may change.
● The camera uses a special lens. The
distances between objects and pedestri-
ans that appear in the image displayed
on the screen will differ from the actual
distances. ( P.241)
NOTICE
● In panoramic view/moving view/see-
through view, the system combines
images taken from the front, back, left
and right side cameras into a single
image. There are limits to the range and
content that can be displayed. Familiar-
ize yourself with the characteristics of
the panoramic view monitor system
before using it.
● Image clarity may decline at the four cor-
ners of the panoramic view/moving view/
see-through view. However, this is not a
malfunction, as these are the regions
along the border of each camera image
where the images are combined.
● Depending on lighting conditions near
each of the cameras, bright and dark
patches may appear on the panoramic
view/moving view/see-through view.
● The panoramic view/moving view/see-
through view display does not extend
higher than the installation position and
image capture range of each camera.
Page 351 of 392
351
4. MEMORY POINTS
HIGHLANDER_Navi_U
NAVIGATION SYSTEM
8
1Select “New”.
2Select the desired item to search for
the location. (P.317)
3Select either or to
change the size of the area to be avoid-
ed and select “OK”.
4Select “OK” when the editing area to
avoid screen appears.
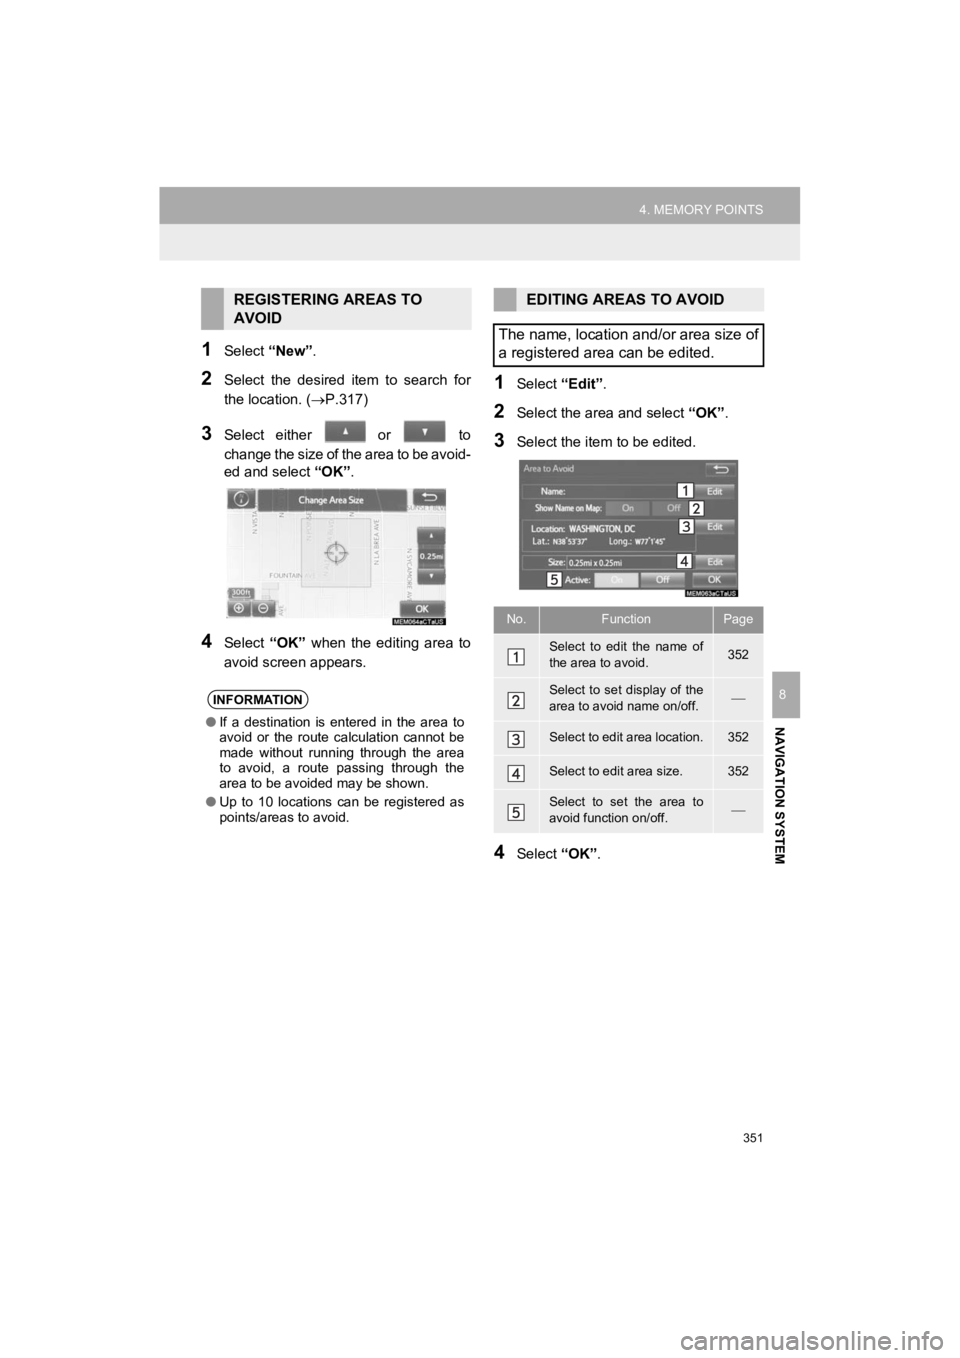
1Select “Edit”.
2Select the area and select “OK”.
3Select the item to be edited.
4Select “OK”.
REGISTERING AREAS TO
AVOID
INFORMATION
●If a destination is entered in the area to
avoid or the route calculation cannot be
made without running through the area
to avoid, a route passing through the
area to be avoided may be shown.
● Up to 10 locations can be registered as
points/areas to avoid.
EDITING AREAS TO AVOID
The name, location and/or area size of
a registered area can be edited.
No.FunctionPage
Select to edit the name of
the area to avoid.352
Select to set display of the
area to avoid name on/off.
Select to edit area location.352
Select to edit area size.352
Select to set the area to
avoid function on/off.
Page 352 of 392
352
4. MEMORY POINTS
HIGHLANDER_Navi_U
■CHANGING THE NAME
1Select “Edit” next to “Name”.
2Enter a name and select “OK”.
■CHANGING THE LOCATION
1Select “Edit” next to “Location”.
2Scroll the map to the desired point
(P.309) and select “OK”.
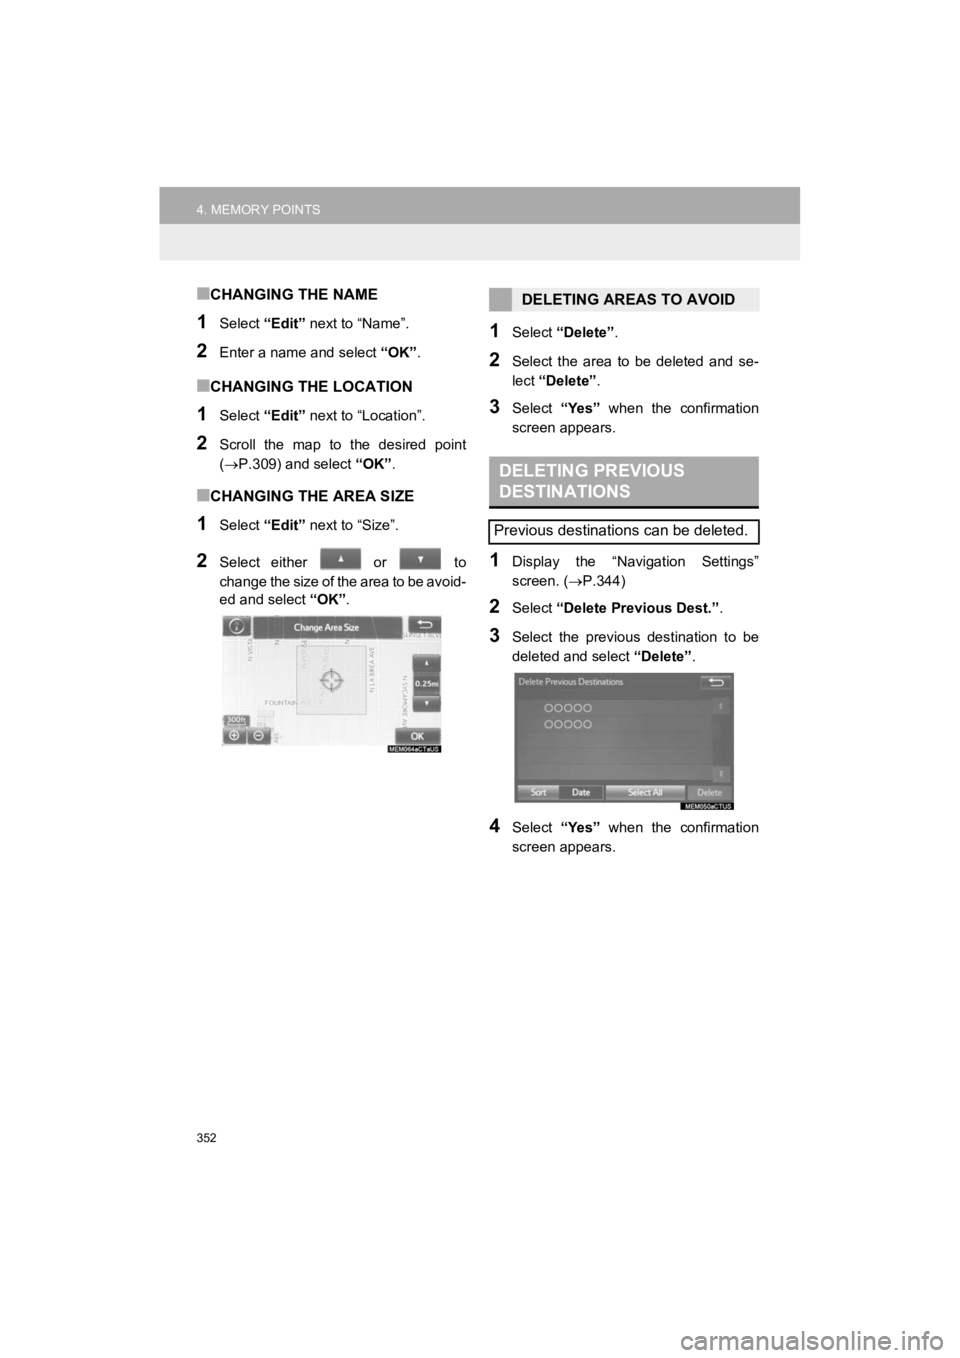
■CHANGING THE AREA SIZE
1Select “Edit” next to “Size”.
2Select either or to
change the size of the area to be avoid-
ed and select “OK”.
1Select “Delete” .
2Select the area to be deleted and se-
lect “Delete” .
3Select “Yes” when the confirmation
screen appears.
1Display the “Navigation Settings”
screen. ( P.344)
2Select “Delete Previous Dest.” .
3Select the previous destination to be
deleted and select “Delete”.
4Select “Yes” when the confirmation
screen appears.
DELETING AREAS TO AVOID
DELETING PREVIOUS
DESTINATIONS
Previous destinations can be deleted.