height TOYOTA HIGHLANDER 2020 (in English) User Guide
[x] Cancel search | Manufacturer: TOYOTA, Model Year: 2020, Model line: HIGHLANDER, Model: TOYOTA HIGHLANDER 2020Pages: 560, PDF Size: 14.42 MB
Page 298 of 560
2984-5. Using the driving support systems
HIGHLANDER_U
WARNING
●Do not replace a sensor with a
part other than a genuine part.
●Do not subject a sensor or its
surrounding area to a strong
impact.
●Do not damage the sensors,
and always keep them clean.
●If the area around a radar sen-
sor is subjected to an impact,
the system may not operate
properly due to a sensor mal-
function. Have the vehicle
inspected by your Toyota
dealer.
■Handling the suspension
Do not modify the suspension, as
changes to the height or inclina-
tion of the vehicle may prevent
the sensors from detecting
objects correctly or cause the sys-
tem to not operate or operate
unnecessarily.
■If the Parking Support Brake
function (static objects) oper-
ates unnecessarily, such as
at a railroad crossing
In the event that the Parking Sup-
port Brake function (static objects)
operates unnecessarily, such as
at a railroad crossing, brake con-
trol will be cancel ed after approxi-
mately 2 seconds, allowing you to
proceed forward and leave the
area, brake control can also be
canceled by depressing the brake
pedal. Depressing the accelera-
tor pedal after brake control is
canceled will allow you to proceed
forward and leave the area.
■Notes when washing the vehi-
cle
Do not apply intensive bursts of
water or steam to the sensor
area.
Doing so may result in the sensor
malfunctioning.
●When using a high pressure
washer to wash the vehicle, do
not spray the sensors directly,
as doing so may cause a sensor
to malfunction.
●When using steam to clean the
vehicle, do not direct steam too
close to the sensors as doing so
may cause a sensor to malfunc-
tion.
■When to disable the Parking
Support Brake
In the following situations, disable
the Parking Support Brake as the
system may operate even though
there is no possibility of a colli-
sion.
●When inspecting the vehicle
using a chassis roller, chassis
dynamo or free roller
●When loading the vehicle onto a
boat, truck or other transport
vessel
●If the suspension has been
modified or tires of a size other
than specified are installed
●If the front of the vehicle is
raised or lowered due to the
carried load
●When equipment that may
obstruct a sensor is installed,
such as a towing eyelet, bumper
protector (an additional trim
strip, etc.), bicycle carrier, or
snow plow
●When using an automatic car
wash
Page 322 of 560
3224-6. Driving tips
HIGHLANDER_U
Specific design characteris-
tics give it a higher center of
gravity than ordinary passen-
ger cars. This vehicle design
feature causes this type of
vehicle to be more likely to
rollover. And, utility vehicles
have a significantly higher
rollover rate than other types
of vehicles.
An advantage of the higher
ground clearance is a better
view of the road allowing you
to anticipate problems.
It is not designed for corner-
ing at the same speeds as
ordinary passenger cars any
more than low-slung sports
cars are designed to perform
satisfactorily under off-road
conditions. Therefore, sharp
turns at excessive speeds
may cause the vehicle to roll-
over.
Utility vehicle precau-
tions
This vehicle belongs to the
utility vehicle class, which
has higher ground clear-
ance and narrower tread in
relation to the height of its
center of gravity.
Utility vehicle feature
WARNING
■Utility vehicle precautions
Always observe the following pre-
cautions to minimize the risk of
death, serious injury or damage to
your vehicle:
●In a rollover crash, an unbelted
person is significantly more
likely to die than a person wear-
ing a seat belt. Therefore, the
driver and all passengers
should always fasten their seat
belts.
●Avoid sharp turns or abrupt
maneuvers, if at all possible.
Failure to operate this vehicle
correctly may resu lt in loss of
control or vehicle rollover caus-
ing death or serious injury.
●Loading cargo on the roof lug-
gage carrier (if equipped) will
make the center of the vehicle
gravity higher. Avoid high
speeds, sudden starts, sharp
turns, sudden braking or abrupt
maneuvers, otherwise it may
result in loss of control or vehi-
cle rollover due to failure to
operate this vehicle correctly.
●Always slow down in gusty
crosswinds. Because of its pro-
file and higher center of gravity,
your vehicle is more sensitive to
side winds than an ordinary
passenger car. Slowing down
will allow you to have better
control.
●Do not drive horizontally across
steep slopes. Driving straight up
or straight down is preferred.
Your vehicle (or any similar
off-road vehicle) can tip over
sideways much more easily
than forward or backward.
Page 466 of 560
4667-2. Steps to take in an emergency
HIGHLANDER_U
When replacing tires on a vehi-
cle with wheel lock nuts, use the
following procedures to remove
and install the wheel lock nuts.
The wheel lock key is stored in
the tray inside the luggage com-partment. Always return the
wheel lock key to its original
position after use, so that it does
not get lost. (
P.465)
■Removal
For ease of removal, the wheel
lock nut should always be the
first one loosened.
1 Place the wheel lock key on
top of the wheel lock nut,
turning until the wheel lock
key and wheel lock nut pat-
terns engage.
2 Place the wheel nut wrench
on the wheel lock key, and
while applying pressure on
the wheel lock key, loosen
the wheel lock nut.
■Installation
For ease of installation, the
wheel lock nut should always be
the last one tightened.
1 By hand, install a wheel lock
nut on each wheel.
2 Place the wheel lock key on
top of the wheel lock nut,
turning until the wheel lock
key and wheel lock nut pat-
terns engage.
3 Place the wheel nut wrench
on the wheel lock key, and
while applying pressure on
the wheel lock key, tighten
the wheel lock nut to the rec-
ommended torque.
WARNING
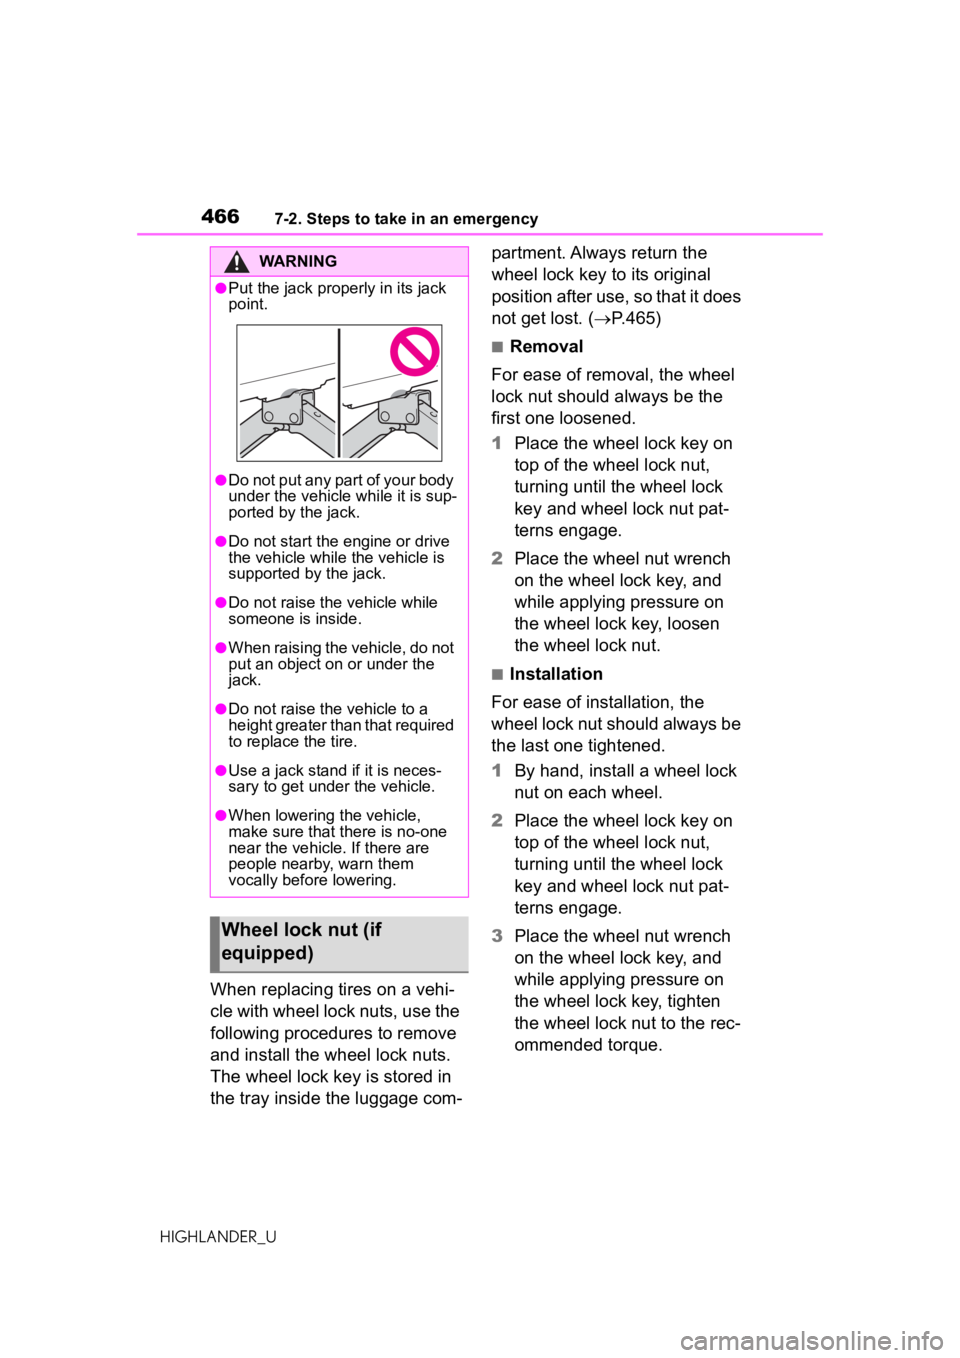
●Put the jack properly in its jack
point.
●Do not put any part of your body
under the vehicle while it is sup-
ported by the jack.
●Do not start the engine or drive
the vehicle while the vehicle is
supported by the jack.
●Do not raise the vehicle while
someone is inside.
●When raising the vehicle, do not
put an object on or under the
jack.
●Do not raise the vehicle to a
height greater than that required
to replace the tire.
●Use a jack stand if it is neces-
sary to get under the vehicle.
●When lowering the vehicle,
make sure that there is no-one
near the vehicle. If there are
people nearby, warn them
vocally before lowering.
Wheel lock nut (if
equipped)
Page 475 of 560
4757-2. Steps to take in an emergency
HIGHLANDER_U
7
When trouble arises
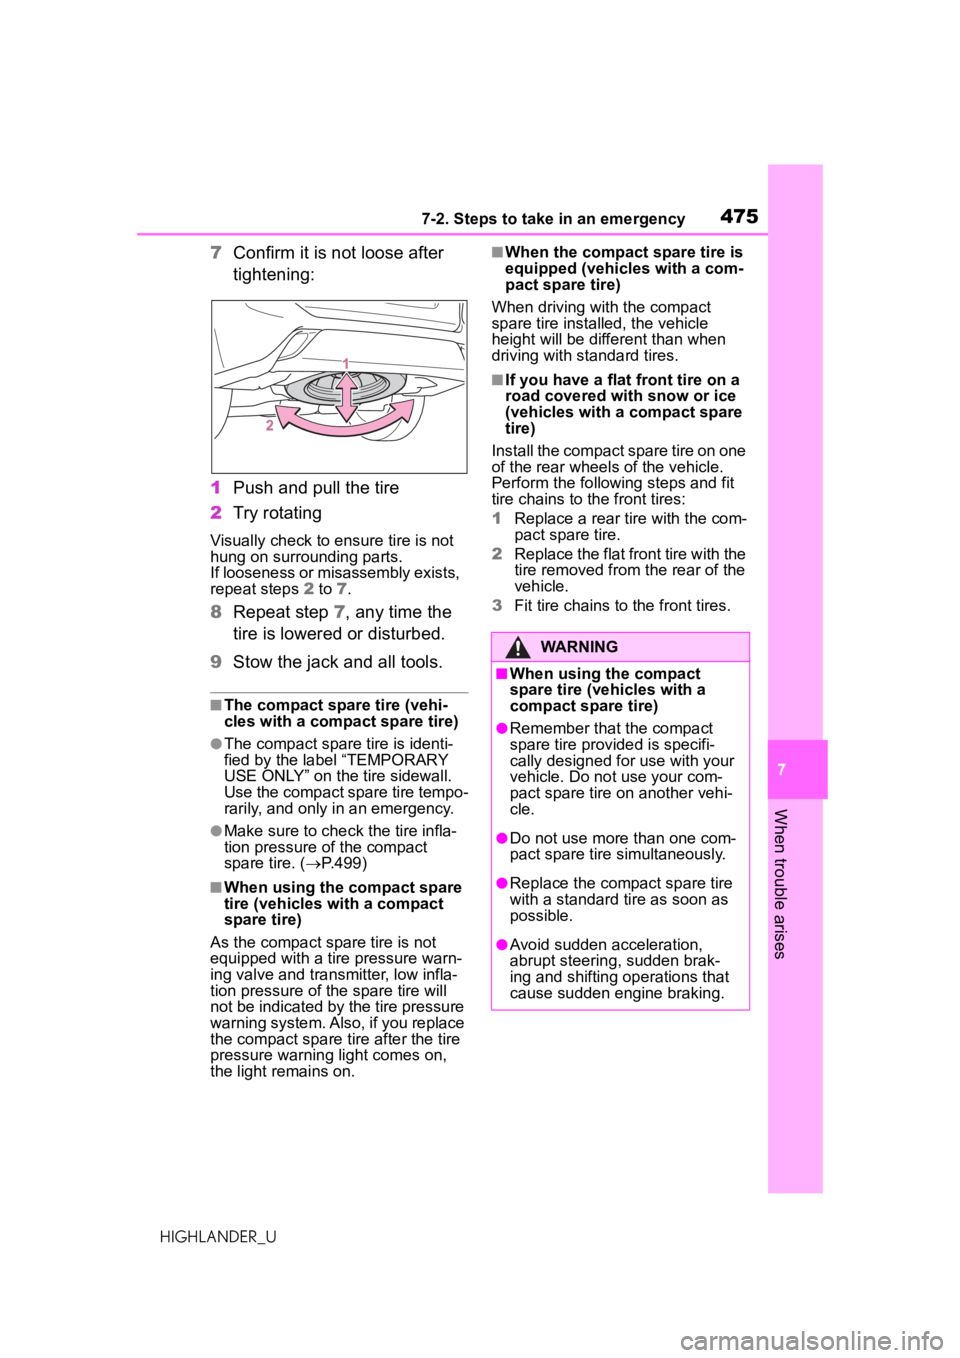
7 Confirm it is not loose after
tightening:
1 Push and pull the tire
2 Try rotating
Visually check to ensure tire is not
hung on surrounding parts.
If looseness or misassembly exists,
repeat steps 2 to 7 .
8Repeat step 7, any time the
tire is lowered or disturbed.
9 Stow the jack and all tools.
■The compact spare tire (vehi-
cles with a compact spare tire)
●The compact spare tire is identi-
fied by the label “TEMPORARY
USE ONLY” on the tire sidewall.
Use the compact spare tire tempo-
rarily, and only in an emergency.
●Make sure to che ck the tire infla-
tion pressure of the compact
spare tire. ( P.499)
■When using the compact spare
tire (vehicles with a compact
spare tire)
As the compact spare tire is not
equipped with a tire pressure warn-
ing valve and transmitter, low infla-
tion pressure of the spare tire will
not be indicated by the tire pressure
warning system. Also, if you replace
the compact spare tire after the tire
pressure warning light comes on,
the light remains on.
■When the compact spare tire is
equipped (vehicles with a com-
pact spare tire)
When driving with the compact
spare tire installed, the vehicle
height will be different than when
driving with standard tires.
■If you have a flat front tire on a
road covered with snow or ice
(vehicles with a compact spare
tire)
Install the compact spare tire on one
of the rear wheels of the vehicle.
Perform the following steps and fit
tire chains to the front tires:
1 Replace a rear tire with the com-
pact spare tire.
2 Replace the flat front tire with the
tire removed from the rear of the
vehicle.
3 Fit tire chains to the front tires.
WARNING
■When using the compact
spare tire (vehicles with a
compact spare tire)
●Remember that the compact
spare tire provided is specifi-
cally designed for use with your
vehicle. Do not use your com-
pact spare tire on another vehi-
cle.
●Do not use more than one com-
pact spare tire simultaneously.
●Replace the compact spare tire
with a standard tire as soon as
possible.
●Avoid sudden acceleration,
abrupt steering, sudden brak-
ing and shifting operations that
cause sudden engine braking.
Page 492 of 560
4928-1. Specifications
HIGHLANDER_U
8-1.Specifications
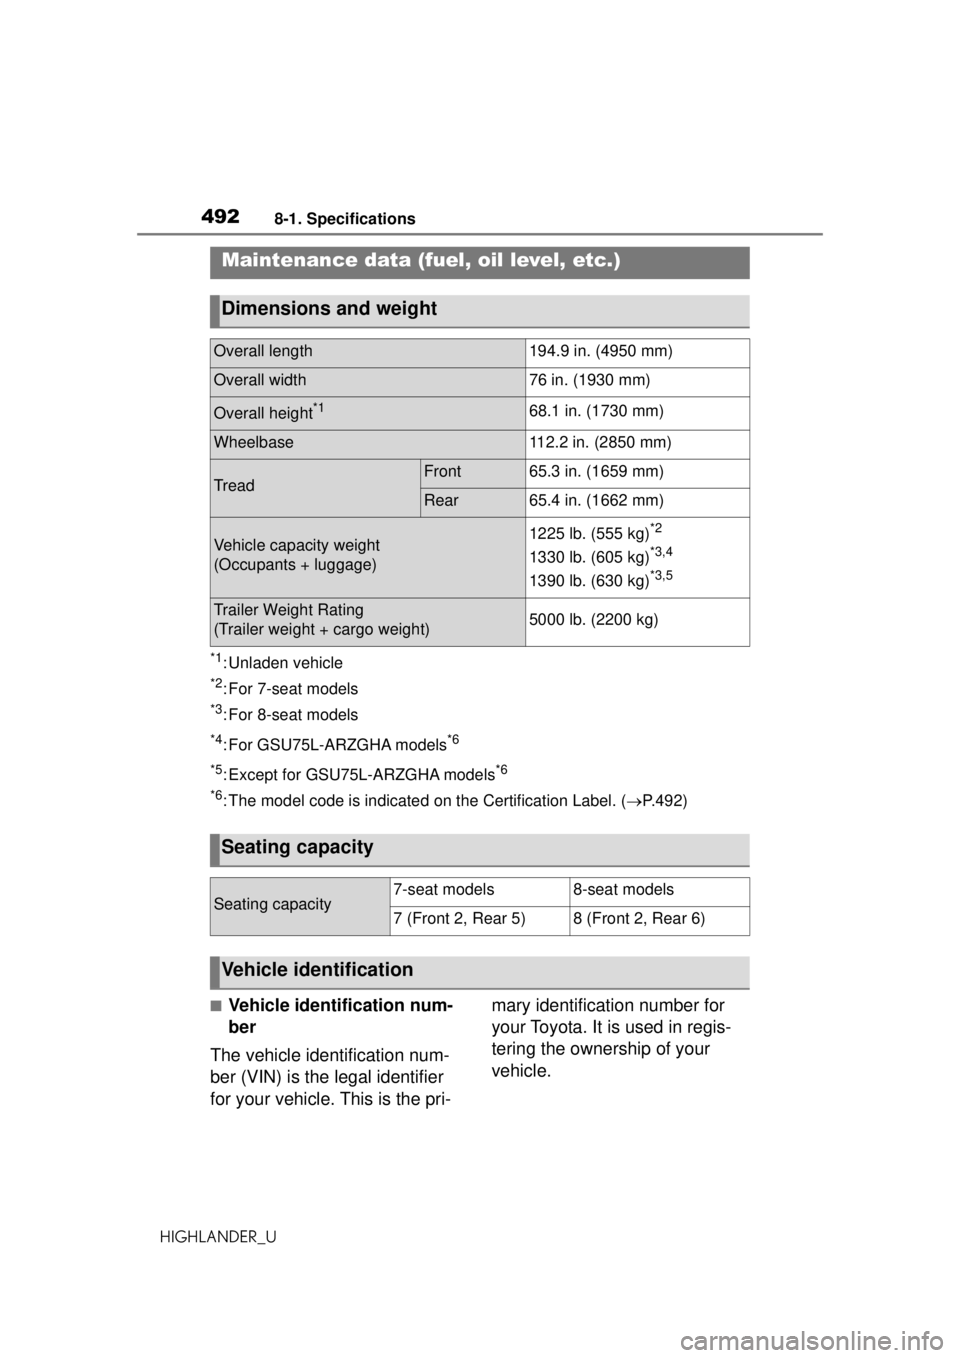
*1: Unladen vehicle
*2: For 7-seat models
*3: For 8-seat models
*4: For GSU75L-ARZGHA models*6
*5
: Except for GSU75L-ARZGHA models*6
*6
: The model code is indicated on the Certification Label. (P.492)
■Vehicle identification num-
ber
The vehicle identification num-
ber (VIN) is the legal identifier
for your vehicle. This is the pri- mary identification number for
your Toyota. It is used in regis-
tering the ownership of your
vehicle.
Maintenance data (fuel, oil level, etc.)
Dimensions and weight
Overall length194.9 in. (4950 mm)
Overall width76 in. (1930 mm)
Overall height*168.1 in. (1730 mm)
Wheelbase112.2 in. (2850 mm)
TreadFront65.3 in. (1659 mm)
Rear65.4 in. (1662 mm)
Vehicle capacity weight
(Occupants + luggage)1225 lb. (555 kg)*2
1330 lb. (605 kg)*3,4
1390 lb. (630 kg)*3,5
Trailer Weight Rating
(Trailer weight + cargo weight)5000 lb. (2200 kg)
Seating capacity
Seating capacity7-seat models8-seat models
7 (Front 2, Rear 5)8 (Front 2, Rear 6)
Vehicle identification
Page 507 of 560
5078-1. Specifications
HIGHLANDER_U
8
Vehicle specifications
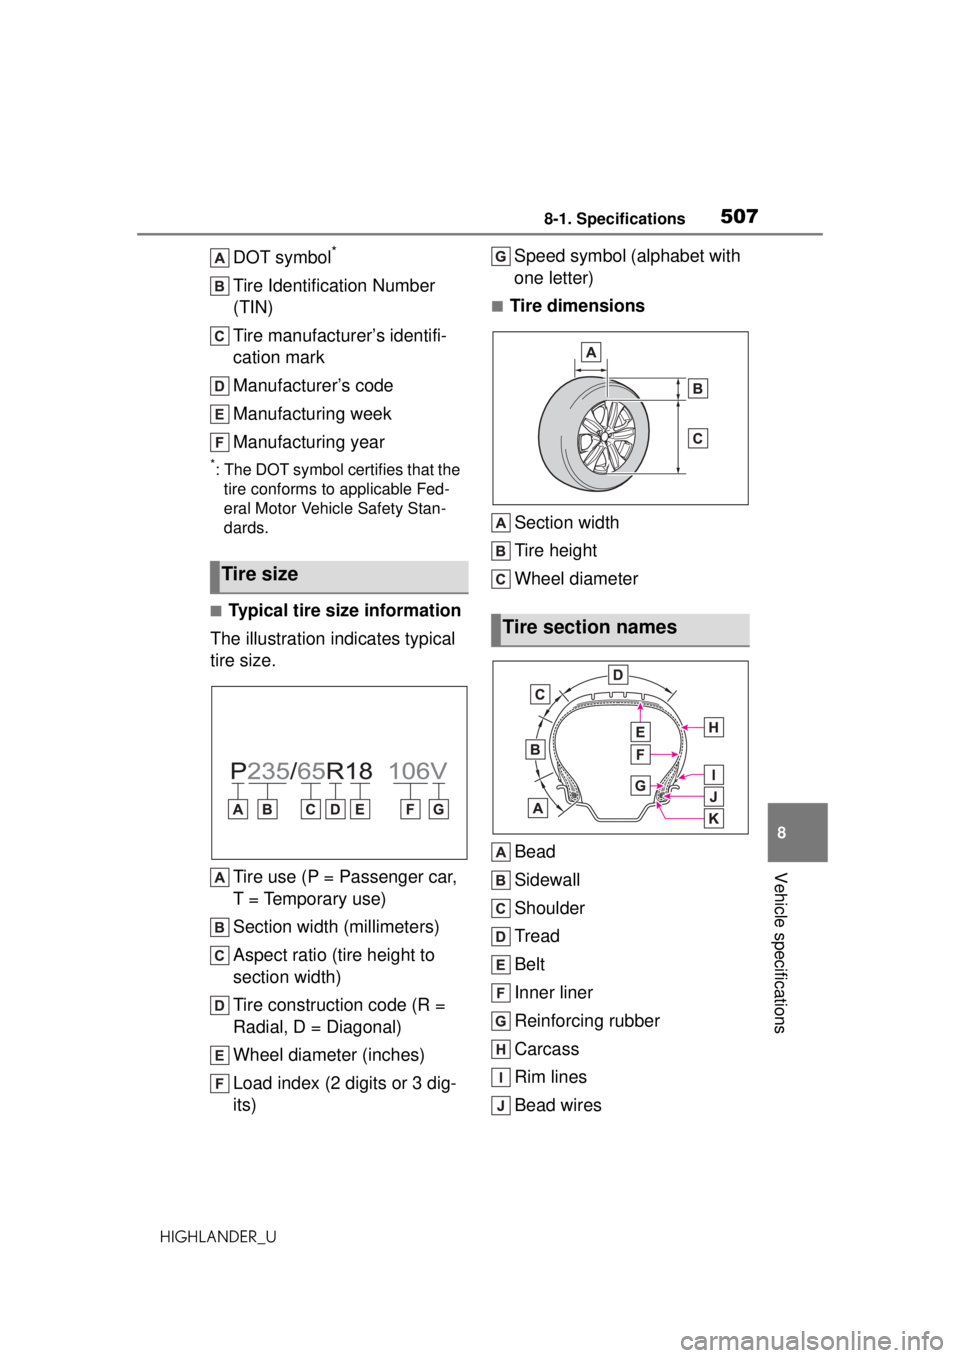
DOT symbol*
Tire Identification Number
(TIN)
Tire manufacturer’s identifi-
cation mark
Manufacturer’s code
Manufacturing week
Manufacturing year
*: The DOT symbol certifies that the tire conforms to applicable Fed-
eral Motor Vehicle Safety Stan-
dards.
■Typical tire size information
The illustration indicates typical
tire size.
Tire use (P = Passenger car,
T = Temporary use)
Section width (millimeters)
Aspect ratio (tire height to
section width)
Tire construction code (R =
Radial, D = Diagonal)
Wheel diameter (inches)
Load index (2 digits or 3 dig-
its) Speed symbol (alphabet with
one letter)
■Tire dimensions
Section width
Tire height
Wheel diameter
Bead
Sidewall
Shoulder
Tread
Belt
Inner liner
Reinforcing rubber
Carcass
Rim lines
Bead wires
Tire size
Tire section names