child seat TOYOTA HIGHLANDER 2021 (in English) Owner's Manual
[x] Cancel search | Manufacturer: TOYOTA, Model Year: 2021, Model line: HIGHLANDER, Model: TOYOTA HIGHLANDER 2021Pages: 568, PDF Size: 15.96 MB
Page 58 of 568
581-2. Child safety
HIGHLANDER_U
and forth to ensure that it is
installed securely. (P.59)
■Booster seat
1 If installing the child restraint
system to the front passen-
ger seat is unavoidable, refer
to P.53for the front passenger
seat adjustment.
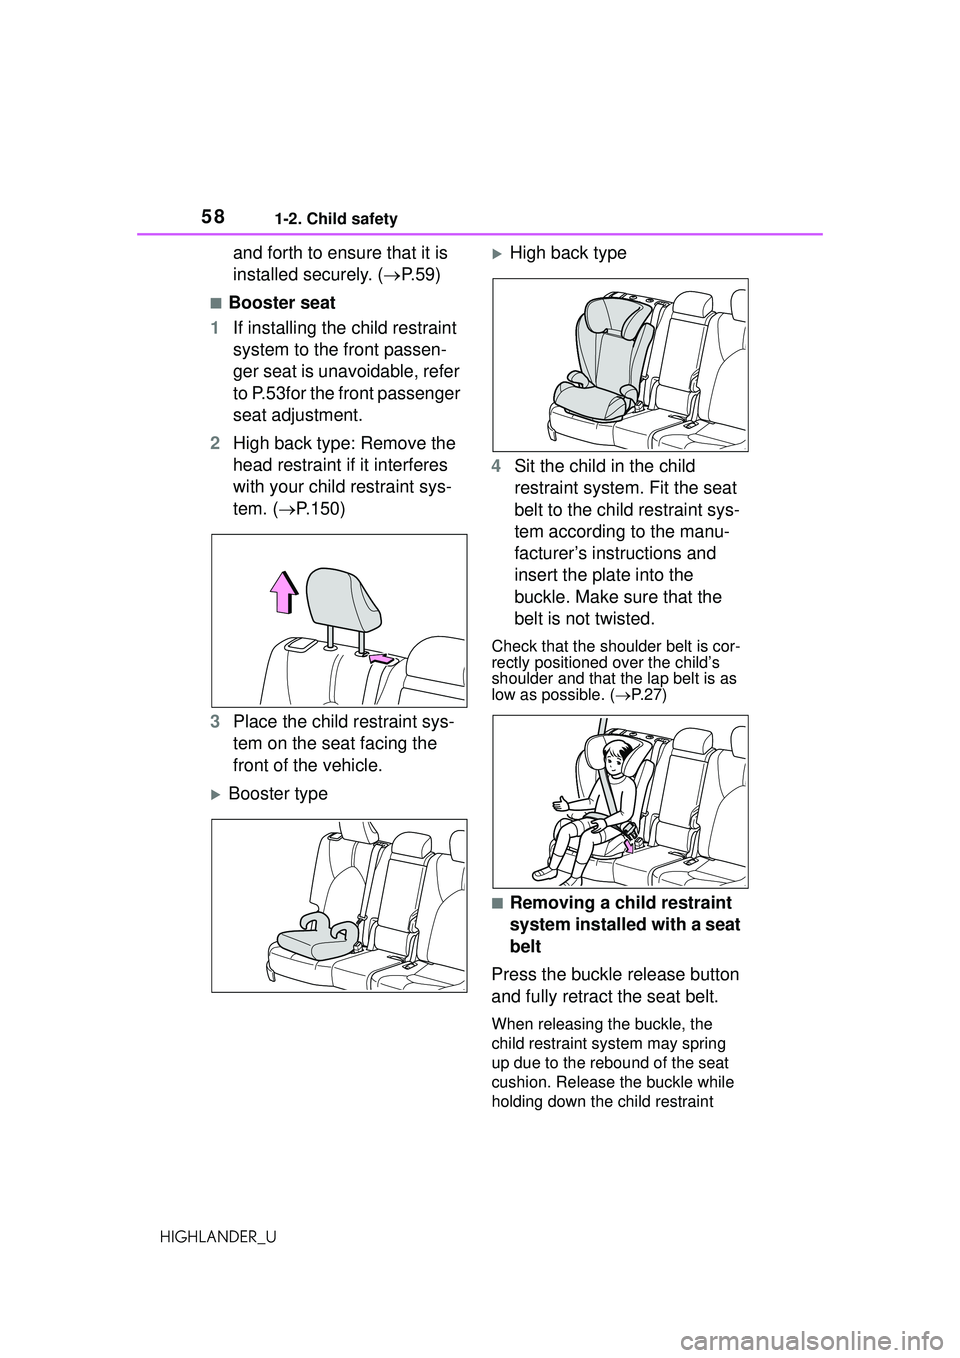
2 High back type: Remove the
head restraint if it interferes
with your child restraint sys-
tem. ( P.150)
3 Place the child restraint sys-
tem on the seat facing the
front of the vehicle.
Booster type
High back type
4 Sit the child in the child
restraint system. Fit the seat
belt to the child restraint sys-
tem according to the manu-
facturer’s instructions and
insert the plate into the
buckle. Make sure that the
belt is not twisted.
Check that the shoulder belt is cor-
rectly positioned over the child’s
shoulder and that the lap belt is as
low as possible. ( P. 2 7 )
■Removing a child restraint
system installed with a seat
belt
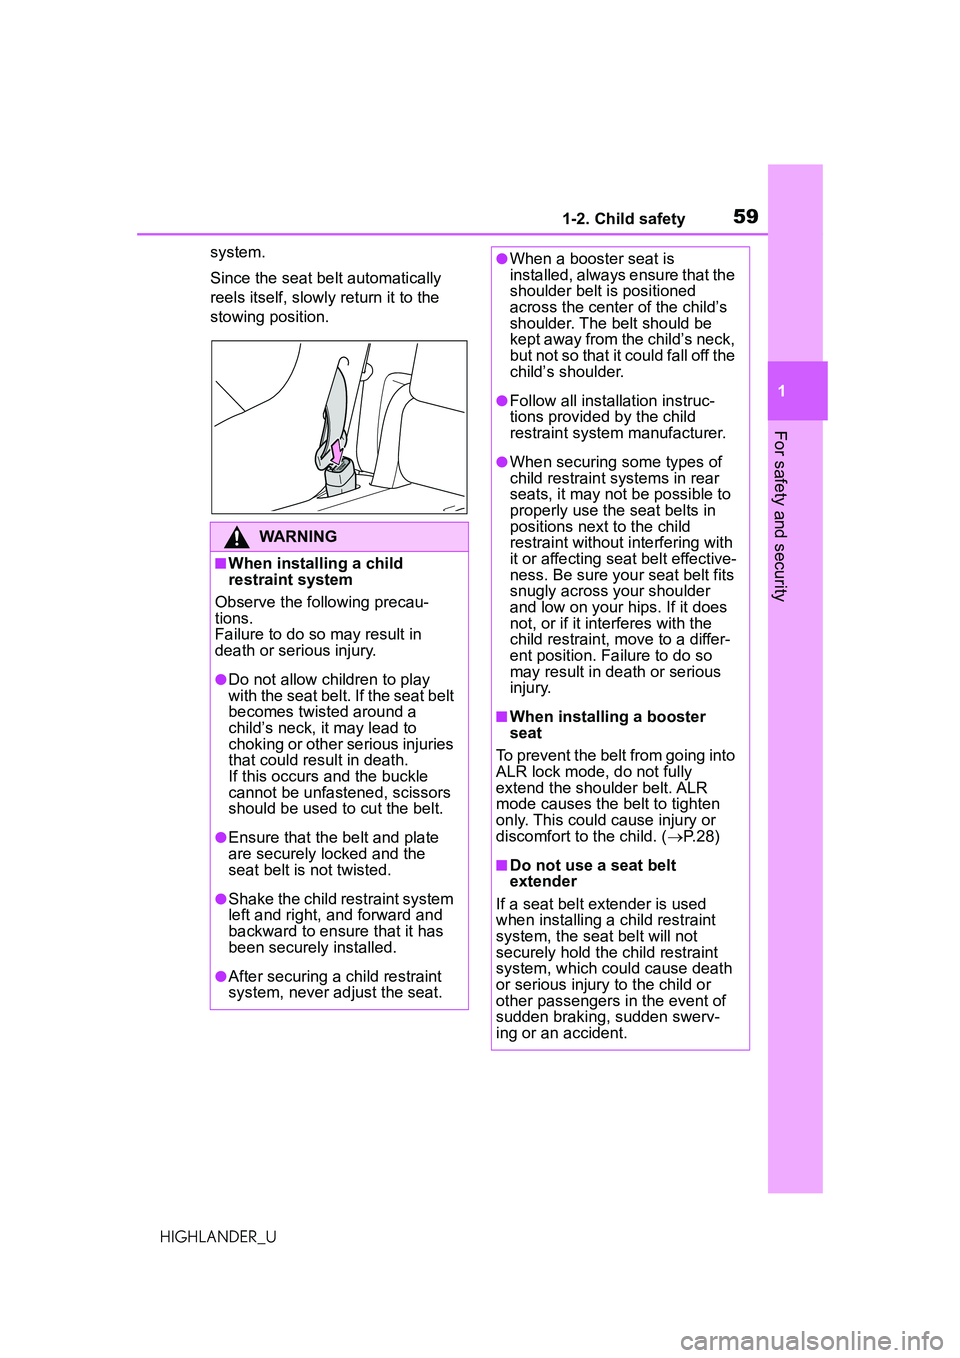
Press the buckle release button
and fully retract the seat belt.
When releasing the buckle, the
child restraint sys tem may spring
up due to the rebound of the seat
cushion. Release the buckle while
holding down the child restraint
Page 59 of 568
591-2. Child safety
1
For safety and security
HIGHLANDER_Usystem.
Since the seat belt automatically
reels itself, slowly return it to the
stowing position.
WARNING
■When installing a child
restraint system
Observe the following precau-
tions.
Failure to do so may result in
death or serious injury.
●Do not allow children to play
with the seat belt. If the seat belt
becomes twisted around a
child’s neck, it may lead to
choking or other serious injuries
that could result in death.
If this occurs and the buckle
cannot be unfastened, scissors
should be used to cut the belt.
●Ensure that the belt and plate
are securely locked and the
seat belt is not twisted.
●Shake the child restraint system
left and right, and forward and
backward to ensure that it has
been securely installed.
●After securing a child restraint
system, never adjust the seat.
●When a booster seat is
installed, always ensure that the
shoulder belt is positioned
across the center of the child’s
shoulder. The belt should be
kept away from the child’s neck,
but not so that it could fall off the
child’s shoulder.
●Follow all installation instruc-
tions provided by the child
restraint system manufacturer.
●When securing some types of
child restraint systems in rear
seats, it may not be possible to
properly use the seat belts in
positions next to the child
restraint without interfering with
it or affecting seat belt effective-
ness. Be sure your seat belt fits
snugly across your shoulder
and low on your hips. If it does
not, or if it interferes with the
child restraint, move to a differ-
ent position. Failure to do so
may result in death or serious
injury.
■When installing a booster
seat
To prevent the belt from going into
ALR lock mode, do not fully
extend the shoulder belt. ALR
mode causes the belt to tighten
only. This could cause injury or
discomfort to the child. ( P. 2 8 )
■Do not use a seat belt
extender
If a seat belt extender is used
when installing a child restraint
system, the seat belt will not
securely hold the child restraint
system, which could cause death
or serious injury to the child or
other passengers in the event of
sudden braking, sudden swerv-
ing or an accident.
Page 60 of 568
601-2. Child safety
HIGHLANDER_U
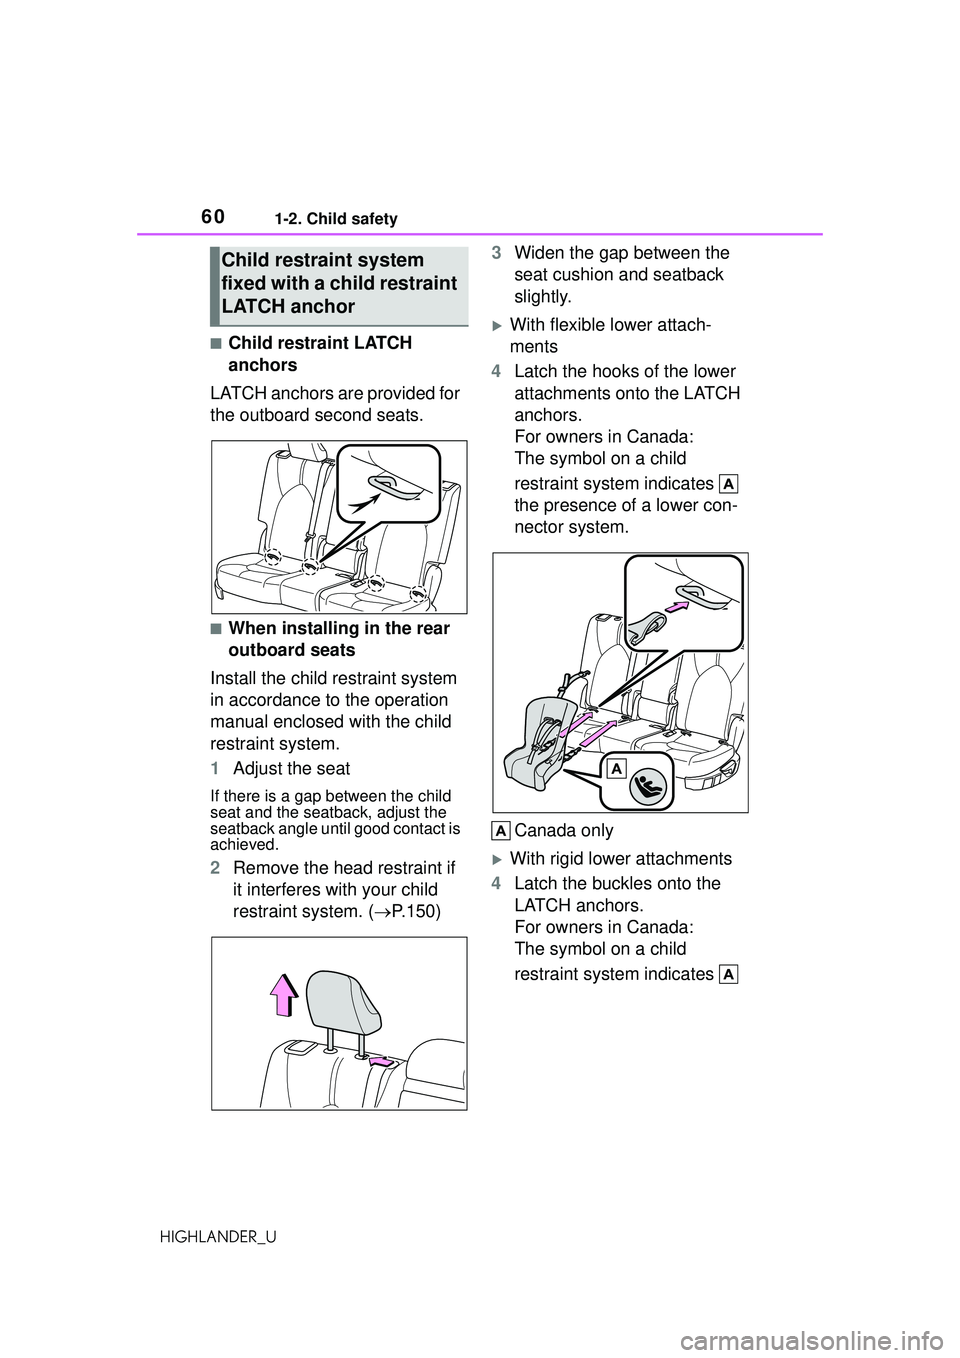
■Child restraint LATCH
anchors
LATCH anchors are provided for
the outboard second seats.
■When installing in the rear
outboard seats
Install the child restraint system
in accordance to the operation
manual enclosed with the child
restraint system.
1 Adjust the seat
If there is a gap between the child
seat and the seatback, adjust the
seatback angle until good contact is
achieved.
2Remove the head restraint if
it interferes with your child
restraint system. ( P.150) 3
Widen the gap between the
seat cushion and seatback
slightly.
With flexible lower attach-
ments
4 Latch the hooks of the lower
attachments onto the LATCH
anchors.
For owners in Canada:
The symbol on a child
restraint system indicates
the presence of a lower con-
nector system.
Canada only
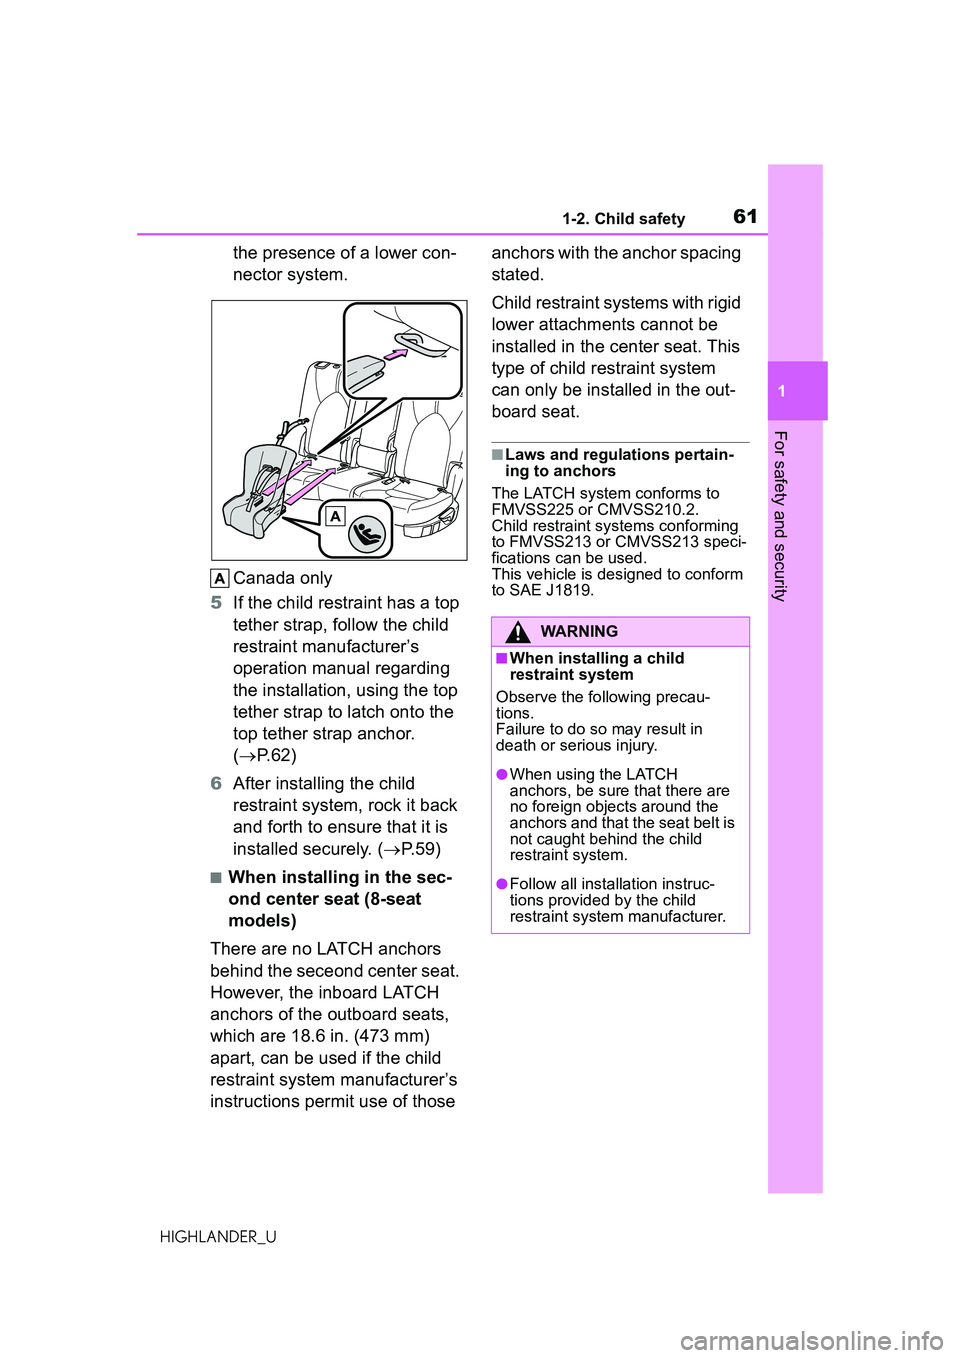
With rigid lower attachments
4 Latch the buckles onto the
LATCH anchors.
For owners in Canada:
The symbol on a child
restraint system indicates
Child restraint system
fixed with a child restraint
LATCH anchor
Page 61 of 568
611-2. Child safety
1
For safety and security
HIGHLANDER_U
the presence of a lower con-
nector system.
Canada only
5 If the child restraint has a top
tether strap, follow the child
restraint manufacturer’s
operation manual regarding
the installation, using the top
tether strap to latch onto the
top tether strap anchor.
( P.62)
6 After installing the child
restraint system, rock it back
and forth to ensure that it is
installed securely. ( P.59)
■When installing in the sec-
ond center seat (8-seat
models)
There are no LATCH anchors
behind the seceond center seat.
However, the inboard LATCH
anchors of the outboard seats,
which are 18.6 in. (473 mm)
apart, can be used if the child
restraint system manufacturer’s
instructions permit use of those anchors with the anchor spacing
stated.
Child restraint systems with rigid
lower attachments cannot be
installed in the center seat. This
type of child restraint system
can only be installed in the out-
board seat.
■Laws and regulations pertain-
ing to anchors
The LATCH system conforms to
FMVSS225 or CMVSS210.2.
Child restraint systems conforming
to FMVSS213 or CMVSS213 speci-
fications can be used.
This vehicle is designed to conform
to SAE J1819.
WARNING
■When installing a child
restraint system
Observe the following precau-
tions.
Failure to do so may result in
death or serious injury.
●When using the LATCH
anchors, be sure that there are
no foreign objects around the
anchors and that the seat belt is
not caught behind the child
restraint system.
●Follow all installation instruc-
tions provided by the child
restraint system manufacturer.
Page 62 of 568
621-2. Child safety
HIGHLANDER_U
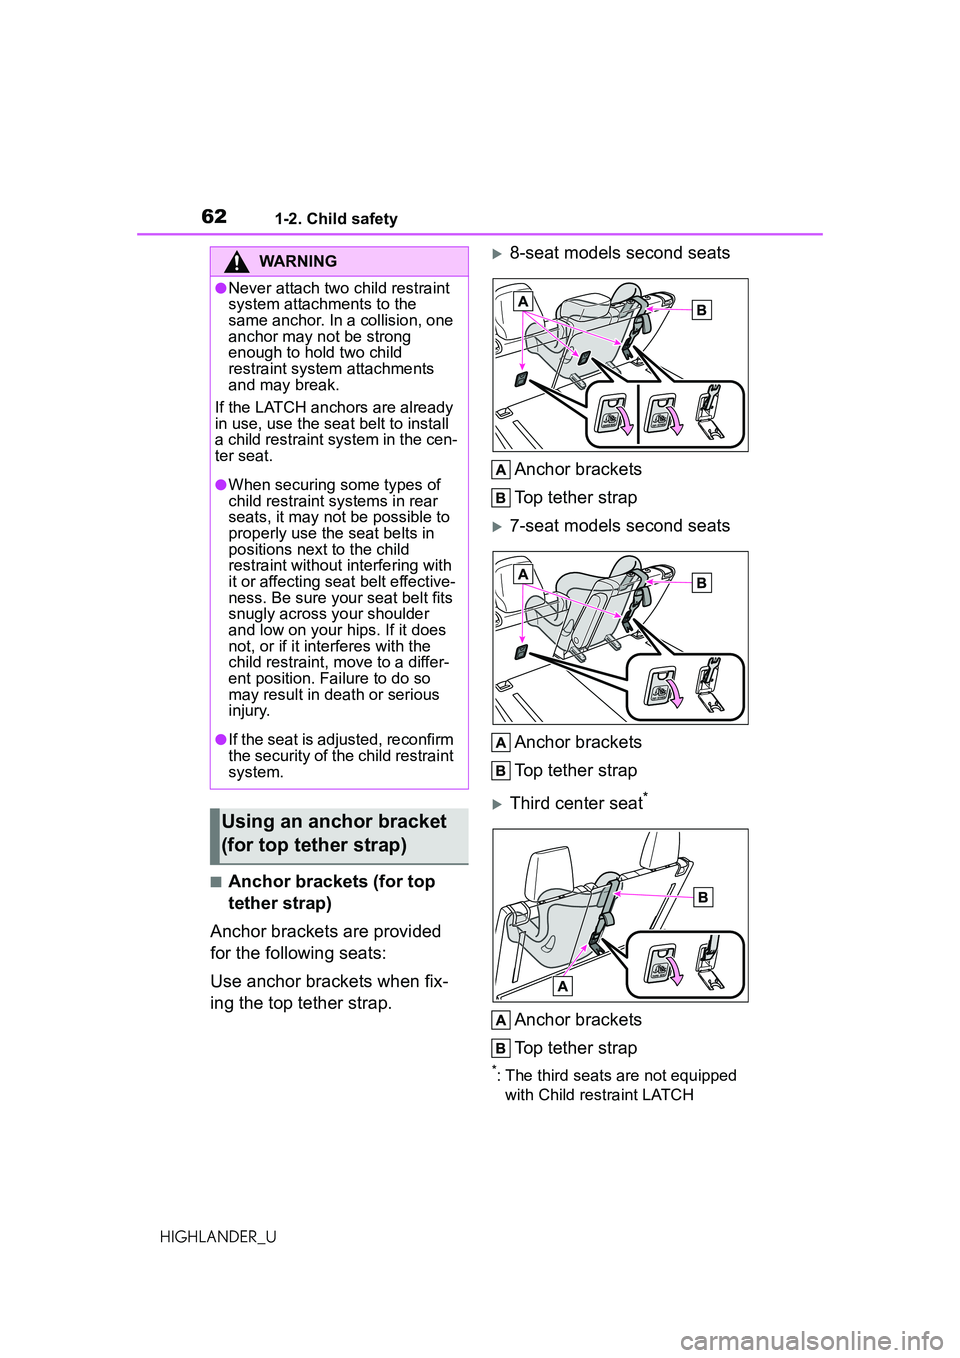
■Anchor brackets (for top
tether strap)
Anchor brackets are provided
for the following seats:
Use anchor brackets when fix-
ing the top tether strap.
8-seat models second seats
Anchor brackets
Top tether strap
7-seat models second seats
Anchor brackets
Top tether strap
Third center seat*
Anchor brackets
Top tether strap
*: The third seats are not equipped with Child restraint LATCH
WARNING
●Never attach two child restraint
system attachments to the
same anchor. In a collision, one
anchor may not be strong
enough to hold two child
restraint system attachments
and may break.
If the LATCH anchors are already
in use, use the seat belt to install
a child restraint system in the cen-
ter seat.
●When securing some types of
child restraint systems in rear
seats, it may not be possible to
properly use the seat belts in
positions next to the child
restraint without interfering with
it or affecting seat belt effective-
ness. Be sure your seat belt fits
snugly across your shoulder
and low on your hips. If it does
not, or if it interferes with the
child restraint, move to a differ-
ent position. Failure to do so
may result in death or serious
injury.
●If the seat is adjusted, reconfirm
the security of the child restraint
system.
Using an anchor bracket
(for top tether strap)
Page 63 of 568
631-2. Child safety
1
For safety and security
HIGHLANDER_Uanchors.
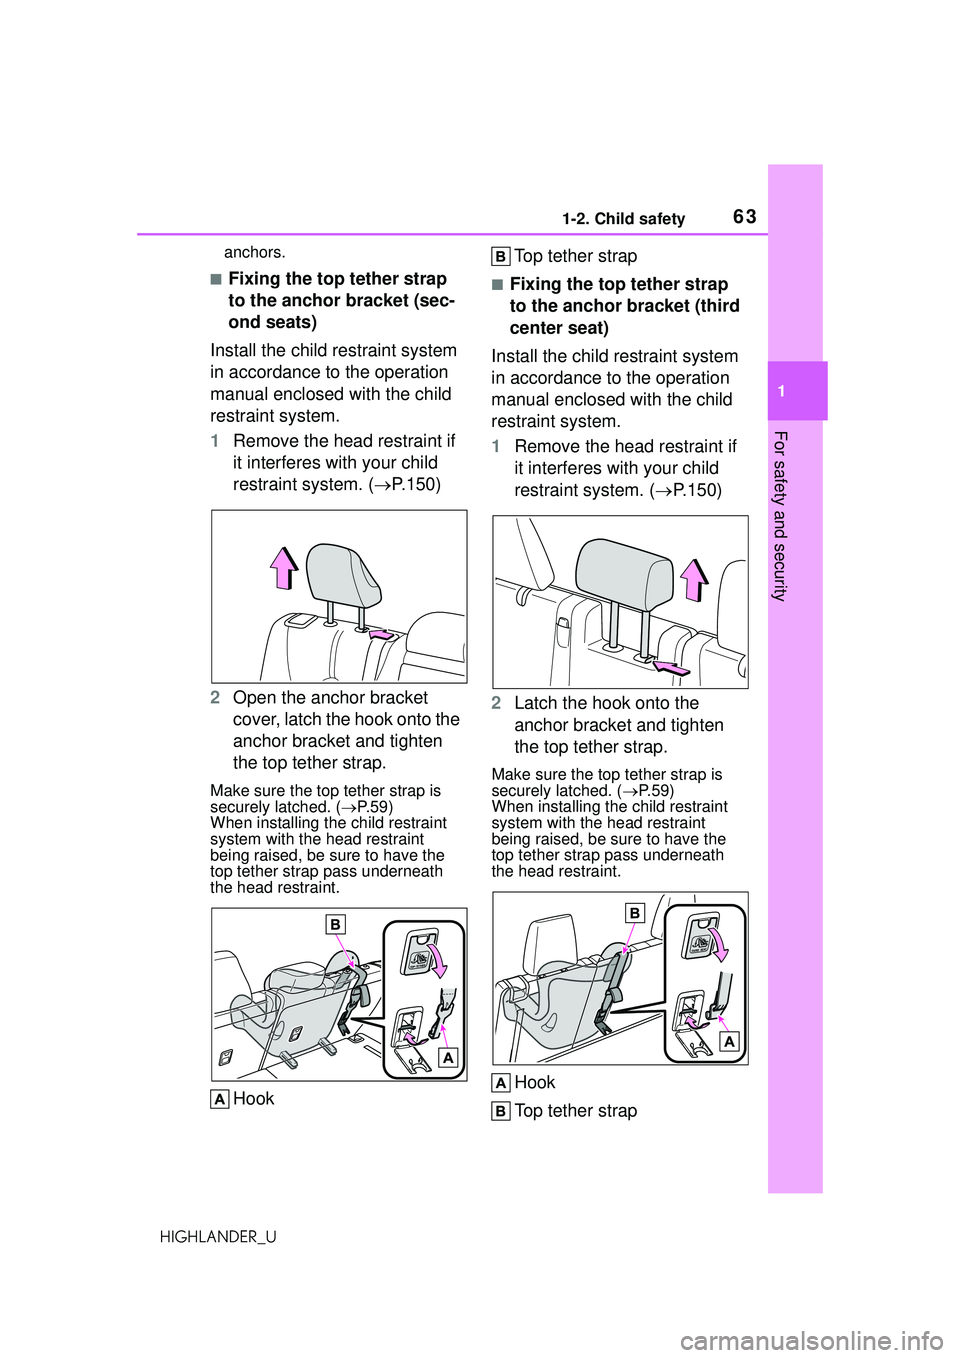
■Fixing the top tether strap
to the anchor bracket (sec-
ond seats)
Install the child restraint system
in accordance to the operation
manual enclosed with the child
restraint system.
1 Remove the head restraint if
it interferes with your child
restraint system. ( P.150)
2 Open the anchor bracket
cover, latch the hook onto the
anchor bracket and tighten
the top tether strap.
Make sure the top tether strap is
securely latched. ( P.59)
When installing the child restraint
system with the head restraint
being raised, be sure to have the
top tether strap pass underneath
the head restraint.
Hook Top tether strap
■Fixing the top tether strap
to the anchor bracket (third
center seat)
Install the child restraint system
in accordance to the operation
manual enclosed with the child
restraint system.
1 Remove the head restraint if
it interferes with your child
restraint system. ( P.150)
2 Latch the hook onto the
anchor bracket and tighten
the top tether strap.
Make sure the top tether strap is
securely latched. ( P. 5 9 )
When installing the child restraint
system with the head restraint
being raised, be sure to have the
top tether strap pass underneath
the head restraint.
Hook
Top tether strap
Page 64 of 568
641-2. Child safety
HIGHLANDER_U
■Laws and regulations pertain-
ing to anchors
The LATCH system conforms to
FMVSS225 or CMVSS210.2.
Child restraint systems conforming
to FMVSS213 or CMVSS213 speci-
fications can be used.
This vehicle is designed to conform
to SAE J1819.
WARNING
■When installing a child
restraint system
Observe the following precau-
tions.
Failure to do so may result in
death or serious injury.
●Firmly attach the top tether
strap and make sure that the
belt is not twisted.
●Do not attach the top strap to
anything other than the anchor
bracket of the seat the child
restraint system is installed to.
●Follow all installation instruc-
tions provided by the child
restraint system manufacturer.
●When installing a child restraint
system in the center rear seat,
adjust both seatbacks at the
same angle. Otherwise, the
child restraint system cannot be
securely restrained and this
may cause death or serious
injuries in the event of sudden
braking, sudden swerving or an
accident.
●When installing the child
restraint system with the head
restraint being raised, after the
head restraint has been raised
and then the anchor bracket has
been fixed, do not lower the
head restraint.
●If the seat is adjusted, reconfirm
the security of the child restraint
system.
NOTICE
■Anchor brackets (for top
tether strap)
When not in use, make certain to
close the lid. If it remains open,
the lid may be damaged.
Page 119 of 568
1193-2. Opening, closing and locking the doors
3
Before driving
HIGHLANDER_U
■Conditions affecting the opera-
tion of the smart key system or
wireless remote control
P. 1 3 5
■If the smart key system or the
wireless remote control does
not operate properly
Use the mechanical key to lock and
unlock the doors. ( P.489)
Replace the key battery with a new
one if it is depleted. ( P.436)
■If the battery is discharged
The doors cannot be locked and
unlocked using the smart key sys-
tem or wireless remote control. Lock
or unlock the doors using the
mechanical key. ( P.489)
■Rear seat reminder function
In order to remind you not to forget
luggage, etc. in the rear seat, when
the engine switch is turned off after
any of the following conditions are
met, a buzzer will sound and a mes-
sage will be displayed on the
multi-information display for approx-
imately 6 seconds.
●The engine is started within 10
minutes after opening and closing
a rear door.
●A rear door has been opened and
closed after the engine was
started.
However, if a rear door is opened
and then closed within approxi-
mately 2 seconds, the rear seat
reminder function may not operate.
The rear seat reminder function
determines that luggage, etc. has
been placed in a rear seat based on
opening and closing of a rear door.
Therefore, depending on the situa-
tion, the rear seat reminder function
may not operate and you may still
forget luggage, etc. in the rear seat,
or it may operate unnecessarily.
The rear seat reminder function can
be enabled/disabled. ( P.521)
■Customization
Some functions can be customized.
( P.521)
WARNING
■To prevent an accident
Observe the following precautions
while driving the vehicle. Failure
to do so may result in a door
opening and an occupant falling
out, resulting in death or serious
injury.
●Ensure that all doors are prop-
erly closed and locked.
●Do not pull the inside handle of
the doors while driving.
Be especially care ful for the front
doors, as the doors may be
opened even if the inside lock but-
tons are in locked position.
●Set the rear door child-protector
locks when children are seated
in the rear seats.
■When opening or closing a
door
Check the surroundings of the
vehicle such as whether the vehi-
cle is on an incline, whether there
is enough space for a door to
open and whether a strong wind
is blowing. When opening or clos-
ing the door, hold the door handle
tightly to prepare for any unpre-
dictable movement.
Page 143 of 568
1433-3. Adjusting the seats
3
Before driving
HIGHLANDER_U
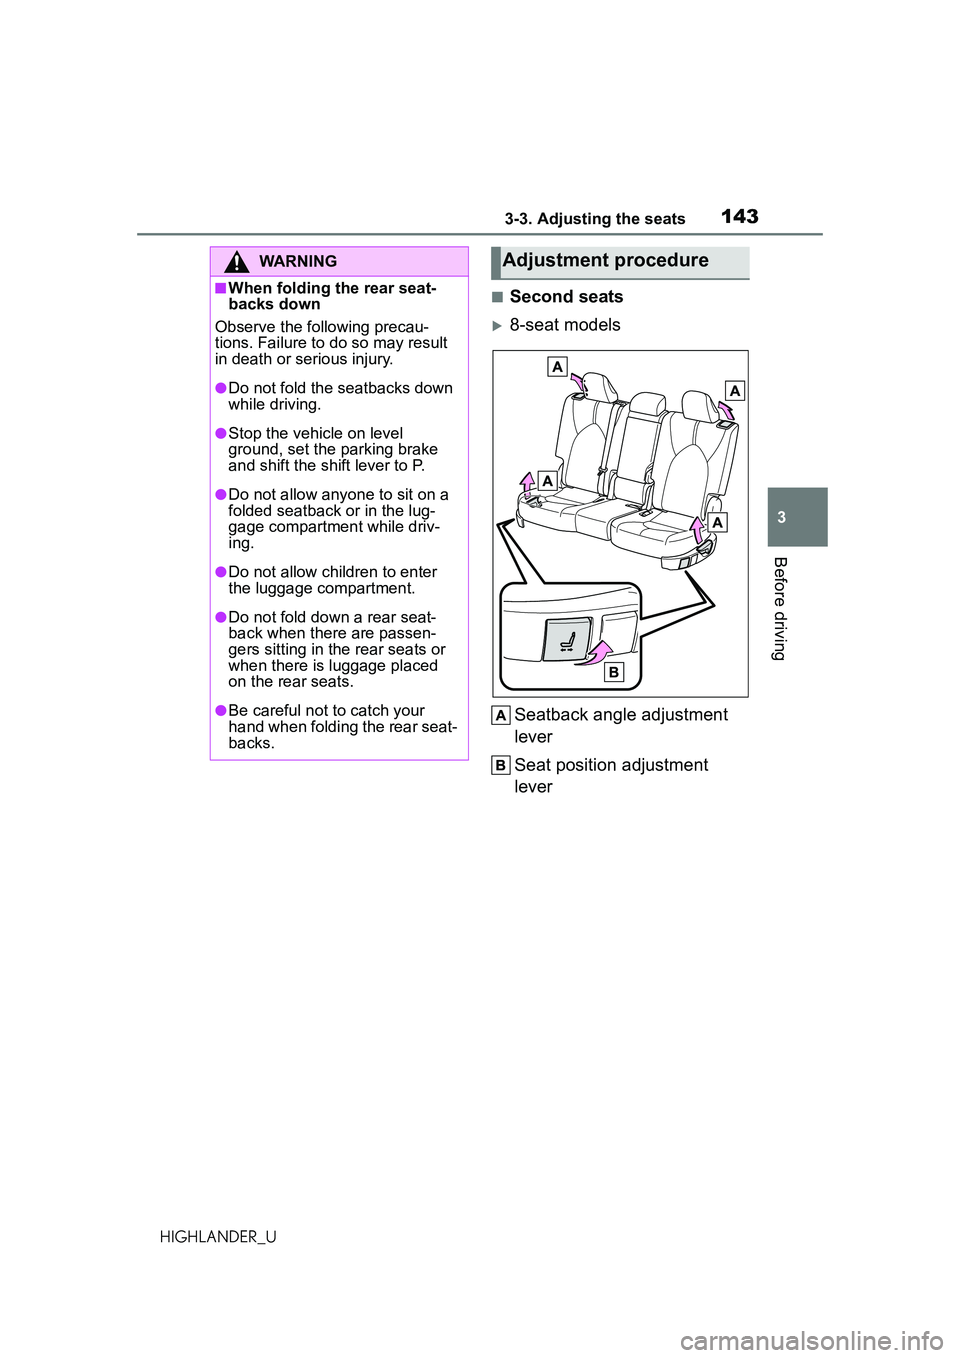
■Second seats
8-seat modelsSeatback angle adjustment
lever
Seat position adjustment
lever
WARNING
■When folding the rear seat-
backs down
Observe the following precau-
tions. Failure to do so may result
in death or serious injury.
●Do not fold the seatbacks down
while driving.
●Stop the vehicle on level
ground, set the parking brake
and shift the shift lever to P.
●Do not allow anyone to sit on a
folded seatback or in the lug-
gage compartment while driv-
ing.
●Do not allow children to enter
the luggage compartment.
●Do not fold down a rear seat-
back when there are passen-
gers sitting in the rear seats or
when there is luggage placed
on the rear seats.
●Be careful not to catch your
hand when folding the rear seat-
backs.
Adjustment procedure
Page 244 of 568
2444-5. Using the driving support systems
HIGHLANDER_U• When part of a detectable object
is hidden by an object, such as
large baggage, an umbrella, or
guardrail
• When there are many things which can reflect the radio waves
of the radar in the vicinity (tunnels,
truss bridges, gravel roads, snow
covered road that have tracks,
etc.)
• When there is an effect on the radio waves to the radar that is
installed on another vehicle
• When multiple de tectable objects
are close together
• If the sun or other light is shining directly on a detectable object
• When a detectable object is a
shade of white and looks
extremely bright
• When a detectable object appears
to be nearly the same color or
brightness as its surroundings
• If a detectable object cuts or sud-
denly emerges in front of your
vehicle
• When the front of your vehicle is
hit by water, snow, dust, etc.
• When a very bright light ahead, such as the sun or the headlights
of oncoming traffic, shines directly
into the front camera
• When approaching the side or
front of a vehicle ahead
• If a vehicle ahead is a motorcycle
• If a vehicle ahead is narrow, such as a personal mobility vehicle
• If a preceding vehicle has a small rear end, such as an unloaded
truck
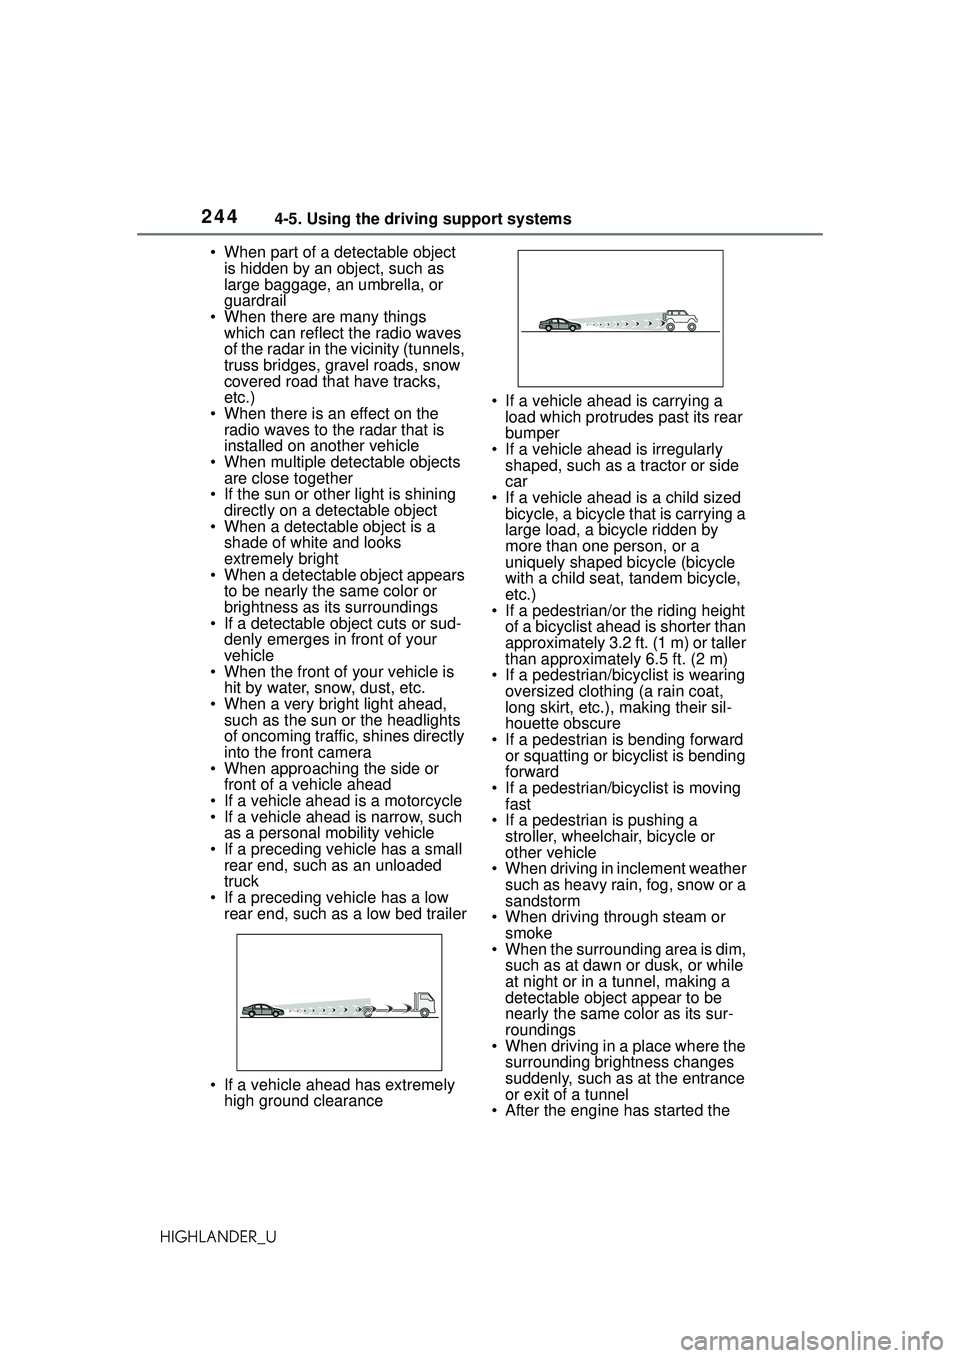
• If a preceding vehicle has a low rear end, such as a low bed trailer
• If a vehicle ahead has extremely high ground clearance • If a vehicle ahead is carrying a
load which protrudes past its rear
bumper
• If a vehicle ahead is irregularly shaped, such as a tractor or side
car
• If a vehicle ahead is a child sized bicycle, a bicycle that is carrying a
large load, a bicycle ridden by
more than one person, or a
uniquely shaped bicycle (bicycle
with a child seat, tandem bicycle,
etc.)
• If a pedestrian/or the riding height of a bicyclist ahead is shorter than
approximately 3.2 ft. (1 m) or taller
than approximately 6.5 ft. (2 m)
• If a pedestrian/bicyclist is wearing
oversized clothing (a rain coat,
long skirt, etc.), making their sil-
houette obscure
• If a pedestrian is bending forward or squatting or bicyclist is bending
forward
• If a pedestrian/bicyclist is moving fast
• If a pedestrian is pushing a
stroller, wheelchair, bicycle or
other vehicle
• When driving in inclement weather
such as heavy rain, fog, snow or a
sandstorm
• When driving through steam or
smoke
• When the surrounding area is dim, such as at dawn or dusk, or while
at night or in a tunnel, making a
detectable object appear to be
nearly the same color as its sur-
roundings
• When driving in a place where the surrounding brightness changes
suddenly, such as at the entrance
or exit of a tunnel
• After the engine has started the