weight TOYOTA HIGHLANDER 2023 User Guide
[x] Cancel search | Manufacturer: TOYOTA, Model Year: 2023, Model line: HIGHLANDER, Model: TOYOTA HIGHLANDER 2023Pages: 552, PDF Size: 13.36 MB
Page 189 of 552
1894-1. Before driving
4
Driving
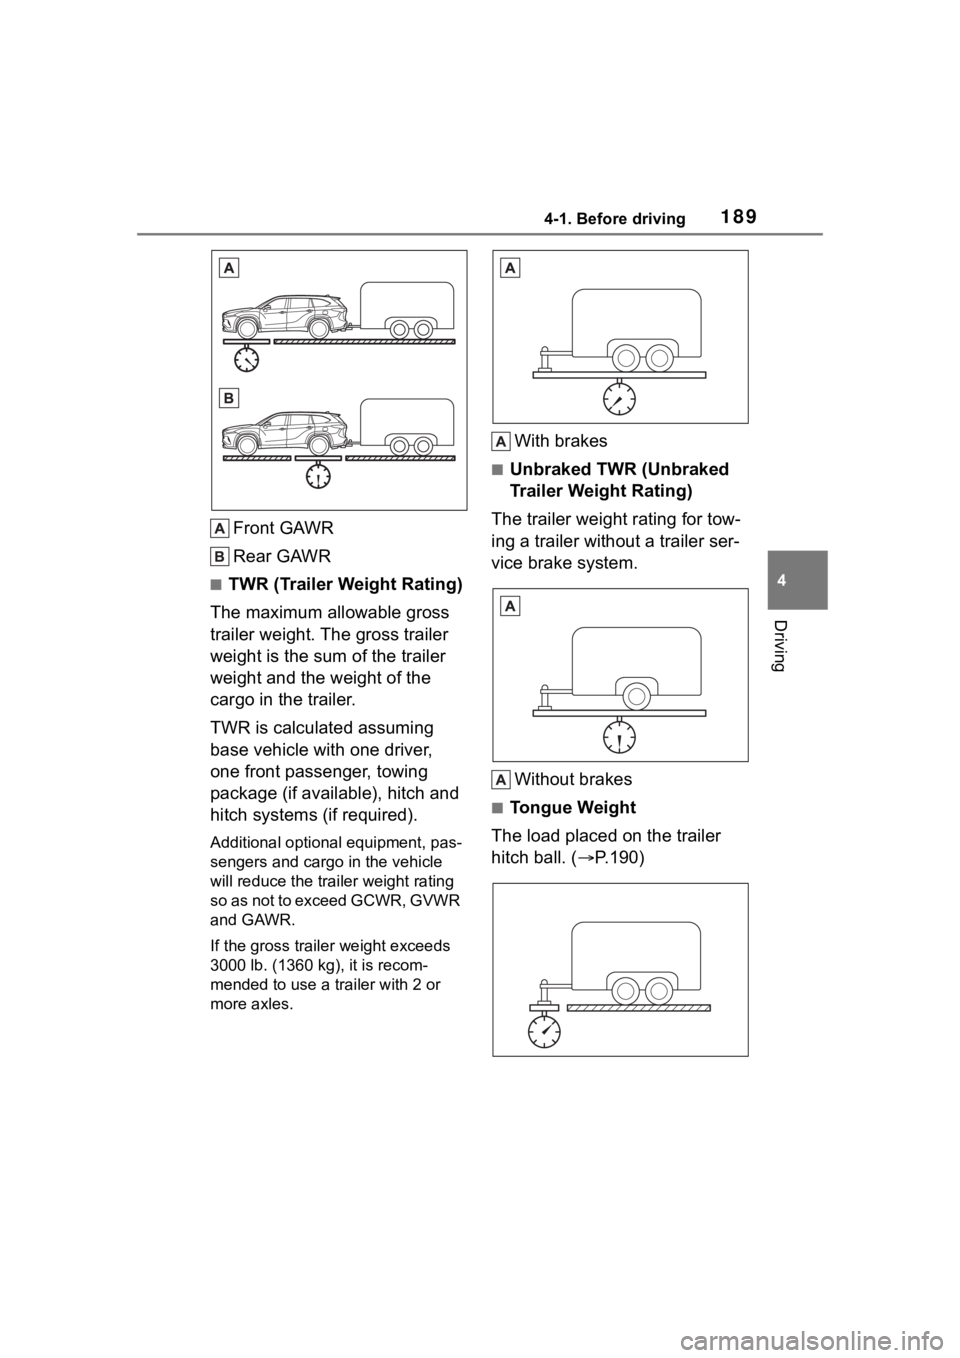
Front GAWR
Rear GAWR
■TWR (Trailer Weight Rating)
The maximum allowable gross
trailer weight. The gross trailer
weight is the sum of the trailer
weight and the weight of the
cargo in the trailer.
TWR is calculated assuming
base vehicle with one driver,
one front passenger, towing
package (if available), hitch and
hitch systems (if required).
Additional optional equipment, pas-
sengers and cargo in the vehicle
will reduce the tra iler weight rating
so as not to exceed GCWR, GVWR
and GAWR.
If the gross traile r weight exceeds
3000 lb. (1360 kg), it is recom-
mended to use a trailer with 2 or
more axles.
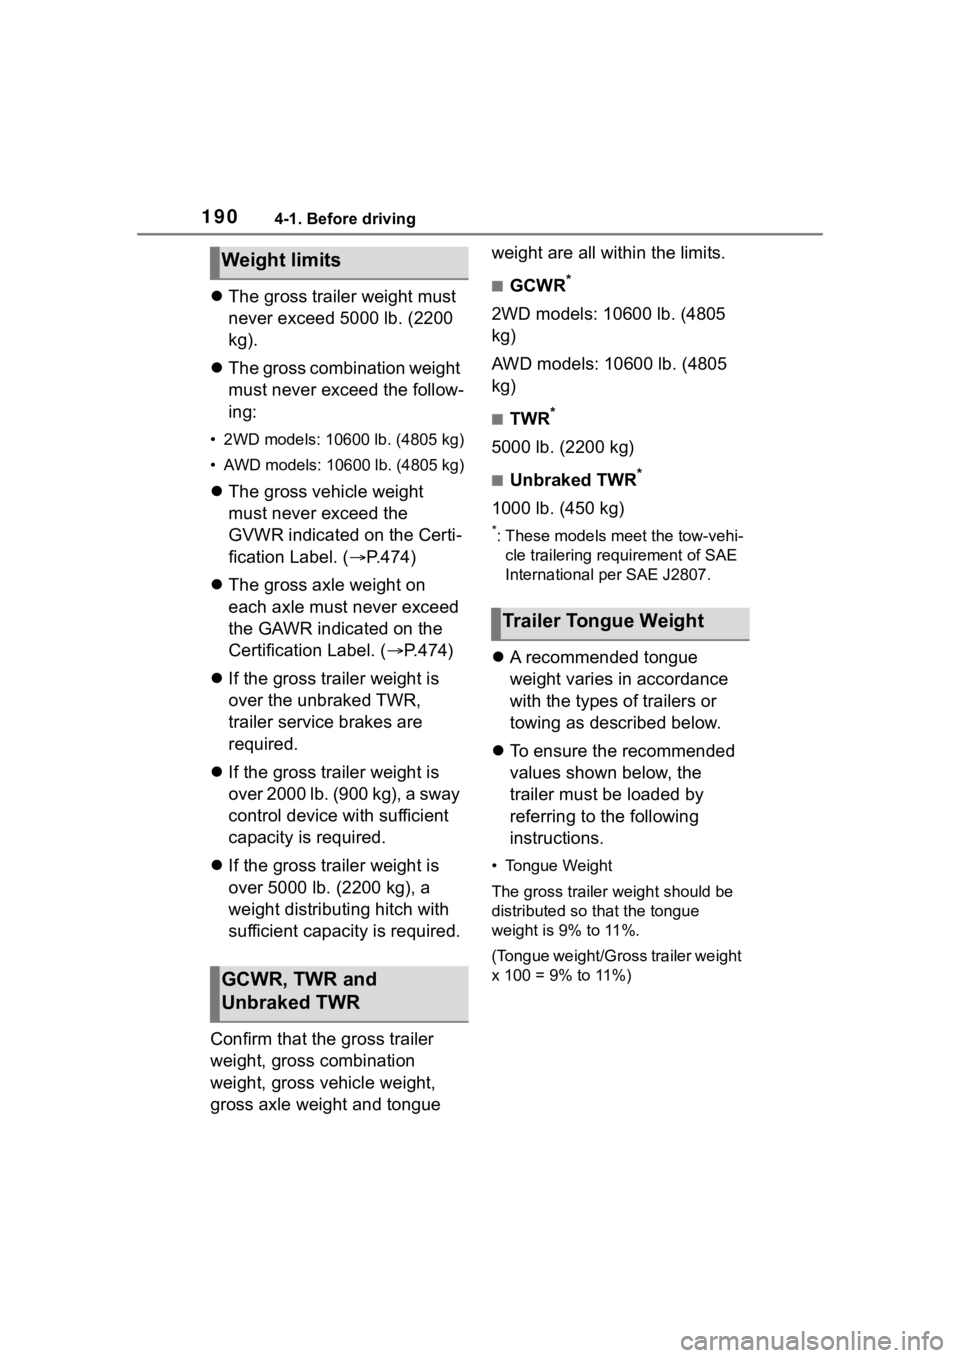
With brakes
■Unbraked TWR (Unbraked
Trailer Weight Rating)
The trailer weight rating for tow-
ing a trailer without a trailer ser-
vice brake system.
Without brakes
■Tongue Weight
The load placed on the trailer
hitch ball. ( P.190)
Page 190 of 552
1904-1. Before driving
The gross trailer weight must
never exceed 5000 lb. (2200
kg).
The gross combination weight
must never exceed the follow-
ing:
• 2WD models: 10600 lb. (4805 kg)
• AWD models: 10600 lb. (4805 kg)
The gross vehicle weight
must never exceed the
GVWR indicated on the Certi-
fication Label. ( P.474)
The gross axle weight on
each axle must never exceed
the GAWR indicated on the
Certification Label. ( P.474)
If the gross trailer weight is
over the unbraked TWR,
trailer service brakes are
required.
If the gross trailer weight is
over 2000 lb. (900 kg), a sway
control device with sufficient
capacity is required.
If the gross trailer weight is
over 5000 lb. (2200 kg), a
weight distributing hitch with
sufficient capacity is required.
Confirm that the gross trailer
weight, gross combination
weight, gross vehicle weight,
gross axle weight and tongue weight are all within the limits.
■GCWR*
2WD models: 10600 lb. (4805
kg)
AWD models: 10600 lb. (4805
kg)
■TWR*
5000 lb. (2200 kg)
■Unbraked TWR*
1000 lb. (450 kg)
*: These models meet the tow-vehi-
cle trailering requirement of SAE
International per SAE J2807.
A recommended tongue
weight varies in accordance
with the types of trailers or
towing as described below.
To ensure the recommended
values shown below, the
trailer must be loaded by
referring to the following
instructions.
• Tongue Weight
The gross trailer weight should be
distributed so that the tongue
weight is 9% to 11%.
(Tongue weight/Gross trailer weight
x 100 = 9% to 11%)
Weight limits
GCWR, TWR and
Unbraked TWR
Trailer Tongue Weight
Page 191 of 552
1914-1. Before driving
4
Driving
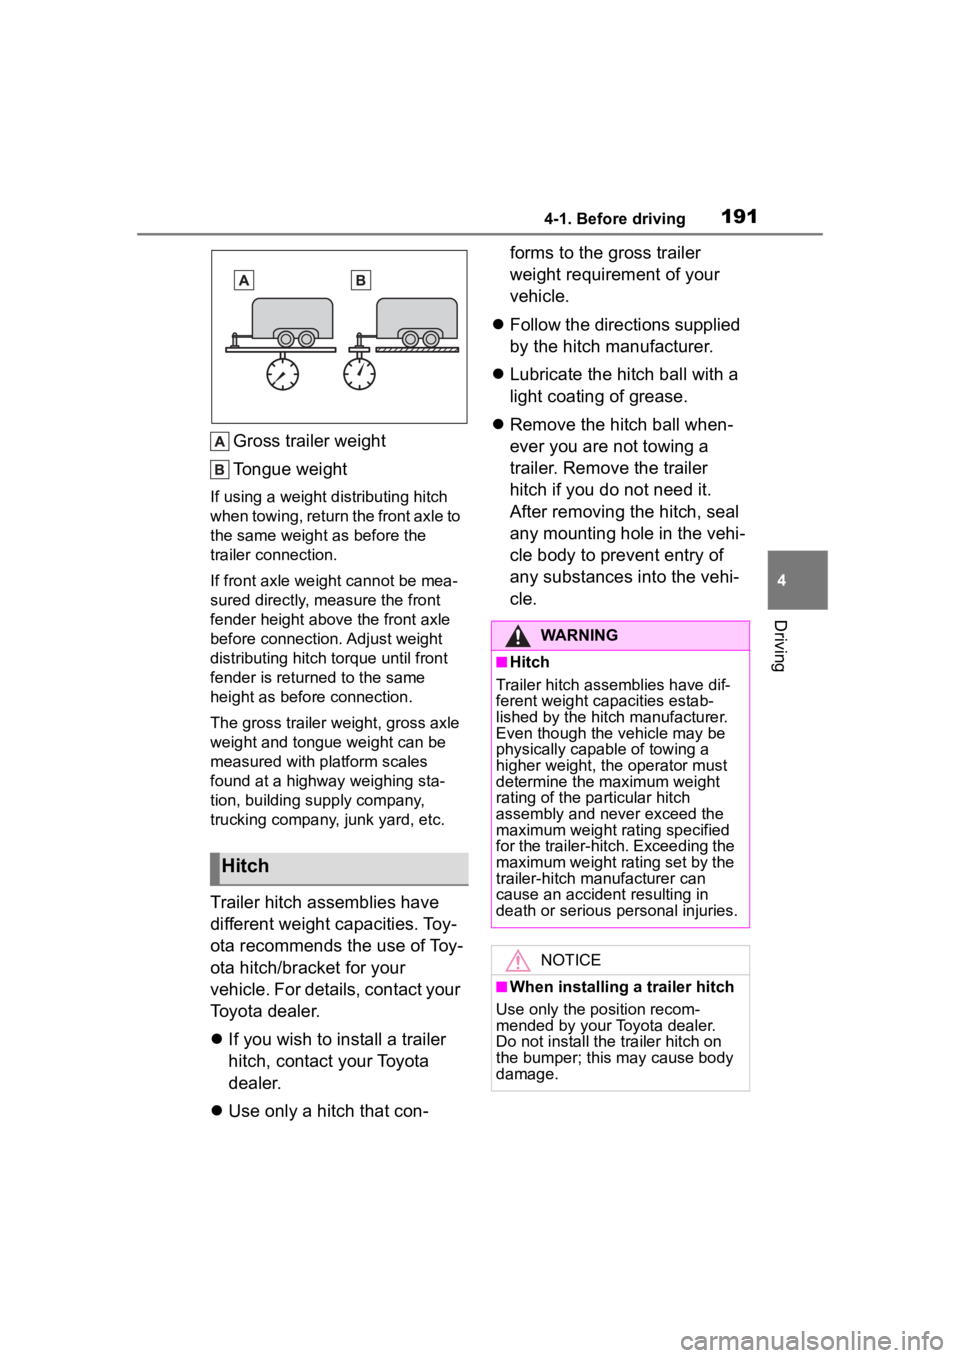
Gross trailer weight
Tongue weight
If using a weight distributing hitch
when towing, return the front axle to
the same weight as before the
trailer connection.
If front axle weight cannot be mea-
sured directly, measure the front
fender height above the front axle
before connection. Adjust weight
distributing hitch torque until front
fender is returned to the same
height as before connection.
The gross trailer weight, gross axle
weight and tongue weight can be
measured with platform scales
found at a highway weighing sta-
tion, building supply company,
trucking company, junk yard, etc.
Trailer hitch assemblies have
different weight capacities. Toy-
ota recommends the use of Toy-
ota hitch/bracket for your
vehicle. For details, contact your
Toyota dealer.
If you wish to install a trailer
hitch, contact your Toyota
dealer.
Use only a hitch that con- forms to the gross trailer
weight requirement of your
vehicle.
Follow the directions supplied
by the hitch manufacturer.
Lubricate the hitch ball with a
light coating of grease.
Remove the hitch ball when-
ever you are not towing a
trailer. Remove the trailer
hitch if you do not need it.
After removing the hitch, seal
any mounting hole in the vehi-
cle body to prevent entry of
any substances into the vehi-
cle.
Hitch
WARNING
■Hitch
Trailer hitch assemblies have dif-
ferent weight capacities estab-
lished by the hitch manufacturer.
Even though the vehicle may be
physically capable of towing a
higher weight, the operator must
determine the maximum weight
rating of the particular hitch
assembly and never exceed the
maximum weight rating specified
for the trailer-hitch. Exceeding the
maximum weight rating set by the
trailer-hitch manufacturer can
cause an accident resulting in
death or serious personal injuries.
NOTICE
■When installing a trailer hitch
Use only the position recom-
mended by your Toyota dealer.
Do not install the trailer hitch on
the bumper; this may cause body
damage.
Page 192 of 552
1924-1. Before driving
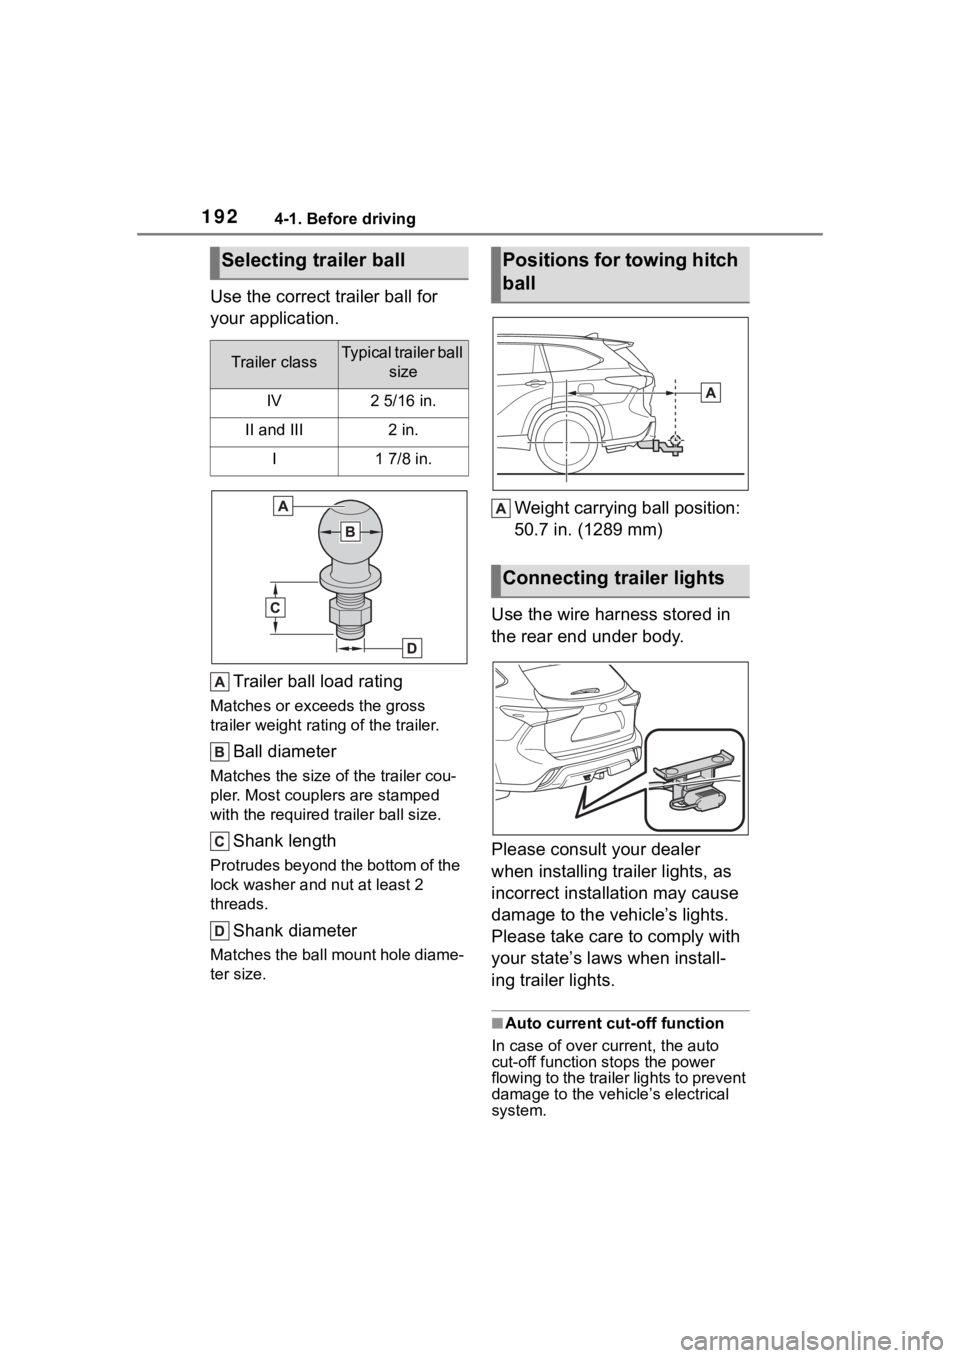
Use the correct trailer ball for
your application.Trailer ball load rating
Matches or exceeds the gross
trailer weight rat ing of the trailer.
Ball diameter
Matches the size of the trailer cou-
pler. Most couplers are stamped
with the required tr ailer ball size.
Shank length
Protrudes beyond the bottom of the
lock washer and nut at least 2
threads.
Shank diameter
Matches the ball mount hole diame-
ter size.
Weight carrying ball position:
50.7 in. (1289 mm)
Use the wire harness stored in
the rear end under body.
Please consult your dealer
when installing trailer lights, as
incorrect installation may cause
damage to the vehicle’s lights.
Please take care to comply with
your state’s laws when install-
ing trailer lights.
■Auto current cut-off function
In case of over current, the auto
cut-off function stops the power
flowing to the trailer lights to prevent
damage to the vehicle’s electrical
system.
Selecting trailer ball
Trailer classTypical trailer ball size
IV2 5/16 in.
II and III2 in.
I1 7/8 in.
Positions for towing hitch
ball
Connecting trailer lights
Page 354 of 552
3545-4. Using the other interior features
does not charge, remove the cover
and/or accessories.
■AM radio cooperation function
during charging
●When noise enters the AM radio
during charging, charging fre-
quency will be automatically
changed to reduce noise.
●While the AM radio automatic tun-
ing, charging is temporarily
stopped in order to prevent tuning
error due to noise caused by
charging. When tuning is finished,
charging will be automatically
resumed.
■Charging precautions
●If the electronic key cannot be
detected in the cabin, charging
cannot be performed. When a
door is opened and closed,
charging may be temporarily sus-
pended.
●While charging, the wireless char-
ger and the portable device will
become warm. This is not a mal-
function. If a portable device
becomes warm while charging
and charging stops due to the pro-
tection function of the portable
device, wait until the portable
device cools down and charge it
again.
The fan may start operating to
lower the temperature inside the
wireless charger, however this is
not a malfunction.
■Sound generated during opera-
tion
When the power su pply switch is
turned on or while a portable device
is being identified, operation sounds
may be heard. This is not a malfunc-
tion.
■Cleaning the wireless charger
P. 3 7 3
WARNING
■Caution while driving
When charging a portable device,
for safety reasons, the driver
should not operate the main part
of the portable device while driv-
ing.
■Caution while in motion
Do not charge lightweight devices
such as wireless headphones
while in motion. These devices
are very light and may be ejected
from the charging tray, which may
lead to unforeseen accidents.
■Caution regarding interfer-
ence with electronic devices
People with implantable cardiac
pacemakers, cardiac resynchroni-
zation therapy pacemakers or
implantable cardioverter def ibrilla-
tors, as well as any other electri-
cal medical device, should consult
their physician about the usage of
the wireless charger.
■To prevent malfunctions or
burns
Observe the following precau-
tions.
Failure to do so may result in an
equipment failure and damage,
catch fire, burns due to overheat
or electric shock.
●Do not insert any metallic
objects between the charging
area and the portable device
while charging.
●Do not attach a n aluminum
sticker or other metallic objects
to the charge area.
●Do not attach a n aluminum
sticker or other metallic objects
to the side of the portable
device (or to its case or cover)
that touches the charge area.
Page 394 of 552
3946-3. Do-it-yourself maintenance
etc., molded into the sidewall of
each tire.
Replace the tires if the treadwear
indicators are showing on a tire.
■When to replace your vehicle’s
tires
Tires should be replaced if:
●The treadwear indicators are
showing on a tire.
●You have tire damage such as
cuts, splits, cracks deep enough
to expose the fabric, and bulges
indicating internal damage.
●A tire goes flat r epeatedly or can-
not be properly repaired due to the
size or location of a cut or other
damage.
If you are not sure, consult with your
Toyota dealer.
■Tire life
Any tire over 6 years old must be
checked by a qualified technician
even if it has seldom or never been
used or damage i s not obvious.
■Proper storage of the spare tire
As an improperly stored spare tire
may cause damage to the wire
cable that holds it, check that the
spare tire is stored properly on a
daily basis.
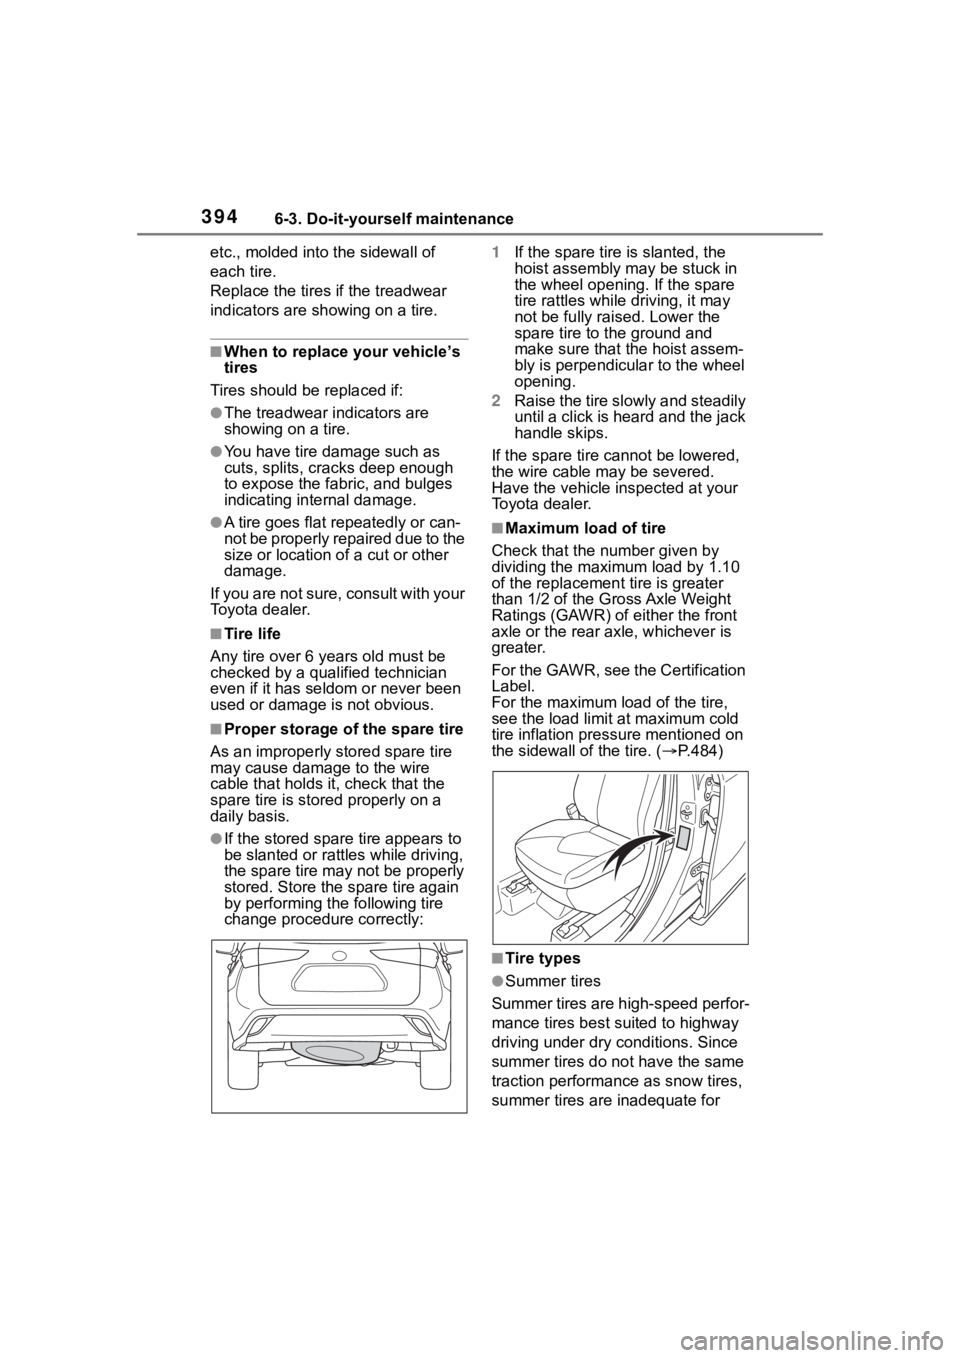
●If the stored spare tire appears to
be slanted or rattl es while driving,
the spare tire may not be properly
stored. Store the spare tire again
by performing the following tire
change procedure correctly: 1
If the spare tire is slanted, the
hoist assembly may be stuck in
the wheel opening. If the spare
tire rattles while driving, it may
not be fully raised. Lower the
spare tire to the ground and
make sure that the hoist assem-
bly is perpendicular to the wheel
opening.
2 Raise the tire slowly and steadily
until a click is heard and the jack
handle skips.
If the spare tire cannot be lowered,
the wire cable may be severed.
Have the vehicle inspected at your
Toyota dealer.
■Maximum load of tire
Check that the n umber given by
dividing the maximum load by 1.10
of the replacement tire is greater
than 1/2 of the Gross Axle Weight
Ratings (GAWR) of either the front
axle or the rear axle, whichever is
greater.
For the GAWR, see the Certification
Label.
For the maximum load of the tire,
see the load limit at maximum cold
tire inflation pressure mentioned on
the sidewall of the tire. ( P.484)
■Tire types
●Summer tires
Summer tires are high-speed perfor-
mance tires best suited to highway
driving under dry conditions. Since
summer tires do not have the same
traction performance as snow tires,
summer tires are inadequate for
Page 406 of 552
4066-3. Do-it-yourself maintenance
sure, observe the following:
●Check only when the tires are
cold.
If your vehicle has been parked for
at least 3 hours or has not been
driven for more tha n 1 mile or 1.5
km, you will get an accurate cold
tire inflation pressure reading.
●Always use a tire pressure gauge.
It is difficult to judge if a tire is
properly inflated based only on its
appearance.
●It is normal for the tire inflation
pressure to be higher after driving
as heat is generated in the tire. Do
not reduce tire inflation pressure
after driving.
●Never exceed the vehicle capacity
weight.
Passengers and luggage weight
should be placed so that the vehi-
cle is balanced.
WARNING
■Proper inflation is critical to
save tire performance
Keep your tires properly inflated.
If the tires are not properly
inflated, the following conditions
may occur which could lead to an
accident resulting in death or seri-
ous injury:
●Excessive wear
●Uneven wear
●Poor handling
●Possibility of blowouts resulting
from overheated tires
●Air leaking from between tire
and wheel
●Wheel deformation and/or tire
damage
●Greater possibility of tire dam-
age while driving (due to road
hazards, expansion joints,
sharp edges in the road, etc.)
NOTICE
■When inspecting and adjust-
ing tire inflation pressure
Be sure to put the tire valve caps
back on.
If a valve cap is no t installed, dirt
or moisture may get into the valve
and cause an air leak, resulting in
decreased tire inflation pressure.
Page 408 of 552
4086-3. Do-it-yourself maintenance
Use only Toyota wheel nuts
and wrenches designed for
use with your aluminum
wheels.
When rotating, repairing or
changing your tires, check
that the wheel nuts are still
tight after driving 1000 miles
(1600 km).
Be careful not to damage the
aluminum wheels when using
tire chains.
Use only Toyota genuine bal-
ance weights or equivalent
and a plastic or rubber ham-
mer when balancing your
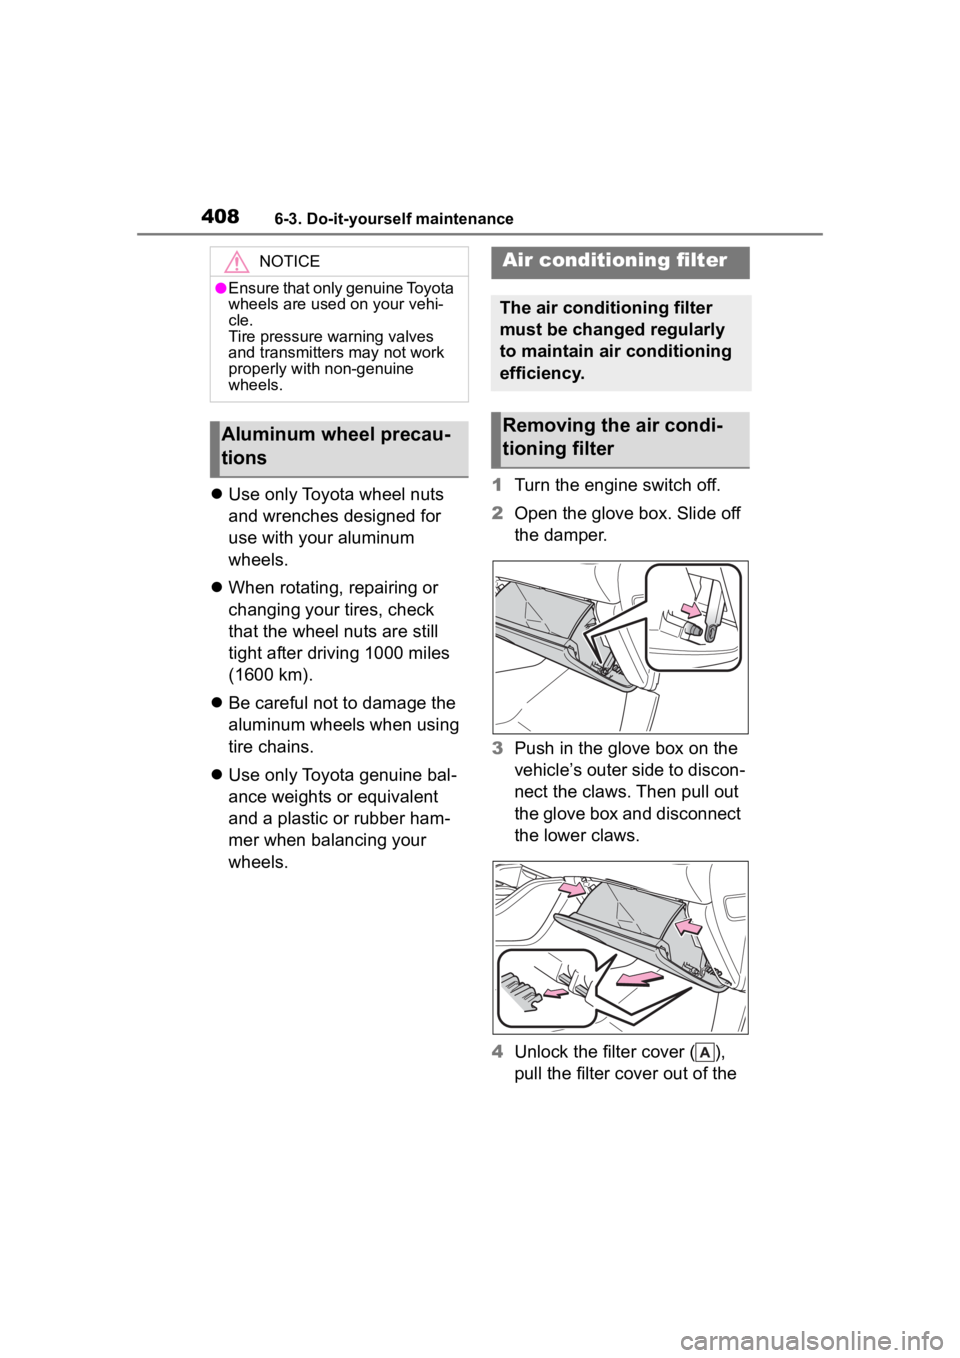
wheels. 1
Turn the engine switch off.
2 Open the glove box. Slide off
the damper.
3 Push in the glove box on the
vehicle’s outer side to discon-
nect the claws. Then pull out
the glove box and disconnect
the lower claws.
4 Unlock the filter cover ( ),
pull the filter cover out of the
NOTICE
●Ensure that only genuine Toyota
wheels are used on your vehi-
cle.
Tire pressure warning valves
and transmitters may not work
properly with non-genuine
wheels.
Aluminum wheel precau-
tions
Air conditioning filter
The air conditioning filter
must be changed regularly
to maintain air conditioning
efficiency.
Removing the air condi-
tioning filter
Page 474 of 552
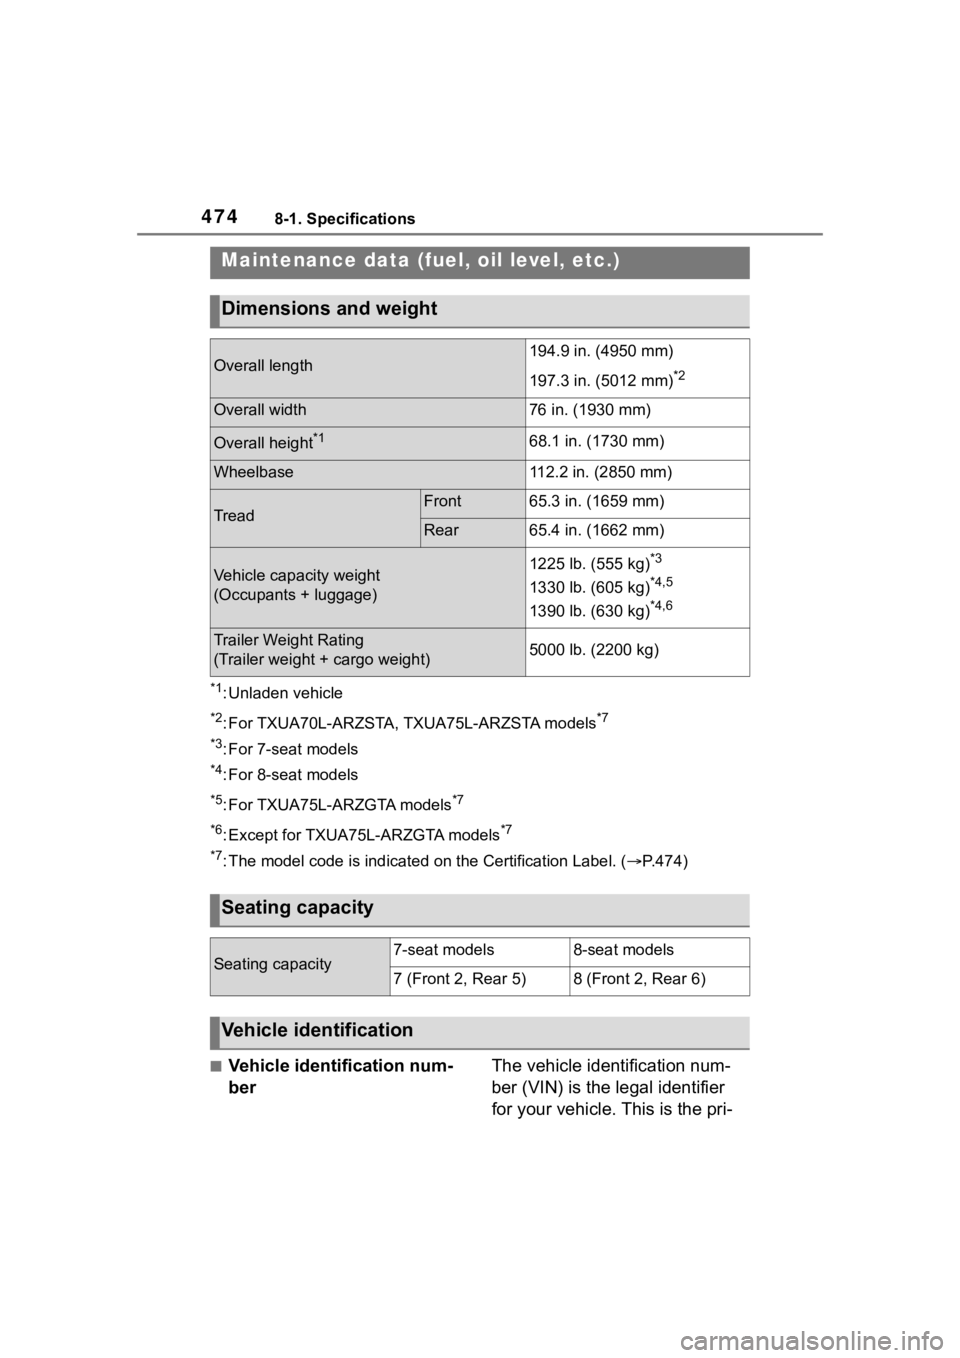
4748-1. Specifications
8-1.Specifications
*1: Unladen vehicle
*2: For TXUA70L-ARZSTA, TXUA75L-ARZSTA models*7
*3
: For 7-seat models
*4: For 8-seat models
*5: For TXUA75L-ARZGTA models*7
*6
: Except for TXUA75L-ARZGTA models*7
*7
: The model code is indicated o n the Certification Label. (P.474)
■Vehicle identification num-
ber The vehicle identification num-
ber (VIN) is the legal identifier
for your vehicle. This is the pri-
Maintenance data (fuel, oil level, etc.)
Dimensions and weight
Overall length194.9 in. (4950 mm)
197.3 in. (5012 mm)
*2
Overall width76 in. (1930 mm)
Overall height*168.1 in. (1730 mm)
Wheelbase112.2 in. (2850 mm)
TreadFront65.3 in. (1659 mm)
Rear65.4 in. (1662 mm)
Vehicle capacity weight
(Occupants + luggage)1225 lb. (555 kg)*3
1330 lb. (605 kg)*4,5
1390 lb. (630 kg)*4,6
Trailer Weight Rating
(Trailer weight + cargo weight)5000 lb. (2200 kg)
Seating capacity
Seating capacity7-seat models8-seat models
7 (Front 2, Rear 5)8 (Front 2, Rear 6)
Vehicle identification
Page 488 of 552
4888-1. Specifications
Grade C corresponds to a level of
performance which all passenger
car tires must meet under the Fed-
eral Motor Vehicle Safety Standard
No. 109.
Grades B and A represent higher
levels of performance on the labo-
ratory test wheel than the minimum
required by law. Warning: The temperature grades
of a tire assume tha
t it is properly
inflated and not overloaded.
Excessive speed, underinflation, or
excessive loading, either sepa-
rately or in combination, can cause
heat buildup and possible tire fail-
ure.
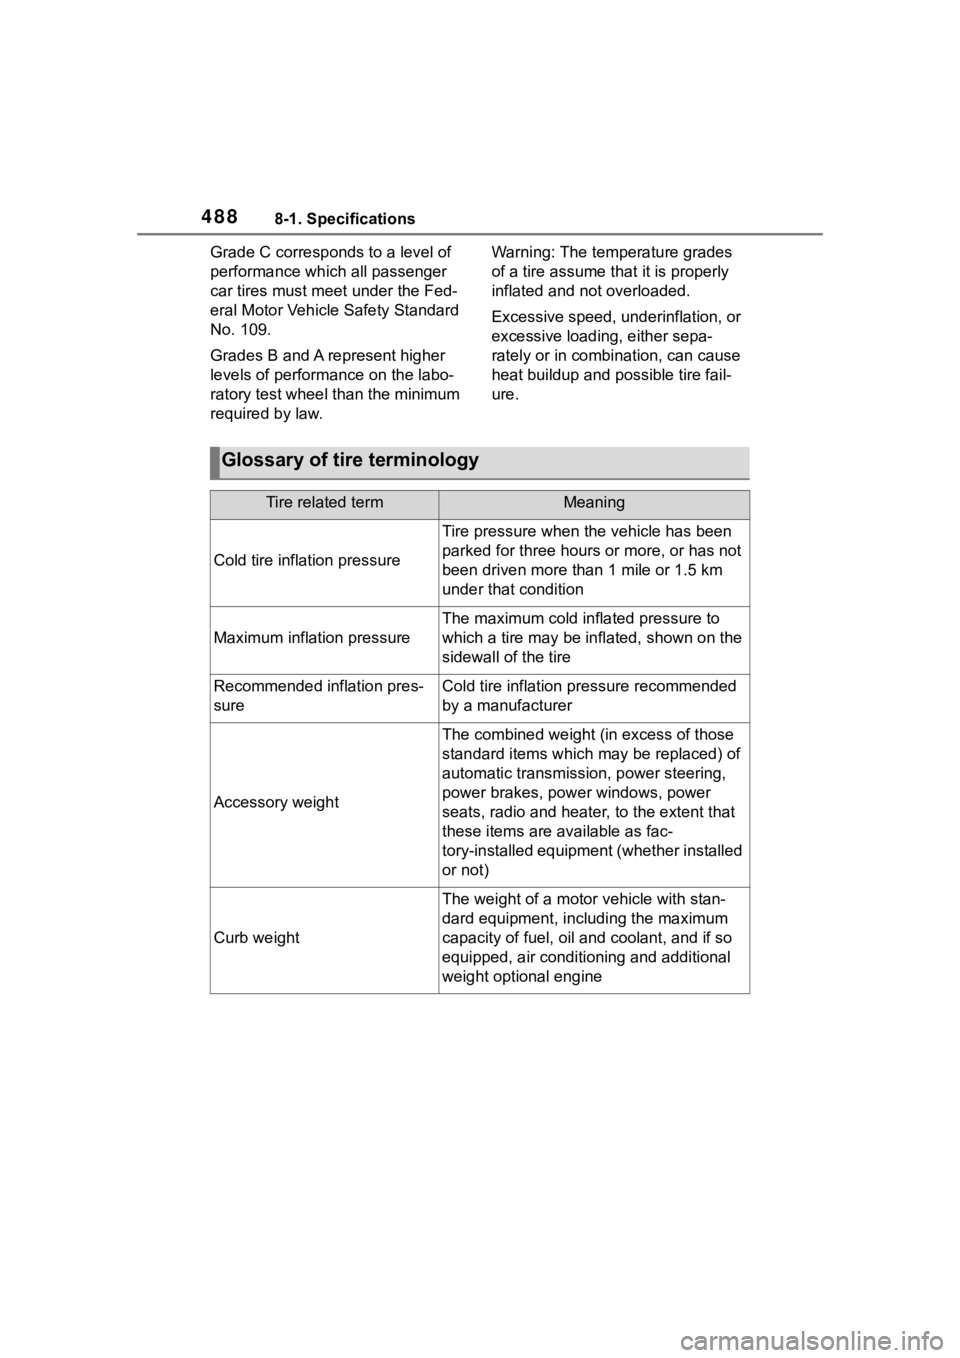
Glossary of tire terminology
Tire related termMeaning
Cold tire infl ation pressure
Tire pressure when the vehicle has been
parked for three hours or more, or has not
been driven more than 1 mile or 1.5 km
under that condition
Maximum inflation pressure
The maximum cold inf lated pressure to
which a tire may be inflated, shown on the
sidewall of the tire
Recommended inflation pres-
sureCold tire inflation pressure recommended
by a manufacturer
Accessory weight
The combined weight (in excess of those
standard items which may be replaced) of
automatic transmission, power steering,
power brakes, power windows, power
seats, radio and heater, to the extent that
these items are available as fac-
tory-installed equipment (whether installed
or not)
Curb weight
The weight of a motor vehicle with stan-
dard equipment, including the maximum
capacity of fuel, oil and coolant, and if so
equipped, air conditioning and additional
weight optional engine