change wheel TOYOTA HIGHLANDER 2023 Owner's Manual
[x] Cancel search | Manufacturer: TOYOTA, Model Year: 2023, Model line: HIGHLANDER, Model: TOYOTA HIGHLANDER 2023Pages: 552, PDF Size: 13.36 MB
Page 265 of 552

2654-5. Using the driving support systems
4
Driving
vehicle will remain stopped.
Press the Stop & Start cancel
switch to disable the Stop &
Start system.
The Stop & Start cancel indicator
will illuminate.
Pressing the switch again will
enable the Stop & Start system and
the Stop & Start cancel indicator will
turn off.
■Automatic enabling of the Stop
& Start system
If the Stop & Start system is dis-
abled using the Sto p & Start cancel
switch, it will be automatically
re-enabled once the engine switch
is turned off and t hen the engine is
started.
When the engine is stopped by
the Stop & Start system when
the vehicle is on an incline,
when the brake pedal is
released, brake force is tempo-
rarily maintained to prevent the
vehicle from rolling backwards
before the engine is restarted and drive force is generated.
When drive force is generated,
the maintained brake force is
automatically canceled.
This function operates on flat
surfaces as well as steep
inclines.
Sound may be generated
from the brake system, but
this does not indicate a mal-
function.
Brake pedal response may
change and vibration may
occur, but this does not indi-
cate a malfunction.
■Points for use
●If the engine switch is pressed
when the engine is stopped by the
Stop & Start system, the engine
will not be able to be restarted by
the automatic engine start func-
tion. In this case, restart the
engine using the normal engine
starting procedure. ( P.197)
●When the engine is being
restarted by the Stop & Start sys-
tem, the power ou tlets may be
temporarily unusable, but this
does not indicate a malfunction.
●Installation and removal of electri-
cal components and wireless
devices may affect the Stop &
Start system. Contact your Toyota
dealer for details.
●When stopping the vehicle for a
longer period of time, turn the
engine switch off to stop the
engine completely.
●When the engine is restarted by
the Stop & Start system, the steer-
ing wheel may temporarily feel
heavy.
Disabling the Stop & Start
system
Hill-start assist control
Page 304 of 552

3044-5. Using the driving support systems
mal. Note that normal driving is
still possible even when Multi-ter-
rain Select brake control is not
operating.
*: After stopping the vehicle, do not stop the engine until the display
message has turned off.
■When Mud & Sand or Rock &
Dirt mode is canceled
In the following situations, Mud &
Sand mode or Rock & Dirt mode are
automatically canceled even if they
are selected.
●When the driving mode is
changed ( P.300)
●When the engine switch is turned
off
■Driving in Mud & Sand or Rock
& Dirt mode
The following types of situations
may occur, but they are not malfunc-
tions.
●Vibrations may be felt throughout
the vehicle or steering wheel
●Operating noise may be heard
from the engine compartment
■When an inspection at your
Toyota dealer is necessary
In the following si tuations, the sys-
tem may be malfunctioning. Have
the vehicle inspected by your Toyota
dealer immediately.
●When the slip indic ator light illumi-
nates while Mud & Sand or Rock
& Dirt mode is selected
●When the indicator for each mode
does not illuminate even though
Mud & Sand or Rock & Dirt mode
is selected
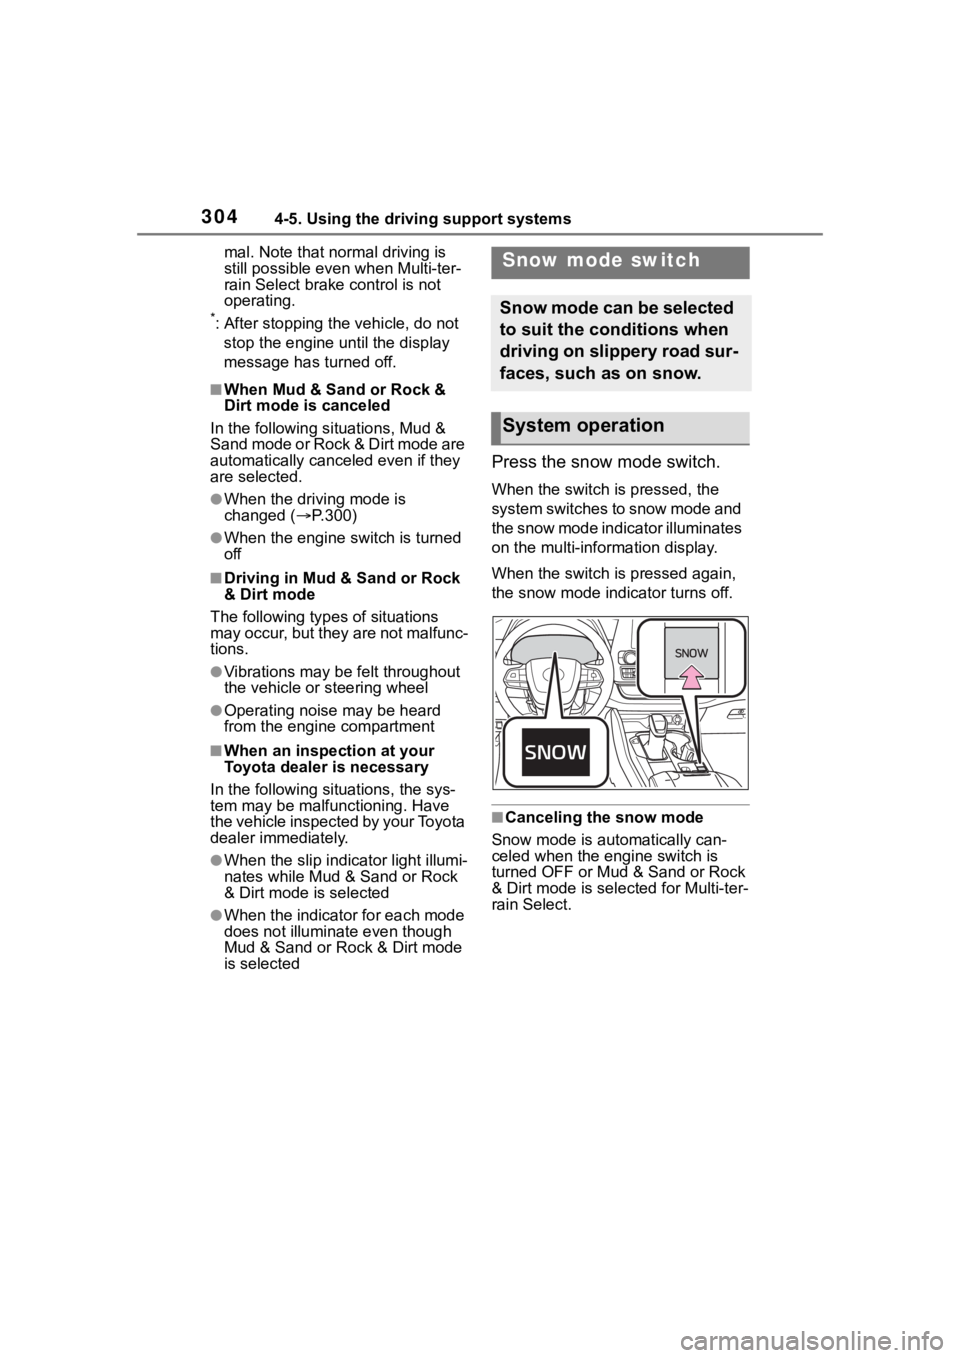
Press the snow mode switch.
When the switch is pressed, the
system switches to snow mode and
the snow mode indi cator illuminates
on the multi-information display.
When the switch is pressed again,
the snow mode indicator turns off.
■Canceling the snow mode
Snow mode is automatically can-
celed when the engine switch is
turned OFF or Mud & Sand or Rock
& Dirt mode is selec ted for Multi-ter-
rain Select.
Snow mode switch
Snow mode can be selected
to suit the conditions when
driving on slippery road sur-
faces, such as on snow.
System operation
Page 318 of 552

3184-6. Driving tips
When driving your vehicle
off-road, please observe the fol-
lowing precautions to ensure
your driving enjoyment and to
help prevent the closure of
areas to off-road vehicles:
Drive your vehicle only in
areas where off-road vehicles
are permitted to travel.
Respect private property. Get
owner’s permission before
entering private property.
Do not enter areas that are
closed. Honor gates, barriers
and signs that restrict travel.
Stay on established roads.
When conditions are wet,
driving techniques should be
changed or travel delayed to
prevent damage to roads.
■Additional information for
off-road driving
For owners in U.S. mainland,
Hawaii and Puerto Rico:
To obtain additional information per-
taining to driving your vehicle
off-road, consult the following orga-
nizations.
●State and Local Parks and Recre-
ation Departments
●State Motor Vehicle Bureau
●Recreational Vehicle Clubs
●U.S. Forest Service and Bureau of
Land Management
Off-road drivingWARNING
■Off-road driving precautions
Always observe t he following pre-
cautions to minim ize the risk of
death, serious injury or damage to
your vehicle:
●Drive carefully when off the
road. Do not take unnecessary
risks by driving in dangerous
places.
●Do not grip the steering wheel
spokes when driving off-road. A
bad bump could jerk the wheel
and injure your hands. Keep
both hands and especially your
thumbs on the ou tside of the
rim.
●Always check your brakes for
effectiveness immediately after
driving in sand, mud, water or
snow.
●After driving through tall grass,
mud, rock, sand, rivers, etc.,
check that there is no grass,
bush, paper, rags, stone, sand,
etc. adhering or trapped on the
underbody. Clear off any such
matter from the underbody. If
the vehicle is used with these
materials trapped or adhering to
the underbody, a breakdown or
fire could occur.
●When driving off-road or in rug-
ged terrain, do not drive at
excessive speeds, jump, make
sharp turns, strike objects, etc.
This may cause loss of control
or vehicle rollover causing
death or serious injury. You are
also risking expensive damage
to your vehicle’s suspension
and chassis.
Page 335 of 552

3355-1. Using the air conditioning system and defogger
5
Interior features
*: If equipped
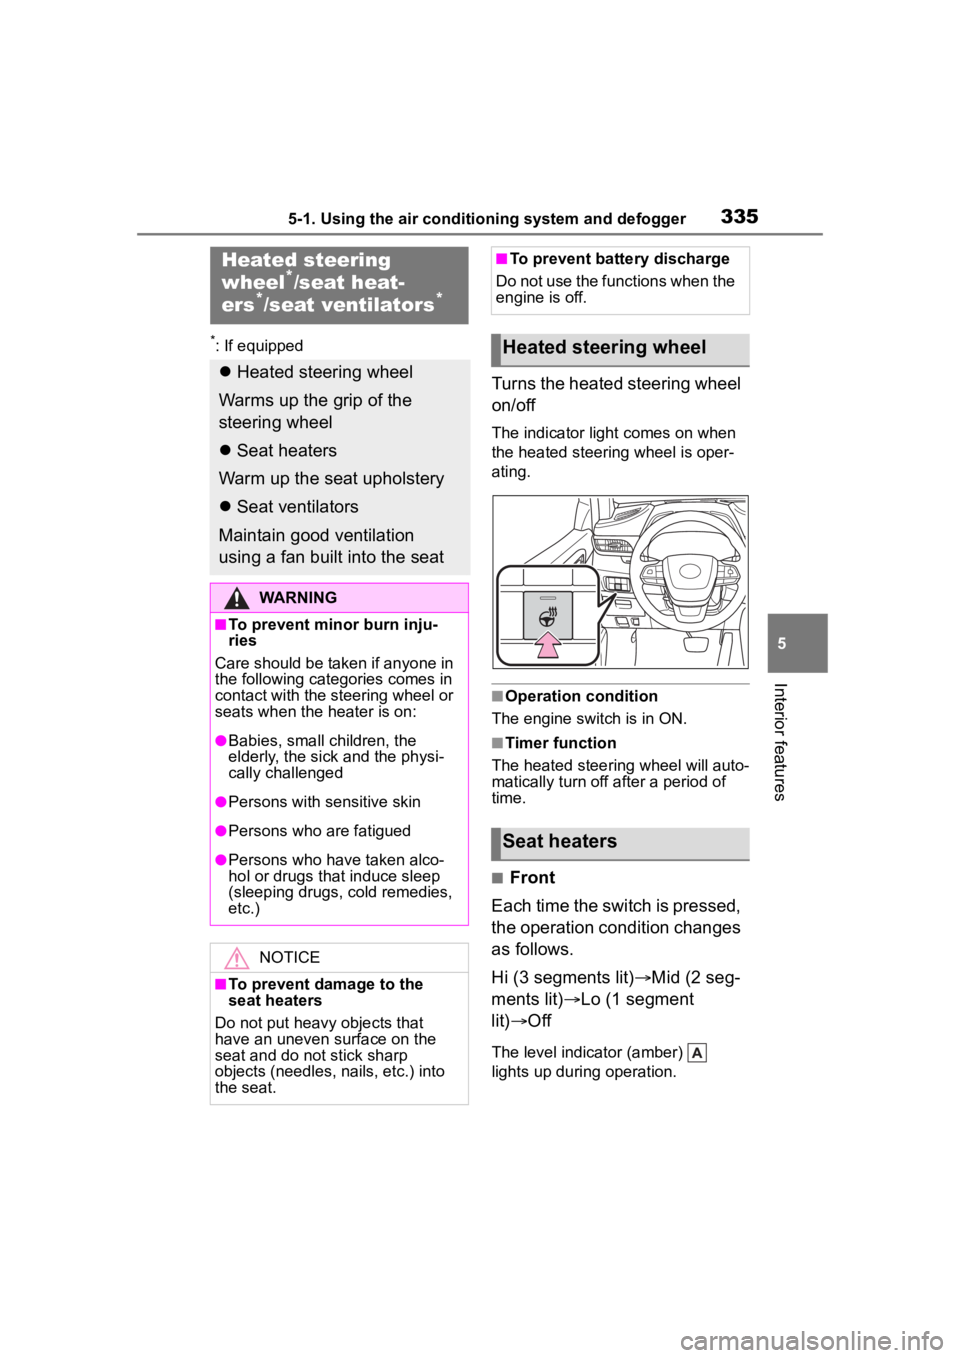
Turns the heated steering wheel
on/off
The indicator light comes on when
the heated steering wheel is oper-
ating.
■Operation condition
The engine switch is in ON.
■Timer function
The heated steering wheel will auto-
matically turn off after a period of
time.
■Front
Each time the switch is pressed,
the operation condition changes
as follows.
Hi (3 segments lit) Mid (2 seg-
ments lit) Lo (1 segment
lit) Off
The level indicator (amber)
lights up during operation.
Heated steering
wheel*/seat heat-
ers*/seat ventilators*
Heated steering wheel
Warms up the grip of the
steering wheel
Seat heaters
Warm up the seat upholstery
Seat ventilators
Maintain good ventilation
using a fan built into the seat
WARNING
■To prevent minor burn inju-
ries
Care should be taken if anyone in
the following categories comes in
contact with the steering wheel or
seats when the heater is on:
●Babies, small children, the
elderly, the sick and the physi-
cally challenged
●Persons with sensitive skin
●Persons who are fatigued
●Persons who have taken alco-
hol or drugs that induce sleep
(sleeping drugs, cold remedies,
etc.)
NOTICE
■To prevent damage to the
seat heaters
Do not put heavy objects that
have an uneven surface on the
seat and do not stick sharp
objects (needles, nails, etc.) into
the seat.
■To prevent battery discharge
Do not use the functions when the
engine is off.
Heated steering wheel
Seat heaters
Page 394 of 552

3946-3. Do-it-yourself maintenance
etc., molded into the sidewall of
each tire.
Replace the tires if the treadwear
indicators are showing on a tire.
■When to replace your vehicle’s
tires
Tires should be replaced if:
●The treadwear indicators are
showing on a tire.
●You have tire damage such as
cuts, splits, cracks deep enough
to expose the fabric, and bulges
indicating internal damage.
●A tire goes flat r epeatedly or can-
not be properly repaired due to the
size or location of a cut or other
damage.
If you are not sure, consult with your
Toyota dealer.
■Tire life
Any tire over 6 years old must be
checked by a qualified technician
even if it has seldom or never been
used or damage i s not obvious.
■Proper storage of the spare tire
As an improperly stored spare tire
may cause damage to the wire
cable that holds it, check that the
spare tire is stored properly on a
daily basis.
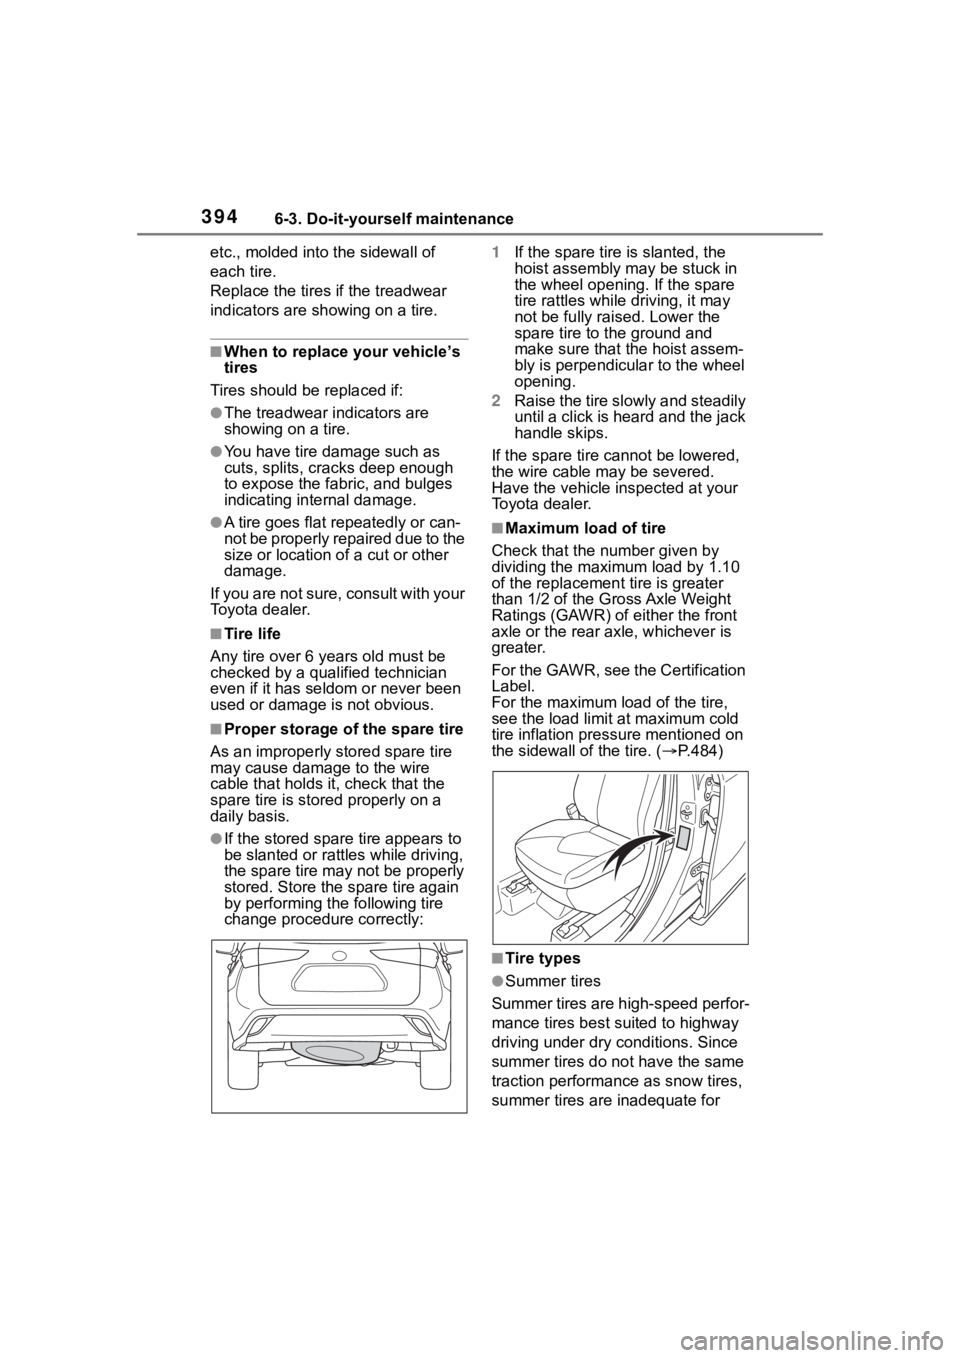
●If the stored spare tire appears to
be slanted or rattl es while driving,
the spare tire may not be properly
stored. Store the spare tire again
by performing the following tire
change procedure correctly: 1
If the spare tire is slanted, the
hoist assembly may be stuck in
the wheel opening. If the spare
tire rattles while driving, it may
not be fully raised. Lower the
spare tire to the ground and
make sure that the hoist assem-
bly is perpendicular to the wheel
opening.
2 Raise the tire slowly and steadily
until a click is heard and the jack
handle skips.
If the spare tire cannot be lowered,
the wire cable may be severed.
Have the vehicle inspected at your
Toyota dealer.
■Maximum load of tire
Check that the n umber given by
dividing the maximum load by 1.10
of the replacement tire is greater
than 1/2 of the Gross Axle Weight
Ratings (GAWR) of either the front
axle or the rear axle, whichever is
greater.
For the GAWR, see the Certification
Label.
For the maximum load of the tire,
see the load limit at maximum cold
tire inflation pressure mentioned on
the sidewall of the tire. ( P.484)
■Tire types
●Summer tires
Summer tires are high-speed perfor-
mance tires best suited to highway
driving under dry conditions. Since
summer tires do not have the same
traction performance as snow tires,
summer tires are inadequate for
Page 398 of 552

3986-3. Do-it-yourself maintenance
the vehicle, particularly around the
wheels or wheel housings.
• If the tire inflation pressure is
extremely higher than the speci-
fied level.
• If the spare tire is in a location
subject to poor radio wave signal
reception.
*
• If wheel without the tire pressure warning valve and transmitter is
used.
• If the ID code on the tire pressure warning valves and transmitters is
not registered in the tire pressure
warning computer.
*: Vehicles with full-size spare tire
only
●Performance may be affected in
the following situations.
• Near a TV tower, electric power plant, gas station, radio station,
large display, airpo rt or other facil-
ity that generates strong radio
waves or electrical noise
• When carrying a portable radio,
cellular phone, cordless phone or
other wireless communication
device
●If tire position information is not
correctly displayed due to the
radio wave conditions, the display
may be corrected by driving and
changing the radio wave condi-
tions.
●When the vehicle is parked, the
time taken for the warning to start
or go off could be extended.
●When tire inflation pressure
declines rapidly for example when
a tire has burst, the warning may
not function.
■Warning performance of the tire
pressure warning system
The warning of the tire pressure
warning system will change in
accordance with th e conditions
under which it was initialized. For
this reason, the system may give a
warning even if the tire pressure
does not reach a low enough level, or if the pressure is higher than the
pressure that was
adjusted to when
the system was initialized.
When replacing tires or wheels,
tire pressure warning valves and
transmitters must also be
installed.
When new tire pressure warning
valves and transmitters are
installed, new ID codes must be
registered in the tire pressure
warning computer and the tire
pressure warning system must
be initialized. Have tire pressure
warning valves and transmitter
ID codes registered by your Toy-
ota dealer. ( P.401)
■Replacing tires and wheels
If the ID code of the tire pressure
warning valve and tr ansmitter is not
registered, the tire pressure warning
system will not work properly. After
driving for about 20 minutes, the tire
pressure warning light blinks for 1
minute and stays on to indicate a
system malfunction.
Installing tire pressure
warning valves and trans-
mitters
Page 399 of 552

3996-3. Do-it-yourself maintenance
6
Maintenance and care
■The tire pressure warning
system must be initialized
in the following circum-
stances:
When the tire inflation pres-
sure is changed such as when changing traveling
speed.
When the tire inflation pres-
sure is changed such as
when the tire size is changed.
When rotating the tires.
After registering the ID codes.
( P.401)
When the tire pressure warning
system is initialized, the current
tire inflation pressure is set as
the benchmark pressure.
■How to initialize the tire
pressure warning system
7-inch display
1 Park the vehicle in a safe
place and turn the engine
switch off.
Initialization cannot be performed
while the vehicle is moving.
2Adjust the tire inflation pres-
sure to the specified cold tire
inflation pressure level.
( P.479)
Make sure to adjust the tire pres-
sure to the specifie d cold tire infla-
tion pressure level. The tire
pressure warning system will oper-
ate based on this pressure level.
3Turn the engine switch to
ON.
4 Select of the multi-infor-
mation display.
5 Press or of the meter
control switch, select and
then press and hold .
NOTICE
■Repairing or replacing tires,
wheels, tire pressure warn-
ing valves, transmitters and
tire valve caps
●When removing or fitting the
wheels, tires or the tire pressure
warning valves and transmit-
ters, contact your Toyota dealer
as the tire pr essure warning
valves and transmitters may be
damaged if not handled cor-
rectly.
●Make sure to install the tire
valve caps. If the tire valve caps
are not installed, water could
enter the tire pressure warning
valves and the tire pressure
warning valves could be bound.
●When replacing ti re valve caps,
do not use tire valve caps other
than those specified. The cap
may become stuck.
■To avoid damage to the tire
pressure warning valves and
transmitters
When a tire is repaired with liquid
sealants, the tire pressure warn-
ing valve and transmitter may not
operate properly. If a liquid seal-
ant is used, contact your Toyota
dealer or other qualified service
shop as soon as possible. Make
sure to replace the tire pressure
warning valve and transmitter
when replaci ng the tire. (P.398)
Initializing the tire pres-
sure warning system
Page 402 of 552

4026-3. Do-it-yourself maintenance
and transmitter, it is necessary
to register the ID code. When
registering the ID codes, per-
form the following procedure.
7-inch display
1 Park the vehicle in a safe
place and turn the engine
switch off.
Initialization cannot be performed
while the vehicle is moving.
2Adjust the tire inflation pres-
sure to the specified cold tire
inflation pressure level.
( P.479)
Make sure to adjust the tire pres-
sure to the specifie d cold tire infla-
tion pressure level. The tire
pressure warning system will oper-
ate based on this pressure level.
3 Turn the engine switch to
ON.
4 Select of the multi-infor-
mation display.
5 Press or of the meter
control switch, select and
then press and hold .
6 Press or of the meter
control switch, select “TPWS”
and then press .
7 Press or of the meter
control switch, select
“Change Wheel” and then
press until the tire pres-
sure warning light starts
slowly blinking 3 times.
The change wheel set mode is acti-
vated and registration is started. Then a message will be displayed
on the multi-information display.
When registration is being per-
formed, the tire pressure warning
light will blink for
approximately 1
minute then illumi nate and “--” will
be displayed for the inflation pres-
sure of each tire o n the multi-infor-
mation display.
8 Drive the vehicle at approxi-
mately 25 mph (40 km/h) or
more for approximately 10 to
30 minutes.
When registration is completed, the
tire pressure warni ng light will go off
and the inflation pressure of each
tire will be disp layed on the
multi-information display.
Even if the vehicle is not driven at
approximately 25 mph (40 km/h) or
more, registration can be com-
pleted by driving for a long time.
However, if registration does not
complete after driving for 1 hour or
more, perform the p rocedure again
from the beginning.
9 Initialize the tire pressure
warning system. ( P.399)
12.3-inch display
1 Park the vehicle in a safe
place and turn the engine
switch off.
Initialization cannot be performed
while the vehicle is moving.
2Adjust the tire inflation pres-
sure to the specified cold tire
inflation pressure level.
( P.479)
Make sure to adjust the tire pres-
sure to the specifie d cold tire infla-
tion pressure level. The tire
pressure warning system will oper-
ate based on this pressure level.
3Turn the engine switch to
ON.
Page 403 of 552

4036-3. Do-it-yourself maintenance
6
Maintenance and care
4Select of the multi-infor-
mation display.
5 Press or of the meter
control switch, select and
then press and hold .
6 Press or of the meter
control switch, select “TPWS”
and then press .
7 Press or of the meter
control switch, select
“Change Wheel” and then
press until the tire pres-
sure warning light starts
slowly blinking 3 times.
The change wheel set mode is acti-
vated and registration is started.
Then a message w ill be displayed
on the multi-inform ation display.
When registration is being per-
formed, the tire pressure warning
light will blink for approximately 1
minute then illumi nate and “--” will
be displayed for the inflation pres-
sure of each tire on the multi-infor-
mation display.
8 Drive the vehicle at approxi-
mately 25 mph (40 km/h) or
more for approximately 10 to
30 minutes.
When registration is completed, the
tire pressure warning light will go off
and the inflation pressure of each
tire will be displayed on the
multi-information display.
Even if the vehicle is not driven at
approximately 25 mph (40 km/h) or
more, registration can be com-
pleted by driving for a long time.
However, if regist ration does not
complete after driving for 1 hour or
more, perform the procedure again from the beginning.
9
Initialize the tire pressure
warning system. ( P.399)
■When registering ID codes
●ID code registrati on is performed
while driving at a vehicle speed of
approximately 25 mph (40 km/h)
or more.
●Before performing ID code regis-
tration, make sure that no wheels
with tire pressure warning valve
and transmitters installed are near
the vehicle.
●Make sure to initi alize the tire
pressure warning system after
registering the ID codes. If the
system is initialized before regis-
tering the ID codes , the initialized
values will be invalid.
●ID codes can be registered by
yourself, but depending on the
driving conditions and driving
environment, registration may
take some time to complete.
■Canceling ID code registration
●To cancel ID code registration
after it has been started, turn the
engine switch off before driving
the vehicle. If the vehicle is driven
after ID code registration is
started, to cancel registration, per-
form the ID code registration start
procedure again and turn the
engine switch off before driving.
●If ID code registration has been
canceled, the tire pressure warn-
ing light will blin k for approxi-
mately 1 minute when the engine
switch is turned to ON and then
illuminate. The tire pressure warn-
ing system will be operational
when the tire pressure warning
light turns off.
●If the warning lig ht does not turn
off even after several minutes
have elapsed, ID code registration
may not have been canceled cor-
rectly. To cancel registration, per-
Page 408 of 552

4086-3. Do-it-yourself maintenance
Use only Toyota wheel nuts
and wrenches designed for
use with your aluminum
wheels.
When rotating, repairing or
changing your tires, check
that the wheel nuts are still
tight after driving 1000 miles
(1600 km).
Be careful not to damage the
aluminum wheels when using
tire chains.
Use only Toyota genuine bal-
ance weights or equivalent
and a plastic or rubber ham-
mer when balancing your
wheels. 1
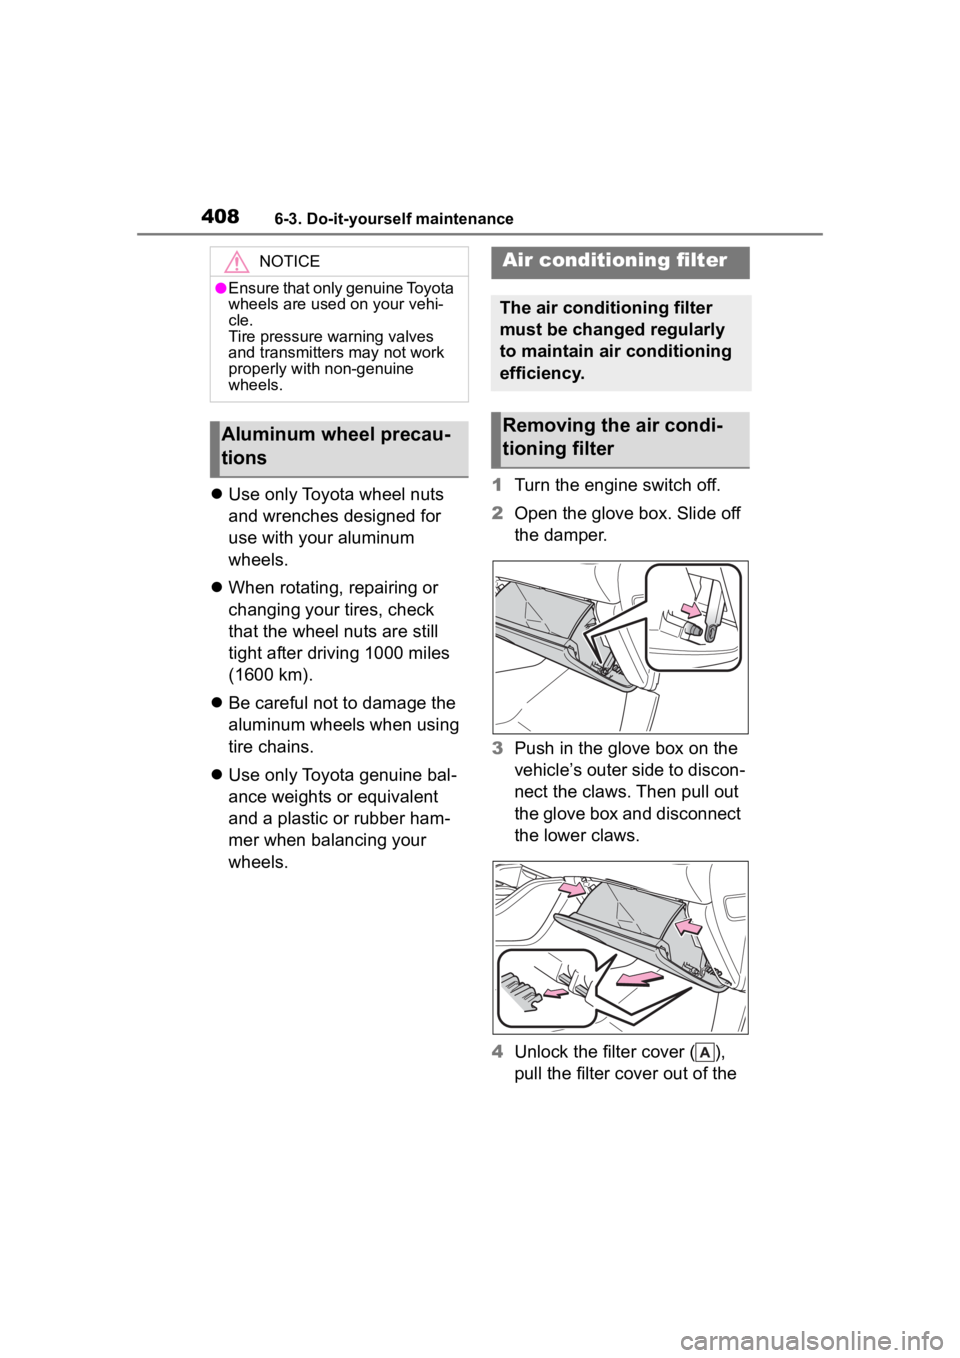
Turn the engine switch off.
2 Open the glove box. Slide off
the damper.
3 Push in the glove box on the
vehicle’s outer side to discon-
nect the claws. Then pull out
the glove box and disconnect
the lower claws.
4 Unlock the filter cover ( ),
pull the filter cover out of the
NOTICE
●Ensure that only genuine Toyota
wheels are used on your vehi-
cle.
Tire pressure warning valves
and transmitters may not work
properly with non-genuine
wheels.
Aluminum wheel precau-
tions
Air conditioning filter
The air conditioning filter
must be changed regularly
to maintain air conditioning
efficiency.
Removing the air condi-
tioning filter