high beam TOYOTA HIGHLANDER 2023 Owners Manual
[x] Cancel search | Manufacturer: TOYOTA, Model Year: 2023, Model line: HIGHLANDER, Model: TOYOTA HIGHLANDER 2023Pages: 552, PDF Size: 13.36 MB
Page 3 of 552
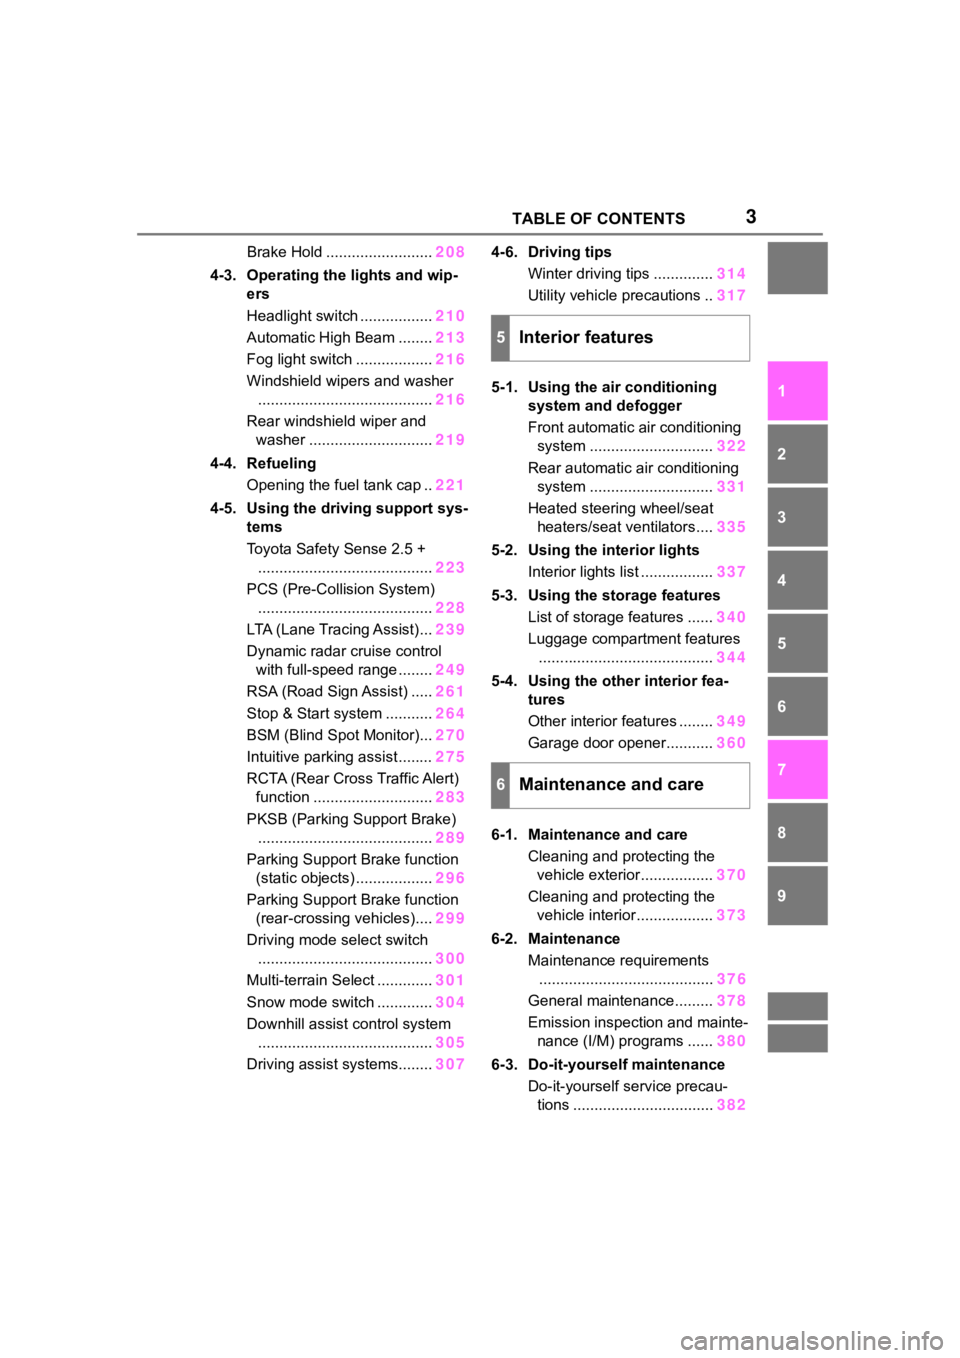
3TABLE OF CONTENTS
1
2
3
4
5
6
7
8
9
10
Brake Hold .........................208
4-3. Operating the lights and wip- ers
Headlight switch ................. 210
Automatic High Beam ........ 213
Fog light switch .................. 216
Windshield wipers and washer ......................................... 216
Rear windshield wiper and washer ............................. 219
4-4. Refueling Opening the fuel tank cap .. 221
4-5. Using the driving support sys- tems
Toyota Safety Sense 2.5 +......................................... 223
PCS (Pre-Collision System) ......................................... 228
LTA (Lane Tracing Assist)... 239
Dynamic radar cruise control with full-speed range ........ 249
RSA (Road Sign Assist) ..... 261
Stop & Start system ........... 264
BSM (Blind Spot Monitor)... 270
Intuitive parking assist ........ 275
RCTA (Rear Cross Traffic Alert) function ............................ 283
PKSB (Parking Support Brake) ......................................... 289
Parking Support Brake function (static objects) .................. 296
Parking Support Brake function (rear-crossing vehicles).... 299
Driving mode select switch ......................................... 300
Multi-terrain Select ............. 301
Snow mode switch ............. 304
Downhill assist control system ......................................... 305
Driving assist systems........ 3074-6. Driving tips
Winter driving tips .............. 314
Utility vehicle precautions .. 317
5-1. Using the air conditioning system and defogger
Front automatic air conditioning
system ............................. 322
Rear automatic air conditioning system ............................. 331
Heated steering wheel/seat heaters/seat ventilators.... 335
5-2. Using the interior lights Interior lights list ................. 337
5-3. Using the storage features List of storage features ...... 340
Luggage compartment features ......................................... 344
5-4. Using the other interior fea- tures
Other interior features ........ 349
Garage door opener........... 360
6-1. Maintenance and care Cleaning and protecting the vehicle exterior................. 370
Cleaning and protecting the vehicle interior.................. 373
6-2. Maintenance
Maintenance requirements ........ ................................. 37
6
General maintenance......... 378
Emission inspection and mainte- nance (I/M) programs ...... 380
6-3. Do-it-yourself maintenance Do-it-yourself service precau-tions ................................. 382
5Interior features
6Maintenance and care
Page 17 of 552
17Pictorial index
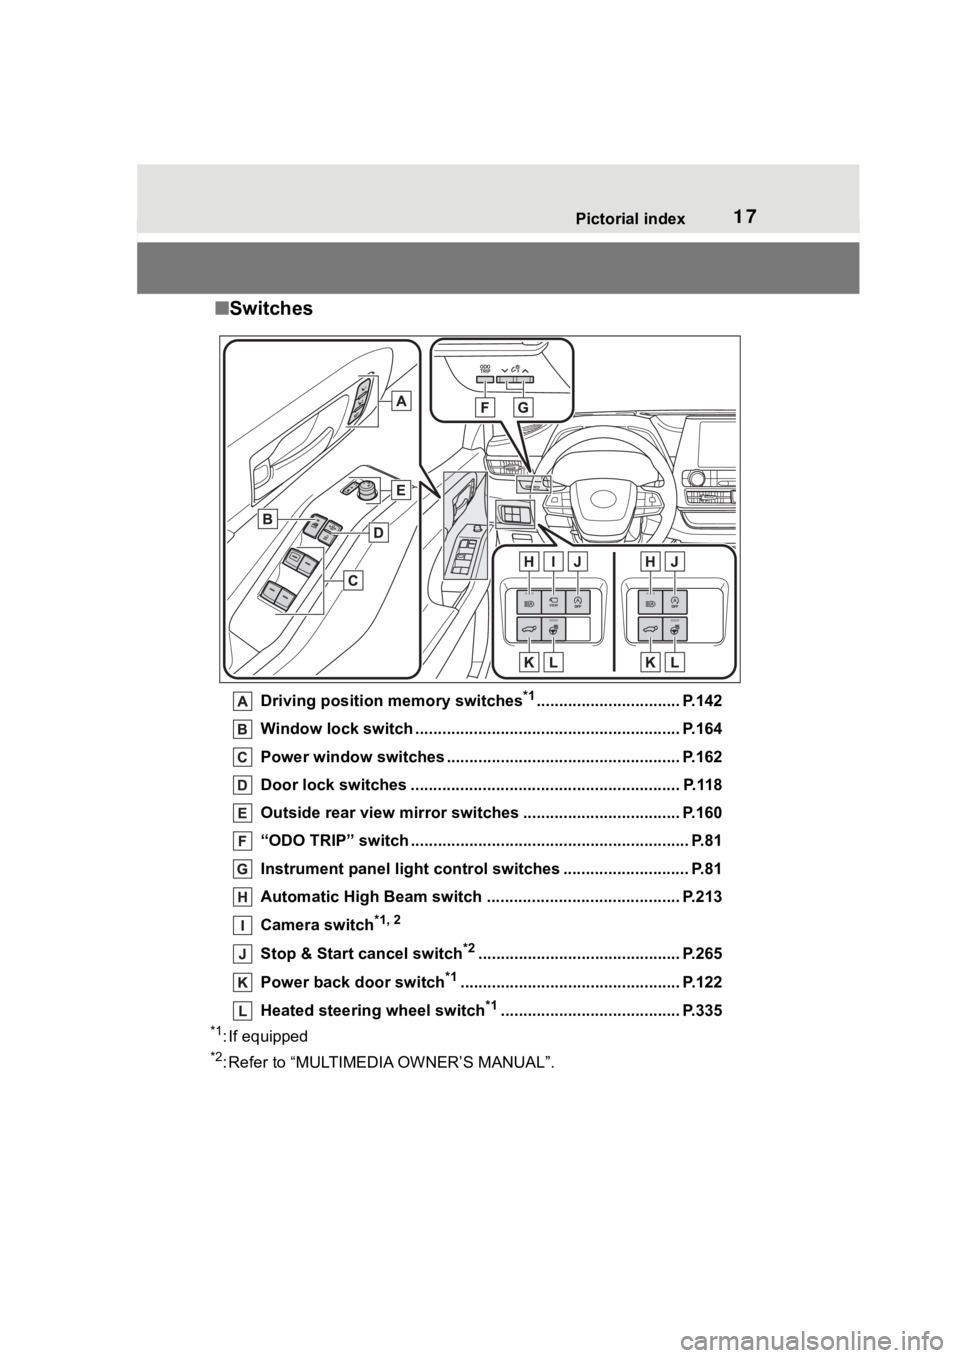
■Switches
Driving position memory switches*1................................ P.142
Window lock switch ............................................. .............. P.164
Power window switches ....... ............................................. P.162
Door lock switches ............................................................ P.118
Outside rear view mirror swi tches ................................... P.160
“ODO TRIP” switch .............................................. ................ P.81
Instrument panel light control switches ........................ .... P.81
Automatic High Beam switch ..................................... ...... P.213
Camera switch
*1, 2
Stop & Start cancel switch*2............................................. P.265
Power back door switch
*1................................................. P.122
Heated steering wheel switch
*1........................................ P.335
*1: If equipped
*2: Refer to “MULTIMEDIA OWNER’S MANUAL”.
Page 77 of 552
772-1. Instrument cluster
2
Vehicle status information and indicators
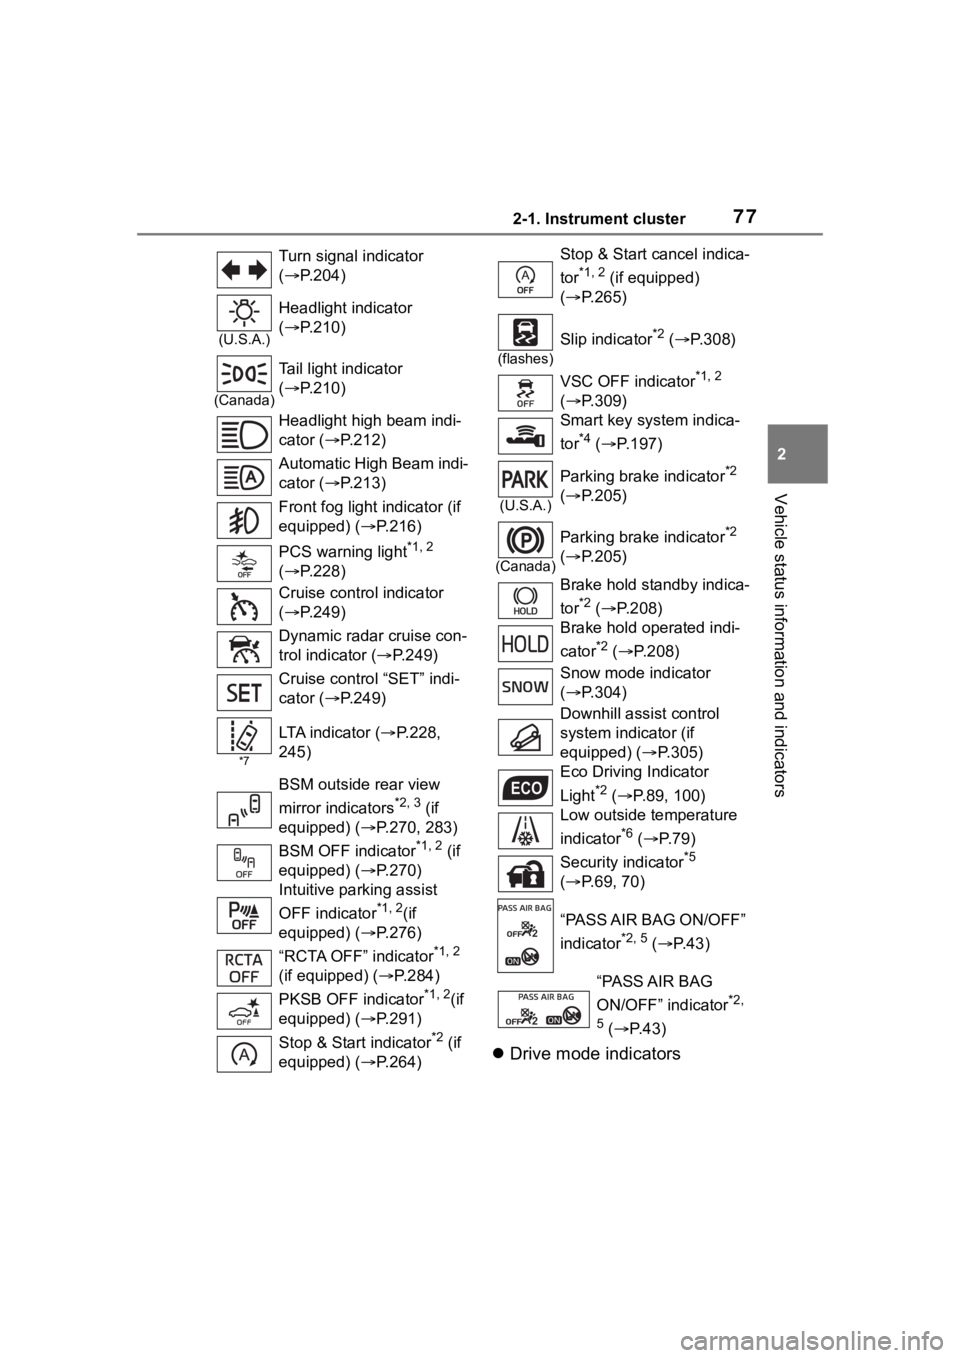
Drive mode indicators
Turn signal indicator
( P.204)
(U.S.A.)
Headlight indicator
( P.210)
(Canada)
Tail light indicator
( P.210)
Headlight high beam indi-
cator ( P.212)
Automatic High Beam indi-
cator ( P.213)
Front fog light indicator (if
equipped) (P.216)
PCS warning light
*1, 2
( P.228)
Cruise control indicator
( P.249)
Dynamic radar cruise con-
trol indicator ( P.249)
Cruise control “SET” indi-
cator ( P.249)
*7
LTA i n d i c a t o r ( P.228,
245)
BSM outside rear view
mirror indicators
*2, 3 (if
equipped) (P.270, 283)
BSM OFF indicator
*1, 2 (if
equipped) (P.270)
Intuitive parking assist
OFF indicator
*1, 2(if
equipped) (P.276)
“RCTA OFF” indicator
*1, 2
(if equipped) ( P.284)
PKSB OFF indicator
*1, 2(if
equipped) (P.291)
Stop & Start indicator
*2 (if
equipped) (P.264)
Stop & Start cancel indica-
tor
*1, 2 (if equipped)
( P.265)
(flashes)
Slip indicator*2 ( P.308)
VSC OFF indicator
*1, 2
( P.309)
Smart key system indica-
tor
*4 ( P.197)
(U.S.A.)
Parking brake indicator*2
( P.205)
(Canada)
Parking brake indicator*2
( P.205)
Brake hold standby indica-
tor
*2 ( P.208)
Brake hold operated indi-
cator
*2 ( P.208)
Snow mode indicator
( P.304)
Downhill assist control
system indicator (if
equipped) ( P.305)
Eco Driving Indicator
Light
*2 ( P.89, 100)
Low outside temperature
indicator
*6 ( P.79)
Security indicator
*5
( P.69, 70)
“PASS AIR BAG ON/OFF”
indicator
*2, 5 ( P. 4 3 )
“PASS AIR BAG
ON/OFF” indicator
*2,
5
( P. 4 3 )
Page 173 of 552
173
4
4
Driving
Driving
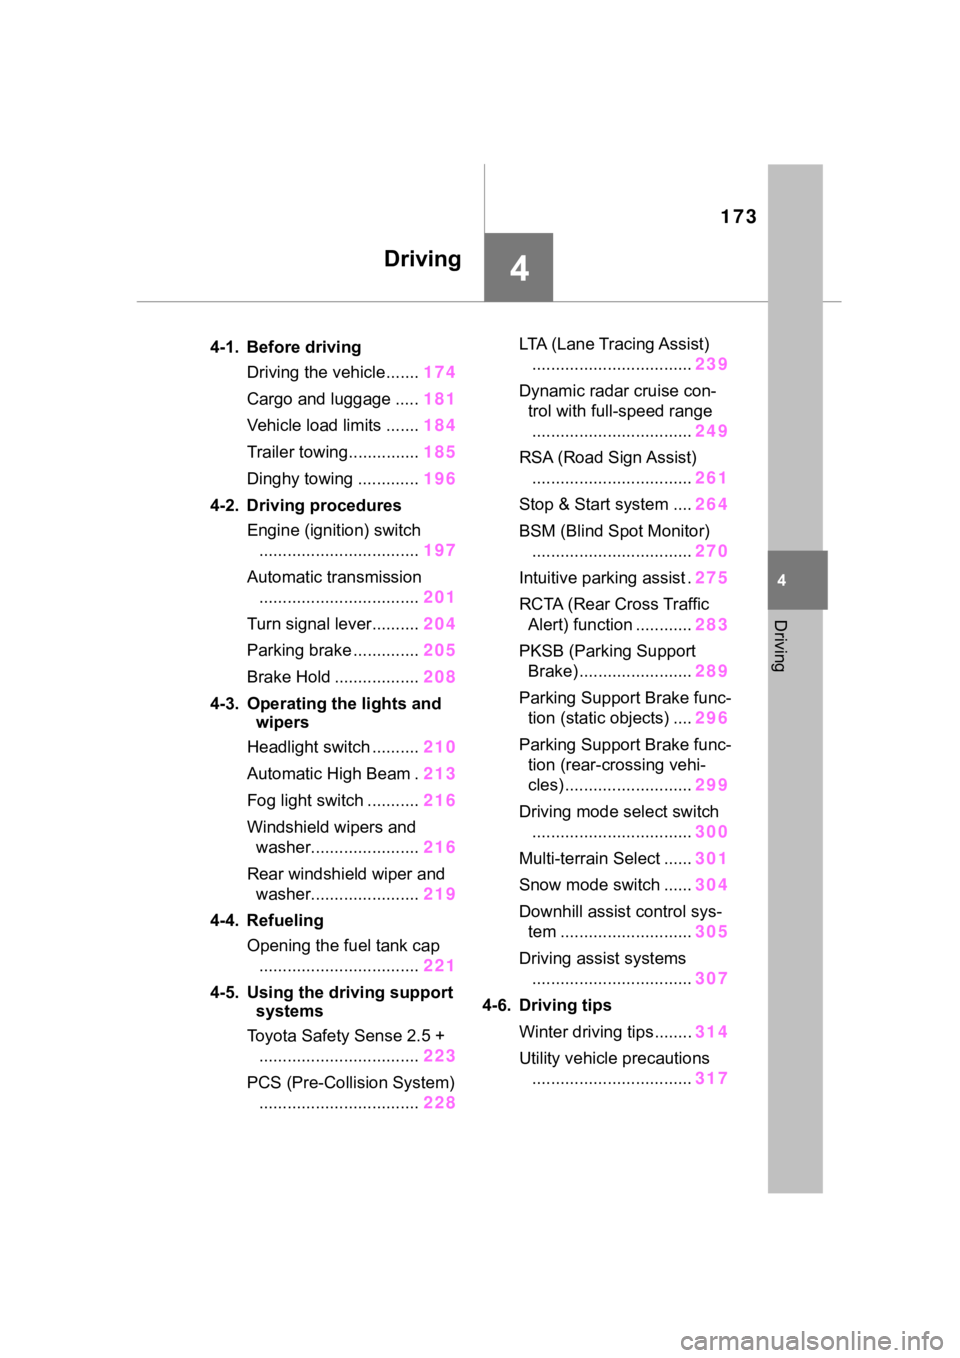
.4-1. Before drivingDriving the vehicle....... 174
Cargo and luggage ..... 181
Vehicle load limits ....... 184
Trailer towing............... 185
Dinghy towing ............. 196
4-2. Driving procedures Engine (ignition) switch.................................. 197
Automatic transmission .................................. 201
Turn signal lever.......... 204
Parking brake .............. 205
Brake Hold .................. 208
4-3. Operating the lights and wipers
Headlight switch .......... 210
Automatic High Beam . 213
Fog light switch ........... 216
Windshield wipers and washer....................... 216
Rear windshield wiper and washer....................... 219
4-4. Refueling Opening the fuel tank cap.................................. 221
4-5. Using the driving support
systems
Toyota Safety Sense 2.5 + .................................. 223
PCS (Pre-Collision System) .................................. 228LTA (Lane Tracing Assist)
.................................. 239
Dynamic radar cruise con- trol with full-speed range.................................. 249
RSA (Road Sign Assist) .................................. 261
Stop & Start system .... 264
BSM (Blind Spot Monitor) .................................. 270
Intuitive parking assist . 275
RCTA (Rear Cross Traffic Alert) function ............ 283
PKSB (Parking Support Brake) ........................ 289
Parking Support Brake func- tion (static objects) .... 296
Parking Support Brake func- tion (rear-crossing vehi-
cles) ........................... 299
Driving mode select switch .................................. 300
Multi-terrain Select ...... 301
Snow mode switch ...... 304
Downhill assist control sys- tem ............................ 305
Driving assist systems .................................. 307
4-6. Driving tips Winter driving tips........ 314
Utility vehicle precautions .................................. 317
Page 212 of 552
2124-3. Operating the lights and wipers
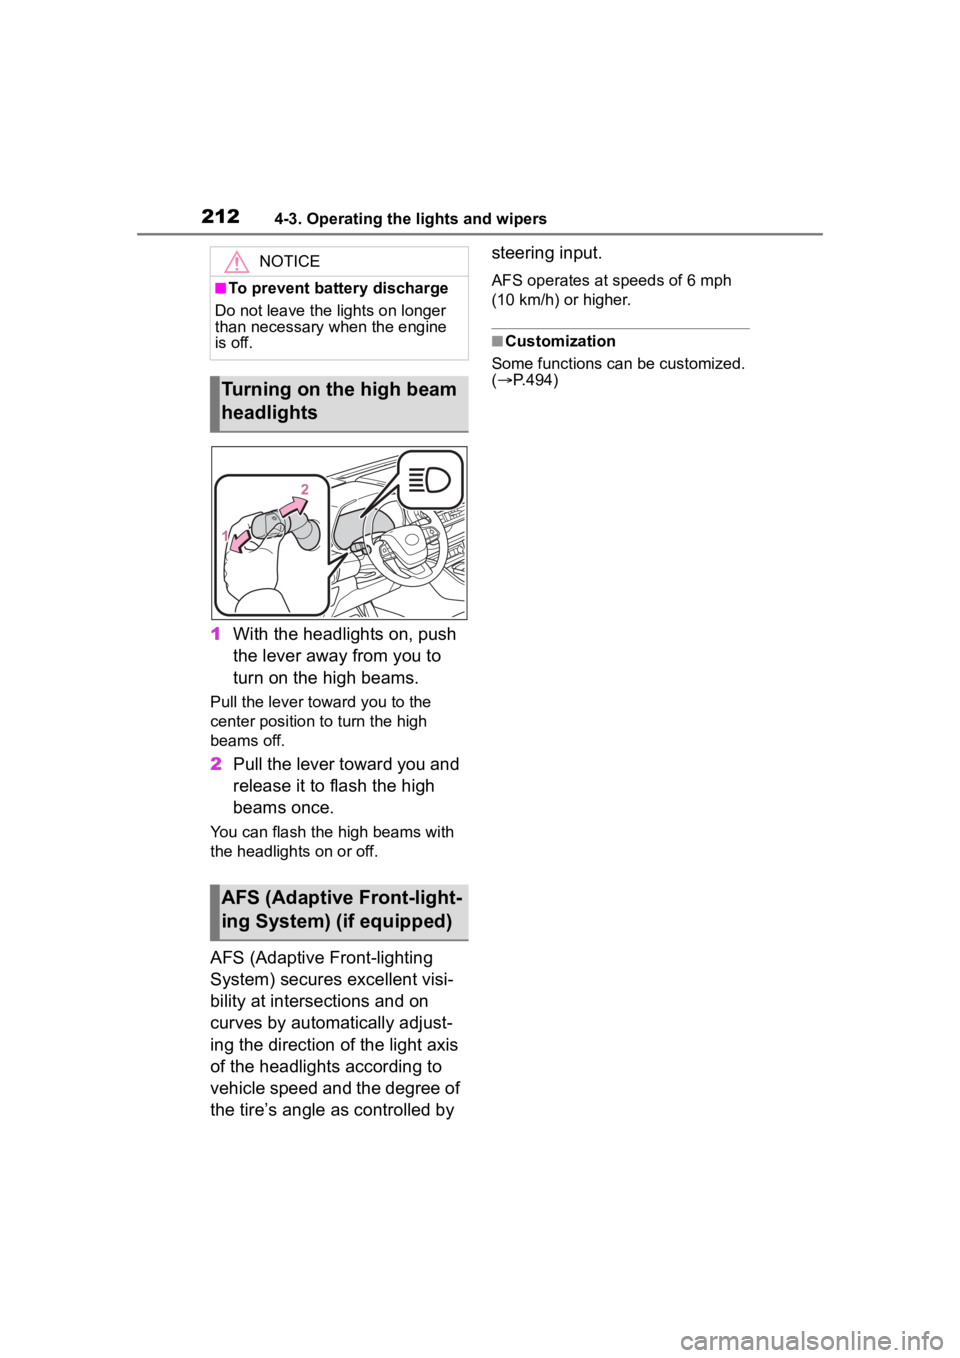
1With the headlights on, push
the lever away from you to
turn on the high beams.
Pull the lever toward you to the
center position to turn the high
beams off.
2Pull the lever toward you and
release it to flash the high
beams once.
You can flash the high beams with
the headlights on or off.
AFS (Adaptive Front-lighting
System) secures excellent visi-
bility at intersections and on
curves by automatically adjust-
ing the direction of the light axis
of the headlights according to
vehicle speed and the degree of
the tire’s angle as controlled by steering input.
AFS operates at speeds of 6 mph
(10 km/h) or higher.
■Customization
Some functions can be customized.
( P.494)
NOTICE
■To prevent battery discharge
Do not leave the lights on longer
than necessary when the engine
is off.
Turning on the high beam
headlights
AFS (Adaptive Front-light-
ing System) (if equipped)
Page 213 of 552
2134-3. Operating the lights and wipers
4
Driving
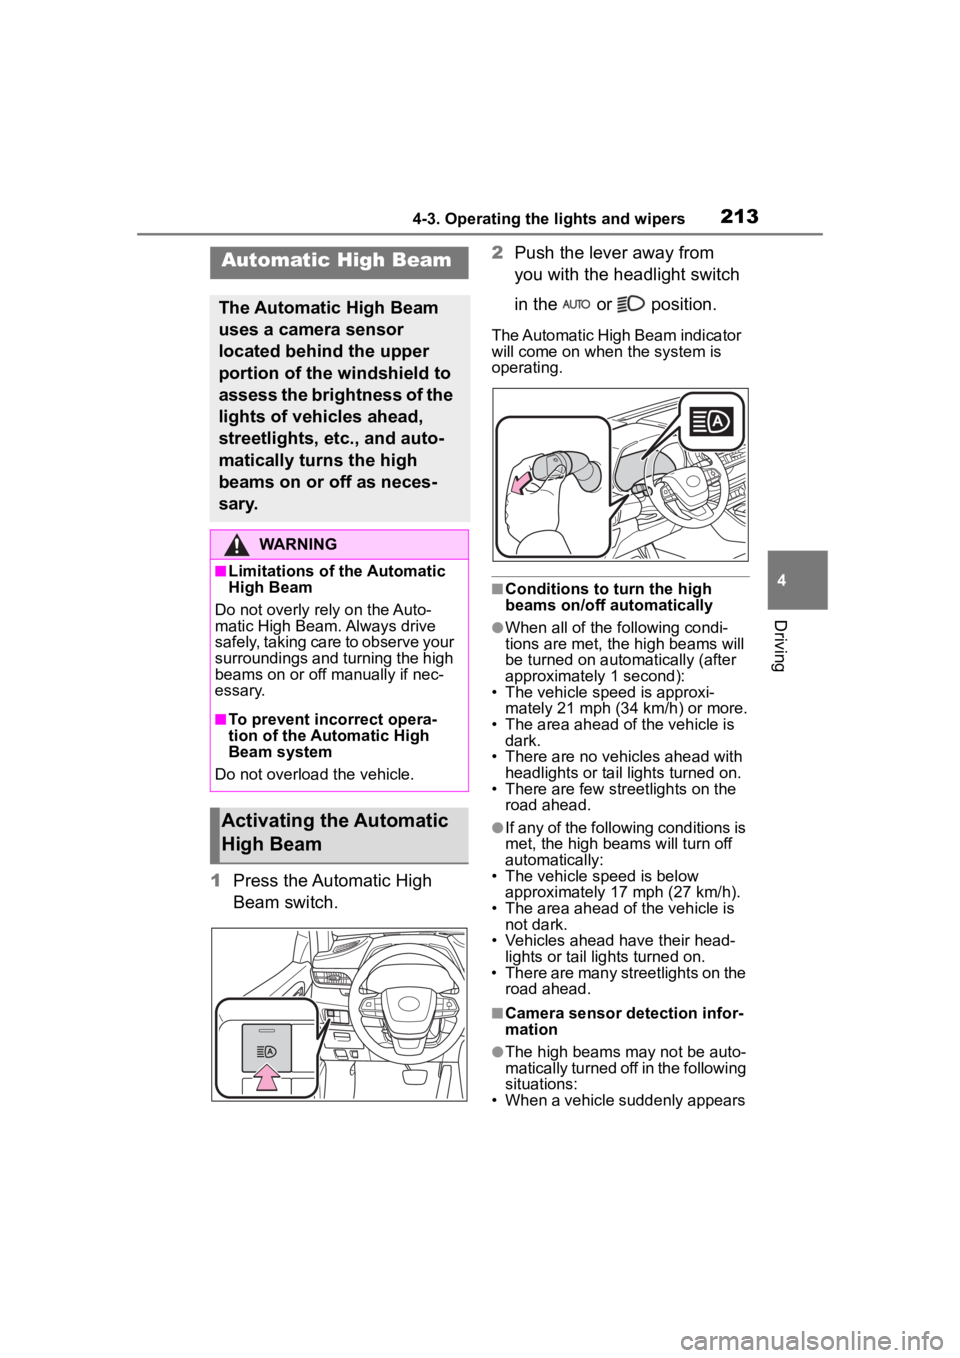
1Press the Automatic High
Beam switch. 2
Push the lever away from
you with the headlight switch
in the or position.
The Automatic High Beam indicator
will come on when the system is
operating.
■Conditions to turn the high
beams on/off automatically
●When all of the following condi-
tions are met, the high beams will
be turned on autom atically (after
approximately 1 second):
• The vehicle speed is approxi-
mately 21 mph (34 km/h) or more.
• The area ahead of the vehicle is dark.
• There are no vehicles ahead with headlights or tail lights turned on.
• There are few str eetlights on the
road ahead.
●If any of the following conditions is
met, the high beams will turn off
automatically:
• The vehicle speed is below
approximately 17 mph (27 km/h).
• The area ahead of the vehicle is not dark.
• Vehicles ahead have their head- lights or tail lights turned on.
• There are many streetlights on the road ahead.
■Camera sensor detection infor-
mation
●The high beams m ay not be auto-
matically turned off in the following
situations:
• When a vehicle suddenly appears
Automatic High Beam
The Automatic High Beam
uses a camera sensor
located behind the upper
portion of the windshield to
assess the brightness of the
lights of vehicles ahead,
streetlights, etc., and auto-
matically turns the high
beams on or off as neces-
sary.
WARNING
■Limitations of the Automatic
High Beam
Do not overly rely on the Auto-
matic High Beam. Always drive
safely, taking care to observe your
surroundings and turning the high
beams on or off manually if nec-
essary.
■To prevent incorrect opera-
tion of the Automatic High
Beam system
Do not overload the vehicle.
Activating the Automatic
High Beam
Page 214 of 552

2144-3. Operating the lights and wipers
from around a curve
• When the vehicle is cut in front of by another vehicle
• When vehicles ahead cannot be detected due to repeated curves,
road dividers or roadside trees
• When vehicles ahead appear in a faraway lane on a wide road
• When the lights of vehicles ahead
are not on
●The high beams may be turned off
if a vehicle ahead that is using fog
lights without its headlights turned
on is detected.
●House lights, street lights, traffic
signals, and illumi nated billboards
or signs and other reflective
objects may cause the high
beams to change to the low
beams, or the low beams to
remain on.
●The following factors may affect
the amount of time taken for the
high beams to turn on or off:
• The brightness of the headlights, fog lights, and ta il lights of vehi-
cles ahead
• The movement and direction of vehicles ahead
• When a vehicle ahead only has
operational lights on one side
• When a vehicle ahead is a two-wheeled vehicle
• The condition of the road (gradi-
ent, curve, condi tion of the road
surface, etc.)
• The number of passengers and amount of luggage in the vehicle
●The high beams may turn on or off
unexpectedly.
●Bicycles or similar vehicles may
not be detected.
●In the following situations the sys-
tem may not be abl e to correctly
detect the surrounding brightness
level. This may cause the low
beams to remain on or the high
beams to flash or dazzle pedestri-
ans or vehicles ahead. In such a
case, it is necess ary to manually
switch between the high and low
beams. • When driving in inclement weather
(heavy rain, snow, fog, sand-
storms, etc.)
• When the windshi eld is obscured
by fog, mist, ice, dirt, etc.
• When the windshield is cracked or
damaged
• When the camera sensor is deformed or dirty
• When the temperature of the cam- era sensor is extremely high
• When the surrounding brightness
level is equal to that of headlights,
tail lights or fog lights
• When headlights or tail lights of
vehicles ahead are turned off,
dirty, changing color, or not aimed
properly
• When the vehicle is hit by water,
snow, dust, etc. from a preceding
vehicle
• When driving through an area of intermittently changing brightness
and darkness
• When frequently and repeatedly driving ascending/descending
roads, or roads with rough, bumpy
or uneven surfaces (such as
stone-paved roads, gravel roads,
etc.)
• When frequently and repeatedly taking curves or driving on a wind-
ing road
• When there is a h ighly reflective
object ahead of the vehicle, such
as a sign or mirror
• When the back of a preceding vehicle is highly reflective, such as
a container on a truck
• When the vehicle’s headlights are damaged or dirty, or are not aimed
properly
• When the vehicle is listing or titling due to a flat tire, a trailer being
towed, etc.
• When the headlights are changed between the high beams and low
beams repeatedly in an abnormal
manner
• When the driver believes that the high beams may be flashing or
dazzling pedestrians or other driv-
ers
Page 215 of 552
2154-3. Operating the lights and wipers
4
Driving
■Temporarily lowering sensor
sensitivity
The sensitivity of the sensor can be
temporarily lowered.
1 Turn the engine s witch off while
the following cond itions are met.
●The headlight switch is in or
.
●The headlight switch lever is in
high beam position.
●Automatic High Beam switch is
on.
2 Turn the engine switch to ON.
3 Within 60 seconds after step 2,
repeat pulling the headlight
switch lever to the original posi-
tion then pushing it to the high
beam position qu ickly 10 times,
then leave the lever in high beam
position.
4 If the sensitivity is changed, the
Automatic High Beam indicator
is turn on and off 3 times.
Automatic High Beam (headlights)
may turn on even w hen the vehicle
is stopped.
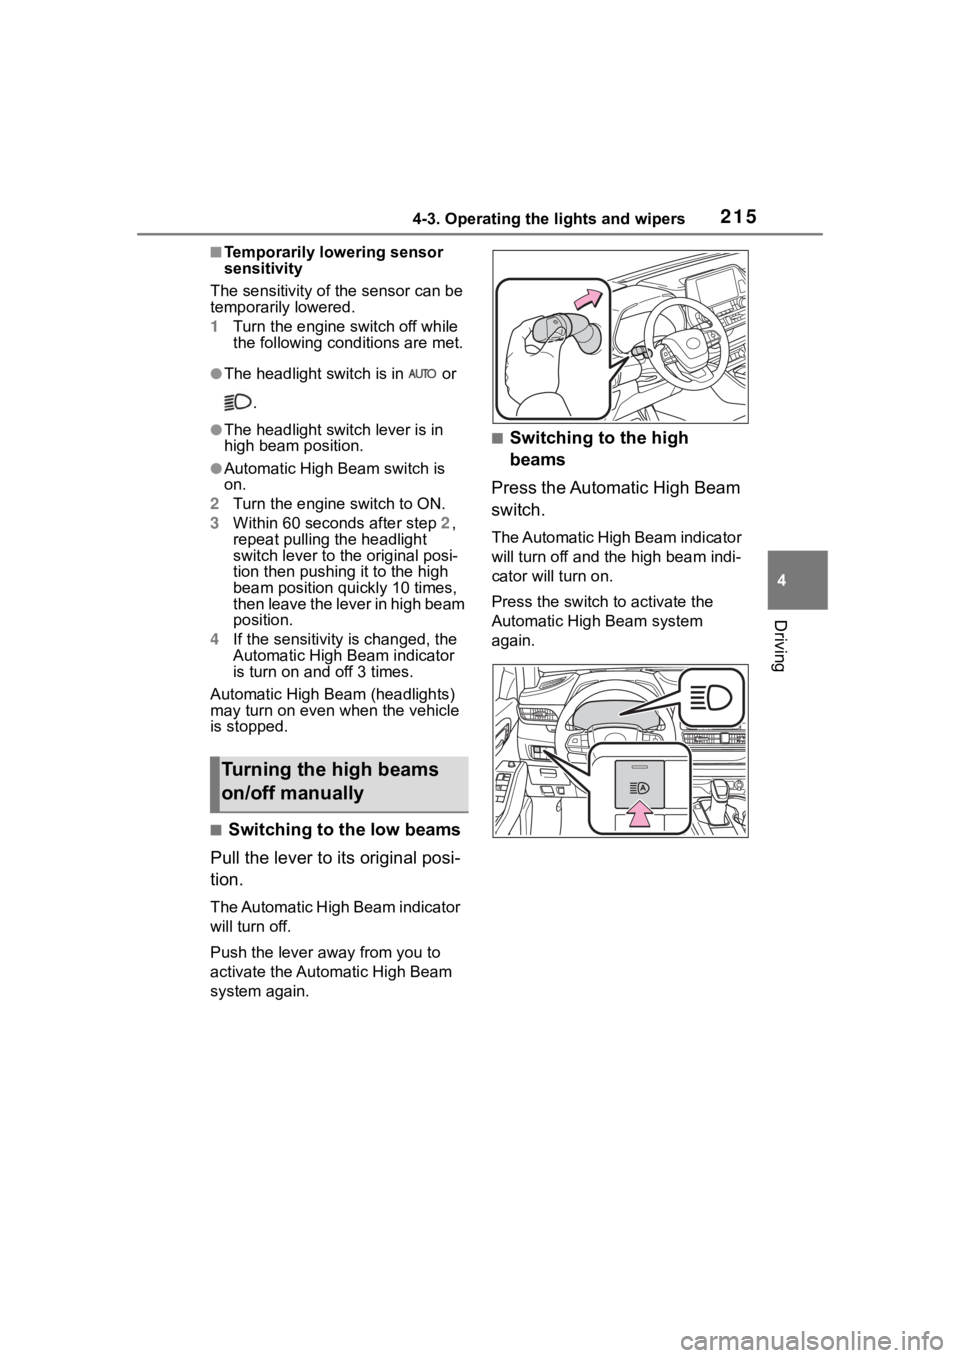
■Switching to the low beams
Pull the lever to its original posi-
tion.
The Automatic High Beam indicator
will turn off.
Push the lever away from you to
activate the Automatic High Beam
system again.
■Switching to the high
beams
Press the Automatic High Beam
switch.
The Automatic High Beam indicator
will turn off and the high beam indi-
cator will turn on.
Press the switch to activate the
Automatic High Beam system
again.
Turning the high beams
on/off manually
Page 223 of 552
2234-5. Using the driving support systems
4
Driving
4-5.Using the driving support systems
■PCS (Pre-Collision System)
P.228
■LTA (Lane Tracing Assist)
P.239
■AHB (Automatic High
Beam)
P.213
■RSA (Road Sign Assist)*
P.261
*: If equipped
■Dynamic radar cruise con-
trol with full-speed range
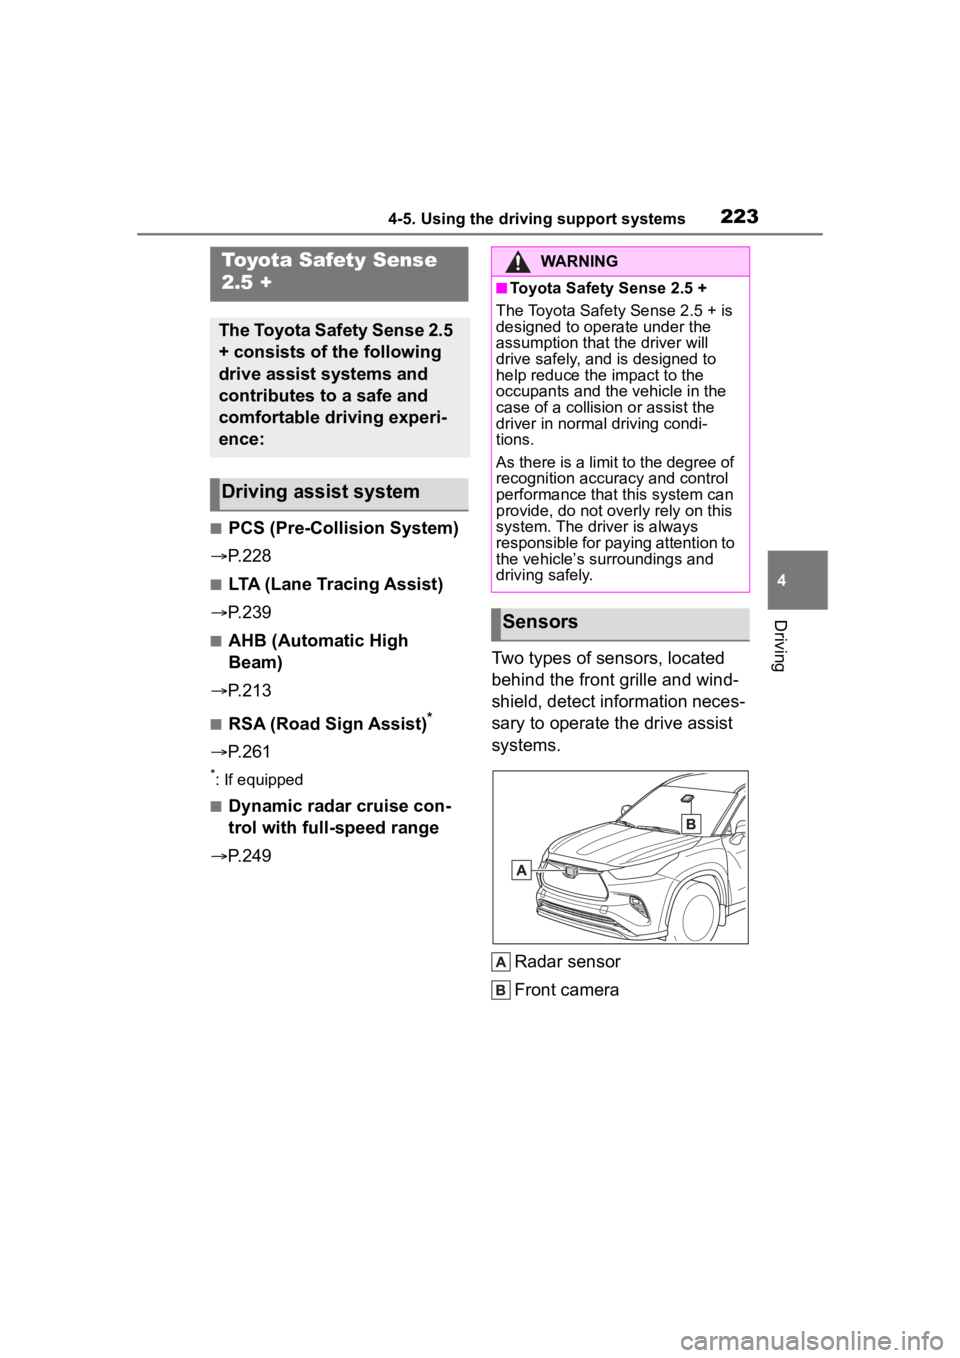
P.249 Two types of sensors, located
behind the front grille and wind-
shield, detect information neces-
sary to operate the drive assist
systems.
Radar sensor
Front camera
Toyota Safety Sense
2.5 +
The Toyota Safety Sense 2.5
+ consists of the following
drive assist systems and
contributes to a safe and
comfortable driving experi-
ence:
Driving assist system
WARNING
■Toyota Safety Sense 2.5 +
The Toyota Safety Sense 2.5 + is
designed to operate under the
assumption that the driver will
drive safely, and is designed to
help reduce the impact to the
occupants and the vehicle in the
case of a collision or assist the
driver in normal driving condi-
tions.
As there is a limit to the degree of
recognition accuracy and control
performance that this system can
provide, do not overly rely on this
system. The driver is always
responsible for paying attention to
the vehicle’s su rroundings and
driving safely.
Sensors
Page 416 of 552
4166-3. Do-it-yourself maintenance
Back-up lights
License plate lights
■Lights that need to be
replaced by your Toyota
dealer
Headlight low beams
Headlight high beams
Daytime running lights (types
A and C)
Daytime running lights/park-
ing lights (type B)
Front fog lights (if equipped)
Side turn signal lights
Tail lights/stop lights
Rear side marker lights
Tail lights
High mounted stoplight
Outer foot lights (if equipped)
■LED lights
The lights other than the following
lights each consist of a number of
LEDs. If any of the LEDs burn out,
take your vehicle to your Toyota
dealer to have the light replaced.
●Front turn signal lights/parking
lights (types A and C)
●Front turn signal lights (type B)
●Front side marker lights
●Rear turn signal lights
●Back-up lights
●License plate lights
■Condensation build-up on the
inside of the lens
Temporary condensation build-up
on the inside of the light lens does
not indicate a malfunction. Contact
your Toyota dealer for more informa- tion in the following situations:
●Large drops of water have built up
on the inside of the lens.
●Water has built up
inside the light.
■When replacing light bulbs
P.413
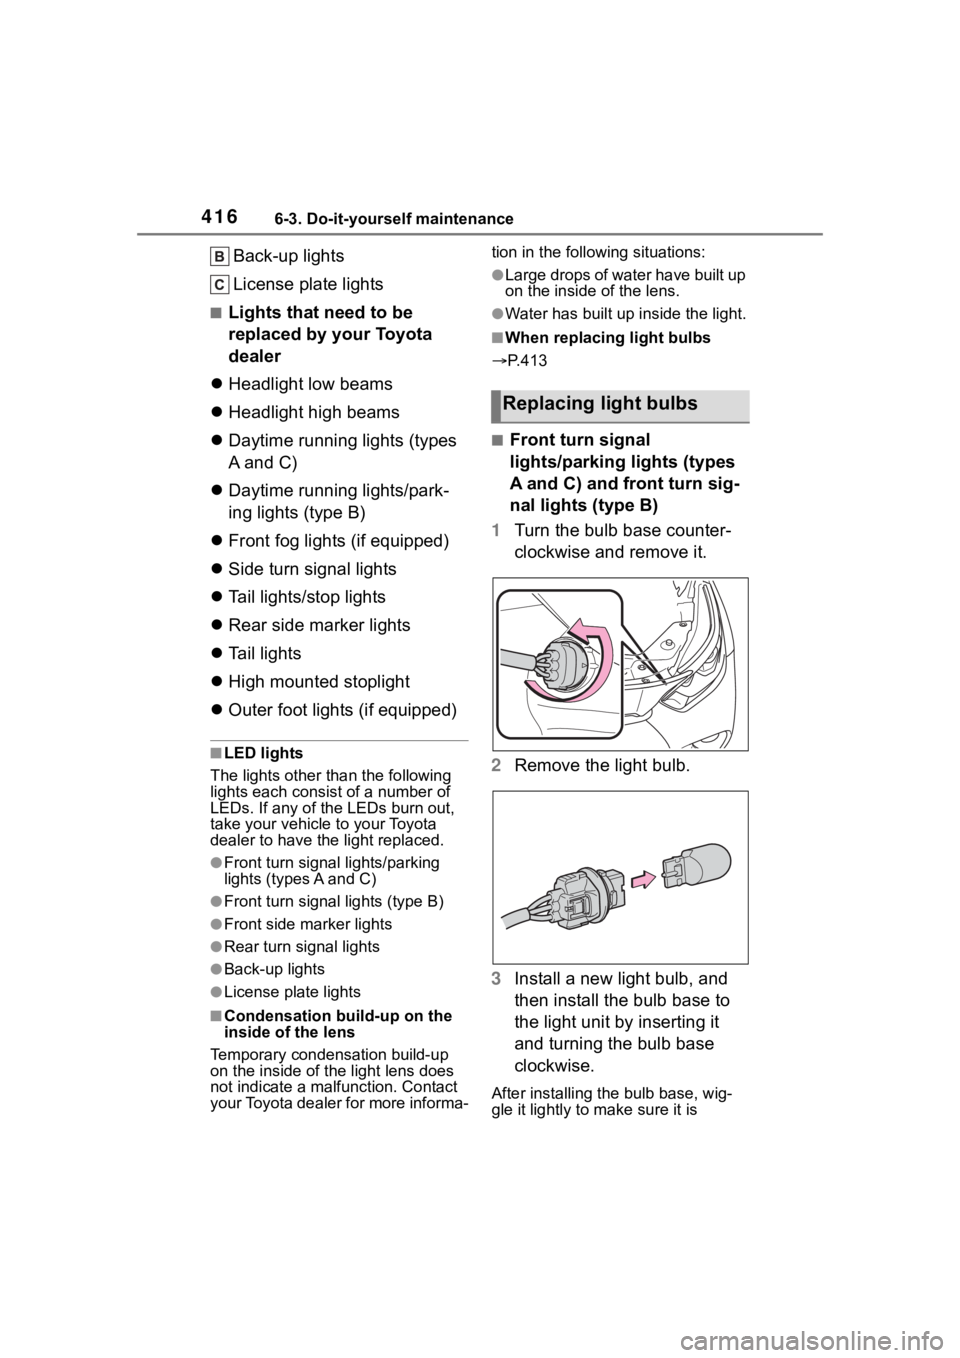
■Front turn signal
lights/parking lights (types
A and C) and front turn sig-
nal lights (type B)
1 Turn the bulb base counter-
clockwise and remove it.
2 Remove the light bulb.
3 Install a new light bulb, and
then install the bulb base to
the light unit by inserting it
and turning the bulb base
clockwise.
After installing the bulb base, wig-
gle it lightly to make sure it is
Replacing light bulbs