instrument panel TOYOTA HILUX 2012 Owners Manual (in English)
[x] Cancel search | Manufacturer: TOYOTA, Model Year: 2012, Model line: HILUX, Model: TOYOTA HILUX 2012Pages: 636, PDF Size: 34.38 MB
Page 19 of 636
19
HILUX_EE (OM0K132E)
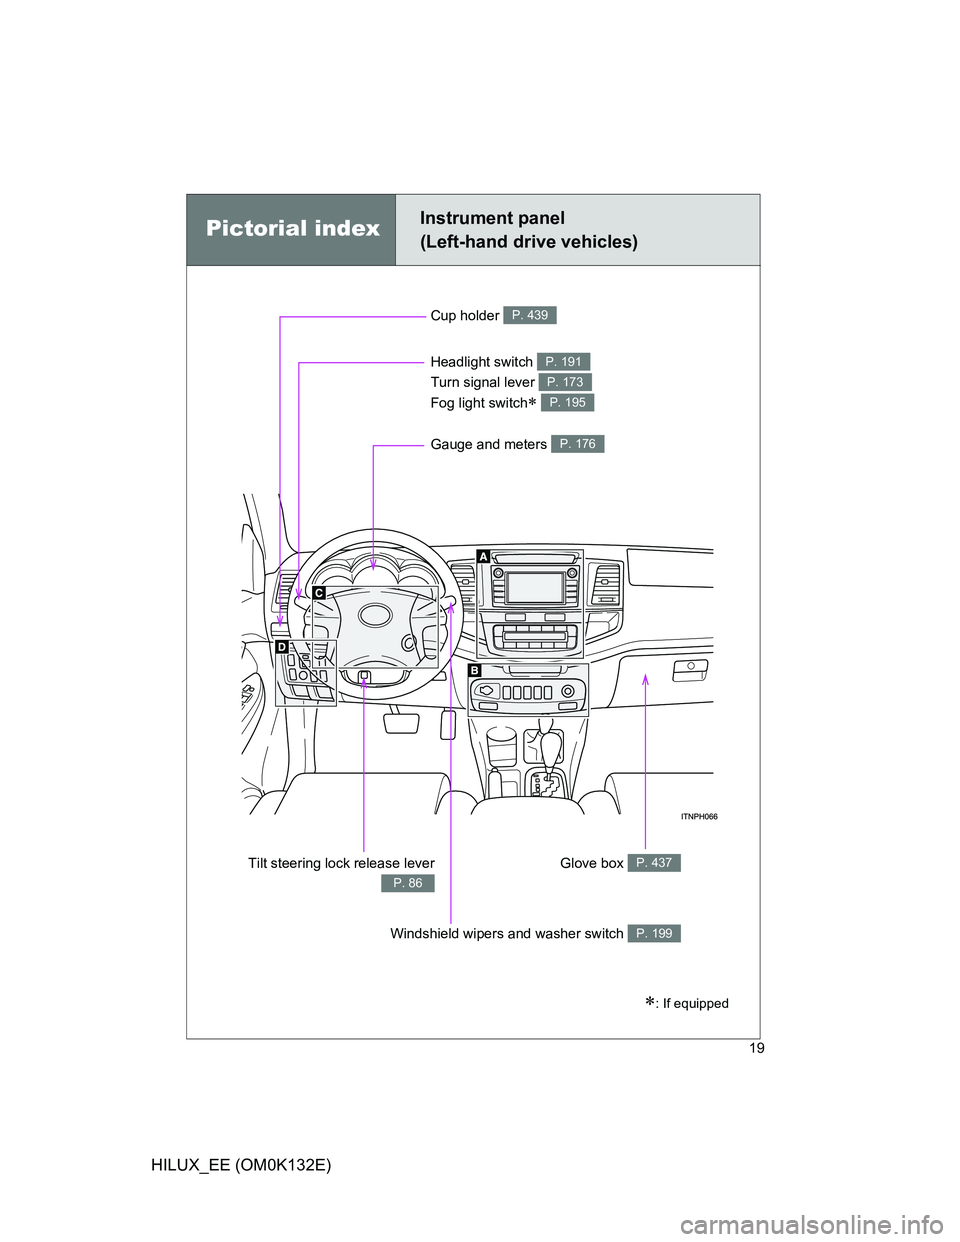
Pictorial indexInstrument panel
(Left-hand drive vehicles)
Cup holder P. 439
Headlight switch
Turn signal lever
Fog light switch
P. 191
P. 173
P. 195
Gauge and meters P. 176
Tilt steering lock release lever
P. 86
Glove box P. 437
Windshield wipers and washer switch P. 199
: If equipped
Page 20 of 636

20
HILUX_EE (OM0K132E)
A
Pictorial indexInstrument panel
(Left-hand drive vehicles)
Vehicles without automatic air conditioning system
Emergency flasher switch
P. 540Air conditioning system P. 250
Front passenger’s seat belt reminder light P. 554
Multi-information display
Clock P. 185
P. 446
Audio system
Rear view monitor
system
P. 266, 323
P. 206
Page 22 of 636
22
HILUX_EE (OM0K132E)
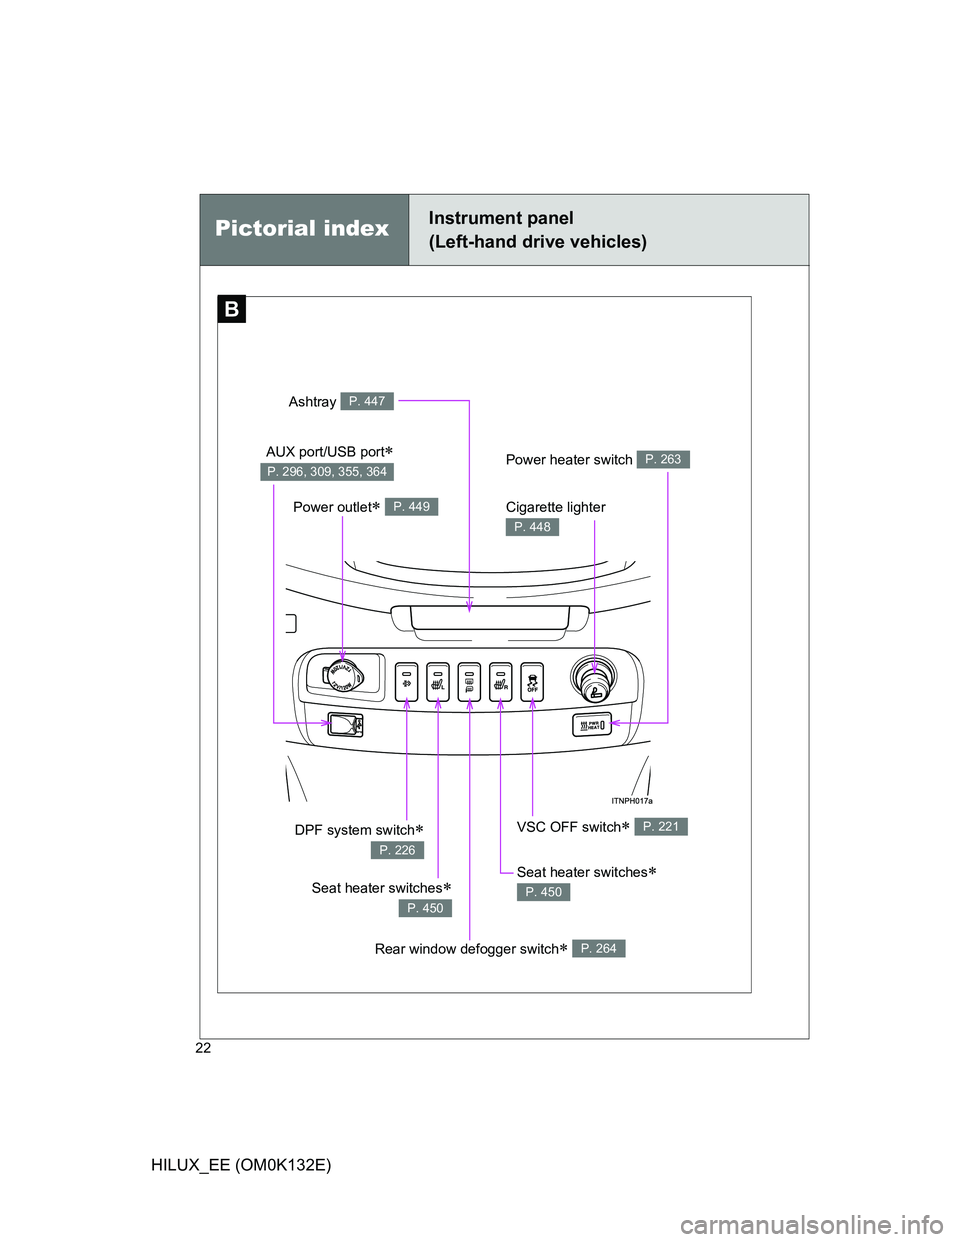
B
Pictorial indexInstrument panel
(Left-hand drive vehicles)
Power outlet P. 449
VSC OFF switch P. 221DPF system switch
P. 226
Cigarette lighter
P. 448
Ashtray P. 447
AUX port/USB port
P. 296, 309, 355, 364Power heater switch P. 263
Seat heater switches
P. 450
Rear window defogger switch P. 264
Seat heater switches
P. 450
Page 24 of 636
24
HILUX_EE (OM0K132E)
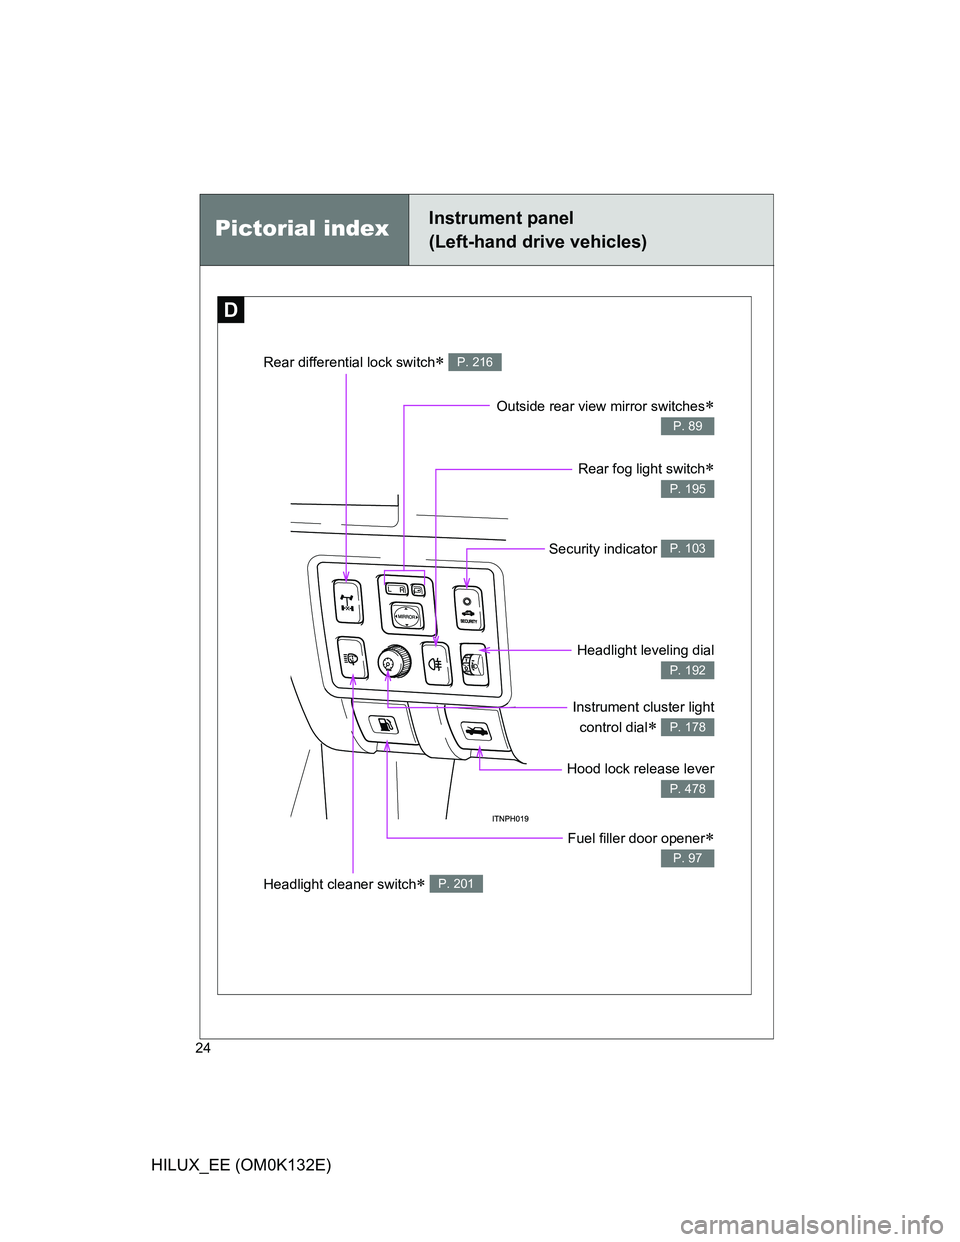
Pictorial indexInstrument panel
(Left-hand drive vehicles)
D
Outside rear view mirror switches
P. 89
Rear fog light switch
P. 195
Security indicator P. 103
Headlight leveling dial
P. 192
Hood lock release lever
P. 478
Headlight cleaner switch P. 201
Rear differential lock switch P. 216
Instrument cluster light
control dial
P. 178
Fuel filler door opener
P. 97
Page 30 of 636
30
HILUX_EE (OM0K132E)
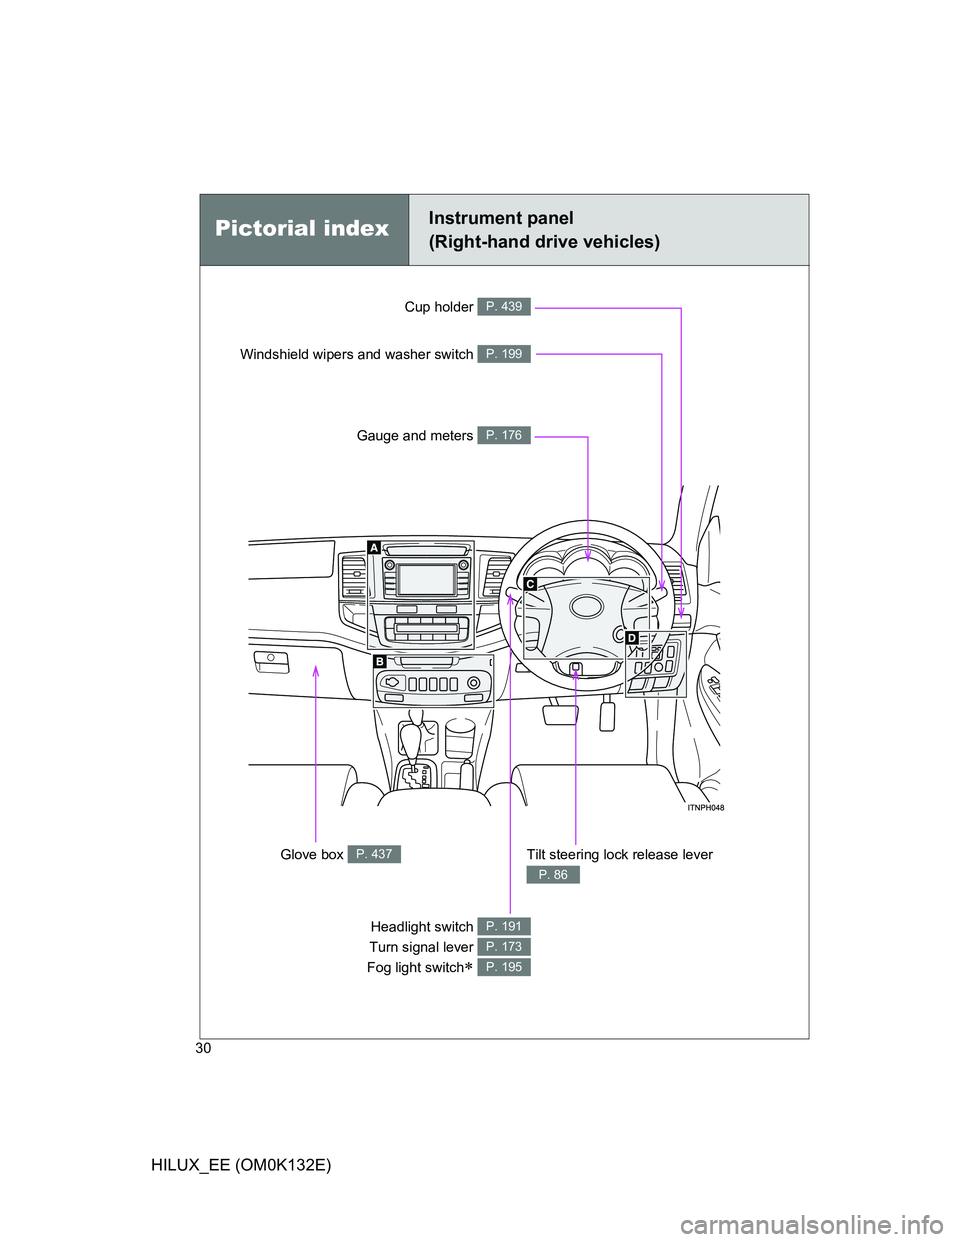
Pictorial indexInstrument panel
(Right-hand drive vehicles)
Cup holder P. 439
Headlight switch
Turn signal lever
Fog light switch
P. 191
P. 173
P. 195
Gauge and meters P. 176
Tilt steering lock release lever
P. 86
Glove box P. 437
Windshield wipers and washer switch P. 199
Page 32 of 636
32
HILUX_EE (OM0K132E)
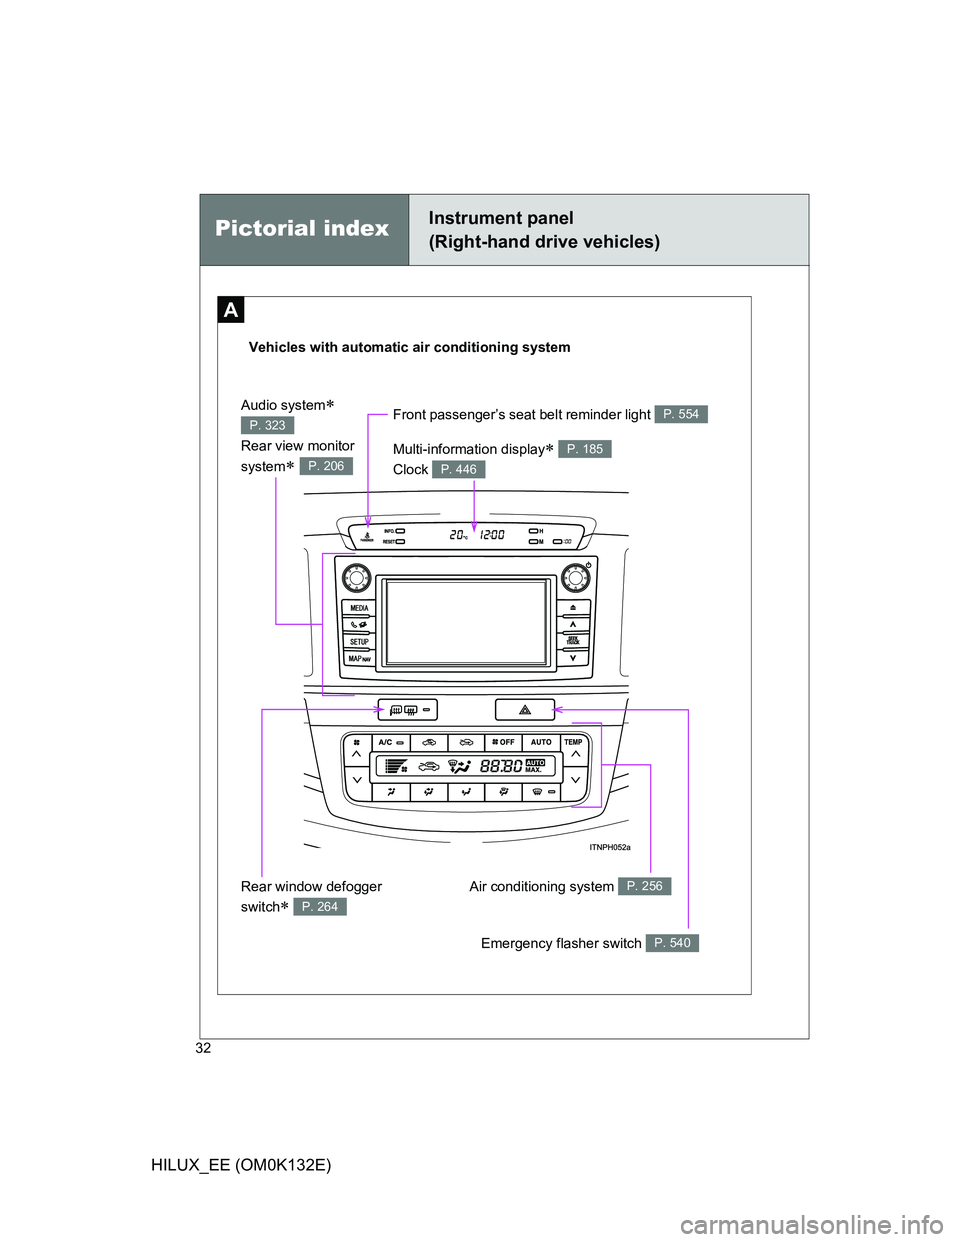
A
Vehicles with automatic air conditioning system
Pictorial indexInstrument panel
(Right-hand drive vehicles)
Air conditioning system P. 256Rear window defogger
switch
P. 264
Front passenger’s seat belt reminder light P. 554
Multi-information display
Clock P. 185
P. 446
Emergency flasher switch P. 540
Audio system
Rear view monitor
system
P. 323
P. 206
Page 34 of 636
34
HILUX_EE (OM0K132E)
Pictorial indexInstrument panel
(Right-hand drive vehicles)
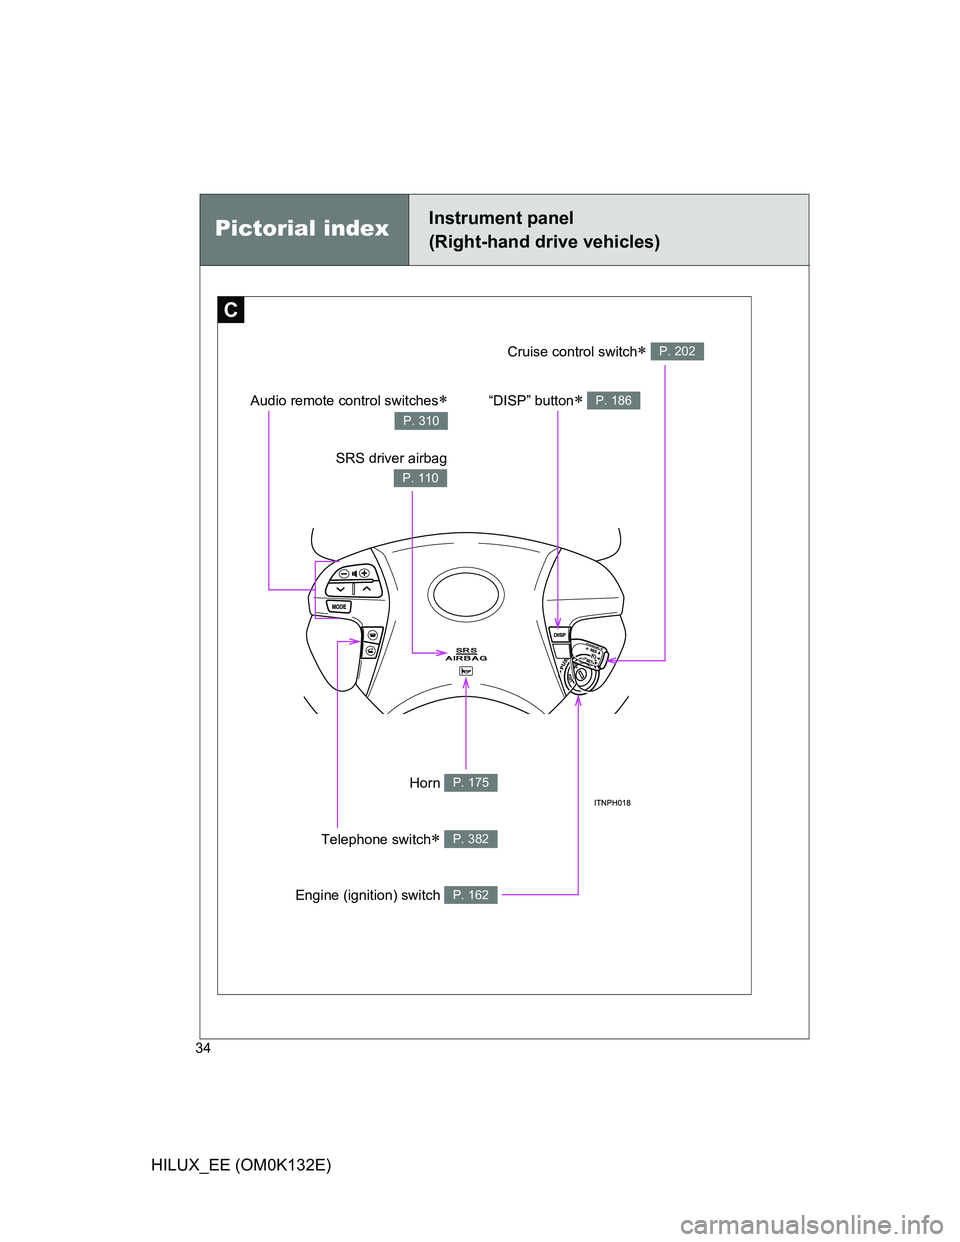
C
SRS driver airbag
P. 110
“DISP” button P. 186
Horn P. 175
Cruise control switch P. 202
Engine (ignition) switch P. 162
Audio remote control switches
P. 310
Telephone switch P. 382
Page 122 of 636
122 1-7. Safety information
HILUX_EE (OM0K132E)
CAUTION
SRS airbag precautions
Do not strike or apply significant levels of force to the area of the SRS air-
bag components.
Doing so can cause the SRS airbags to malfunction.
Do not touch any of the component parts immediately after the SRS air-
bags have deployed (inflated) as they may be hot.
If breathing becomes difficult after the SRS airbags have deployed, open a
door or window to allow fresh air in, or leave the vehicle if it is safe to do
so. Wash off any residue as soon as possible to prevent skin irritation.
If the areas where the SRS airbags are stored, such as the steering wheel
pad and front and rear pillar garnishes, are damaged or cracked, have
them replaced by any authorized Toyota dealer or repairer, or another duly
qualified and equipped professional.
Modification and disposal of SRS airbag system components
Do not dispose of your vehicle or perform any of the following modifications
without consulting any authorized Toyota dealer or repairer, or another duly
qualified and equipped professional. The SRS airbags may malfunction or
deploy (inflate) accidentally, causing death or serious injury.
Installation, removal, disassembly and repair of the SRS airbags
Repairs, modifications, removal or replacement of the steering wheel,
instrument panel, dashboard, seats or seat upholstery, front, side and rear
pillars or roof side rails
Repairs or modifications of the front fender, front bumper, or side of the
occupant compartment
Installation of snow plows, winches, etc. to the front grille (bull bars or kan-
garoo bar etc.)
Modifications to the vehicle’s suspension system
Installation of electronic devices such as RF-transmitter and CD players
Page 156 of 636
156 2-1. Driving procedures
HILUX_EE (OM0K132E)
CAUTION
When the vehicle is parked
Do not leave glasses, cigarette lighters, spray cans, or soft drink cans in
the vehicle when it is in the sun.
Doing so may result in the following:
• Gas may leak from a cigarette lighter or spray can, and may lead to a
fire.
• The temperature inside the vehicle may cause the plastic lenses and
plastic material of glasses to deform or crack.
• Soft drink cans may fracture, causing the contents to spray over the
interior of the vehicle, and may also cause a short circuit in the vehi-
cle’s electrical components.
Do not leave cigarette lighters in the vehicle. If a cigarette lighter is in a
place such as the glove box or on the floor, it may be lit accidentally when
luggage is loaded or the seat is adjusted, causing a fire.
Do not attach adhesive discs to the windshield or windows. Do not place
containers such as air fresheners on the instrument panel or dashboard.
Adhesive discs or containers may act as lenses, causing a fire in the vehi-
cle.
Do not leave a door or window open if the curved glass is coated with a
metallized film such as a silver-colored one. Reflected sunlight may cause
the glass to act as a lens, causing a fire.
Always apply the parking brake, shift the shift lever to P (vehicles with
automatic transmission only), stop the engine and lock the vehicle.
Do not leave the vehicle unattended while the engine is running.
Page 178 of 636
178 2-2. Instrument cluster
HILUX_EE (OM0K132E)
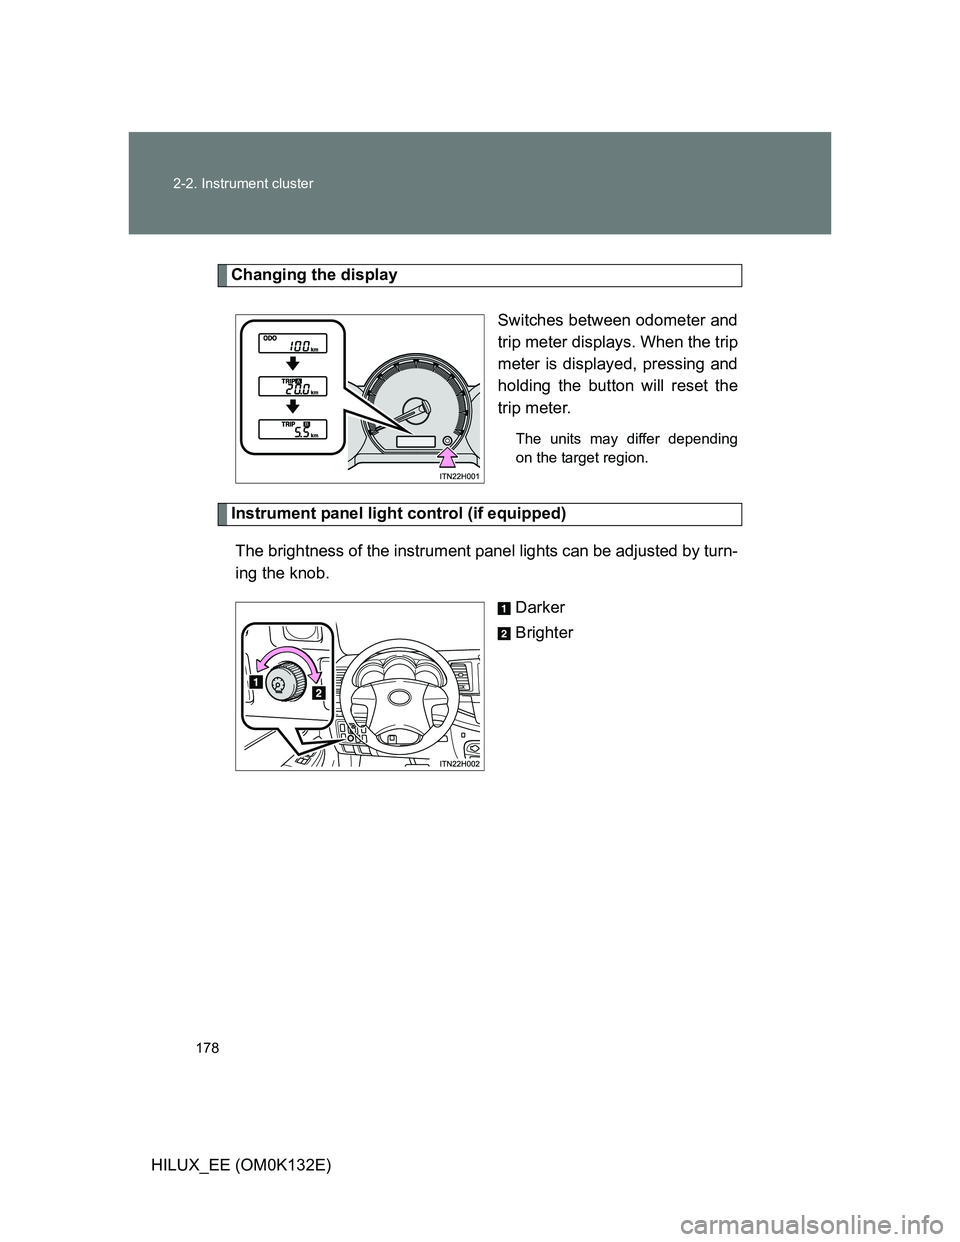
Changing the display
Switches between odometer and
trip meter displays. When the trip
meter is displayed, pressing and
holding the button will reset the
trip meter.
The units may differ depending
on the target region.
Instrument panel light control (if equipped)
The brightness of the instrument panel lights can be adjusted by turn-
ing the knob.
Darker
Brighter