TOYOTA HILUX 2023 Owner's Manual
HILUX 2023
TOYOTA
TOYOTA
https://www.carmanualsonline.info/img/14/60046/w960_60046-0.png
TOYOTA HILUX 2023 Owner's Manual
Page 535 of 810
5337-3. Do-it-yourself maintenance
HILUX_OM_OM0K789E_(EE)
7
Maintenance and care
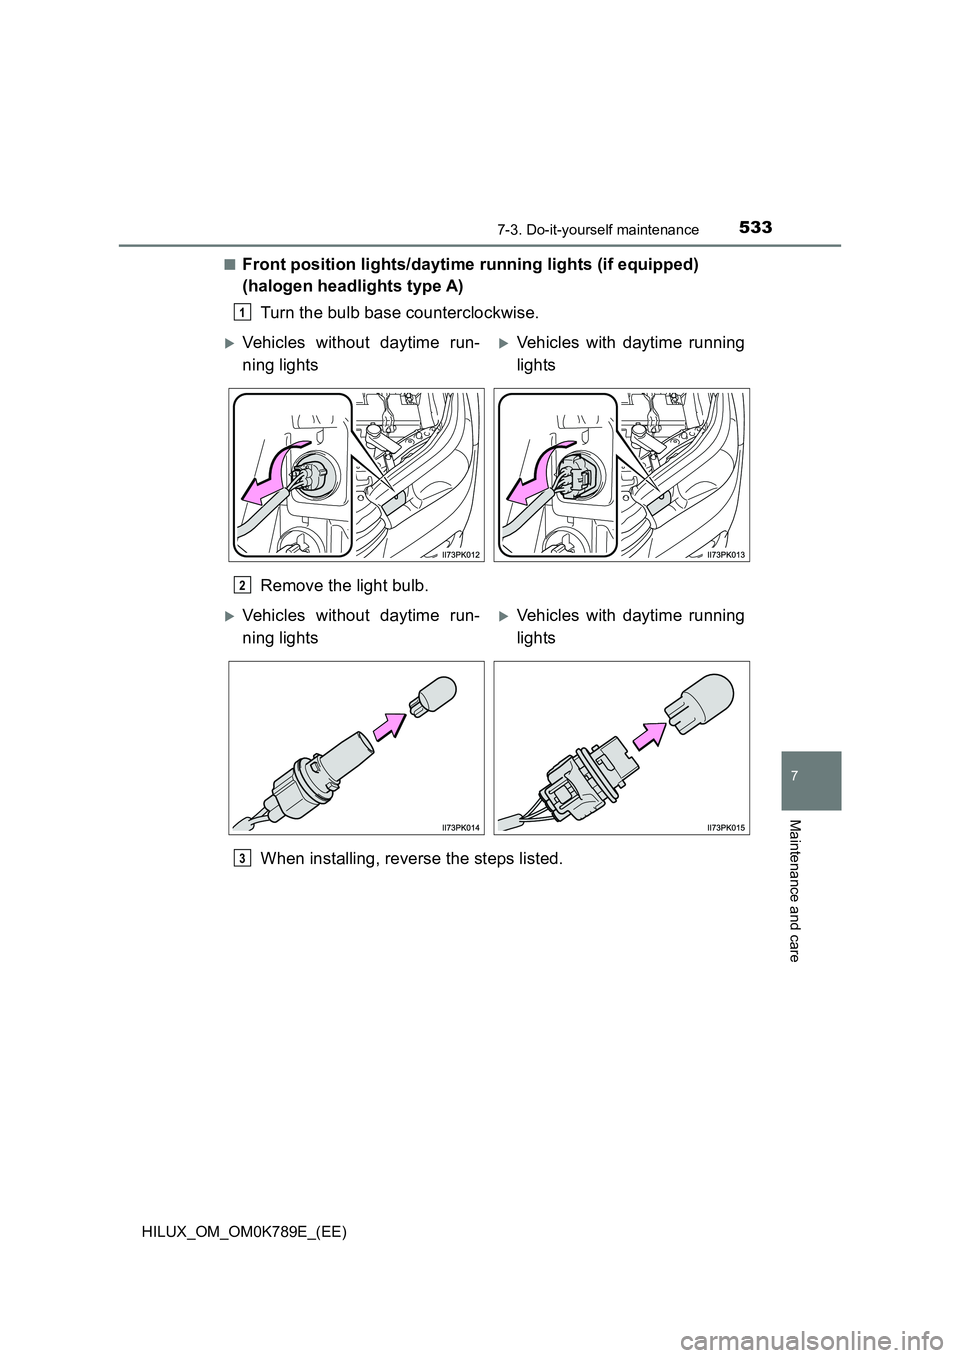
■Front position lights/daytime running lights (if equipped)
(halogen headlights type A)
Turn the bulb base counterclockwise.
Remove the light bulb.
When installing, reverse the steps listed.
1
Vehicles without daytime run-
ning lights
Vehicles with daytime running
lights
2
Vehicles without daytime run-
ning lights
Vehicles with daytime running
lights
3
Page 537 of 810
5357-3. Do-it-yourself maintenance
HILUX_OM_OM0K789E_(EE)
7
Maintenance and care
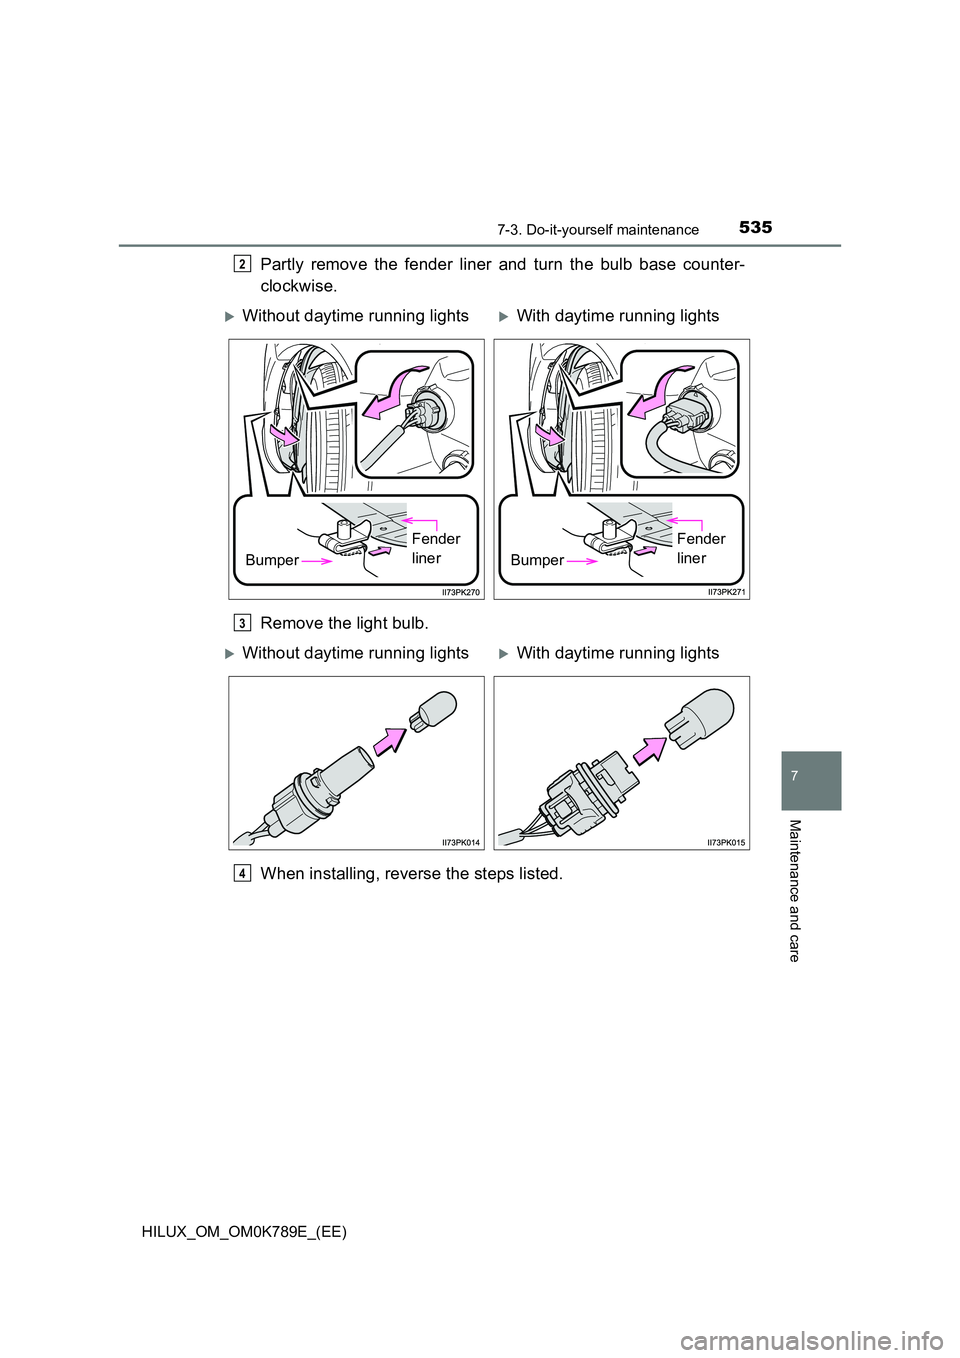
Partly remove the fender liner and turn the bulb base counter-
clockwise.
Remove the light bulb.
When installing, reverse the steps listed.
2
Without daytime running lightsWith daytime running lights
Bumper
Fender
linerBumper
Fender
liner
3
Without daytime running lightsWith daytime running lights
4
Page 538 of 810
5367-3. Do-it-yourself maintenance
HILUX_OM_OM0K789E_(EE)
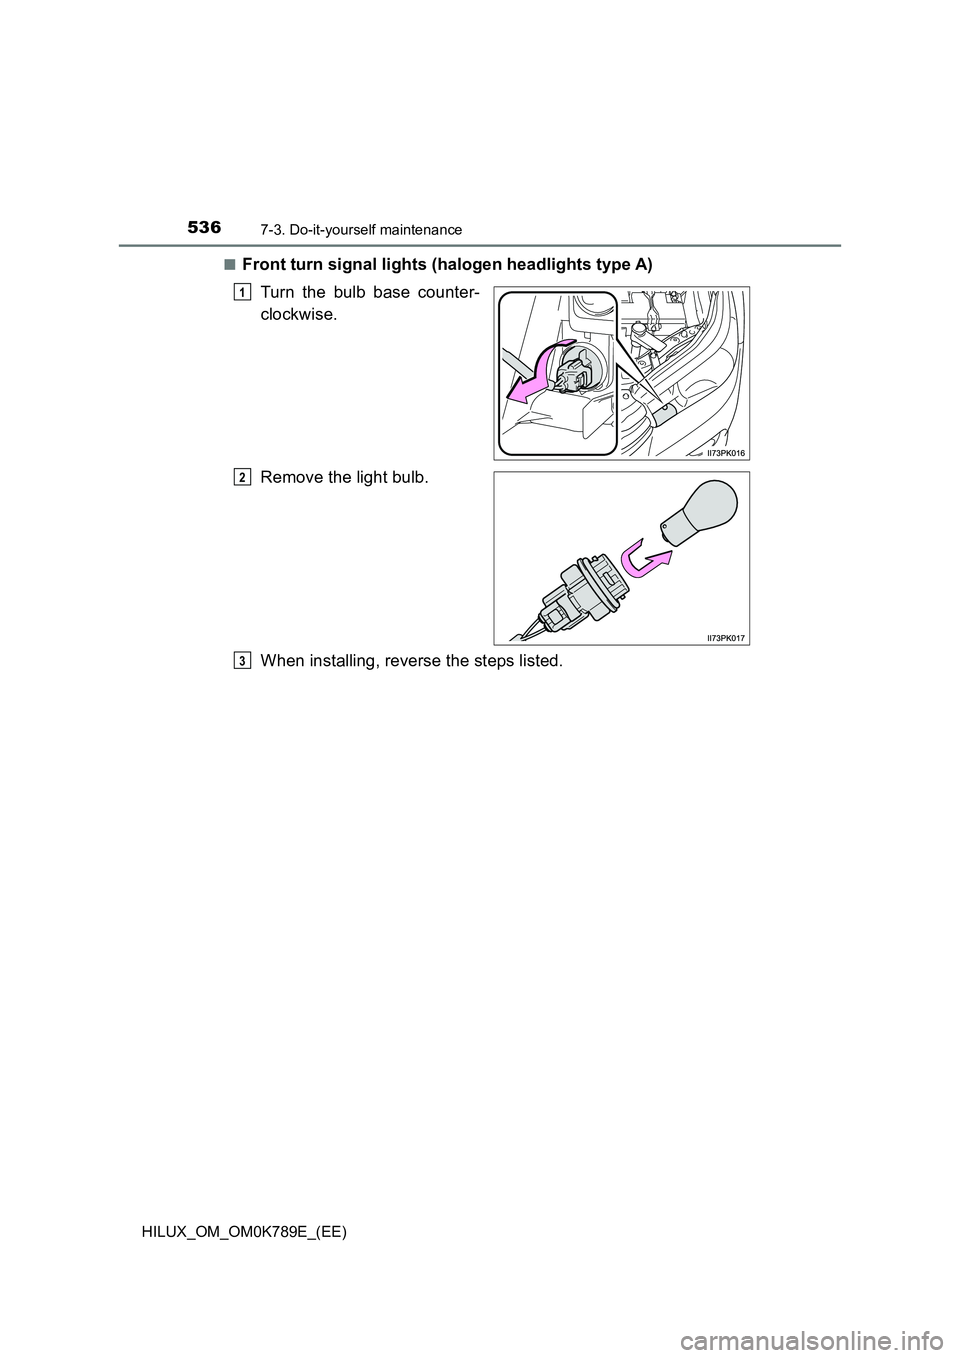
■Front turn signal lights (halogen headlights type A)
Turn the bulb base counter-
clockwise.
Remove the light bulb.
When installing, reverse the steps listed.
1
2
3
Page 540 of 810
5387-3. Do-it-yourself maintenance
HILUX_OM_OM0K789E_(EE)
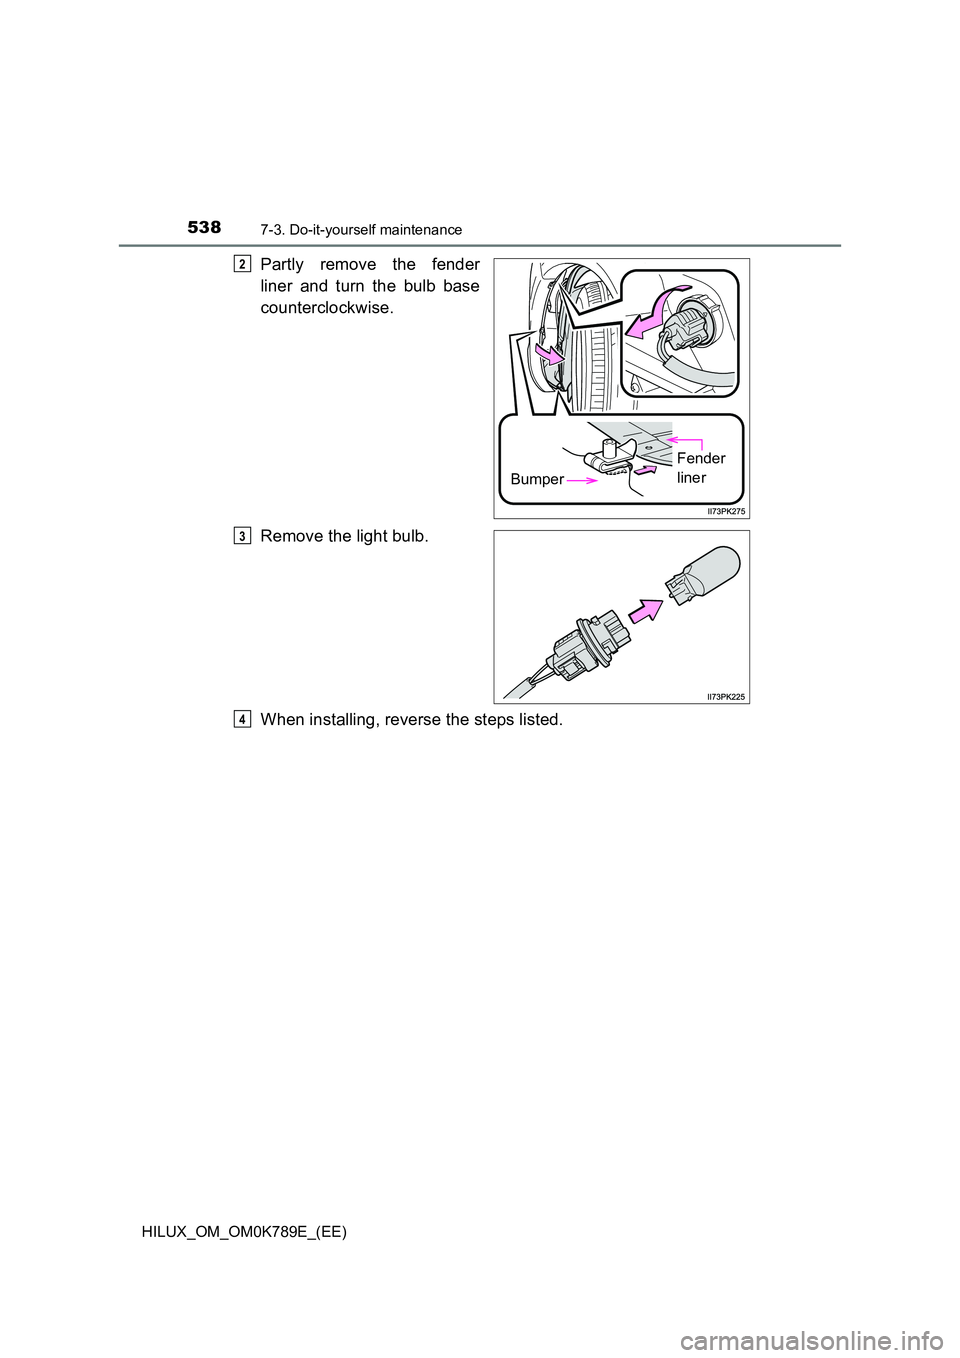
Partly remove the fender
liner and turn the bulb base
counterclockwise.
Remove the light bulb.
When installing, reverse the steps listed.
Bumper
Fender
liner
2
3
4
Page 542 of 810
5407-3. Do-it-yourself maintenance
HILUX_OM_OM0K789E_(EE)
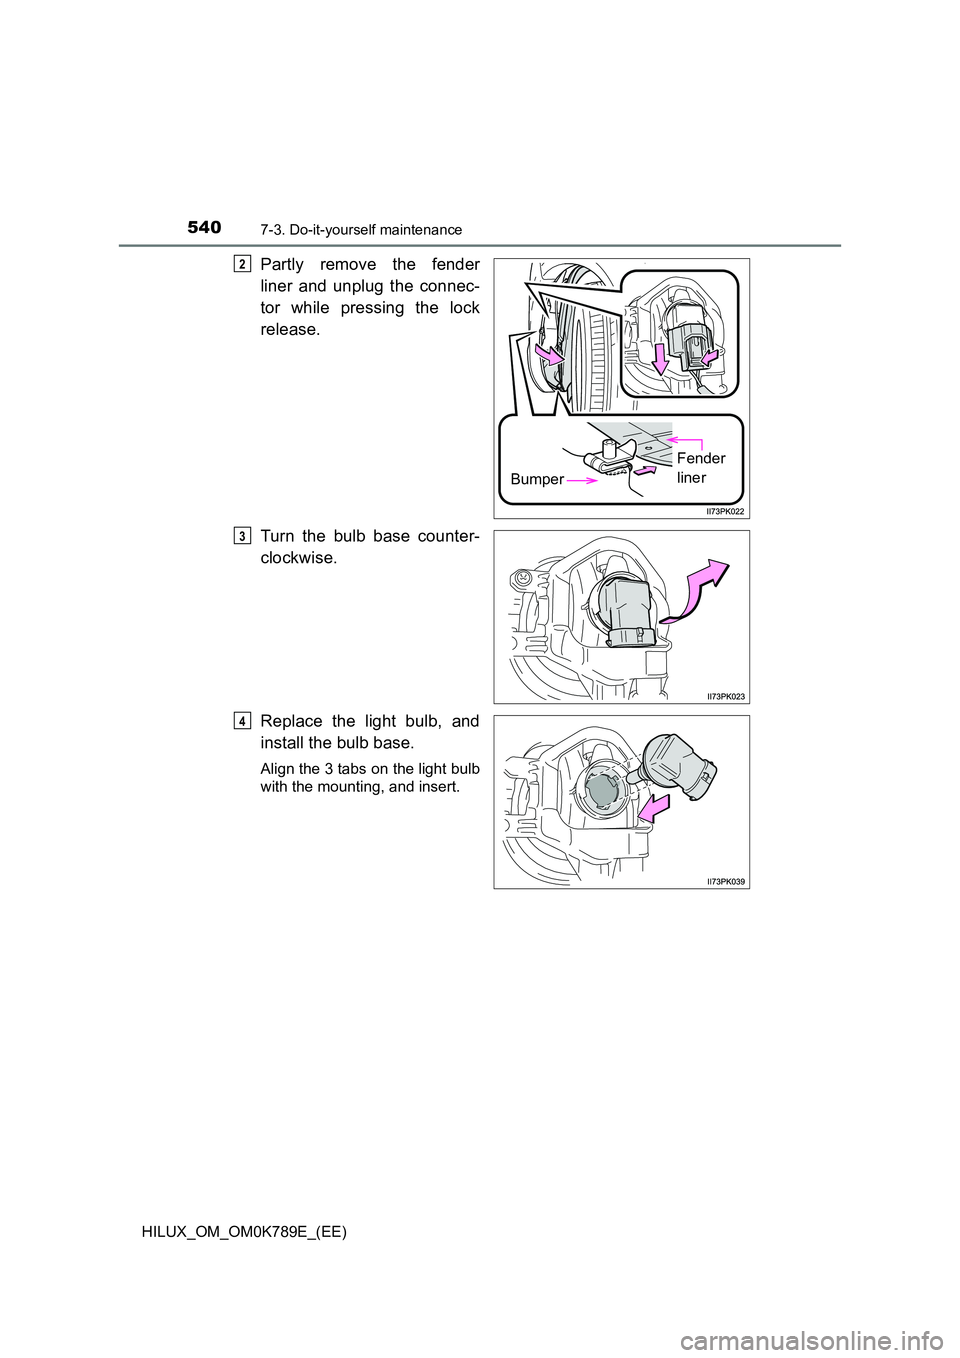
Partly remove the fender
liner and unplug the connec-
tor while pressing the lock
release.
Turn the bulb base counter-
clockwise.
Replace the light bulb, and
install the bulb base.
Align the 3 tabs on the light bulb
with the mounting, and insert.
Bumper
Fender
liner
2
3
4
Page 544 of 810
5427-3. Do-it-yourself maintenance
HILUX_OM_OM0K789E_(EE)
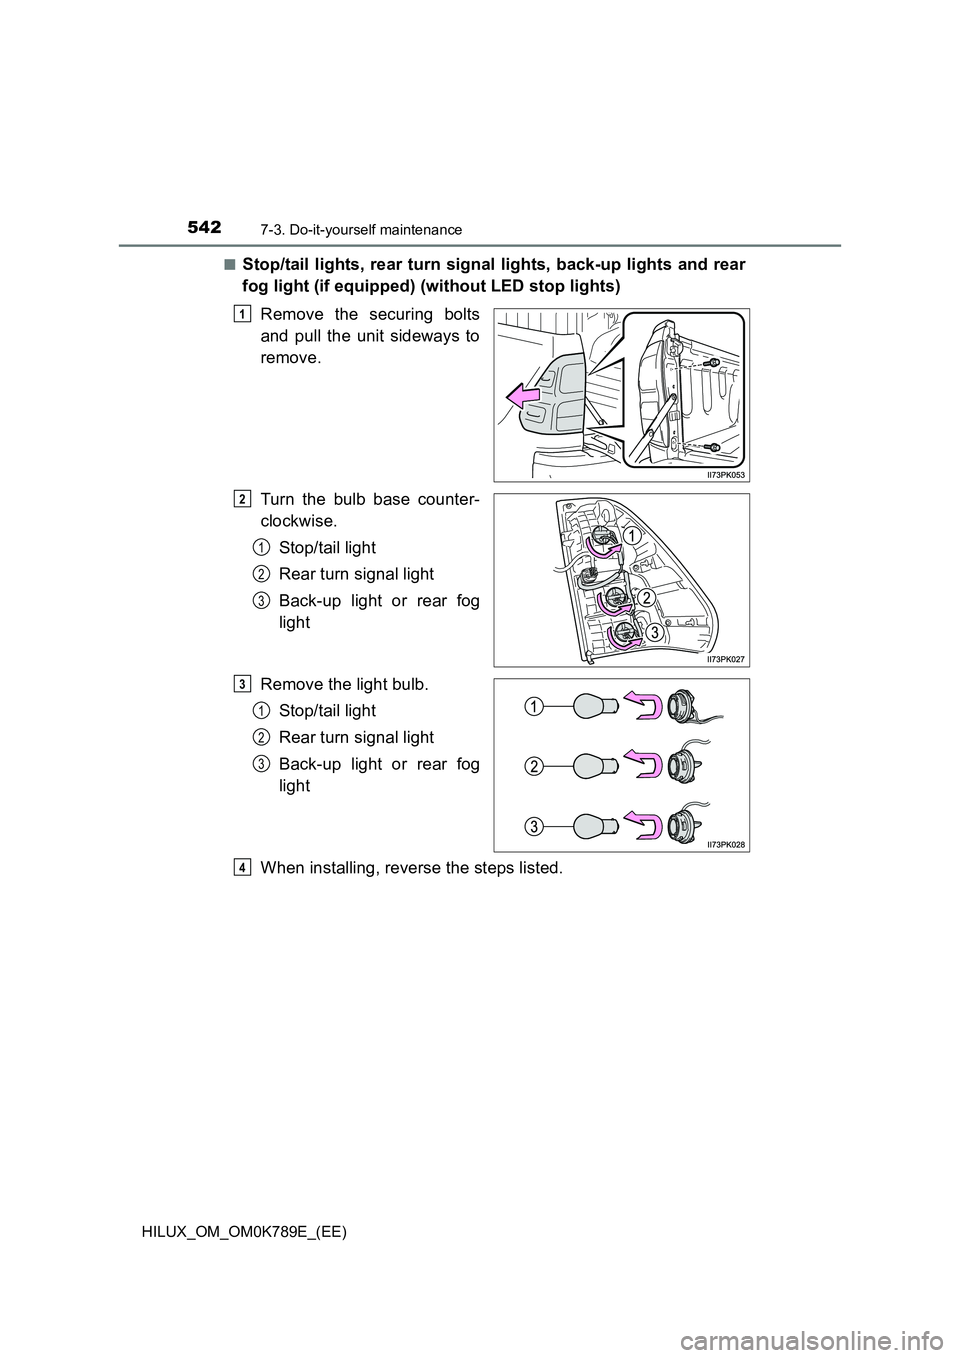
■Stop/tail lights, rear turn signal lights, back-up lights and rear
fog light (if equipped) (without LED stop lights)
Remove the securing bolts
and pull the unit sideways to
remove.
Turn the bulb base counter-
clockwise.
Stop/tail light
Rear turn signal light
Back-up light or rear fog
light
Remove the light bulb.
Stop/tail light
Rear turn signal light
Back-up light or rear fog
light
When installing, reverse the steps listed.
1
2
1
2
3
3
1
2
3
4
Page 545 of 810
5437-3. Do-it-yourself maintenance
HILUX_OM_OM0K789E_(EE)
7
Maintenance and care
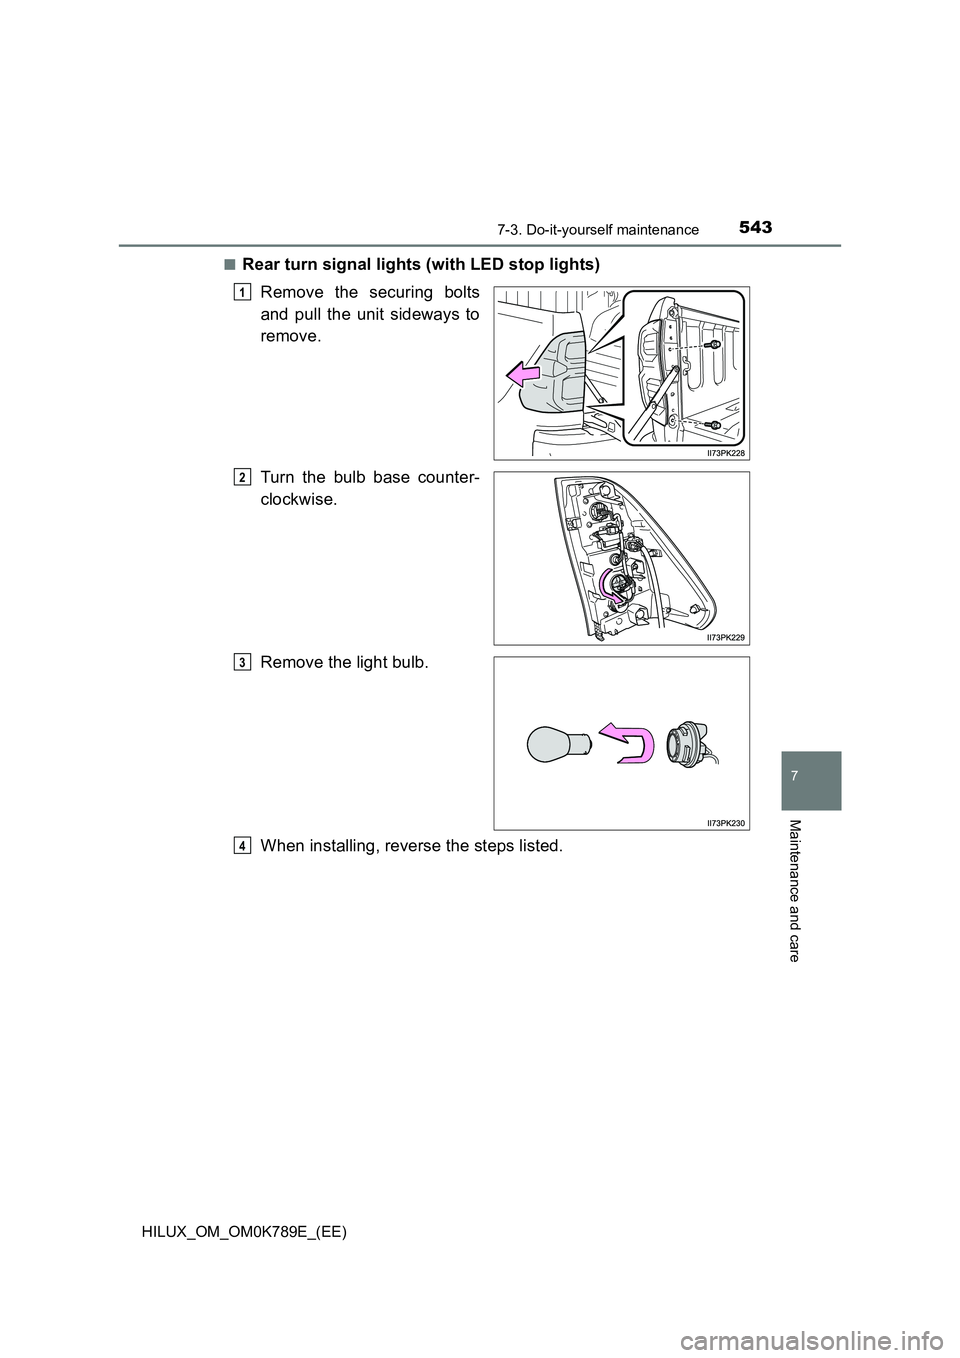
■Rear turn signal lights (with LED stop lights)
Remove the securing bolts
and pull the unit sideways to
remove.
Turn the bulb base counter-
clockwise.
Remove the light bulb.
When installing, reverse the steps listed.
1
2
3
4
Page 546 of 810
5447-3. Do-it-yourself maintenance
HILUX_OM_OM0K789E_(EE)
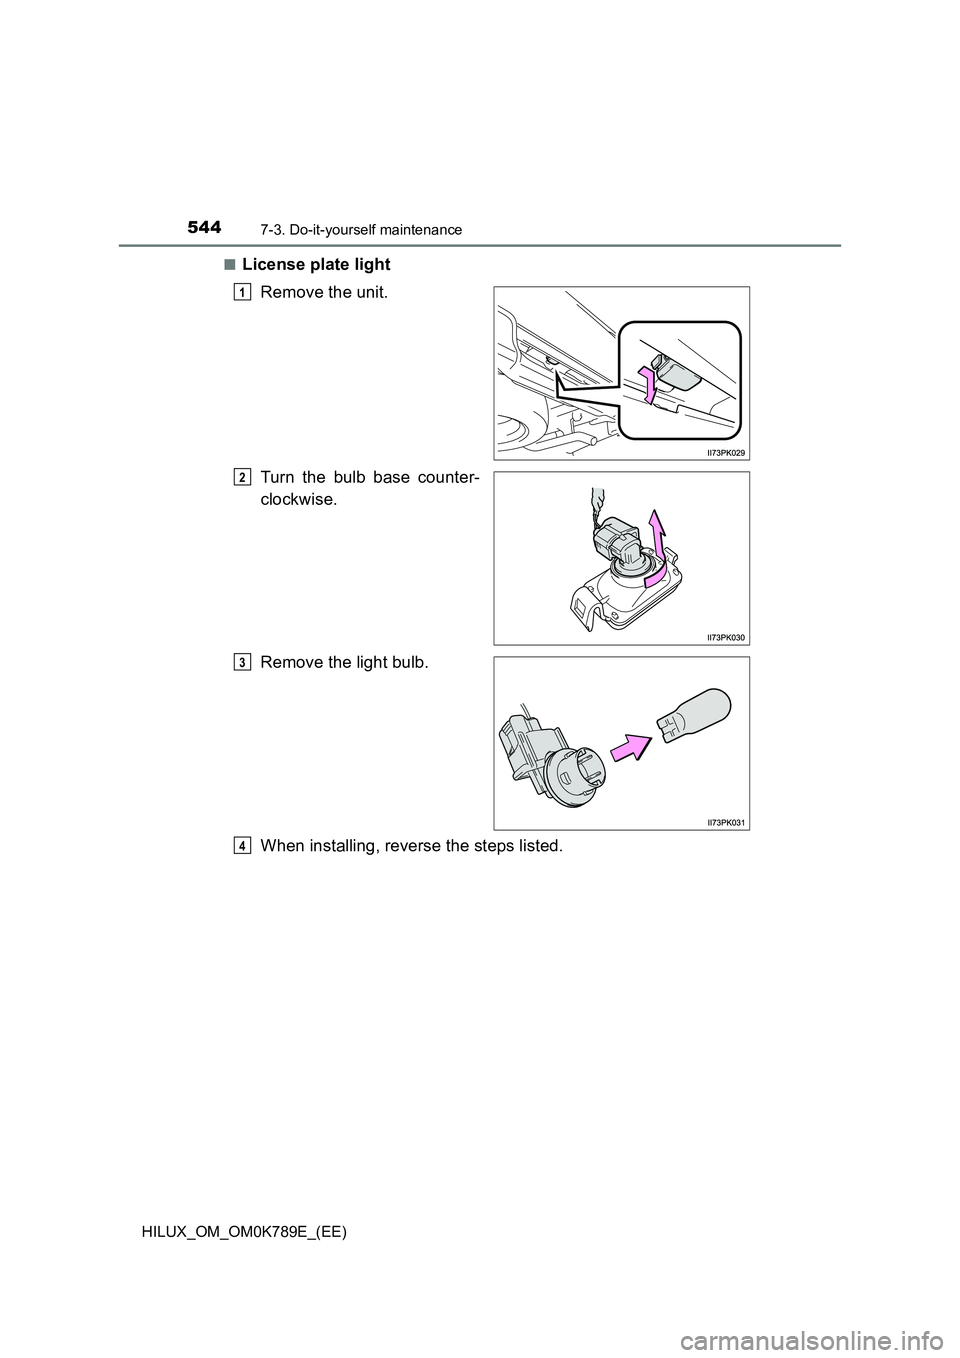
■License plate light
Remove the unit.
Turn the bulb base counter-
clockwise.
Remove the light bulb.
When installing, reverse the steps listed.
1
2
3
4
Page 549 of 810
5477-3. Do-it-yourself maintenance
HILUX_OM_OM0K789E_(EE)
7
Maintenance and care
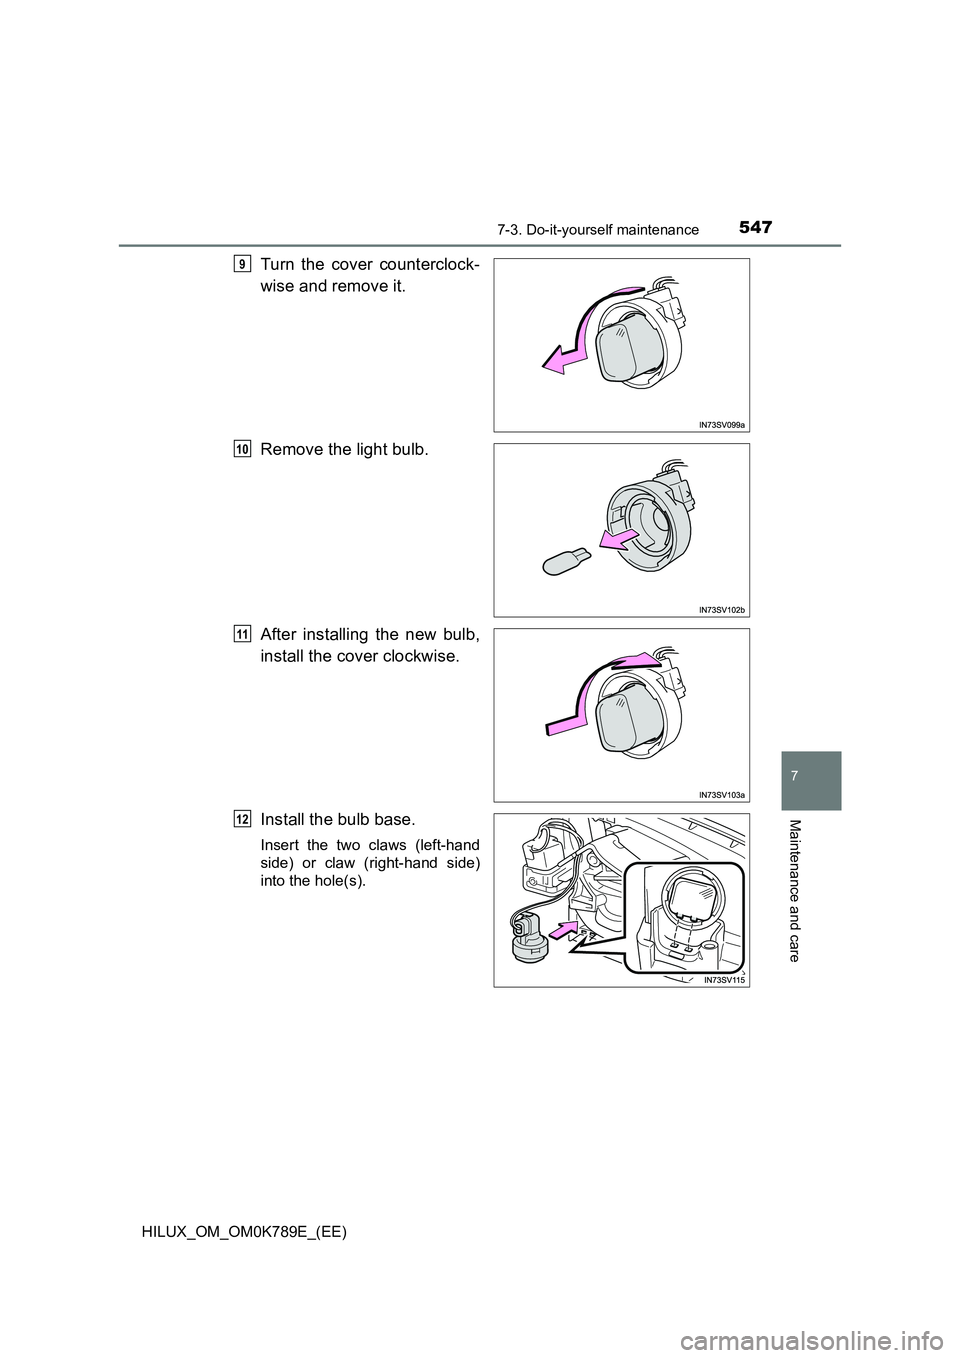
Turn the cover counterclock-
wise and remove it.
Remove the light bulb.
After installing the new bulb,
install the cover clockwise.
Install the bulb base.
Insert the two claws (left-hand
side) or claw (right-hand side)
into the hole(s).
9
10
11
12
Page 596 of 810
5948-2. Steps to take in an emergency
HILUX_OM_OM0K789E_(EE)
Type C
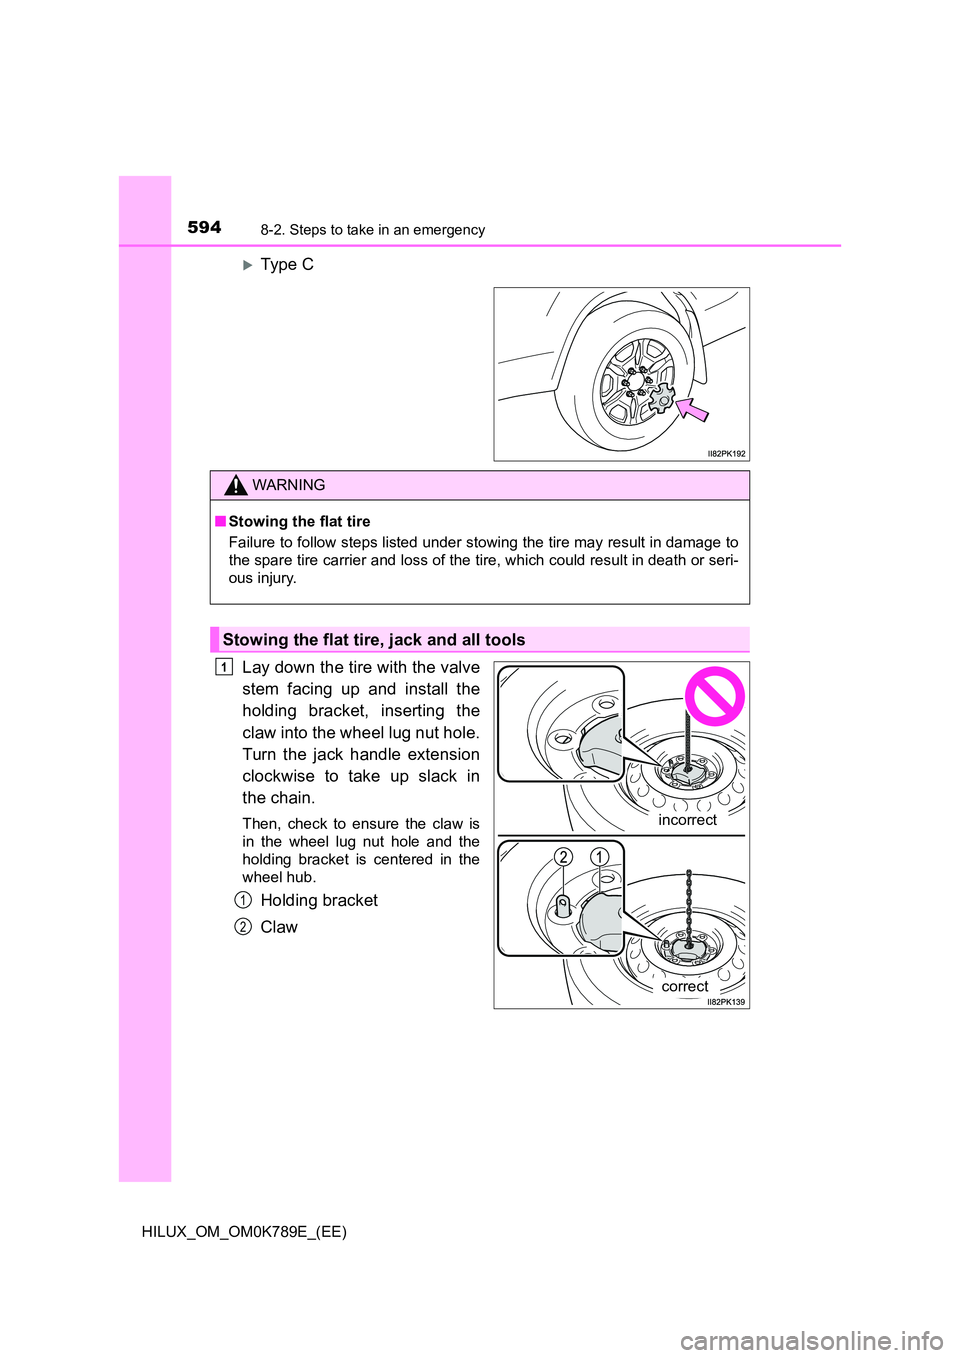
Lay down the tire with the valve
stem facing up and install the
holding bracket, inserting the
claw into the wheel lug nut hole.
Turn the jack handle extension
clockwise to take up slack in
the chain.
Then, check to ensure the claw is
in the wheel lug nut hole and the
holding bracket is centered in the
wheel hub.
Holding bracket
Claw
WARNING
■ Stowing the flat tire
Failure to follow steps listed under stowing the tire may result in damage to
the spare tire carrier and loss of the tire, which could result in death or seri-
ous injury.
Stowing the flat tire, jack and all tools
incorrect
correct
1
1
2
