ECU TOYOTA HILUX 2023 Manual PDF
[x] Cancel search | Manufacturer: TOYOTA, Model Year: 2023, Model line: HILUX, Model: TOYOTA HILUX 2023Pages: 810, PDF Size: 131.54 MB
Page 263 of 810

2614-4. Refueling
4
Driving
HILUX_OM_OM0K789E_(EE)
WARNING
■When refueling the vehicle
Observe the following precautions while refueling the vehicle. Failure to do
so may result in death or serious injury.
● After exiting the vehicle and before opening the fuel cap, touch an
unpainted metal surface to discharge any stat ic electricity. It is important to
discharge static electricity before re fueling because sparks resulting from
static electricity can cause fuel vapors to ignite while refueling.
● Type A (P. 262) only: Always hold the grips on the fuel tank cap and turn
it slowly to remove it.
A whooshing sound may be heard when the fuel tank cap is loosened.
Wait until the sound cannot be heard before fully removing the cap. In hot
weather, pressurized fuel may spray out the filler neck and cause injury.
● Do not allow anyone that has not discharged static electricity from their
body to come close to an open fuel tank.
● Do not inhale vaporized fuel.
Fuel contains substances that are harmful if inhaled.
● Do not smoke while refueling the vehicle.
Doing so may cause the fuel to ignite and cause a fire.
● Do not return to the vehicle or touch any person or object that is statically
charged.
This may cause static electricity to build up, resulting in a possible ignition
hazard.
■ When refueling
Observe the following precautions to pr event fuel overflowing from the fuel
tank:
● Securely insert the fuel nozzle into the fuel filler neck.
● Stop filling the tank after the fuel nozzle automatically clicks off.
● Do not top off the fuel tank.
Page 416 of 810

4145-6. Using Bluetooth® devices
HILUX_OM_OM0K789E_(EE)
Registering a Bluetooth® device
Press the “TUNE•SELECT” knob and select “Bluetooth” using the
knob.
Press the knob and select “Pairing” using the knob.
A passkey will be displayed.
SSP (Secure Simple Pairing) incompatible Bluetooth® devices:
Input the passkey into the device.
SSP (Secure Simple Pairing) compatible Bluetooth® devices:
Select “Yes” to register the device. Depending on the type of
device, it may register automatically.
If a Bluetooth® device has both music player and cellular phone func-
tions, both functions will be registered at the same time. When delet-
ing the device, both functions will be deleted at the same time.
If the off-hook button is pressed and the “TEL” mode is entered when
no phones have been registered, the registration screen will be auto-
matically displayed.
Before using the Bluetooth® audio/phone, it is necessary to reg-
ister a Bluetooth® device in the system. You can register up to 5
Bluetooth® devices.
How to register a Bluetooth® device
1
2
3
Page 465 of 810

4636-3. Using the storage features
HILUX_OM_OM0K789E_(EE)
6
Interior features
Luggage compartment features
Deck hooks are provided for
securing loose items.
Deck hooks (if equipped)
Page 487 of 810

4857-3. Do-it-yourself maintenance
HILUX_OM_OM0K789E_(EE)
7
Maintenance and care
WARNING
■Pre-driving check
Check that the hood is fully closed and locked.
If the hood is not locked properly, it may open while the vehicle is in motion
and cause an accident, which may result in death or serious injury.
■ After installing the support rod into the slot
Make sure the rod supports the hood securely from falling down on to your
head or body.
NOTICE
■ When closing the hood
Be sure to return the support rod to its clip before closing the hood. Closing
the hood with the support rod up could cause the hood to bend.
Page 497 of 810

4957-3. Do-it-yourself maintenance
HILUX_OM_OM0K789E_(EE)
7
Maintenance and care
If there are not lines on the side of the battery:
Check the fluid level as follows.
Remove the vent plug.
Check the fluid level by look-
ing directly at the cell.
If the fluid level is low, add dis-
tilled water.
Put the vent plug back on and close it securely.
■Adding distilled water (vehicles with maintenance type bat-
tery)
Remove the vent plug.
Add distilled water.
Put the vent plug back on and close it securely.
■ Before recharging
When recharging, the battery produces hydrogen gas which is flammable and
explosive. Therefore, observe the following before recharging:
● If recharging with the battery installed on the vehicle, be sure to disconnect
the ground cable.
● Make sure the power switch on the charger is off when connecting and dis-
connecting the charger cables to the battery.
1
Low O.K.2
3
1
2
3
Page 508 of 810

5067-3. Do-it-yourself maintenance
HILUX_OM_OM0K789E_(EE)
NOTICE
■When refilling AdBlue™
Observe the following precautions.
Failure to do so may result in damage to the vehicle parts, paint, etc.
● Do not use urea solution other than AdBlue™.
● If AdBlue™ comes into contact with any painted surfaces on the vehicle,
immediately wash the affected areas with water.
● If AdBlue™ is spilled inside the engine compartment, immediately wipe it
with a wet cloth.
■ When refilling AdBlue™ with the refilling equipment
Observe the following precautions to prevent AdBlue™ overflowing from the
AdBlue™ tank:
● Securely insert the nozzle into the AdBlue™ filler neck.
● Stop filling the tank after the nozzle automatically clicks off.
● Do not top off the AdBlue™ tank.
■ When storing AdBlue™ containers
Observe the following precautions.
Failure to do so may result in damage to vehicle parts, paint, etc., and
changes in the chemical compounds of AdBlue™ may cause unpleasant
odors.
● Do not leave AdBlue™ containers inside the vehicle.
● Tightly seal AdBlue™ containers and store them in a cool, dry location
with good ventilation and no exposure to direct sunlight.
Page 531 of 810

5297-3. Do-it-yourself maintenance
HILUX_OM_OM0K789E_(EE)
7
Maintenance and care
■Headlight (low beams) (halogen headlights type B)
Unplug the connector while
depressing the lock release.
Turn the bulb base counter-
clockwise.
Replace the light bulb, and
install the bulb base.
Align the 3 tabs on the light bulb
with the mounting, and insert.
Turn and secure the bulb
base.
1
2
3
4
Page 533 of 810

5317-3. Do-it-yourself maintenance
HILUX_OM_OM0K789E_(EE)
7
Maintenance and care
■Headlight (high beams) (halogen headlights type B)
Unplug the connector while
depressing the lock release.
Turn the bulb base counter-
clockwise.
Replace the light bulb, and
install the bulb base.
Align the 3 tabs on the light bulb
with the mounting, and insert.
Turn and secure the bulb
base.
1
2
3
4
Page 543 of 810

5417-3. Do-it-yourself maintenance
HILUX_OM_OM0K789E_(EE)
7
Maintenance and care
Turn and secure the bulb
base.
Install the connector.
Shake the bulb base gently to
check that it is not loose, turn
the front fog lights on once and
visually confirm that no light is
leaking through the mounting.
When installing the fender liner, screws and clips, reverse the
removing procedure in steps and .
5
6
7
12
Page 544 of 810
5427-3. Do-it-yourself maintenance
HILUX_OM_OM0K789E_(EE)
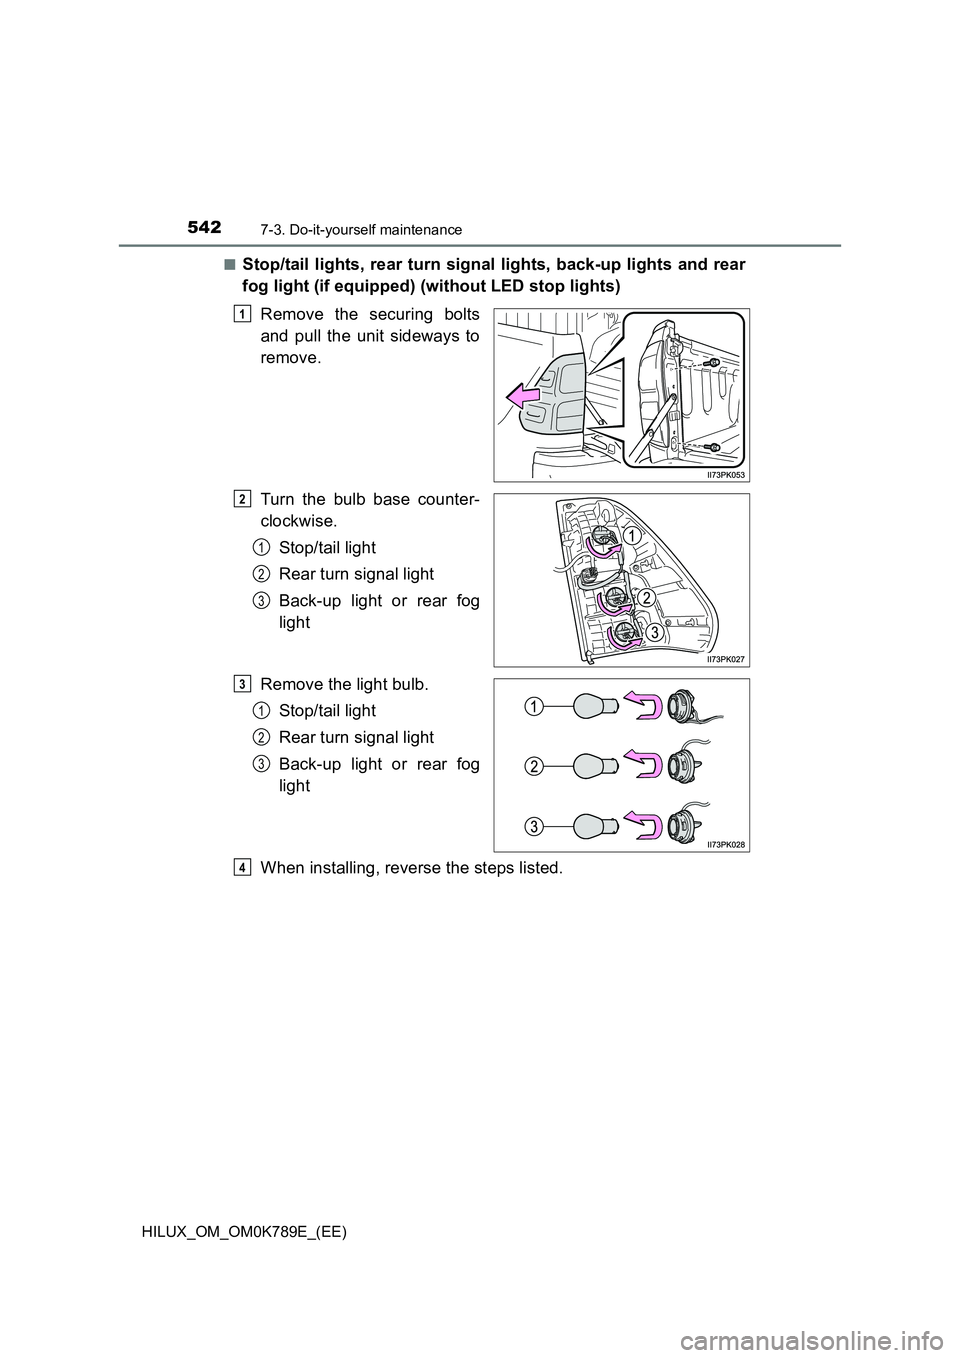
■Stop/tail lights, rear turn signal lights, back-up lights and rear
fog light (if equipped) (without LED stop lights)
Remove the securing bolts
and pull the unit sideways to
remove.
Turn the bulb base counter-
clockwise.
Stop/tail light
Rear turn signal light
Back-up light or rear fog
light
Remove the light bulb.
Stop/tail light
Rear turn signal light
Back-up light or rear fog
light
When installing, reverse the steps listed.
1
2
1
2
3
3
1
2
3
4