TOYOTA iA 2016 Accessories, Audio & Navigation (in English)
Manufacturer: TOYOTA, Model Year: 2016,
Model line: iA,
Model: TOYOTA iA 2016
Pages: 90, PDF Size: 1.1 MB
TOYOTA iA 2016 Accessories, Audio & Navigation (in English)
iA 2016
TOYOTA
TOYOTA
https://www.carmanualsonline.info/img/14/43202/w960_43202-0.png
TOYOTA iA 2016 Accessories, Audio & Navigation (in English)
Trending: width, phone, ECU, reset, light, ESP, engine
Page 21 of 90

21
1
2
3
4
5
6
Tilting up and
down, Changes the vertical view
angle of the map in 3D
mode.
Select the button once to mo dify the view in large
steps, or select and hold the button to modify it
continuously and smoothly.
Rotating left
and right , Changes the horizontal view angle of the map.
Select the button once to mo
dify the view in large
steps, or select and hold the button to modify it
continuously and smoothly.
Compass The direction of the compass shows North. Select
the button to switch to North-up view, and then
select again to rotate the map in the previous
direction.
Open/close , The UMP (menu bar) is displayed on the lower
part of the screen.
Hides the displayed UMP if the UMP has been
displayed.
Select
destination Select this button to select the Cursor as a new
destination. The route is automatically calculated.
Return to
normal
navigation Select this button to move the map back to follow
the current GPS position. Automatic map rotation
is also re-enabled.
The map manipulation buttons disappear and
navigation continues.
ActionButton(s)Description
Page 22 of 90
22
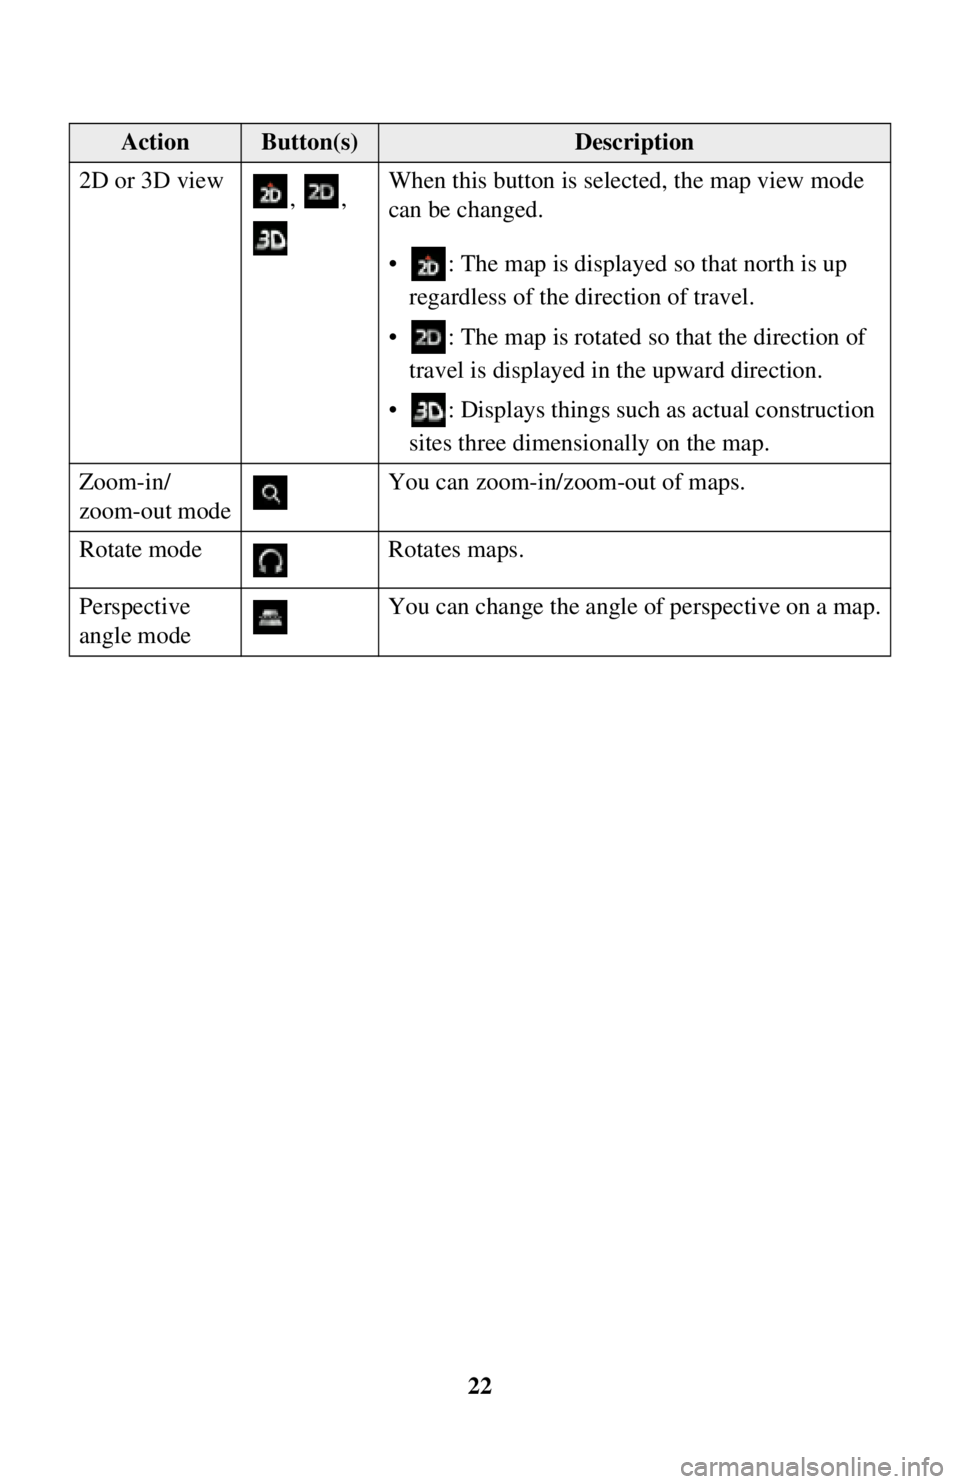
2D or 3D view
, , When this button is selected, the map view mode
can be changed.
• : The map is displayed so that north is up
regardless of the direction of travel.
• : The map is rotated so that the direction of travel is displayed in the upward direction.
• : Displays things such as actual construction sites three dimensionally on the map.
Zoom-in/
zoom-out mode You can zoom-in/zoom-out of maps.
Rotate mode Rotates maps.
Perspective
angle mode You can change the angle of perspective on a map.
ActionButton(s)Description
Page 23 of 90
23
1
2
3
4
5
6
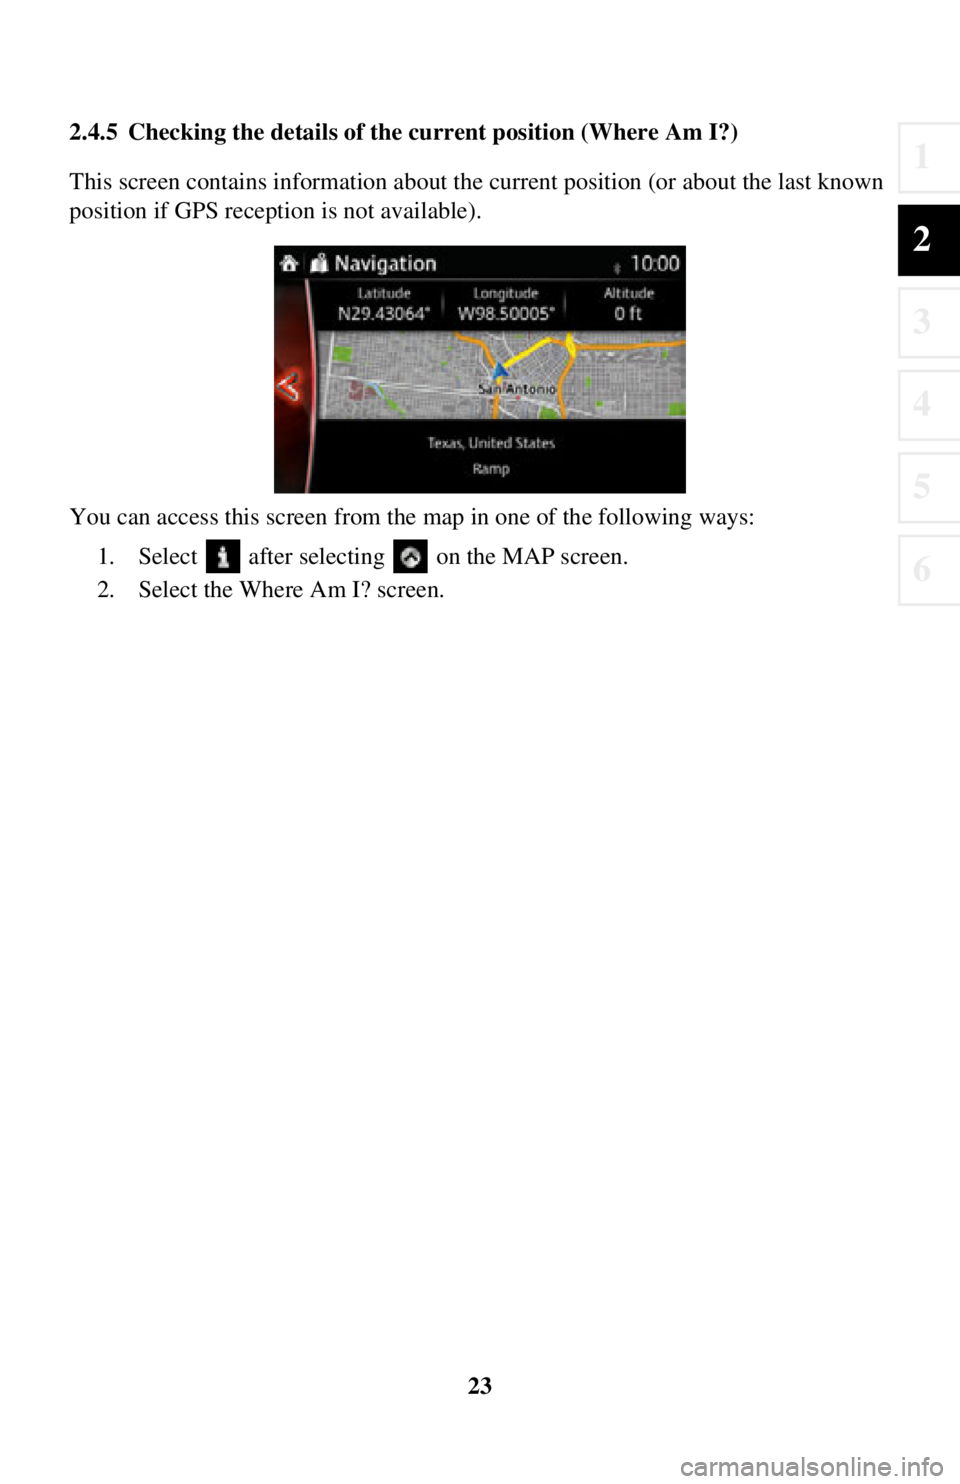
2.4.5 Checking the details of the current position (Where Am I?)
This screen contains information about the current position (or about the last known
position if GPS receptio n is not available).
You can access this screen from the map in one of the following ways:
1. Select after selectin g on the MAP screen.
2. Select the Where Am I? screen.
Page 24 of 90
24
3 On-road navigation
You can set up your route in different ways:
If you need a route for immediate navigation, you can select the destination and start
navigating to it right away (normal navigation).
You can plan routes with multiple destinations. Select the first destination. Then
select a second destination and add it to your route to create a mu lti-point route. You
can add as many destinations to your route as you like.
3.1 Selecting the destination of a route
The navigation system offers you seve ral ways of choosing your destination:
• Enter a full address or a part of an address (page 25).
• Select a POI (point of interest) from a database as your destination (page 38).
• Searches the destination from the map (page 54).
• Use a previously saved Favorite destination (page 56).
• Select a location from the History of previously used destinations (page 58).
• Enter the coordinate of the destination (page 60).
There are other convenient functions.
Page 25 of 90
25
1
2
3
4
5
6
3.1.1 Entering an address or a part of the address
If you know at least a part of the address, it is the quickest way to select the
destination of the route.
Using the same screen, you can find an address by entering:
• Destination address
• The center of a city
• An intersection
• The midpoint of a street
3.1.1.1 Entering an address
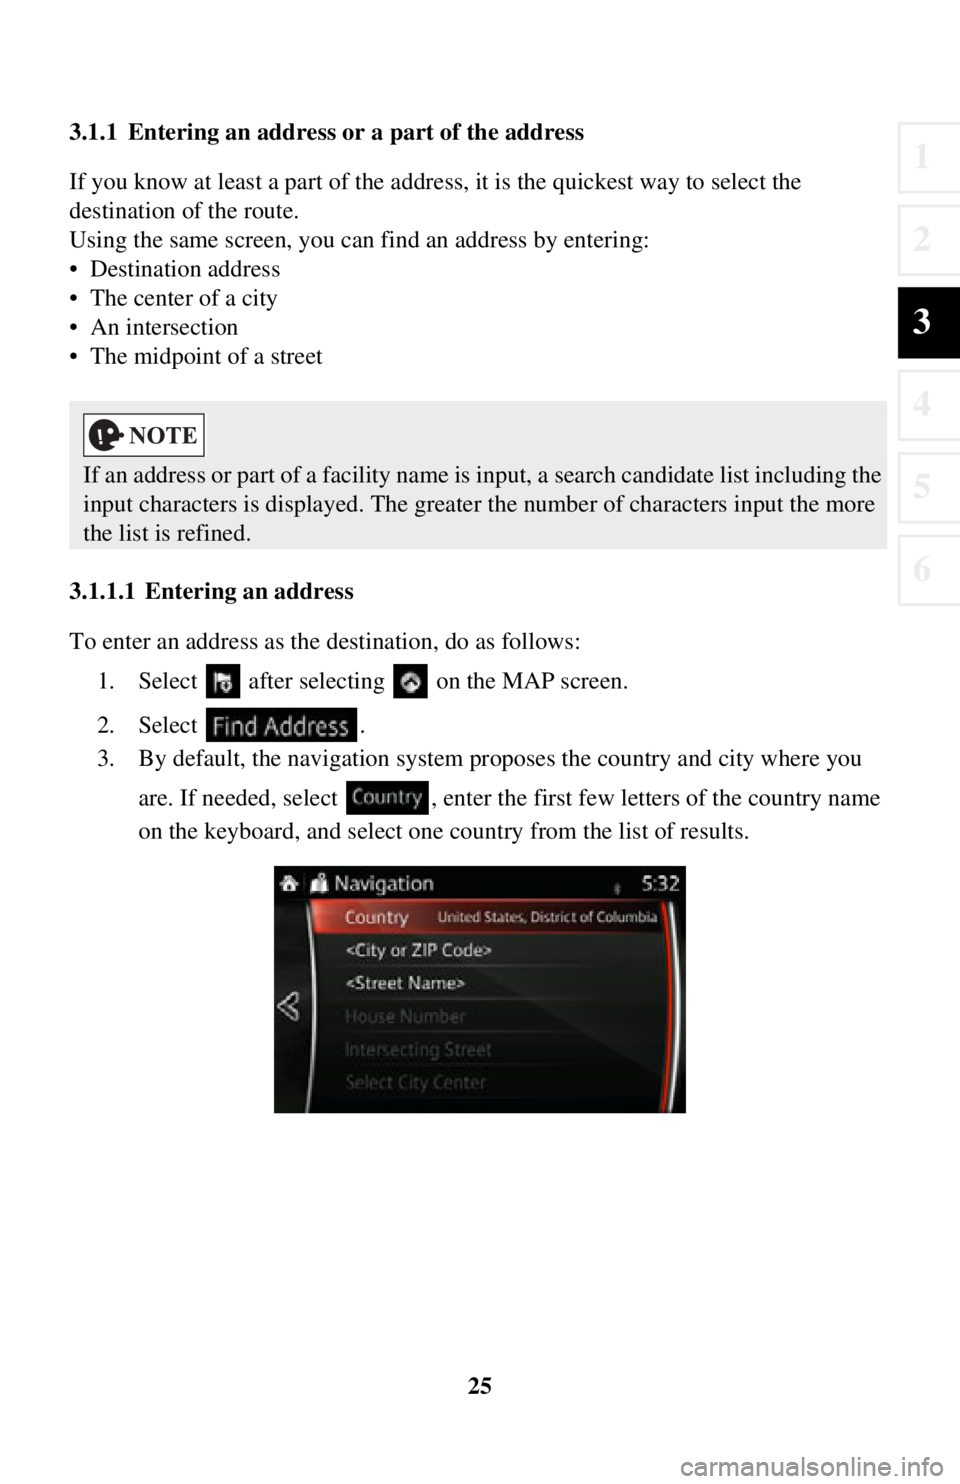
To enter an address as the destination, do as follows:
1. Select after selectin g on the MAP screen.
2. Select .
3. By default, the navigation system pr oposes the country and city where you
are. If needed, select , enter the first few letters of the country name
on the keyboard, and select one country from the list of results.
If an address or part of a facility name is input, a search candidate list including the
input characters is displayed. The greater the number of characters input the more
the list is refined.
Page 26 of 90
26
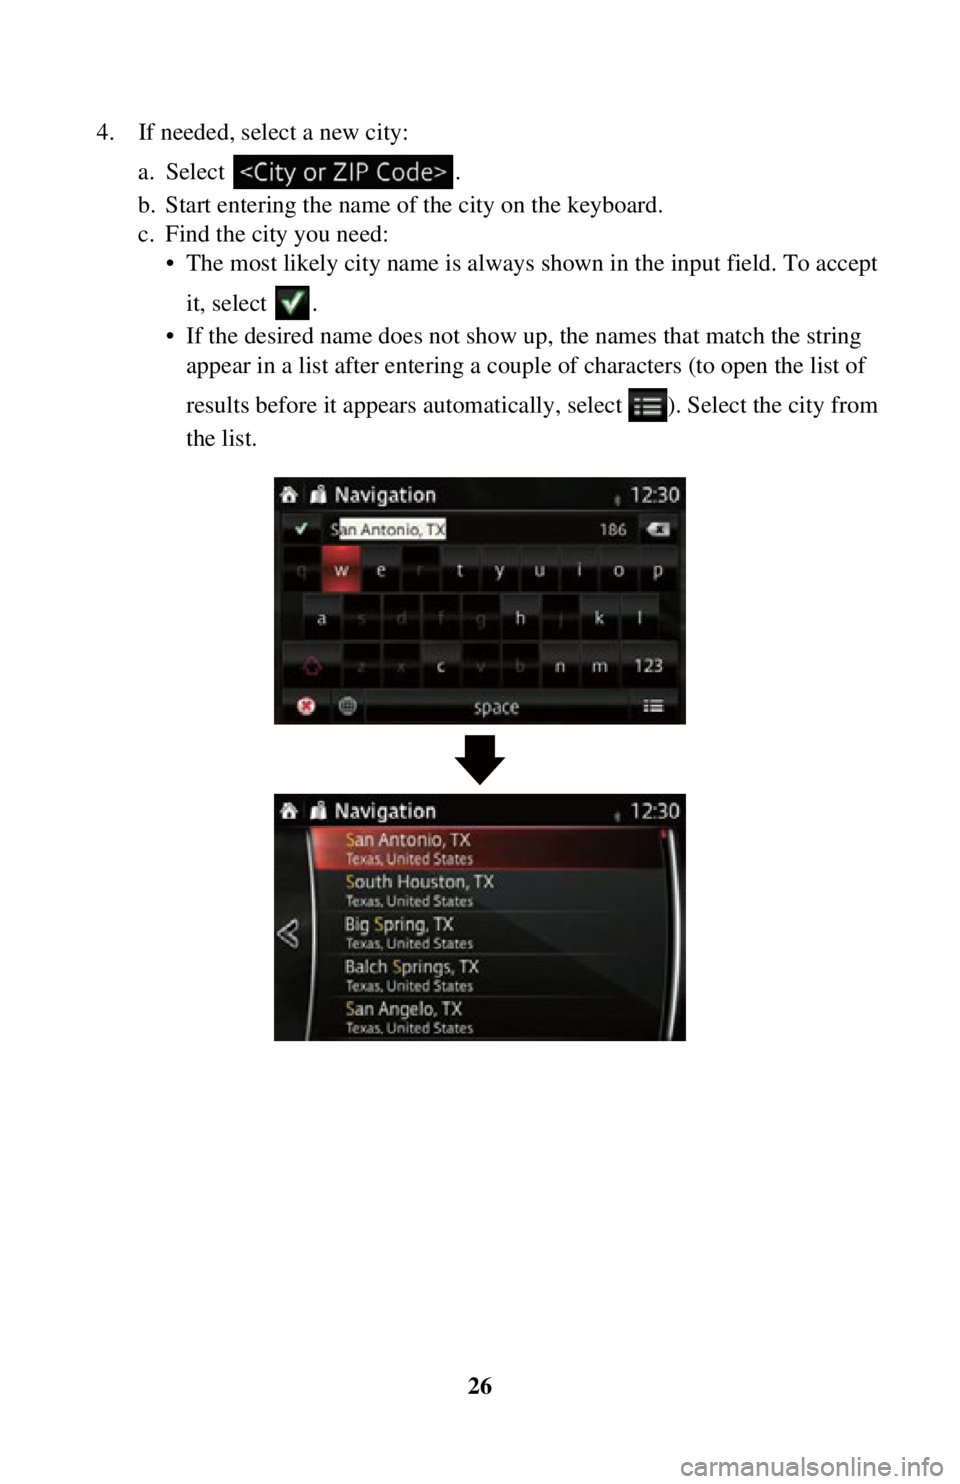
4. If needed, select a new city:
a. Select .
b. Start entering the name of the city on the keyboard.
c. Find the city you need:• The most likely city na me is always shown in the input field. To accept
it, select .
• If the desired name does not show up, the names that match the string appear in a list after entering a coup le of characters (to open the list of
results before it appears automatically , select ). Select the city from
the list.
Page 27 of 90
27
1
2
3
4
5
6
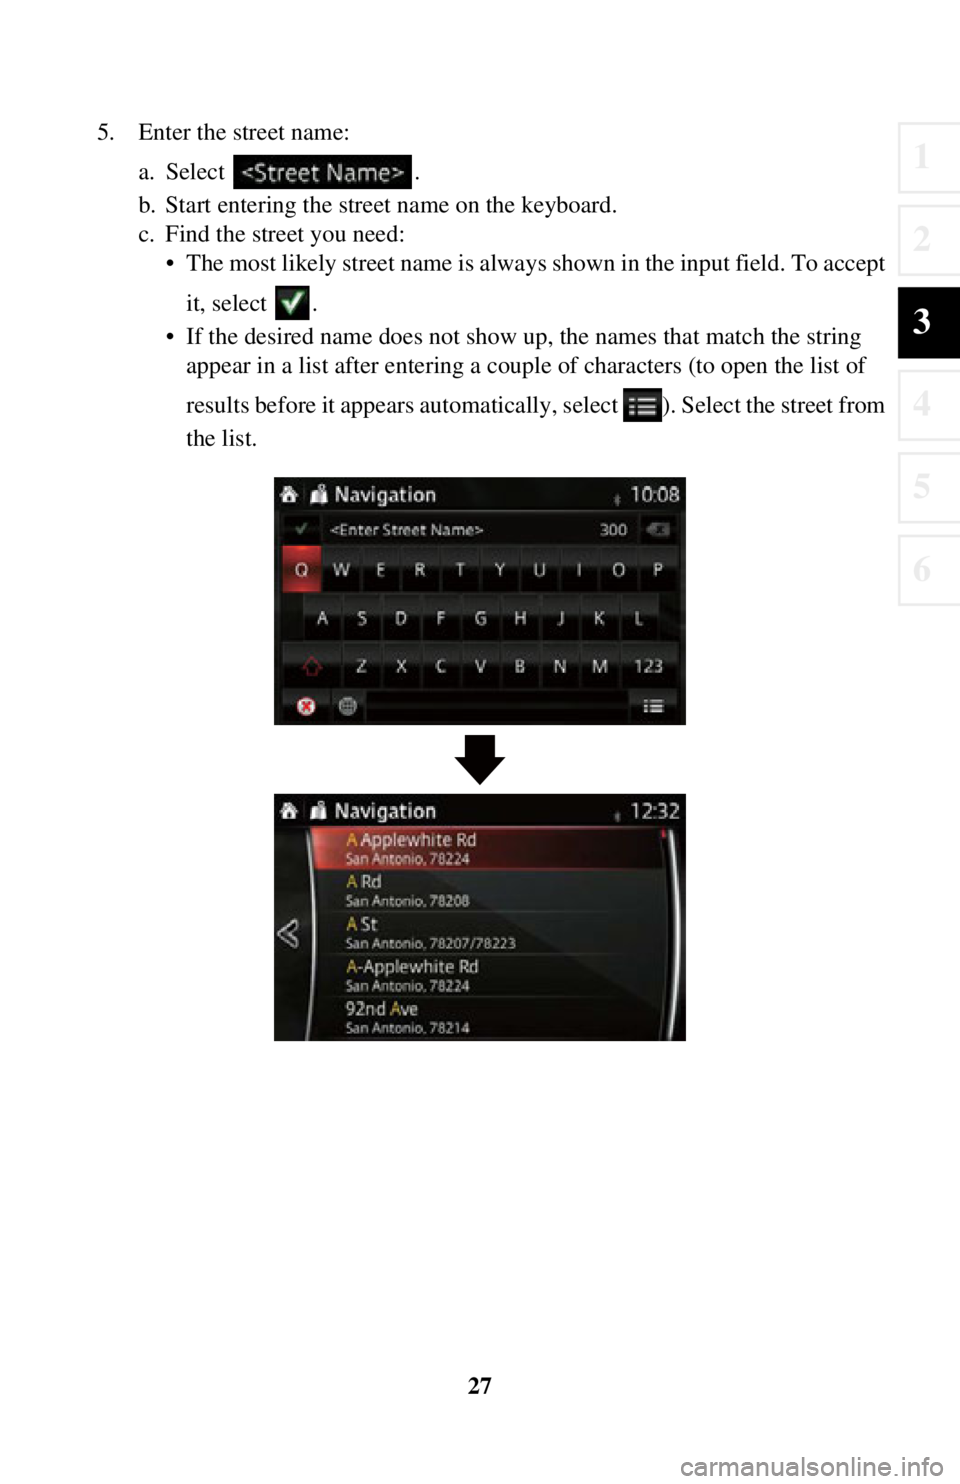
5. Enter the street name:a. Select .
b. Start entering the street name on the keyboard.
c. Find the street you need:• The most likely street name is always shown in the input field. To accept
it, select .
• If the desired name does not show up, the names that match the string appear in a list after entering a coup le of characters (to open the list of
results before it appears automatically , select ). Select the street from
the list.
Page 28 of 90
28
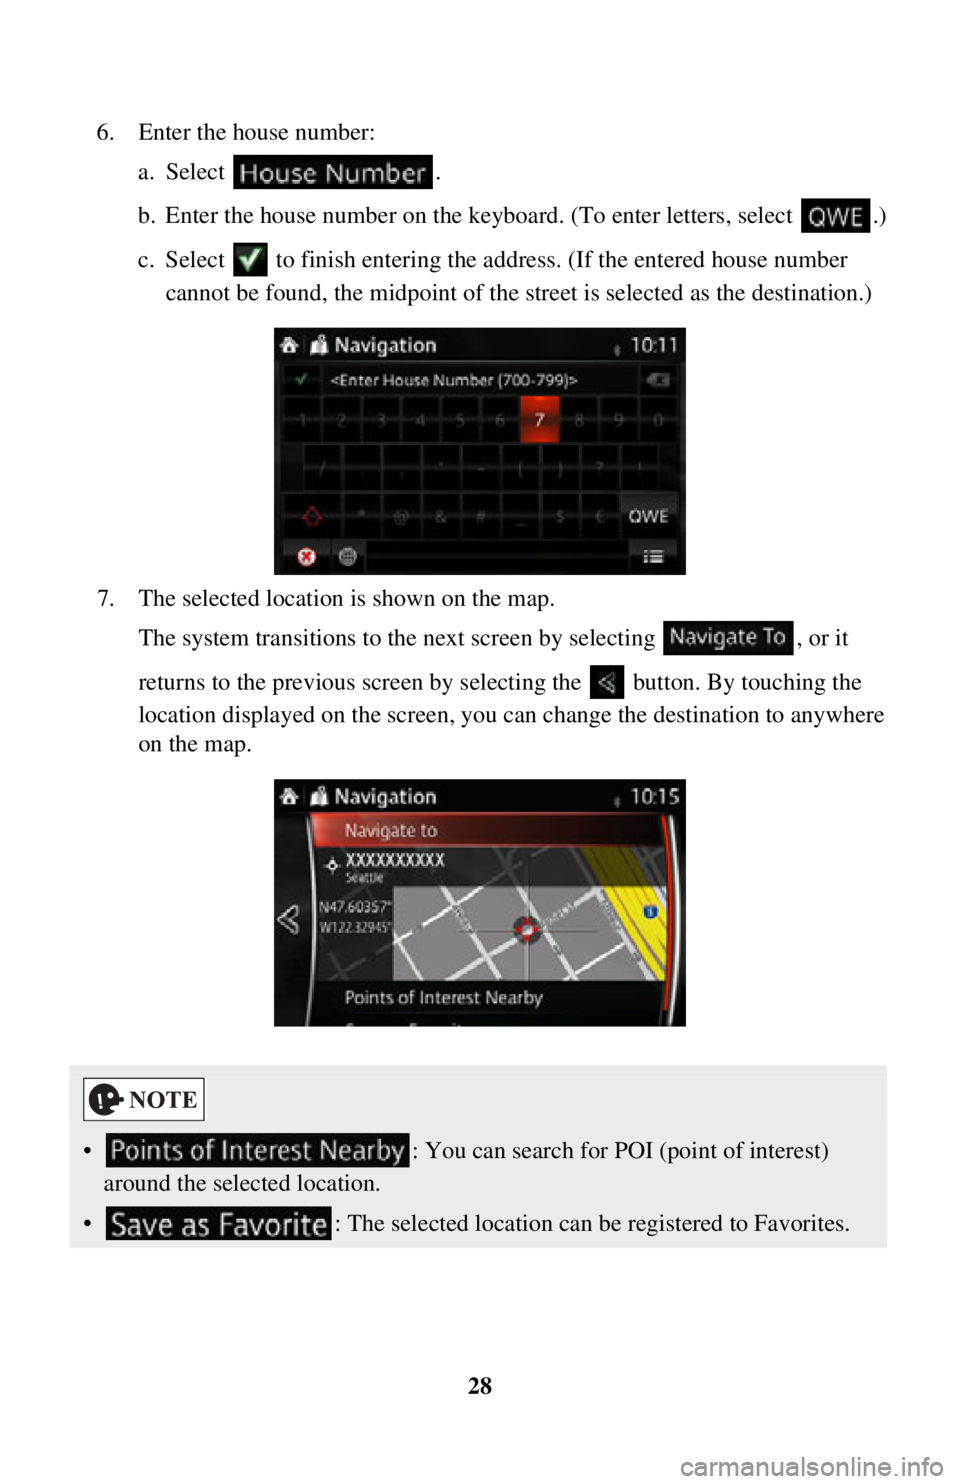
6. Enter the house number:
a. Select .
b. Enter the house number on the keyboard. (To enter letters, select .)
c. Select to finish entering the ad dress. (If the entered house number
cannot be found, the midpoint of the street is selected as the destination.)
7. The selected location is shown on the map. The system transitions to the next screen by selecting , or it
returns to the previous screen by selecting the button. By touching the
location displayed on the screen, you can change the destination to anywhere
on the map.
• : You can search for POI (point of interest)
around the selected location.
• : The selected location can be registered to Favorites.
Page 29 of 90
29
1
2
3
4
5
6
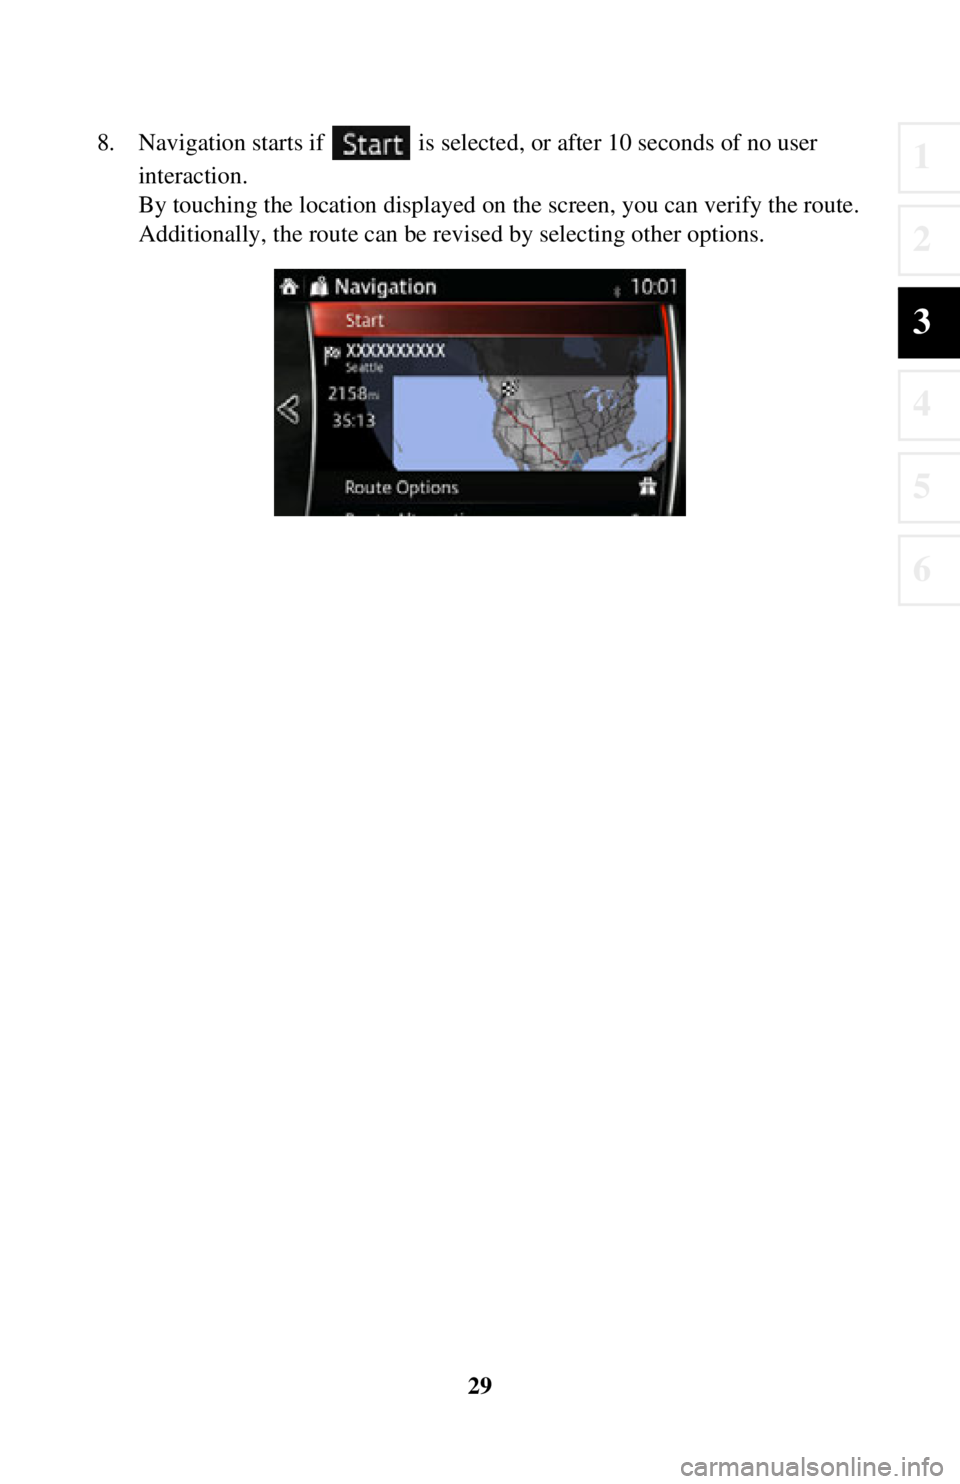
8. Navigation starts if is selected, or after 10 seconds of no user
interaction.
By touching the location displayed on the screen, you can verify the route.
Additionally, the route can be revised by selecting other options.
Page 30 of 90
30
3.1.1.2 Entering the midpoint of
a street as the destination
You can navigate to the midpoint of a street if the house number is not available: 1. Select after selectin g on the MAP screen.
2. Select .
3. If necessary, modify the country and city as described earlier (page 25).
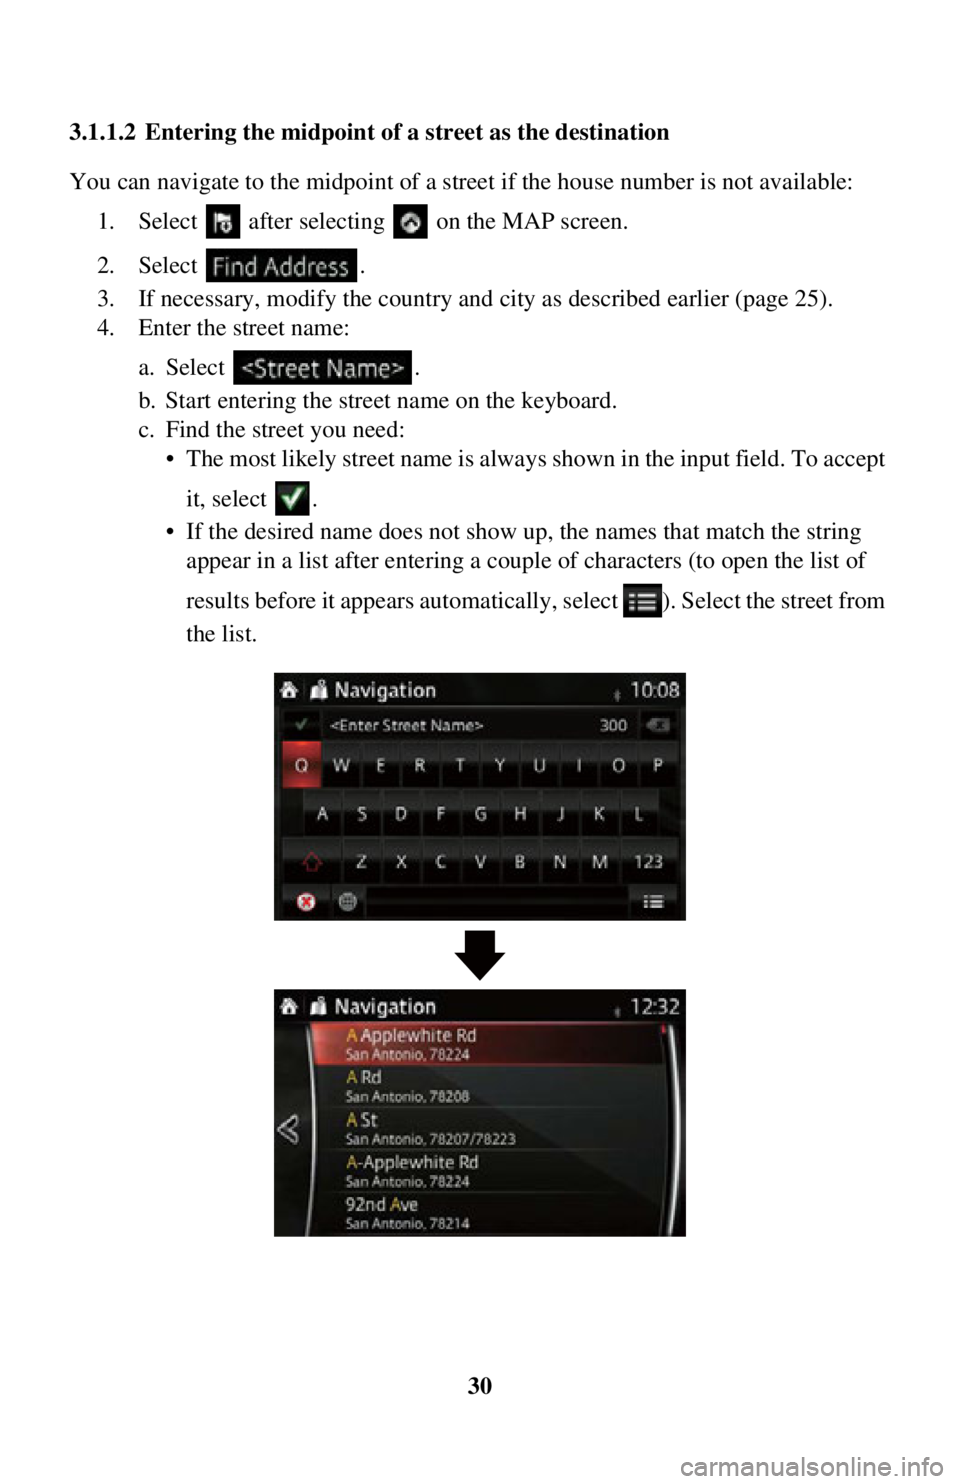
4. Enter the street name:
a. Select .
b. Start entering the street name on the keyboard.
c. Find the street you need:• The most likely street name is always shown in the input field. To accept
it, select .
• If the desired name does not show up, the names that match the string appear in a list after entering a coup le of characters (to open the list of
results before it appears automatically , select ). Select the street from
the list.
Trending: service, change time, ECU, stop start, display, tow, ESP

