bulb TOYOTA iA 2016 Owners Manual (in English)
[x] Cancel search | Manufacturer: TOYOTA, Model Year: 2016, Model line: iA, Model: TOYOTA iA 2016Pages: 588, PDF Size: 5.15 MB
Page 5 of 588
5
1
8 7
6 4 3
2
iA_OM_OM99M17z_(U)
5
5-1. Essential InformationIntroduction ....................... 418
5-2. Scheduled Maintenance Maintenance Monitor......... 420
5-3. Owner Maintenance Owner Maintenance Precautions ..................... 424
Hood.................................. 426
Engine Compartment Overview ......................... 428
Engine Oil.......................... 429
Engine Coolant.................. 431
Brake/Clutch Fluid ............. 434
Window Washer Fluid ....... 435
Body Lubrication ............... 436
Wiper Blades ..................... 437
Battery ............................... 440
Key Battery Replacement ................... 443
Tires .................................. 446
Light Bulbs ........................ 451
Fuses ................................ 460
5-4. Appearance Care Exterior Care ..................... 468
Interior Care ...................... 476 6-1. Parking in an Emergency
Parking in an Emergency ...................... 482
6-2. Flat Tire Spare Tire and Tool Storage ............................ 483
Changing a Flat Tire .......... 487
6-3. Battery Runs Out Jump-Starting .................... 497
6-4. Emergency Starting Starting a Flooded Engine ............................. 500
Push-Starting ..................... 501
6-5. Overheating Overheating ....................... 502
6-6. Emergency Towing Towing Description ............ 504
Tiedown Hooks .................. 505
6-7. Warning/Indicator Lights and Warning Sounds
If a Warning Light Turns On or Flashes .................. 507
Message Indicated on Display............................. 520
Warning Sound is Activated.......................... 522
6-8. When Trunk Lid Cannot be Opened
When Trunk Lid Cannot be Opened....................... 525
5Maintenance and Care6If Trouble Arises
Page 180 of 588
180
iA_OM_OM99M17z_(U)
3-4. Switches and Controls
Turn and Lane-Change Signals
The ignition must be switched ON to use the turn and lane-change
signals.
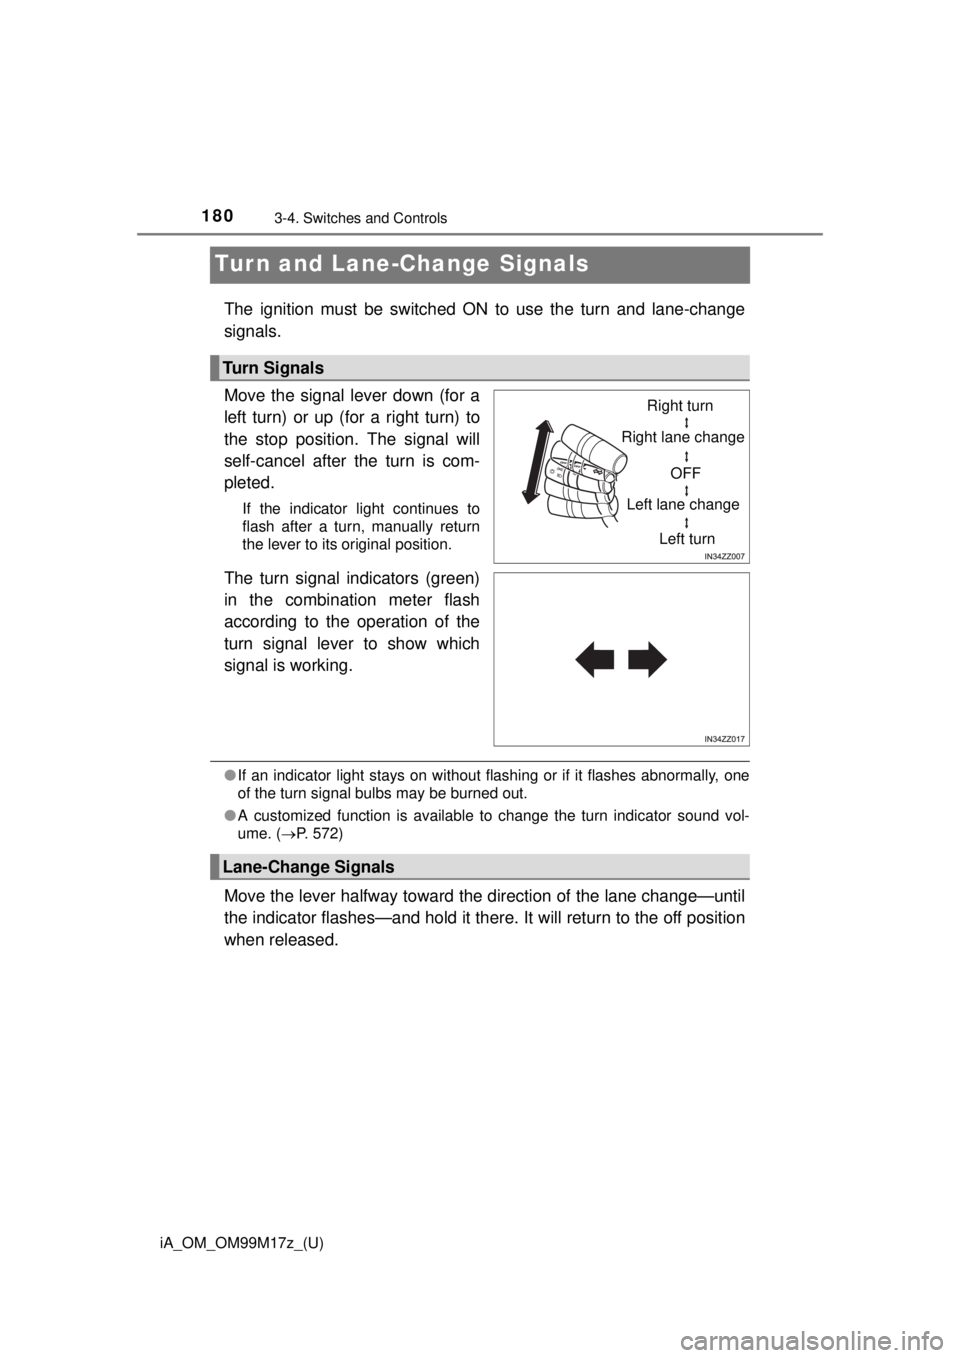
Move the signal lever down (for a
left turn) or up (for a right turn) to
the stop position. The signal will
self-cancel after the turn is com-
pleted.
If the indicator light continues to
flash after a turn, manually return
the lever to its original position.
The turn signal indicators (green)
in the combination meter flash
according to the operation of the
turn signal lever to show which
signal is working.
●If an indicator light stays on without flashing or if it flashes abnormally, one
of the turn signal bulbs may be burned out.
● A customized function is available to change the turn indicator sound vol-
ume. ( P. 572)
Move the lever halfway toward the direction of the lane change—until
the indicator flashes—and hold it ther e. It will return to the off position
when released.
Turn Signals
Right turn
Right lane change
OFF
Left lane change
Left turn
Lane-Change Signals
Page 417 of 588
417
iA_OM_OM99M17z_(U)
5Maintenance and Care
5-1. Essential InformationIntroduction ....................... 418
5-2. Scheduled Maintenance Maintenance Monitor ........ 420
5-3. Owner Maintenance Owner Maintenance Precautions ..................... 424
Hood ................................. 426
Engine Compartment Overview ......................... 428
Engine Oil ......................... 429
Engine Coolant ................. 431
Brake/Clutch Fluid............. 434
Window Washer Fluid ....... 435
Body Lubrication ............... 436
Wiper Blades..................... 437
Battery............................... 440
Key Battery Replacement ................... 443
Tires .................................. 446
Light Bulbs ........................ 451
Fuses ................................ 460
5-4. Appearance Care Exterior Care ..................... 468
Interior Care ...................... 476
Page 451 of 588
451
iA_OM_OM99M17z_(U)
5-3. Owner Maintenance
5
Maintenance and Care
Light Bulbs
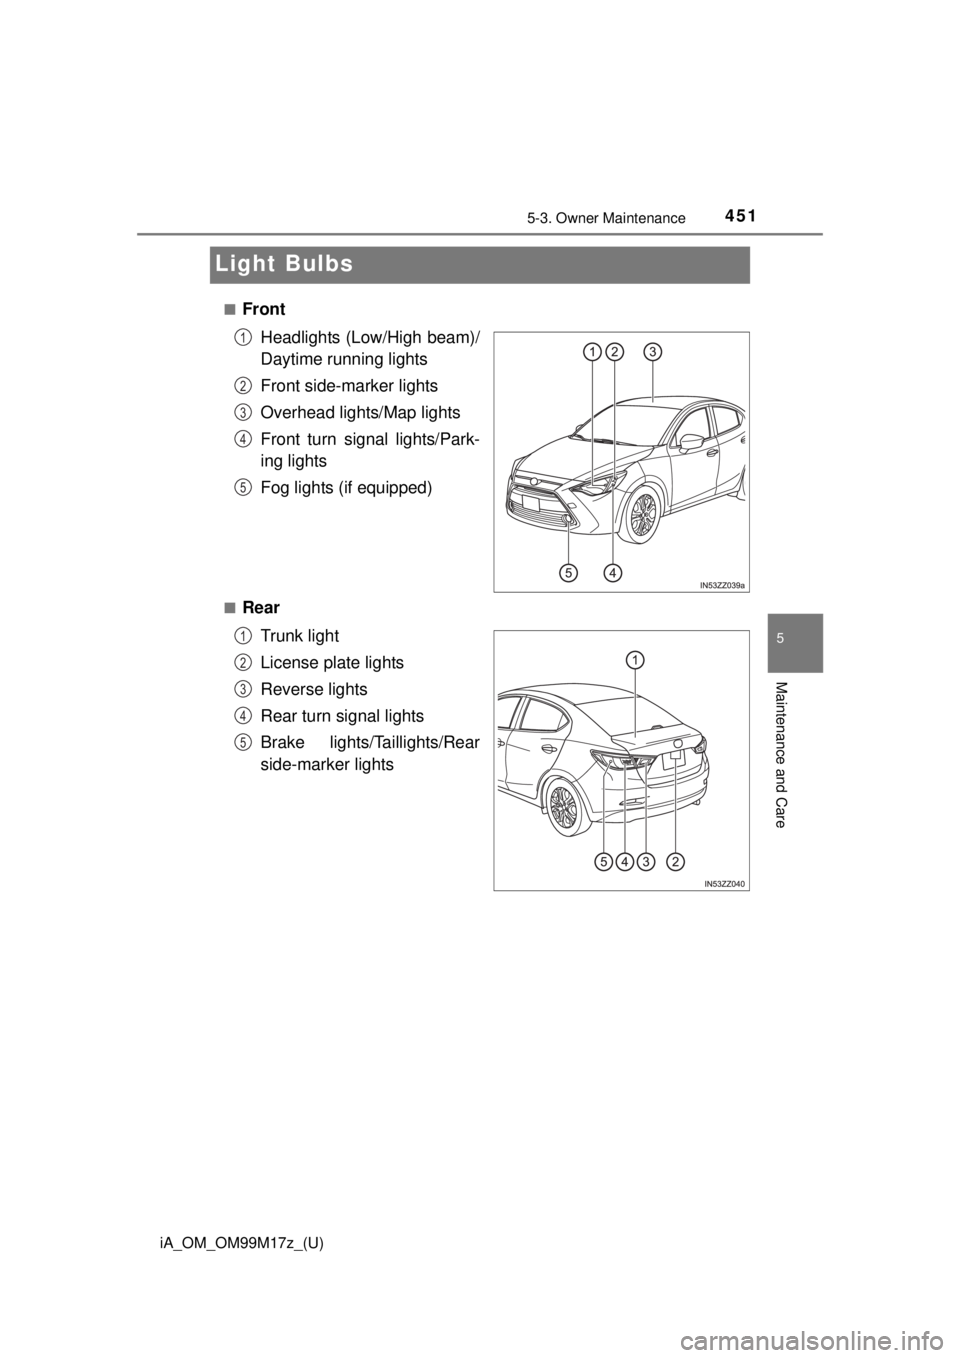
■FrontHeadlights (Low/High beam)/
Daytime running lights
Front side-marker lights
Overhead lights/Map lights
Front turn signal lights/Park-
ing lights
Fog lights (if equipped)
■Rear
Trunk light
License plate lights
Reverse lights
Rear turn signal lights
Brake lights/Taillights/Rear
side-marker lights
1
2
3
4
5
1
2
3
4
5
Page 452 of 588
4525-3. Owner Maintenance
iA_OM_OM99M17z_(U)■
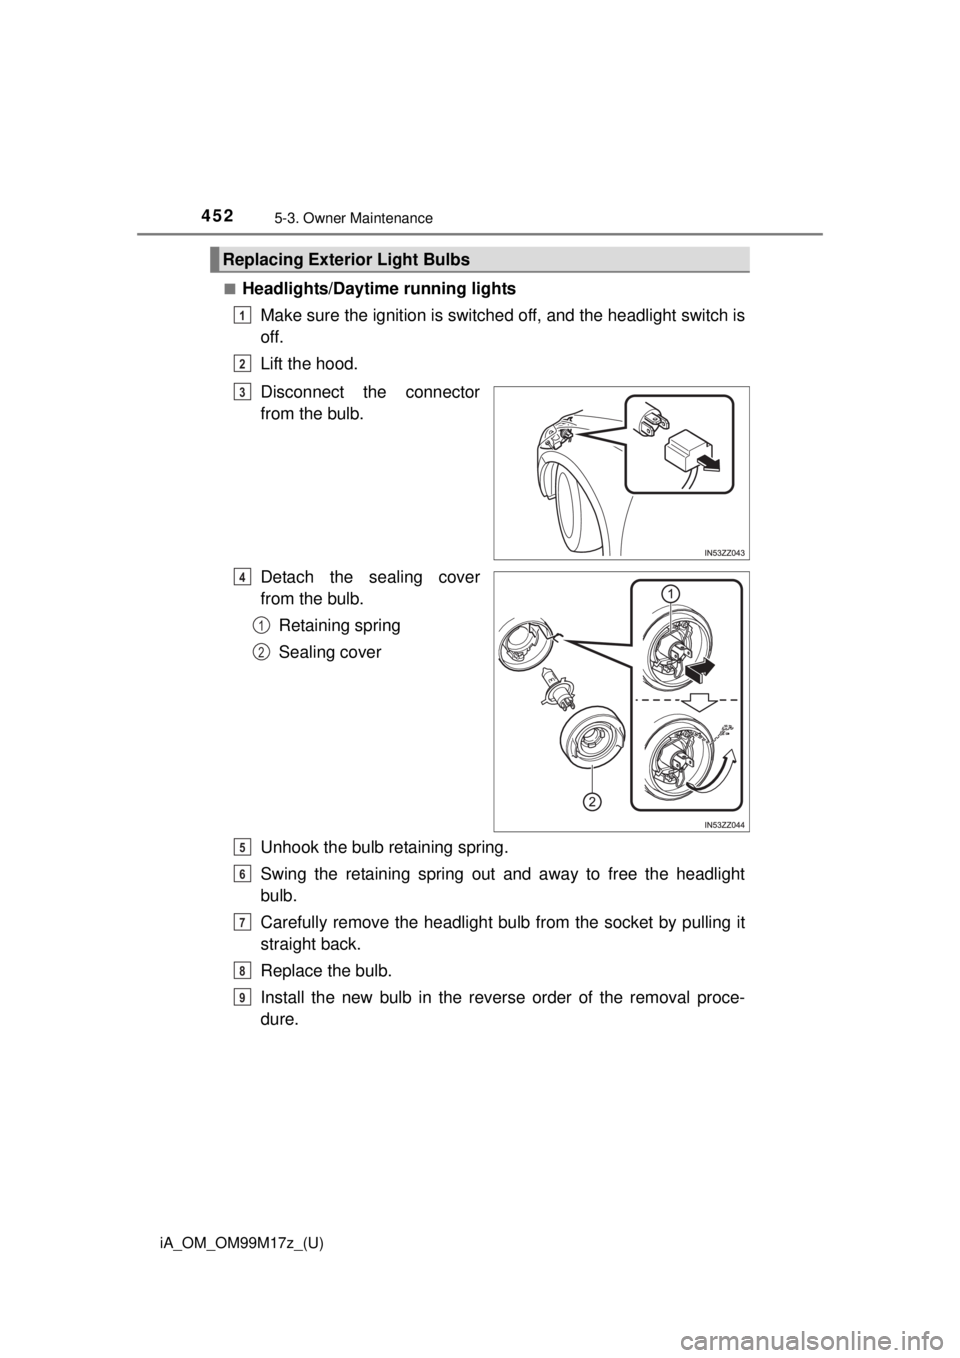
Headlights/Daytime running lights
Make sure the ignition is switched off, and the headlight switch is
off.
Lift the hood.
Disconnect the connector
from the bulb.
Detach the sealing cover
from the bulb.Retaining spring
Sealing cover
Unhook the bulb retaining spring.
Swing the retaining spring out and away to free the headlight
bulb.
Carefully remove the headlight bulb from the socket by pulling it
straight back.
Replace the bulb.
Install the new bulb in the reverse order of the removal proce-
dure.
Replacing Exterior Light Bulbs
1
2
3
4
1
2
5
6
7
8
9
Page 453 of 588
iA_OM_OM99M17z_(U)
4535-3. Owner Maintenance
5
Maintenance and Care
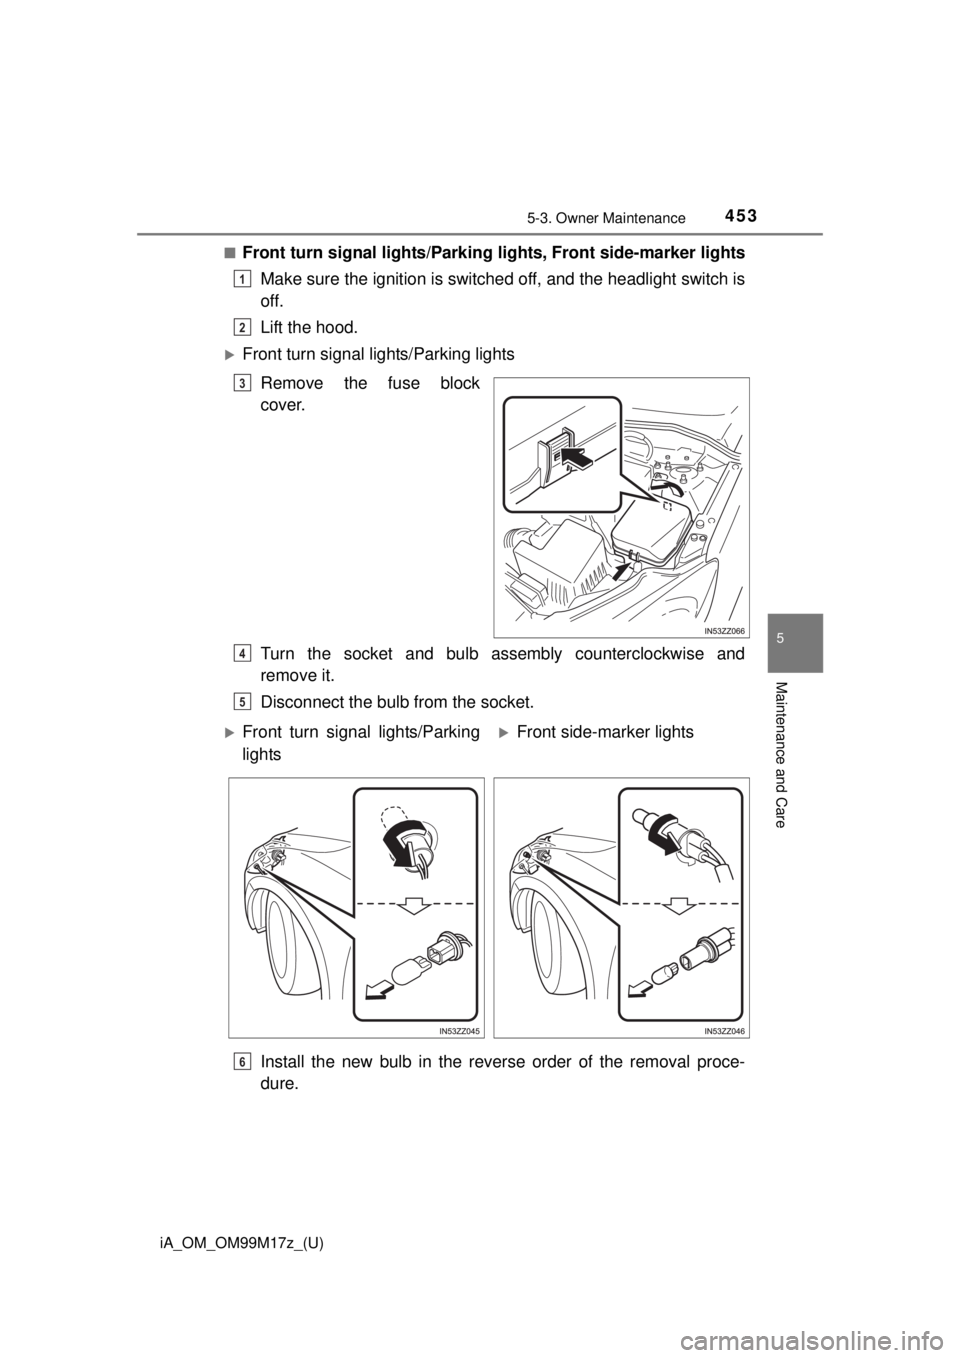
■Front turn signal lights/Parking lights, Front side-marker lights
Make sure the ignition is switched off, and the headlight switch is
off.
Lift the hood.
Front turn signal lights/Parking lights
Remove the fuse block
cover.
Turn the socket and bulb assembly counterclockwise and
remove it.
Disconnect the bulb from the socket.
Install the new bulb in the reverse order of the removal proce-
dure.
1
2
3
4
5
Front turn signal lights/Parking
lightsFront side-marker lights
6
Page 455 of 588
iA_OM_OM99M17z_(U)
4555-3. Owner Maintenance
5
Maintenance and Care
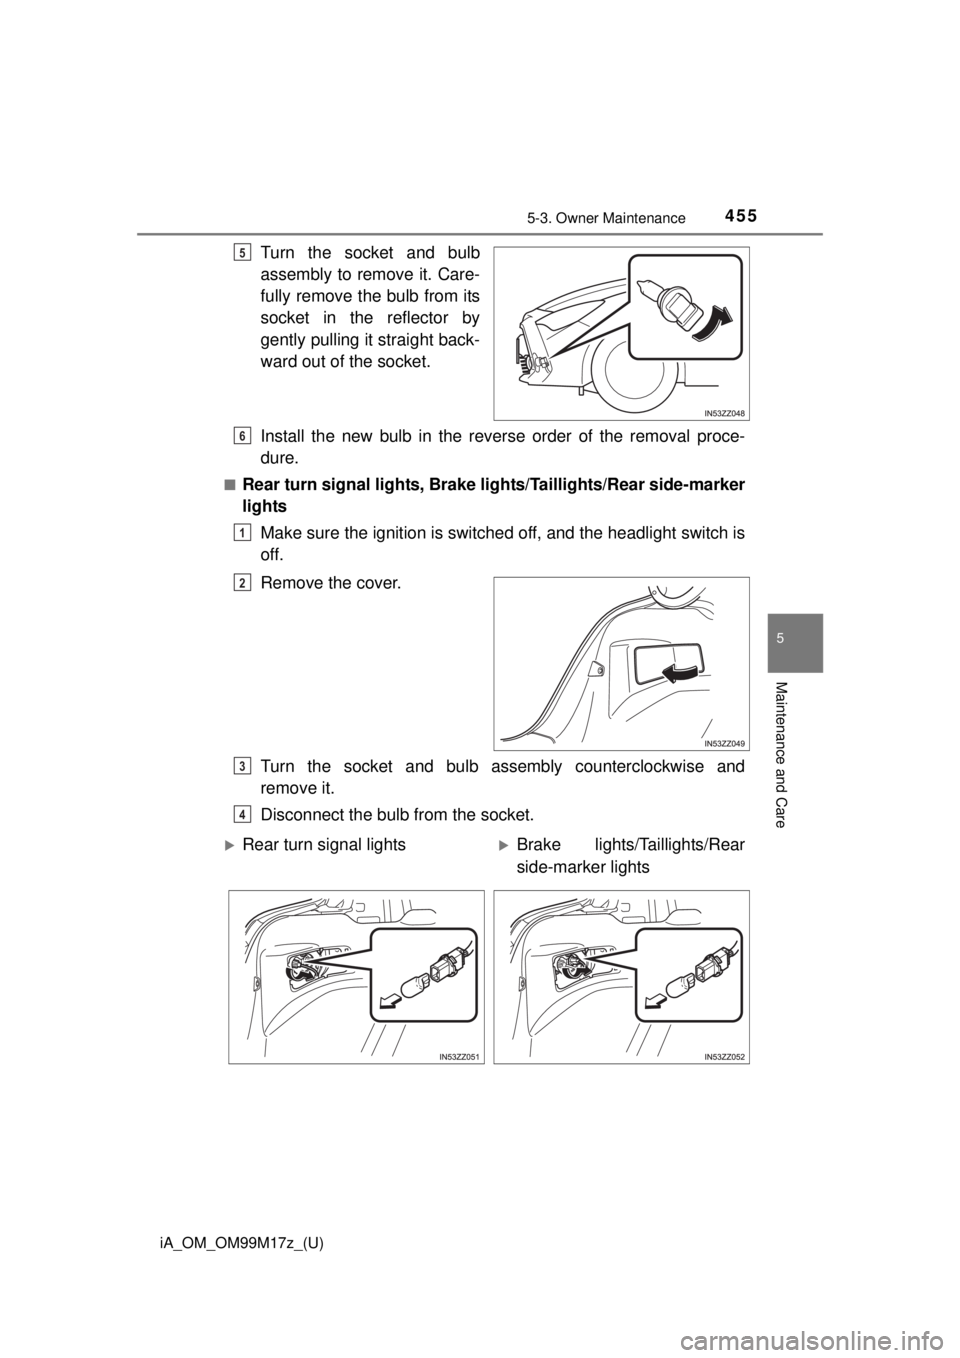
Turn the socket and bulb
assembly to remove it. Care-
fully remove the bulb from its
socket in the reflector by
gently pulling it straight back-
ward out of the socket.
Install the new bulb in the reverse order of the removal proce-
dure.
■Rear turn signal lights, Brake lights/Taillights/Rear side-marker
lightsMake sure the ignition is switched off, and the headlight switch is
off.
Remove the cover.
Turn the socket and bulb assembly counterclockwise and
remove it.
Disconnect the bulb from the socket.
5
6
1
2
3
4
Rear turn signal lightsBrake lights/Taillights/Rear
side-marker lights
Page 456 of 588
4565-3. Owner Maintenance
iA_OM_OM99M17z_(U)
Install the new bulb in the reverse order of the removal proce-
dure.
Verify that the cover is securely installed.
Insert the cover tabs and install the cover.
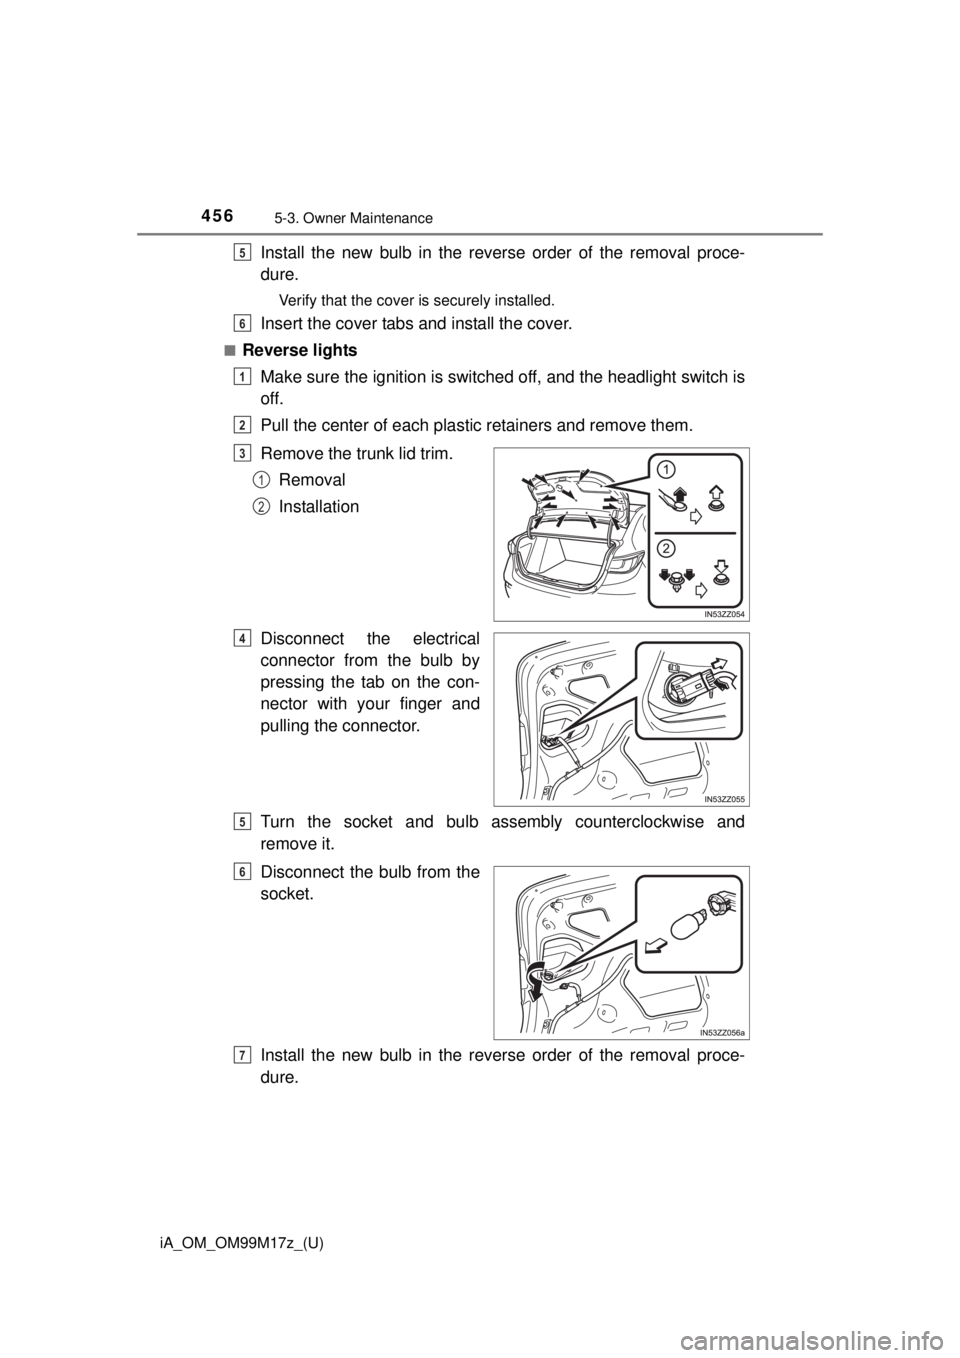
■Reverse lightsMake sure the ignition is switched off, and the headlight switch is
off.
Pull the center of each plastic retainers and remove them.
Remove the trunk lid trim.Removal
Installation
Disconnect the electrical
connector from the bulb by
pressing the tab on the con-
nector with your finger and
pulling the connector.
Turn the socket and bulb assembly counterclockwise and
remove it.
Disconnect the bulb from the
socket.
Install the new bulb in the reverse order of the removal proce-
dure.
5
6
1
2
3
1
2
4
5
6
7
Page 457 of 588
iA_OM_OM99M17z_(U)
4575-3. Owner Maintenance
5
Maintenance and Care
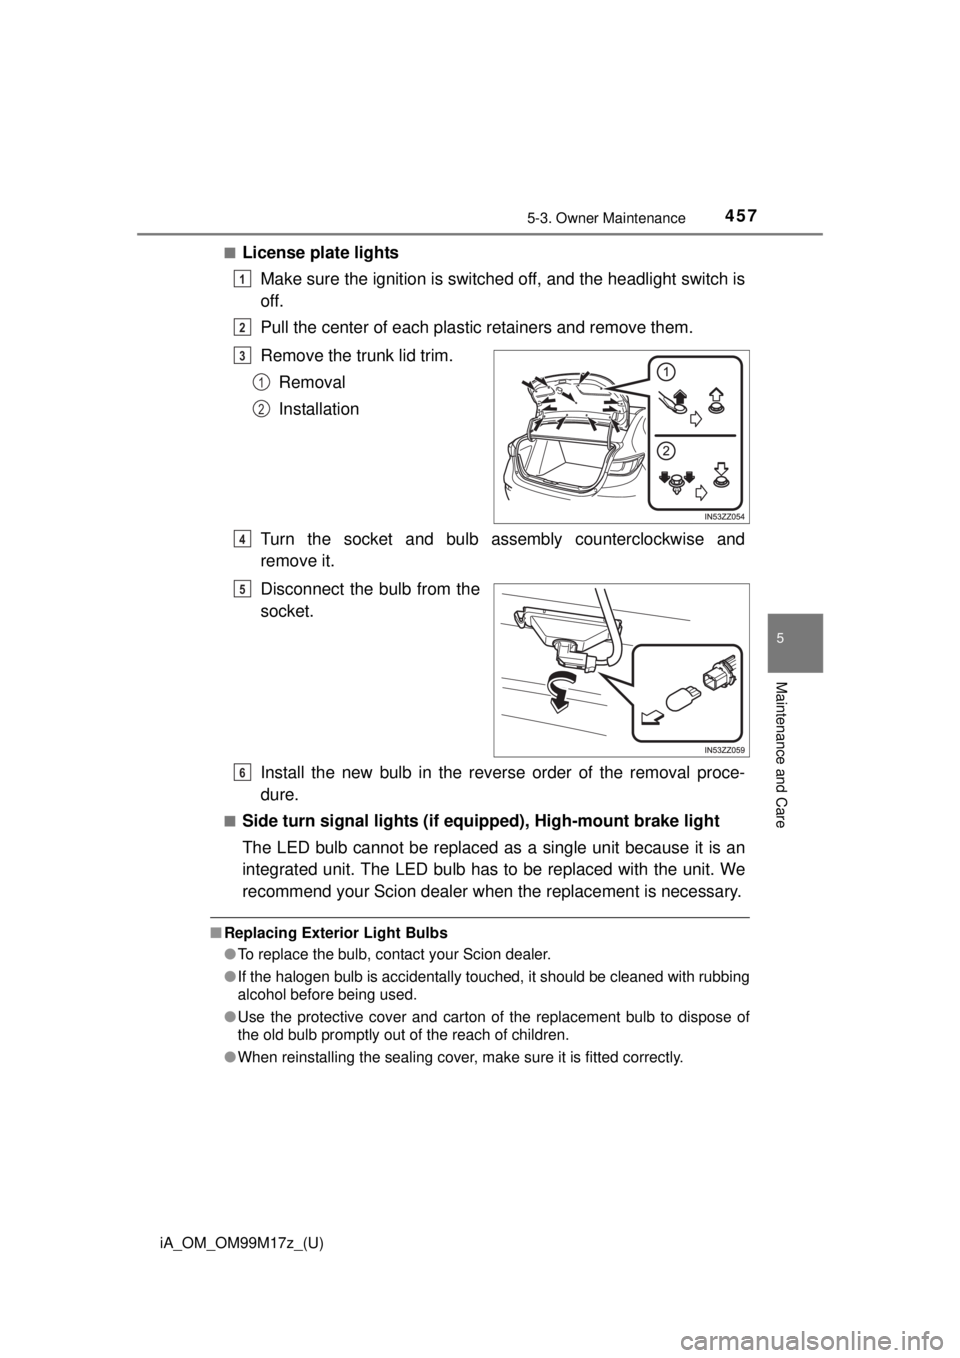
■License plate lightsMake sure the ignition is switched off, and the headlight switch is
off.
Pull the center of each plastic retainers and remove them.
Remove the trunk lid trim.Removal
Installation
Turn the socket and bulb assembly counterclockwise and
remove it.
Disconnect the bulb from the
socket.
Install the new bulb in the reverse order of the removal proce-
dure.
■Side turn signal lights (if e quipped), High-mount brake light
The LED bulb cannot be replaced as a single unit because it is an
integrated unit. The LED bulb has to be replaced with the unit. We
recommend your Scion dealer when the replacement is necessary.
■Replacing Exterior Light Bulbs
●To replace the bulb, contact your Scion dealer.
● If the halogen bulb is accidentally touched, it should be cleaned with rubbing
alcohol before being used.
● Use the protective cover and carton of the replacement bulb to dispose of
the old bulb promptly out of the reach of children.
● When reinstalling the sealing cover, make sure it is fitted correctly.
1
2
3
1
2
4
5
6
Page 458 of 588
4585-3. Owner Maintenance
iA_OM_OM99M17z_(U)■
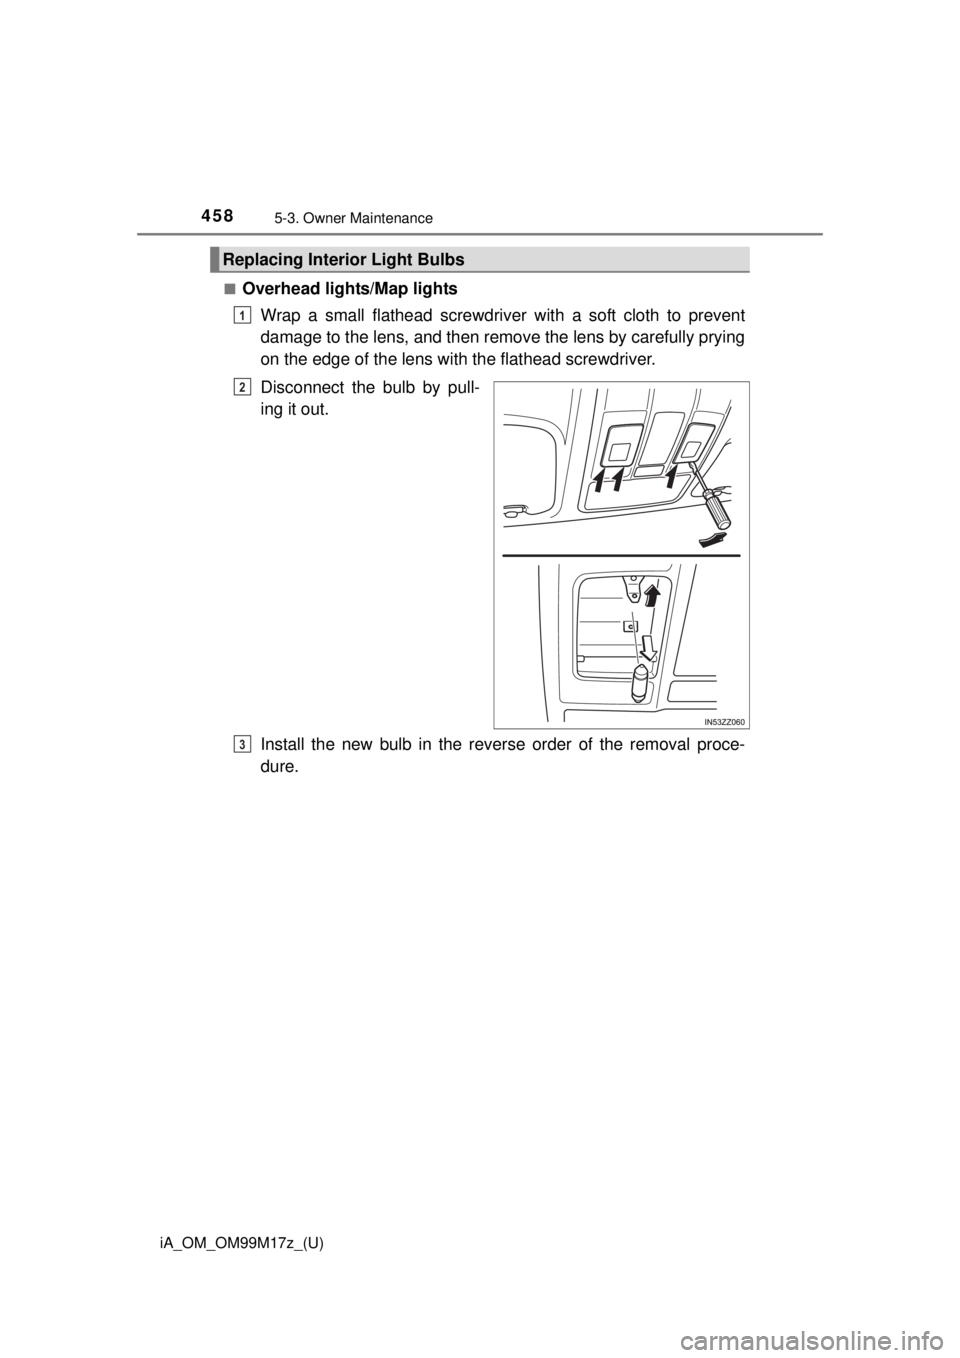
Overhead lights/Map lights
Wrap a small flathead screwdriver with a soft cloth to prevent
damage to the lens, and then remove the lens by carefully prying
on the edge of the lens with the flathead screwdriver.
Disconnect the bulb by pull-
ing it out.
Install the new bulb in the reverse order of the removal proce-
dure.
Replacing Interior Light Bulbs
1
2
3