display TOYOTA iM 2016 Accessories, Audio & Navigation (in English)
[x] Cancel search | Manufacturer: TOYOTA, Model Year: 2016, Model line: iM, Model: TOYOTA iM 2016Pages: 144, PDF Size: 19.87 MB
Page 103 of 144
103
4. Bluetooth® HANDS-FREE SYSTEM
4
Bluetooth
® HANDS-FREE SYSTEM
7. Bluetooth® PHONE MESSAGE FUNCTION
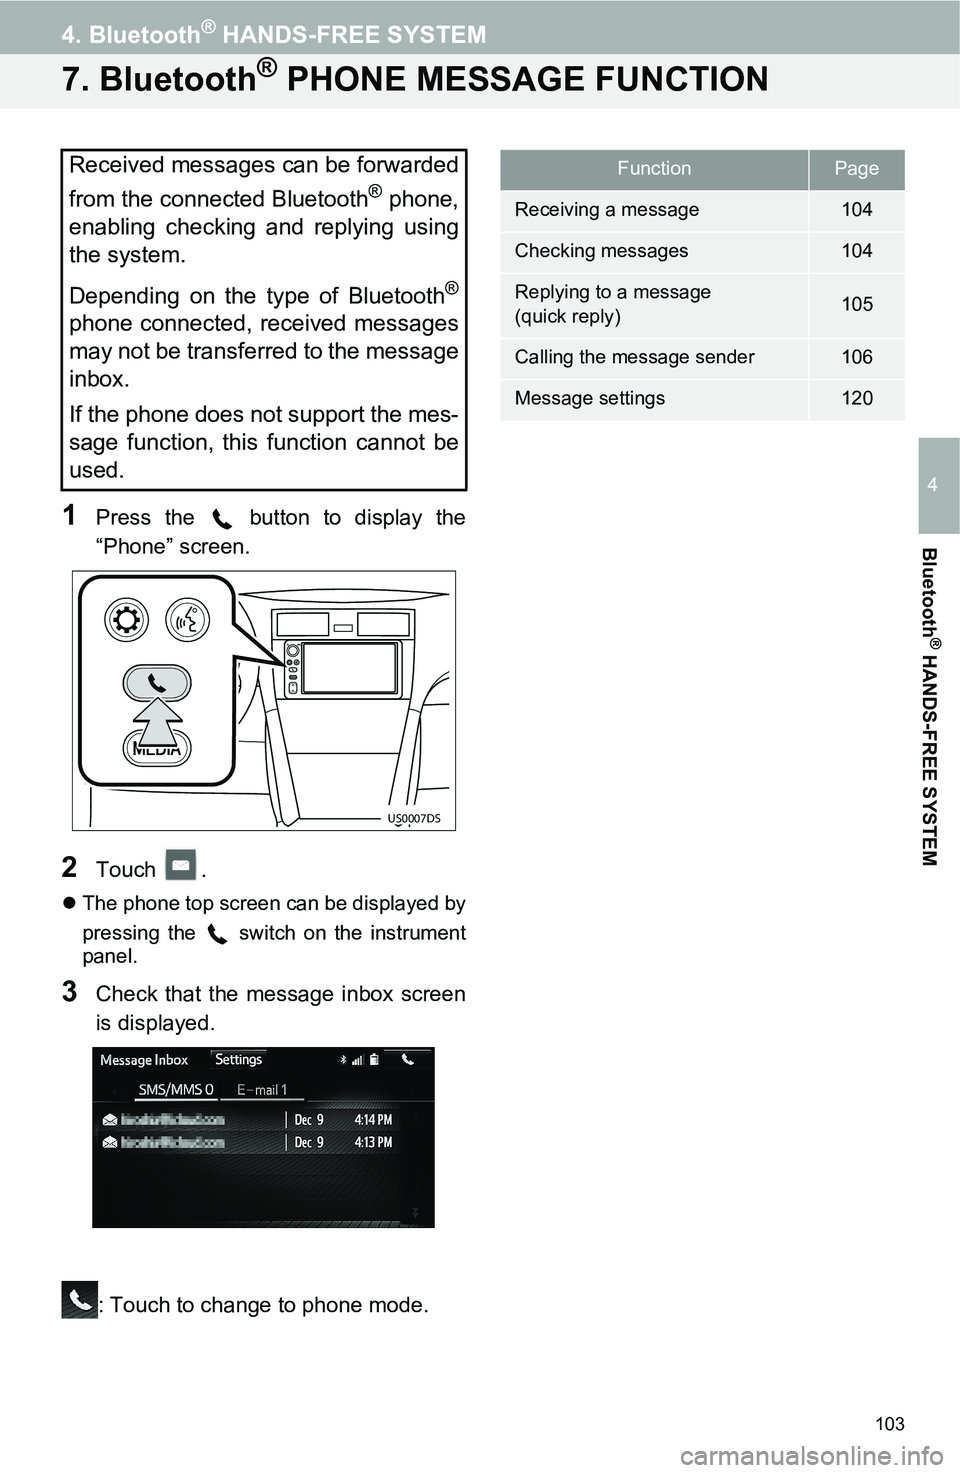
1Press the button to display the
“Phone” screen.
2Touch .
The phone top screen can be displayed by
pressing the switch on the instrument
panel.
3Check that the message inbox screen
is displayed.
: Touch to change to phone mode.
Received messages can be forwarded
from the connected Bluetooth
® phone,
enabling checking and replying using
the system.
Depending on the type of Bluetooth
®
phone connected, received messages
may not be transferred to the message
inbox.
If the phone does not support the mes-
sage function, this function cannot be
used.
US0007DS
FunctionPage
Receiving a message104
Checking messages104
Replying to a message
(quick reply)105
Calling the message sender106
Message settings120
Page 104 of 144
104
4. Bluetooth® HANDS-FREE SYSTEM
1Display the message inbox screen.
(→P.103)
2Touch the desired message from the
list.
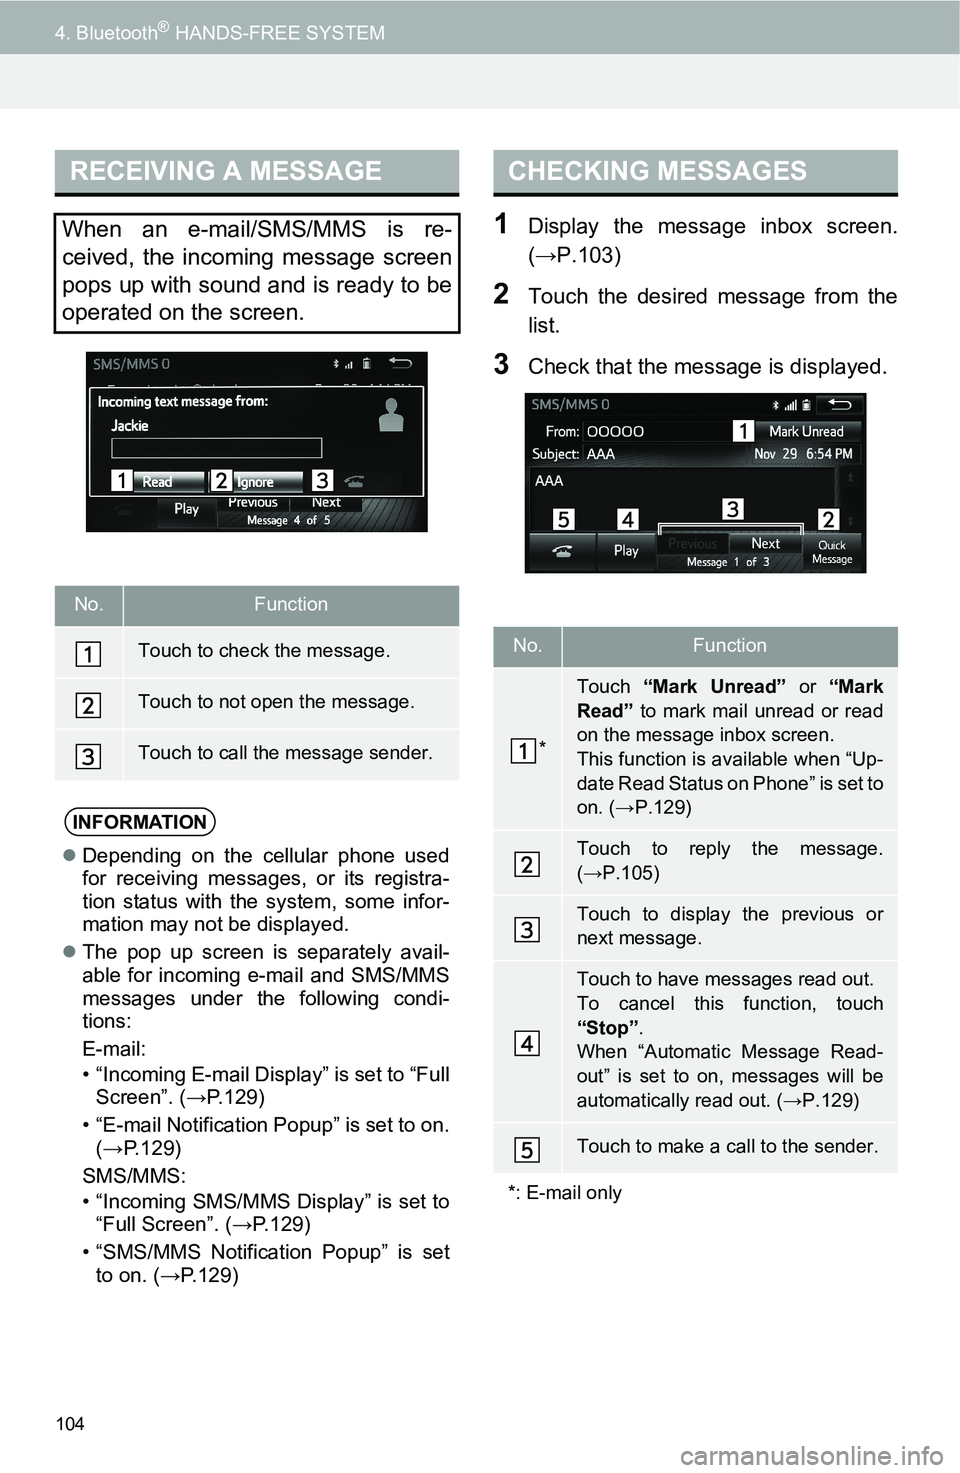
3Check that the message is displayed.
RECEIVING A MESSAGE
When an e-mail/SMS/MMS is re-
ceived, the incoming message screen
pops up with sound and is ready to be
operated on the screen.
No.Function
Touch to check the message.
Touch to not open the message.
Touch to call the message sender.
INFORMATION
Depending on the cellular phone used
for receiving messages, or its registra-
tion status with the system, some infor-
mation may not be displayed.
The pop up screen is separately avail-
able for incoming e-mail and SMS/MMS
messages under the following condi-
tions:
E-mail:
• “Incoming E-mail Display” is set to “Full
Screen”. (→P.129)
• “E-mail Notification Popup” is set to on.
(→P.129)
SMS/MMS:
• “Incoming SMS/MMS Display” is set to
“Full Screen”. (→P.129)
• “SMS/MMS Notification Popup” is set
to on. (→P.129)
CHECKING MESSAGES
No.Function
*
Touch “Mark Unread” or “Mark
Read” to mark mail unread or read
on the message inbox screen.
This function is available when “Up-
date Read Status on Phone” is set to
on. (→P.129)
Touch to reply the message.
(→P.105)
Touch to display the previous or
next message.
Touch to have messages read out.
To cancel this function, touch
“Stop”.
When “Automatic Message Read-
out” is set to on, messages will be
automatically read out. (→P.129)
Touch to make a call to the sender.
*: E-mail only
Page 105 of 144
105
4. Bluetooth® HANDS-FREE SYSTEM
4
Bluetooth
® HANDS-FREE SYSTEM
1Display the message inbox screen.
(→P.103)
2Touch the desired message from the
list.
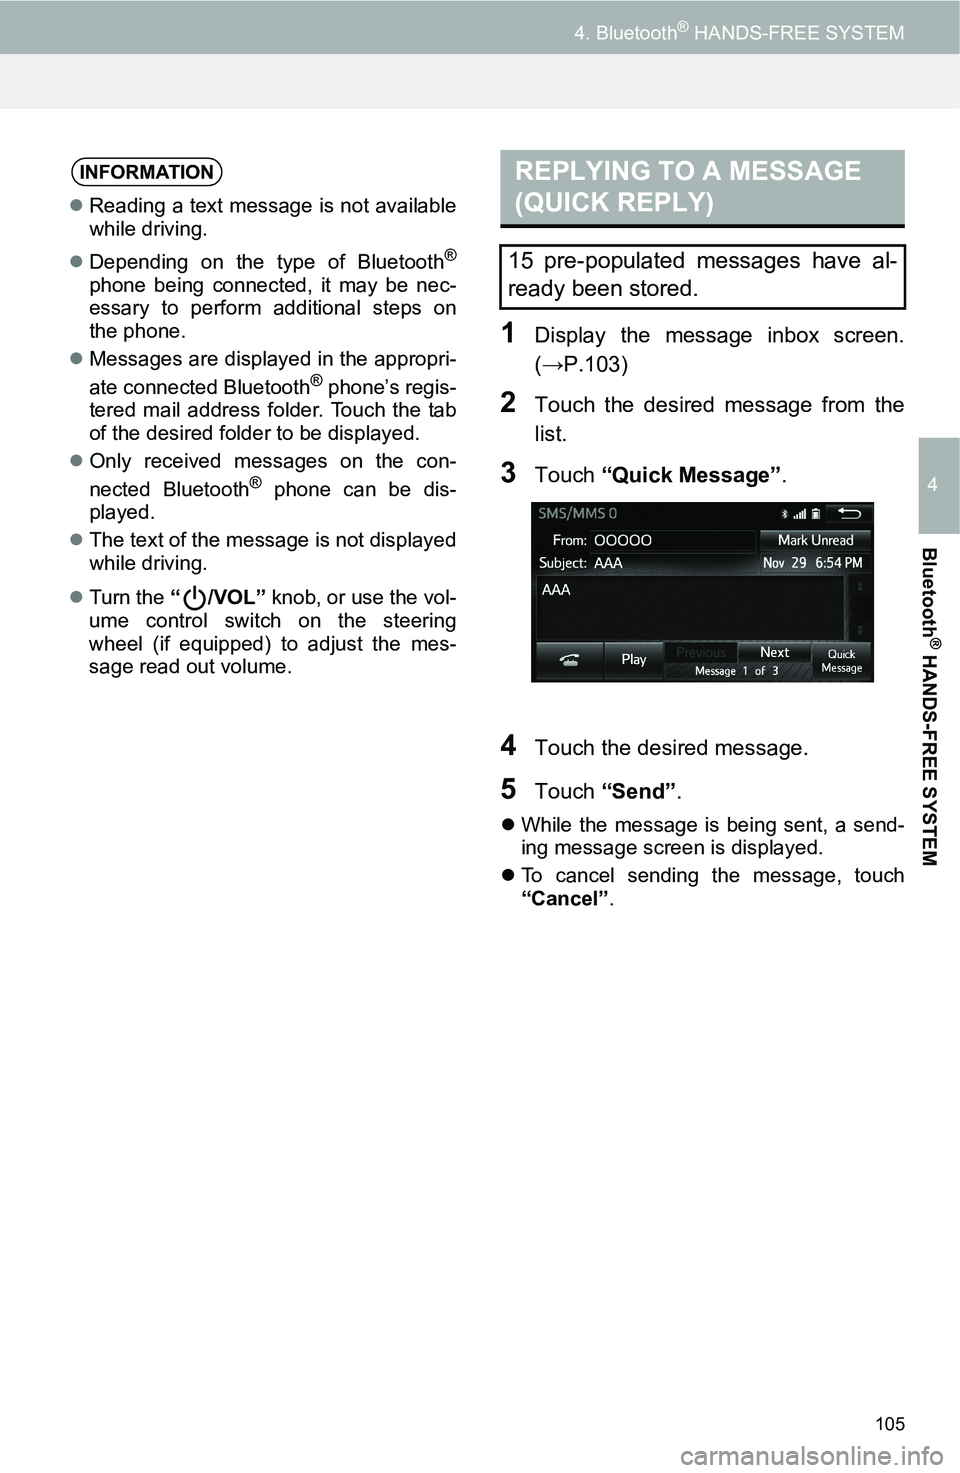
3Touch “Quick Message”.
4Touch the desired message.
5Touch “Send”.
While the message is being sent, a send-
ing message screen is displayed.
To cancel sending the message, touch
“Cancel”.
INFORMATION
Reading a text message is not available
while driving.
Depending on the type of Bluetooth
®
phone being connected, it may be nec-
essary to perform additional steps on
the phone.
Messages are displayed in the appropri-
ate connected Bluetooth
® phone’s regis-
tered mail address folder. Touch the tab
of the desired folder to be displayed.
Only received messages on the con-
nected Bluetooth
® phone can be dis-
played.
The text of the message is not displayed
while driving.
Turn the “/VOL” knob, or use the vol-
ume control switch on the steering
wheel (if equipped) to adjust the mes-
sage read out volume.
REPLYING TO A MESSAGE
(QUICK REPLY)
15 pre-populated messages have al-
ready been stored.
Page 106 of 144
106
4. Bluetooth® HANDS-FREE SYSTEM
EDITING QUICK REPLY
MESSAGES
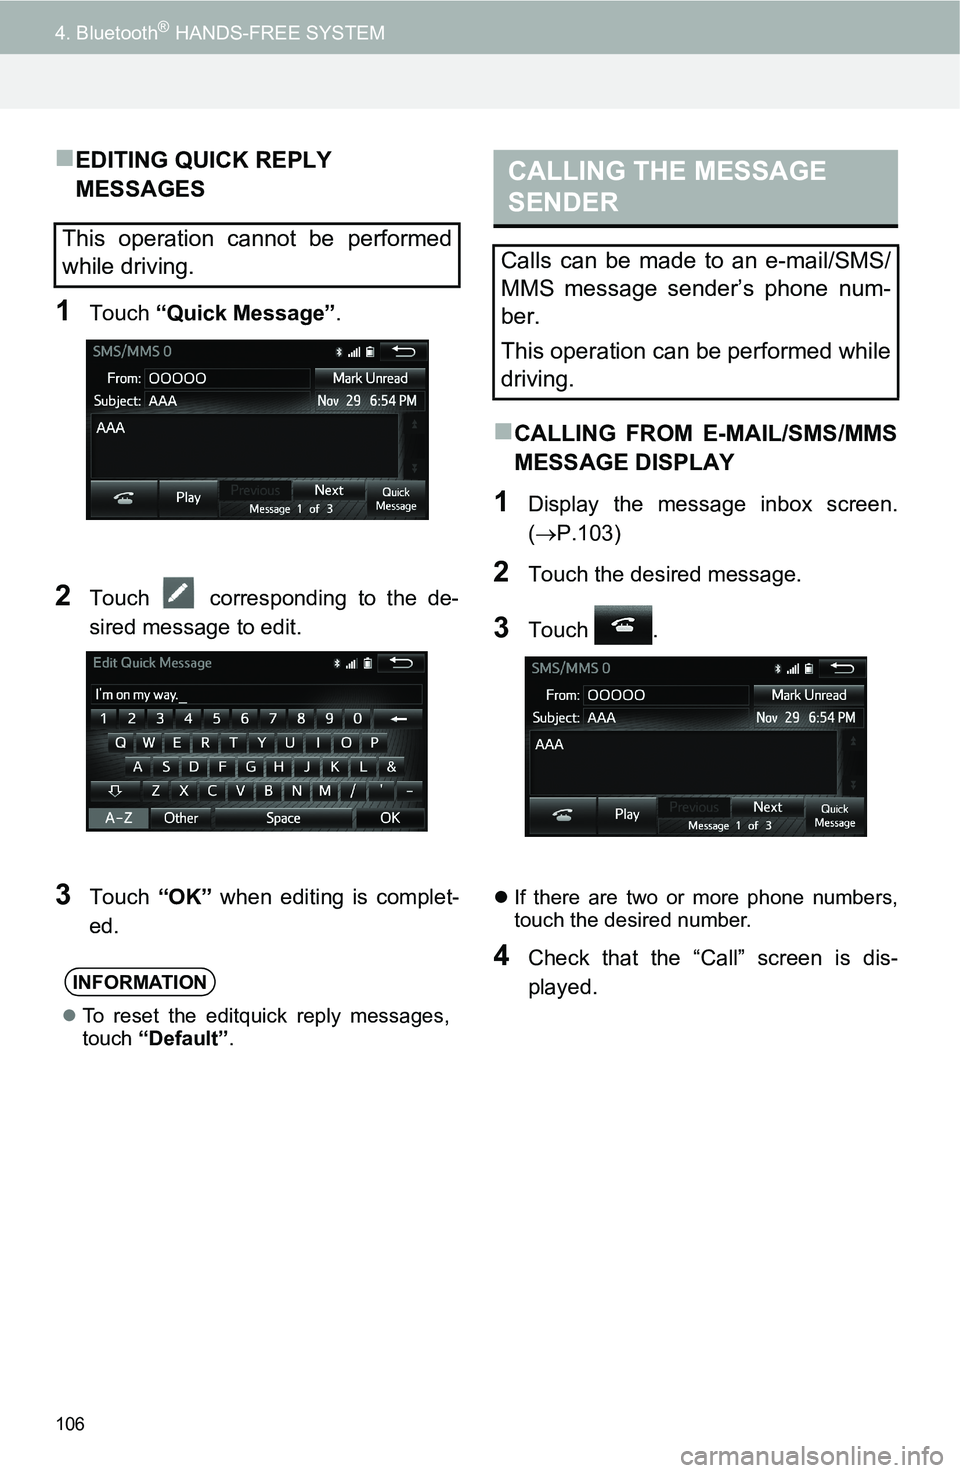
1Touch “Quick Message”.
2Touch corresponding to the de-
sired message to edit.
3Touch “OK” when editing is complet-
ed.
CALLING FROM E-MAIL/SMS/MMS
MESSAGE DISPLAY
1Display the message inbox screen.
(P.103)
2Touch the desired message.
3Touch .
If there are two or more phone numbers,
touch the desired number.
4Check that the “Call” screen is dis-
played.
This operation cannot be performed
while driving.
INFORMATION
To reset the editquick reply messages,
touch “Default”.
CALLING THE MESSAGE
SENDER
Calls can be made to an e-mail/SMS/
MMS message sender’s phone num-
ber.
This operation can be performed while
driving.
Page 107 of 144
107
4. Bluetooth® HANDS-FREE SYSTEM
4
Bluetooth
® HANDS-FREE SYSTEM
CALLING A NUMBER FROM WITH-
IN A MESSAGE
1Display the message inbox screen.
(P.103)
2Touch the desired message.
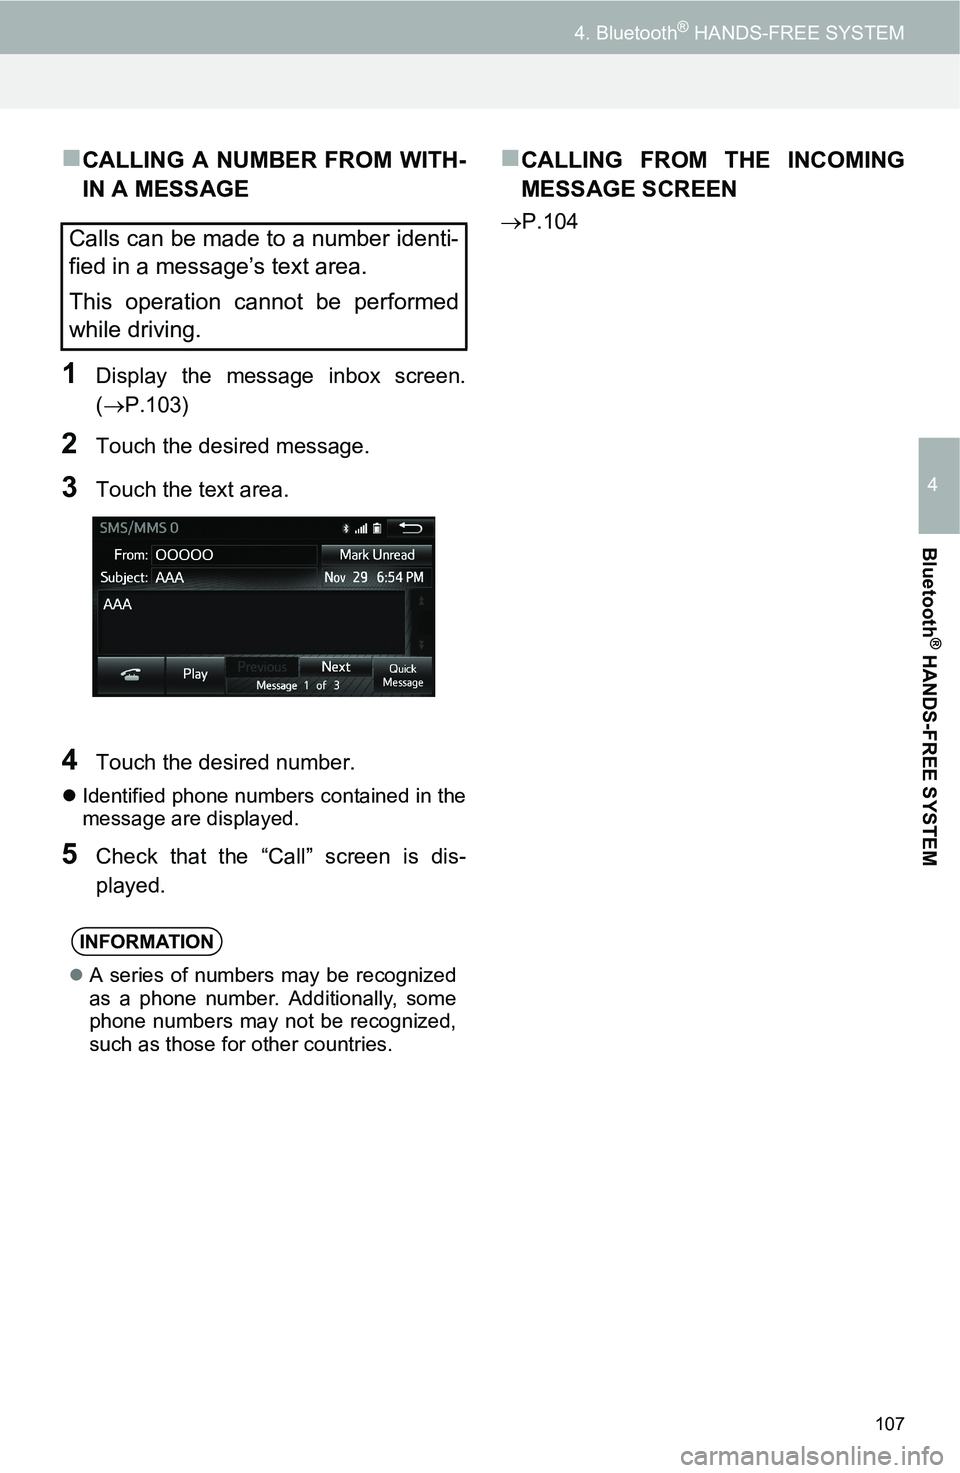
3Touch the text area.
4Touch the desired number.
Identified phone numbers contained in the
message are displayed.
5Check that the “Call” screen is dis-
played.
CALLING FROM THE INCOMING
MESSAGE SCREEN
P.104Calls can be made to a number identi-
fied in a message’s text area.
This operation cannot be performed
while driving.
INFORMATION
A series of numbers may be recognized
as a phone number. Additionally, some
phone numbers may not be recognized,
such as those for other countries.
Page 109 of 144
5
109
1
2
3
4
5
1 QUICK REFERENCE ................... 110
2. GENERAL SETTINGS ................. 111
GENERAL SETTINGS SCREEN .......... 111
3. Bluetooth® SETTINGS ................ 113
“Bluetooth* Setup” SCREEN................. 113
REGISTERED DEVICE ........................ 114
DELETING A Bluetooth® DEVICE ........ 115
EDITING THE Bluetooth® DEVICE
INFORMATION .................................. 116
DETAILED Bluetooth
® SETTINGS ....... 117
4. PHONE SETTINGS ...................... 120
PHONE/MESSAGE SETTINGS SCREEN ............................................ 120
“Sound Settings” SCREEN ................... 121
“Contact/Call History Settings” SCREEN ............................................ 122
“Messaging Settings” SCREEN ............ 129
“Phone Display Settings” SCREEN ...... 130
5. DISPLAY SETTINGS ................... 131
GENERAL SETTINGS SCREEN .......... 131
6. VOICE SETTINGS ........................ 133
VOICE SETTINGS SCREEN ................ 133
7. VEHICLE SETTINGS (EQUALIZER SETTINGS).......... 135
SETUP
Page 110 of 144
110
5. SETUP
1. QUICK REFERENCE
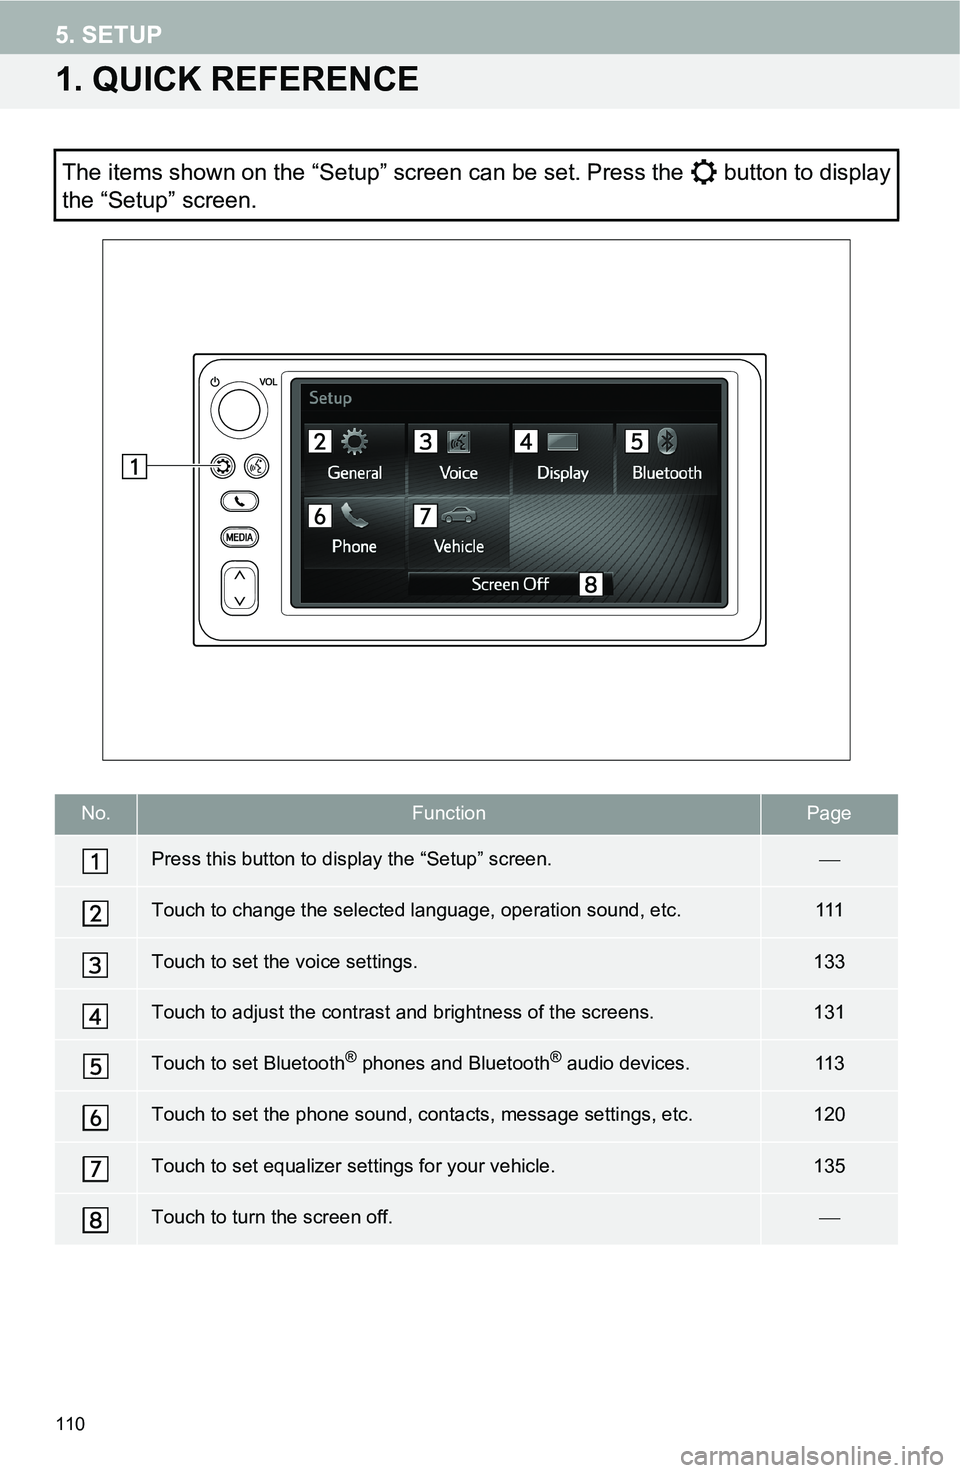
The items shown on the “Setup” screen can be set. Press the button to display
the “Setup” screen.
No.FunctionPage
Press this button to display the “Setup” screen.
Touch to change the selected language, operation sound, etc.111
Touch to set the voice settings.133
Touch to adjust the contrast and brightness of the screens.131
Touch to set Bluetooth® phones and Bluetooth® audio devices.11 3
Touch to set the phone sound, contacts, message settings, etc.120
Touch to set equalizer settings for your vehicle.135
Touch to turn the screen off.
Page 111 of 144
111
5. SETUP
5
SETUP
2. GENERAL SETTINGS
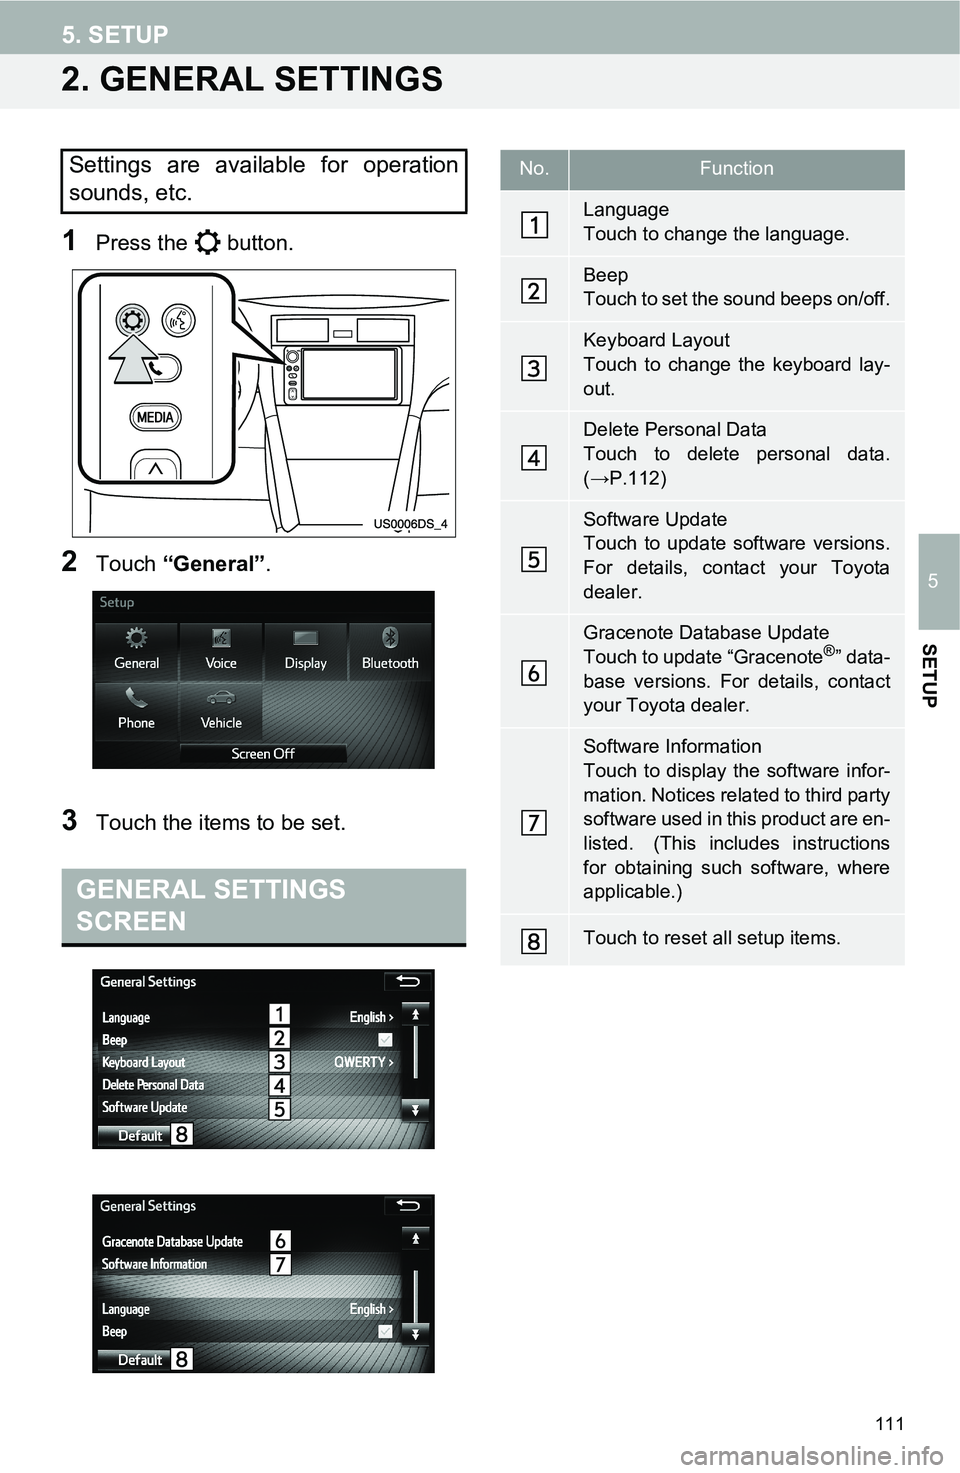
1Press the button.
2Touch “General”.
3Touch the items to be set.
Settings are available for operation
sounds, etc.
GENERAL SETTINGS
SCREEN
No.Function
Language
Touch to change the language.
Beep
Touch to set the sound beeps on/off.
Keyboard Layout
Touch to change the keyboard lay-
out.
Delete Personal Data
Touch to delete personal data.
(→P.112)
Software Update
Touch to update software versions.
For details, contact your Toyota
dealer.
Gracenote Database Update
Touch to update “Gracenote®” data-
base versions. For details, contact
your Toyota dealer.
Software Information
Touch to display the software infor-
mation. Notices related to third party
software used in this product are en-
listed. (This includes instructions
for obtaining such software, where
applicable.)
Touch to reset all setup items.
Page 112 of 144
112
5. SETUP
1Display the “General Settings” screen.
(→P.111)
2Touch “Language”.
3Touch the desired language.
The selectable languages may differ
depending on the region.
When setting the language on this unit
and using aha as a source, the language
setting on the aha application will need to
be set also to display the proper language.
1Display the “General Settings” screen.
(→P.111)
2Touch “Beep” to switch settings
between On and Off.
1Display the “General Settings” screen.
(→P.111)
2Touch “Keyboard Layout”.
3Touch the desired keyboard layout.
“QWERTY”:Latin characters, “QWERTY”-
Layout
“Alphabetical”:Latin characters, “ABC”-
Layout
1Display the “General Settings” screen.
(→P.111)
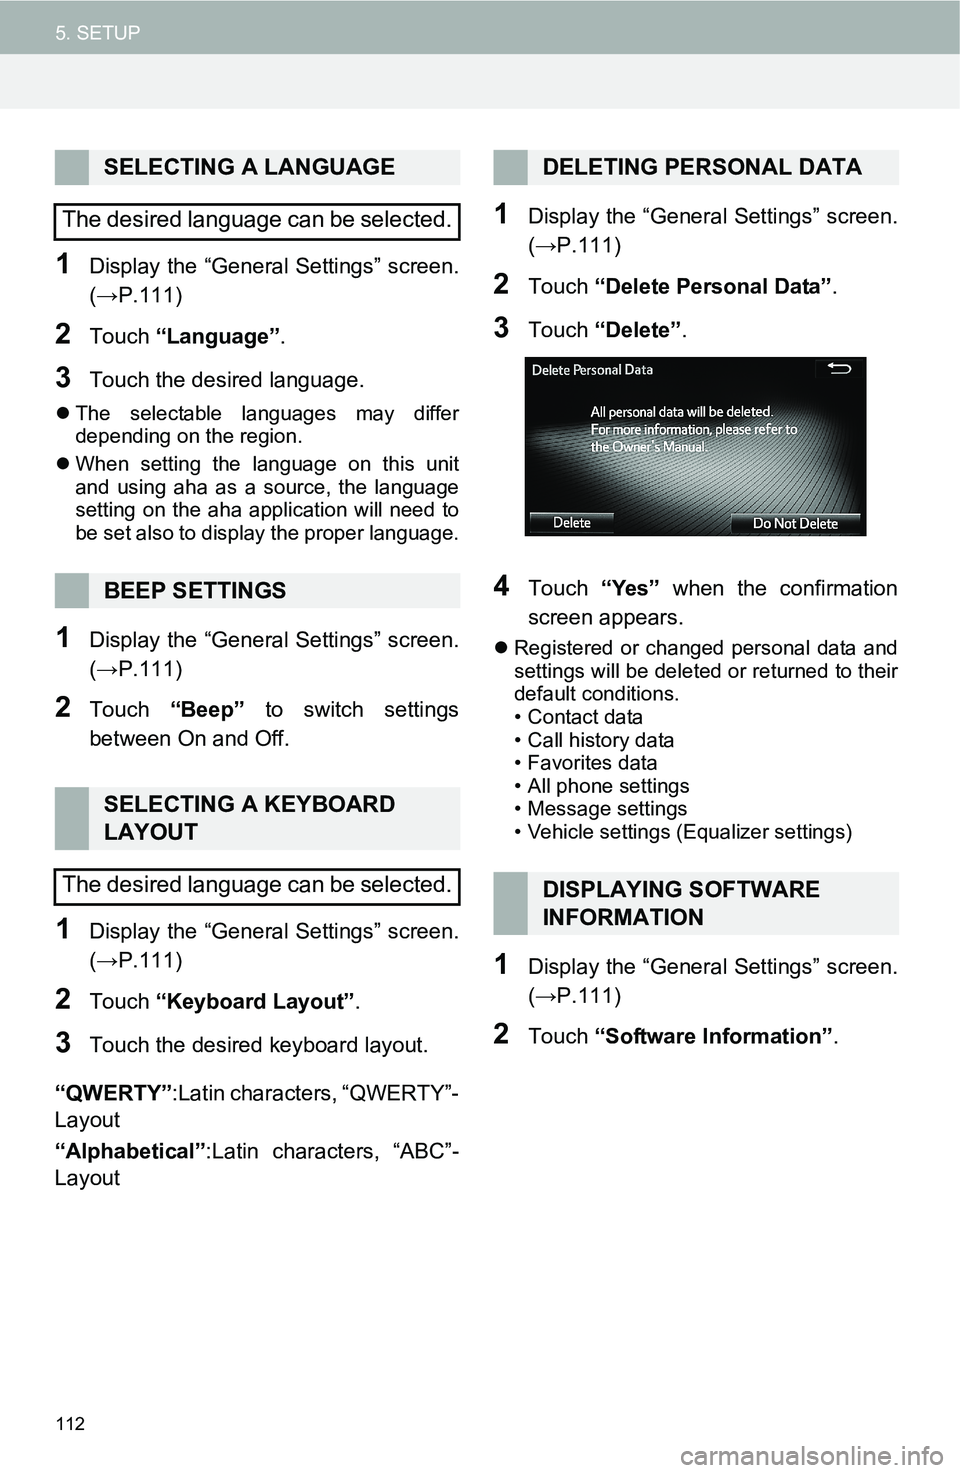
2Touch “Delete Personal Data”.
3Touch “Delete”.
4Touch “Yes” when the confirmation
screen appears.
Registered or changed personal data and
settings will be deleted or returned to their
default conditions.
• Contact data
• Call history data
• Favorites data
• All phone settings
• Message settings
• Vehicle settings (Equalizer settings)
1Display the “General Settings” screen.
(→P.111)
2Touch “Software Information”.
SELECTING A LANGUAGE
The desired language can be selected.
BEEP SETTINGS
SELECTING A KEYBOARD
LAYOUT
The desired language can be selected.
DELETING PERSONAL DATA
DISPLAYING SOFTWARE
INFORMATION
Page 114 of 144
114
5. SETUP
1Display the “Bluetooth* Setup” screen.
(→P.113)
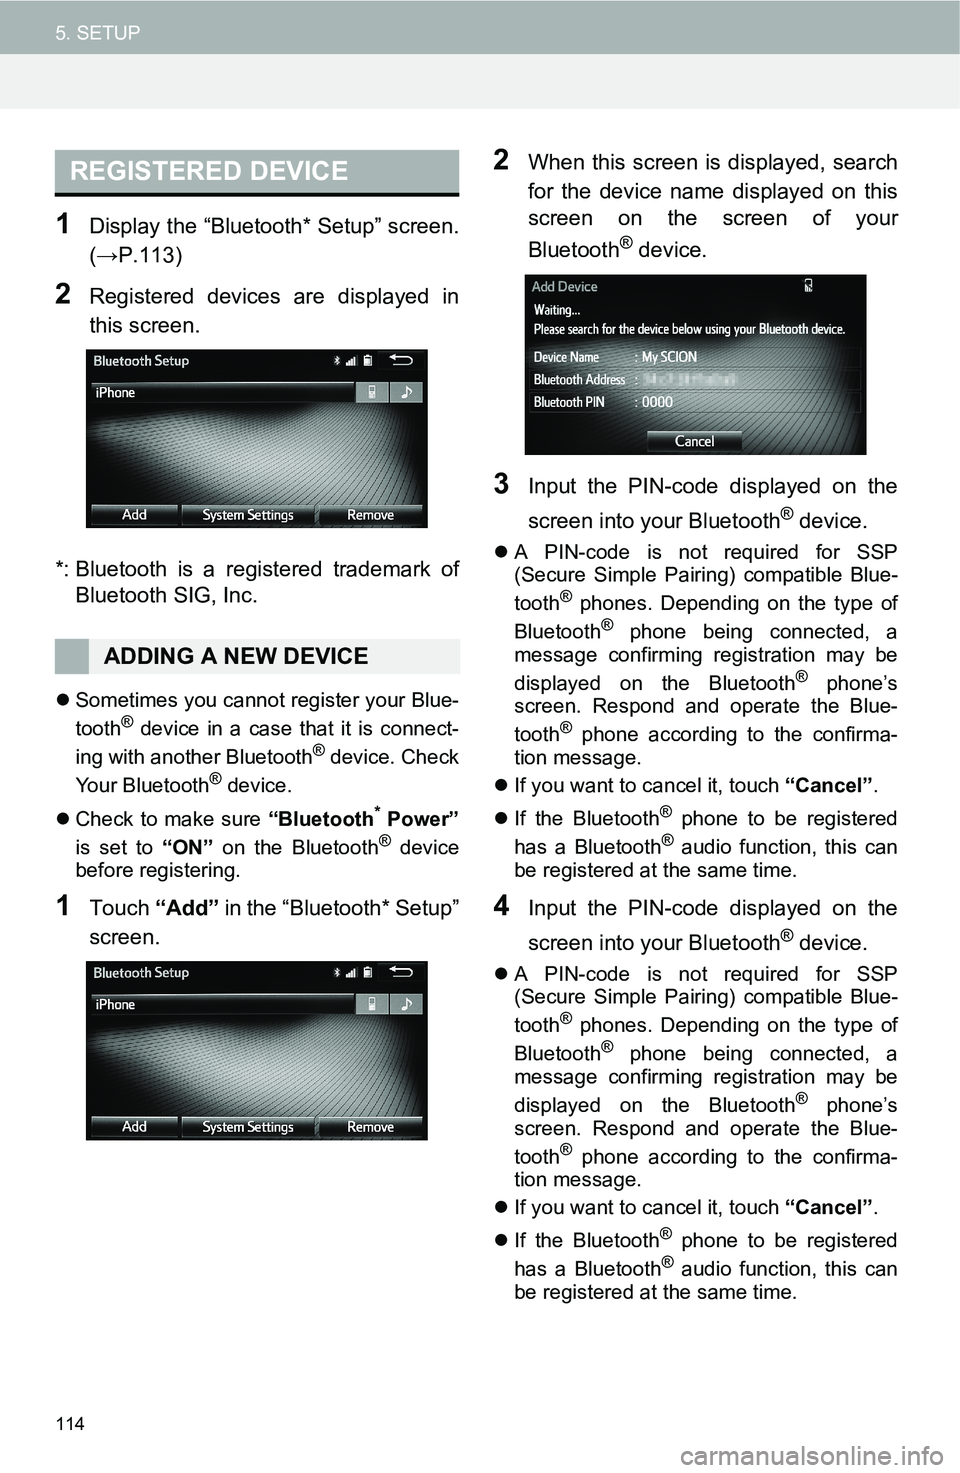
2Registered devices are displayed in
this screen.
*: Bluetooth is a registered trademark of
Bluetooth SIG, Inc.
Sometimes you cannot register your Blue-
tooth® device in a case that it is connect-
ing with another Bluetooth® device. Check
Your Bluetooth® device.
Check to make sure “Bluetooth
* Power”
is set to “ON” on the Bluetooth® device
before registering.
1Touch “Add” in the “Bluetooth* Setup”
screen.
2When this screen is displayed, search
for the device name displayed on this
screen on the screen of your
Bluetooth
® device.
3Input the PIN-code displayed on the
screen into your Bluetooth
® device.
A PIN-code is not required for SSP
(Secure Simple Pairing) compatible Blue-
tooth
® phones. Depending on the type of
Bluetooth® phone being connected, a
message confirming registration may be
displayed on the Bluetooth
® phone’s
screen. Respond and operate the Blue-
tooth
® phone according to the confirma-
tion message.
If you want to cancel it, touch “Cancel”.
If the Bluetooth
® phone to be registered
has a Bluetooth® audio function, this can
be registered at the same time.
4Input the PIN-code displayed on the
screen into your Bluetooth
® device.
A PIN-code is not required for SSP
(Secure Simple Pairing) compatible Blue-
tooth
® phones. Depending on the type of
Bluetooth® phone being connected, a
message confirming registration may be
displayed on the Bluetooth
® phone’s
screen. Respond and operate the Blue-
tooth
® phone according to the confirma-
tion message.
If you want to cancel it, touch “Cancel”.
If the Bluetooth
® phone to be registered
has a Bluetooth® audio function, this can
be registered at the same time.
REGISTERED DEVICE
ADDING A NEW DEVICE