TOYOTA IQ 2013 Owners Manual
Manufacturer: TOYOTA, Model Year: 2013,
Model line: IQ,
Model: TOYOTA IQ 2013
Pages: 372, PDF Size: 7.77 MB
TOYOTA IQ 2013 Owners Manual
IQ 2013
TOYOTA
TOYOTA
https://www.carmanualsonline.info/img/14/67074/w960_67074-0.png
TOYOTA IQ 2013 Owners Manual
Trending: battery capacity, child lock, hood release, display, low beam, sensor, phone
Page 201 of 372
201
4-3. Do-it-yourself maintenance
4
Maintenance and care
CAUTION
■
When raising your vehicle
●When raising the vehicle, do not place any objects on top of or underneath
the floor jack.
Page 202 of 372
202
4-3. Do-it-yourself maintenance
Replacing the tire
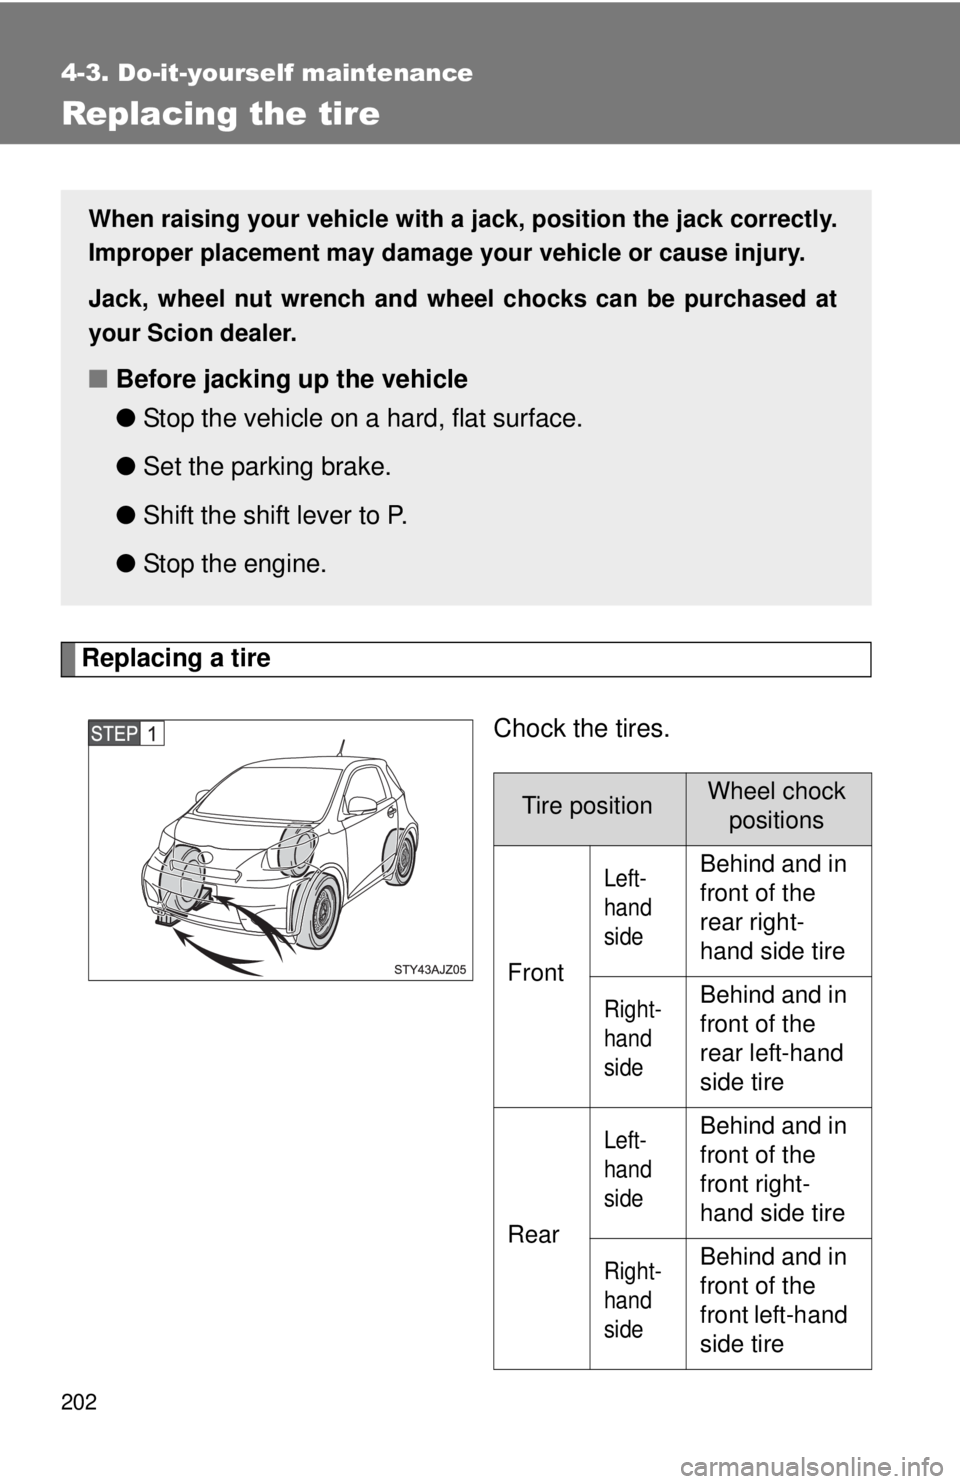
Replacing a tireChock the tires.
When raising your vehicle with a jack, position the jack correctly.
Improper placement may damage your vehicle or cause injury.
Jack, wheel nut wrench and wheel chocks can be purchased at
your Scion dealer.
■Before jacking up the vehicle
●Stop the vehicle on a hard, flat surface.
● Set the parking brake.
● Shift the shift lever to P.
● Stop the engine.
Tire positionWheel chock
positions
Front
Left-
hand
sideBehind and in
front of the
rear right-
hand side tire
Right-
hand
sideBehind and in
front of the
rear left-hand
side tire
Rear
Left-
hand
sideBehind and in
front of the
front right-
hand side tire
Right-
hand
sideBehind and in
front of the
front left-hand
side tire
Page 203 of 372
203
4-3. Do-it-yourself maintenance
4
Maintenance and care
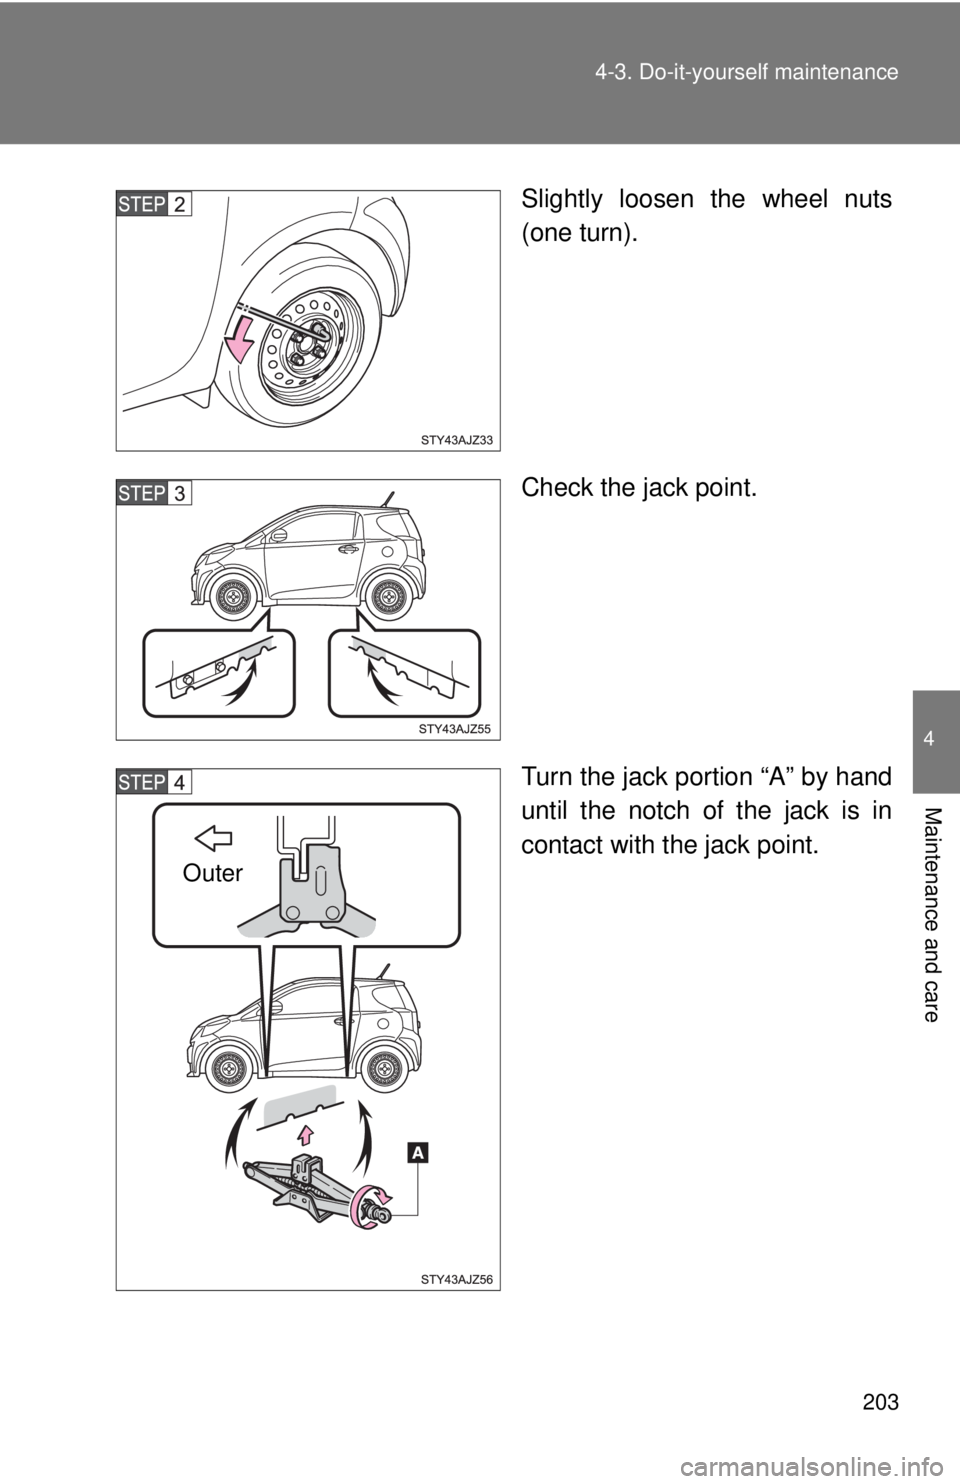
Slightly loosen the wheel nuts
(one turn).
Check the jack point.
Turn the jack portion “A” by hand
until the notch of the jack is in
contact with the jack point.
Outer
Page 204 of 372
204 4-3. Do-it-yourself maintenance
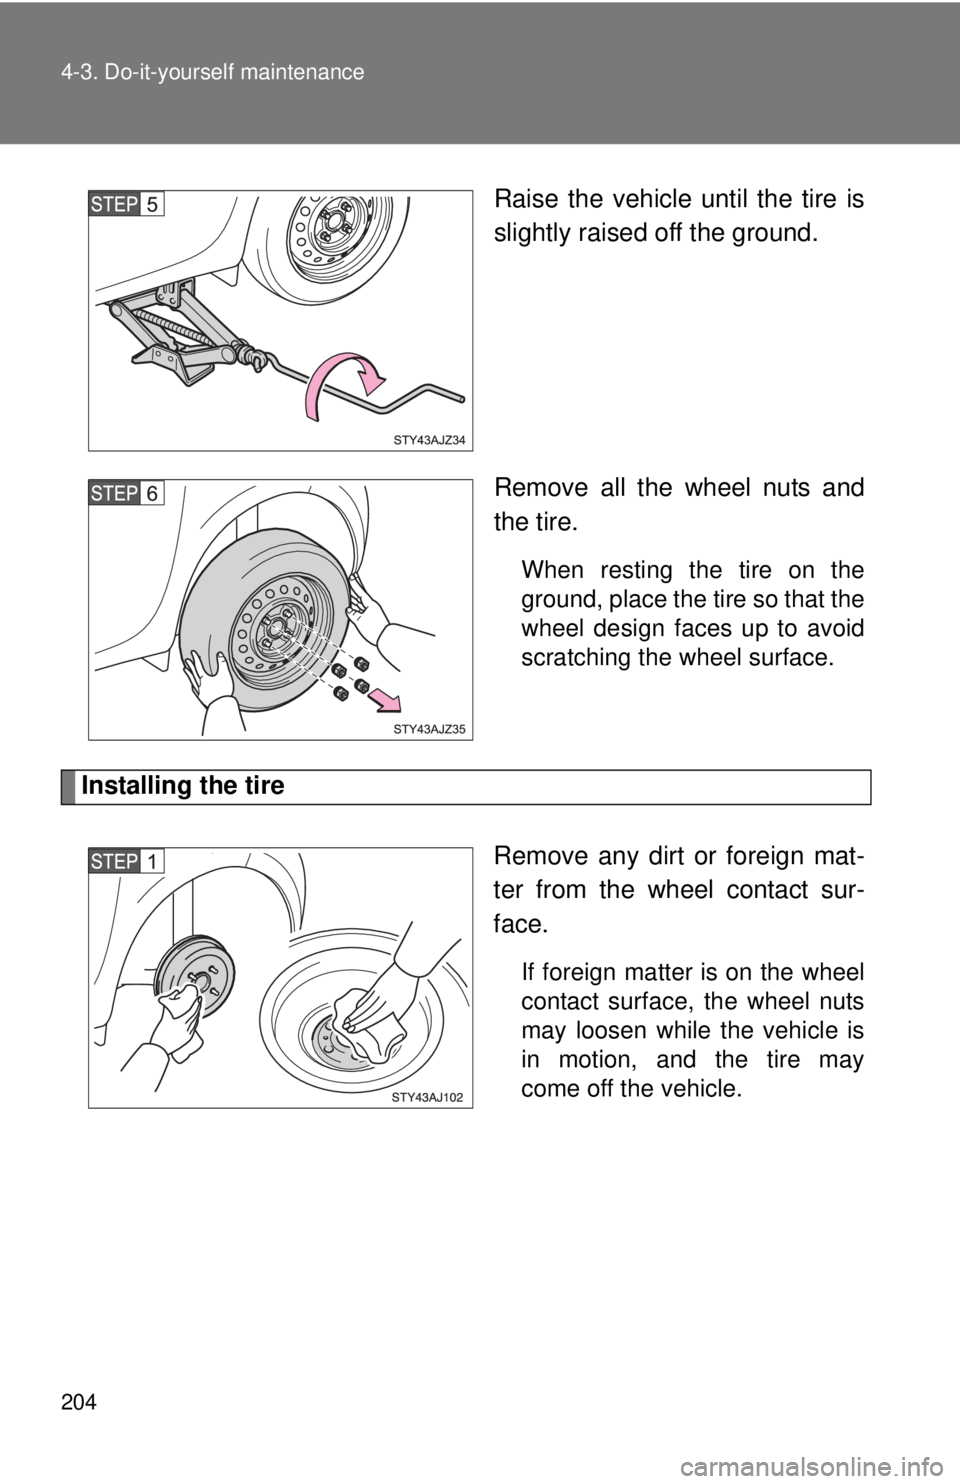
Raise the vehicle until the tire is
slightly raised off the ground.
Remove all the wheel nuts and
the tire.
When resting the tire on the
ground, place the tire so that the
wheel design faces up to avoid
scratching the wheel surface.
Installing the tireRemove any dirt or foreign mat-
ter from the wheel contact sur-
face.
If foreign matter is on the wheel
contact surface, the wheel nuts
may loosen while the vehicle is
in motion, and the tire may
come off the vehicle.
Page 205 of 372
205
4-3. Do-it-yourself maintenance
4
Maintenance and care
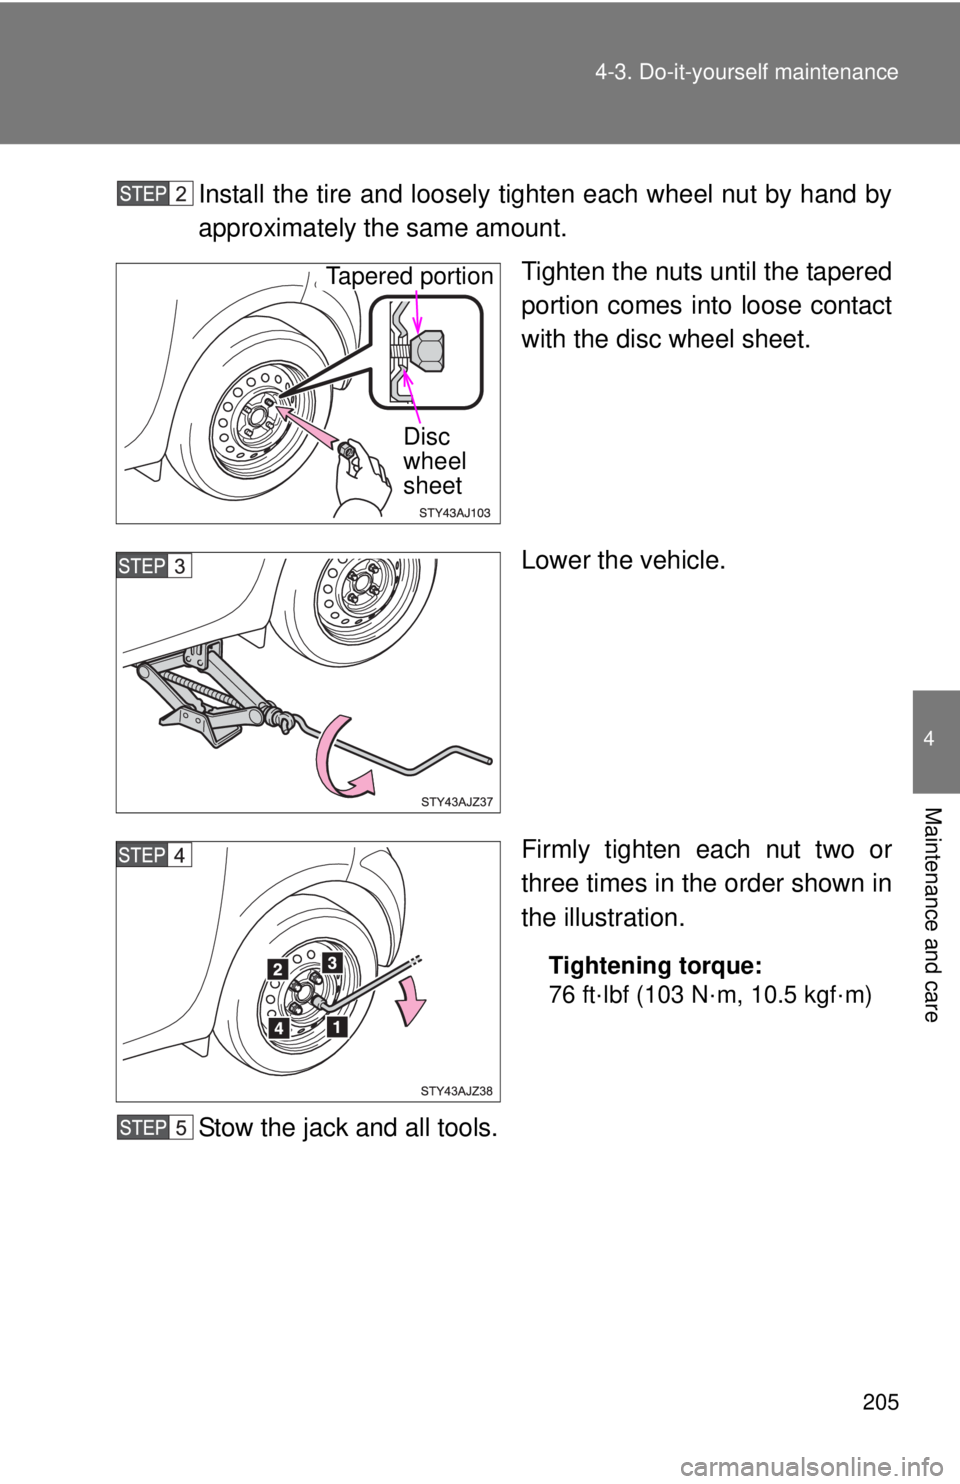
Install the tire and loosely ti
ghten each wheel nut by hand by
approximately the same amount.
Tighten the nuts until the tapered
portion comes into loose contact
with the disc wheel sheet.
Lower the vehicle.
Firmly tighten each nut two or
three times in the order shown in
the illustration.
Tightening torque:
76 ft·lbf (103 N·m, 10.5 kgf·m)
Stow the jack and all tools.
Tapered portion
Disc
wheel
sheet
Page 206 of 372

206 4-3. Do-it-yourself maintenance
CAUTION
■Using the jack
Improper use of the jack may lead to death or serious injuries due to the
vehicle suddenly falling off the jack.
●Do not use the jack for any purpose ot her than replacing tires or install-
ing and removing tire chains.
●Do not use it on other vehicles, an d do not use other jacks for replac-
ing tires on this vehicle.
●Always check that the jack is securely set to the jack point.
●Do not put any part of your body under the vehicle supported by a jack.
●Do not start or run the engine while your vehicle is supported by the
jack.
●Do not raise the vehicle while someone is in it.
●When raising the vehicle, do not put an object on or under the jack.
●Do not raise the vehicle to a hei ght greater than that required to
replace the tire.
●Use a jack stand if it is necessary to get under the vehicle.
Take particular care when lowering the vehicle to ensure that no one
working on or near the vehicle will be injured.
■Replacing a tire
Observe the following precautions to reduce the risk of death or serious
injury.
●Have the wheel nuts tightened with a torque wrench to 76 ft·lbf (103
N·m, 10.5 kgf·m) as soon as possible after changing wheels.
Failure to follow these precautions could cause the nuts to loosen and
the wheel may fall off, which could lead to an accident causing death
or serious injury.
●Do not attach a heavily damaged wheel ornament, as it may fly off the
wheel while the vehicle is moving.
Page 207 of 372
207
4-3. Do-it-yourself maintenance
4
Maintenance and care
CAUTION
■When installing the wheel nuts
●Never use oil or grease on the wheel bolts or wheel nuts.
Oil and grease may cause the wheel nuts to be excessively tightened,
leading to bolt or disc wheel damage. In addition, the oil or grease can
cause the wheel nuts to loosen and the wheel may fall off, causing an
accident and resulting in death or serious injury. Remove any oil or
grease from the wheel bolts or wheel nuts.
■Location of tools
There are no place to install the jack, wheel nut wrench and wheel
chocks, so do not put it inside the vehicle.
Failure to follow the precaution could cause the interior to get damaged,
the tools may fly out in events such as sudden braking, and may cause
an accident.
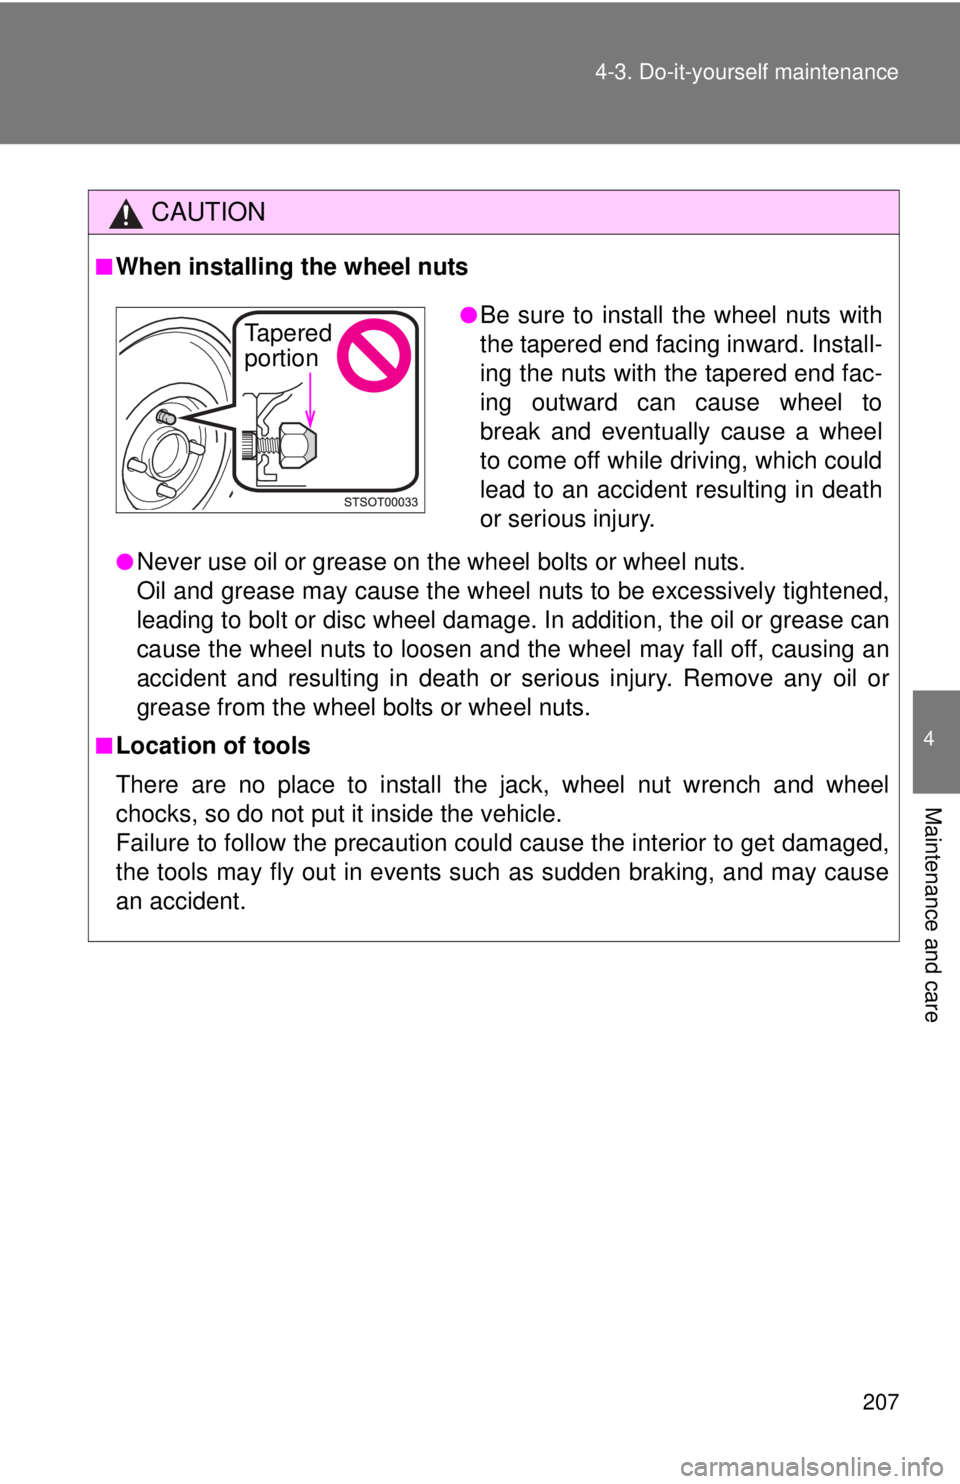
●Be sure to install the wheel nuts with
the tapered end faci
ng inward. Install-
ing the nuts with the tapered end fac-
ing outward can cause wheel to
break and eventually cause a wheel
to come off while driving, which could
lead to an accident resulting in death
or serious injury.Tapered
portion
Page 208 of 372
208
4-3. Do-it-yourself maintenance
Engine compar tment
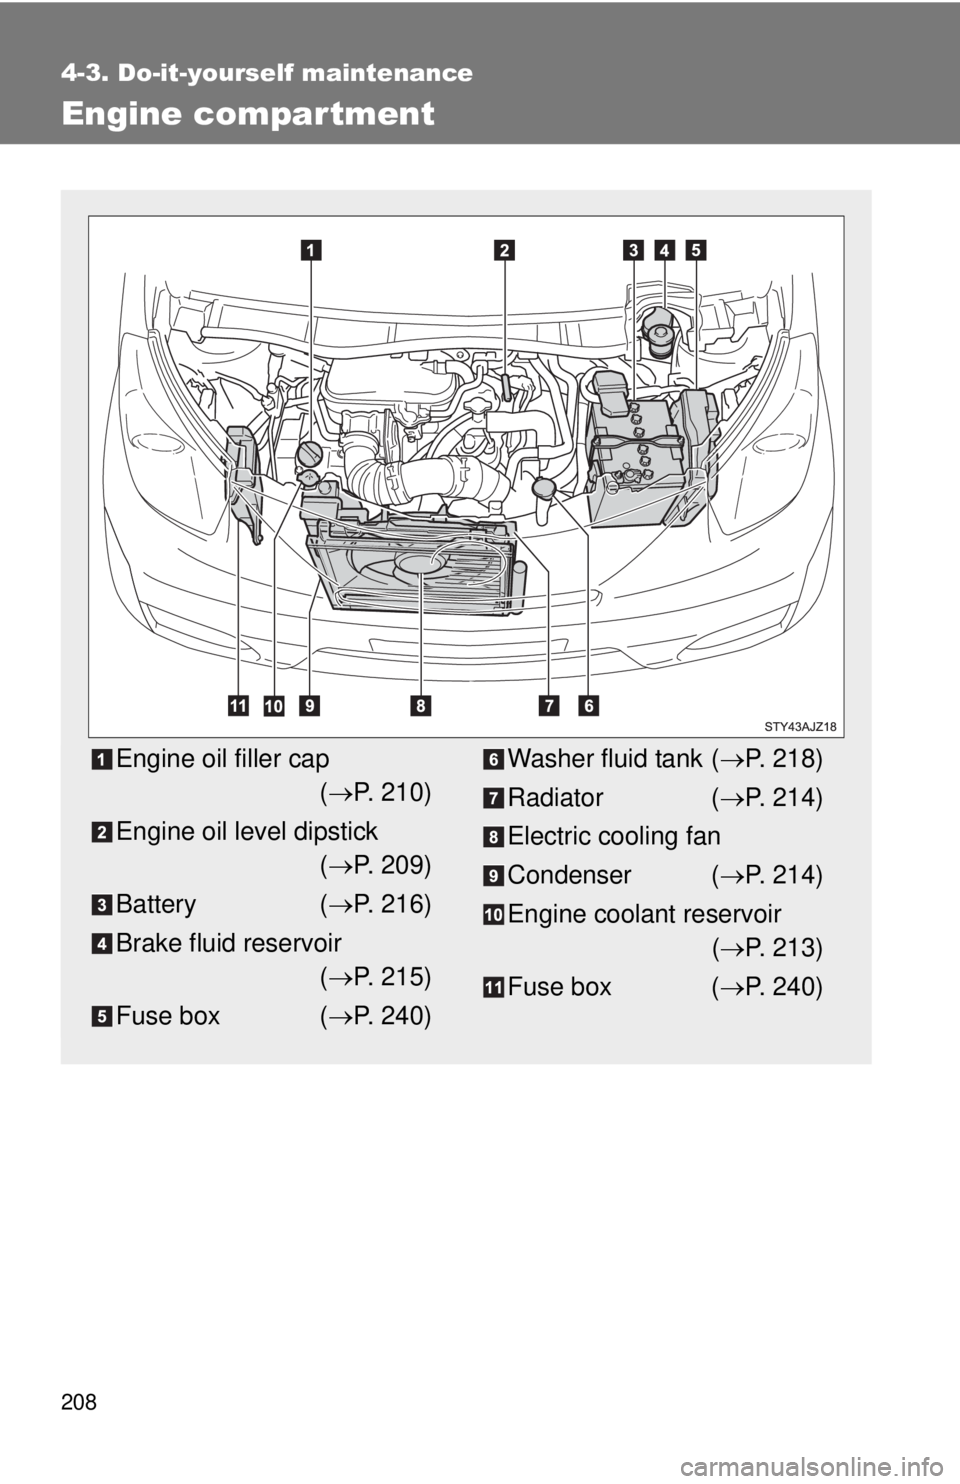
Engine oil filler cap ( P. 210)
Engine oil level dipstick ( P. 209)
Battery ( P. 216)
Brake fluid reservoir ( P. 215)
Fuse box ( P. 240)Washer fluid tank ( P. 218)
Radiator ( P. 214)
Electric cooling fan
Condenser ( P. 214)
Engine coolant reservoir ( P. 213)
Fuse box ( P. 240)
Page 209 of 372
209
4-3. Do-it-yourself maintenance
4
Maintenance and care
Engine oil
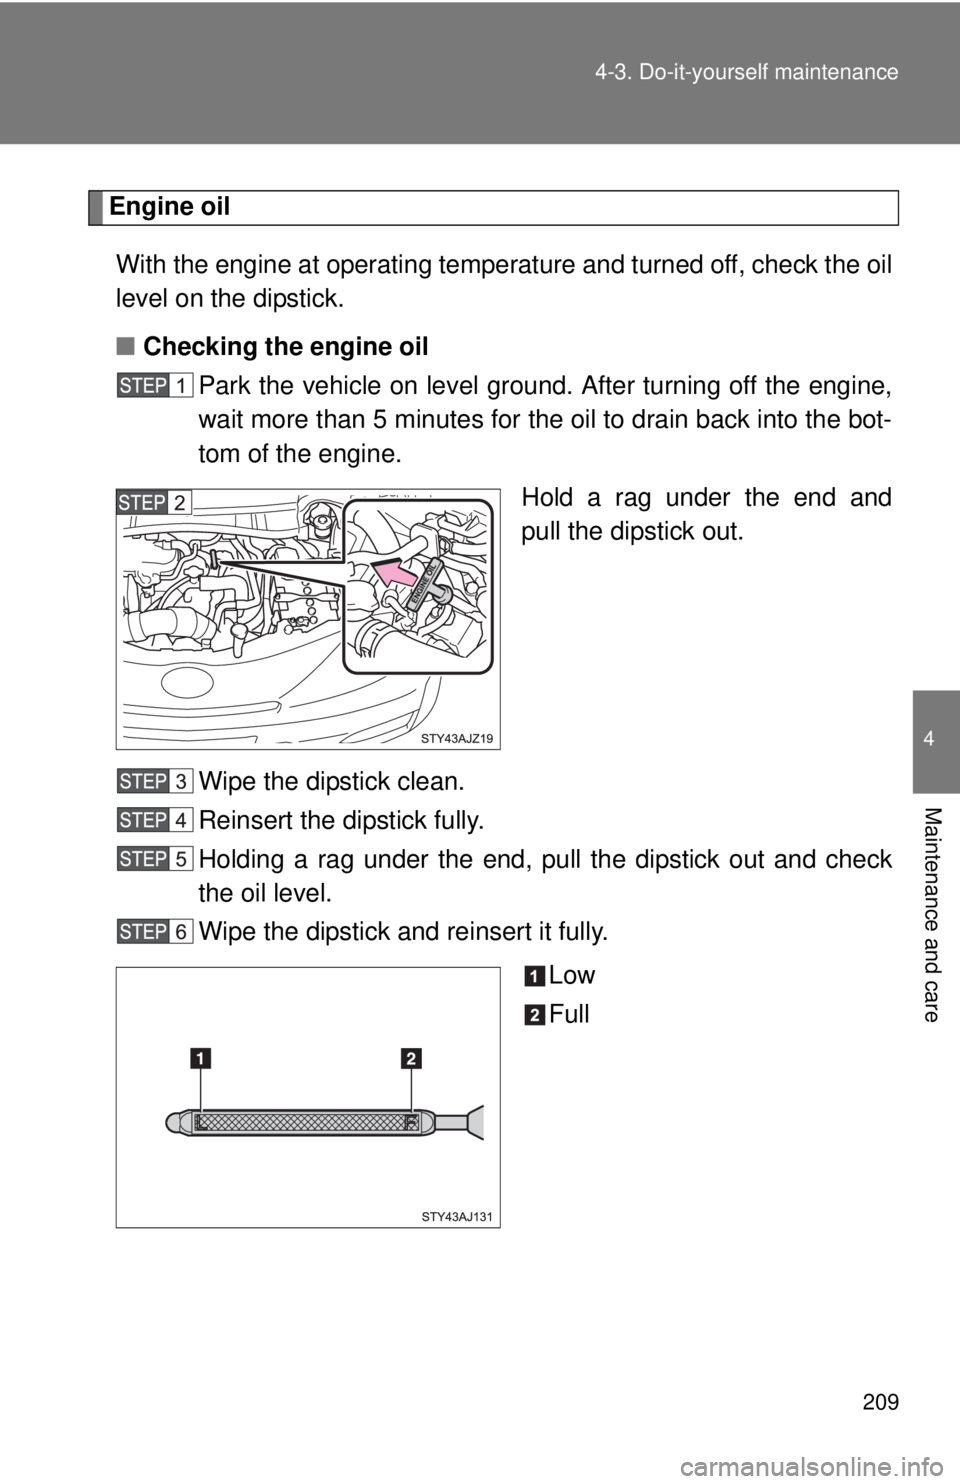
With the engine at operating temperature and turned off, check the oil
level on the dipstick.
■ Checking the engine oil
Park the vehicle on level gro und. After turning off the engine,
wait more than 5 minutes for the oil to drain back into the bot-
tom of the engine.
Hold a rag under the end and
pull the dipstick out.
Wipe the dipstick clean.
Reinsert the dipstick fully.
Holding a rag under the end, pull the dipstick out and check
the oil level.
Wipe the dipstick and reinsert it fully. Low
Full
Page 210 of 372
210 4-3. Do-it-yourself maintenance
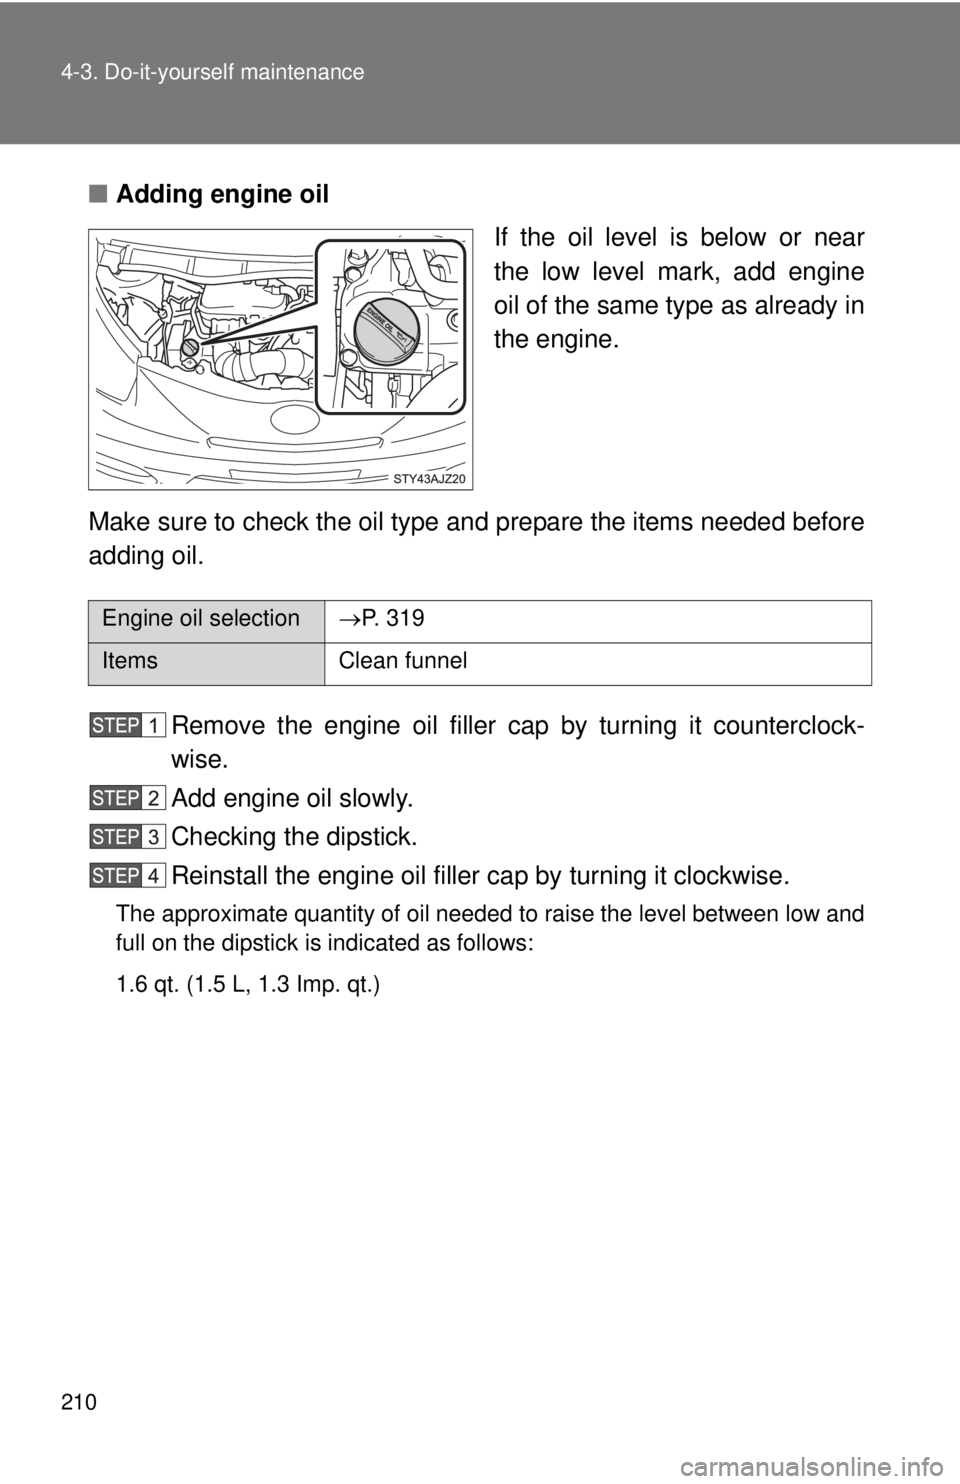
■Adding engine oil
If the oil level is below or near
the low level mark, add engine
oil of the same type as already in
the engine.
Make sure to check the oil type and prepare the items needed before
adding oil. Remove the engine oil filler cap by turning it counterclock-
wise.
Add engine oil slowly.
Checking the dipstick.
Reinstall the engine oil filler cap by turning it clockwise.
The approximate quantity of oil needed to raise the level between low and
full on the dipstick is indicated as follows:
1.6 qt. (1.5 L, 1.3 Imp. qt.)
Engine oil selectionP. 319
ItemsClean funnel
Trending: wheel size, cooling, winter tires, driver seat adjustment, remote control, odometer, coolant reservoir

