display TOYOTA LAND CRUISER 2013 J200 User Guide
[x] Cancel search | Manufacturer: TOYOTA, Model Year: 2013, Model line: LAND CRUISER, Model: TOYOTA LAND CRUISER 2013 J200Pages: 720, PDF Size: 21.46 MB
Page 100 of 720
100 1-4. Opening and closing the windows and moon roof
LC200_OM_OM60F57U_(U)
■Moon roof open warning buzzer
The buzzer sounds and message is shown on the multi-information display
in the instrument panel when the “ENGINE START STOP” switch is turned
OFF and the driver’s door is opened with the moon roof open.
■Customization
Settings (e.g. linked door lock operation) can be changed.
(Customizable features P. 692)
CAUTION
■Opening the moon roof
Observe the following precautions.
Failing to do so may cause death or serious injury.
●Do not allow any passengers to put their hands or heads outside the vehi-
cle while it is moving.
●Do not sit on top of the moon roof.
■Closing the moon roof
Observe the following precautions.
Failing to do so may result in death or serious injury.
●Check to make sure that all passengers do not have any part of their bod-
ies in a position where they could be caught when the moon roof is being
operated.
●Do not allow children to operate the moon roof.
Closing the moon roof on someone can cause death or serious injury.
■Jam protection function
●Never try jamming any part of your body to activate the jam protection
function intentionally.
●The jam protection function may not work if something gets caught just
before the moon roof fully closes.
Page 140 of 720
140
1-7. Safety information
LC200_OM_OM60F57U_(U)
Installing child restraints
Follow the child restraint system manufacturer’s instructions. Firmly
secure the child restraints using the LATCH anchors or a seat belt.
Attach the top tether strap when installing a child restraint.
The lap/shoulder belt can be used if your child restraint system is
not compatible with the LATCH (Lower Anchors and Tethers for Chil-
dren) system.
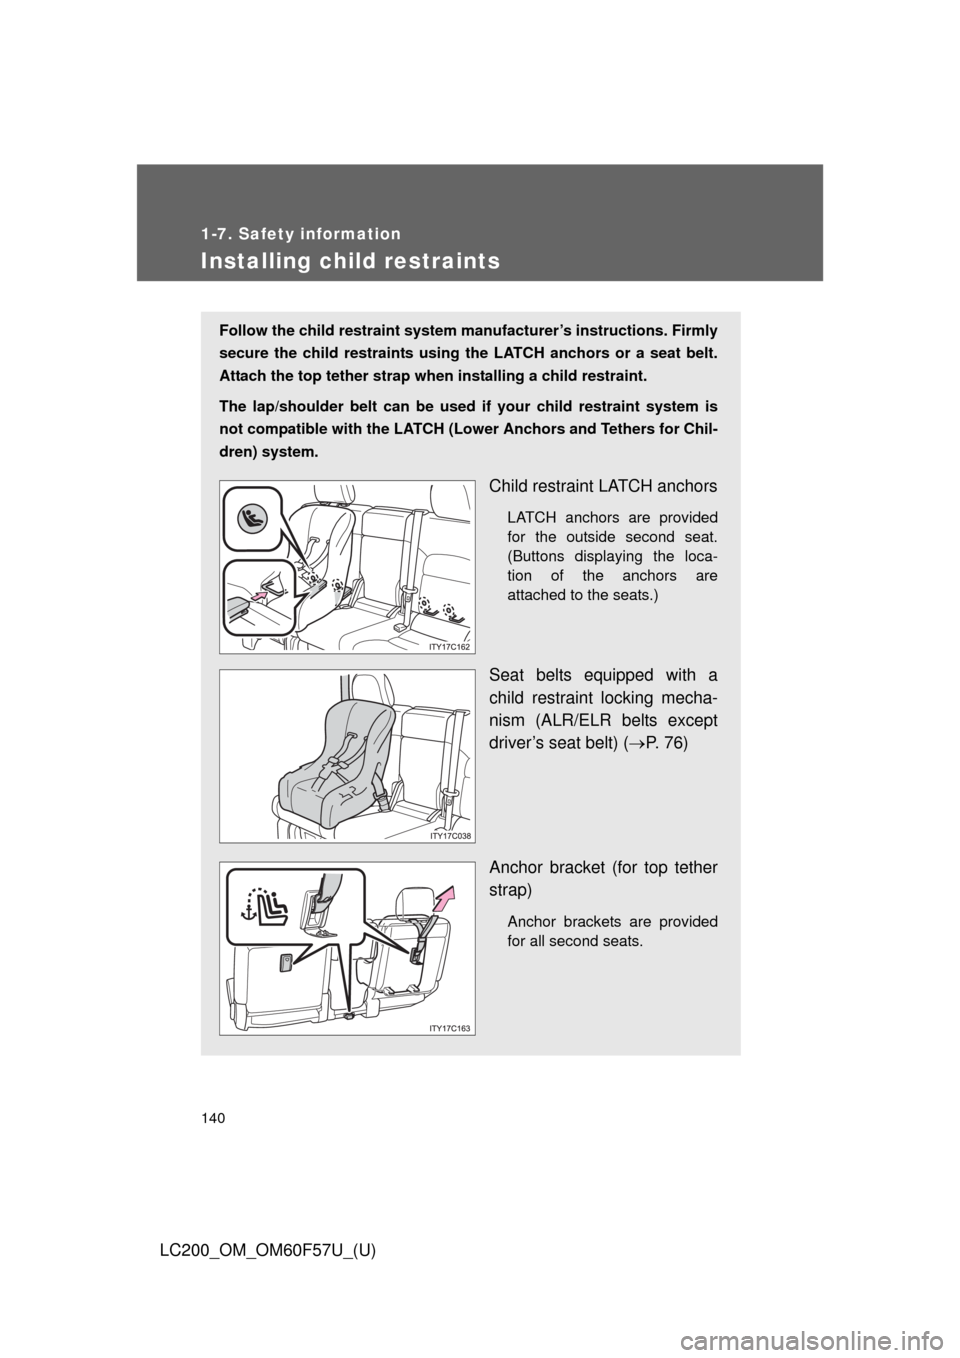
Child restraint LATCH anchors
LATCH anchors are provided
for the outside second seat.
(Buttons displaying the loca-
tion of the anchors are
attached to the seats.)
Seat belts equipped with a
child restraint locking mecha-
nism (ALR/ELR belts except
driver’s seat belt) (P. 76)
Anchor bracket (for top tether
strap)
Anchor brackets are provided
for all second seats.
Page 153 of 720
When driving2
153
LC200_OM_OM60F57U_(U)
2-1. Driving procedures
Driving the vehicle............ 154
Engine (ignition) switch .... 166
Automatic transmission .... 171
Turn signal lever .............. 176
Parking brake ................... 177
Horn ................................. 178
2-2. Instrument cluster
Gauges and meters ......... 179
Indicators and
warning lights ................. 184
Multi-information
display............................ 189
2-3. Operating the lights
and wipers
Headlight switch ............... 196
Fog light switch ................ 201
Windshield wipers
and washer .................... 202
Rear window wiper
and washer .................... 208
Headlight cleaner
switch ............................. 2092-4. Using other driving systems
Cruise control ................... 210
Dynamic radar
cruise control ................. 214
Intuitive parking assist...... 229
Four-wheel drive
system ........................... 240
Crawl Control
(with Turn Assist
function) ......................... 245
Multi-terrain Select ........... 251
Multi-terrain Monitor ......... 257
Driving assist systems ..... 282
Pre-Collision System........ 290
2-5. Driving information
Off-road precautions ........ 297
Cargo and luggage .......... 302
Vehicle load limits ............ 309
Winter driving tips ............ 310
Trailer towing ................... 315
Dinghy towing .................. 333
Page 156 of 720
156 2-1. Driving procedures
LC200_OM_OM60F57U_(U)
■Drum-in-disc type parking brake system
Your vehicle has a drum-in-disc type parking brake system.
This type of brake system needs bedding-down of the brake shoes periodi-
cally or whenever the parking brake shoes and/or drums are replaced.
Have your Toyota dealer perform the bedding-down.
■Operating your vehicle in a foreign country
Comply with the relevant vehicle registration laws and confirm the availability
of the correct fuel. (P. 668)
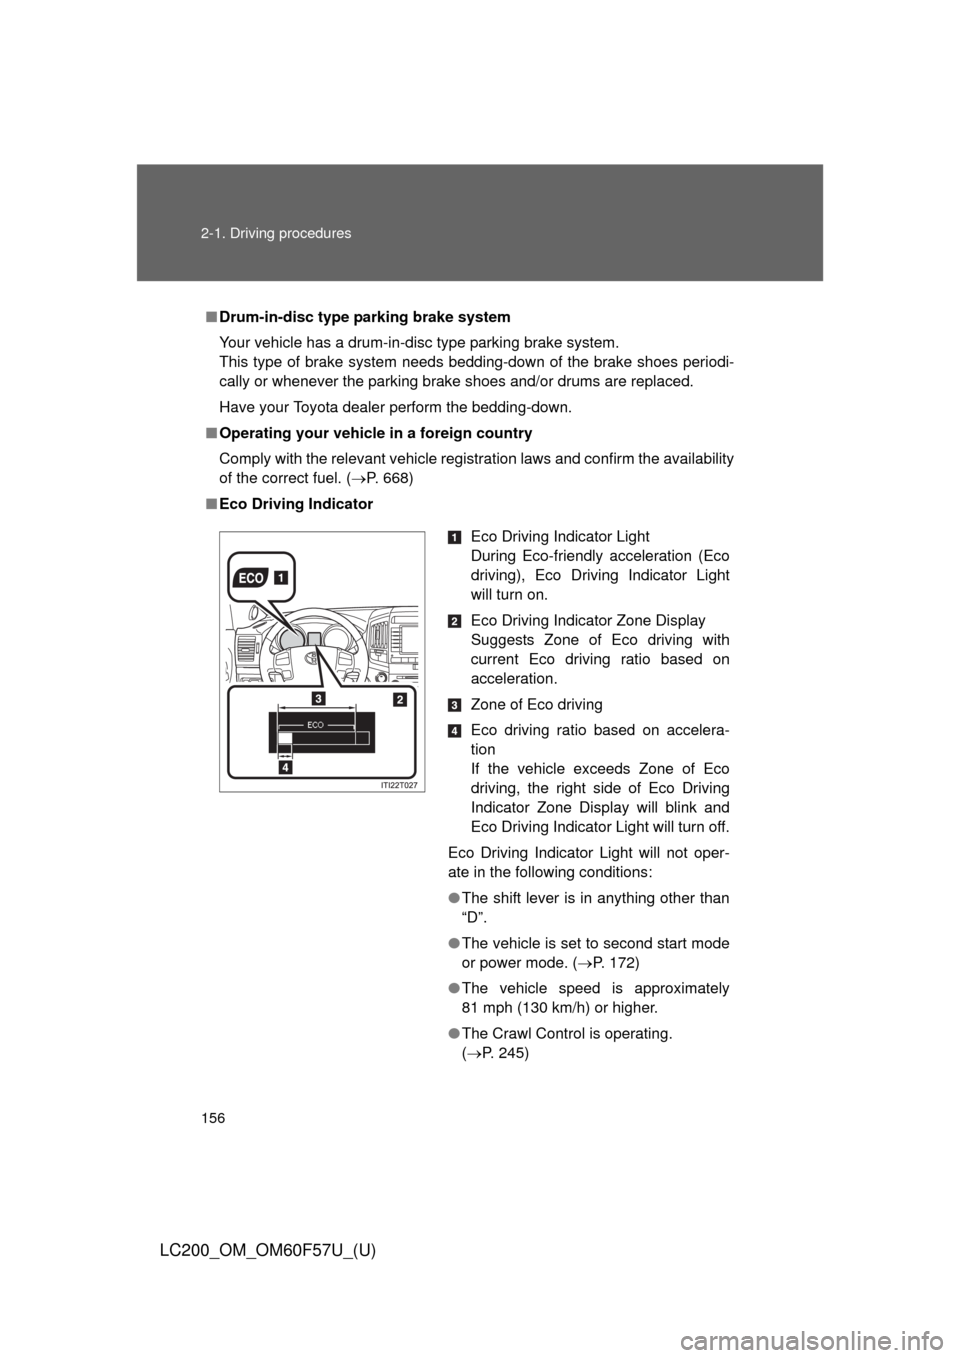
■Eco Driving Indicator
Eco Driving Indicator Light
During Eco-friendly acceleration (Eco
driving), Eco Driving Indicator Light
will turn on.
Eco Driving Indicator Zone Display
Suggests Zone of Eco driving with
current Eco driving ratio based on
acceleration.
Zone of Eco driving
Eco driving ratio based on accelera-
tion
If the vehicle exceeds Zone of Eco
driving, the right side of Eco Driving
Indicator Zone Display will blink and
Eco Driving Indicator Light will turn off.
Eco Driving Indicator Light will not oper-
ate in the following conditions:
●The shift lever is in anything other than
“D”.
●The vehicle is set to second start mode
or power mode. (P. 172)
●The vehicle speed is approximately
81 mph (130 km/h) or higher.
●The Crawl Control is operating.
(P. 245)
Page 168 of 720
168 2-1. Driving procedures
LC200_OM_OM60F57U_(U)
■Operation of the “ENGINE START STOP” switch
When operating the “ENGINE START STOP” switch, one short, firm press is
enough. If the switch is pressed improperly, the engine may not start or the
“ENGINE START STOP” switch mode may not change. It is not necessary to
press and hold the switch.
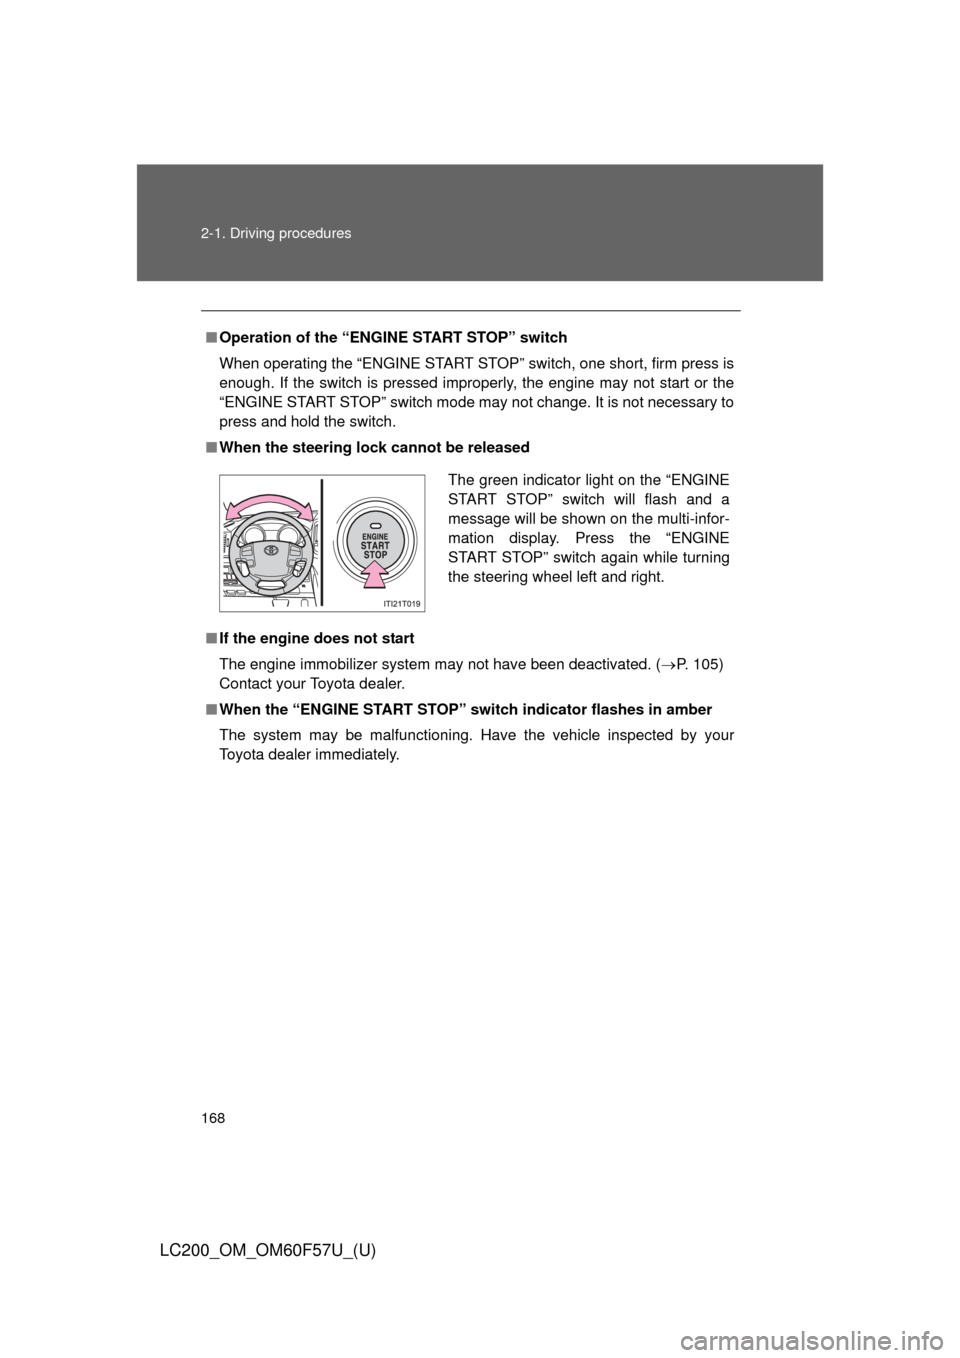
■When the steering lock cannot be released
■If the engine does not start
The engine immobilizer system may not have been deactivated. (P. 105)
Contact your Toyota dealer.
■When the “ENGINE START STOP” switch indicator flashes in amber
The system may be malfunctioning. Have the vehicle inspected by your
Toyota dealer immediately.
The green indicator light on the “ENGINE
START STOP” switch will flash and a
message will be shown on the multi-infor-
mation display. Press the “ENGINE
START STOP” switch again while turning
the steering wheel left and right.
Page 179 of 720
179
2
When driving
LC200_OM_OM60F57U_(U)
2-2. Instrument cluster
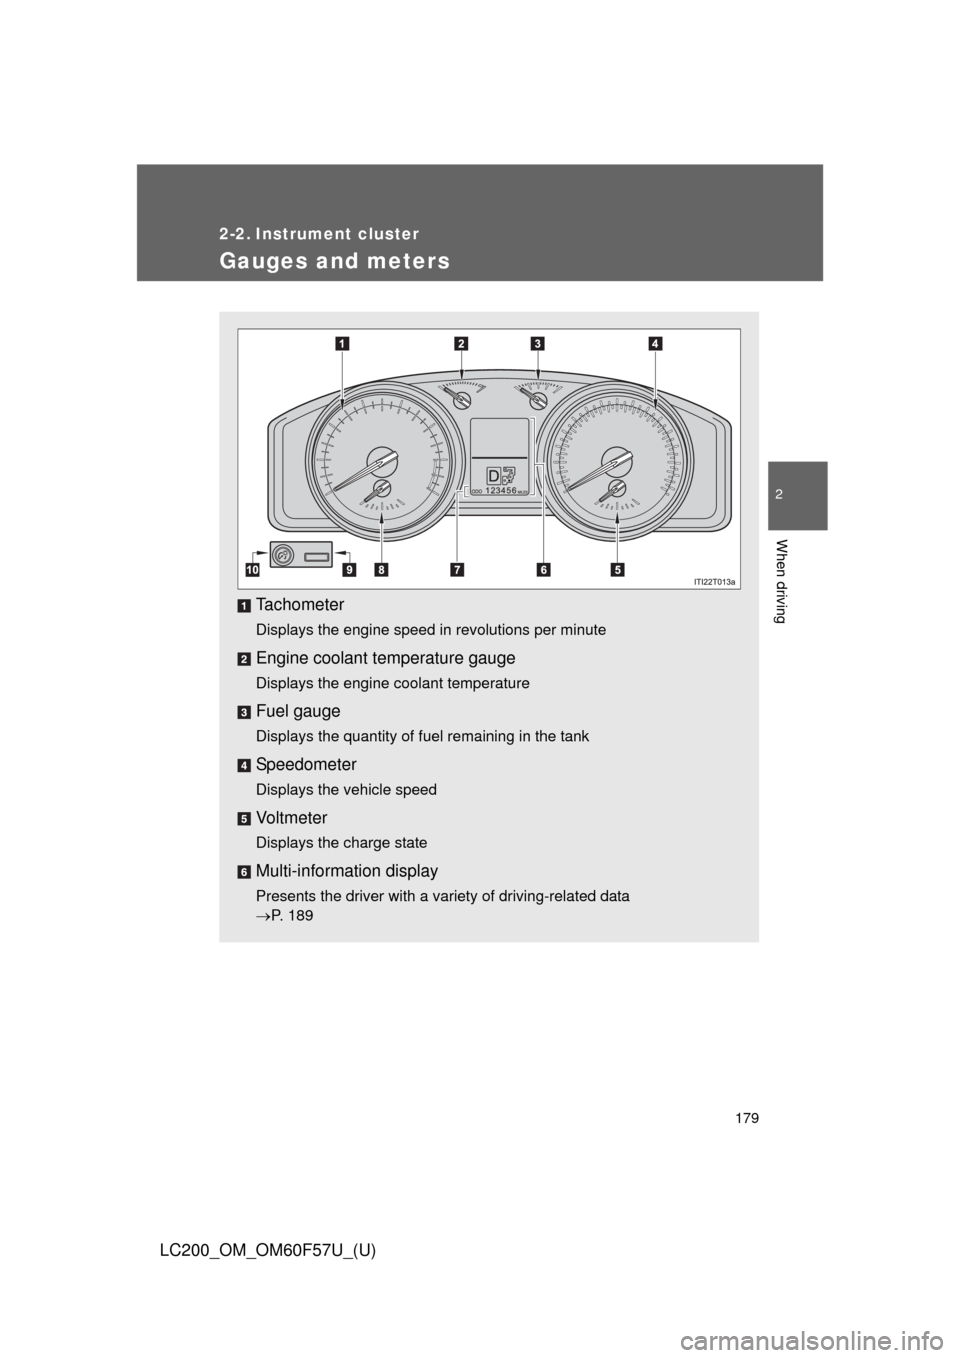
Gauges and meters
Tachometer
Displays the engine speed in revolutions per minute
Engine coolant temperature gauge
Displays the engine coolant temperature
Fuel gauge
Displays the quantity of fuel remaining in the tank
Speedometer
Displays the vehicle speed
Vo l t m e t e r
Displays the charge state
Multi-information display
Presents the driver with a variety of driving-related data
P. 189
Page 180 of 720
180 2-2. Instrument cluster
LC200_OM_OM60F57U_(U)
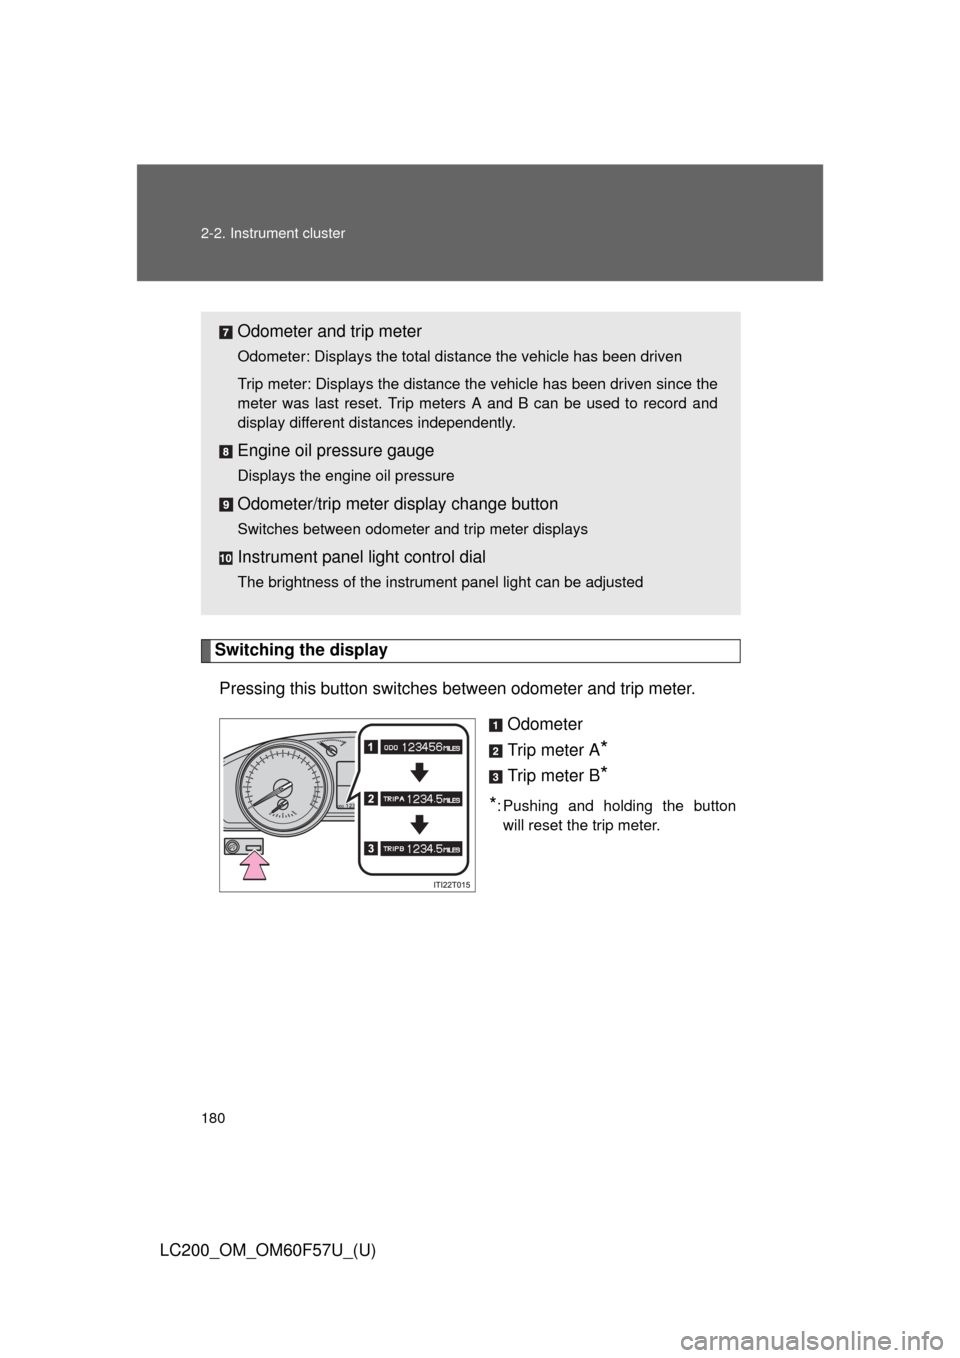
Switching the display
Pressing this button switches between odometer and trip meter.
Odometer
Trip meter A
*
Trip meter B*
*: Pushing and holding the button
will reset the trip meter.
Odometer and trip meter
Odometer: Displays the total distance the vehicle has been driven
Trip meter: Displays the distance the vehicle has been driven since the
meter was last reset. Trip meters A and B can be used to record and
display different distances independently.
Engine oil pressure gauge
Displays the engine oil pressure
Odometer/trip meter display change button
Switches between odometer and trip meter displays
Instrument panel light control dial
The brightness of the instrument panel light can be adjusted
Page 181 of 720
181 2-2. Instrument cluster
2
When driving
LC200_OM_OM60F57U_(U)
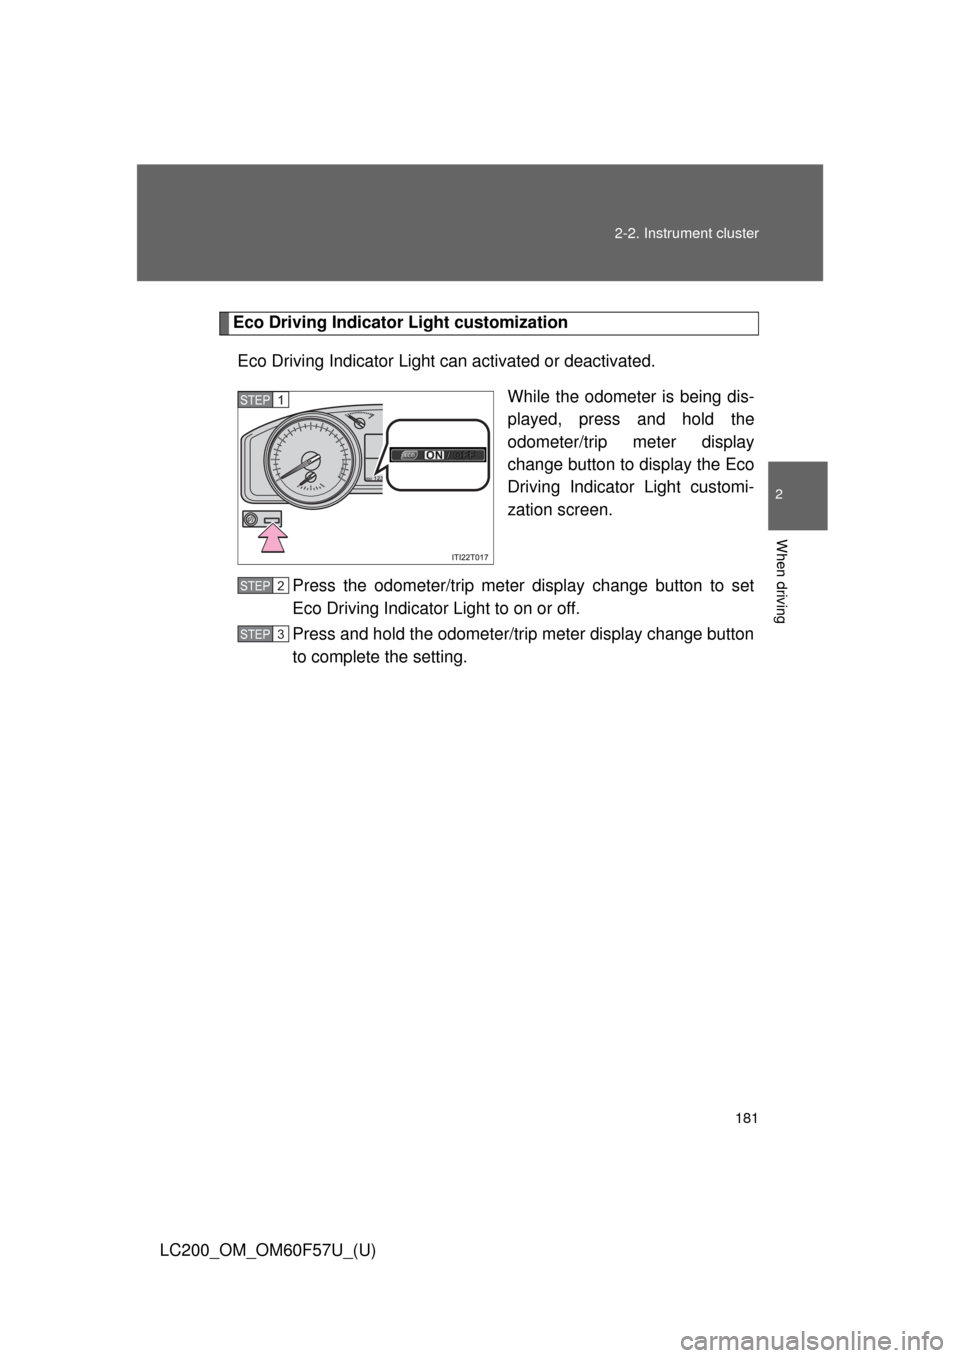
Eco Driving Indicator Light customization
Eco Driving Indicator Light can activated or deactivated.
While the odometer is being dis-
played, press and hold the
odometer/trip meter display
change button to display the Eco
Driving Indicator Light customi-
zation screen.
Press the odometer/trip meter display change button to set
Eco Driving Indicator Light to on or off.
Press and hold the odometer/trip meter display change button
to complete the setting.
STEP1
STEP2
STEP3
Page 182 of 720
182 2-2. Instrument cluster
LC200_OM_OM60F57U_(U)
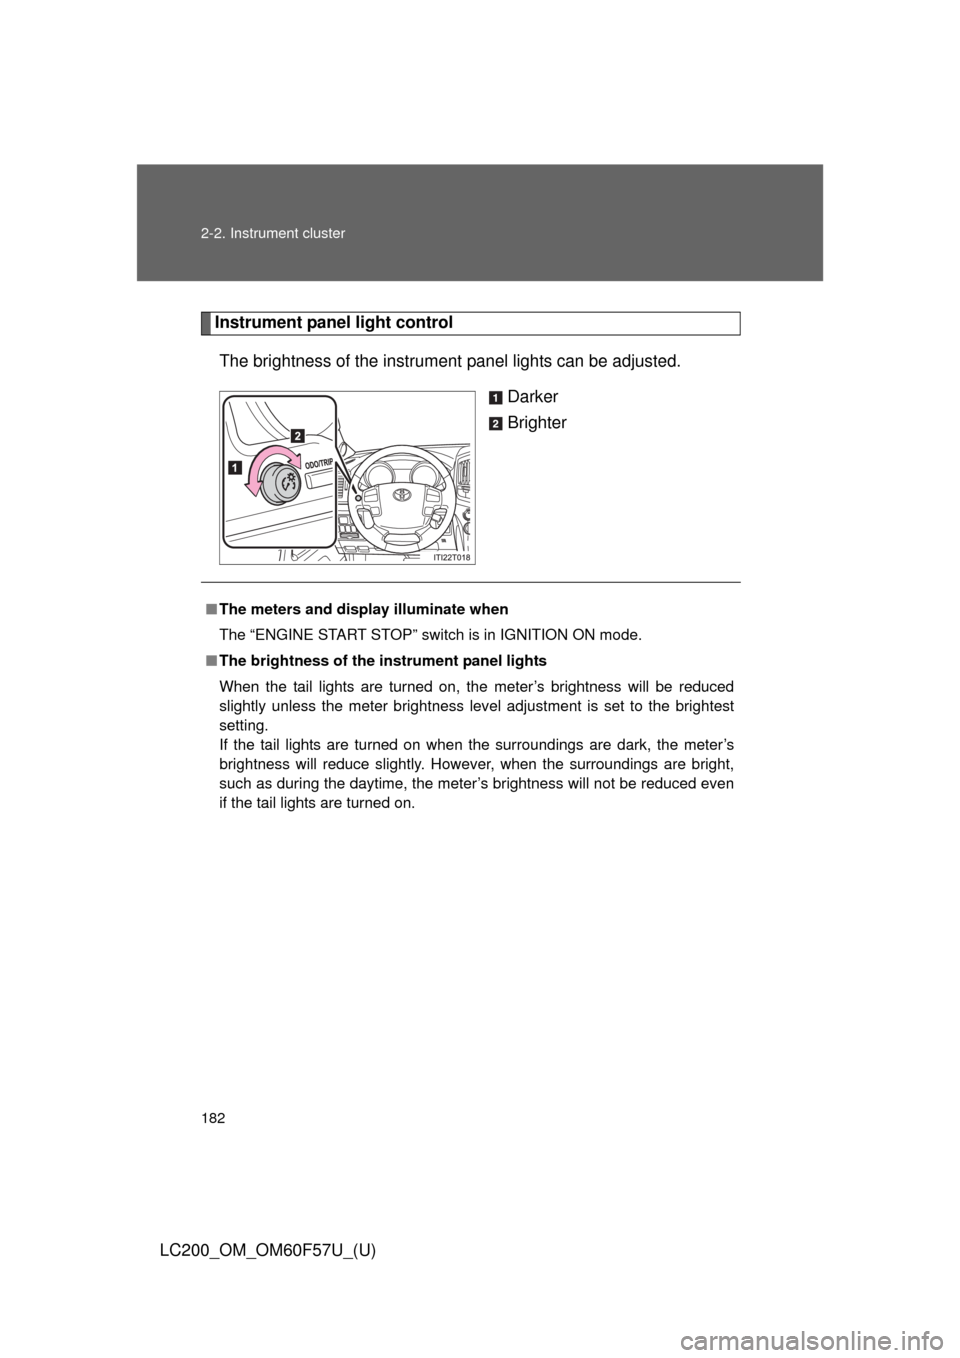
Instrument panel light control
The brightness of the instrument panel lights can be adjusted.
Darker
Brighter
■The meters and display illuminate when
The “ENGINE START STOP” switch is in IGNITION ON mode.
■The brightness of the instrument panel lights
When the tail lights are turned on, the meter’s brightness will be reduced
slightly unless the meter brightness level adjustment is set to the brightest
setting.
If the tail lights are turned on when the surroundings are dark, the meter’s
brightness will reduce slightly. However, when the surroundings are bright,
such as during the daytime, the meter’s brightness will not be reduced even
if the tail lights are turned on.
Page 184 of 720
184
2-2. Instrument cluster
LC200_OM_OM60F57U_(U)
Indicators and warning lights
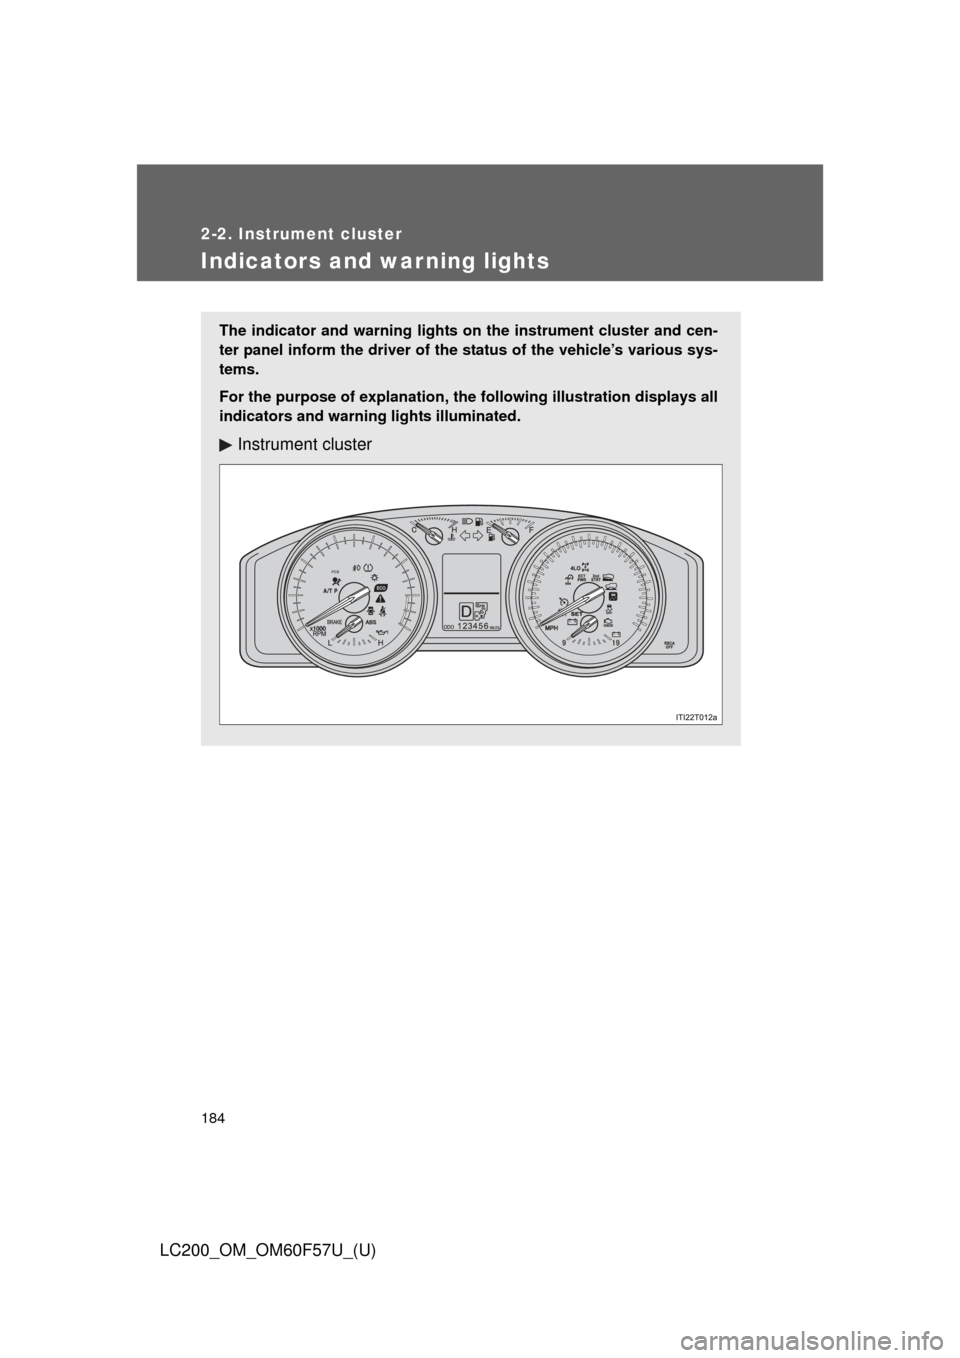
The indicator and warning lights on the instrument cluster and cen-
ter panel inform the driver of the status of the vehicle’s various sys-
tems.
For the purpose of explanation, the following illustration displays all
indicators and warning lights illuminated.
Instrument cluster