TOYOTA MATRIX 2009 E140 / 2.G Owners Manual
MATRIX 2009 E140 / 2.G
TOYOTA
TOYOTA
https://www.carmanualsonline.info/img/14/6531/w960_6531-0.png
TOYOTA MATRIX 2009 E140 / 2.G Owners Manual
Trending: steering wheel adjustment, child lock, wiper size, CD player, coolant reservoir, low beam, radio
Page 331 of 440
331 4-3. Do-it-yourself maintenance
4
Maintenance and care
■After a fuse is replaced
●If the lights do not turn on even after the fuse has been replaced, a bulb
may need replacing. (→P. 332)
●If the replaced fuse blows again, have the vehicle inspected by your
Toyota dealer.
■If there is an overload in the circuits
The fuses are designed to blow before the entire wiring harness is damaged.
CAUTION
■To prevent system breakdowns and vehicle fire
Observe the following precautions.
Failing to do so may cause damage, and possibly a fire or injury.
●Never use a fuse of a higher amperage rating than indicated, or use any
other object in place of a fuse.
●Always use a genuine Toyota fuse or equivalent.
Never replace a fuse with a wire, even as a temporary fix.
This can cause extensive damage or even fire.
●Do not modify the fuse or the fuse box.
NOTICE
■Before replacing fuses
Have the cause of electrical overload determined and repaired by your
Toyota dealer, as soon as possible.
Page 332 of 440
332
4-3. Do-it-yourself maintenance
Light bulbs
You may replace the following bulbs yourself. The difficulty level of
replacement varies depending on the bulb. If necessary bulb
replacement seems difficult to perform, contact your Toyota dealer.
For more information about replacing other light bulbs, contact your
Toyota dealer.
■Prepare a replacement light bulb.
Check the wattage of the light bulb being replaced. (→P. 404)
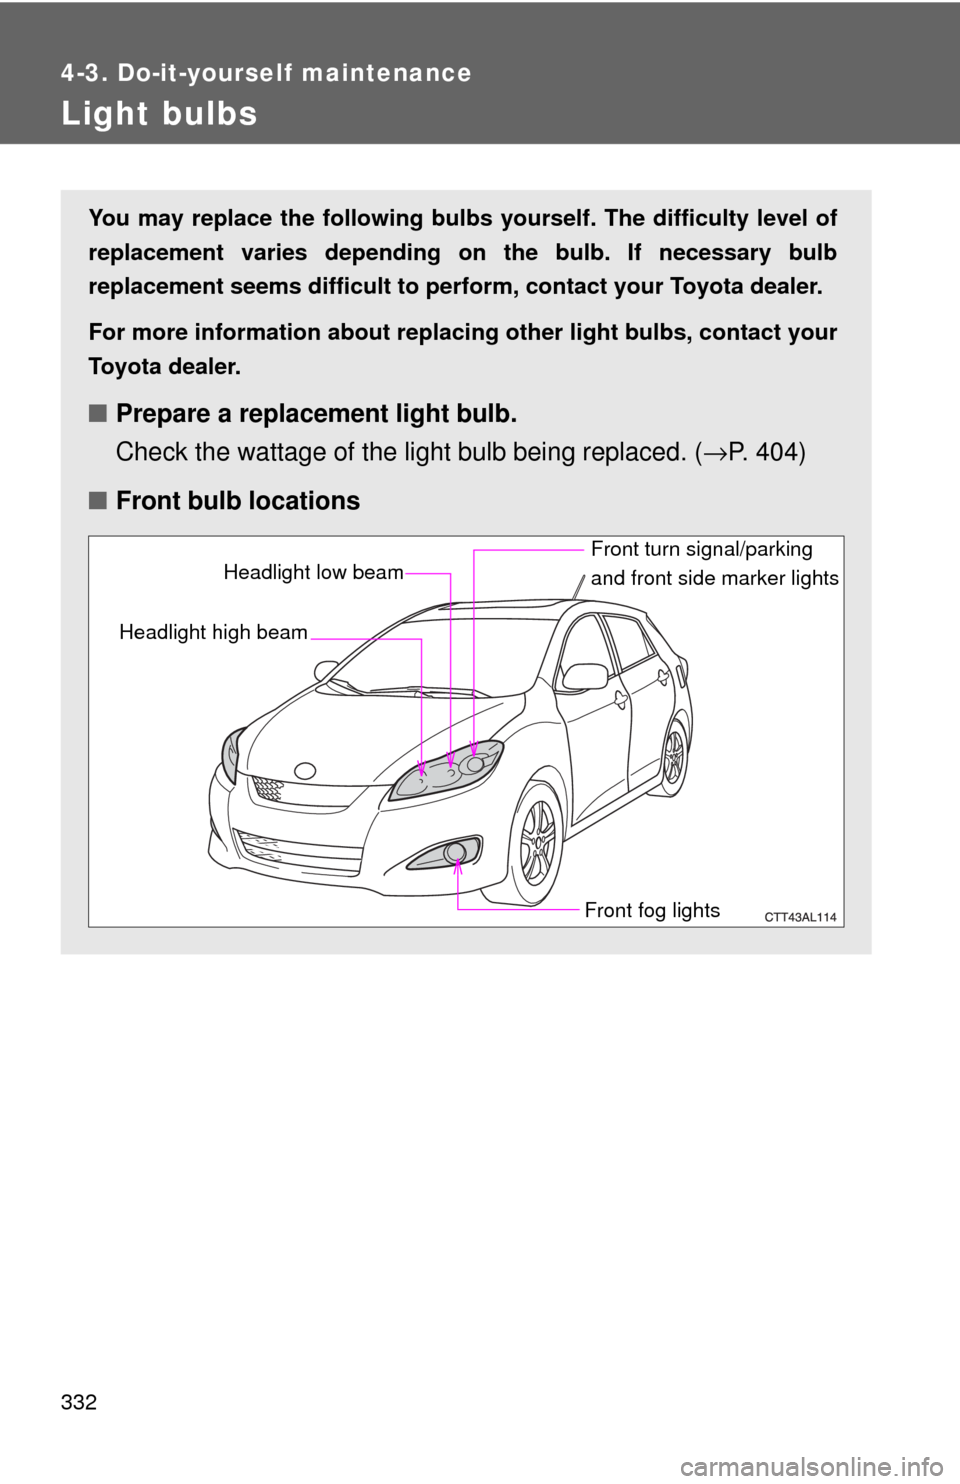
■Front bulb locations
Headlight high beam
Front turn signal/parking
and front side marker lights
Front fog lightsHeadlight low beam
Page 333 of 440
333 4-3. Do-it-yourself maintenance
4
Maintenance and care
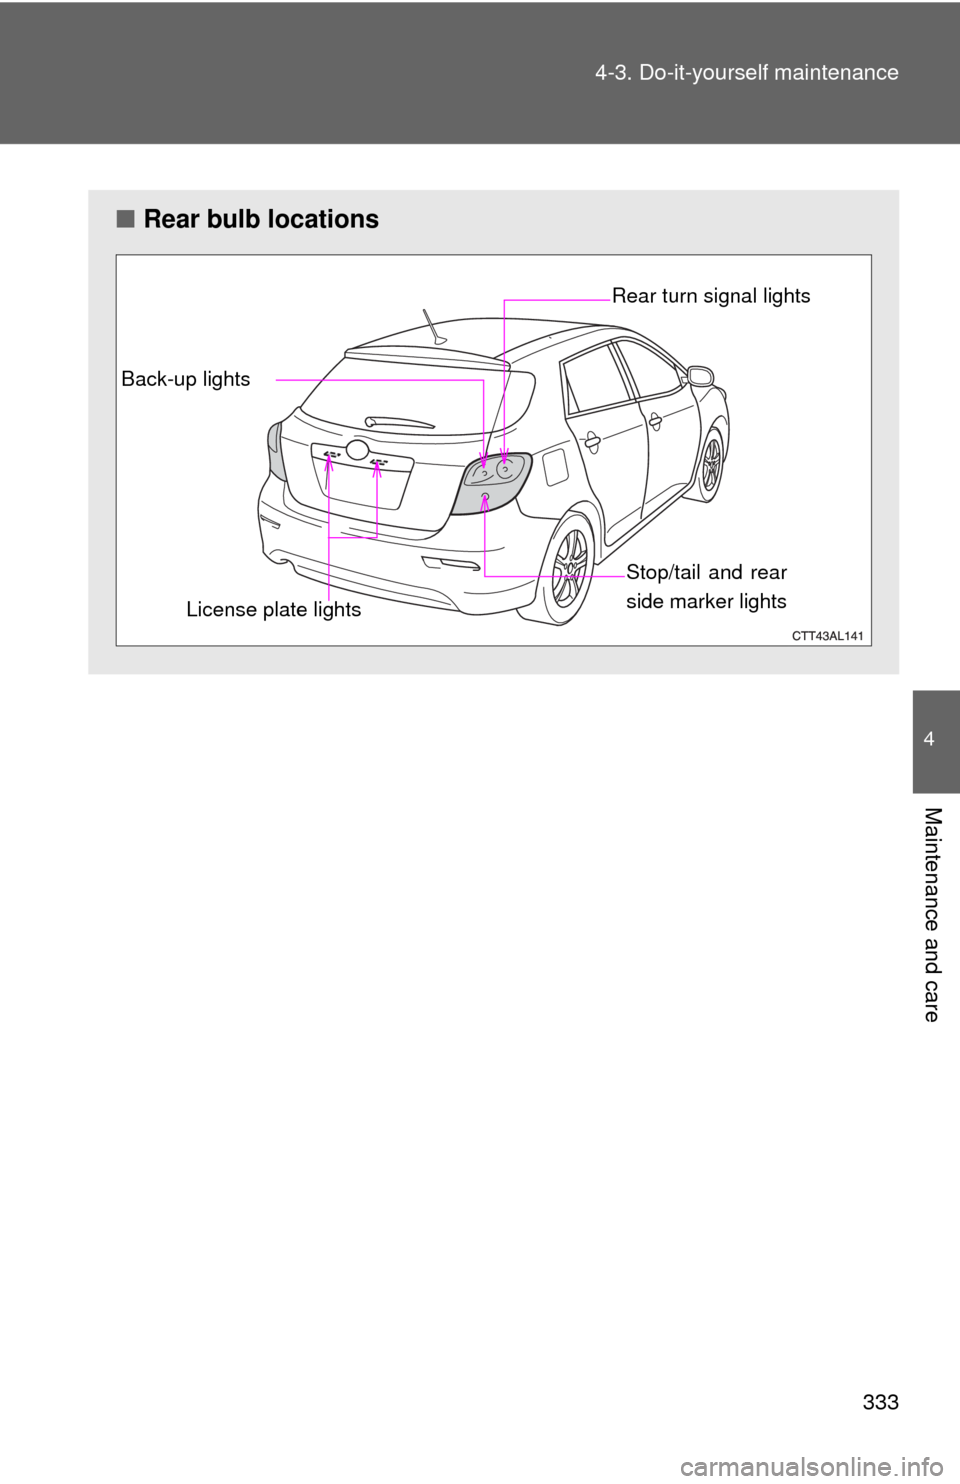
■Rear bulb locations
Stop/tail and rear
side marker lights Rear turn signal lights
Back-up lights
License plate lights
Page 334 of 440
334 4-3. Do-it-yourself maintenance
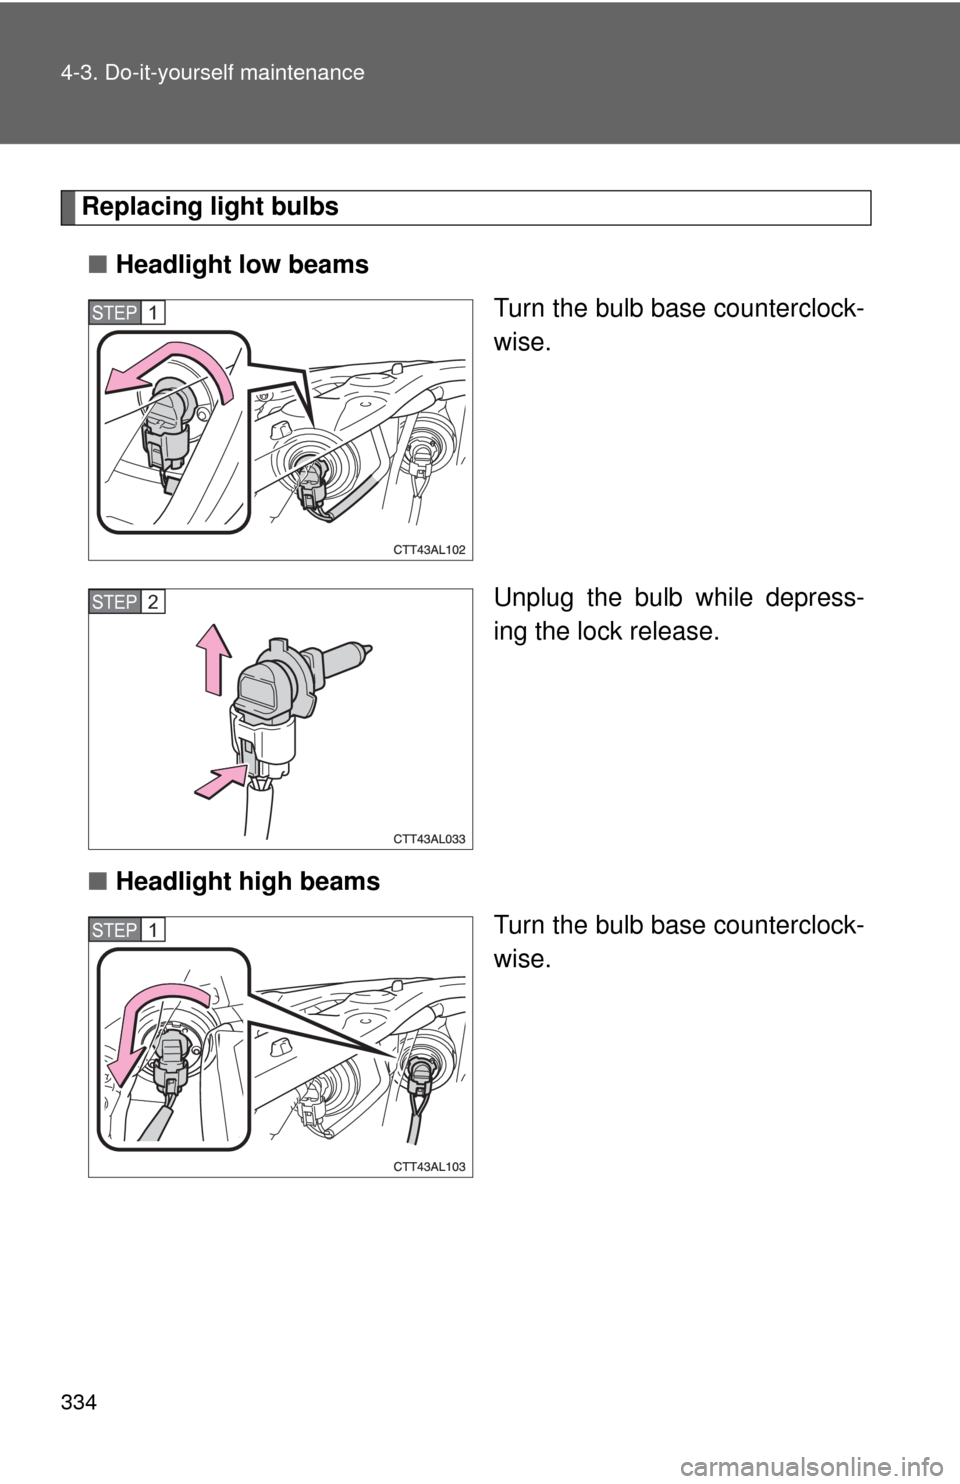
Replacing light bulbs
■Headlight low beams
Turn the bulb base counterclock-
wise.
Unplug the bulb while depress-
ing the lock release.
■Headlight high beams
Turn the bulb base counterclock-
wise.
STEP1
STEP2
STEP1
Page 335 of 440
335 4-3. Do-it-yourself maintenance
4
Maintenance and care
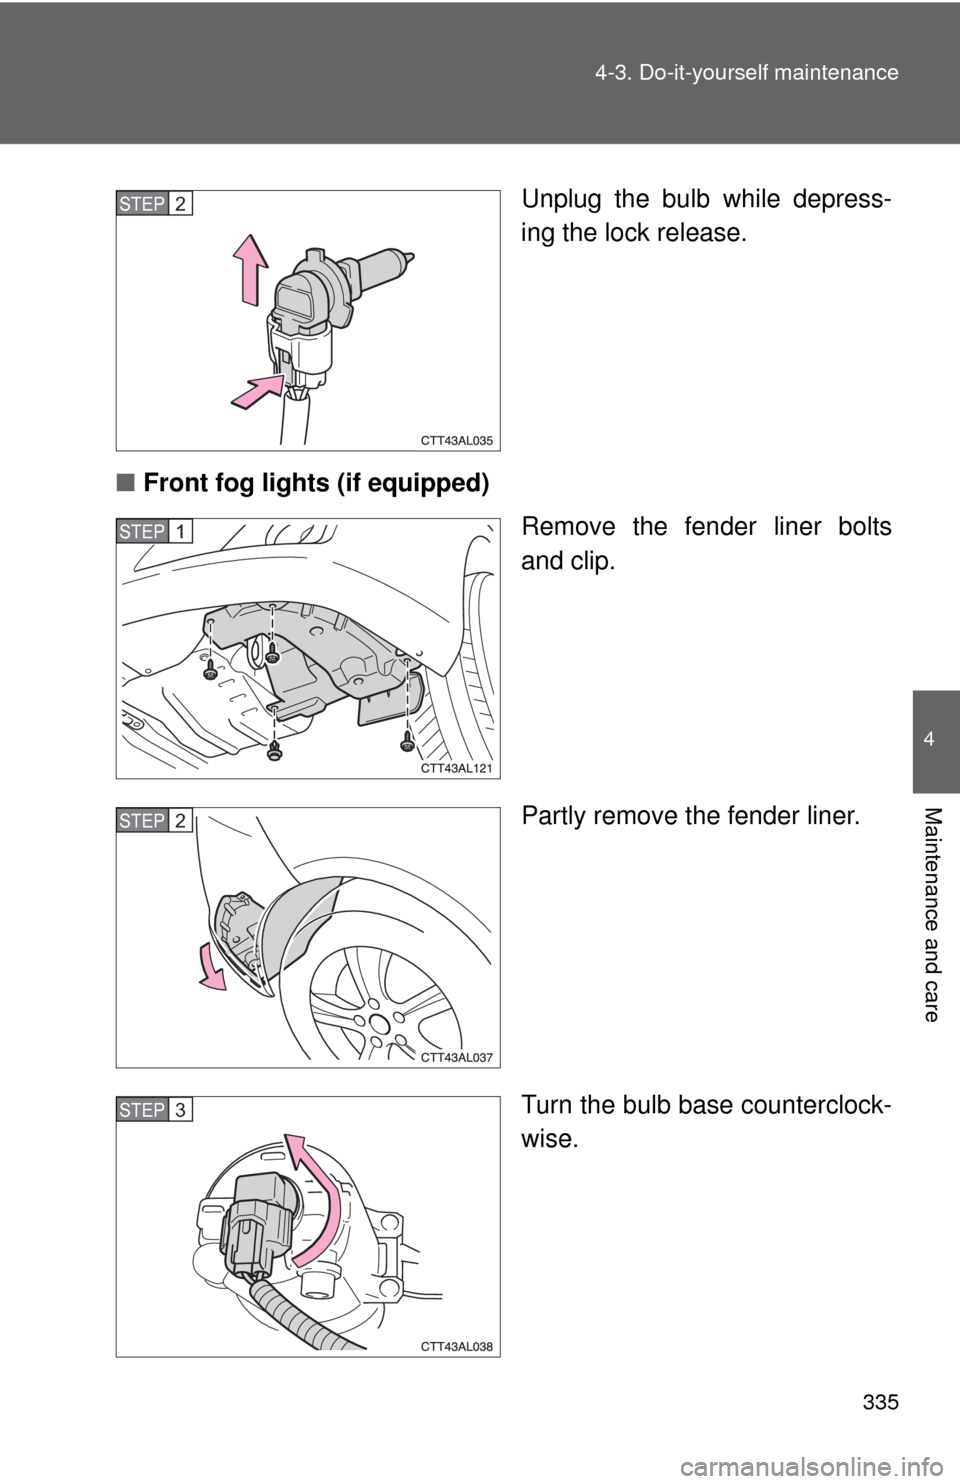
Unplug the bulb while depress-
ing the lock release.
■Front fog lights (if equipped)
Remove the fender liner bolts
and clip.
Partly remove the fender liner.
Turn the bulb base counterclock-
wise.STEP2
STEP1
STEP2
STEP3
Page 336 of 440
336 4-3. Do-it-yourself maintenance
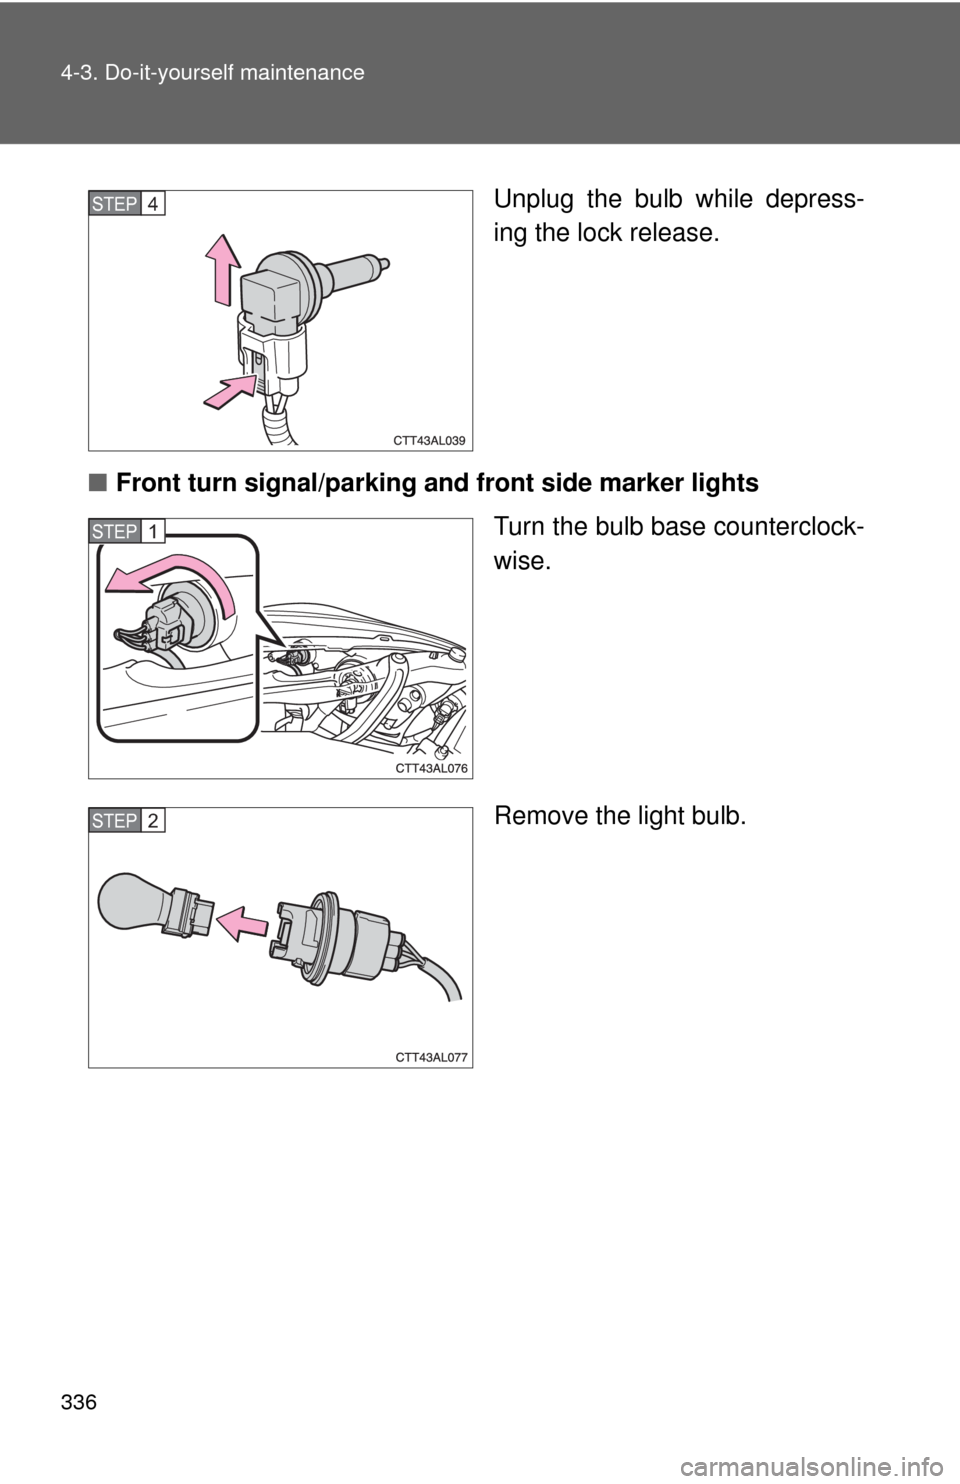
Unplug the bulb while depress-
ing the lock release.
■Front turn signal/parking and front side marker lights
Turn the bulb base counterclock-
wise.
Remove the light bulb.STEP4
STEP1
STEP2
Page 337 of 440
337 4-3. Do-it-yourself maintenance
4
Maintenance and care
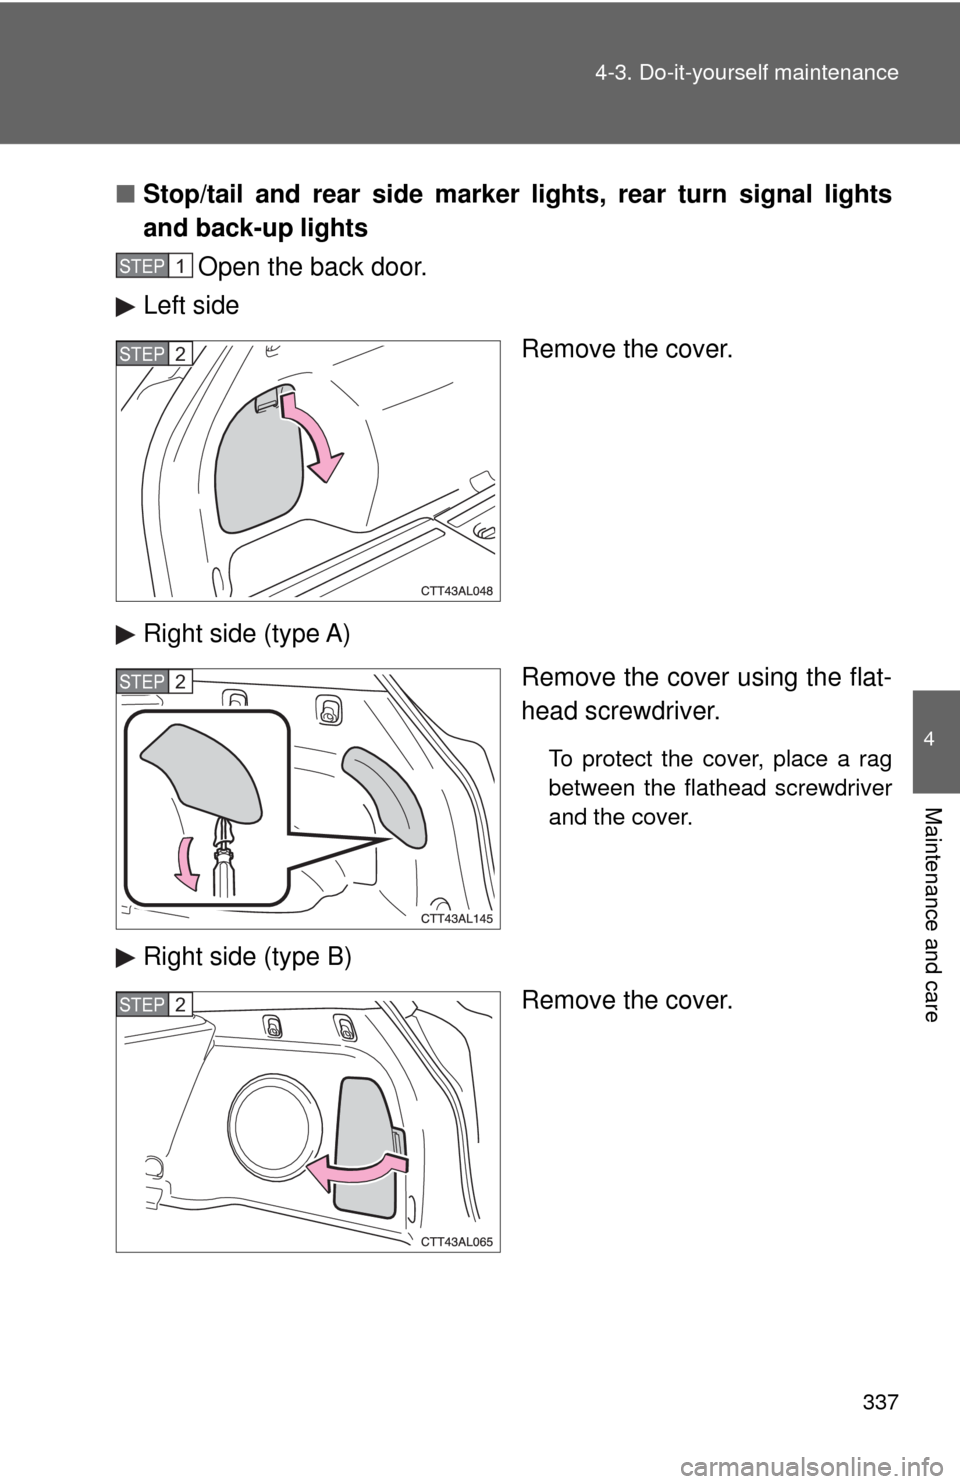
■Stop/tail and rear side marker lights, rear turn signal lights
and back-up lights
Open the back door.
Left side
Remove the cover.
Right side (type A)
Remove the cover using the flat-
head screwdriver.
To protect the cover, place a rag
between the flathead screwdriver
and the cover.
Right side (type B)
Remove the cover.
STEP1
STEP2
STEP2
STEP2
Page 338 of 440
338 4-3. Do-it-yourself maintenance
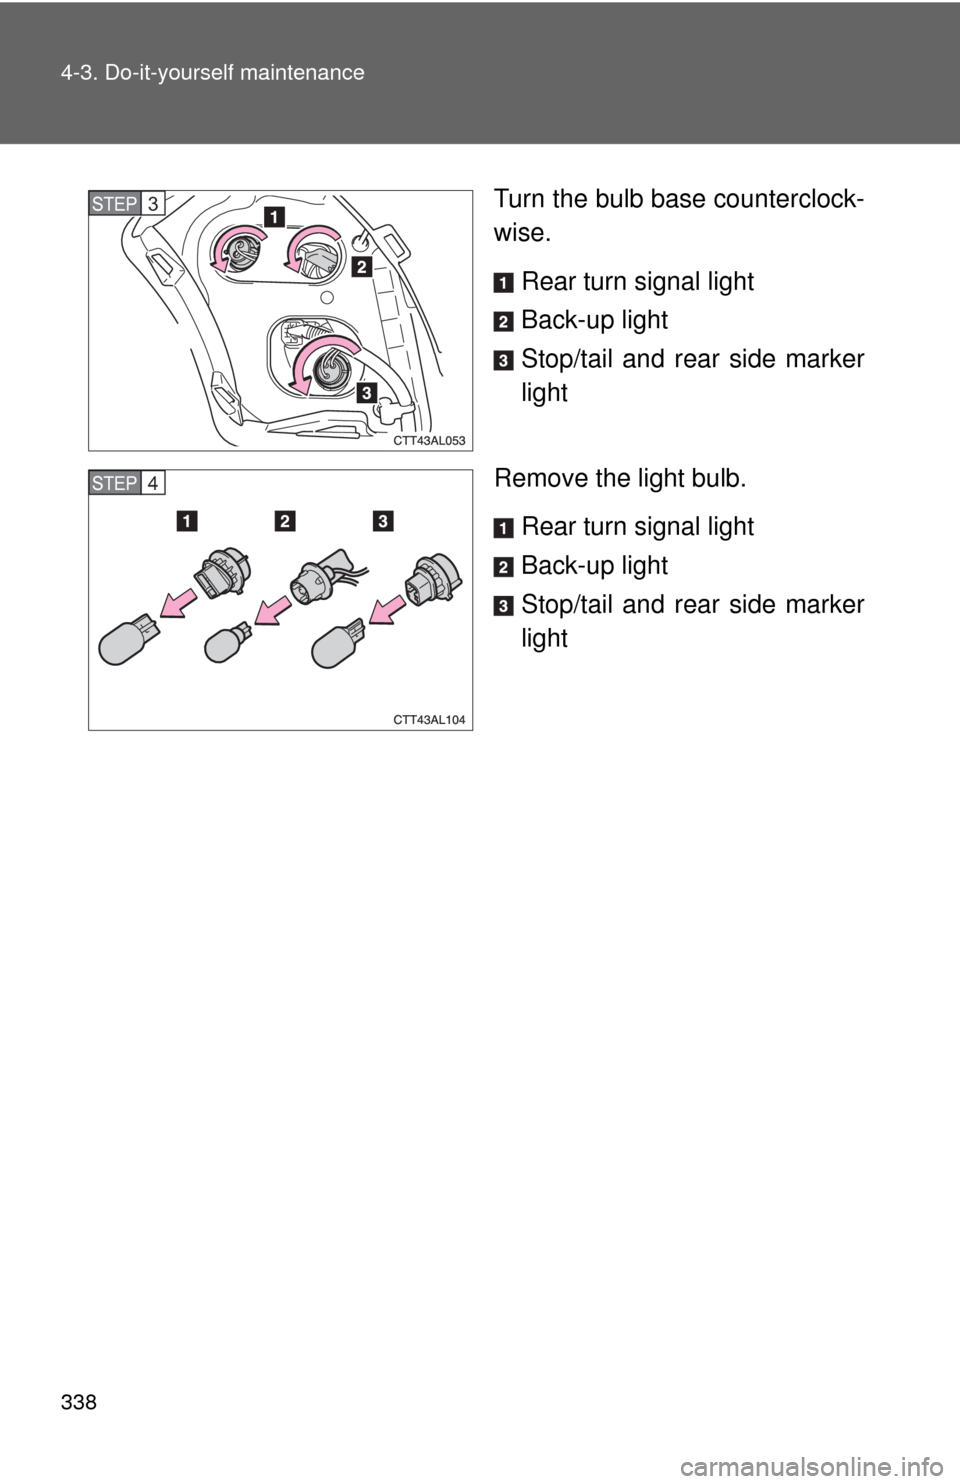
Turn the bulb base counterclock-
wise.
Rear turn signal light
Back-up light
Stop/tail and rear side marker
light
Remove the light bulb.
Rear turn signal light
Back-up light
Stop/tail and rear side marker
lightSTEP3
STEP4
Page 339 of 440
339 4-3. Do-it-yourself maintenance
4
Maintenance and care
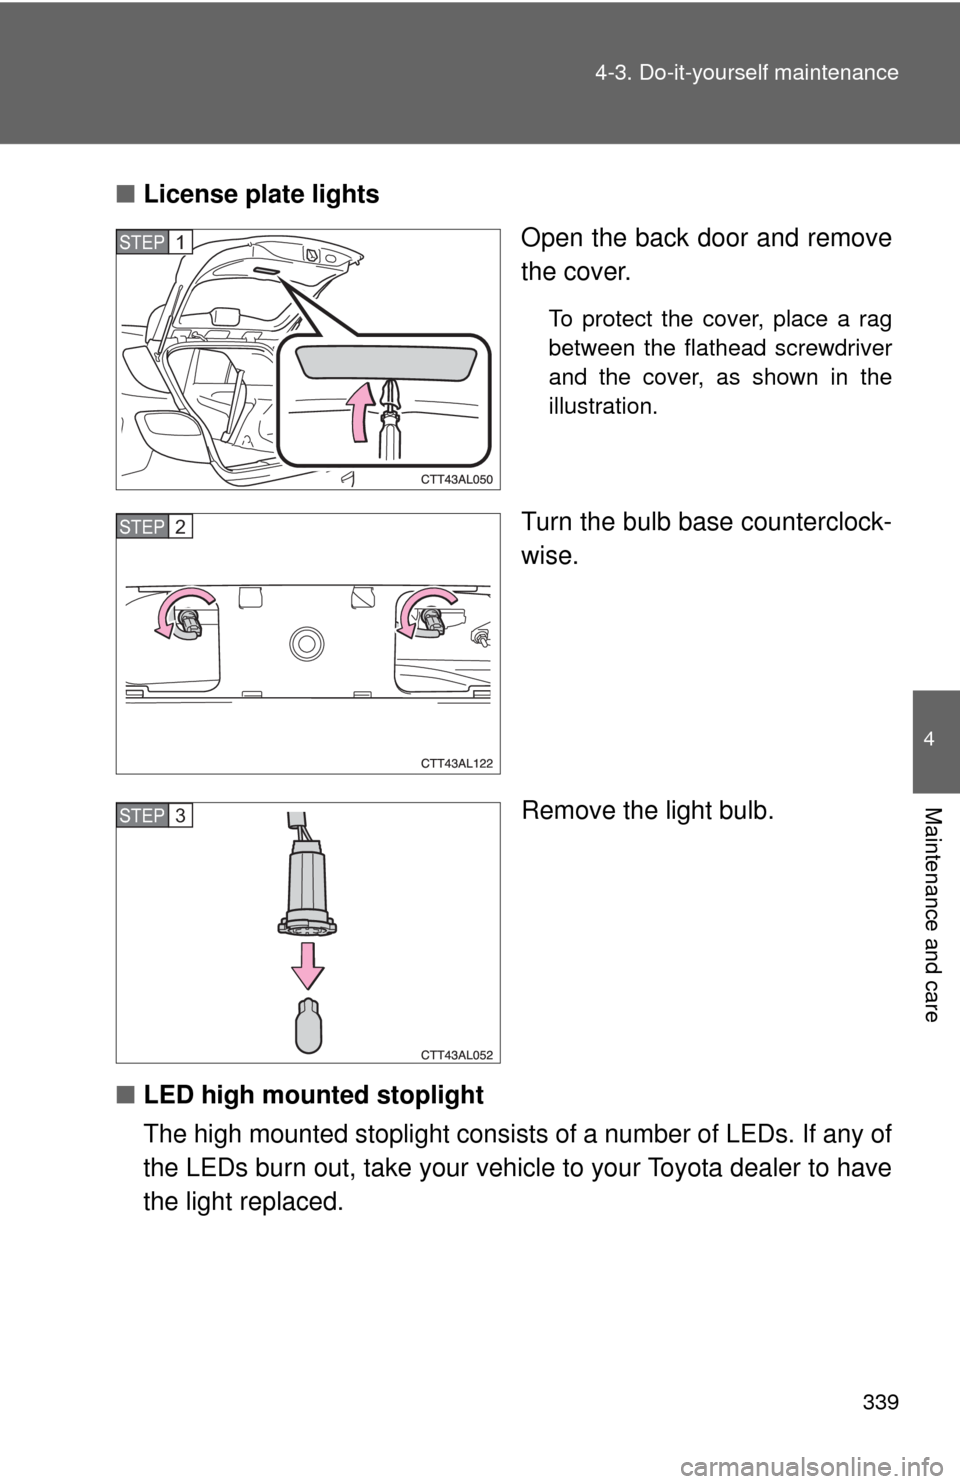
■License plate lights
Open the back door and remove
the cover.
To protect the cover, place a rag
between the flathead screwdriver
and the cover, as shown in the
illustration.
Turn the bulb base counterclock-
wise.
Remove the light bulb.
■LED high mounted stoplight
The high mounted stoplight consists of a number of LEDs. If any of
the LEDs burn out, take your vehicle to your Toyota dealer to have
the light replaced.
STEP1
STEP2
STEP3
Page 340 of 440
340 4-3. Do-it-yourself maintenance
■Condensation build-up on the inside of the lens
Contact your Toyota dealer for more information in the following situations.
Temporary condensation build-up on the inside of the headlight lens does
not indicate a malfunction.
●Large drops of water are built up on the inside of the lens.
●Water has built up inside the headlight.
CAUTION
■Replacing light bulbs
●Turn off the headlights. Do not attempt to replace the bulb immediately
after turning off the headlights.
The bulbs become very hot and may cause burns.
●Do not touch the glass portion of the light bulb with bare hands. Hold the
bulb by the plastic or metal portion.
If the bulb is scratched or dropped it may blow out or crack.
●Fully install light bulbs and any parts used to secure them. Failing to do so
may result in heat damage, fire, or water entering the headlight unit. This
may damage the headlights or cause condensation to build up on the lens.
■To prevent damage or fire
Make sure bulbs are fully seated and locked.
Trending: rear view mirror, oil change, engine, spare tire, airbag, engine oil, coolant capacity

