display TOYOTA MATRIX 2010 E140 / 2.G User Guide
[x] Cancel search | Manufacturer: TOYOTA, Model Year: 2010, Model line: MATRIX, Model: TOYOTA MATRIX 2010 E140 / 2.GPages: 448, PDF Size: 9.74 MB
Page 191 of 448
191
3-2. Using the audio system
3
Interior features
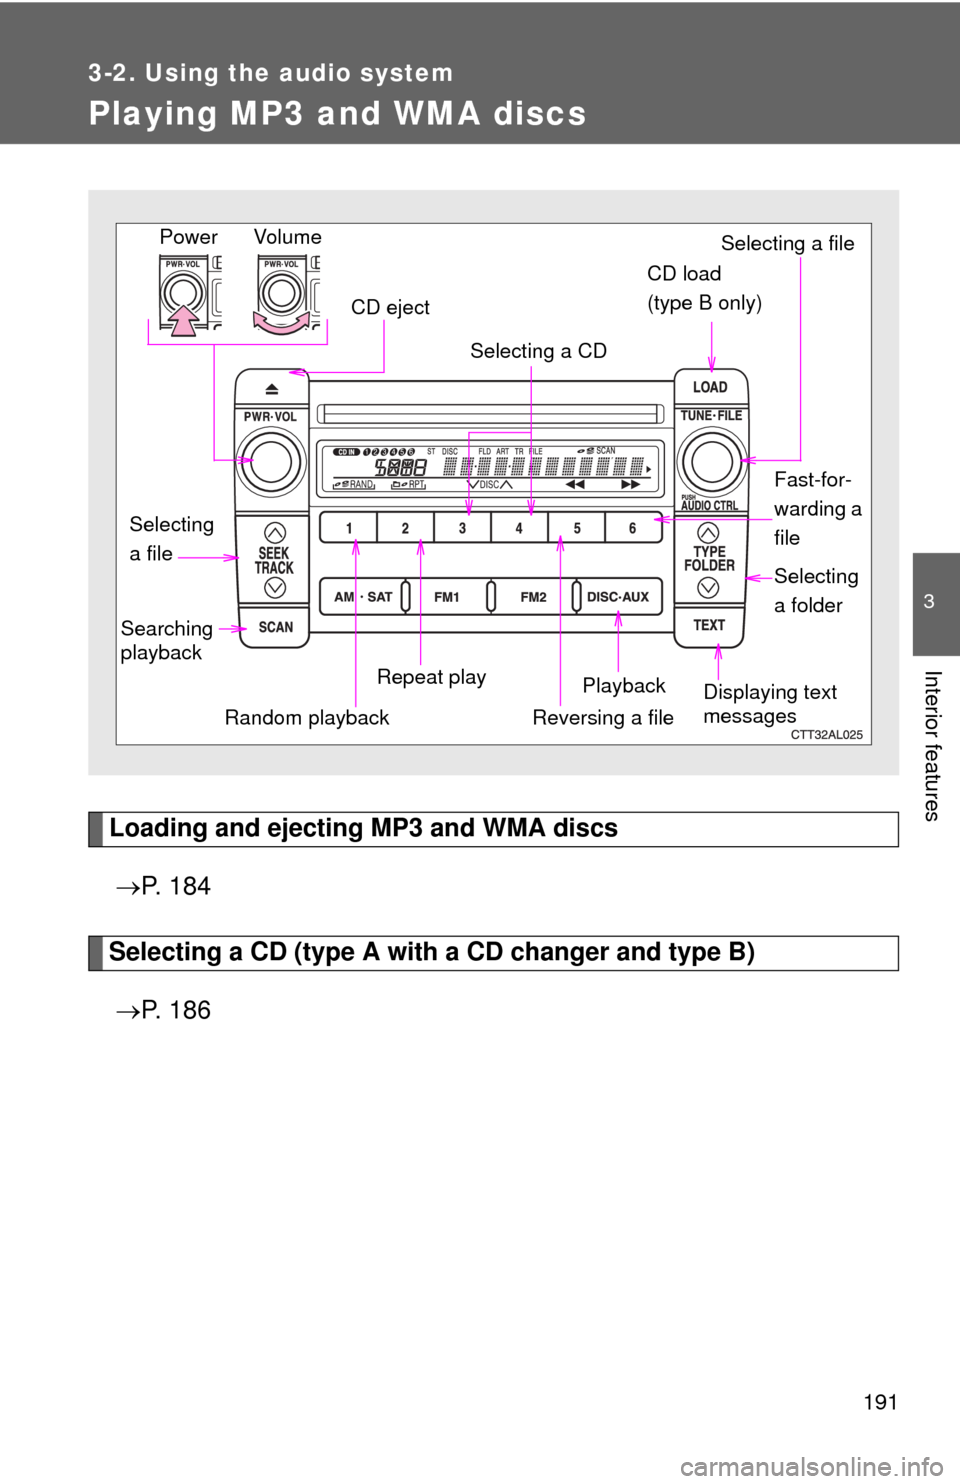
Playing MP3 and WMA discs
Loading and ejecting MP3 and WMA discs
P. 1 8 4
Selecting a CD (type A with a CD changer and type B)
P. 1 8 6
Vol u m e
Random playbackSelecting a file
Playback Power
CD eject
Displaying text
messages Selecting
a fileSelecting a CD
CD load
(type B only)
Repeat play Searching
playback
Selecting
a folder
Reversing a file
Fast-for-
warding a
file
Page 193 of 448
193 3-2. Using the audio system
3
Interior features
Repeat play
■To repeat a file
Press (RPT).
■To repeat all of the files in a folder
Press and hold (RPT) until you hear a beep.
Random playback
■To play files from a particular folder in random order
Press (RAND).
■To play all of the files on a disc in random order
Press and hold (RAND) until you hear a beep.
Switching the display
Press .
Each time is pressed, the display changes in the order of Folder
no./File no./Elapsed timeFolder nameFile nameAlbum title (MP3
only)Track titleArtist name.
Page 194 of 448
194 3-2. Using the audio system
■Display
P. 187
■Canceling random, repeat and scan playback
P. 187
■Error messages
“ERROR”: This indicates a problem either with the CD or inside the
player. The CD may be dirty, damaged or inserted up-side
down.
“WAIT”: Operation has stopped due to a high temperature inside the
player. Wait for a while and then press . Contact your
Toyota dealer if the CD still cannot be played.
“NO MUSIC”: This indicates that the MP3/WMA file is not included in the
CD.
■Discs that can be used
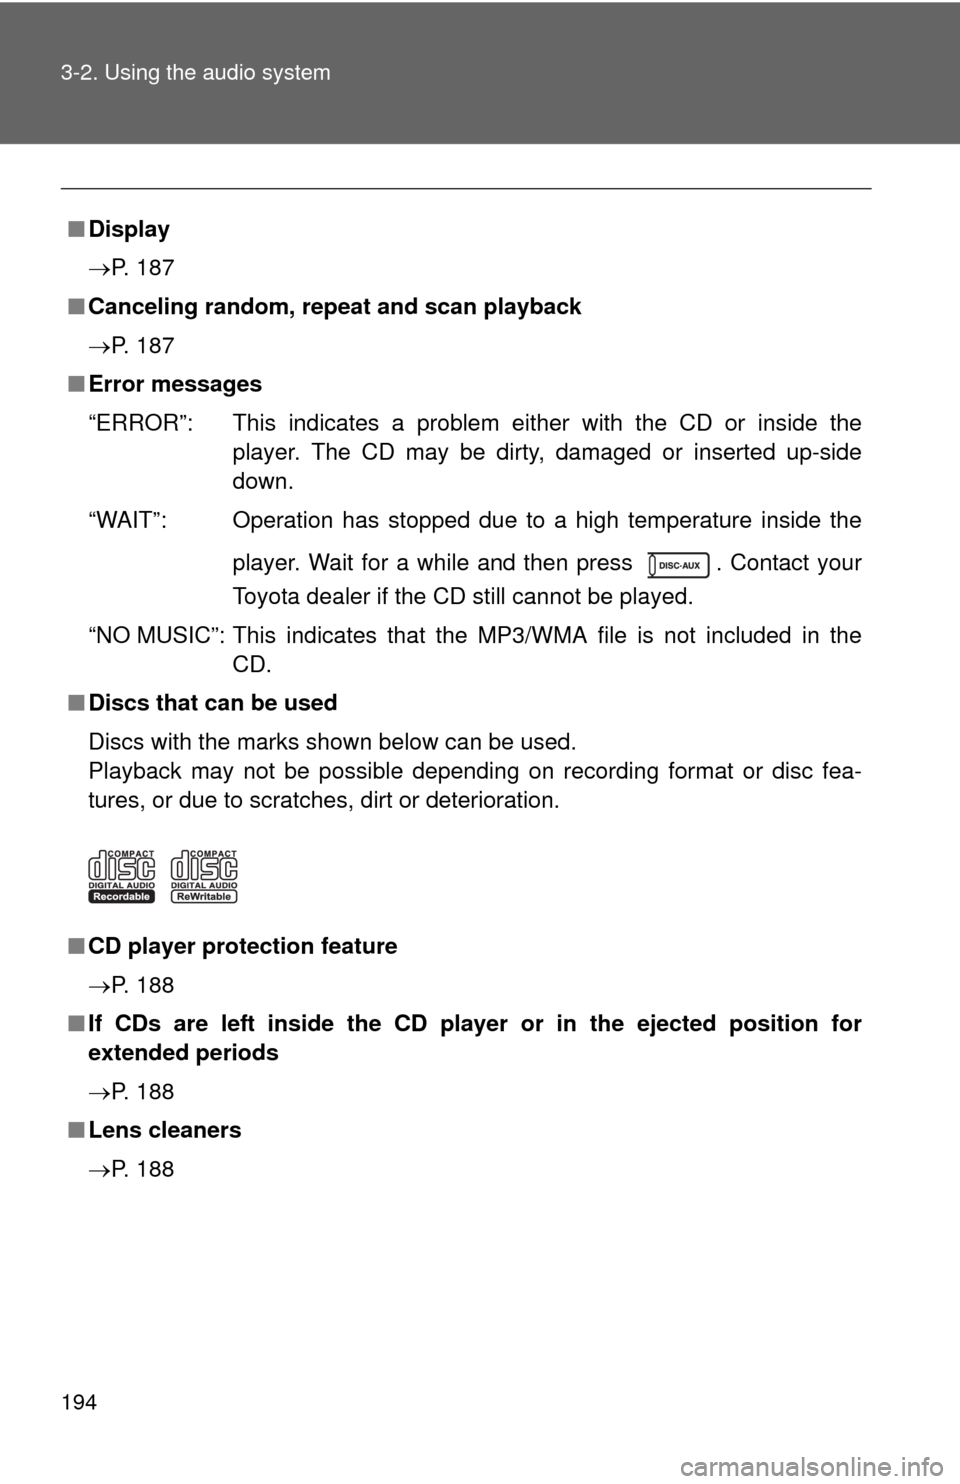
Discs with the marks shown below can be used.
Playback may not be possible depending on recording format or disc fea-
tures, or due to scratches, dirt or deterioration.
■CD player protection feature
P. 188
■If CDs are left inside the CD player or in the ejected position for
extended periods
P. 188
■Lens cleaners
P. 188
Page 196 of 448
196 3-2. Using the audio system
●Compatible media
Media that can be used for MP3 and WMA playback are CD-Rs and CD-
RWs.
Playback in some instances may not be possible, depending on the status
of the CD-R or CD-RW. Playback may not be possible or the audio may
jump if the disc is scratched or marked with fingerprints.
●Compatible disc formats
The following disc formats can be used.
• Disc formats: CD-ROM Mode 1 and Mode 2
CD-ROM XA Mode 2, Form 1 and Form 2
• File formats: ISO9660 Level 1, Level 2, (Romeo, Joliet)
MP3 and WMA files written in any format other than those listed above
may not play correctly, and their file names and folder names may not
be displayed correctly.
Items related to standards and limitations are as follows.
• Maximum directory hierarchy: 8 levels
• Maximum length of folder names/file names: 32 characters
• Maximum number of folders: 192 (including the root)
• Maximum number of files per disc: 255
●File names
The only files that can be recognized as MP3/WMA and played are those
with the extension .mp3 or .wma.
●Multi-sessions
As the audio system is compatible with multi-sessions, it is possible to play
discs that contain MP3 and WMA files. However, only the first session can
be played.
Page 199 of 448
199
3-2. Using the audio system
3
Interior features
Optimal use of the audio system
Using the AUDIO CONTROL function
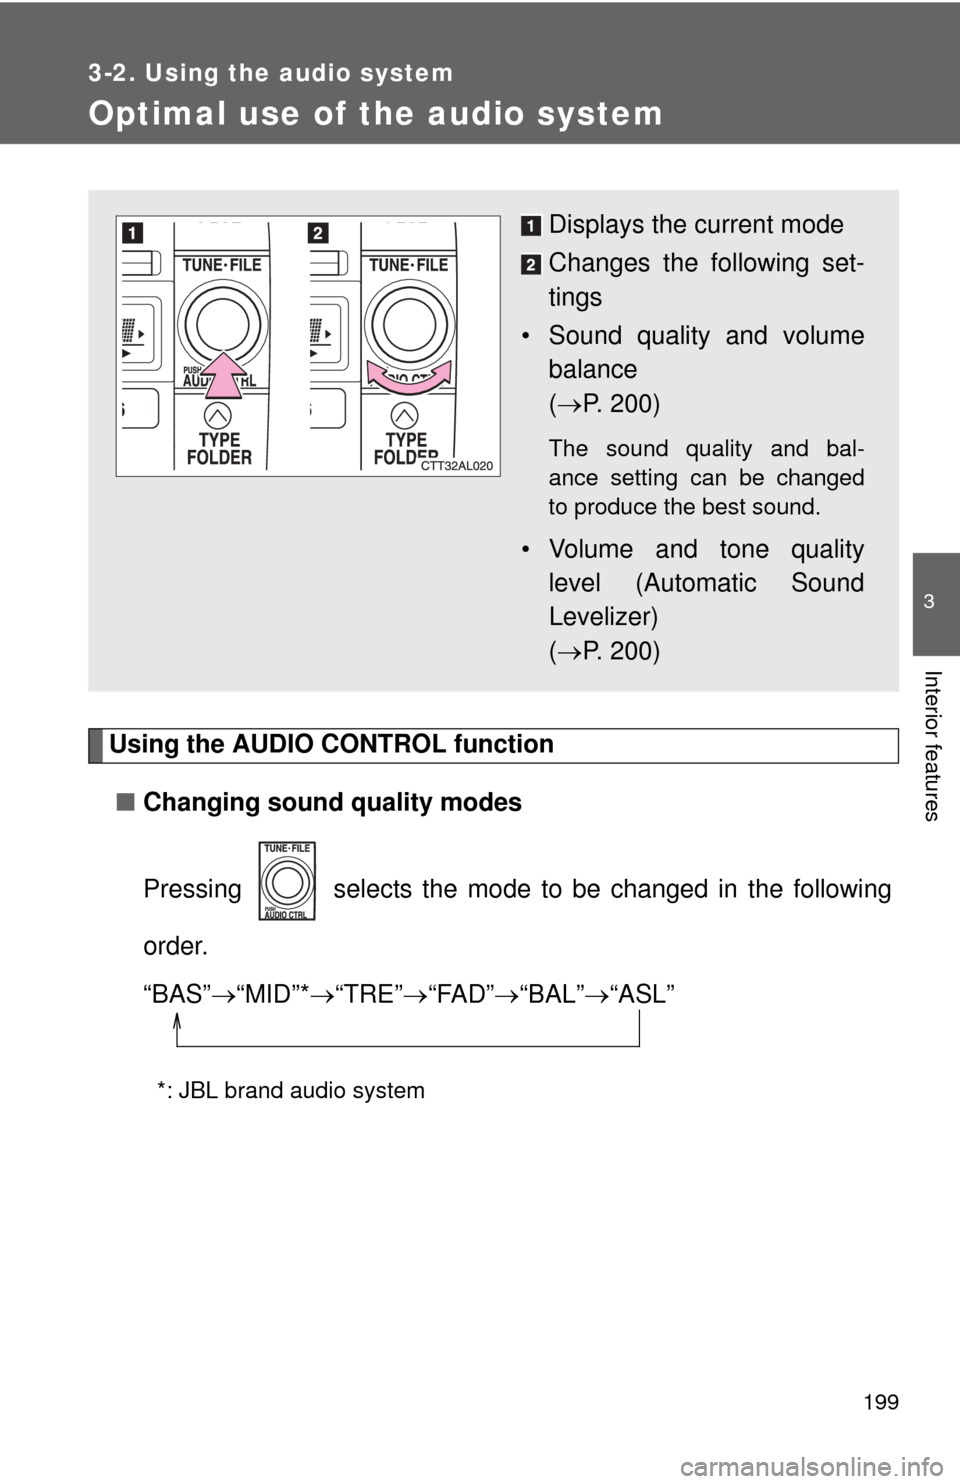
■Changing sound quality modes
Pressing selects the mode to be changed in the following
order.
“BAS”“MID”*“TRE”“FAD”“BAL”“ASL”
*: JBL brand audio system
Displays the current mode
Changes the following set-
tings
• Sound quality and volume
balance
(P. 200)
The sound quality and bal-
ance setting can be changed
to produce the best sound.
• Volume and tone quality
level (Automatic Sound
Levelizer)
(P. 200)
Page 200 of 448
200 3-2. Using the audio system
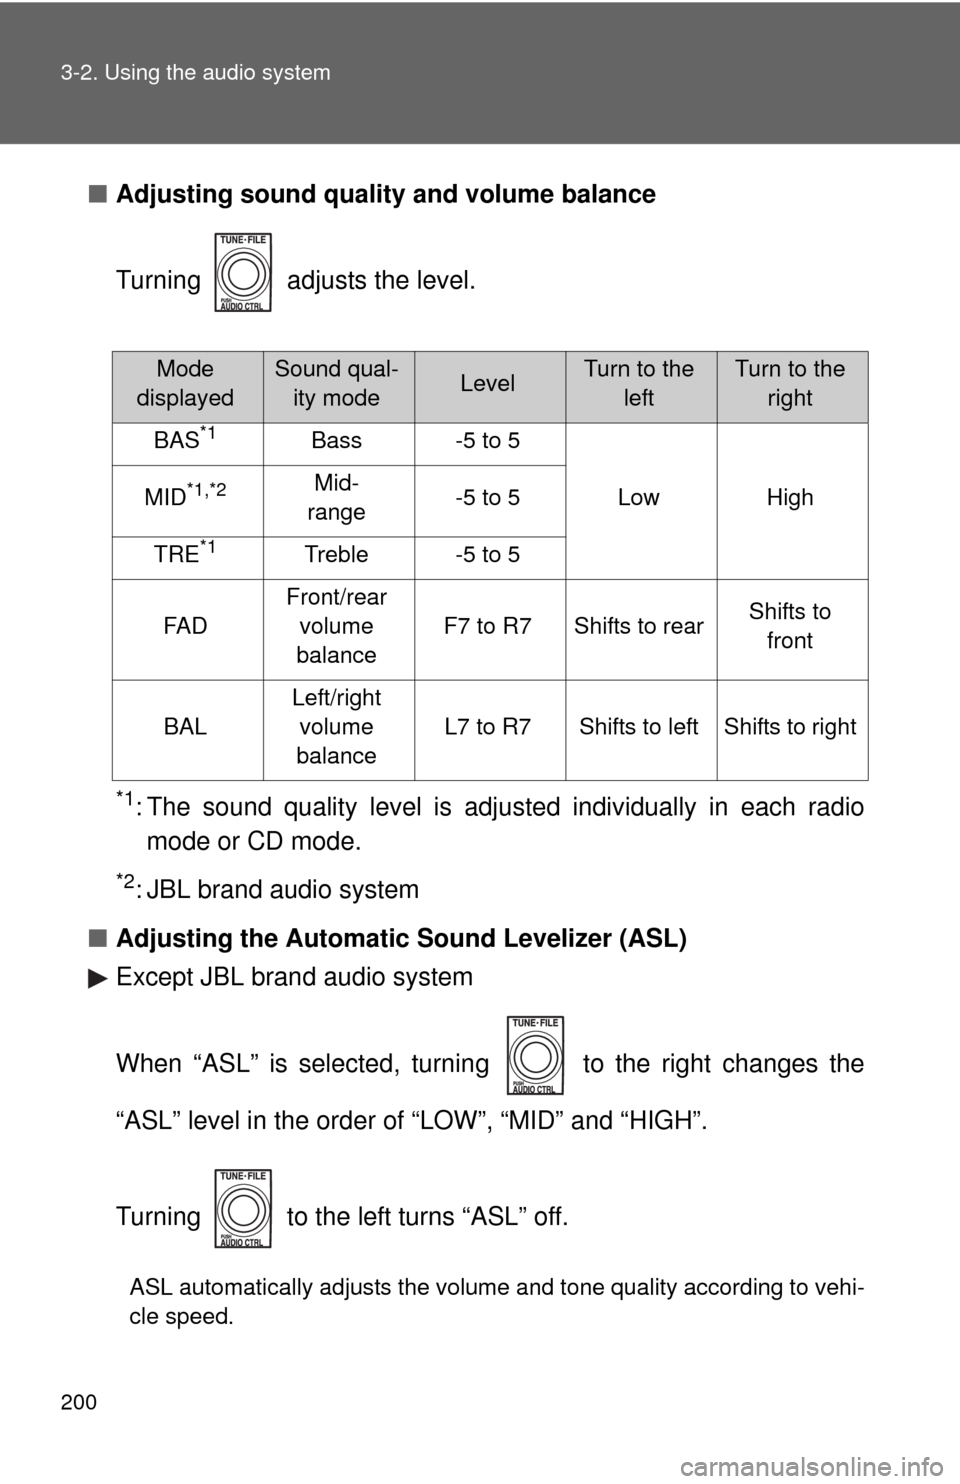
■Adjusting sound quality and volume balance
Turning adjusts the level.
*1: The sound quality level is adjusted individually in each radio
mode or CD mode.
*2: JBL brand audio system
■Adjusting the Automatic Sound Levelizer (ASL)
Except JBL brand audio system
When “ASL” is selected, turning to the right changes the
“ASL” level in the order of “LOW”, “MID” and “HIGH”.
Turning to the left turns “ASL” off.
ASL automatically adjusts the volume and tone quality according to vehi-
cle speed.
Mode
displayedSound qual-
ity modeLevelTurn to the
leftTurn to the
right
BAS*1Bass-5 to 5
LowHighMID*1,*2Mid-
range-5 to 5
TRE*1Treble-5 to 5
FA D
Front/rear
volume
balance
F7 to R7Shifts to rearShifts to
front
BAL
Left/right
volume
balance
L7 to R7Shifts to leftShifts to right
Page 209 of 448
209
3-3. Using the hands-free phone system (for cellular phone)
3
Interior features
Using the hands-free phone system (for cellular phone)
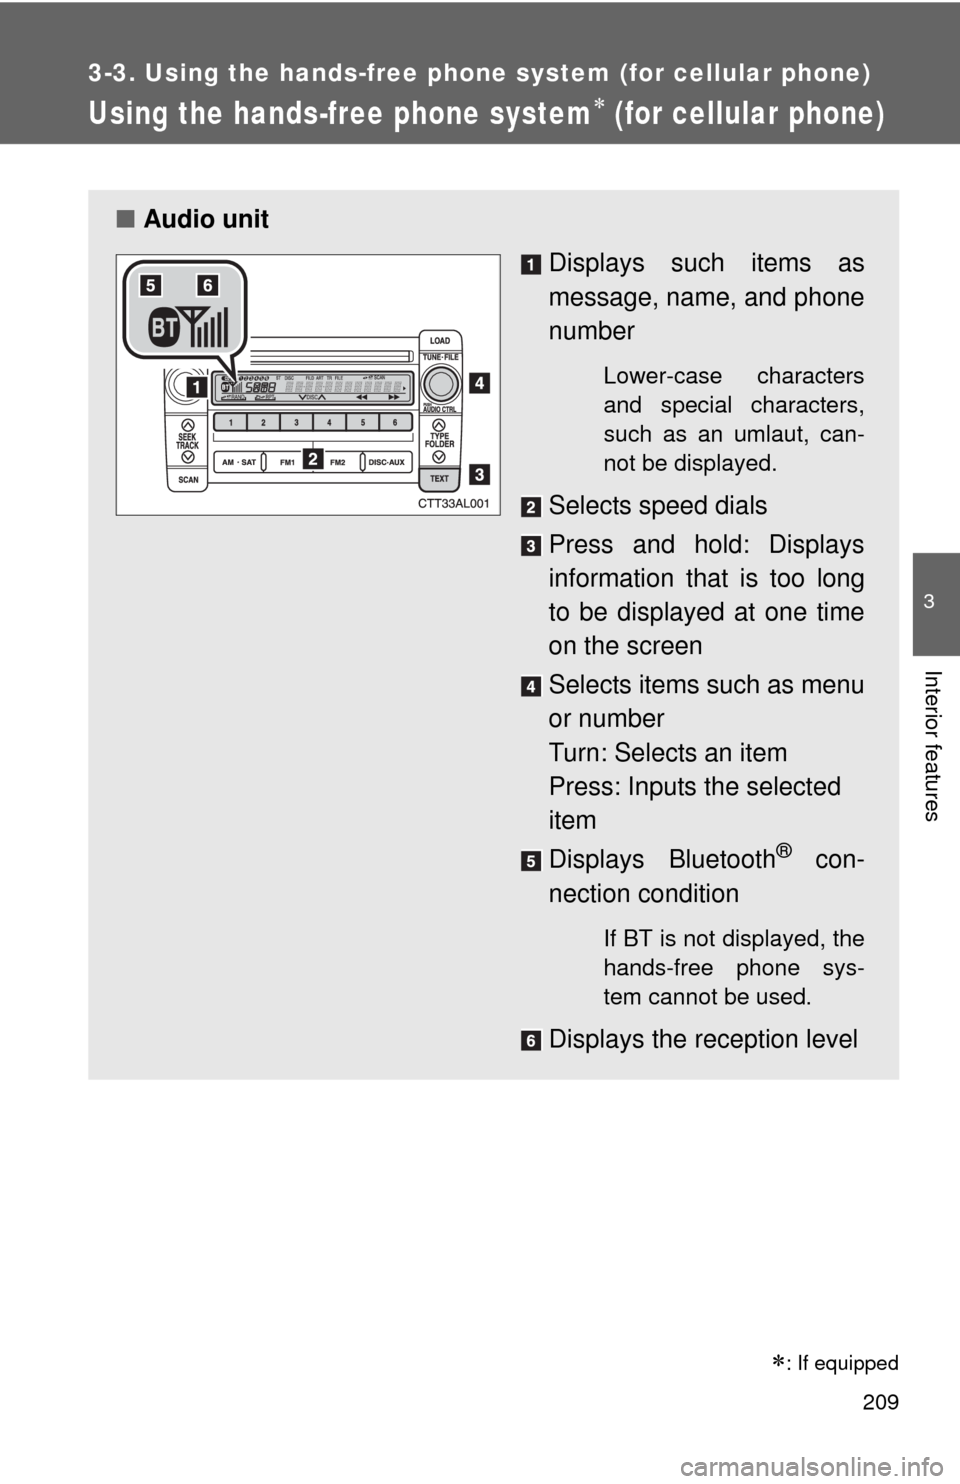
■Audio unit
Displays such items as
message, name, and phone
number
Lower-case characters
and special characters,
such as an umlaut, can-
not be displayed.
Selects speed dials
Press and hold: Displays
information that is too long
to be displayed at one time
on the screen
Selects items such as menu
or number
Turn: Selects an item
Press: Inputs the selected
item
Displays Bluetooth
® con-
nection condition
If BT is not displayed, the
hands-free phone sys-
tem cannot be used.
Displays the reception level
: If equipped
Page 212 of 448

212 3-3. Using the hands-free phone system (for cellular phone)
Operating the system by using a voice command
By following voice guidance instructions output from the speaker,
voice commands can be given to allow for operation of the hands-
free phone system without checking the display or operating .
■Operation procedure when using a voice command
Press the talk switch and say the command for a desired function.
(P. 214)
■Auxiliary commands when using a voice command
The following auxiliary commands can be used when operating the
system using a voice command:
Cancel: Exits the hands-free phone system
Repeat: Repeats the previous voice guidance instruction
Go back: Returns to the previous procedure
Help: Reads aloud the function summary if a help comment is
registered for the selected function
Page 213 of 448
213 3-3. Using the hands-free phone system (for cellular phone)
3
Interior features
Using the hands-free phone system for the first time
Before using the hands-free phone system, it is necessary to register
a cellular phone in the system. The phone registration mode will be
entered automatically when starting the system with no cellular
phone registered. Follow the procedure below to register a cellular
phone:
Press the off-hook switch or the talk switch.
The introductory guidance and phone name registration instructions
are heard.
Register a phone name by either of the following methods.
a. Select “Record Name” by using , and say a name to
be registered.
b. Press the talk switch and say a name to be registered.
A voice guidance instruction to confirm the input is heard.
Select “Confirm” by using a voice command or .
A passkey is displayed and heard, and a voice guidance instruction
for inputting the passkey into the cellular phone is heard.
Input the passkey into the cellular phone.
Refer to the manual that comes with the cellular phone for the oper-
ation of the phone.
Guidance for registration completion is heard.
STEP1
STEP2
STEP3
STEP4
Page 232 of 448
232 3-3. Using the hands-free phone system (for cellular phone)
■Adding procedure
Select “Add Entry” by using a voice command or .
Use one of the following methods to input a telephone num-
ber:
Inputting a telephone number by using a voice command
STEP2-1 Select “By Voice” by using a voice command or
.
STEP2-2 Press the talk switch, say the desired number, and
select “Confirm” by using a voice command.
Transferring data from the cellular phone
STEP2-1 Select “By Phone” and then “Confirm” by using a
voice command or .
STEP2-2 Transfer the data from the cellular phone.
Refer to the manual that comes with the cellular phone for
the details of transferring data.
STEP2-3 Select the data to be registered by either of the fol-
lowing methods:
a. Say “Previous” or “Next” until the desired data is
displayed, and select “Confirm” by using a voice
command.
b. Select the desired data by using .
STEP1
STEP2