checking TOYOTA MATRIX 2012 E140 / 2.G Owners Manual
[x] Cancel search | Manufacturer: TOYOTA, Model Year: 2012, Model line: MATRIX, Model: TOYOTA MATRIX 2012 E140 / 2.GPages: 516, PDF Size: 7.02 MB
Page 4 of 516
TABLE OF CONTENTSIndex
4
3-5. Using the interior lightsInterior lights list ................. 296
• Interior light ...................... 297
• Personal/interior lights...... 298
• Personal lights ................. 299
3-6. Using the storage features List of storage features....... 300
• Glove box ......................... 301
• Console box ..................... 301
• Cup holders ...................... 302
• Bottle holders ................... 304
• Auxiliary boxes ................. 305
3-7. Other interior features Sun visors .......................... 307
Vanity mirrors ..................... 308
Clock .................................. 309
Ashtrays ............................. 310
Cigarette lighter .................. 311
Power outlet ....................... 312
Grocery bag hook............... 314
Seatback table ................... 316
Floor mat ............................ 317
Luggage compartment feature .............................. 318
Compass ............................ 325 4-1. Maintenance and care
Cleaning and protecting the vehicle exterior ........... 330
Cleaning and protecting the vehicle interior ............ 333
4-2. Maintenance Maintenance requirements .................... 336
General maintenance ......... 338
Emission inspection and maintenance (I/M)
programs .......................... 341
4-3. Do-it-yourself maintenance Do-it-yourself service precautions ....................... 342
Hood ................................... 346
Positioning a floor jack........ 348
Engine compartment .......... 351
Tires.................................... 365
Tire inflation pressure ......... 374
Wheels................................ 378
Air conditioning filter ........... 381
Key battery ......................... 383
Checking and replacing fuses ................................. 385
Light bulbs .......................... 394
4Maintenance and care
Page 329 of 516
Maintenance and care4
329
4-1. Maintenance and careCleaning and protecting the vehicle exterior......... 330
Cleaning and protecting the vehicle interior.......... 333
4-2. Maintenance Maintenance requirements .................. 336
General maintenance....... 338
Emission inspection and maintenance (I/M)
programs........................ 341 4-3. Do-it-yourself
maintenance
Do-it-yourself service precautions .................... 342
Hood ................................ 346
Positioning a floor jack ..... 348
Engine compartment ........ 351
Tires ................................. 365
Tire inflation pressure ...... 374
Wheels ............................. 378
Air conditioning filter......... 381
Key battery ....................... 383
Checking and replacing fuses .............................. 385
Light bulbs........................ 394
Page 353 of 516
353
4-3. Do-it-yourself maintenance
4
Maintenance and care
Engine oil
With the engine at operating temperature and turned off, check the oil
level on the dipstick.
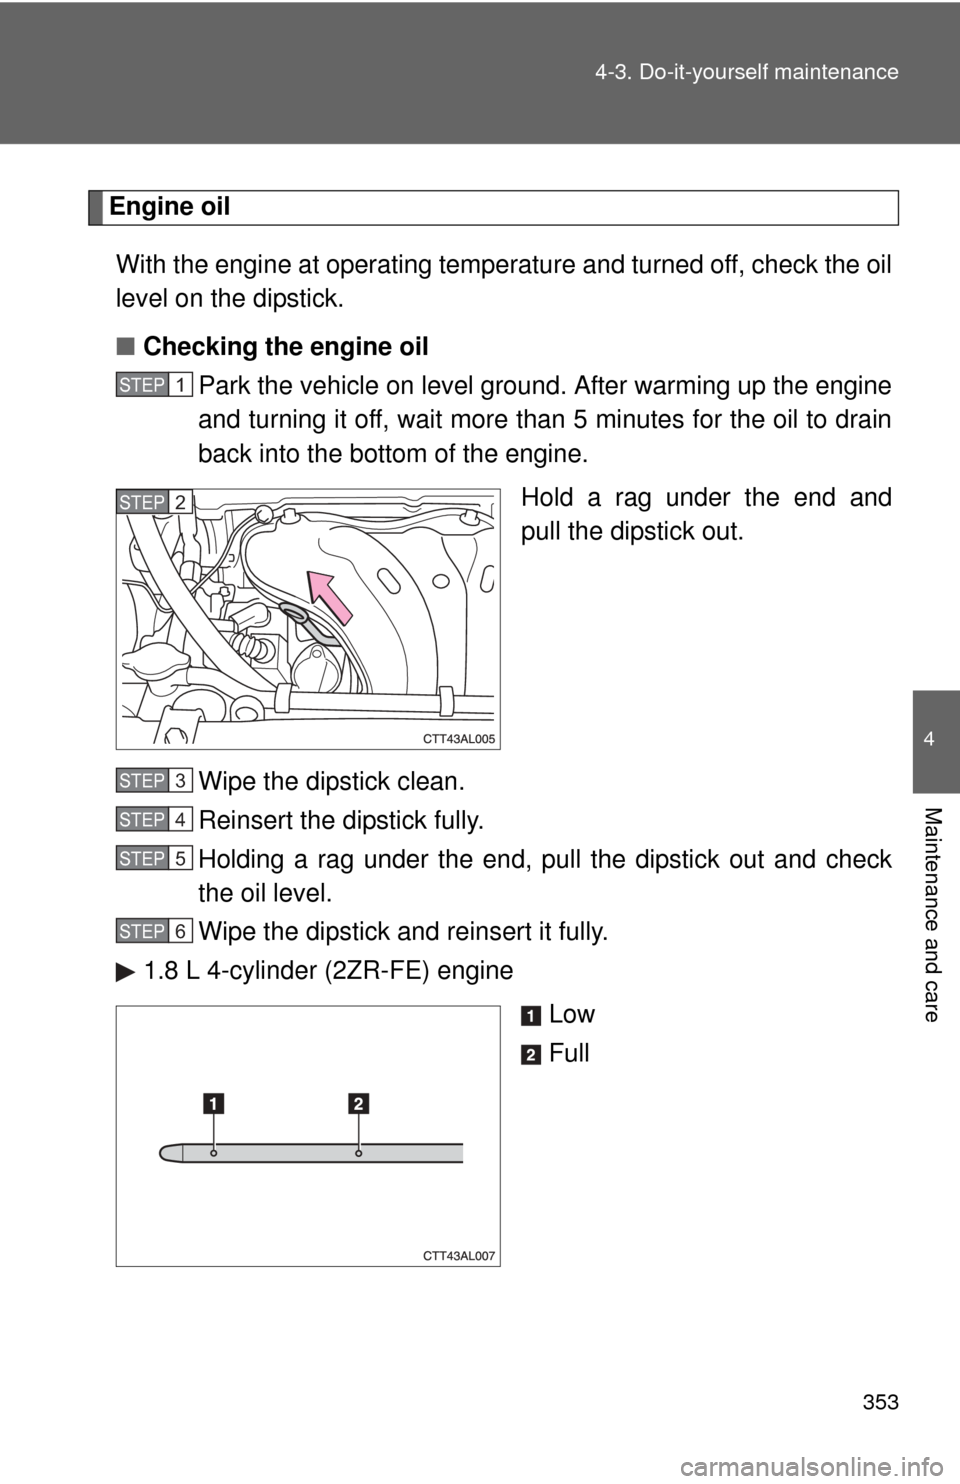
■ Checking the engine oil
Park the vehicle on level ground. After warming up the engine
and turning it off, wait more than 5 minutes for the oil to drain
back into the bottom of the engine.
Hold a rag under the end and
pull the dipstick out.
Wipe the dipstick clean.
Reinsert the dipstick fully.
Holding a rag under the end, pull the dipstick out and check
the oil level.
Wipe the dipstick and reinsert it fully.
1.8 L 4-cylinder (2ZR-FE) engine
Low
Full
STEP1
STEP2
STEP3
STEP4
STEP5
STEP6
Page 354 of 516
354 4-3. Do-it-yourself maintenance
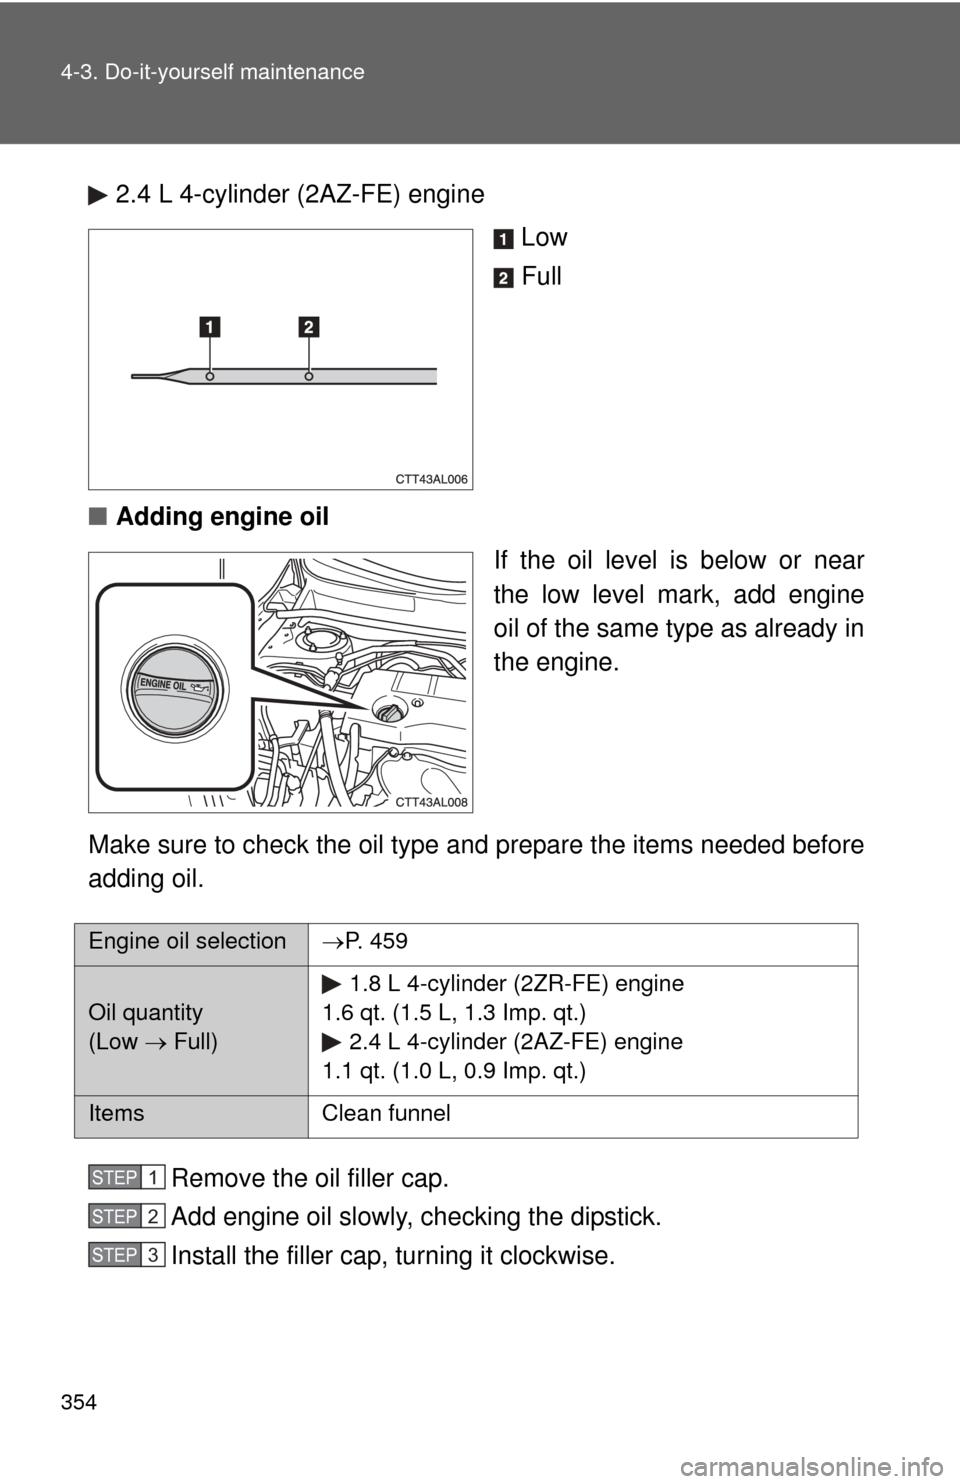
2.4 L 4-cylinder (2AZ-FE) engineLow
Full
■ Adding engine oil
If the oil level is below or near
the low level mark, add engine
oil of the same type as already in
the engine.
Make sure to check the oil type and prepare the items needed before
adding oil.
Remove the oil filler cap.
Add engine oil slowly, checking the dipstick.
Install the filler cap, turning it clockwise.
Engine oil selection P. 4 5 9
Oil quantity
(Low Full) 1.8 L 4-cylinder (2ZR-FE) engine
1.6 qt. (1.5 L, 1.3 Imp. qt.) 2.4 L 4-cylinder (2AZ-FE) engine
1.1 qt. (1.0 L, 0.9 Imp. qt.)
Items Clean funnel
STEP1
STEP2
STEP3
Page 359 of 516

359
4-3. Do-it-yourself maintenance
4
Maintenance and care
Brake fluid
■ Checking fluid level
The brake fluid level should be
between the “MAX” and “MIN”
lines on the tank.
Make sure to check the fluid type and prepare the necessary items.
■ Adding fluid
Make sure to check the fluid type and prepare the necessary items.
Slide and lift up the rubber strip
to partly remove it as shown.
Fluid type FMVSS No.116 DOT 3 or SAE J1703 brake fluid
Items Clean funnel
STEP1
Page 360 of 516
360 4-3. Do-it-yourself maintenance
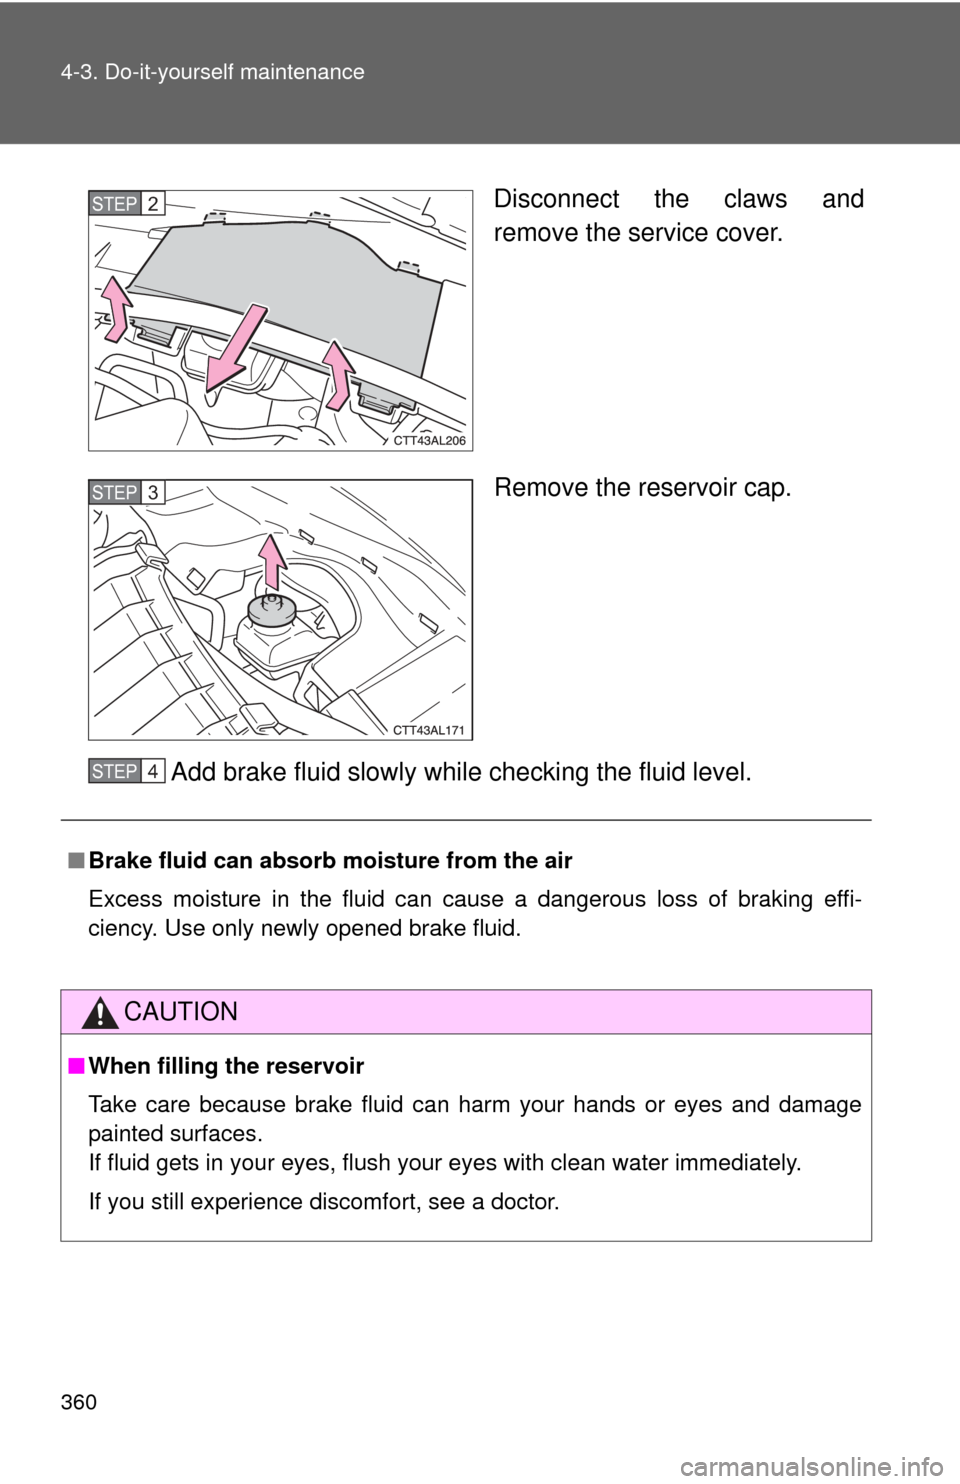
Disconnect the claws and
remove the service cover.
Remove the reservoir cap.
Add brake fluid slowly while checking the fluid level.STEP2
STEP3
■ Brake fluid can absorb moisture from the air
Excess moisture in the fluid can cause a dangerous loss of braking effi-
ciency. Use only newly opened brake fluid.
CAUTION
■When filling the reservoir
Take care because brake fluid can harm your hands or eyes and damage
painted surfaces.
If fluid gets in your eyes, flush your eyes with clean water immediately.
If you still experience discomfort, see a doctor.
STEP4
Page 365 of 516
365
4-3. Do-it-yourself maintenance
4
Maintenance and care
Tires
Replace or rotate tires in accordance with maintenance sched-
ules and treadwear.
■Checking tires
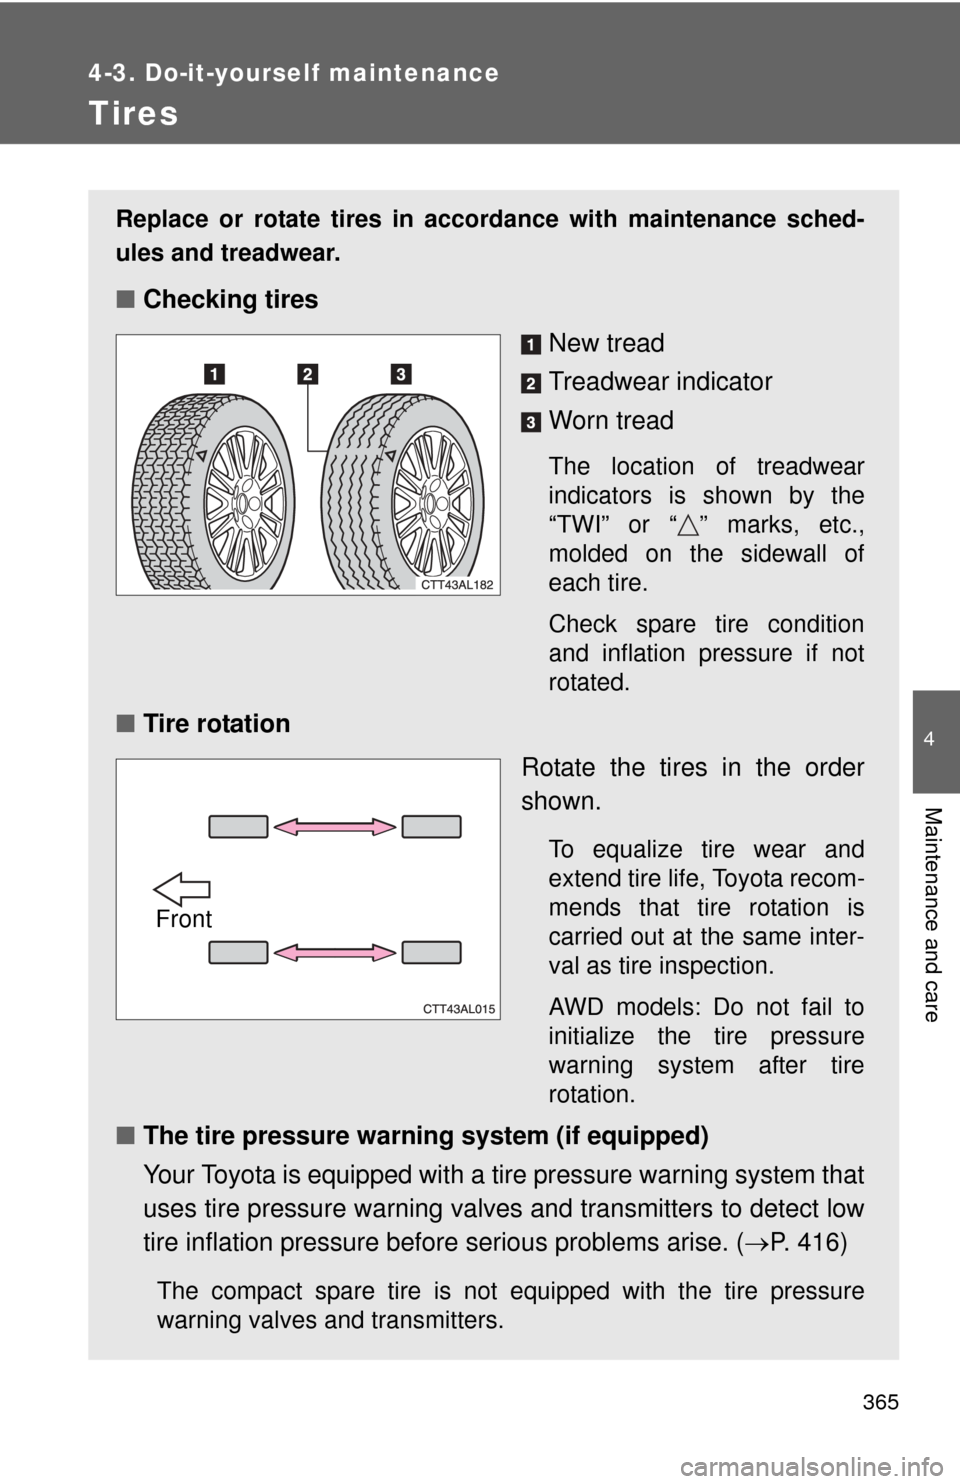
New tread
Treadwear indicator
Worn tread
The location of treadwear
indicators is shown by the
“TWI” or “ ” marks, etc.,
molded on the sidewall of
each tire.
Check spare tire condition
and inflation pressure if not
rotated.
■Tire rotation
Rotate the tires in the order
shown.
To equalize tire wear and
extend tire life, Toyota recom-
mends that tire rotation is
carried out at the same inter-
val as tire inspection.
AWD models: Do not fail to
initialize the tire pressure
warning system after tire
rotation.
■The tire pressure warning system (if equipped)
Your Toyota is equipped with a tire pressure warning system that
uses tire pressure warning valves and transmitters to detect low
tire inflation pressure before serious problems arise. (P. 416)
The compact spare tire is not equipped with the tire pressure
warning valves and transmitters.
Front
Page 370 of 516
370 4-3. Do-it-yourself maintenance
■Tire types
1 Summer tiresSummer tires are high-speed performance tires best suited to highway
driving under dry conditions. Sinc e summer tires do not have the same
traction performance as snow tire s, summer tires are inadequate for
driving on snow-covered or icy roads. For driving on snow-covered
roads or icy roads, the use of snow tires is recommended. When
installing snow tires, be sure to replace all four tires.
2 All season tires All season tires are designed to provide better traction in snow and to
be adequate for driving in most winter conditions, as well as for use
year round. All season tires, however, do not have adequate traction
performance compared with snow tires in heavy or loose snow. Also,
all season tires fall short in acceleration and handling performance
compared with summer tires in highway driving.
3Snow tires For driving on snow-covered roads or icy roads, we recommend using
snow tires. If you need snow tires, select tires of the same size, con-
struction and load capacity as the or iginally installed tires. Since your
vehicle has radial tires as original equipment, make sure your snow
tires also have radial construction. Do not install studded tires without
first checking local regulations for possible restrictions. Snow tires
should be installed on all wheels. ( P. 161)
■Initializing the tire pr essure warning system
Initialize the tires with the tire inflati on pressure adjusted to the specified
level.
Page 376 of 516
376 4-3. Do-it-yourself maintenance
■Effects of incorrect tire inflation pressure
Driving with incorrect tire inflation pressure ma y result in the following:
●Reduced fuel efficiency
●Reduced driving comfort and tire life
●Reduced safety
●Damage to the drive train
If a tire needs frequent re filling, have it checked by your Toyota dealer.
■Instructions for checking tire inflation pressure
When checking tire inflation pressure, observe the following:
●Check only when the tires are cold.
If your vehicle has been parked for at least 3 hours and has not been
driven for more than 1 mile or 1.5 km, you will get an accurate cold
tire inflation pressure reading.
●Always use a tire pressure gauge.
The appearance of the tire can be mi sleading. In addition, tire infla-
tion pressures that are even just a few pounds off can degrade ride
and handling.
●Do not bleed or reduce tire inflation pressure after driving. It is normal
for the tire inflation pressure to be higher after driving.
●Never exceed the vehicle capacity weight.
Passengers and luggage weight should be placed so that the vehicle
is balanced.
Page 382 of 516
382 4-3. Do-it-yourself maintenance
■Checking interval
Replace the air conditioning filter according to the maintenance schedule. In
dusty areas or areas with heavy traffic flow, early replacement may be
required. (For scheduled maintenance information, please refer to the
“Scheduled Maintenance Guide” or “Owner’s Manual Supplement”.)
■ If air flow from the vents decreases dramatically
The filter may be clogged. Check the filter and replace if necessary.
NOTICE
■When using the air conditioning system
Make sure that a filter is always installed.
Using the air conditioning system without a filter may cause damage to the
system.
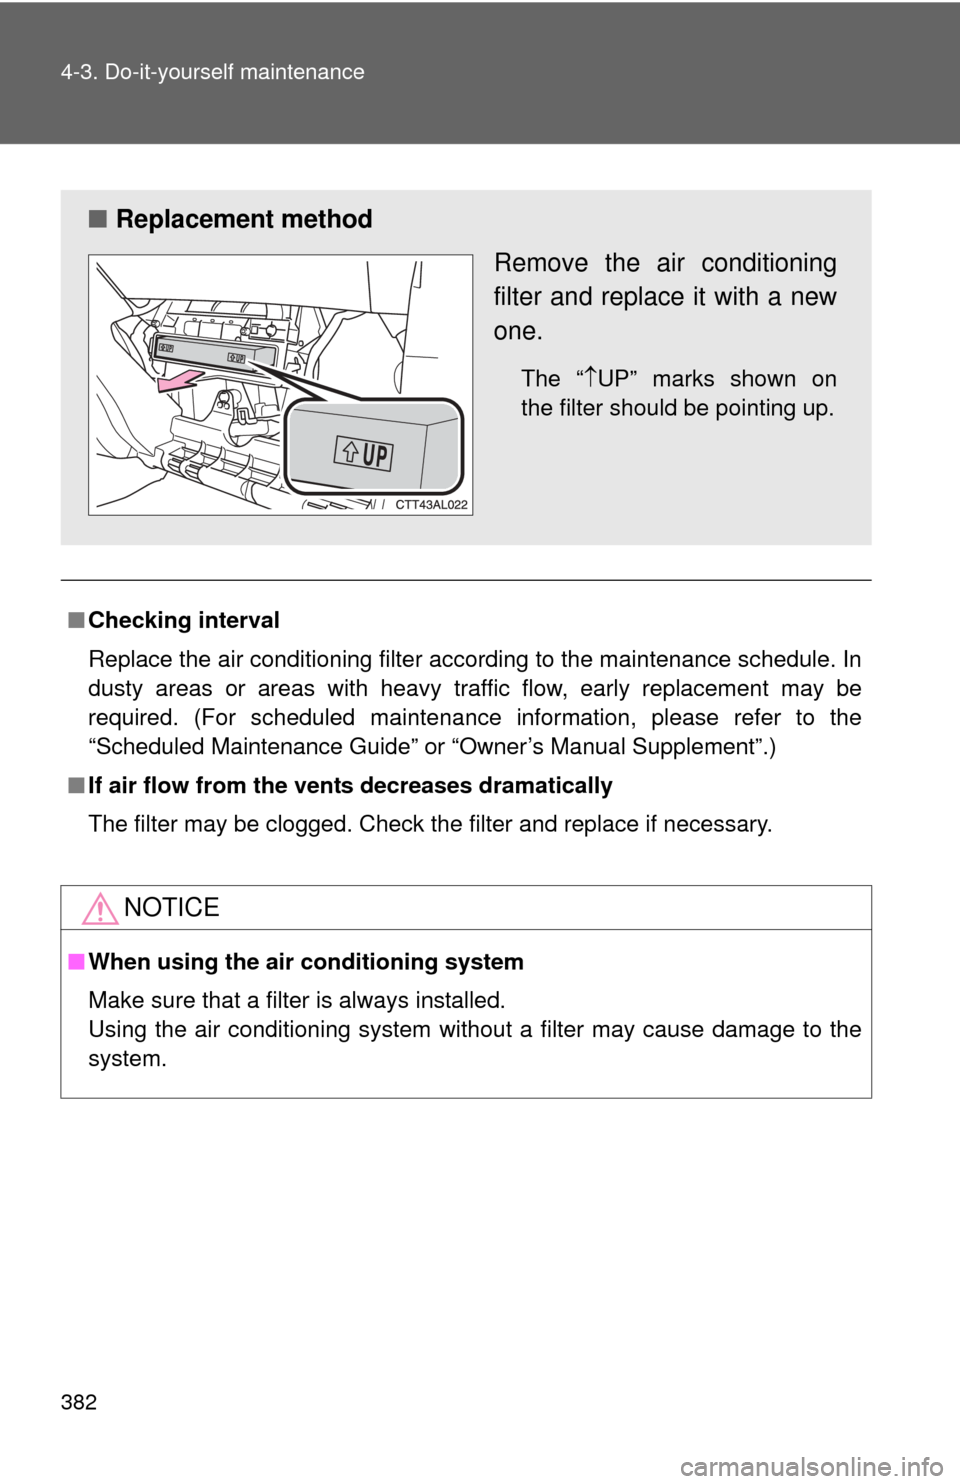
■ Replacement method
Remove the air conditioning
filter and replace it with a new
one.
The “UP” marks shown on
the filter should be pointing up.