seats TOYOTA MATRIX 2012 E140 / 2.G Owners Manual
[x] Cancel search | Manufacturer: TOYOTA, Model Year: 2012, Model line: MATRIX, Model: TOYOTA MATRIX 2012 E140 / 2.GPages: 516, PDF Size: 7.02 MB
Page 2 of 516

TABLE OF CONTENTSIndex
2
1-1. Key informationKeys ..................................... 26
1-2. Opening, closing and
locking the doors
Wireless remote control ....... 28
Doors.................................... 31
Back door ............................. 36
1-3. Adjustable components
(seats, mirrors,
steering wheel)
Front seats ........................... 40
Rear seats ............................ 44
Head restraints ..................... 46
Seat belts ............................. 48
Steering wheel ..................... 54
Anti-glare inside rear view mirror.......................... 55
Outside rear view mirrors ..... 57
1-4. Opening a nd closing the
windo ws
Power windows .................... 59
Moon roof ............................. 61
1-5. Refueling Opening the fuel tank cap .... 64
1-6. Theft deterrent system Engine immobilizer system ................................ 68
Theft prevention labels ......... 70 1-7. Safety information
Correct driving posture ......... 71
SRS airbags ......................... 73
Front passenger occupant classification system ........... 85
Child restraint systems ......... 90
Installing child restraints ....... 94
2-1. Driving procedures Driving the vehicle .............. 106
Engine (ignition) switch....... 118
Automatic transmission ...... 122
Manual transmission........... 127
Turn signal lever ................. 129
Parking brake ..................... 130
Horn .................................... 131
2-2. Instrument cluster Gauges and meters ............ 132
Indicators and warning lights ................................. 135
2-3. Operating the lights and wipers
Headlight switch ................. 138
Fog light switch ................... 141
Windshield wipers and washer .............................. 143
Rear window wiper and washer .............................. 146
1Before driving
2When driving
Page 8 of 516
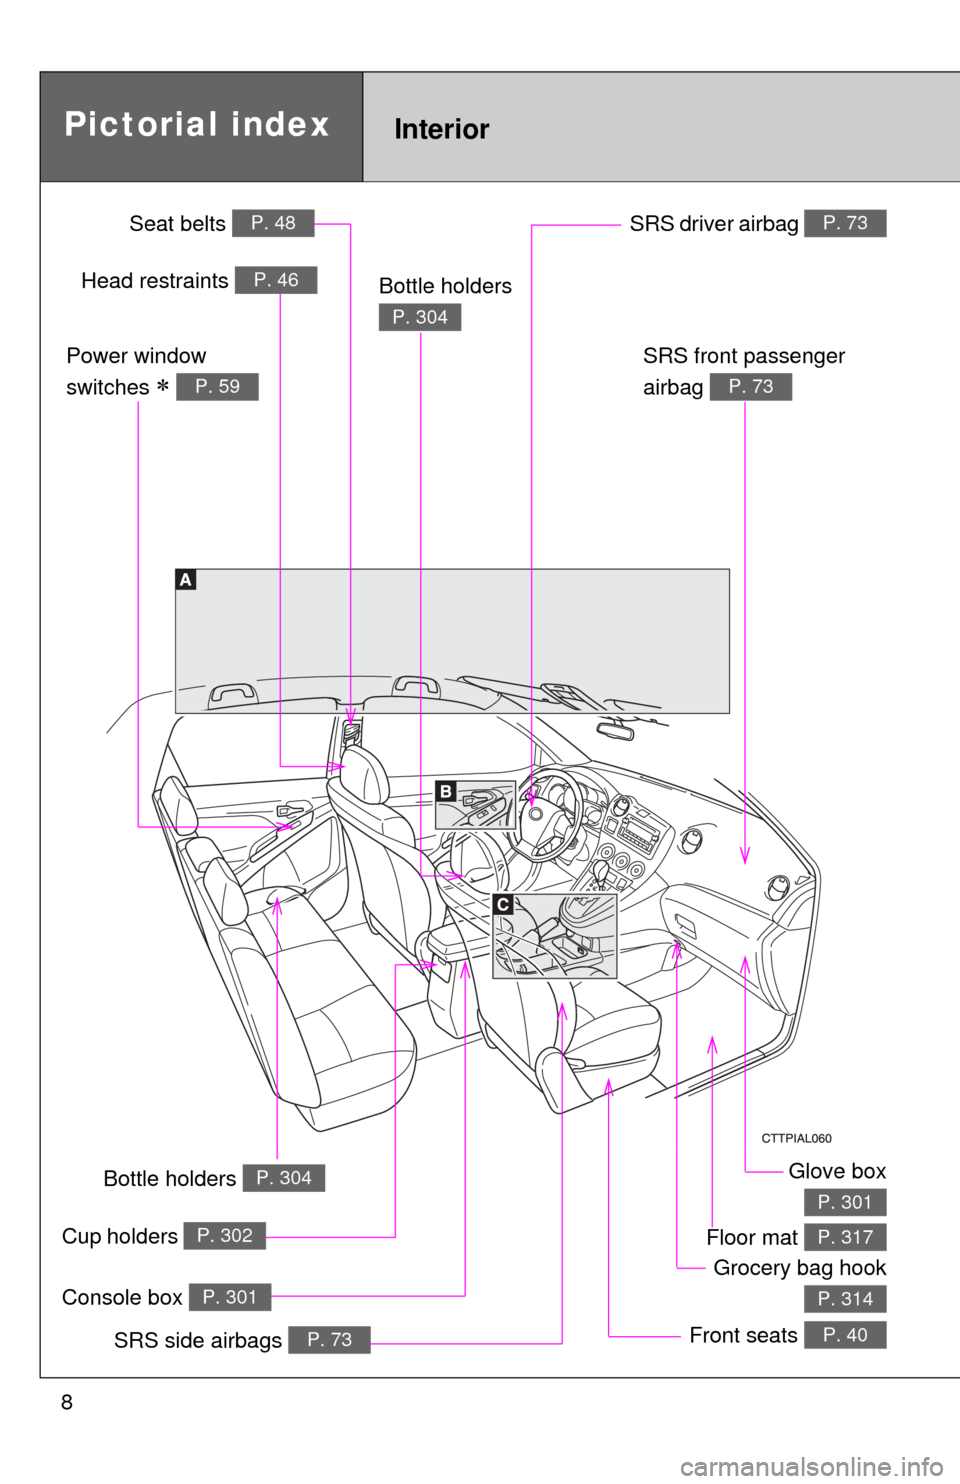
8
Glove box
P. 301
Front seats P. 40
Power window
switches
P. 59
SRS front passenger
airbag
P. 73
SRS driver airbag P. 73
Console box P. 301
InteriorPictorial index
Floor mat P. 317
Head restraints P. 46Bottle holders
P. 304
Bottle holders P. 304
Grocery bag hook
P. 314
Seat belts P. 48
Cup holders P. 302
SRS side airbags P. 73
Page 25 of 516
Before driving1
25
1-1. Key informationKeys ................................... 26
1-2. Opening, closing and locking the doors
Wireless remote control ..... 28
Doors ................................. 31
Back door ........................... 36
1-3. Adjustable components (seats, mirrors,
steering wheel)
Front seats ......................... 40
Rear seats.......................... 44
Head restraints................... 46
Seat belts ........................... 48
Steering wheel ................... 54
Anti-glare inside rear view mirror ....................... 55
Outside rear view mirrors.............................. 57
1-4. Opening and closing the windows
Power windows .................. 59
Moon roof ........................... 61 1-5. Refueling
Opening the fuel tank cap ................................... 64
1-6. Theft deterrent system Engine immobilizer system ............................. 68
Theft prevention labels....... 70
1-7. Safety information Correct driving posture....... 71
SRS airbags ....................... 73
Front passenger occupant classification system ........ 85
Child restraint systems....... 90
Installing child restraints..... 94
Page 40 of 516
40
1-3. Adjustable components (seats, mirrors, steering wheel)
Front seats
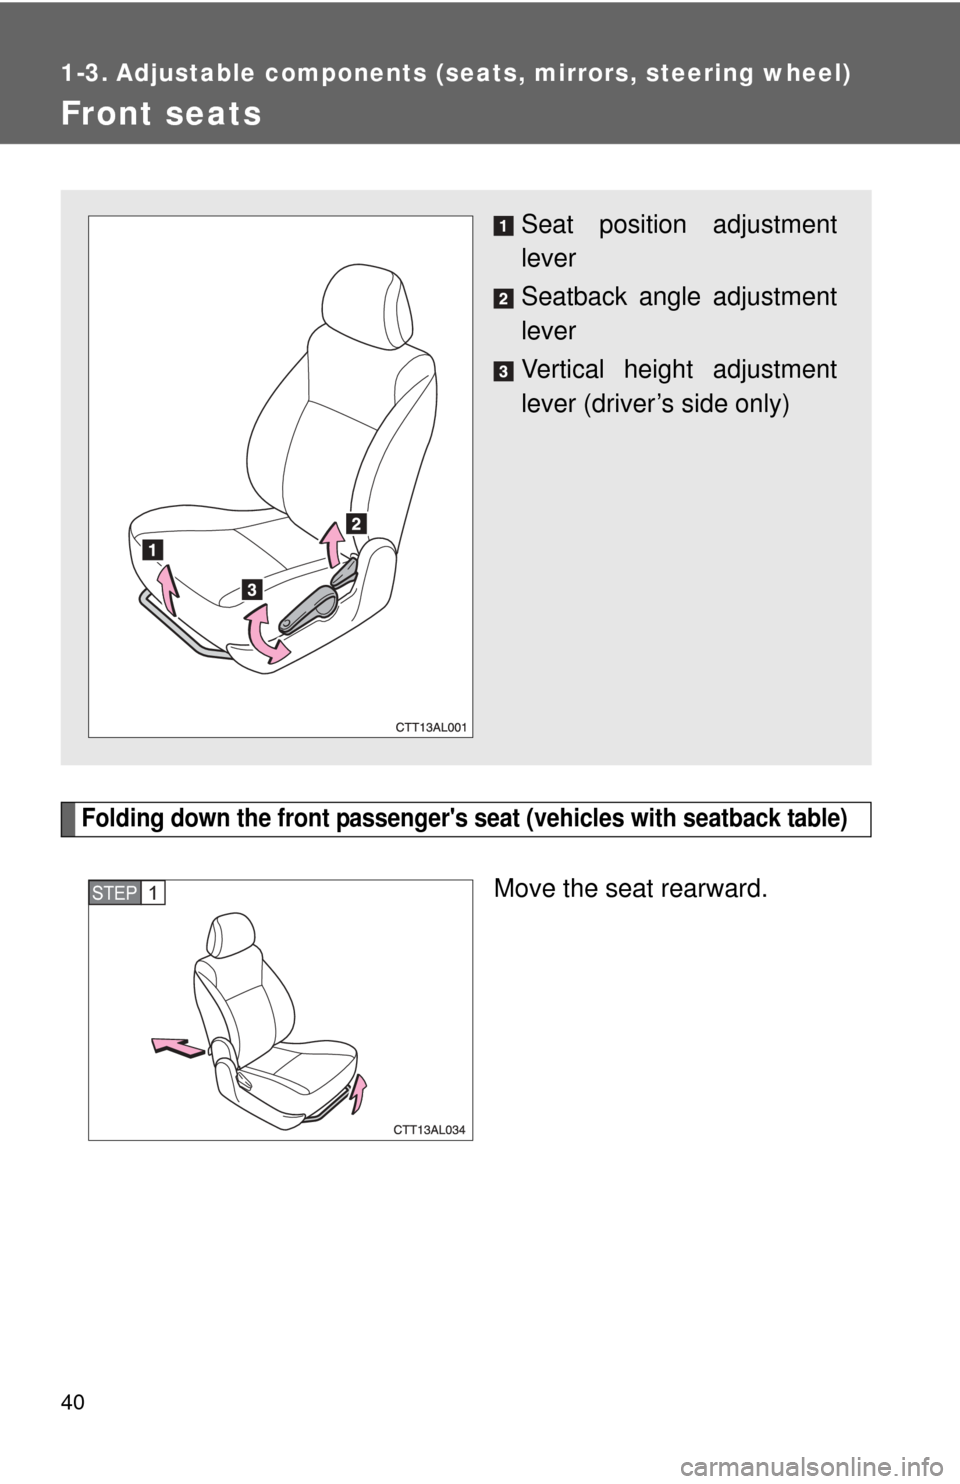
Folding down the front passenger's seat (vehicles with seatback table)
Move the seat rearward.
Seat position adjustment
lever
Seatback angle adjustment
lever
Vertical height adjustment
lever (driver’s side only)
STEP1
Page 42 of 516
42 1-3. Adjustable components (seats, mirrors, steering wheel)
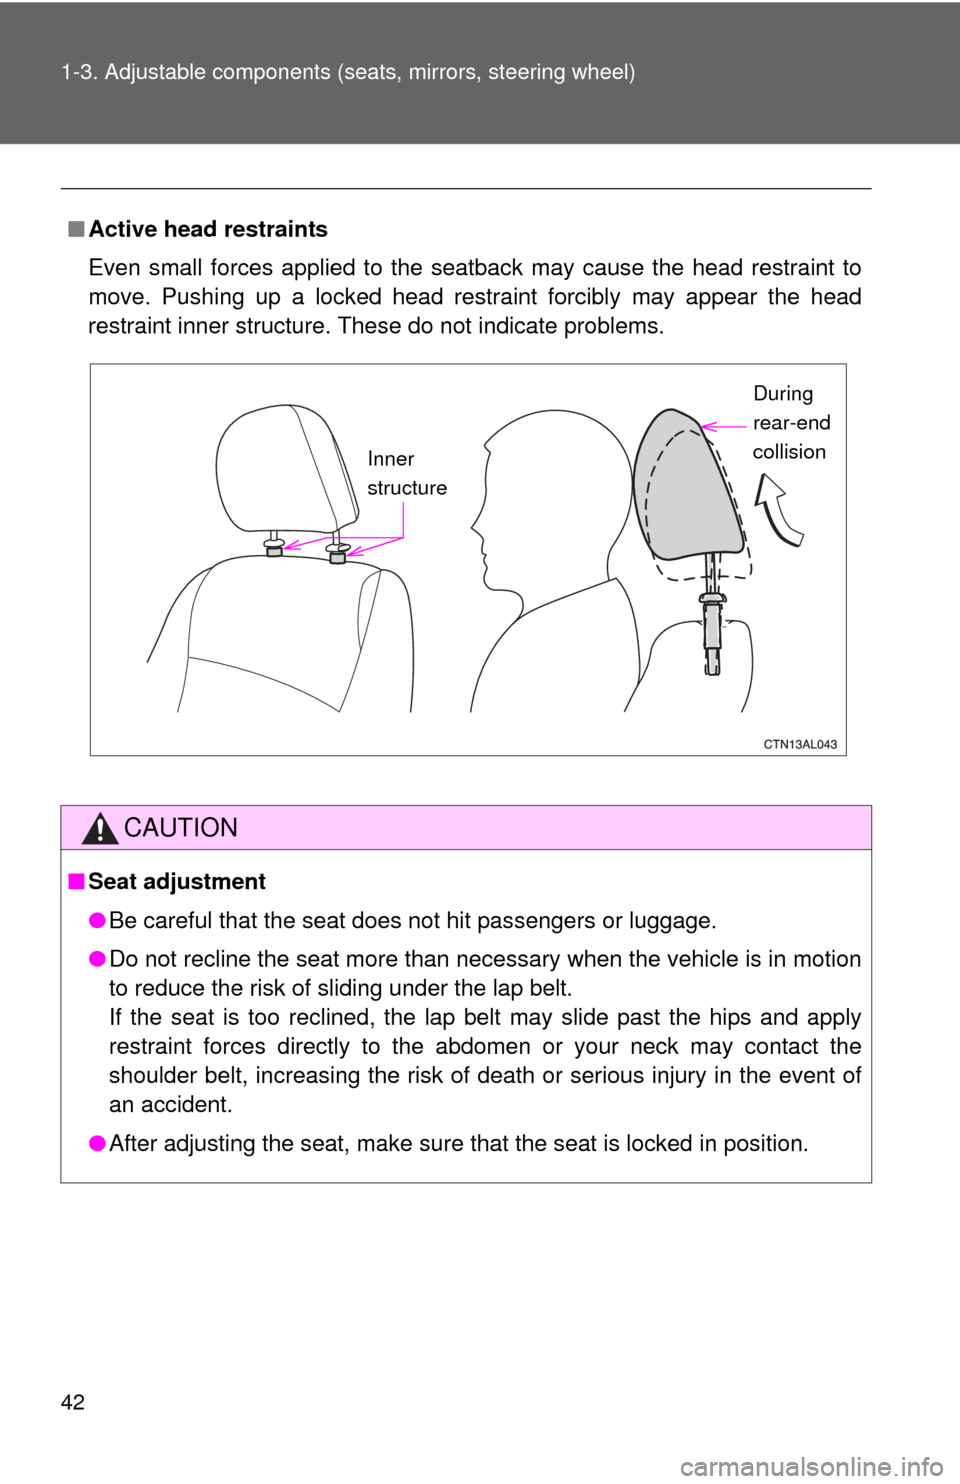
■Active head restraints
Even small forces applied to the seatback may cause the head restraint to
move. Pushing up a locked head restraint forcibly may appear the head
restraint inner structure. These do not indicate problems.
CAUTION
■Seat adjustment
●Be careful that the seat does not hit passengers or luggage.
● Do not recline the seat more than necessary when the vehicle is in motion
to reduce the risk of sliding under the lap belt.
If the seat is too reclined, the lap belt may slide past the hips and apply
restraint forces directly to the abdomen or your neck may contact the
shoulder belt, increasing the risk of death or serious injury in the event of
an accident.
● After adjusting the seat, make sure that the seat is locked in position.
Inner
structure During
rear-end
collision
Page 44 of 516
44
1-3. Adjustable components (seats, mirrors, steering wheel)
Rear seats
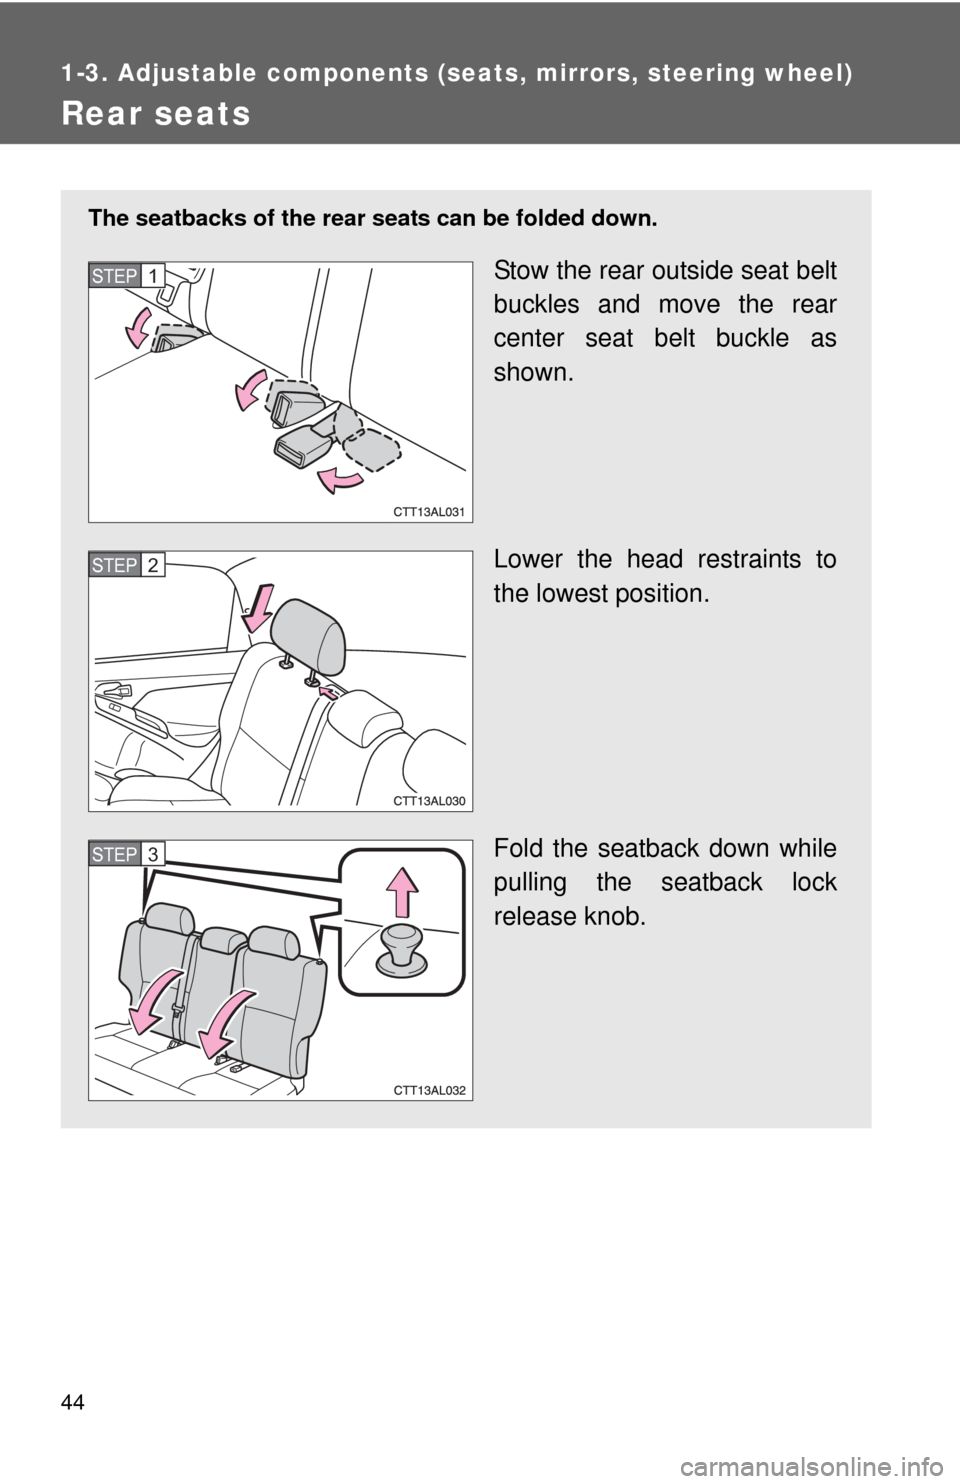
The seatbacks of the rear seats can be folded down.
Stow the rear outside seat belt
buckles and move the rear
center seat belt buckle as
shown.
Lower the head restraints to
the lowest position.
Fold the seatback down while
pulling the seatback lock
release knob.STEP1
STEP2
STEP3
Page 46 of 516
46
1-3. Adjustable components (seats, mirrors, steering wheel)
Head restraints
■Removing the head restraints
■ Installing the head restraints
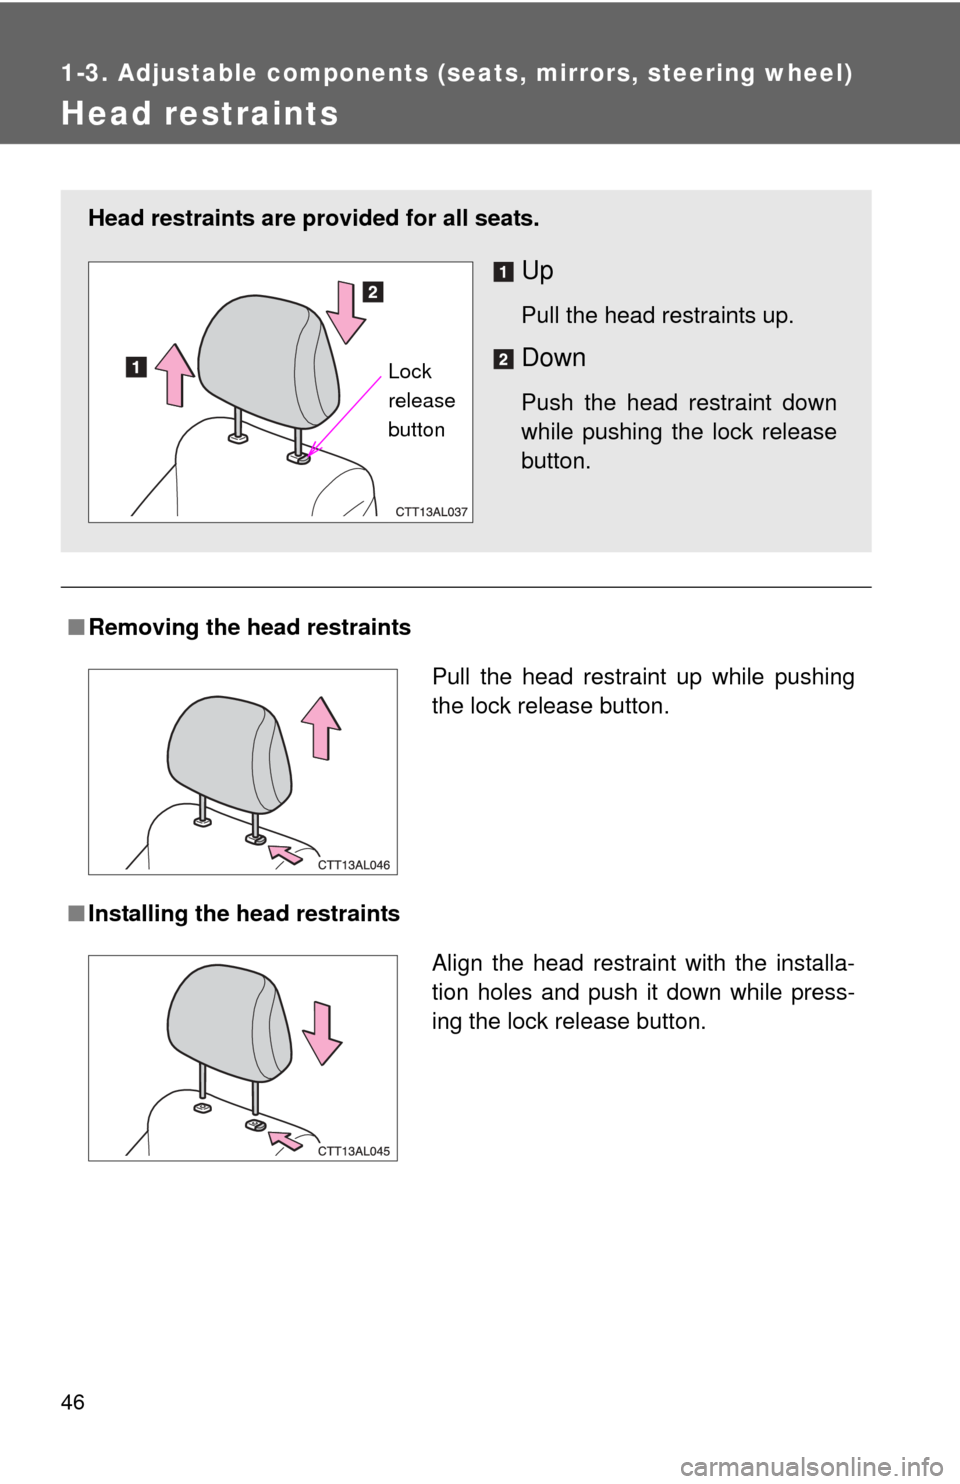
Head restraints are provided for all seats.
Up
Pull the head restraints up.
Down
Push the head restraint down
while pushing the lock release
button.
Lock
release
button
Pull the head restraint up while pushing
the lock release button.
Align the head restraint with the installa-
tion holes and push it down while press-
ing the lock release button.
Page 48 of 516
48
1-3. Adjustable components (seats, mirrors, steering wheel)
Seat belts
Make sure that all occupants are wearing their seat belts before driv-
ing the vehicle.
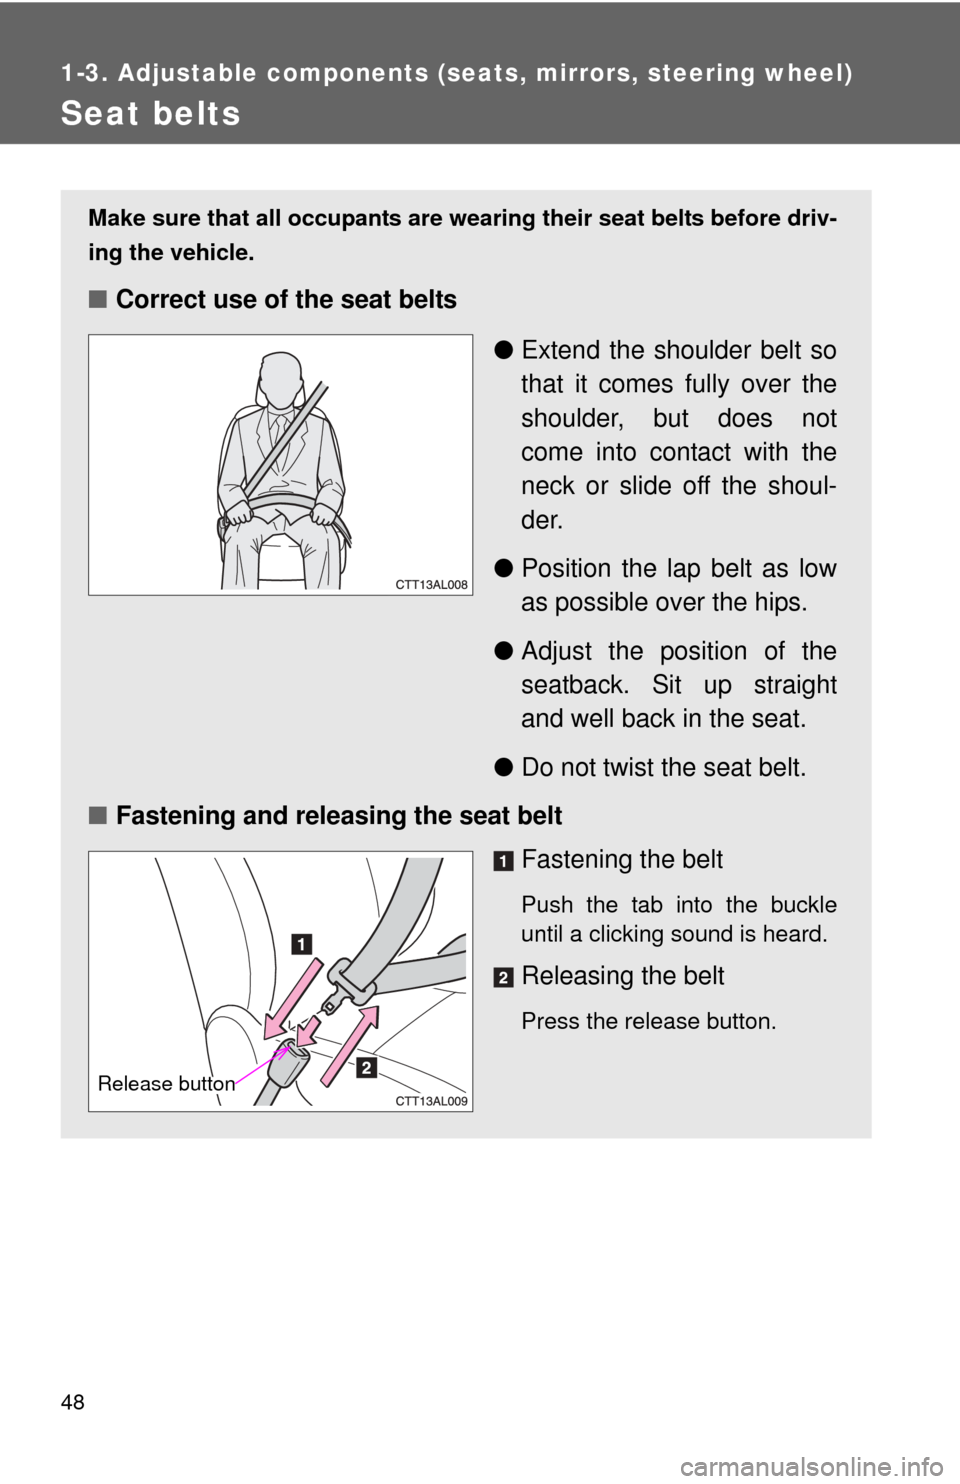
■Correct use of the seat belts
●Extend the shoulder belt so
that it comes fully over the
shoulder, but does not
come into contact with the
neck or slide off the shoul-
der.
● Position the lap belt as low
as possible over the hips.
● Adjust the position of the
seatback. Sit up straight
and well back in the seat.
● Do not twist the seat belt.
■ Fastening and releasing the seat belt
Fastening the belt
Push the tab into the buckle
until a clicking sound is heard.
Releasing the belt
Press the release button.
Release button
Page 49 of 516
49
1-3. Adjustable components (s
eats, mirrors, steering wheel)
1
Before driving
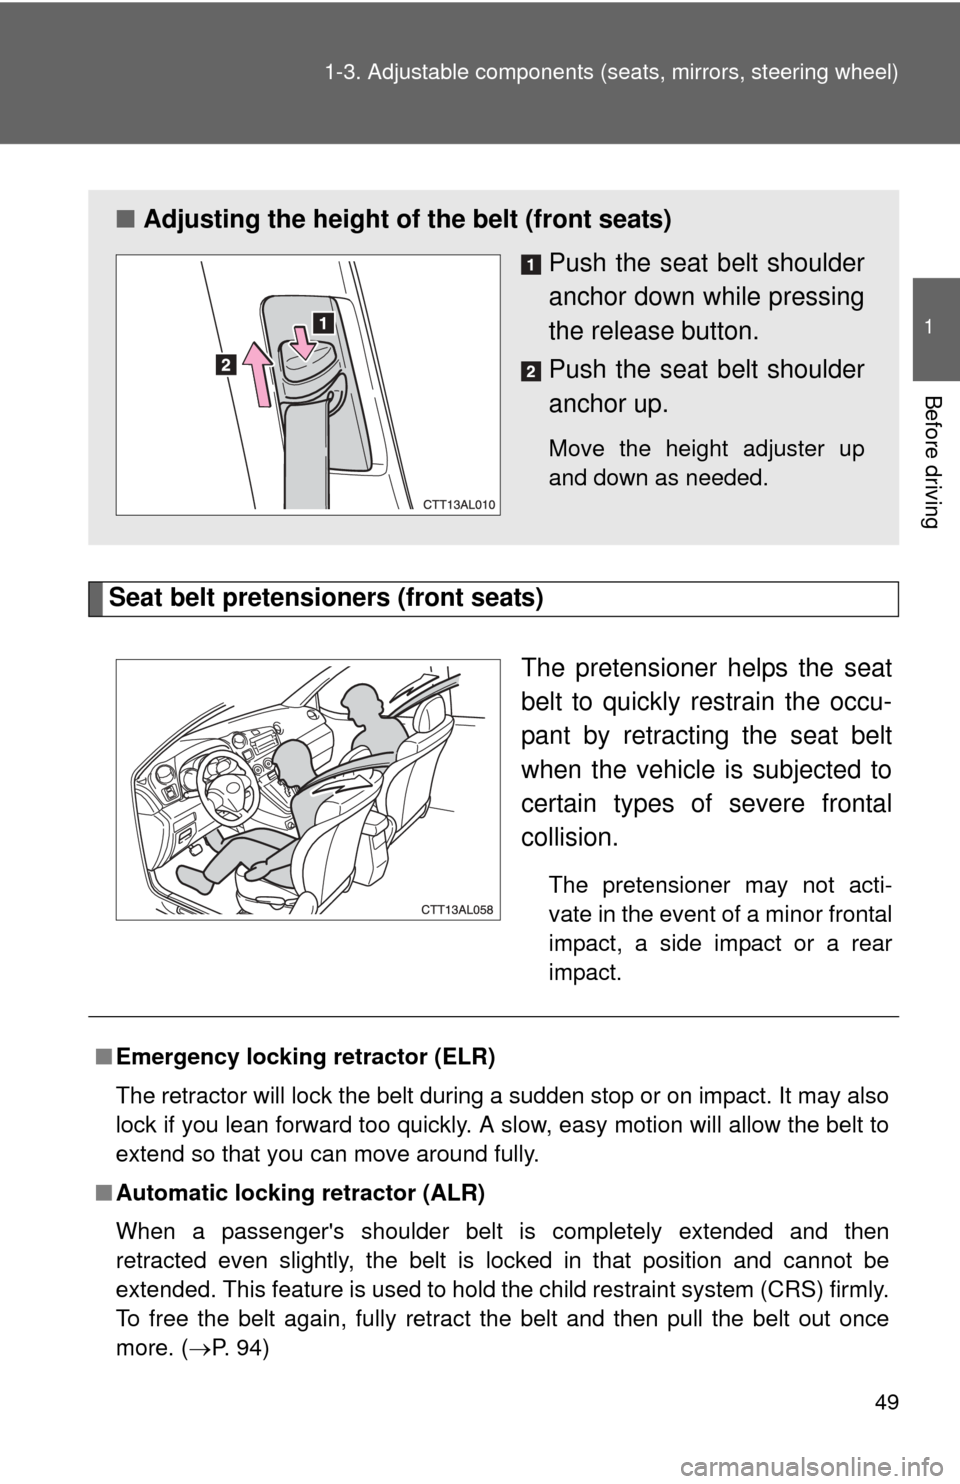
Seat belt pretensioners (front seats)
The pretensioner helps the seat
belt to quickly restrain the occu-
pant by retracting the seat belt
when the vehicle is subjected to
certain types of severe frontal
collision.
The pretensioner may not acti-
vate in the event of a minor frontal
impact, a side impact or a rear
impact.
■Adjusting the height of the belt (front seats)
Push the seat belt shoulder
anchor down while pressing
the release button.
Push the seat belt shoulder
anchor up.
Move the height adjuster up
and down as needed.
■Emergency locking retractor (ELR)
The retractor will lock the belt during a sudden stop or on impact. It may also
lock if you lean forward too quickly. A slow, easy motion will allow the belt to
extend so that you can move around fully.
■ Automatic locking retractor (ALR)
When a passenger's shoulder belt is completely extended and then
retracted even slightly, the belt is locked in that position and cannot be
extended. This feature is used to hold the child restraint system (CRS) firmly.
To free the belt again, fully retract the belt and then pull the belt out once
more. ( P. 94)
Page 50 of 516
50 1-3. Adjustable components (seats, mirrors, steering wheel)
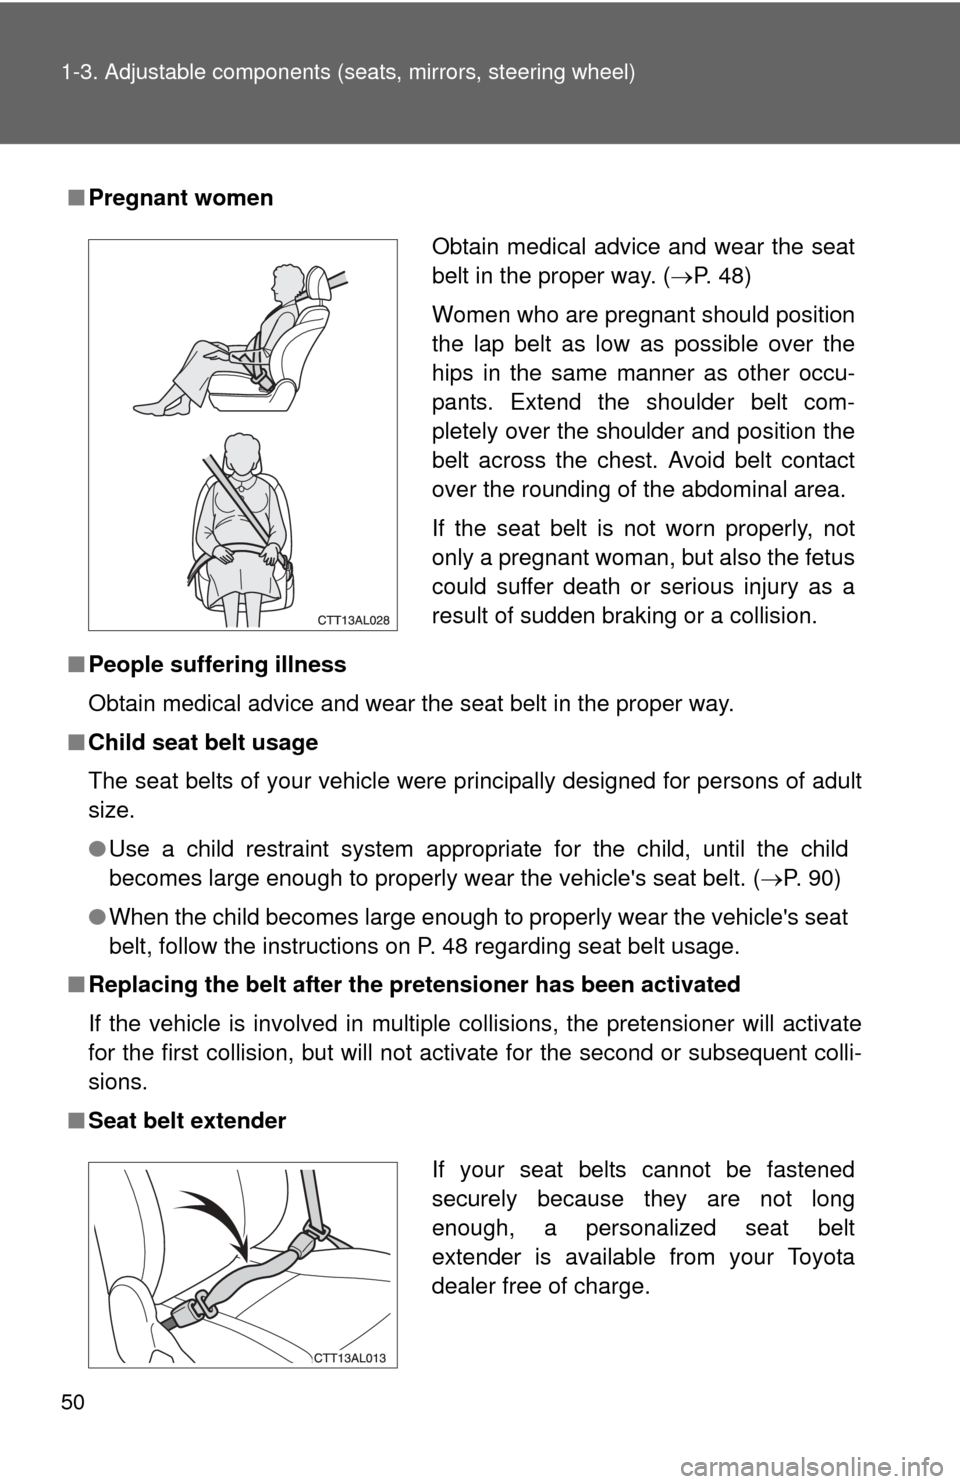
■Pregnant women
■ People suffering illness
Obtain medical advice and wear the seat belt in the proper way.
■ Child seat belt usage
The seat belts of your vehicle were principally designed for persons of adult
size.
●Use a child restraint system appropriate for the child, until the child
becomes large enough to properly w ear the vehicle's seat belt. (P. 90)
● When the child becomes large enough to properly wear the vehicle's seat
belt, follow the instructions on P. 48 regarding seat belt usage.
■ Replacing the belt after the pretensioner has been activated
If the vehicle is involved in multiple collisions, the pretensioner will activate
for the first collision, but will not activate for the second or subsequent colli-
sions.
■ Seat belt extender
Obtain medical advice and wear the seat
belt in the proper way. ( P. 48)
Women who are pregnant should position
the lap belt as low as possible over the
hips in the same manner as other occu-
pants. Extend the shoulder belt com-
pletely over the shoulder and position the
belt across the chest. Avoid belt contact
over the rounding of the abdominal area.
If the seat belt is not worn properly, not
only a pregnant woman, but also the fetus
could suffer death or serious injury as a
result of sudden braking or a collision.
If your seat belts cannot be fastened
securely because they are not long
enough, a personalized seat belt
extender is available from your Toyota
dealer free of charge.