TOYOTA MIRAI 2016 1.G Owners Manual
Manufacturer: TOYOTA, Model Year: 2016, Model line: MIRAI, Model: TOYOTA MIRAI 2016 1.GPages: 464, PDF Size: 8.05 MB
Page 191 of 464
1915-3. Operating the lights and wipers
5
Driving
MIRAI_OM_USA_OM62004U
When all of the following conditions are fulfilled, high beam will be
automatically turned on:
●Vehicle speed is above appr oximately 21 mph (34 km/h).
● The area ahead of the vehicle is dark.
● There are no oncoming or preceding vehicles with headlights or tail
lights turned on.
● There are few streetlights on the road ahead.
If any of the following conditions are fulfilled, high beam will be auto-
matically turned off:
● Vehicle speed drops below approximately 17 mph (27 km/h).
● The area ahead of the vehicle is not dark.
● Oncoming or preceding vehicles have headlights or tail lights
turned on.
● There are many streetlights on the road ahead.
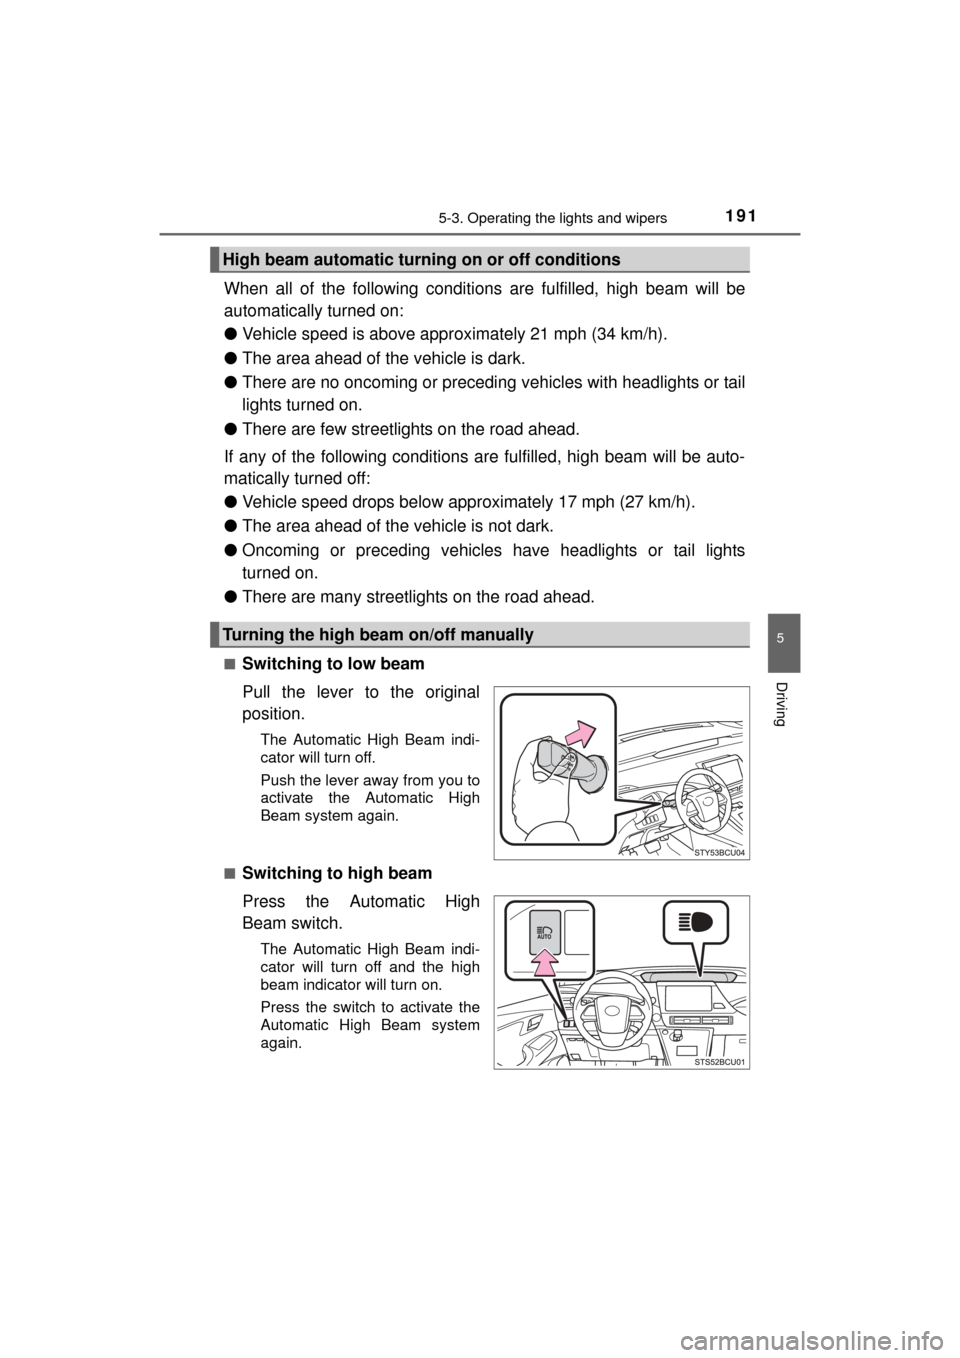
■Switching to low beam
Pull the lever to the original
position.
The Automatic High Beam indi-
cator will turn off.
Push the lever away from you to
activate the Automatic High
Beam system again.
■
Switching to high beam
Press the Automatic High
Beam switch.
The Automatic High Beam indi-
cator will turn off and the high
beam indicator will turn on.
Press the switch to activate the
Automatic High Beam system
again.
High beam automatic turning on or off conditions
Turning the high beam on/off manually
Page 192 of 464

1925-3. Operating the lights and wipers
MIRAI_OM_USA_OM62004U
■The Automatic High Beam can be operated when
The power switch is in ON mode.
■ Camera sensor detection information
●High beam may not be automatically turned off in the following situations:
• When oncoming vehicles suddenly appear from a curve
• When the vehicle is cut in front of by another
• When oncoming or preceding vehicles are hidden from sight due to
repeated curves, road dividers or roadside trees
● High beam may be turned off if an oncoming vehicle that is using fog lights
without using the headlights is detected.
● House lights, street lights, red traffic signals, and illuminated billboards or
signs may cause the high beam to turn off.
● The following factors may affect the amount of time taken to turn high beam
on or off:
• The brightness of headlights, fog lights, and tail lights of oncoming and
preceding vehicles
• The movement and direction of oncoming and preceding vehicles
• When an oncoming or preceding vehicle only has operational lights on one side
• When an oncoming or preceding vehicle is a two-wheeled vehicle
• The condition of the road (gradient, curve, condition of the road surface,
etc.)
• The number of passengers and amount of luggage
● High beam may be turned on or off when unexpected by the driver.
Page 193 of 464

1935-3. Operating the lights and wipers
5
Driving
MIRAI_OM_USA_OM62004U●
In the situations below, the system may not be able to correctly detect the
surrounding brightness levels, and may flash or expose nearby pedestrians
to the high beam. Therefore, you should consider turning the high beams on
or off manually rather than relying on the Automatic High Beam system.
• In bad weather (rain, snow, fog, sandstorms, etc.).
• The windshield is obscured by fog, mist, ice, dirt, etc.
• The windshield is cracked or damaged.
• The camera sensor is deformed or dirty.
• The camera sensor temperature is extremely high.
• Surrounding brightness levels are equal to those of headlights, tail lights
or fog lights.
• Vehicles ahead have headlights that are either switched off, dirty, are changing color, or are not aimed properly.
• When driving through an area of in termittently changing brightness and
darkness.
• When frequently and repeatedly driving ascending/descending roads, or
roads with rough, bumpy or uneven surfaces (such as stone-paved
roads, gravel tracks, etc.).
• When frequently and repeatedly taking curves or driving on a winding
road.
• There is a highly reflective object ahead of the vehicle, such as a sign or a mirror.
• The back of a vehicle ahead is highly reflective, such as a container on a truck.
• The vehicle’s headlights are damaged or dirty.
• The vehicle is listing or tilting, due to a flat tire, a trailer being towed, etc.
• The driver believes that the high beam may be causing problems or dis-
tress to other drivers or pedestrians nearby.
WARNING
■Limitations of the Automatic High Beam
Do not rely on the Automatic High Beam. Always drive safely, taking care to
observe your surroundings and turning high beam on or off manually if nec-
essary.
Page 194 of 464
1945-3. Operating the lights and wipers
MIRAI_OM_USA_OM62004U
NOTICE
■Notes when using the Au tomatic High Beam system
Observe the following to ensure that the Automatic High Beam functions
correctly.
● Do not place items on the dashboard. There is a possibility that the cam-
era sensor will mistake items reflected in the windshield for streetlights,
the headlights of other vehicles, etc.
● Do not install a parking tag or any other accessories near or around the
camera sensor.
● Do not overload the vehicle.
● Do not modify the vehicle.
● If the windshield needs to be replaced, contact your Toyota dealer.
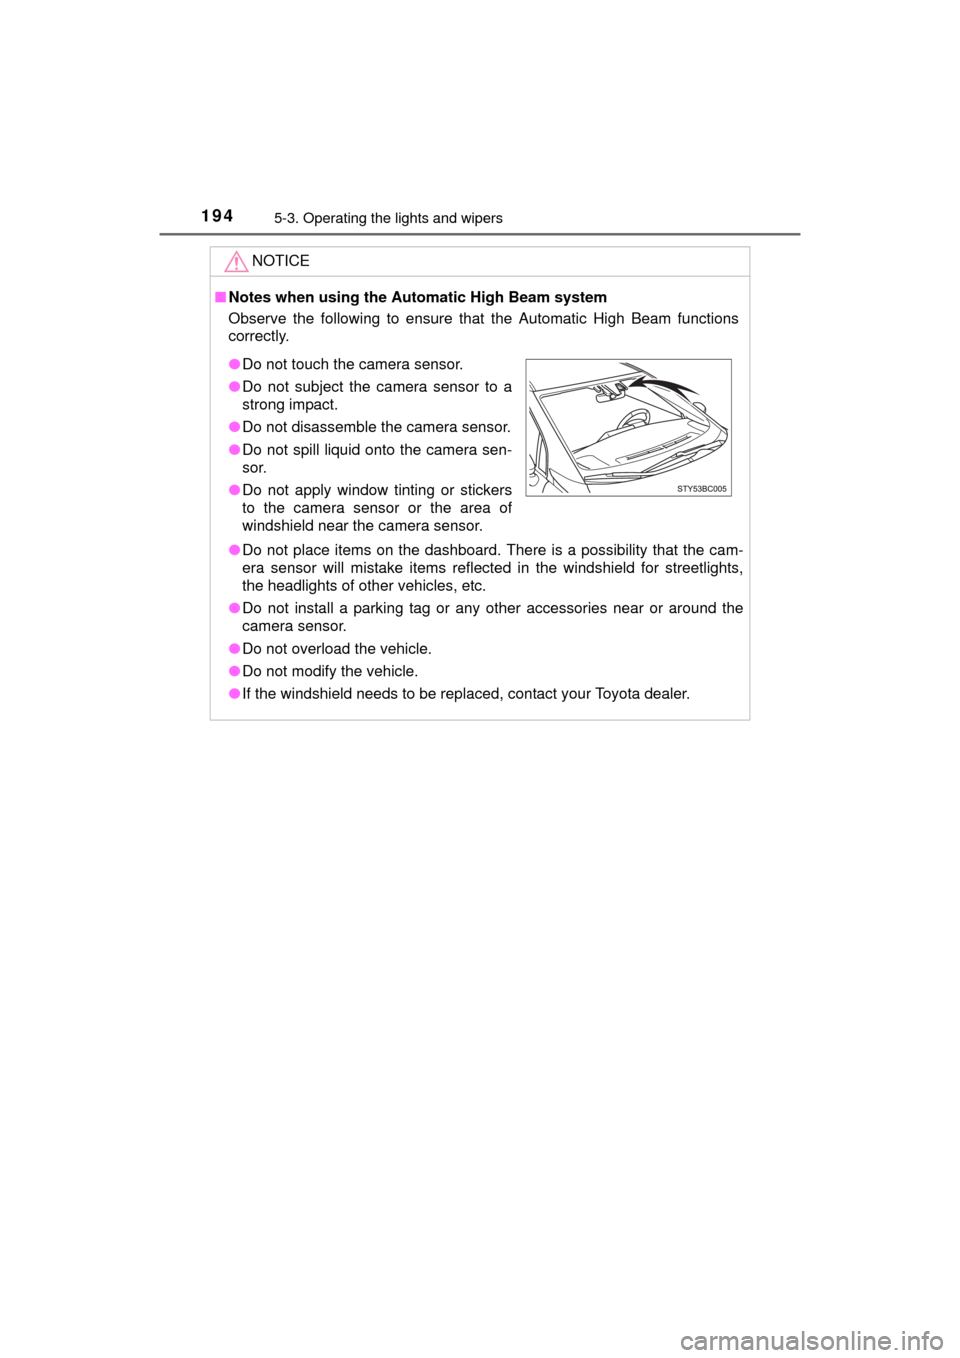
●Do not touch the camera sensor.
● Do not subject the camera sensor to a
strong impact.
● Do not disassemble the camera sensor.
● Do not spill liquid onto the camera sen-
sor.
● Do not apply window tinting or stickers
to the camera sensor or the area of
windshield near the camera sensor.
Page 195 of 464
1955-3. Operating the lights and wipers
5
Driving
MIRAI_OM_USA_OM62004U
Windshield wipers and washer
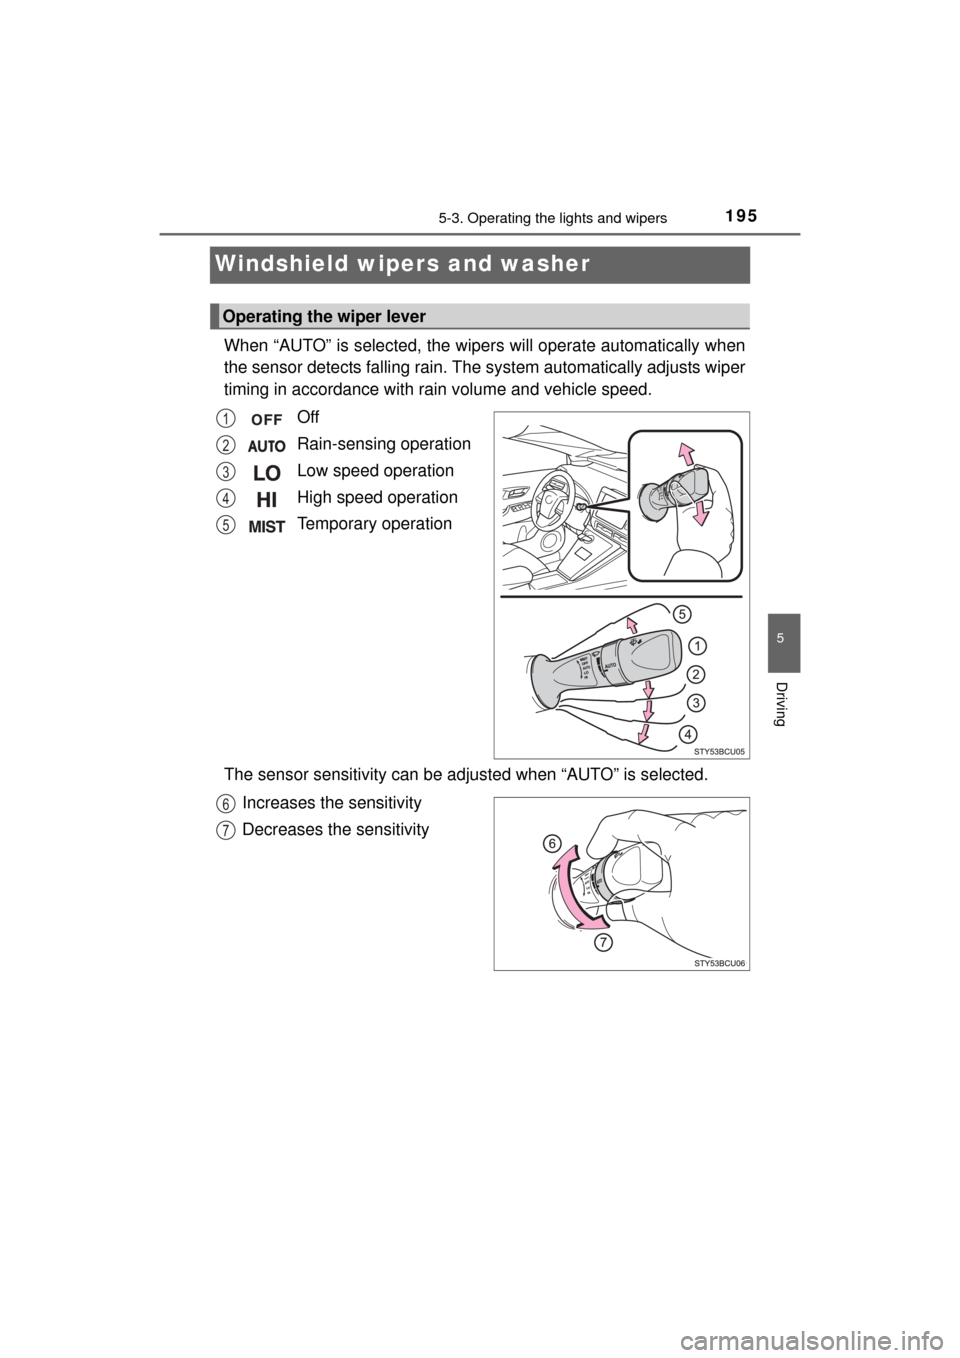
When “AUTO” is selected, the wipers will operate automatically when
the sensor detects falling rain. The system automatically adjusts wiper
timing in accordance with rain volume and vehicle speed.
Off
Rain-sensing operation
Low speed operation
High speed operation
Temporary operation
The sensor sensitivity can be adjusted when “AUTO” is selected. Increases the sensitivity
Decreases the sensitivity
Operating the wiper lever
1
2
3
4
5
6
7
Page 196 of 464
1965-3. Operating the lights and wipers
MIRAI_OM_USA_OM62004U
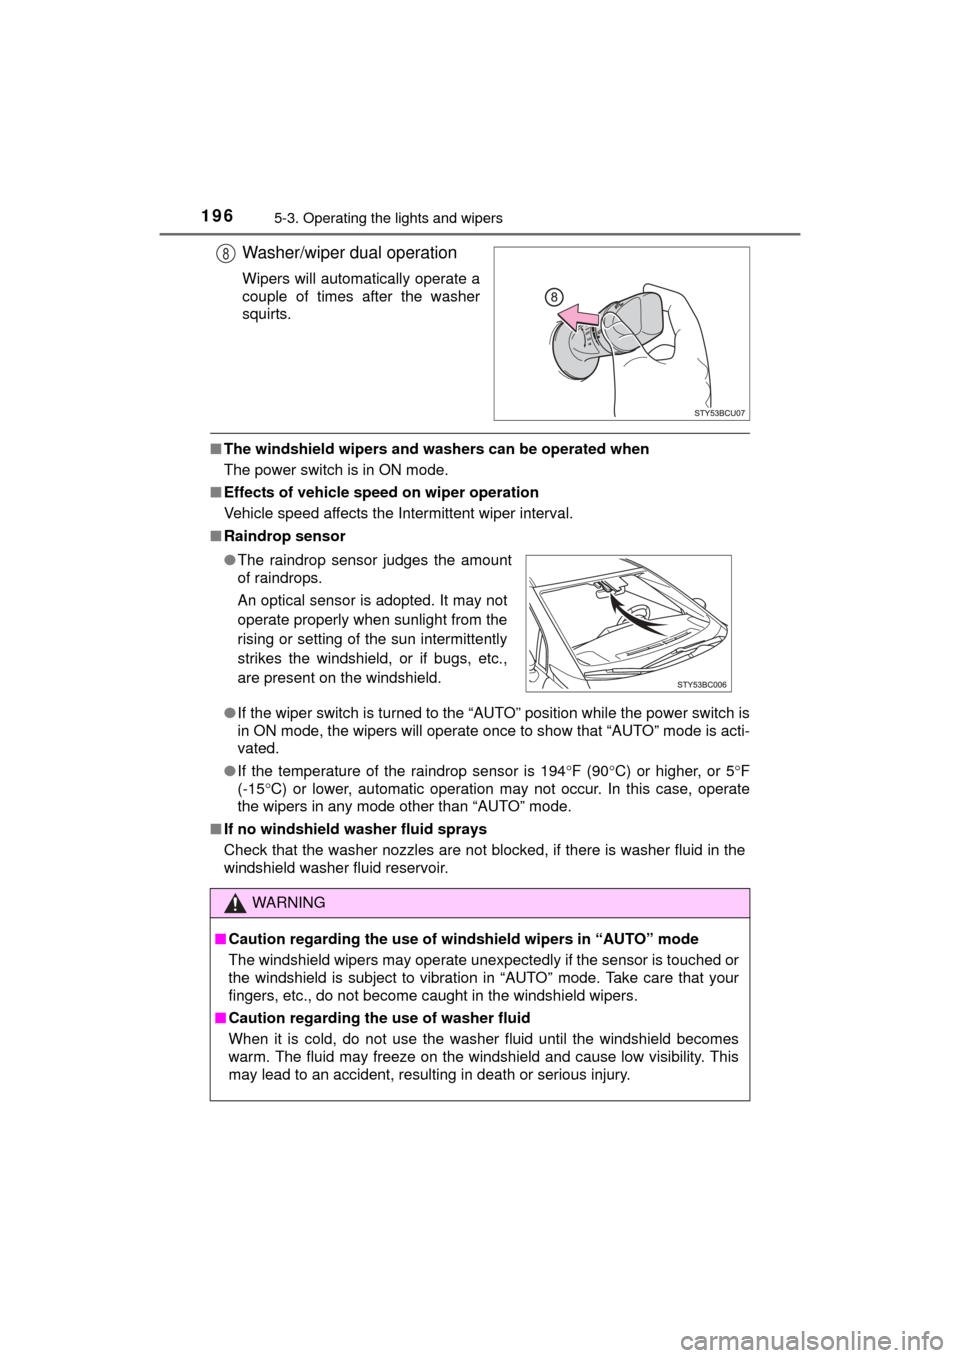
Washer/wiper dual operation
Wipers will automatically operate a
couple of times after the washer
squirts.
■The windshield wipers and washers can be operated when
The power switch is in ON mode.
■ Effects of vehicle speed on wiper operation
Vehicle speed affects the Intermittent wiper interval.
■ Raindrop sensor
●If the wiper switch is turned to the “AUTO” position while the power switch is
in ON mode, the wipers will operate once to show that “AUTO” mode is acti-
vated.
● If the temperature of the raindrop sensor is 194 F (90 C) or higher, or 5 F
(-15 C) or lower, automatic operation may not occur. In this case, operate
the wipers in any mode other than “AUTO” mode.
■ If no windshield washer fluid sprays
Check that the washer nozzles are not blocked, if there is washer fluid in the
windshield washer fluid reservoir.
8
●The raindrop sensor judges the amount
of raindrops.
An optical sensor is adopted. It may not
operate properly when sunlight from the
rising or setting of the sun intermittently
strikes the windshield, or if bugs, etc.,
are present on the windshield.
WARNING
■ Caution regarding the use of windshield wipers in “AUTO” mode
The windshield wipers may operate unexpectedly if the sensor is touched or
the windshield is subject to vibration in “AUTO” mode. Take care that your
fingers, etc., do not become caught in the windshield wipers.
■ Caution regarding the use of washer fluid
When it is cold, do not use the washer fluid until the windshield becomes
warm. The fluid may freeze on the windshield and cause low visibility. This
may lead to an accident, resulting in death or serious injury.
Page 197 of 464
1975-3. Operating the lights and wipers
5
Driving
MIRAI_OM_USA_OM62004U
NOTICE
■When the windshield is dry
Do not use the wipers, as they may damage the windshield.
■ When the washer fluid tank is empty
Do not operate the switch continually as the washer fluid pump may over-
heat.
■ When a nozzle becomes blocked
In this case, contact your Toyota dealer.
Do not try to clear it with a pin or other object. The nozzle will be damaged\
.
■ To prevent 12-volt battery discharge
Do not leave the wipers on longer than necessary when the fuel cell system
is off.
Page 198 of 464
1985-4. Refueling
MIRAI_OM_USA_OM62004U
Opening the fuel door
●Close the all the doors and windows.
● Set the parking brake.
● Shift the shift position to P.
● Turn the power switch off.
● Turn off the headlights.
■Fuel Type
Compressed hydrogen gas
■ Notes on fueling
●Fueling will not be possible if the pressure inside the vehicle’s hydrogen tanks
is higher than the supply pressure of the hydrogen station. If the hydrogen
tanks are more than half full, the vehicle will be unable to fuel at a H35 dis-
penser.
A hydrogen station with a H70 dispenser (supply pressure of 10150 psi
[70 MPa, 714 kgf/cm
2, 700 bar] is necessary to completely fill hydrogen tanks.
● If the fueling cannot be completed due to trouble with the station equipment,
call the number indicated on the equipment.
● Fuel with compressed hydrogen gas only at hydrogen stations.
● Fuel at hydrogen stations conforming with the Society of Automo-
tive Engineers (SAE) J2601 fueling protocol or laws that may
supersede such SAE protocols.
● Refer to the Mirai Station Finder Application in Entune,
www.toyota.com
, or call 800-331-4331.
● Observe any notices or instructio ns shown at hydrogen stations.
● The filling time and amount of fuel may depend on outside tem-
perature and the equipment at that hydrogen station.
●
Vehicles with expired hydrogen tanks must not be used. (P. 8 6 )
Consult your Toyota dealer.
Before filling
Page 199 of 464
1995-4. Refueling
5
Driving
MIRAI_OM_USA_OM62004U
WARNING
■When filling
Observe the following precautions while fueling the vehicle.
Failure to do so may result in death or serious injury.
●Turn the power switch off before fueling.
● Ensure the hydrogen gas nozzle is locked onto the vehicle receptacle
before filling. This can be done by pulling on the hydrogen gas nozzle to
check that it cannot be pulled off.
Failure to do so may result in injury or damage to the hydrogen gas nozzle
or vehicle.
● Do not smoke while fueling.
● Because the fuel is cold, the hydrogen gas nozzle and vehicle receptacle
surface will become cold, and frost may develop. After fueling is com-
pleted, remove the hydrogen gas nozzle by the plastic handle only. Do not
touch any other parts of the hydrogen gas nozzle or vehicle receptacle
with bare hands immediately after f ueling, as frostbite may occur.
NOTICE
■When filling
●Fuel only with compressed hydrogen gas at stations compliant with the
Society of Automotive Engineers (SAE) J2601 fueling protocol or laws that
may supersede such SAE protocols.
If improper fuels are used, the fuel cell stack will be damaged.
● Do not swing or drop the hydrogen gas nozzle, or subject it to a large
amount of force. Doing so may cause damage.
● If the hydrogen gas nozzle cannot be removed after fueling, it may be fro-
zen to the vehicle receptacle. Wait for the hydrogen gas nozzle to thaw
before attempting to remove. Do not pull or rotate the hydrogen gas nozzle
forcibly. Failure to follow these precautions may cause damage.
● Be sure to replace the cap after filling. If foreign material gets in the vehicle
receptacle, it may cause damage.
● Do not put anything sharp, such as a screwdriver, blade, or any foreign
object into the mouth of the vehicle receptacle. If the vehicle receptacle is
damaged, hydrogen gas may leak during fueling.
● If you notice anything unusual about the vehicle receptacle, please notify
your Toyota dealer.
● If you notice anything unusual with the hydrogen dispenser or hydrogen
gas nozzle, please notify the hydrogen station operator. Contact informa-
tion is usually displayed on the dispenser.
Page 200 of 464
2005-4. Refueling
MIRAI_OM_USA_OM62004U
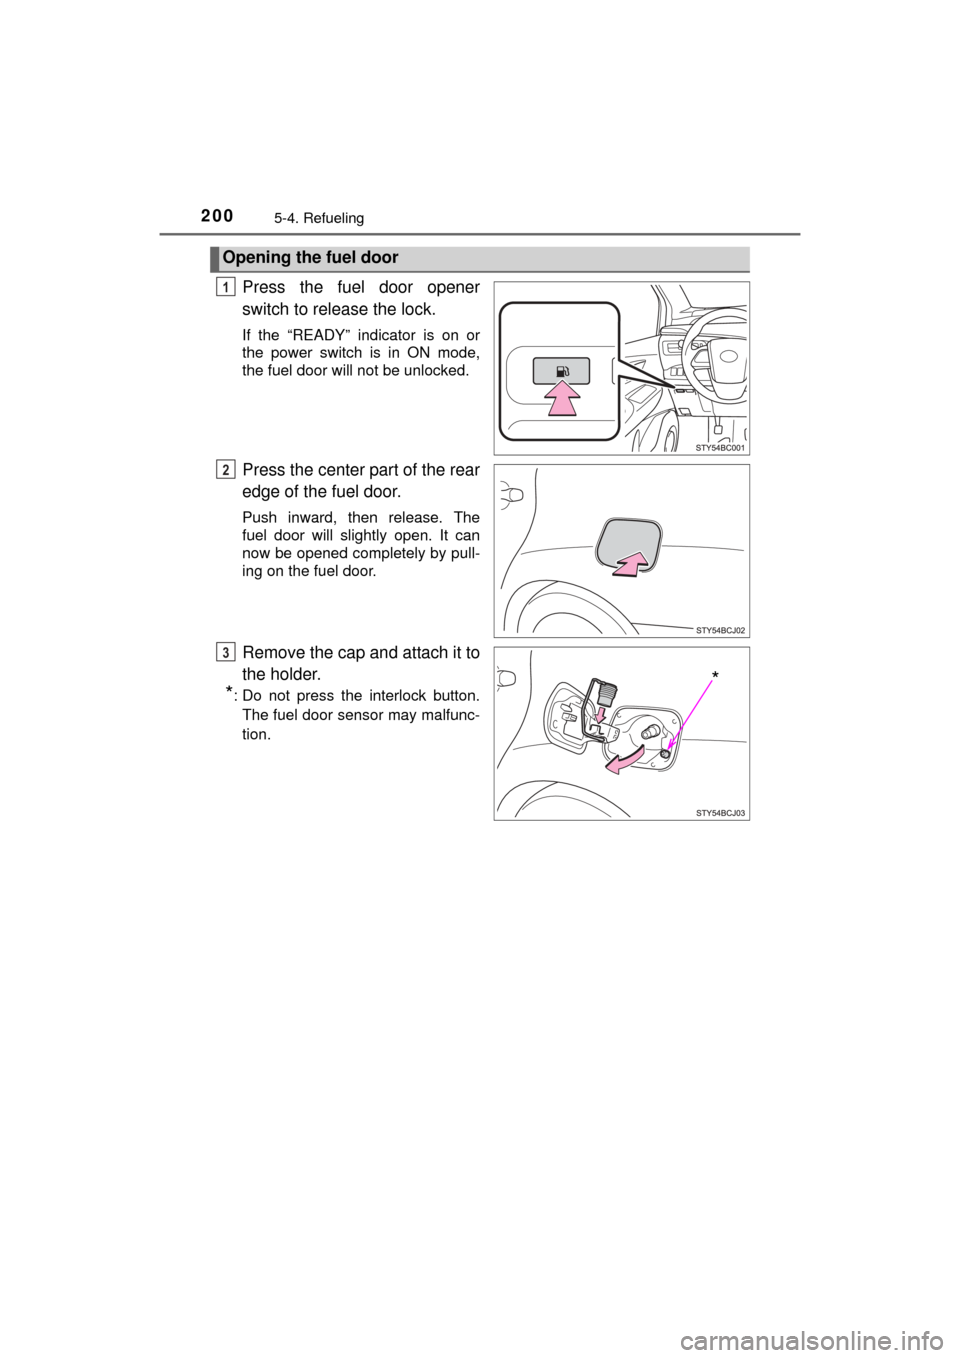
Press the fuel door opener
switch to release the lock.
If the “READY” indicator is on or
the power switch is in ON mode,
the fuel door will not be unlocked.
Press the center part of the rear
edge of the fuel door.
Push inward, then release. The
fuel door will slightly open. It can
now be opened completely by pull-
ing on the fuel door.
Remove the cap and attach it to
the holder.
*: Do not press the interlock button.The fuel door sensor may malfunc-
tion.
Opening the fuel door
1
2
*
3