audio TOYOTA MIRAI 2020 Accessories, Audio & Navigation (in English)
[x] Cancel search | Manufacturer: TOYOTA, Model Year: 2020, Model line: MIRAI, Model: TOYOTA MIRAI 2020Pages: 288, PDF Size: 7.9 MB
Page 59 of 288
59
2. CONNECTIVITY SETTINGS
BASIC FUNCTION
2
MIRAI_Navi_USA_OM62074U_20MY
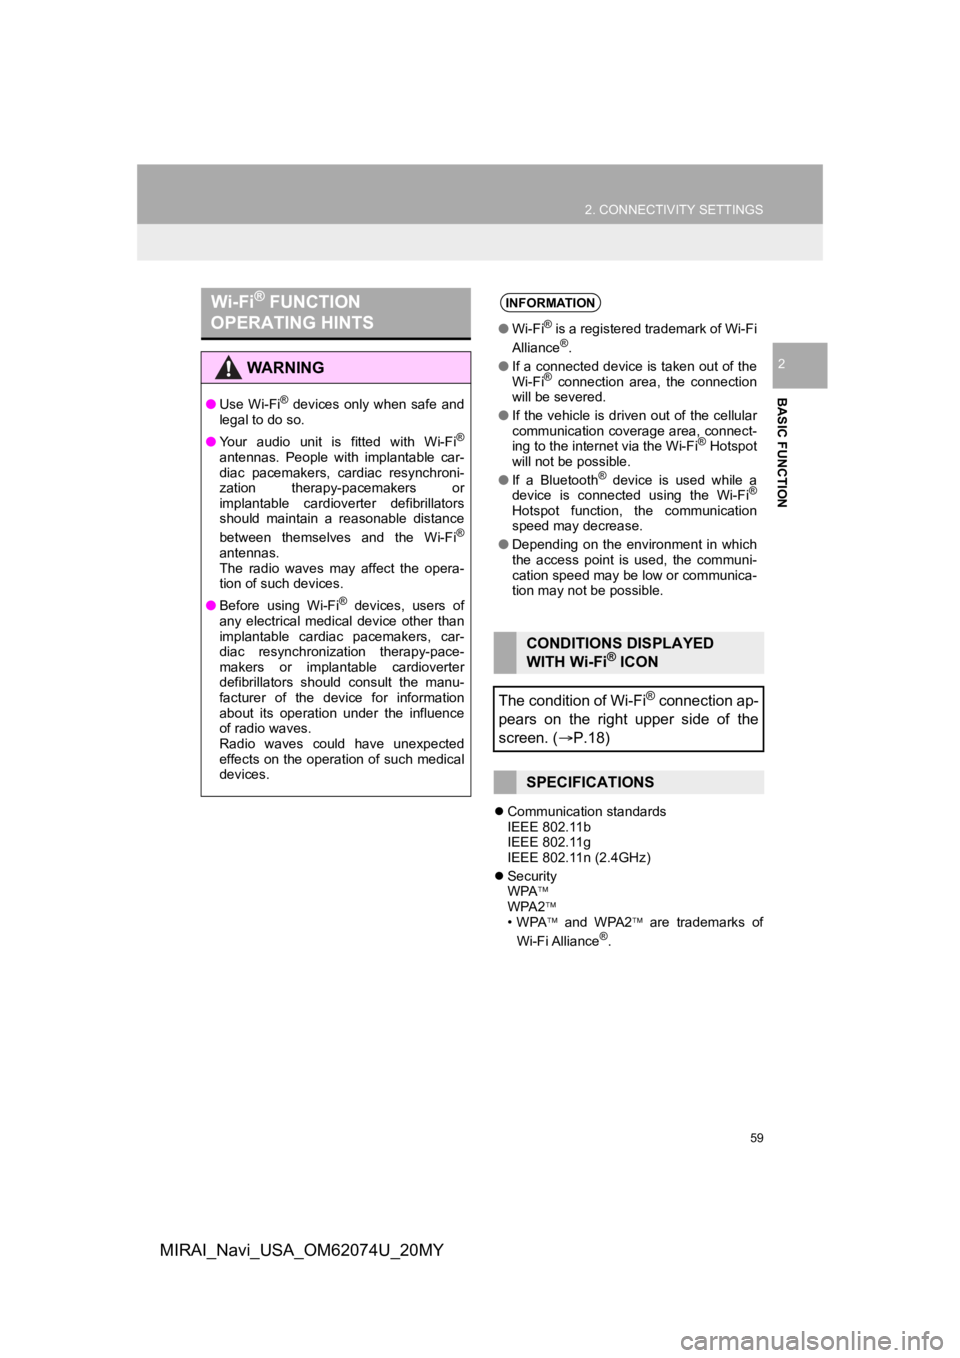
Communication standards
IEEE 802.11b
IEEE 802.11g
IEEE 802.11n (2.4GHz)
Security
WPA
WPA2
•WPA and WPA2 are trademarks of
Wi-Fi Alliance
®.
Wi-Fi® FUNCTION
OPERATING HINTS
WA R N I N G
● Use Wi-Fi® devices only when safe and
legal to do so.
● Your audio unit is fitted with Wi-Fi
®
antennas. People with implantable car-
diac pacemakers, cardiac resynchroni-
zation therapy-pacemakers or
implantable cardioverter defibrillators
should maintain a reasonable distance
between themselves and the Wi-Fi
®
antennas.
The radio waves may affect the opera-
tion of such devices.
● Before using Wi-Fi
® devices, users of
any electrical medical device other than
implantable cardiac pacemakers, car-
diac resynchronization therapy-pace-
makers or implantable cardioverter
defibrillators should consult the manu-
facturer of the device for information
about its operation under the influence
of radio waves.
Radio waves could have unexpected
effects on the operation of such medical
devices.
INFORMATION
● Wi-Fi® is a registered trademark of Wi-Fi
Alliance®.
● If a connected device is taken out of the
Wi-Fi
® connection area, the connection
will be severed.
● If the vehicle is driven out of the cellular
communication coverage area, connect-
ing to the internet via the Wi-Fi
® Hotspot
will not be possible.
● If a Bluetooth
® device is used while a
device is connected using the Wi-Fi®
Hotspot function, the communication
speed may decrease.
● Depending on the environment in which
the access point is used, the communi-
cation speed may be low or communica-
tion may not be possible.
CONDITIONS DISPLAYED
WITH Wi-Fi® ICON
The condition of Wi-Fi
® connection ap-
pears on the right upper side of the
screen. ( P.18)
SPECIFICATIONS
Page 61 of 288
61
3. OTHER SETTINGS
BASIC FUNCTION
2
MIRAI_Navi_USA_OM62074U_20MY
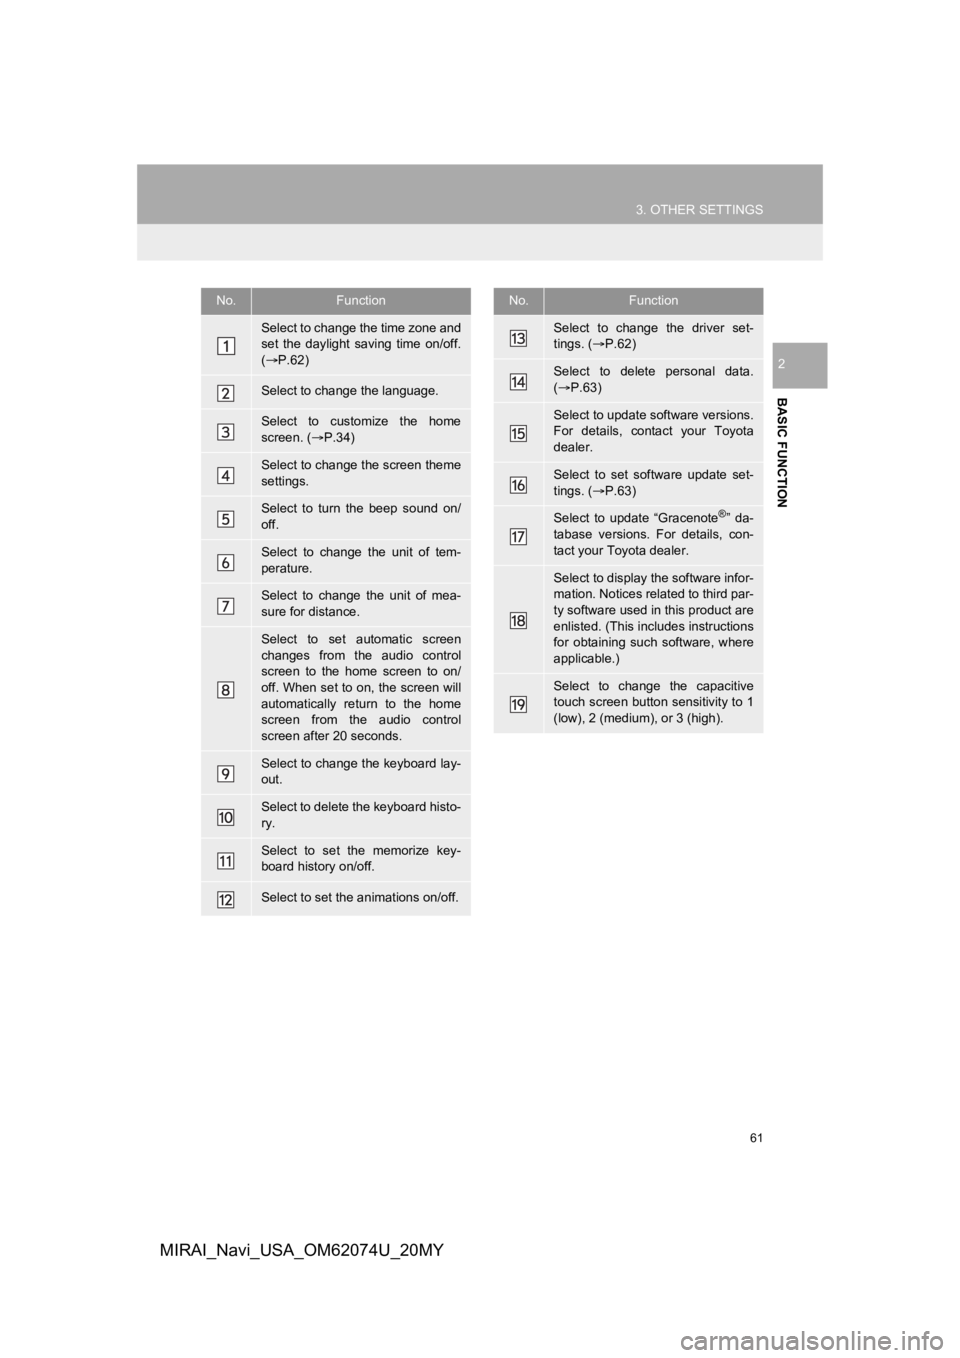
No.Function
Select to change the time zone and
set the daylight saving time on/off.
( P.62)
Select to change the language.
Select to customize the home
screen. ( P.34)
Select to change the screen theme
settings.
Select to turn the beep sound on/
off.
Select to change the unit of tem-
perature.
Select to change the unit of mea-
sure for distance.
Select to set automatic screen
changes from the audio control
screen to the home screen to on/
off. When set to on, the screen will
automatically return to the home
screen from the audio control
screen after 20 seconds.
Select to change the keyboard lay-
out.
Select to delete the keyboard histo-
ry.
Select to set the memorize key-
board history on/off.
Select to set the animations on/off.
Select to change the driver set-
tings. ( P.62)
Select to delete personal data.
( P.63)
Select to update software versions.
For details, contact your Toyota
dealer.
Select to set software update set-
tings. ( P.63)
Select to update “Gracenote®” da-
tabase versions. For details, con-
tact your Toyota dealer.
Select to display the software infor-
mation. Notices related to third par-
ty software used in this product are
enlisted. (This includes instructions
for obtaining such software, where
applicable.)
Select to change the capacitive
touch screen button sensitivity to 1
(low), 2 (medium), or 3 (high).
No.Function
Page 62 of 288
62
3. OTHER SETTINGS
MIRAI_Navi_USA_OM62074U_20MY
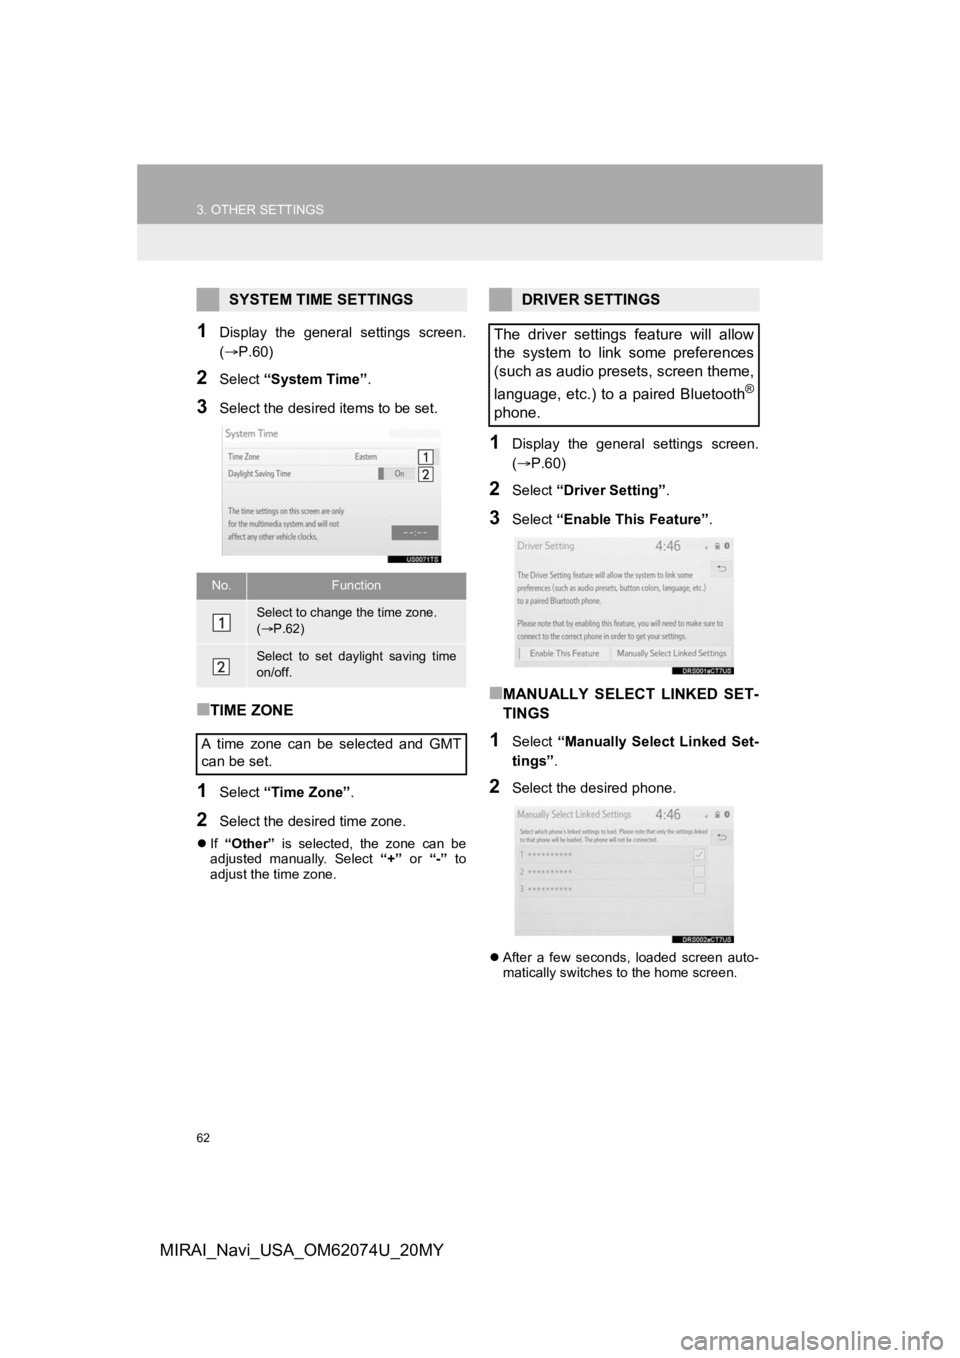
1Display the general settings screen.
(P.60)
2Select “System Time” .
3Select the desired items to be set.
■TIME ZONE
1Select “Time Zone” .
2Select the desired time zone.
If “Other” is selected, the zone can be
adjusted manually. Select “+” or “-” to
adjust the time zone.
1Display the general settings screen.
( P.60)
2Select “Driver Setting” .
3Select “Enable This Feature” .
■MANUALLY SELECT LINKED SET-
TINGS
1Select “Manually Select Linked Set-
tings” .
2Select the desired phone.
After a few seconds, loaded screen auto-
matically switches to the home screen.
SYSTEM TIME SETTINGS
No.Function
Select to change the time zone.
( P.62)
Select to set daylight saving time
on/off.
A time zone can be selected and GMT
can be set.
DRIVER SETTINGS
The driver settings feature will allow
the system to link some preferences
(such as audio presets, screen theme,
language, etc.) to a paired Bluetooth
®
phone.
Page 63 of 288
63
3. OTHER SETTINGS
BASIC FUNCTION
2
MIRAI_Navi_USA_OM62074U_20MY
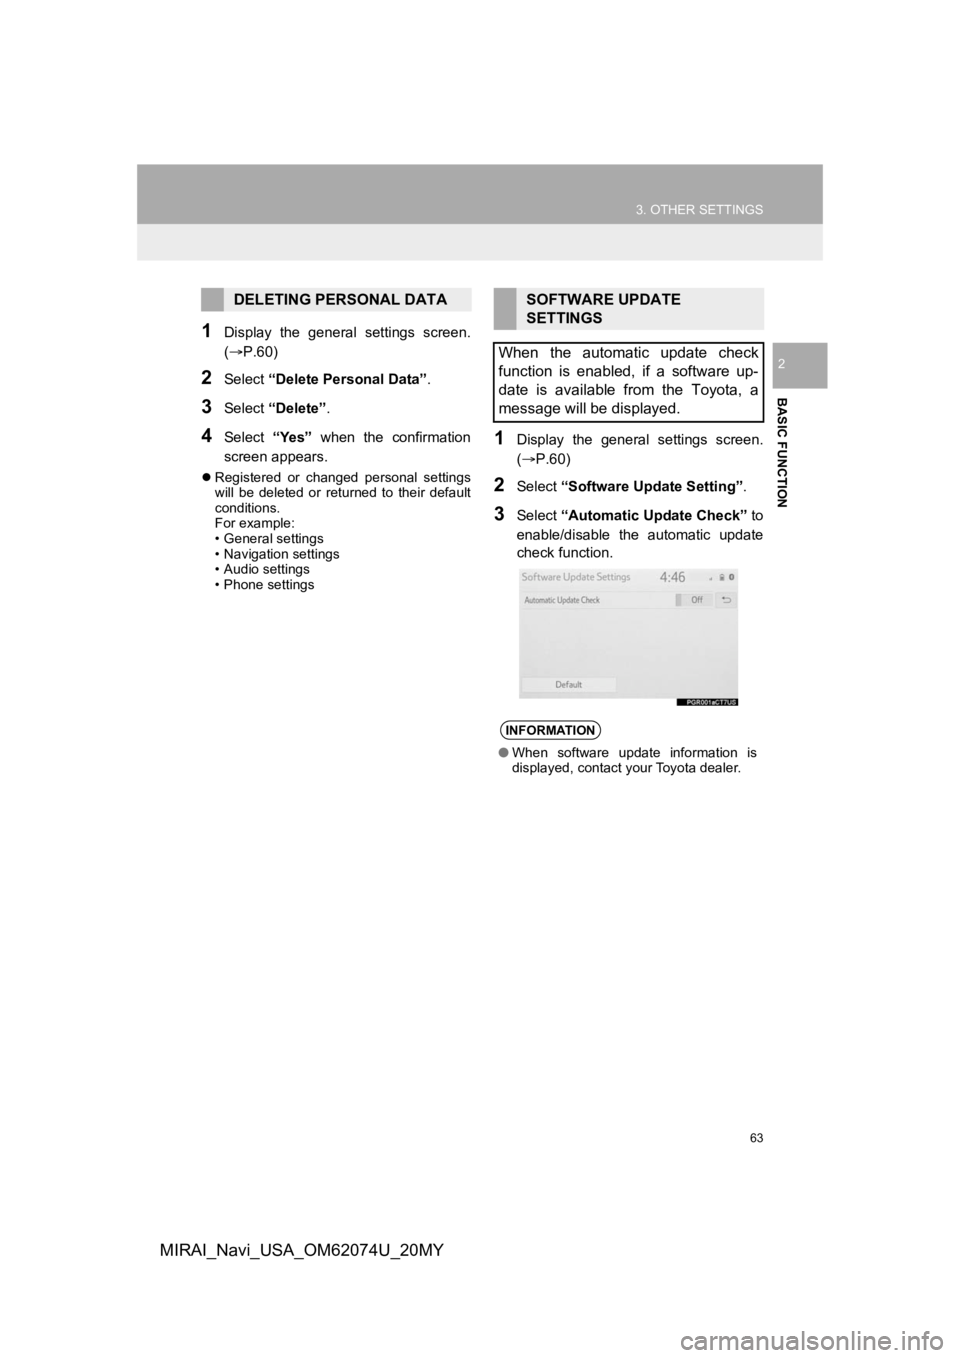
1Display the general settings screen.
(P.60)
2Select “Delete Personal Data” .
3Select “Delete” .
4Select “Yes” when the confirmation
screen appears.
Registered or changed personal settings
will be deleted or returned to their default
conditions.
For example:
• General settings
• Navigation settings
• Audio settings
• Phone settings
1Display the general settings screen.
(P.60)
2Select “Software Upda te Setting”.
3Select “Automatic Update Check” to
enable/disable the automatic update
check function.
DELETING PERSONAL DATASOFTWARE UPDATE
SETTINGS
When the automatic update check
function is enabled, if a software up-
date is available from the Toyota, a
message will be displayed.
INFORMATION
● When software update information is
displayed, contact your Toyota dealer.
Page 64 of 288
64
3. OTHER SETTINGS
MIRAI_Navi_USA_OM62074U_20MY
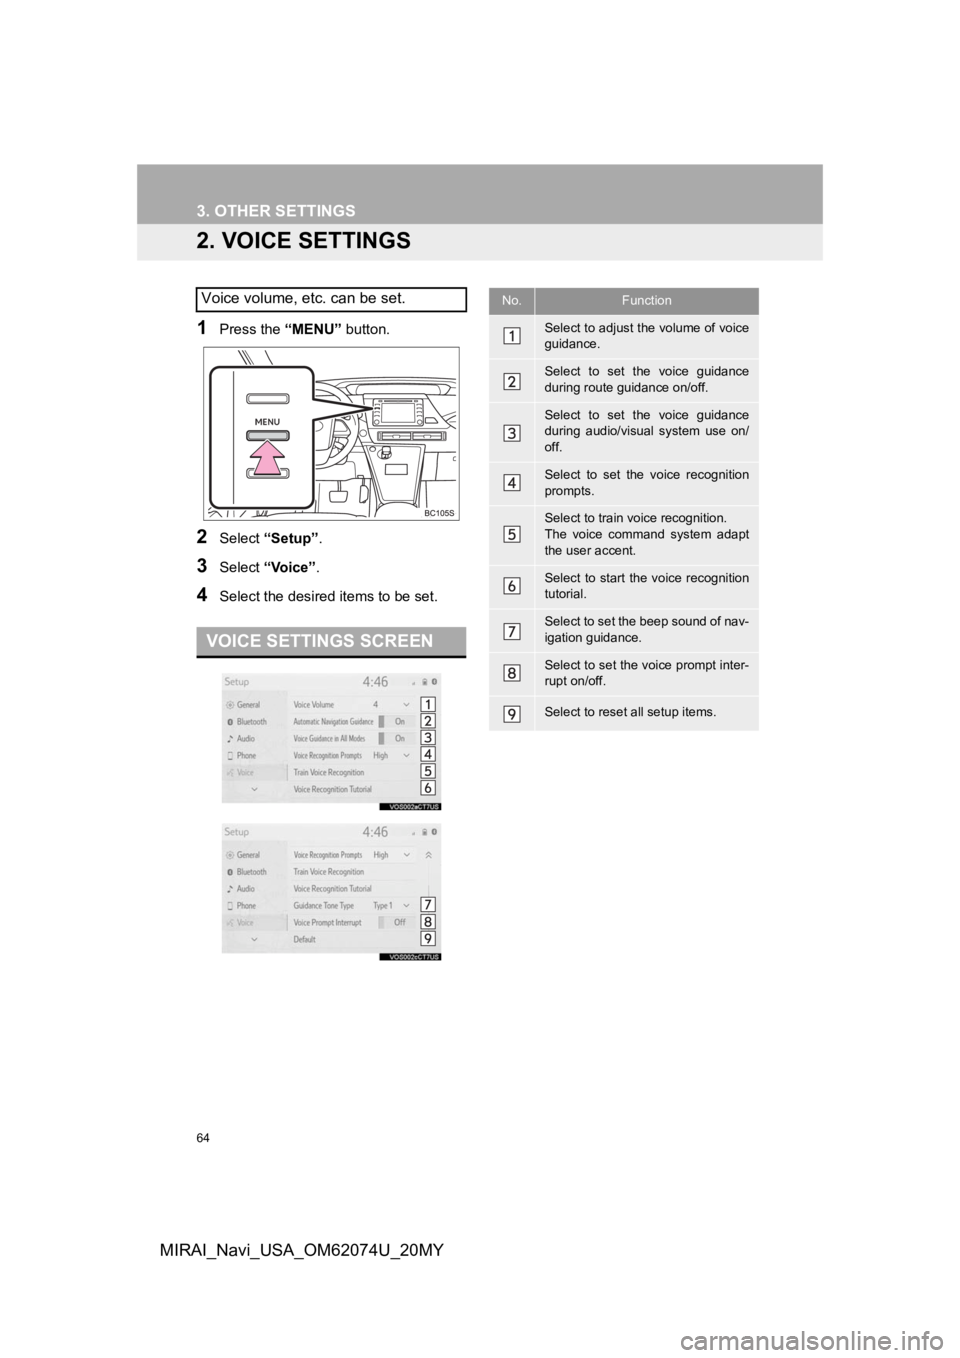
2. VOICE SETTINGS
1Press the “MENU” button.
2Select “Setup” .
3Select “Voice” .
4Select the desired items to be set.
Voice volume, etc. can be set.
VOICE SETTINGS SCREEN
No.Function
Select to adjust the volume of voice
guidance.
Select to set the voice guidance
during route guidance on/off.
Select to set the voice guidance
during audio/visual system use on/
off.
Select to set the voice recognition
prompts.
Select to train voice recognition.
The voice command system adapt
the user accent.
Select to start the voice recognition
tutorial.
Select to set the beep sound of nav-
igation guidance.
Select to set the voice prompt inter-
rupt on/off.
Select to reset all setup items.
Page 70 of 288
70
MIRAI_Navi_USA_OM62074U_20MY
1. QUICK REFERENCE .................... 72
2. SOME BASICS .............................. 74
TURNING THE SYSTEM ON AND OFF...................................................... 74
SELECTING AN AUDIO SOURCE ........ 74
DISC SLOT ............................................ 75
USB/AUX PORT..................................... 76
SOUND SETTINGS ............................... 76
AUDIO SCREEN ADJUSTMENT ........... 78
VOICE COMMAND SYSTEM ................ 79
1BASIC OPERATION
3
AUDIO/VISUAL SYSTEM
Page 71 of 288
3
71
1
2
3
4
5
6
7
8
9
MIRAI_Navi_USA_OM62074U_20MY
1. AM/FM/SiriusXM (SXM) RADIO .... 80
OVERVIEW ........................................... 80
PRESETTING A STATION .................... 82
CACHING A RADIO PROGRAM ........... 82
SELECTING A STATION FROM THE LIST ............................................ 84
RADIO OPTIONS .................................. 85
RADIO BROADCAST DATA SYSTEM ............................................. 85
USING HD Radio™ TECHNOLOGY ..... 86
AVAILABLE HD Radio™ TECHNOLOGY ................................... 86
HD Radio™ TROUBLESHOOTING GUIDE ................................................. 87
HOW TO SUBSCRIBE TO SiriusXM Radio Services .................................... 88
DISPLAYING THE RADIO ID ................ 89
IF THE SATELLITE RADIO TUNER MALFUNCTIONS ................................ 90
1. CD .................................................. 91
OVERVIEW ........................................... 91
2. USB MEMORY ............................... 94
OVERVIEW ........................................... 94
3. iPod/iPhone ................................... 97
OVERVIEW ........................................... 97
4. Bluetooth® AUDIO...................... 100
OVERVIEW.......................................... 100
REGISTERING/CONNECTING A Bluetooth
® DEVICE ........................... 104
5. AUX ............................................. 105
OVERVIEW.......................................... 105
1. STEERING SWITCHES............... 107
1. AUDIO SETTINGS ...................... 109
AUDIO SETTINGS SCREEN............... 109
1. OPERATING INFORMATION ..... 111
RADIO.................................................. 111
CD PLAYER AND DISC ...................... 112
iPod/iPhone.......................................... 114
HIGH-RESOLUTION SOUND SOURCE ........................................... 115
FILE INFORMATION ........................... 116
TERMS ................................................ 119
ERROR MESSAGES ........................... 121
2RADIO OPERATION
3MEDIA OPERATION
4AUDIO/VISUAL REMOTE
CONTROLS
5SETUP
6TIPS FOR OPERATING
THE AUDIO/VISUAL SYSTEM
AUDIO/VISUAL SYSTEM
Page 72 of 288
72
MIRAI_Navi_USA_OM62074U_20MY
1. BASIC OPERATION
1. QUICK REFERENCE
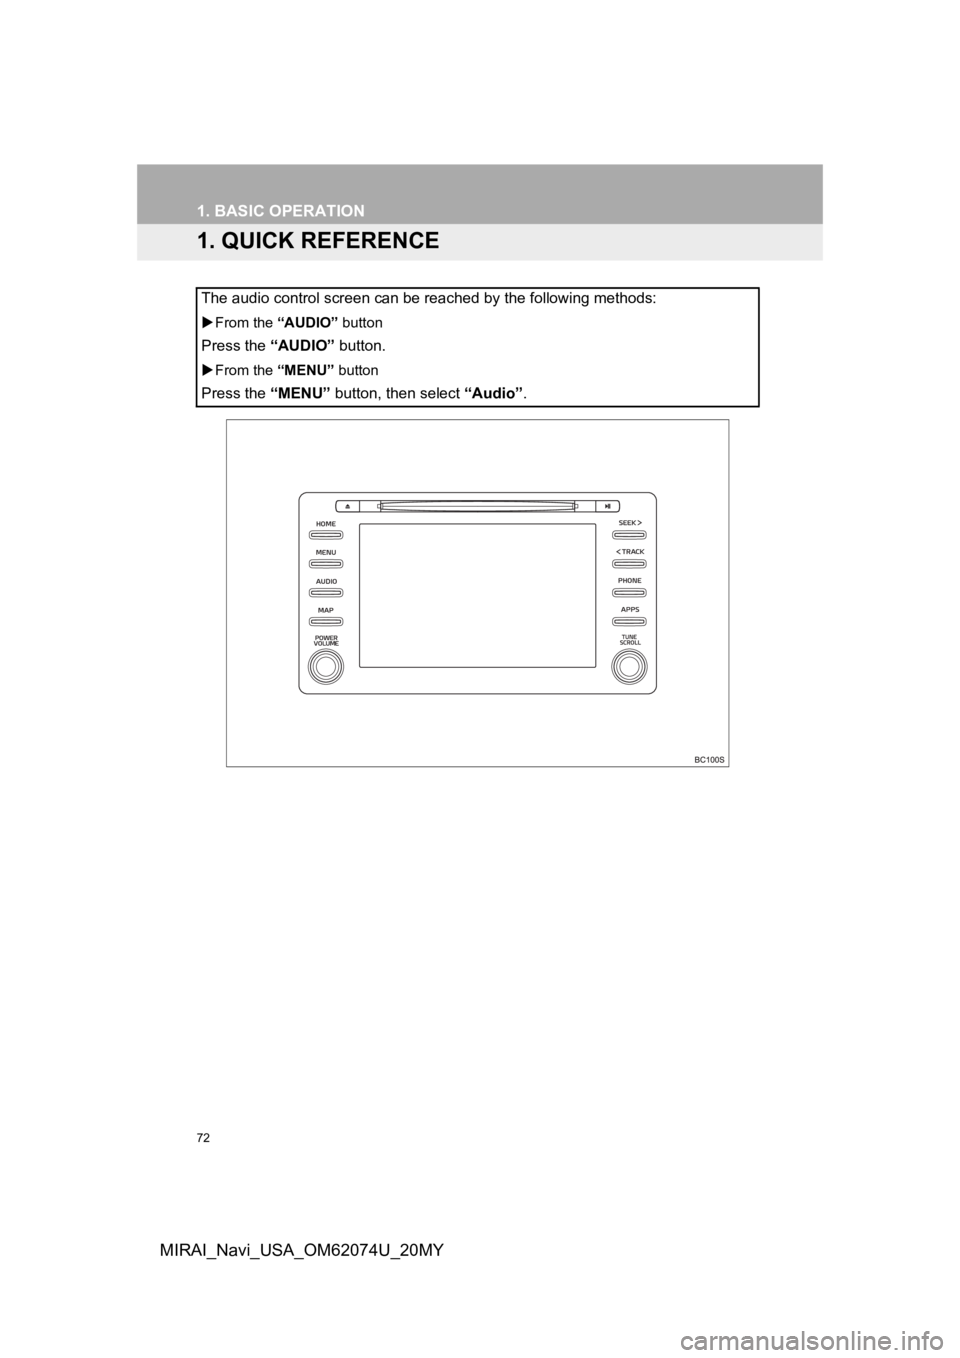
The audio control screen can be reached by the following methods:
From the “AUDIO” button
Press the “AUDIO” button.
From the “MENU” button
Press the “MENU” button, then select “Audio” .
Page 73 of 288
73
1. BASIC OPERATION
AUDIO/VISUAL SYSTEM
3
MIRAI_Navi_USA_OM62074U_20MY
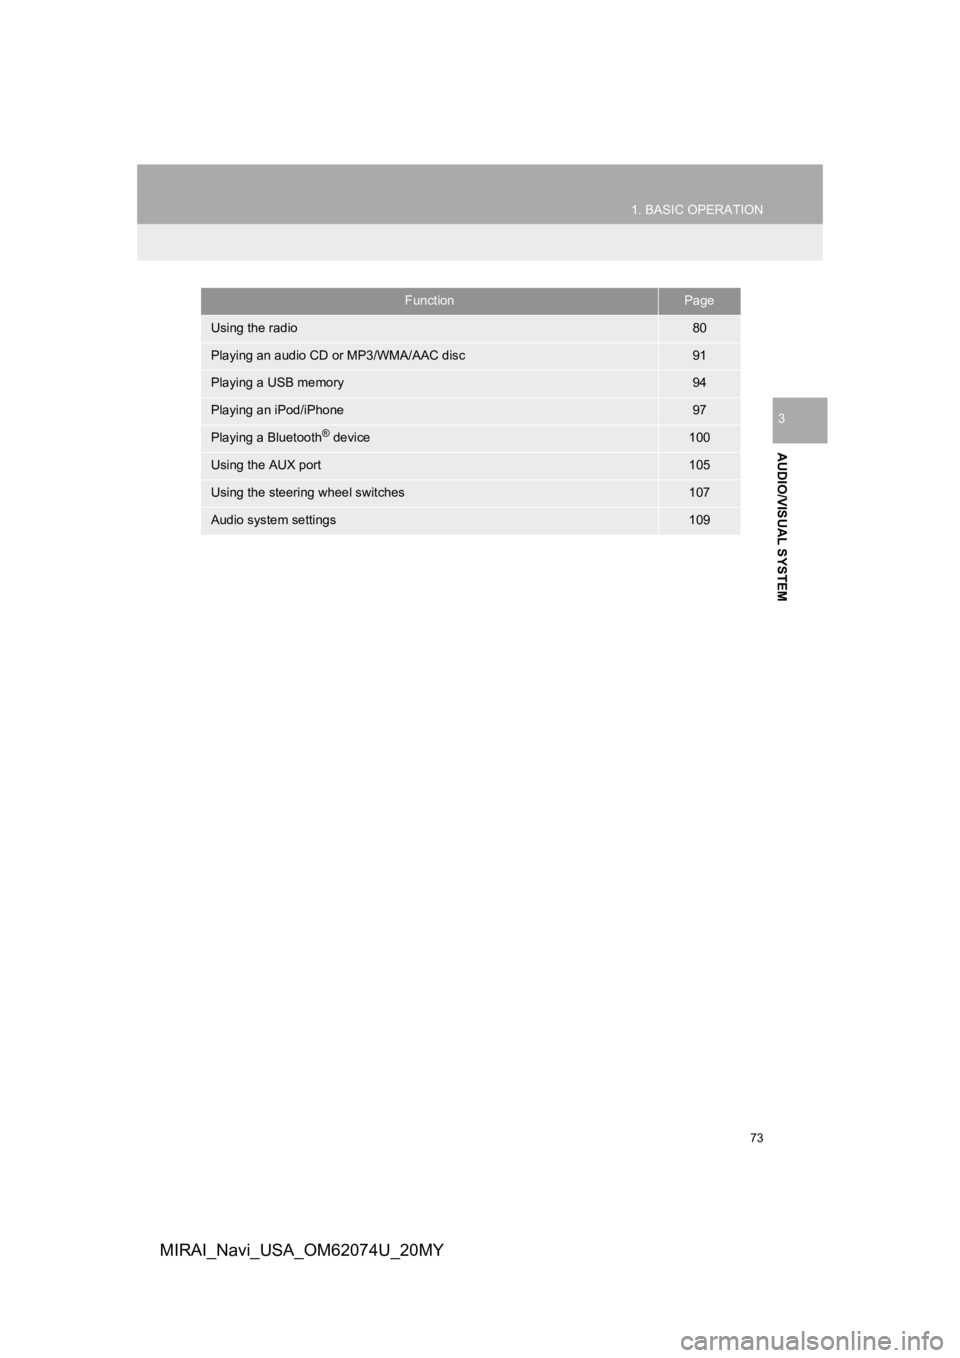
FunctionPage
Using the radio80
Playing an audio CD or MP3/WMA/AAC disc91
Playing a USB memory94
Playing an iPod/iPhone97
Playing a Bluetooth® device100
Using the AUX port105
Using the steering wheel switches107
Audio system settings109
Page 74 of 288
74
1. BASIC OPERATION
MIRAI_Navi_USA_OM62074U_20MY
2. SOME BASICS
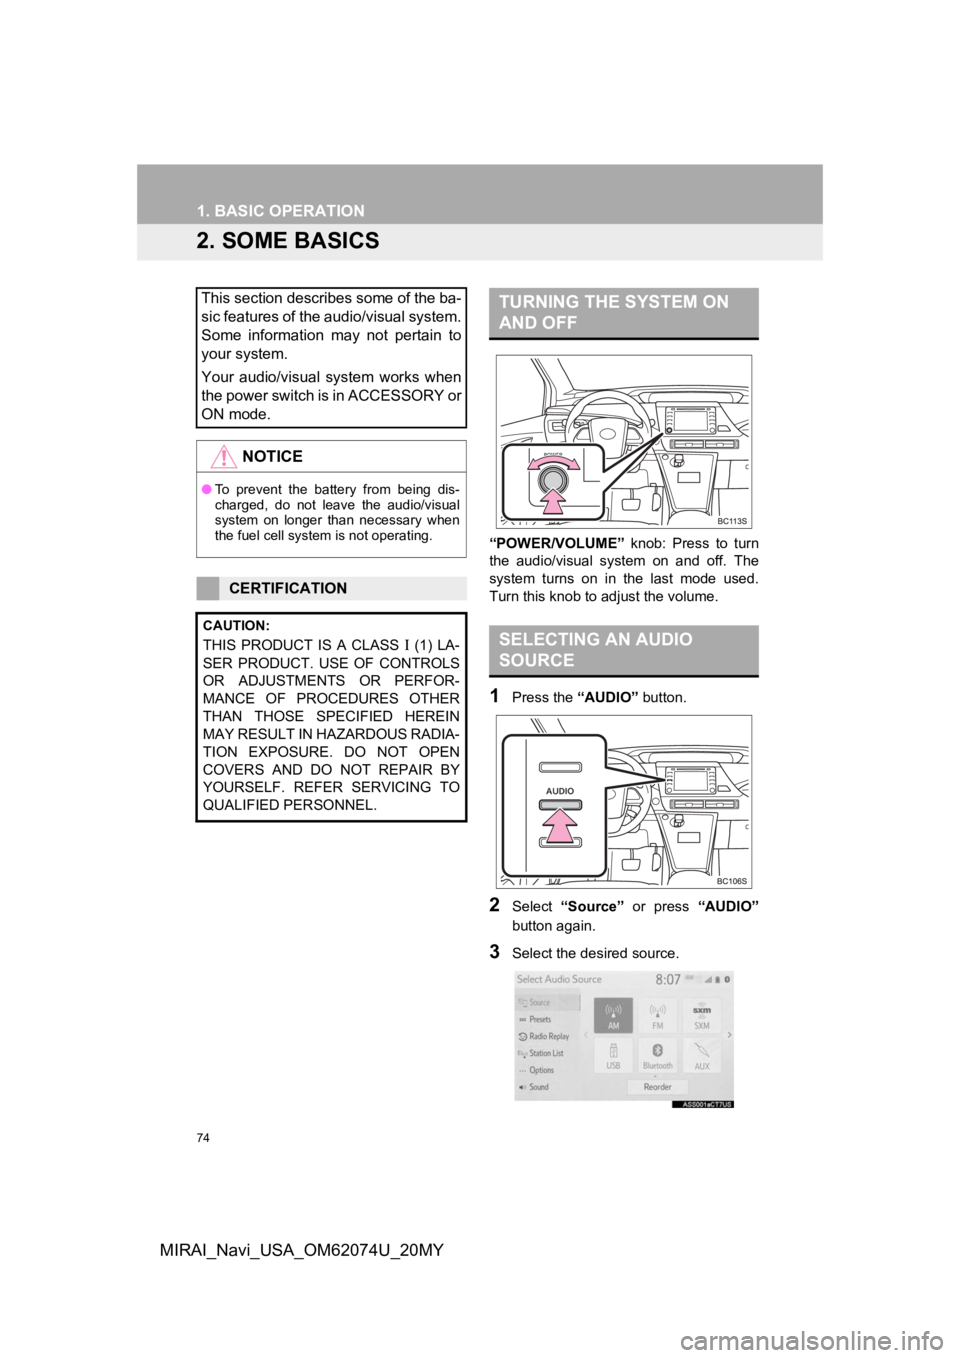
“POWER/VOLUME” knob: Press to turn
the audio/visual system on and off. The
system turns on in t he last mode used.
Turn this knob to adjust the volume.
1Press the “AUDIO” button.
2Select “Source” or press “AUDIO”
button again.
3Select the desired source.
This section describes some of the ba-
sic features of the audio/visual system.
Some information may not pertain to
your system.
Your audio/visual system works when
the power switch is in ACCESSORY or
ON mode.
NOTICE
● To prevent the battery from being dis-
charged, do not leave the audio/visual
system on longer than necessary when
the fuel cell system is not operating.
CERTIFICATION
CAUTION:
THIS PRODUCT IS A CLASS (1) LA-
SER PRODUCT. USE OF CONTROLS
OR ADJUSTMENTS OR PERFOR-
MANCE OF PROCEDURES OTHER
THAN THOSE SPECIFIED HEREIN
MAY RESULT IN HAZARDOUS RADIA-
TION EXPOSURE. DO NOT OPEN
COVERS AND DO NOT REPAIR BY
YOURSELF. REFER SERVICING TO
QUALIFIED PERSONNEL.
TURNING THE SYSTEM ON
AND OFF
SELECTING AN AUDIO
SOURCE