low beam TOYOTA MIRAI 2020 Owners Manual (in English)
[x] Cancel search | Manufacturer: TOYOTA, Model Year: 2020, Model line: MIRAI, Model: TOYOTA MIRAI 2020Pages: 528, PDF Size: 11.98 MB
Page 203 of 528
2035-3. Operating the lights and wipers
5
Driving
MIRAI_OM_USA_OM62073U
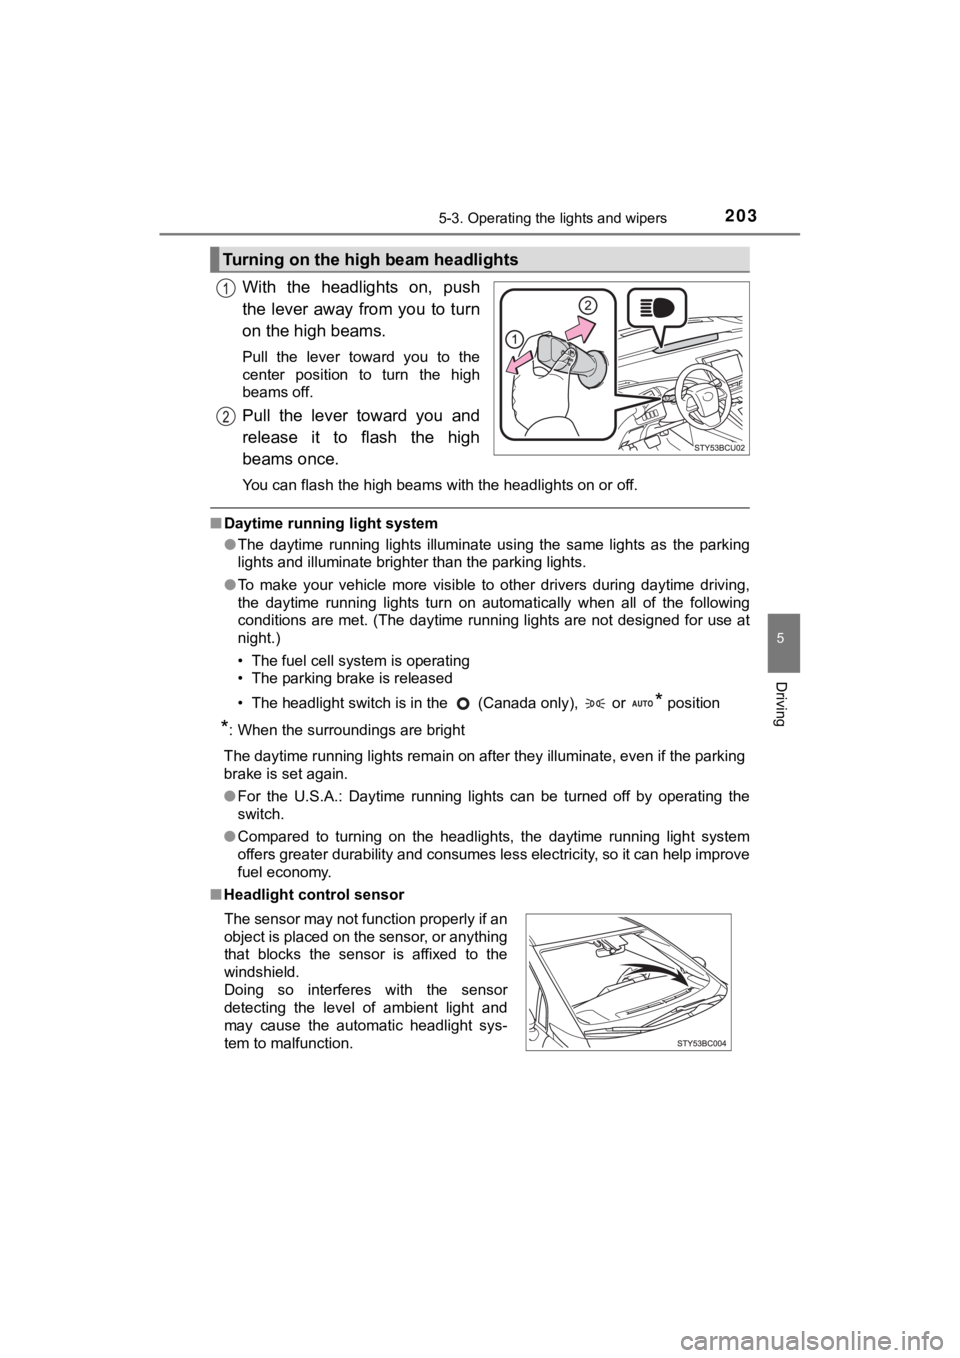
With the headlights on, push
the lever away from you to turn
on the high beams.
Pull the lever toward you to the
center position to turn the high
beams off.
Pull the lever toward you and
release it to flash the high
beams once.
You can flash the high beams with the headlights on or off.
■Daytime running light system
●The daytime running lights illuminate using the same lights as the parking
lights and illuminate brighter than the parking lights.
● To make your vehicle more visible to other drivers during dayti me driving,
the daytime running lights turn on automatically when all of the following
conditions are met. (The daytime running lights are not designe d for use at
night.)
• The fuel cell system is operating
• The parking brake is released
• The headlight switch is in the (Canada only), or
* position
*: When the surroundings are bright
The daytime running lights remain on after they illuminate, even if the parking
brake is set again.
● For the U.S.A.: Daytime running lights can be turned off by ope rating the
switch.
● Compared to turning on the headlights, the daytime running ligh t system
offers greater durability and consumes less electricity, so it can help improve
fuel economy.
■ Headlight control sensor
Turning on the high beam headlights
The sensor may not function properly if an
object is placed on the sensor, or anything
that blocks the sensor is affixed to the
windshield.
Doing so interferes with the sensor
detecting the level of ambient light and
may cause the automatic headlight sys-
tem to malfunction.
Page 206 of 528
2065-3. Operating the lights and wipers
MIRAI_OM_USA_OM62073U
When all of the following conditions are fulfilled, high beam will be
automatically turned on:
● Vehicle speed is above appr oximately 21 mph (34 km/h).
● The area ahead of the vehicle is dark.
● There are no oncoming or precedi ng vehicles with headlights or tail
lights turned on.
● There are few street lights on the road ahead.
If any of the following conditions are fulfilled, high beam wil l be auto-
matically turned off:
● Vehicle speed drops below app roximately 17 mph (27 km/h).
● The area ahead of the vehicle is not dark.
● Oncoming or preceding vehicles have headlights or tail lights
turned on.
● There are many streetlights on the road ahead.
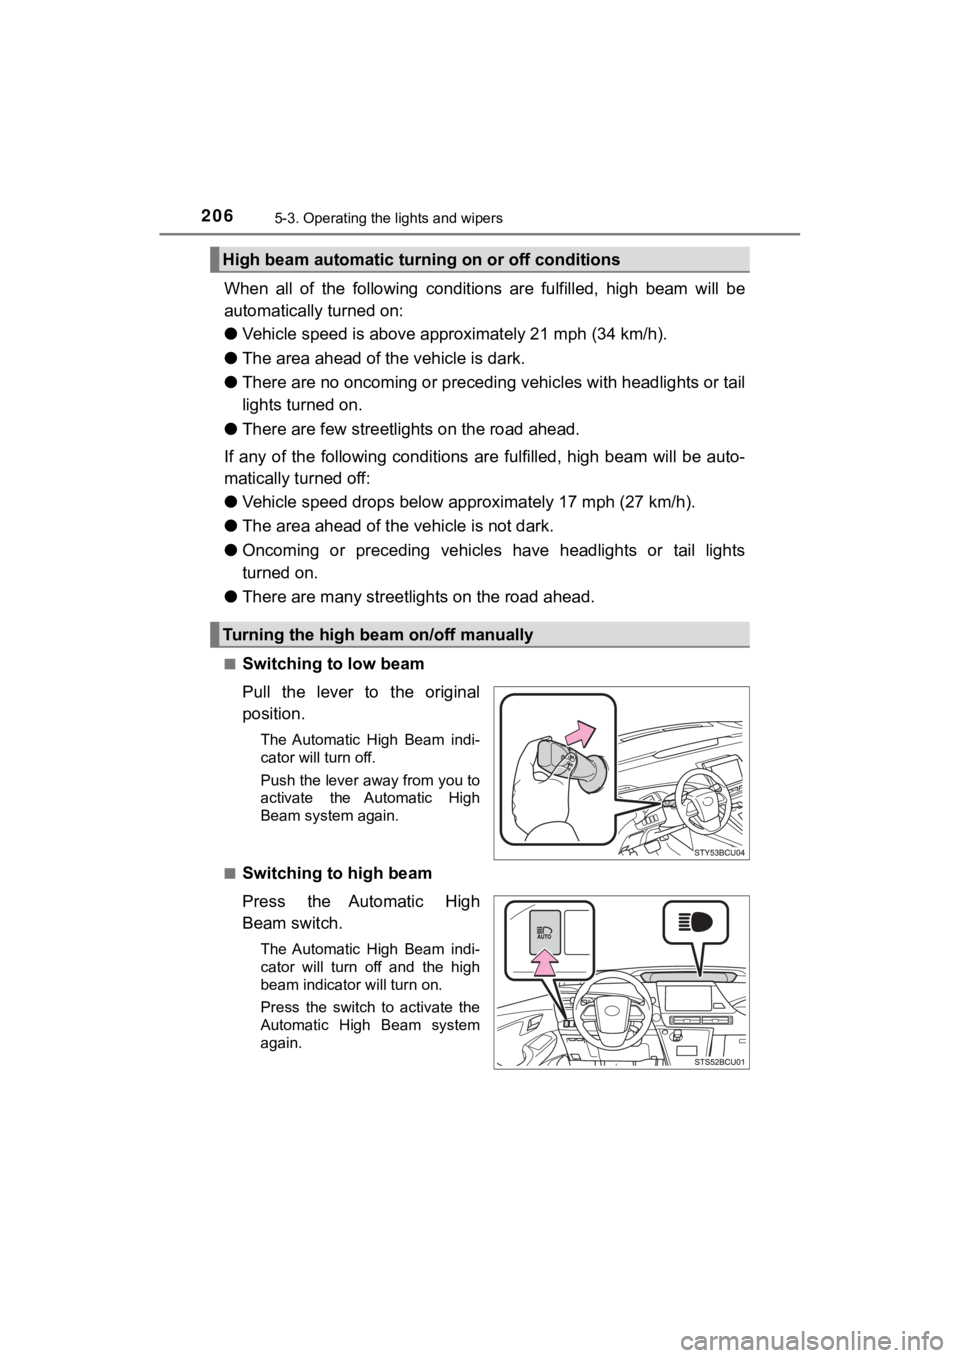
■Switching to low beam
Pull the lever to the original
position.
The Automatic High Beam indi-
cator will turn off.
Push the lever away from you to
activate the Automatic High
Beam system again.
■
Switching to high beam
Press the Automatic High
Beam switch.
The Automatic High Beam indi-
cator will turn off and the high
beam indicator will turn on.
Press the switch to activate the
Automatic High Beam system
again.
High beam automatic tur ning on or off conditions
Turning the high beam on/off manually
Page 207 of 528
2075-3. Operating the lights and wipers
5
Driving
MIRAI_OM_USA_OM62073U
■The Automatic High Beam can be operated when
The power switch is in ON mode.
■ Camera sensor detection information
●High beam may not be automatically turned off in the following situations:
• When oncoming vehicles suddenly appear from a curve
• When the vehicle is cut in front of by another
• When oncoming or preceding vehicles are hidden from sight due to
repeated curves, road dividers or roadside trees
● High beam may be turned off if an oncoming vehicle that is usin g fog lights
without using the headlights is detected.
● House lights, street lights, red traffic signals, and illuminated billboards or
signs may cause the high beam to turn off.
● The following factors may affect the amount of time taken to tu rn high beam
on or off:
• The brightness of headlights, fog lights, and tail lights of o ncoming and
preceding vehicles
• The movement and direction of oncoming and preceding vehicles
• When an oncoming or preceding vehicle only has operational lig hts on
one side
• When an oncoming or preceding vehicle is a two-wheeled vehicle
• The condition of the road (gradient, curve, condition of the r oad surface,
etc.)
• The number of passengers and amount of luggage
● High beam may be turned on or off when unexpected by the driver .
Page 208 of 528

2085-3. Operating the lights and wipers
MIRAI_OM_USA_OM62073U●
In the situations below, the system may not be able to correctl y detect the
surrounding brightness levels, and may flash or expose nearby p edestrians
to the high beam. Therefore, you should consider turning the hi gh beams on
or off manually rather than relying on the Automatic High Beam system.
• In bad weather (rain, snow, fog, sandstorms, etc.).
• The windshield is obscured by fog, mist, ice, dirt, etc.
• The windshield is cracked or damaged.
• The camera sensor is deformed or dirty.
• The camera sensor temperature is extremely high.
• Surrounding brightness levels are equal to those of headlights , tail lights
or fog lights.
• Vehicles ahead have headlights that are either switched off, d irty, are
changing color, or are not aimed properly.
• When driving through an area of intermittently changing brightness and darkness.
• When frequently and repeatedly driving ascending/descending roads, or
roads with rough, bumpy or uneven surfaces (such as stone-paved
roads, gravel tracks, etc.).
• When frequently and repeatedly taking curves or driving on a w inding
road.
• There is a highly reflective object ahead of the vehicle, such as a sign or a mirror.
• The back of a vehicle ahead is highly reflective, such as a co ntainer on a
truck.
• The vehicle’s headlights are damaged or dirty.
• The vehicle is listing or tilting, due to a flat tire, a trailer being towed, etc.
• The driver believes that the high beam may be causing problems or dis-
tress to other drivers or pedestrians nearby.
WARNING
■ Limitations of the Automatic High Beam
Do not rely on the Automatic High Beam. Always drive safely, ta king care to
observe your surroundings and turning high beam on or off manua lly if nec-
essary.
Page 209 of 528
2095-3. Operating the lights and wipers
5
Driving
MIRAI_OM_USA_OM62073U
NOTICE
■Notes when using the Aut omatic High Beam system
Observe the following to ensure that the Automatic High Beam fu nctions
correctly.
● Do not place items on the dashboard. There is a possibility tha t the cam-
era sensor will mistake items reflected in the windshield for s treetlights,
the headlights of other vehicles, etc.
● Do not install a parking tag or any other accessories near or a round the
camera sensor.
● Do not overload the vehicle.
● Do not modify the vehicle.
● If the windshield needs to be replaced, contact your Toyota dea ler.
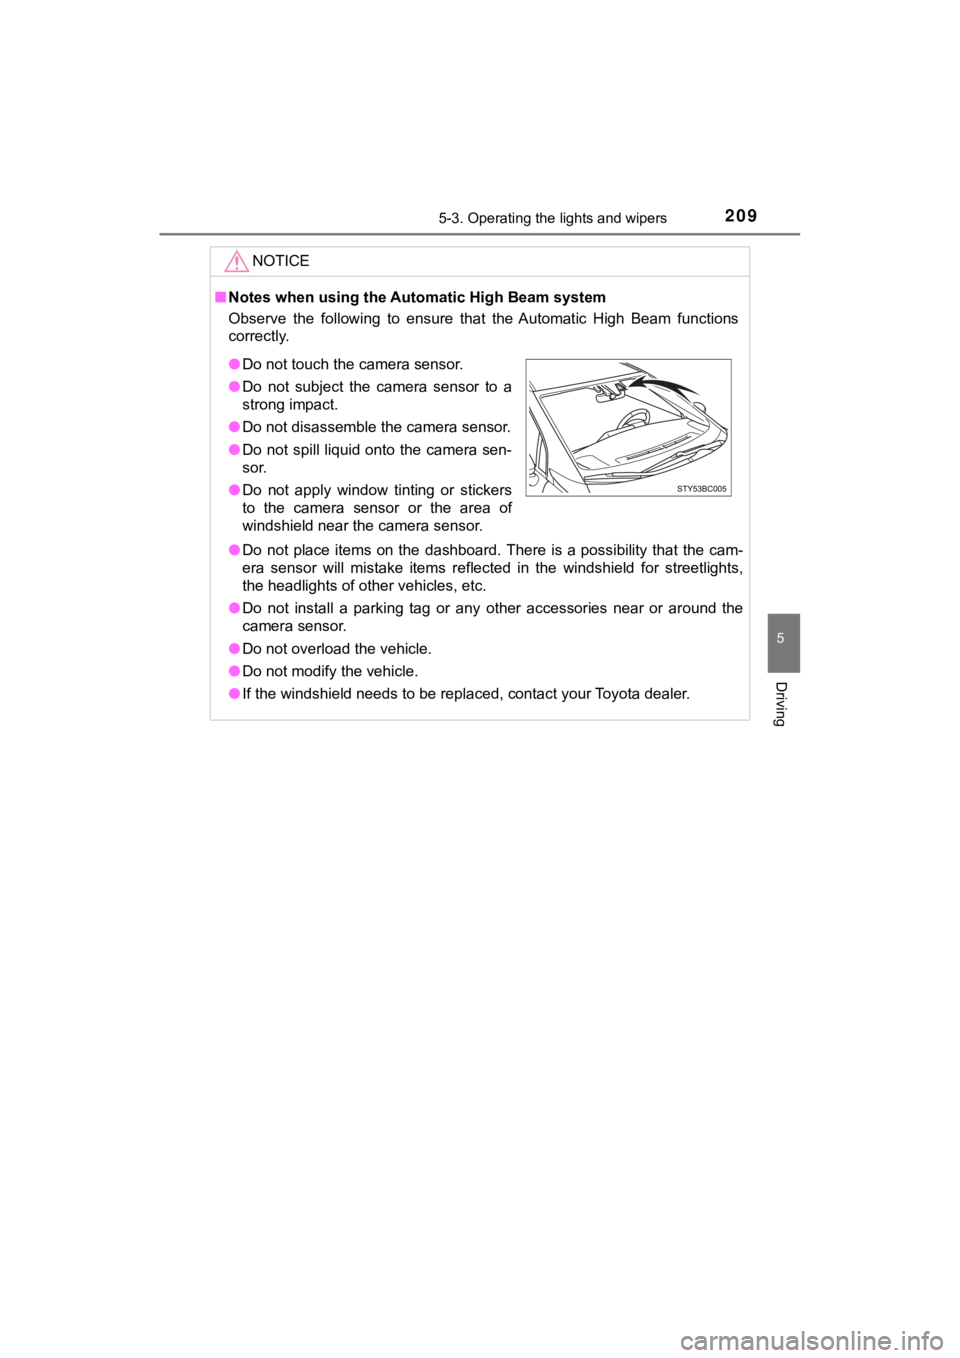
●Do not touch the camera sensor.
● Do not subject the camera sensor to a
strong impact.
● Do not disassemble the camera sensor.
● Do not spill liquid onto the camera sen-
sor.
● Do not apply window tinting or stickers
to the camera sensor or the area of
windshield near the camera sensor.
Page 218 of 528
2185-5. Using the driving support systems
MIRAI_OM_USA_OM62073U
Toyota Safety Sense 2.0
■PCS (Pre-Collision System)
P. 2 2 6
■LDA (Lane Departure Aler t with steering control)
P. 2 3 8
■Automatic High Beam
P. 2 0 5
■RSA (Road Sign Assi st) (if equipped)
P. 2 4 8
■Dynamic radar cruise control
P. 2 5 3
The Toyota Safety Sense 2.0 consists of the following drive
assist systems and contributes t o a safe and comfortable driv-
ing experience:
Driving assist system
WARNING
■ Toyota Safety Sense 2.0
The Toyota Safety Sense 2.0 is designed to operate under the as sumption
that the driver will drive safely, and is designed to help redu ce the impact to
the occupants and the vehicle in the case of a collision or ass ist the driver in
normal driving conditions.
As there is a limit to the degree of recognition accuracy and control perfor-
mance that this system can provide, do not overly rely on this system. The
driver is always responsible for paying attention to the vehicl e’s surround-
ings and driving safely.
Page 405 of 528
4057-3. Do-it-yourself maintenance
MIRAI_OM_USA_OM62073U
7
Maintenance and care
Light bulbs
■LED light bulbs
The following lights consist of a number of LEDs. If any of the LEDs burn out,
take your vehicle to your Toyota dealer to have the light repla ced.
● Headlight low beams
● Headlight high beams
● Parking lights and daytime running lights
● Front side marker lights
● Front turn signal lights
● Side turn signal lights
● Tail lights
● Stop lights
● Rear side marker lights
● Rear turn signal lights
● High mounted stop lights
● License plate lights
● Back-up lights
■ Condensation build-up on the inside of the lens
Temporary condensation build-up on the inside of the headlight lens does not
indicate a malfunction.
Contact your Toyota dealer for more information in the followin g situations:
● Large drops of water have built up on the inside of the lens.
● Water has built up inside the headlight.
If any lights burn out, have it replaced by your Toyota dealer:
WARNING
■Handling lights
Do not touch the lights while they are on or immediately after they have
been turned off. Doing so may result in burns.
Page 431 of 528
![TOYOTA MIRAI 2020 Owners Manual (in English) 4318-2. Steps to take in an emergency
MIRAI_OM_USA_OM62073U
8
When trouble arises
■If “Shifted to [N] Position To Shift to [P], Stop Your Vehicle and Press [P]
Switch” is displayed
When the v](/img/14/42628/w960_42628-430.png "TOYOTA MIRAI 2020 Owners Manual (in English) 4318-2. Steps to take in an emergency
MIRAI_OM_USA_OM62073U
8
When trouble arises
■If “Shifted to [N] Position To Shift to [P], Stop Your Vehicle and Press [P]
Switch” is displayed
When the v")
4318-2. Steps to take in an emergency
MIRAI_OM_USA_OM62073U
8
When trouble arises
■If “Shifted to [N] Position To Shift to [P], Stop Your Vehicle and Press [P]
Switch” is displayed
When the vehicle is moving, a warning message is displayed when the P
position switch is operated and attempting to shift the shift p osition to P.
The shift position is changed to N.
Operate the P position switch after the vehicle has been brough t to a com-
plete stop.
■ If “Smart Key System Malfunction See Owner’s Manual” is displayed
P. 145
■ If “Front Camera Unavailable” or “Front Camera Unavailable See
Owner’s Manual” is displayed
The following systems may be suspended until the problem shown in the
message is resolved. ( P. 224)
● PCS (Pre-Collision System)
● LDA (Lane Departure Alert with steering control)
● Automatic High Beam
● RSA (Road Sign Assist) (if equipped)
● Dynamic radar cruise control
■ If “Radar Cruise Control Unavailable See Owner's Manual” is sho wn
The dynamic radar cruise control system is suspended temporaril y or until the
problem shown in the message is resolved. (causes and coping me thods:
P. 224)
■ If “Radar Cruise Control Unavailable” is shown
The dynamic radar cruise control system cannot be used temporar ily. Use the
system when it becomes available again.
■ If the shift position cannot be changed or the power switch is turned to
ACCESSORY mode even if trying to turn the power switch off when a
warning message is shown
If the 12-volt battery is discharged or the shift control syste m is malfunction-
ing, the followings may occur.
● The shift position may not be changed to P.
When parking, stop the vehicle on level ground and apply the pa rking brake
firmly.
● The fuel cell system may not start.
● The power switch may be turned to ACCESSORY mode even if trying to
turn the power switch off.
In this case, the power switch may be turned off after applying the parking
brake.
● The automatic P position selection function ( P. 191) may not operate.
Before turning the power switch off, be sure to press the P pos ition switch
and check that the shift position is in P by the shift position indicator or P
position switch indicator.
■ Warning buzzer
P. 424