warning lights TOYOTA MIRAI 2022 User Guide
[x] Cancel search | Manufacturer: TOYOTA, Model Year: 2022, Model line: MIRAI, Model: TOYOTA MIRAI 2022Pages: 556, PDF Size: 17.34 MB
Page 95 of 556
953-1. Instrument cluster
Owners Manual_USA_M62084_en
3
Vehicle status information and indicators
*1: Indicates the coolant tempera- ture is cool.
*2: This light illuminates on the multi-information display.
*3: This light illuminates on the multi-information display with a
message.
*4: Depending on the operating con-ditions of the system, the color
and state (illuminat ed/blinking) of
the indicator change.
*5: The light comes on when the system is turned off.
*6: Intuitive parking assist OFF indi-cator turns on wh en the power
switch is turned t o ON while the
Intuitive parking assist function is
on. It will turn off after a few sec-
onds.
*7: These lights tu rn on when the
power switch is turned to ON to
indicate that a system check is
being performed. They will turn
off after the fuel cell system is
on, or after a few seconds. There
may be a malfunction in a sys-
tem if the lights do not turn on, or
turn off. Have the vehicle
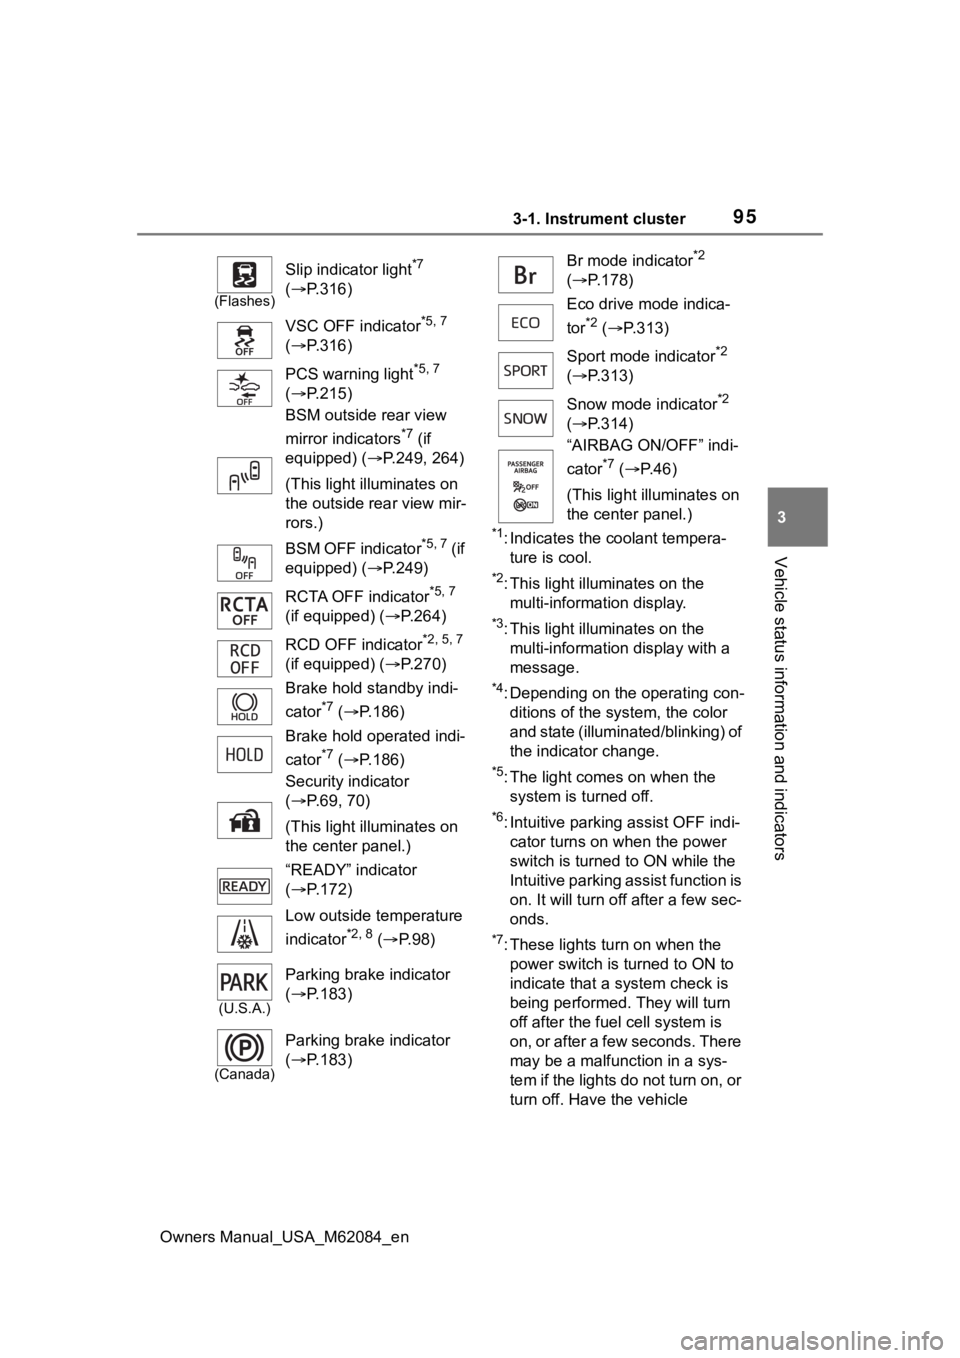
(Flashes)
Slip indicator light*7
( P.316)
VSC OFF indicator
*5, 7
( P.316)
PCS warning light
*5, 7
( P.215)
BSM outside rear view
mirror indicators
*7 (if
equipped) ( P.249, 264)
(This light illuminates on
the outside rear view mir-
rors.)
BSM OFF indicator
*5, 7 (if
equipped) ( P.249)
RCTA OFF indicator
*5, 7
(if equipped) ( P.264)
RCD OFF indicator
*2, 5, 7
(if equipped) ( P.270)
Brake hold standby indi-
cator
*7 ( P.186)
Brake hold operated indi-
cator
*7 ( P.186)
Security indicator
( P.69, 70)
(This light illuminates on
the center panel.)
“READY” indicator
( P.172)
Low outside temperature
indicator
*2, 8 ( P. 9 8 )
(U.S.A.)
Parking brake indicator
( P.183)
(Canada)
Parking brake indicator
( P.183)
Br mode indicator*2
( P.178)
Eco drive mode indica-
tor
*2 ( P.313)
Sport mode indicator
*2
( P.313)
Snow mode indicator
*2
( P.314)
“AIRBAG ON/OFF” indi-
cator
*7 ( P. 4 6 )
(This light illuminates on
the center panel.)
Page 99 of 556
993-1. Instrument cluster
Owners Manual_USA_M62084_en
3
Vehicle status information and indicators
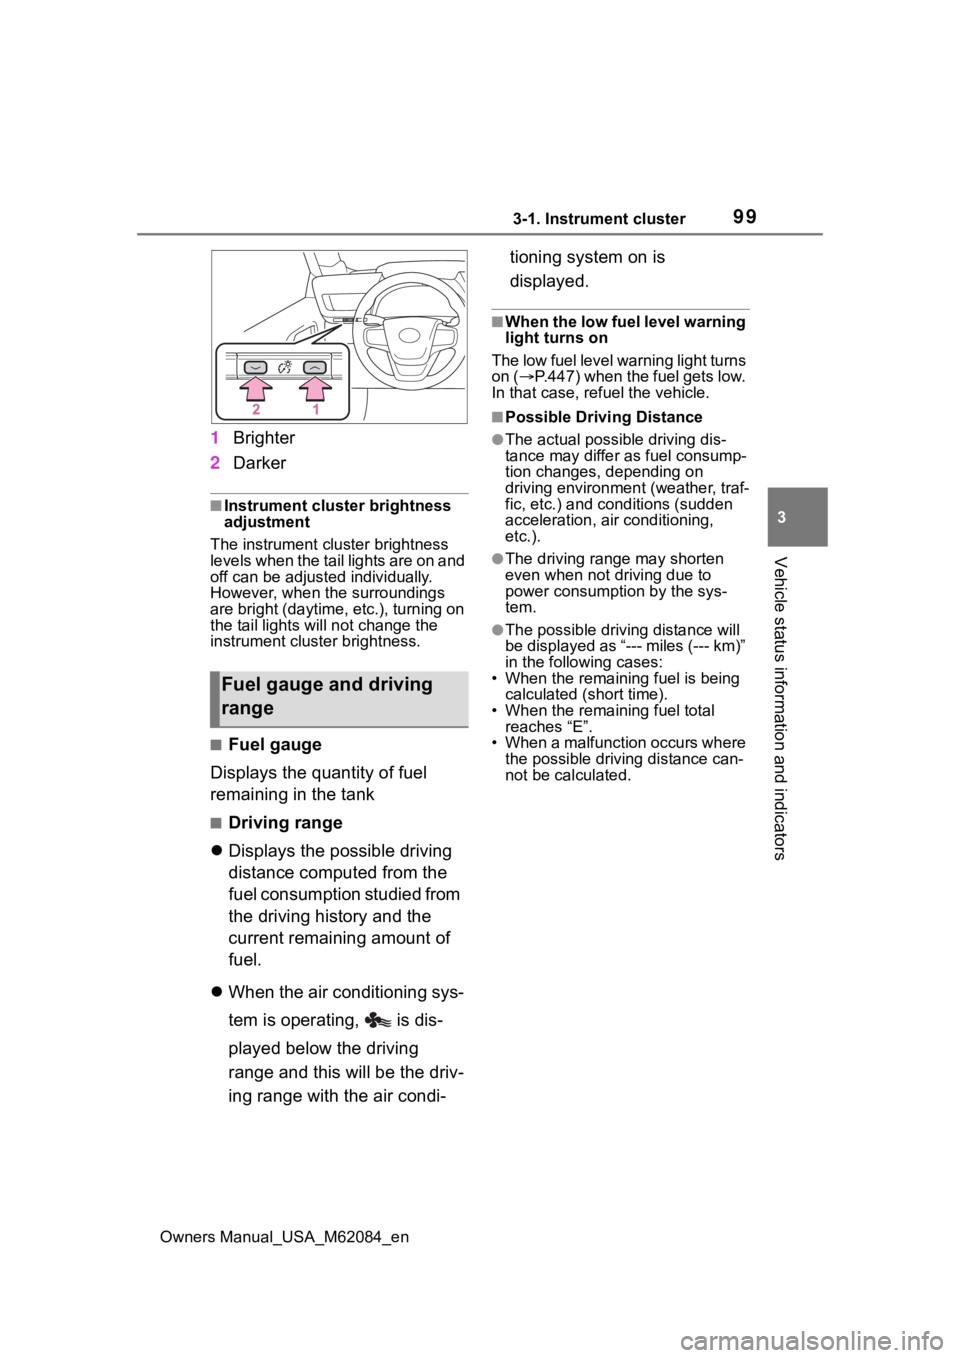
1 Brighter
2 Darker
■Instrument cluster brightness
adjustment
The instrument cluster brightness
levels when the tail lights are on and
off can be adjusted individually.
However, when the surroundings
are bright (daytime, etc.), turning on
the tail lights will not chan ge the
instrument cluster brightness.
■Fuel gauge
Displays the quantity of fuel
remaining in the tank
■Driving range
Displays the possible driving
distance computed from the
fuel consumption studied from
the driving history and the
current remaining amount of
fuel.
When the air conditioning sys-
tem is operating, is dis-
played below the driving
range and this will be the driv-
ing range with the air condi- tioning system on is
displayed.
■When the low fuel level warning
light turns on
The low fuel level warning light turns
on ( P.447) when the fuel gets low.
In that case, refuel the vehicle.
■Possible Drivi ng Distance
●The actual possible driving dis-
tance may differ as fuel consump-
tion changes, depending on
driving environment (weather, traf-
fic, etc.) and conditions (sudden
acceleration, air conditioning,
etc.).
●The driving range may shorten
even when not driving due to
power consumption by the sys-
tem.
●The possible driving distance will
be displayed as “--- miles (--- km)”
in the following cases:
• When the remaining fuel is being calculated (short time).
• When the remaining fuel total
reaches “E”.
• When a malfunction occurs where the possible driving distance can-
not be calculated.
Fuel gauge and driving
range
Page 106 of 556
1063-1. Instrument cluster
Owners Manual_USA_M62084_enrelated settings for that function
are not selectable.
Select to display warning mes-
sages and measures to be
taken if a malfunction is
detected. (
P.451)
Displays suggestions to the
driver in the following situations.
To select a response to a dis-
played suggestion, use the
meter control switches.
■Suggestion to turn on the
headlights
If the headlight switch is in other
than or , and the vehicle
speed is 3 mph (5 km/h) or
higher for a certain amount of
time when the surroundings are
dark, a suggestion message will
be displayed.
■Suggestion to turn off the
headlights
If the headlights are left on for a
certain amount of time after the
power switch has been turned
off, a suggestion message will be displayed.
When the headlight switch is in
the AUTO position: The mes-
sage asking if you wish to turn
the headlights off is displayed.
To turn the headlights off, select
“Yes”.
If the driver’s door is opened after
the power switch is turned off, this
suggestion message will not be dis-
played.
■Customization
The suggestion fu nction can be
turned on/off. (Customizable fea-
tures: P.498)
NOTICE
■During setting up the display
To prevent 12-volt battery dis-
charge, ensure that the fuel cell
system is operating while setting
up the display features.
Warning message display
Suggestion function
Page 143 of 556
1434-4. Adjusting the steering wheel and mirrors
Owners Manual_USA_M62084_en
4
Before driving
*: If equipped
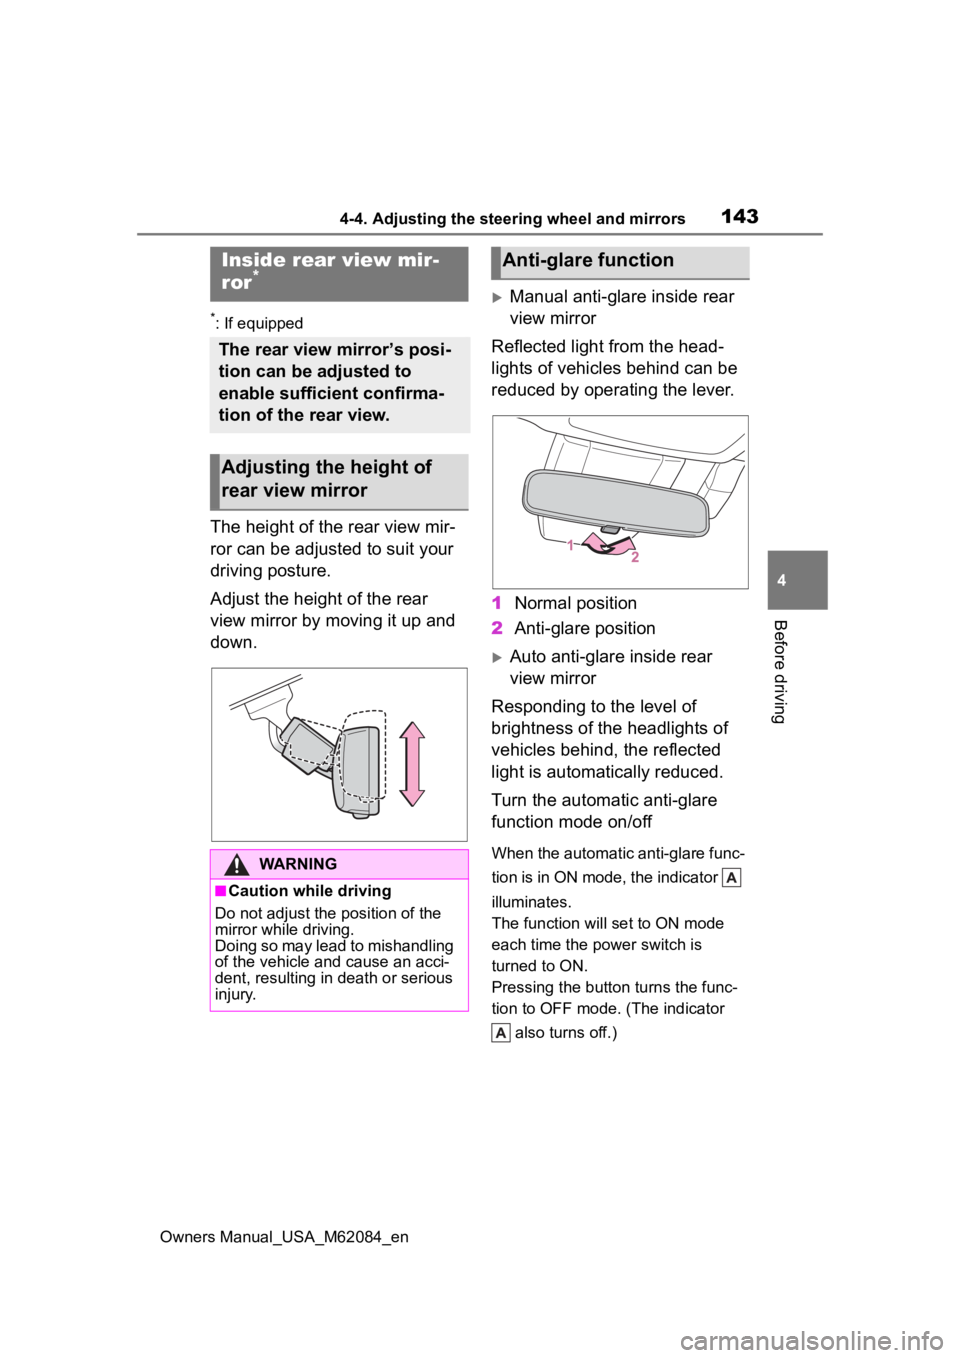
The height of the rear view mir-
ror can be adjusted to suit your
driving posture.
Adjust the height of the rear
view mirror by moving it up and
down.
Manual anti-glare inside rear
view mirror
Reflected light from the head-
lights of vehicles behind can be
reduced by operating the lever.
1 Normal position
2 Anti-glare position
Auto anti-glare inside rear
view mirror
Responding to the level of
brightness of the headlights of
vehicles behind, the reflected
light is automatically reduced.
Turn the automatic anti-glare
function mode on/off
When the automatic anti-glare func-
tion is in ON mode, the indicator
illuminates.
The function will set to ON mode
each time the power switch is
turned to ON.
Pressing the button turns the func-
tion to OFF mode. (The indicator also turns off.)
Inside rear view mir-
ror*
The rear view mirror’s posi-
tion can be adjusted to
enable sufficient confirma-
tion of the rear view.
Adjusting the height of
rear view mirror
WARNING
■Caution while driving
Do not adjust the position of the
mirror while driving.
Doing so may lead to mishandling
of the vehicle and cause an acci-
dent, resulting in death or serious
injury.
Anti-glare function
Page 145 of 556
1454-4. Adjusting the steering wheel and mirrors
Owners Manual_USA_M62084_en
4
Before driving
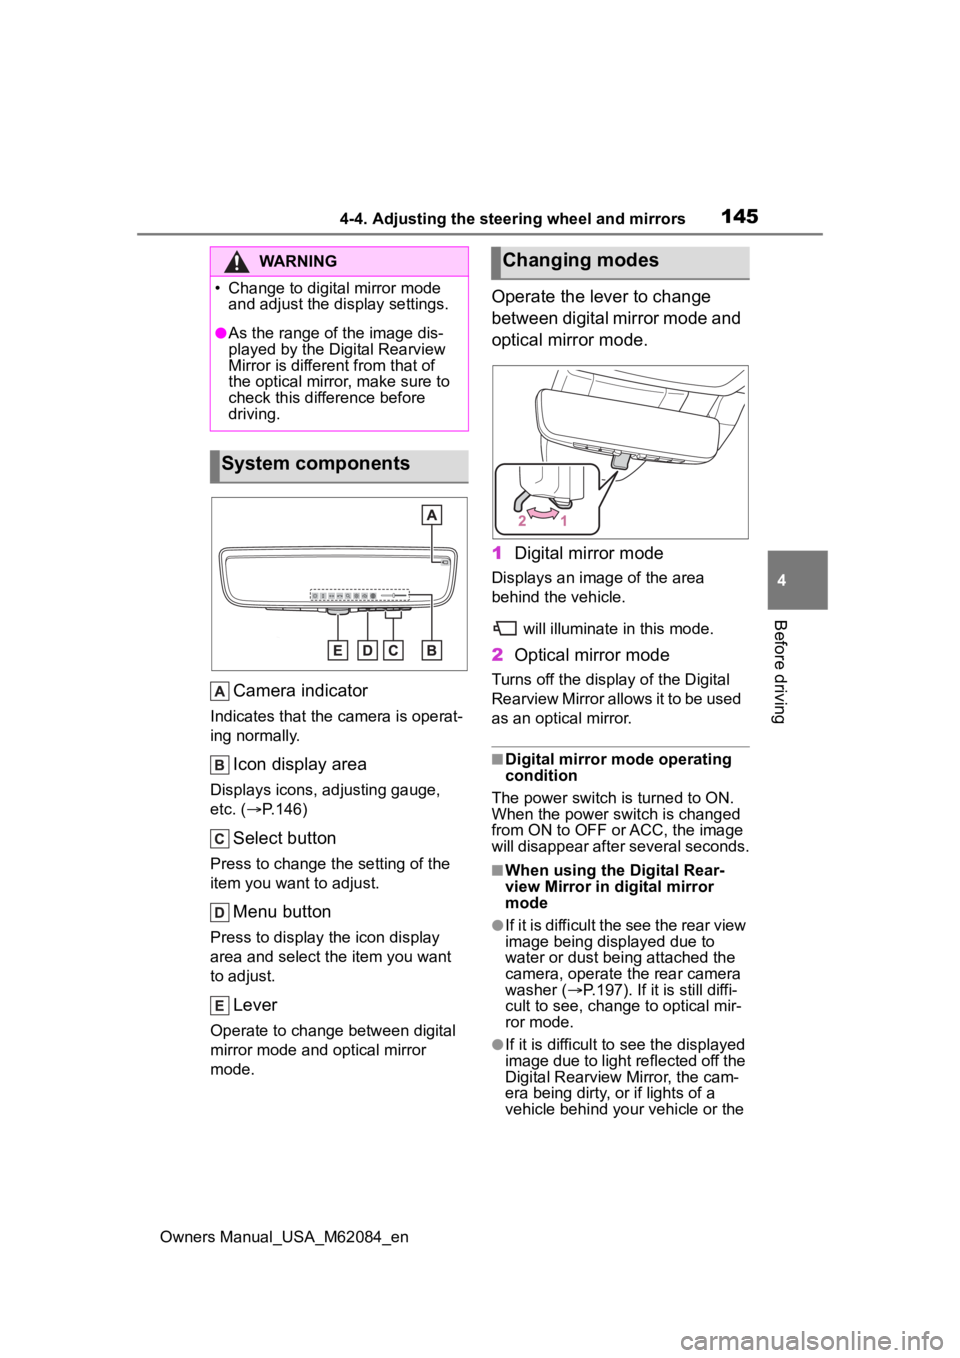
Camera indicator
Indicates that the camera is operat-
ing normally.
Icon display area
Displays icons, adjusting gauge,
etc. ( P.146)
Select button
Press to change the setting of the
item you want to adjust.
Menu button
Press to display the icon display
area and select the item you want
to adjust.
Lever
Operate to change between digital
mirror mode and optical mirror
mode.
Operate the lever to change
between digital mirror mode and
optical mirror mode.
1 Digital mirror mode
Displays an ima ge of the area
behind the vehicle.
will illuminate in this mode.
2Optical mirror mode
Turns off the display of the Digital
Rearview Mirror allows it to be used
as an optical mirror.
■Digital mirror mode operating
condition
The power switch is turned to ON.
When the power switch is changed
from ON to OFF o r ACC, the image
will disappear after several seconds.
■When using the Digital Rear-
view Mirror in d igital mirror
mode
●If it is difficult the see the rear view
image being displayed due to
water or dust being attached the
camera, operate the rear camera
washer ( P.197). If it is still diffi-
cult to see, change to optical mir-
ror mode.
●If it is difficult to see the displayed
image due to light reflected off the
Digital Rearview Mirror, the cam-
era being dirty, or if lights of a
vehicle behind your vehicle or the
WARNING
�
Page 193 of 556
1935-3. Operating the lights and wipers
Owners Manual_USA_M62084_en
5
Driving
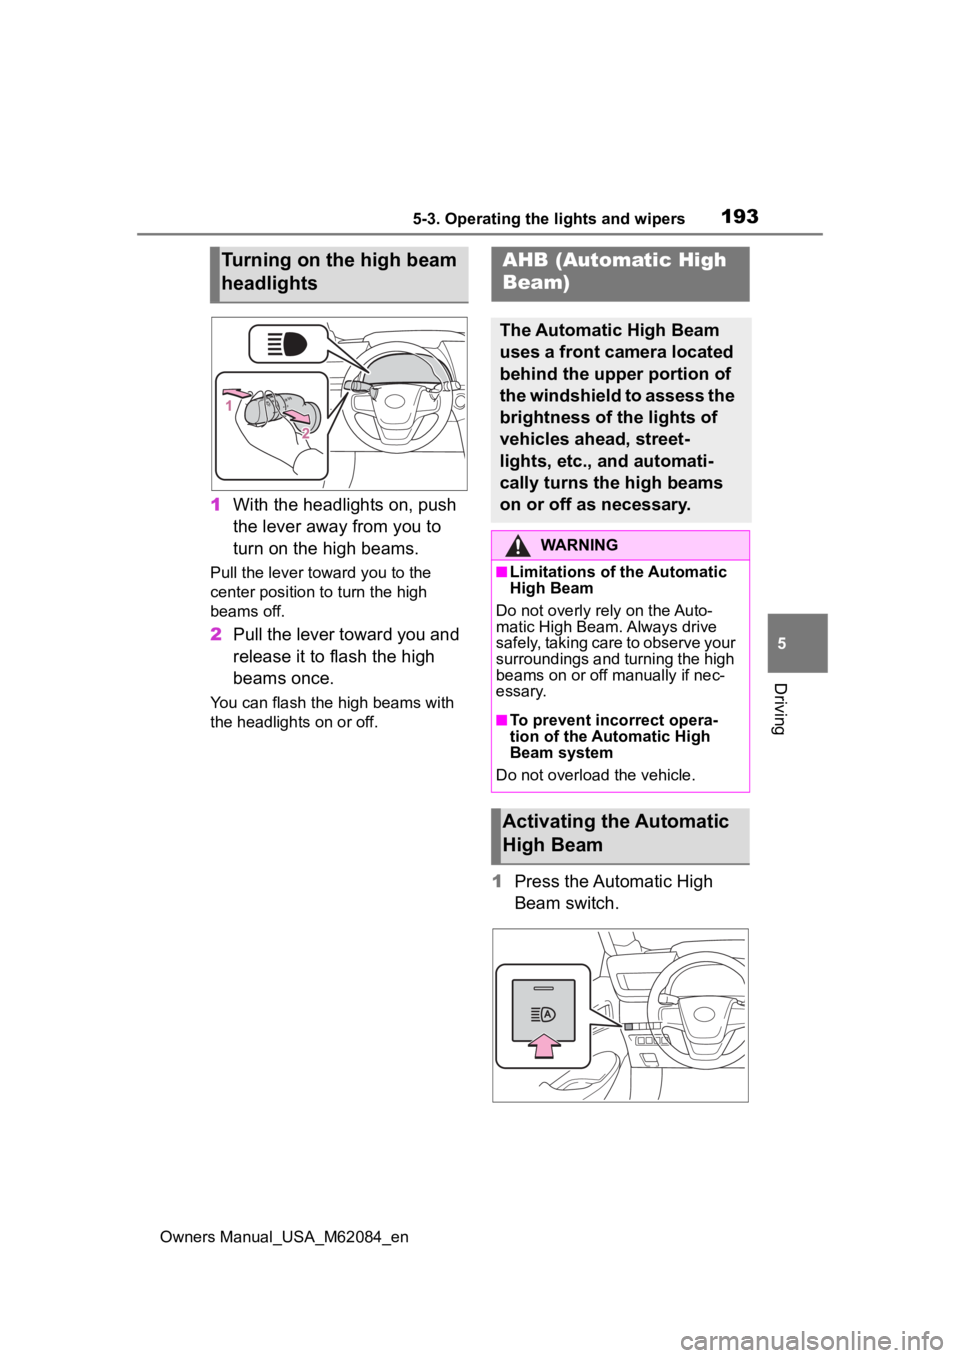
1 With the headlights on, push
the lever away from you to
turn on the high beams.
Pull the lever toward you to the
center position to turn the high
beams off.
2Pull the lever toward you and
release it to flash the high
beams once.
You can flash the high beams with
the headlights on or off.
1Press the Automatic High
Beam switch.
Turning on the high beam
headlightsAHB (Automatic High
Beam)
The Automatic High Beam
uses a front camera located
behind the upper portion of
the windshield to assess the
brightness of the lights of
vehicles ahead, street-
lights, etc., and automati-
cally turns the high beams
on or off as necessary.
WARNING
■Limitations of the Automatic
High Beam
Do not overly rely on the Auto-
matic High Beam. Always drive
safely, taking care to observe your
surroundings and turning the high
beams on or off manually if nec-
essary.
■To prevent inc orrect opera-
tion of the Automatic High
Beam system
Do not overload the vehicle.
Activating the Automatic
High Beam
Page 200 of 556
2005-3. Operating the lights and wipers
Owners Manual_USA_M62084_en
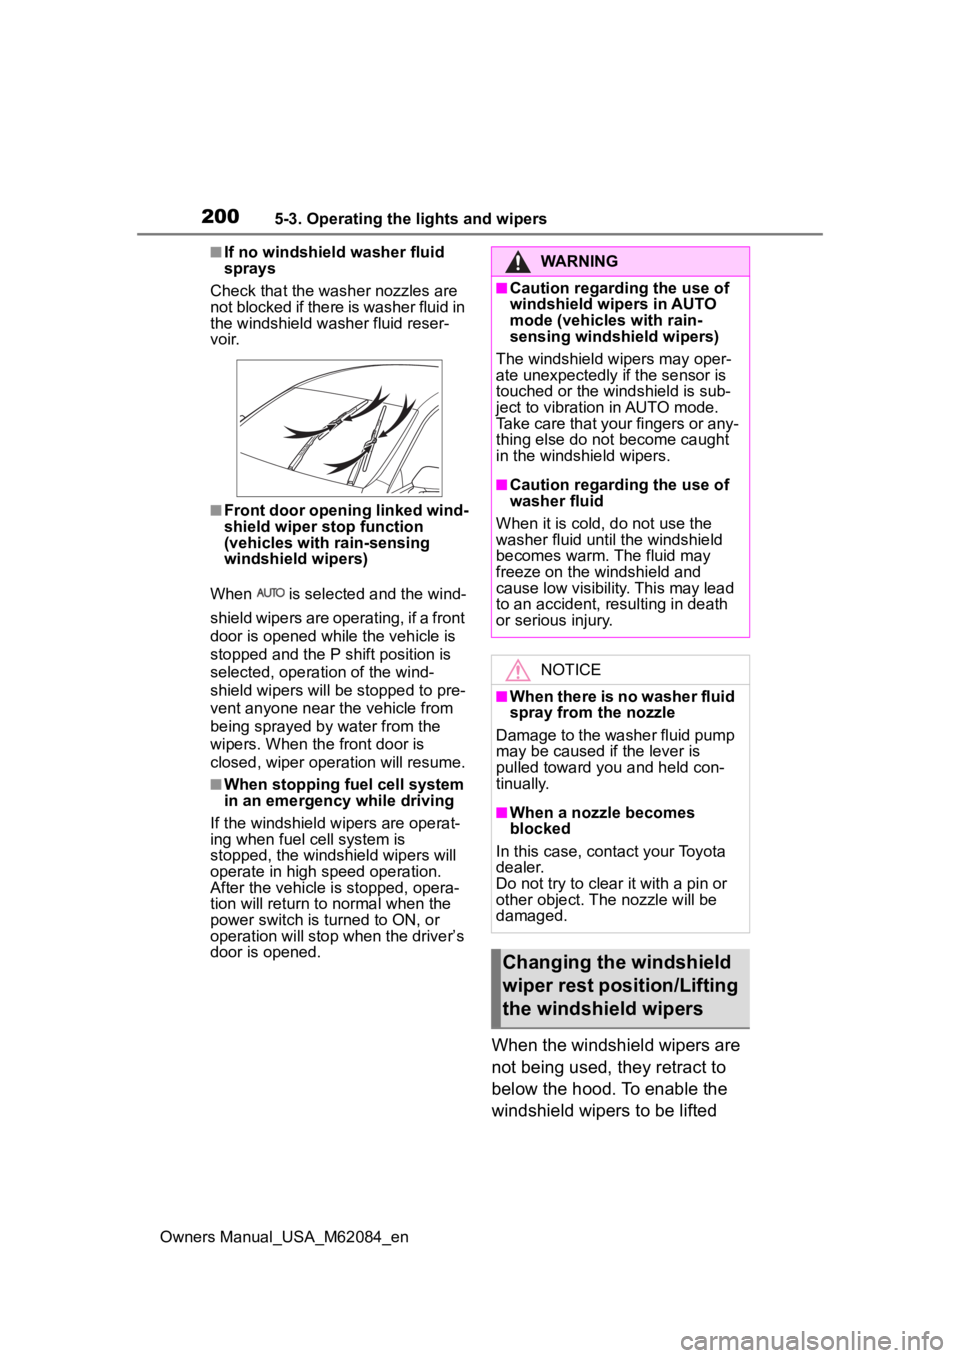
■If no windshield washer fluid
sprays
Check that the wash er nozzles are
not blocked if there is washer fluid in
the windshield washer fluid reser-
v oi r.
■Front door opening linked wind-
shield wiper stop function
(vehicles with rain-sensing
windshield wipers)
When is selected and the wind-
shield wipers are operating, if a front
door is opened while the vehicle is
stopped and the P shift position is
selected, operation of the wind-
shield wipers will be stopped to pre-
vent anyone near the vehicle from
being sprayed by water from the
wipers. When the front door is
closed, wiper operation will resume.
■When stopping fuel cell system
in an emergency while driving
If the windshield wipers are operat-
ing when fuel cell system is
stopped, the windshield wipers will
operate in high speed operation.
After the vehicle is stopped, opera-
tion will return to normal when the
power switch is turned to ON, or
operation will stop w hen the driver’s
door is opened.
When the windshield wipers are
not being used, they retract to
below the hood. To enable the
windshield wipers to be lifted
WARNING
■Caution regarding the use of
windshield wipers in AUTO
mode (vehicles with rain-
sensing windshield wipers)
The windshield wipers may oper-
ate unexpectedly if the sensor is
touched or the windshield is sub-
ject to vibration in AUTO mode.
Take care that your fingers or any-
thing else do not become caught
in the windshield wipers.
■Caution regarding the use of
washer fluid
When it is cold, do not use the
washer fluid unt il the windshield
becomes warm. The fluid may
freeze on the windshield and
cause low visibility. This may lead
to an accident, resulting in death
or serious injury.
NOTICE
■When there is no washer fluid
spray from the nozzle
Damage to the washer fluid pump
may be caused if the lever is
pulled toward you and held con-
tinually.
■When a nozzle becomes
blocked
In this case, contact your Toyota
dealer.
Do not try to clear it with a pin or
other object. The nozzle will be
damaged.
Changing the windshield
wiper rest position/Lifting
the windshield wipers
Page 203 of 556
2035-4. Refueling
Owners Manual_USA_M62084_en
5
Driving
5-4.Refueling
Close the all the doors and
windows.
Set the parking brake.
Shift the shift position to P.
Turn the power switch off.
Turn off the headlights.
■Fuel types
P.483
■Notes on fueling
●Fueling will not be possible if the
pressure inside the vehicle’s
hydrogen tanks is higher than the
supply pressure of the hydrogen
station. If the hydrogen tanks are
more than half full, the vehicle will
be unable to fuel at a H35 dis-
penser. A hydrogen station with a
H70 dispenser (supply pressure of
10150 psi) [70 MPa, 714 kgf/cm
2,
700 bar] is necessary to com-
pletely fill hydrogen tanks.
●If the fueling cannot be completed
due to trouble with the station
equipment, call the number indi-
cated on the equipment.
Opening the fuel door
Fuel with compressed
hydrogen gas only at hydro-
gen stations.
Fuel at hydrogen stations
conforming with the Society
of Automotive Engineers
(SAE) J2601 fueling proto-
col or laws that may super-
sede such SAE protocols.
Refer to the Mirai Station
Finder Application in Con-
nected services,
https://www.toyota.com/
connected-services/ (for
U.S. owners) or
https://www.toyota.ca/
toyota/en/about/
connected-services (for
Canadian owners), or call 1-
800-331-4331 (for U.S.
owners) or 1-888-869-6828
(for Canadian owners).
Observe any notices or
instructions shown at hydro-
gen stations.
The filling time and amount
of fuel may depend on out-
side temperature and the
equipment at that hydrogen
station.
Vehicles with expired hydro-
gen tanks must not be used.
Check P.81 to learn how
and when to check the expi-
ration. Consult your Toyota
dealer.
Before filling
WARNING
■When filling
Observe the following precautions
while fueling the vehicle. Failure
to do so may result in death or
serious injury.
Page 209 of 556
2095-5. Using the driving support systems
Owners Manual_USA_M62084_en
5
Driving
■Certification
P.546
WARNING
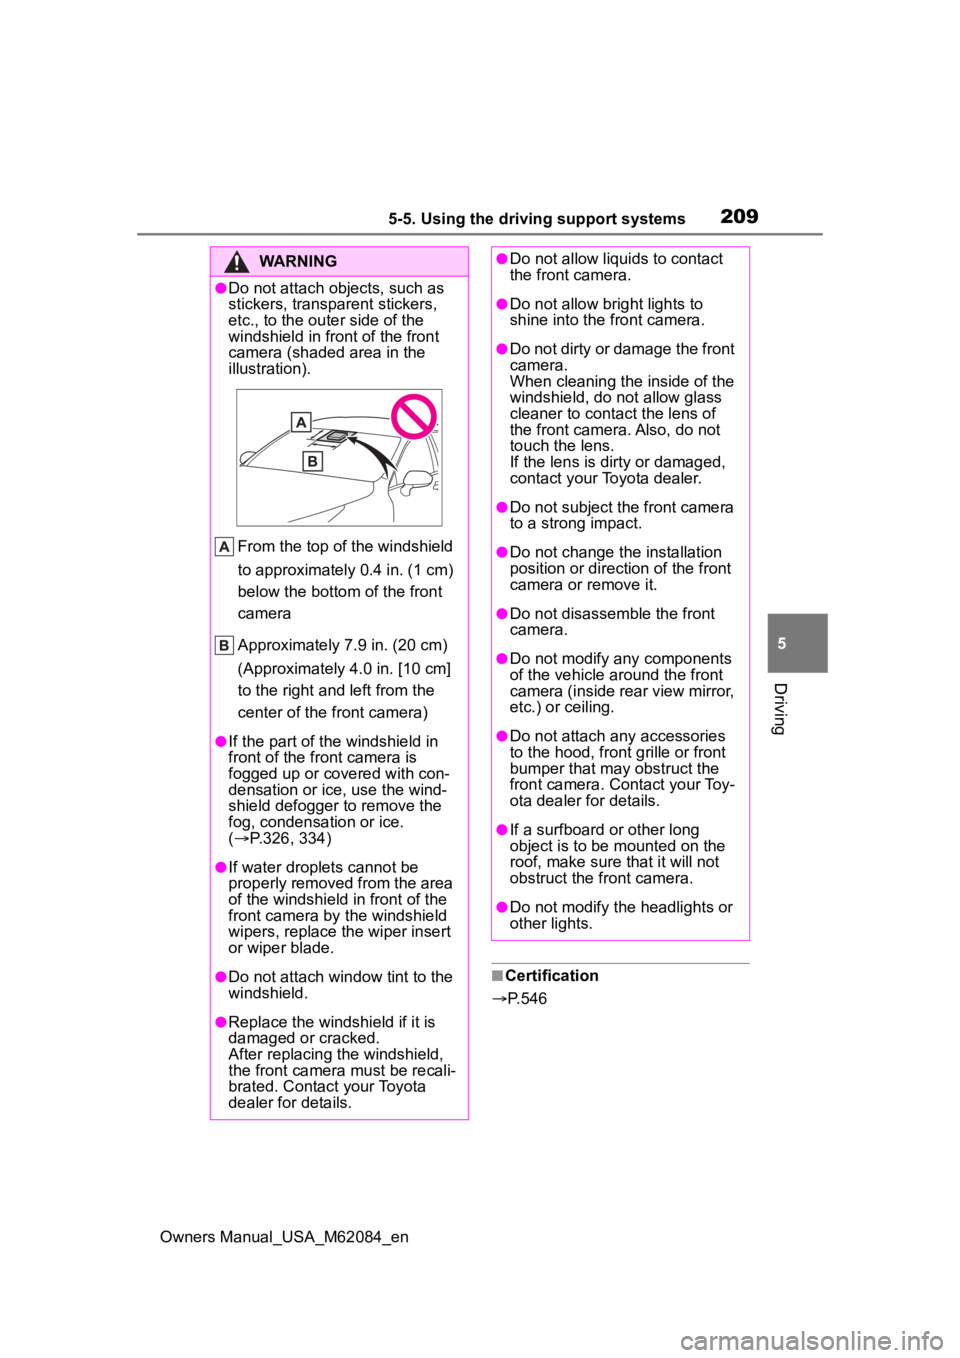
●Do not attach objects, such as
stickers, transparent stickers,
etc., to the oute r side of the
windshield in fr ont of the front
camera (shaded area in the
illustration).
From the top of the windshield
to approximately 0.4 in. (1 cm)
below the bottom of the front
camera
Approximately 7.9 in. (20 cm)
(Approximately 4.0 in. [10 cm]
to the right and left from the
center of the front camera)
●If the part of the windshield in
front of the front camera is
fogged up or covered with con-
densation or ice, use the wind-
shield defogger to remove the
fog, condensation or ice.
( P.326, 334)
●If water droplets cannot be
properly removed from the area
of the windshield in front of the
front camera by the windshield
wipers, replace the wiper insert
or wiper blade.
●Do not attach win dow tint to the
windshield.
●Replace the windshield if it is
damaged or cracked.
After replacing the windshield,
the front camera must be recali-
brated. Contact your Toyota
dealer for details.
●Do not allow liquids to contact
the front camera.
●Do not allow bright lights to
shine into the front camera.
●Do not dirty or damage the front
camera.
When cleaning the inside of the
windshield, do not allow glass
cleaner to contact the lens of
the front camera. Also, do not
touch the lens.
If the lens is dirty or damaged,
contact your Toyota dealer.
●Do not subject the front camera
to a strong impact.
●Do not change the installation
position or direction of the front
camera or remove it.
●Do not disassemble the front
camera.
●Do not modify any components
of the vehicle around the front
camera (inside rear view mirror,
etc.) or ceiling.
●Do not attach any accessories
to the hood, front grille or front
bumper that may obstruct the
front camera. Contact your Toy-
ota dealer for details.
●If a surfboard or other long
object is to be mounted on the
roof, make sure that it will not
obstruct the front camera.
●Do not modify the headlights or
other lights.
Page 218 of 556
2185-5. Using the driving support systems
Owners Manual_USA_M62084_en
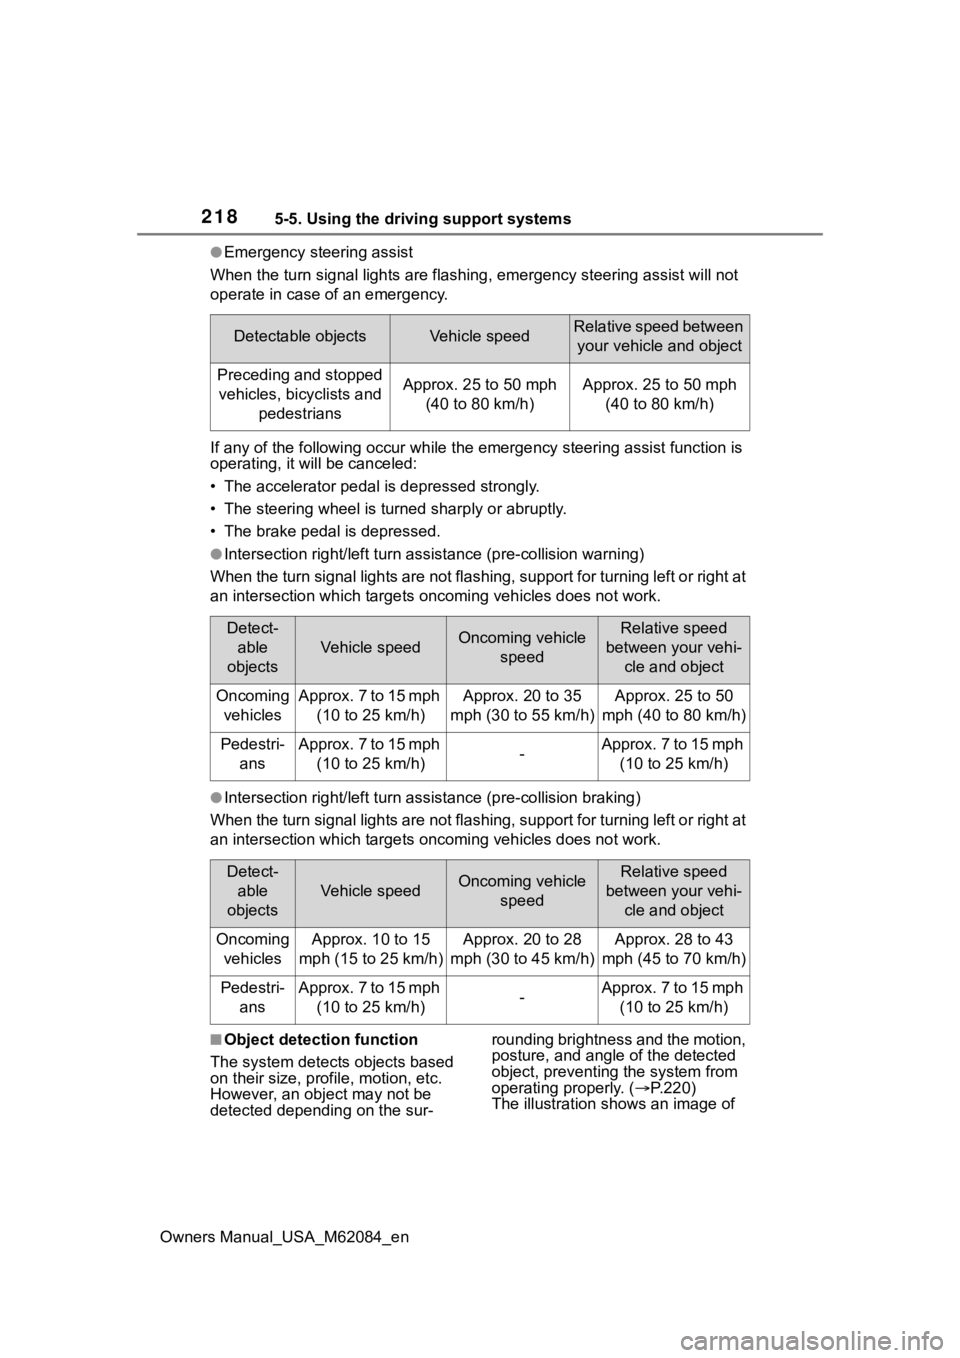
●Emergency steering assist
When the turn signal lights are flashing, emergency steering as sist will not
operate in case of an emergency.
If any of the following occur wh ile the emergency steering assi st function is
operating, it will be canceled:
• The accelerator pedal is depressed strongly.
• The steering wheel is tur ned sharply or abruptly.
• The brake pedal is depressed.
●Intersection right/left turn assistance (pre-collision warning)
When the turn signal lights are not flashing, support for turning left or right at
an intersection which targets on coming vehicles does not work.
●Intersection right/left turn assistance (pre-collision braking)
When the turn signal lights are not flashing, support for turning left or right at
an intersection which targets on coming vehicles does not work.
■Object detection function
The system detects objects based
on their size, profile, motion, etc.
However, an object may not be
detected depending on the sur- rounding brightness and the motion,
posture, and angle of the detected
object, preventing the system from
operating properly. (
P.220)
The illustration shows an image of
Detectable objectsVehicle speedRelative speed between
your vehicle and object
Preceding and stopped vehicles, bicyclists and pedestriansApprox. 25 to 50 mph (40 to 80 km/h)Approx. 25 to 50 mph (40 to 80 km/h)
Detect-able
objects
Vehicle speedOncoming vehicle speedRelative speed
between your vehi- cle and object
Oncoming vehiclesApprox. 7 to 15 mph (10 to 25 km/h)Approx. 20 to 35
mph (30 to 55 km/h)Approx. 25 to 50
mph (40 to 80 km/h)
Pedestri- ansApprox. 7 to 15 mph (10 to 25 km/h)-Approx. 7 to 15 mph (10 to 25 km/h)
Detect-able
objects
Vehicle speedOncoming vehicle speedRelative speed
between your vehi- cle and object
Oncoming vehiclesApprox. 10 to 15
mph (15 to 25 km/h)Approx. 20 to 28
mph (30 to 45 km/h)Approx. 28 to 43
mph (45 to 70 km/h)
Pedestri- ansApprox. 7 to 15 mph (10 to 25 km/h)-Approx. 7 to 15 mph (10 to 25 km/h)