ESP TOYOTA MIRAI 2022 Workshop Manual
[x] Cancel search | Manufacturer: TOYOTA, Model Year: 2022, Model line: MIRAI, Model: TOYOTA MIRAI 2022Pages: 556, PDF Size: 17.34 MB
Page 385 of 556
3857-1. Maintenance and care
Owners Manual_USA_M62084_en
7
Maintenance and care
Remove dirt using a water-
dampened soft cloth or syn-
thetic chamois.
Wipe the surface with a dry,
soft cloth to remove any
remaining moisture.
■Cleaning the areas with satin-
finish metal accents
The metal areas use a layer of real
metal for the surface. It is necessary
to clean them regularly. If dirty areas
are left uncleaned for long periods
of time, they may be difficult to
clean.
Remove dirt and dust using a
vacuum cleaner.
Wipe off any excess dirt and
dust with a soft cloth damp-
ened with diluted detergent.
Use a diluted water solution of
approximately 5% neutral wool
NOTICE
• Steering wheel: Organic sub-
stances, such as thinner, and
cleaner that contains alcohol
●Do not use polish wax or polish
cleaner. The instrument panel’s
or other interior part’s painted
surface may be damaged.
■Preventing damage to leather
surfaces
Observe the following precautions
to avoid damage to and deteriora-
tion of leather surfaces:
●Remove any dust or dirt from
leather surfaces immediately.
●Do not expose the vehicle to
direct sunlight for extended peri-
ods of time. Park the vehicle in
the shade, especially during
summer.
●Do not place items made of
vinyl, plastic, or containing wax
on the upholstery, as they may
stick to the leather surface if the
vehicle interior heats up signifi-
cantly.
■Water on the floor
Do not wash the vehicle floor with
water.
Vehicle systems such as the
audio system may be damaged if
water comes into contact with
electrical components such as the
audio system above or under the
floor of the vehicle. Water may
also cause the body to rust.
■When cleaning the inside of
the windshield
Do not allow glass cleaner to con-
tact the lens. Also, do not touch
the lens. ( P.207)
■Cleaning the inside of the rear
window
●Do not use glass cleaner to
clean the rear window, as this
may cause damage to the rear
window defogger heater wires
or antenna. Use a cloth damp-
ened with lukewarm water to
gently wipe the window clean.
Wipe the window in strokes run-
ning parallel to the heater wires
or antenna.
●Be careful not to scratch or
damage the heater wires or
antenna.
Cleaning the areas with
satin-finish metal accents
Cleaning the leather areas
Page 387 of 556
3877-2. Maintenance
Owners Manual_USA_M62084_en
7
Maintenance and care
7-2.Maintenance
■Repair and replacement
It is recommended that genuine
Toyota parts be used for repairs to
ensure performanc e of each sys-
tem. If non-Toyota parts are used in
replacement or if a repair shop other
than a Toyota dealer performs
repairs, confirm the warranty cover-
age.
■Allow inspection and repairs to
be performed by a Toyota
dealer
●Toyota technicians are well-
trained specialists and are kept up
to date with the latest service
information. They are well
informed about the operation of all
systems on your vehicle.
●Keep a copy of the repair order. It
proves that the maintenance that
has been performed is under war-
ranty coverage. If any problem
should arise while your vehicle is
under warranty, your Toyota
dealer will promptly take care of it.
General maintenance should be
performed on a daily basis. This
can be done by yourself or by a
Toyota dealer.
Scheduled maintenance should
be performed at specified inter-
vals according to the mainte-
nance schedule.
For details about maintenance
items and schedules, refer to the
“Scheduled Maintenance Guide” or
“Owner’s Manual Supplement”.
You can perform some mainte-
nance procedures by yourself.
Please be aware that do-it-your-
self maintenance may affect
Maintenance require-
ments
To ensure safe and econom-
ical driving, day-to-day care
and regular maintenance
are essential. It is the
owner’s responsibility to
perform regular checks.
Toyota recommends the
maintenance below.
WARNING
■If your vehicle is not properly
maintained
Improper maintenance could
result in serious damage to the
vehicle and possible death or seri-
ous injury.
■Handling of the 12-volt bat-
tery
●Oils, fuels and fluids contained
in vehicles as well as waste pro-
duced by component wear con-
tain or emit chemicals known to
the State of California to cause
cancer and birth defects or
other reproductive harm. Avoid
exposure and wash any
affected area immediately.
●12-volt battery posts, terminals
and related accessories con-
tain lead and lead compounds
which are known to cause brain
damage. Wash your hands after
handling. ( P.400)
General maintenance
Scheduled maintenance
Do-it-yourself mainte-
nance
Page 450 of 556
4508-2. Steps to take in an emergency
Owners Manual_USA_M62084_en
WARNING
■When the electric power
steering system warning light
comes on
When the light comes on yellow,
the assist to the power steering is
restricted. When the light comes
on red, the assist to the power
steering is lost and handling oper-
ations of the steering wheel
become extremely heavy.
When steering wheel operations
are heavier than usual, grip the
steering wheel firmly and operate
it using more force than usual.
■If the tire pressure warning
light comes on
Be sure to observe the following
precautions.
Failure to do so could cause a
loss of vehicle control and result
in death or serious injury.
●Check and adjust the tire infla-
tion pressure immediately.
●If the tire pressure warning light
comes on even after tire infla-
tion pressure adjustment, it is
probable that y ou have a flat
tire. Have the flat tire replaced
by the nearest Toyota dealer.
●Avoid abrupt maneuvering and
braking.
If the vehicle tires deteriorate,
you could lose control of the
steering wheel or the brakes.
■If a blowout or sudden air
leakage should occur
The tire pressure warning system
may not activate immediately.
■Maintenance of the tires
Each tire, includi ng the spare (if
provided), should be checked
monthly when cold and inflated to
the inflation pressure recom-
mended by the vehicle manufac-
turer on the vehicle placard or tire
inflation pressure label (tire and
load information label). (If your
vehicle has tires of a different size
than the size indicated on the
vehicle placard or tire inflation
pressure label [tire and load infor-
mation label], you should deter-
mine the proper tire inflation
pressure for those tires.)
As an added safety feature, your
vehicle has been equipped with a
tire pressure monitoring system
(TPMS-tire pressure warning sys-
tem) that illuminates a low tire
pressure telltale (tire pressure
warning light) w hen one or more
of your tires is s ignificantly under-
inflated. Accordingly, when the
low tire pressure te lltale (tire pres-
sure warning light) illuminates,
you should stop and check your
tires as soon as possible, and
inflate them to the proper pres-
sure. Driving on a significantly
under-inflated tire causes the tire
to overheat and can lead to tire
failure. Under-inflation also
reduces fuel efficiency and tire
tread life, and may affect the vehi-
cle’s handling and stopping ability.
Please note that the TPMS (tire
pressure warning system) is not a
substitute for proper tire mainte-
nance, and it is the driver’s
responsibility to m aintain correct
tire pressure, even if under-infla-
tion has not reached the level to
trigger illumination of the TPMS
low tire pressure te lltale (tire pres-
sure warning light).
Page 464 of 556
4648-2. Steps to take in an emergency
Owners Manual_USA_M62084_en
WARNING
■Do not drive the vehicle with
a flat tire
Do not continue driving with a flat
tire.
Driving even a short distance with
a flat tire can damage the tire and
the wheel beyond repair.
Driving with a flat tire may cause a
circumferential groove on the side
wall. In such a case, the tire may
explode when using a repair kit.
■When fixing the flat tire
●Stop your vehicle in a safe and
flat area.
●Do not touch the wheels or the
area around the brakes immedi-
ately after the vehicle has been
driven.
After the vehicle has been
driven, the wheels and the area
around the brakes may be
extremely hot. Touching these
areas with hands , feet or other
body parts may result in burns.
●Connect the valve and hose
securely with the tire installed
on the vehicle. If the hose is not
properly connected to the valve,
air leakage may occur as seal-
ant may be sprayed out.
●If the hose comes off the valve
while inflating the tire, there is a
risk that the hose will move
abruptly due to air pressure.
●After inflation of the tire has
completed, the sealant may
splatter when the hose is dis-
connected or some air is let out
of the tire.
●Follow the operation procedure
to repair the tire. If the proce-
dures not followed, the sealant
may spray out.
●Keep back from the tire while it
is being repaired, as there is a
chance of it bursting while the
repair operation is being per-
formed. If you notice any cracks
or deformation of the tire, turn
off the compressor switch and
stop the repair operation imme-
diately.
●The repair kit may overheat if
operated for a long period of
time. Do not operate the repair
kit continuously for more than
40 minutes.
●Parts of the re pair kit become
hot during operation. Be careful
handling the repair kit during
and after operation. Do not
touch the metal part connecting
the bottle and the compressor. It
will be extremely hot.
●Do not attach the vehicle speed
warning sticker to an area other
than the one indicated. If the
sticker is attached to an area
where an SRS airbag is located,
such as the pad of the steering
wheel, it may prevent the SRS
airbag from operating properly.
■Driving to spread the liquid
sealant evenly
Observe the following precautions
to reduce the risk of accidents.
Failing to do so may result in a
loss of vehicle control and cause
death or serious injury.
●Drive the vehicle carefully at a
low speed. Be especially careful
when turning and cornering.
●If the vehicle does not drive
straight or you feel a pull
through the steering wheel, stop
the vehicle and check the fol-
lowing.
• Tire condition. The tire may have separated from the wheel.
Page 473 of 556

4738-2. Steps to take in an emergency
Owners Manual_USA_M62084_en
8
When trouble arises
■Starting the fuel cell system
when the 12-volt battery is dis-
charged
The fuel cell system cannot be
started by push-starting.
■To prevent 12-volt battery dis-
charge
●Turn off the headlights and the
audio system while the fuel cell
system is off.
●Turn off any unnecessary electri-
cal components when the vehicle
is running at a low speed for an
extended period, such as in heavy
traffic.
■When the 12-volt battery is
removed or discharged
●Information stor ed in the ECU is
cleared. When the 12-volt battery
is depleted, have the vehicle
inspected at you r Toyota dealer.
●Some systems may require initial-
ization. ( P.510)
●If the 12-volt battery discharges, it
may not be possible to shift the
shift position to other positions.
In this case, the vehicle cannot be
towed without lifting both rear
wheels because the rear wheels will
be locked.
■When removing the 12-volt bat-
tery terminals
When the 12-volt battery terminals
are removed, the information stored
in the ECU is cleared. Before
removing the 12-volt battery termi-
nals, contact your Toyota dealer.
■Charging the 1 2-volt battery
The electricity stor ed in the 12-volt
battery will discharge gradually even
when the vehicle is not in use, due
to natural discharge and the drain-
ing effects of certain electrical appli-
ances. If the vehicle is left for a long
time, the 12-volt battery may dis-
charge, and the fuel cell system
may be unable to s tart. (The 12-volt battery recharges automatically
while the fuel cell
system is operat-
ing.)
■When recharging or replacing
the 12-volt battery
●In some cases, it may not be pos-
sible to unlock the doors using the
smart key system when the 12-
volt battery is discharged. Use the
wireless remote c ontrol or the
mechanical key to lock or unlock
the doors.
●The fuel cell system may not start
on the first attempt after the 12-
volt battery has recharged but will
start normally after the second
attempt. This is not a malfunction.
●The power switch mode is memo-
rized by the vehicle. When the 12-
volt battery is reconnected, the
system will return to the mode it
was in before the 12-volt battery
was discharged. Before discon-
necting the 12-volt battery, turn
the power switch off.
If you are unsure what mode the
power switch was in before the
12-volt battery discharged, be
especially careful when recon-
necting the 12-volt battery.
●When the 12-volt battery is recon-
nected, start the fuel cell system,
depress the brake pedal, and con-
firm that it is possible to shift into
each shift position.
●If the battery is removed or the ter-
minals disconnected without oper-
ating the water release function
during cold weather, the vehicle
may not start due to the fuel cell
system being frozen. To prevent
this, operate th e water release
function before removing the bat-
tery or disconnecting the termi-
nals. ( P.189)
■When replacing t he 12-volt bat-
tery
●Use a Central De gassing type 12-
volt battery (European Regula-
tions).
Page 491 of 556

4919-1. Specifications
Owners Manual_USA_M62084_en
9
Vehicle specifications
tion on uniform tire quality grad-
ing.
Your Toyota dealer will help answer
any questions you may have as you
read this information.
■DOT quality grades
All passenger vehicle tires must
conform to Federal Safety
Requirements in addition to
these grades. Quality grades
can be found where applicable
on the tire sidewall between
tread shoulder and maximum
section width.
For example: Treadwear 200 Trac-
tion AA Temperature A
■Treadwear
The treadwear grade is a com-
parative rating based on the
wear rate of the tire when tested
under controlled conditions on a
specified government test
course.
For example, a tire graded 150
would wear one and a half (1 - 1/2)
times as well on the government
course as a tire graded 100.
The relative perfo rmance of tires
depends upon the actual conditions
of their use. Performance may differ
significantly from the norm due to
variations in driving habits, service
practices and differences in road
characteristics and climate.
■Traction AA, A, B, C
The traction grades, from high-
est to lowest, are AA, A, B and
C, and they represent the tire’s
ability to stop on wet pavement as measured under controlled
conditions on specified govern-
ment test surfaces of asphalt
and concrete.
A tire marked C may have poor
traction performance.
Warning: The traction grade
assigned to this tire is based on
braking (straight ahead) traction
tests and does not include corner-
ing (turning) traction.
■Temperature A, B, C
The temperature grades are A
(the highest), B, and C, repre-
senting the tire’s resistance to
the generation of heat and its
ability to dissipate heat when
tested under controlled condi-
tions on a specified indoor labo-
ratory test wheel.
Sustained high temperature can
cause the material of the tire to
degenerate and reduce tire life, and
excessive temperature can lead to
sudden tire failure.
Grade C corresponds to a level of
performance which all passenger
car tires must meet under the Fed-
eral Motor Vehicle Safety Standard
No. 109.
Grades B and A represent higher
levels of performance on the labo-
ratory test wheel than the minimum
required by law.
Warning: The temperature grades
of a tire assume tha t it is properly
inflated and not overloaded.
Excessive speed, underinflation, or
excessive loading, either sepa-
rately or in combination, can cause
Page 494 of 556
4949-1. Specifications
Owners Manual_USA_M62084_en
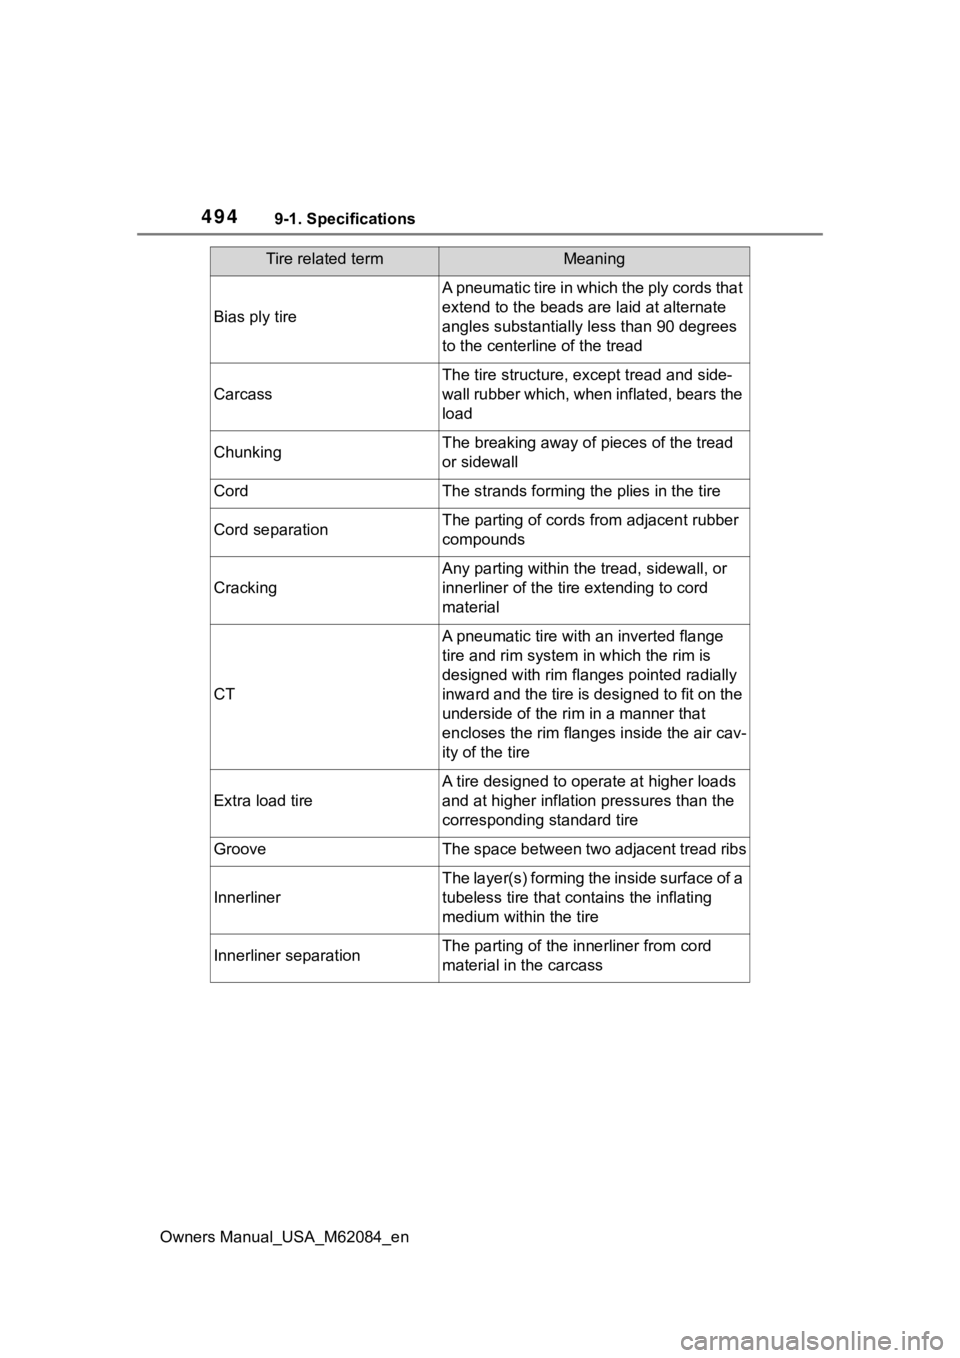
Bias ply tire
A pneumatic tire in which the ply cords that
extend to the beads are laid at alternate
angles substantially less than 90 degrees
to the centerline of the tread
Carcass
The tire structure, except tread and side-
wall rubber which, when inflated, bears the
load
ChunkingThe breaking away of pieces of the tread
or sidewall
CordThe strands forming the plies in the tire
Cord separationThe parting of cords from adjacent rubber
compounds
Cracking
Any parting within the tread, sidewall, or
innerliner of the ti re extending to cord
material
CT
A pneumatic tire with an inverted flange
tire and rim system in which the rim is
designed with rim flanges pointed radially
inward and the tire is designed to fit on the
underside of the rim in a manner that
encloses the rim flanges inside the air cav-
ity of the tire
Extra load tire
A tire designed to operate at higher loads
and at higher inflation pressures than the
corresponding standard tire
GrooveThe space between two adjacent tread ribs
Innerliner
The layer(s) forming the inside surface of a
tubeless tire that contains the inflating
medium within the tire
Innerliner separationThe parting of the innerliner from cord
material in the carcass
Tire related termMeaning
Page 496 of 556
4969-1. Specifications
Owners Manual_USA_M62084_en
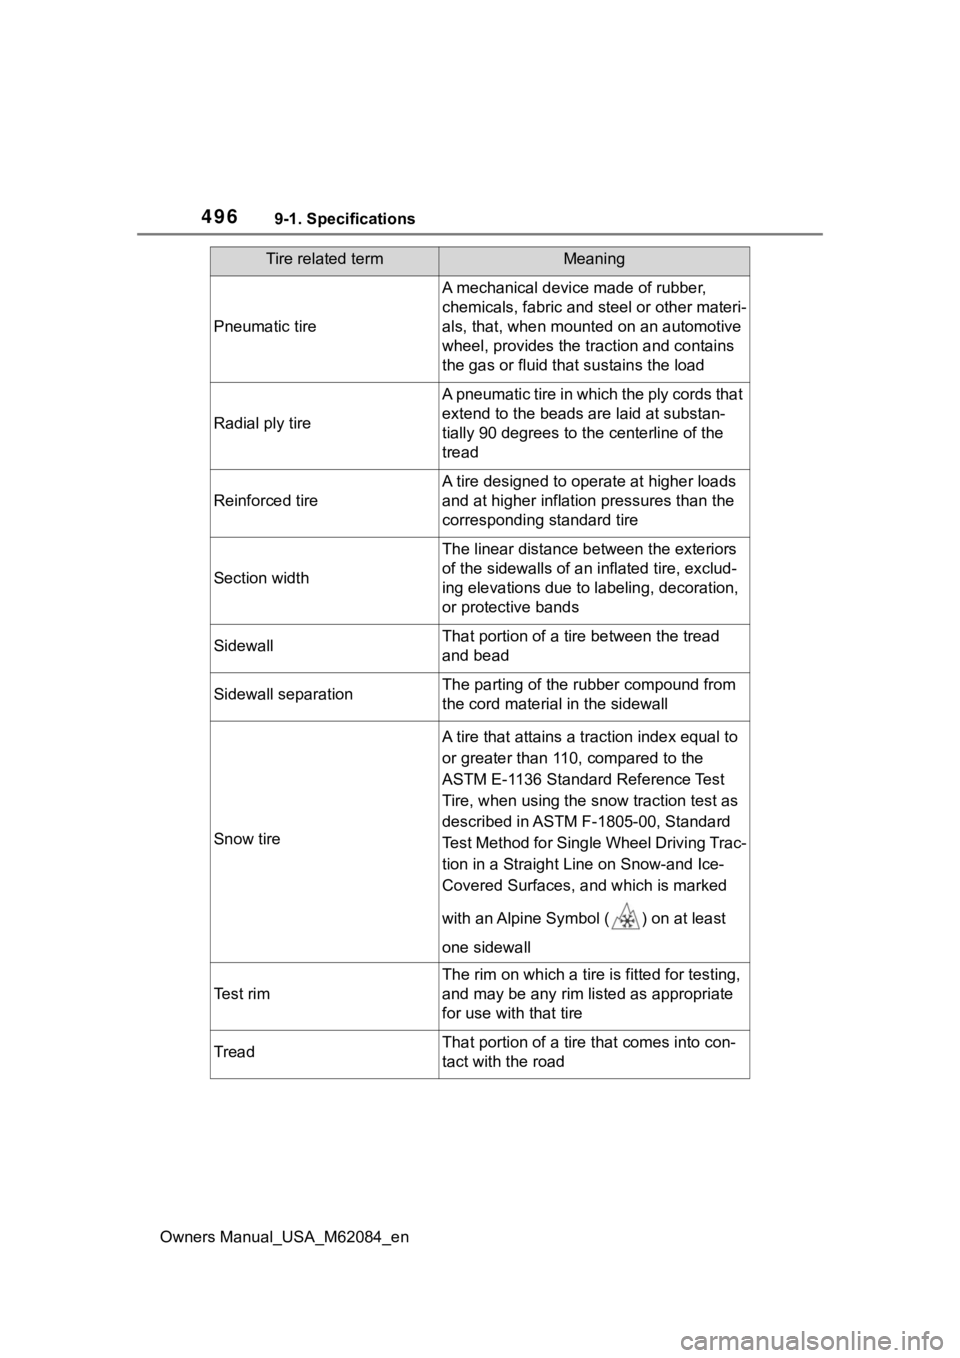
Pneumatic tire
A mechanical device made of rubber,
chemicals, fabric and steel or other materi-
als, that, when mounted on an automotive
wheel, provides the tr action and contains
the gas or fluid that sustains the load
Radial ply tire
A pneumatic tire in which the ply cords that
extend to the beads are laid at substan-
tially 90 degrees to the centerline of the
tread
Reinforced tire
A tire designed to operate at higher loads
and at higher inflation pressures than the
corresponding standard tire
Section width
The linear distance between the exteriors
of the sidewalls of an i nflated tire, exclud-
ing elevations due to labeling, decoration,
or protective bands
SidewallThat portion of a tire between the tread
and bead
Sidewall separationThe parting of the rubber compound from
the cord material in the sidewall
Snow tire
A tire that attains a t raction index equal to
or greater than 110, compared to the
ASTM E-1136 Standard Reference Test
Tire, when using the snow traction test as
described in ASTM F-1805-00, Standard
Test Method for Single Wheel Driving Trac-
tion in a Straight Line on Snow-and Ice-
Covered Surfaces, and which is marked
with an Alpine Symbol ( ) on at least
one sidewall
Test rim
The rim on which a tire is fitted for testing,
and may be any rim lis ted as appropriate
for use with that tire
TreadThat portion of a tire that comes into con-
tact with the road
Tire related termMeaning
Page 520 of 556
52010-1. For owners
Owners Manual_USA_M62084_en
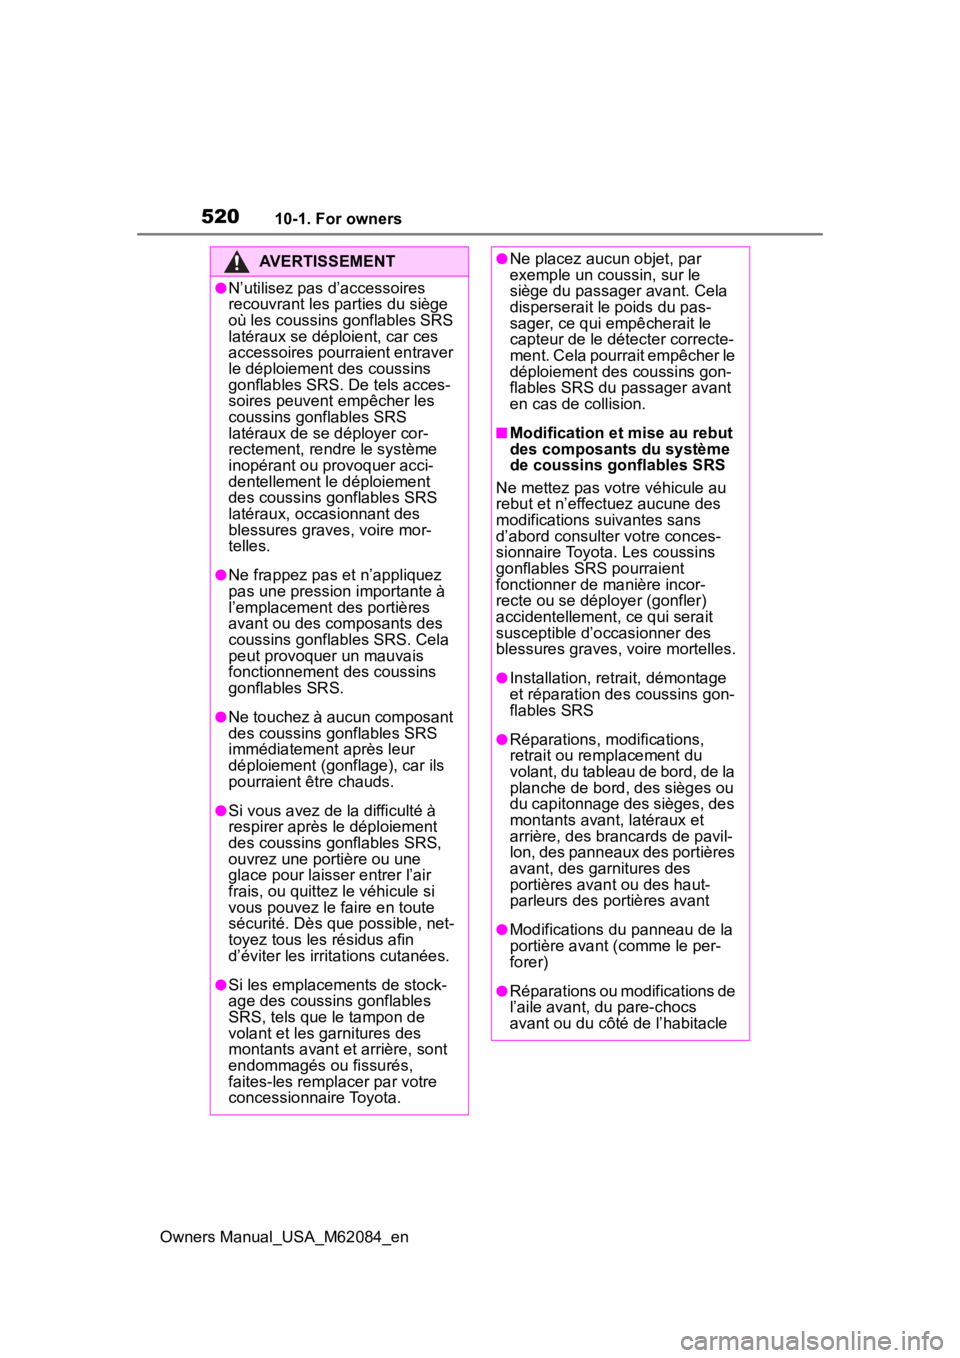
AVERTISSEMENT
●N’utilisez pas d’accessoires
recouvrant les parties du siège
où les coussins gonflables SRS
latéraux se déploient, car ces
accessoires pourraient entraver
le déploiement des coussins
gonflables SRS. De tels acces-
soires peuvent empêcher les
coussins gonflables SRS
latéraux de se déployer cor-
rectement, rendre le système
inopérant ou provoquer acci-
dentellement le déploiement
des coussins gonflables SRS
latéraux, occasionnant des
blessures graves, voire mor-
telles.
●Ne frappez pas et n’appliquez
pas une pression importante à
l’emplacement des portières
avant ou des composants des
coussins gonflables SRS. Cela
peut provoquer un mauvais
fonctionnement des coussins
gonflables SRS.
●Ne touchez à aucun composant
des coussins gonflables SRS
immédiatement après leur
déploiement (gonflage), car ils
pourraient être chauds.
●Si vous avez de la difficulté à
respirer après le déploiement
des coussins gonflables SRS,
ouvrez une portière ou une
glace pour laisser entrer l’air
frais, ou quittez le véhicule si
vous pouvez le faire en toute
sécurité. Dès que possible, net-
toyez tous les résidus afin
d’éviter les irritations cutanées.
●Si les emplacements de stock-
age des coussins gonflables
SRS, tels que le tampon de
volant et les garnitures des
montants avant et arrière, sont
endommagés ou fissurés,
faites-les remplacer par votre
concessionnaire Toyota.
●Ne placez aucun objet, par
exemple un coussin, sur le
siège du passager avant. Cela
disperserait le poids du pas-
sager, ce qui empêcherait le
capteur de le dét ecter correcte-
ment. Cela pourrait empêcher le
déploiement des coussins gon-
flables SRS du passager avant
en cas de collision.
■Modification et mise au rebut
des composants du système
de coussins gonflables SRS
Ne mettez pas votre véhicule au
rebut et n’effectuez aucune des
modifications suivantes sans
d’abord consulter votre conces-
sionnaire Toyota. Les coussins
gonflables SRS pourraient
fonctionner de manière incor-
recte ou se déployer (gonfler)
accidentellement, ce qui serait
susceptible d’occasionner des
blessures graves, voire mortelles.
●Installation, retrait, démontage
et réparation des coussins gon-
flables SRS
●Réparations, modifications,
retrait ou remplacement du
volant, du tableau de bord, de la
planche de bord, des sièges ou
du capitonnage des sièges, des
montants avant, latéraux et
arrière, des brancards de pavil-
lon, des panneaux des portières
avant, des garnitures des
portières avant ou des haut-
parleurs des portières avant
●Modifications du panneau de la
portière avant (comme le per-
forer)
●Réparations ou modifications de
l’aile avant, du pare-chocs
avant ou du côté de l’habitacle