seat adjustment TOYOTA MIRAI 2022 Owners Manual
[x] Cancel search | Manufacturer: TOYOTA, Model Year: 2022, Model line: MIRAI, Model: TOYOTA MIRAI 2022Pages: 556, PDF Size: 17.34 MB
Page 1 of 556
1
2
3
4
5
6
7
8
9
10
Owners Manual_USA_M62084_en
Pictorial indexSearch by illustration
For safety
and securityMake sure to read through them
(Main topics: Child seat, theft deterrent system)
Fuel cell systemFuel cell vehicle characteristics, precautions, etc.
(Main topics: Fuel cell system)
Vehicle status
information and
indicatorsReading driving-related information
(Main topics: Meters, multi-information display)
Before driving
Opening and closing the doors and windows,
adjustment before driving
(Main topics: Keys, doors, seats)
Driving
Operations and advice which are necessary for
driving
(Main topics: Starting f uel cell system, refueling)
Interior featuresUsage of the interior features
(Main topics: Air conditioner, storage features)
Maintenance
and careCaring for your vehicle and maintenance
procedures
(Main topics: Interior and exterior, light bulbs)
When trouble
arisesWhat to do in case of malfunction and emergency
(Main topics: Battery discharge, flat tire)
Vehicle
specificationsVehicle specifications, customizable features
(Main topics: Fuel, oil, tire inflation pressure)
For ownersReporting safety defects for U.S. owners, seat belt
and SRS airbag instructions for Canadian owners
IndexSearch by symptom
Search alphabetically
Page 28 of 556
281-1. For safe use
Owners Manual_USA_M62084_en
Make sure that all occupants are
wearing their seat belts before
driving the vehicle. (P.29)
Use a child restraint system
appropriate for the child until the child becomes large enough to
properly wear the vehicle’s seat
belt. (
P.52)
Make sure that you can see
backward clearly by adjusting
the inside and outside rear view
mirrors properly. ( P.143, 144,
154)
WARNING
■For safe driving
Observe the following precau-
tions.
Failure to do so m ay result in
death or serious injury.
●Do not adjust the position of the
driver’s seat while driving.
Doing so could cause the driver
to lose control of the vehicle.
●Do not place a cushion between
the driver or passenger and the
seatback.
A cushion may prevent correct
posture from being achieved,
and reduce the effectiveness of
the seat belt and head restraint.
●Do not place anything under the
front seats.
Objects placed under the front
seats may become jammed in
the seat tracks and stop the
seat from locking in place. This
may lead to an accident and the
adjustment mechanism may
also be damaged.
●Always observe the legal speed
limit when driving on public
roads.
●When driving over long dis-
tances, take regular breaks
before you start to feel tired.
Also, if you feel tired or sleepy
while driving, do not force your-
self to continue driving and take
a break immediately.
Correct use of the seat
belts
Adjusting the mirrors
Page 57 of 556
571-2. Child safety
Owners Manual_USA_M62084_en
1
For safety and security
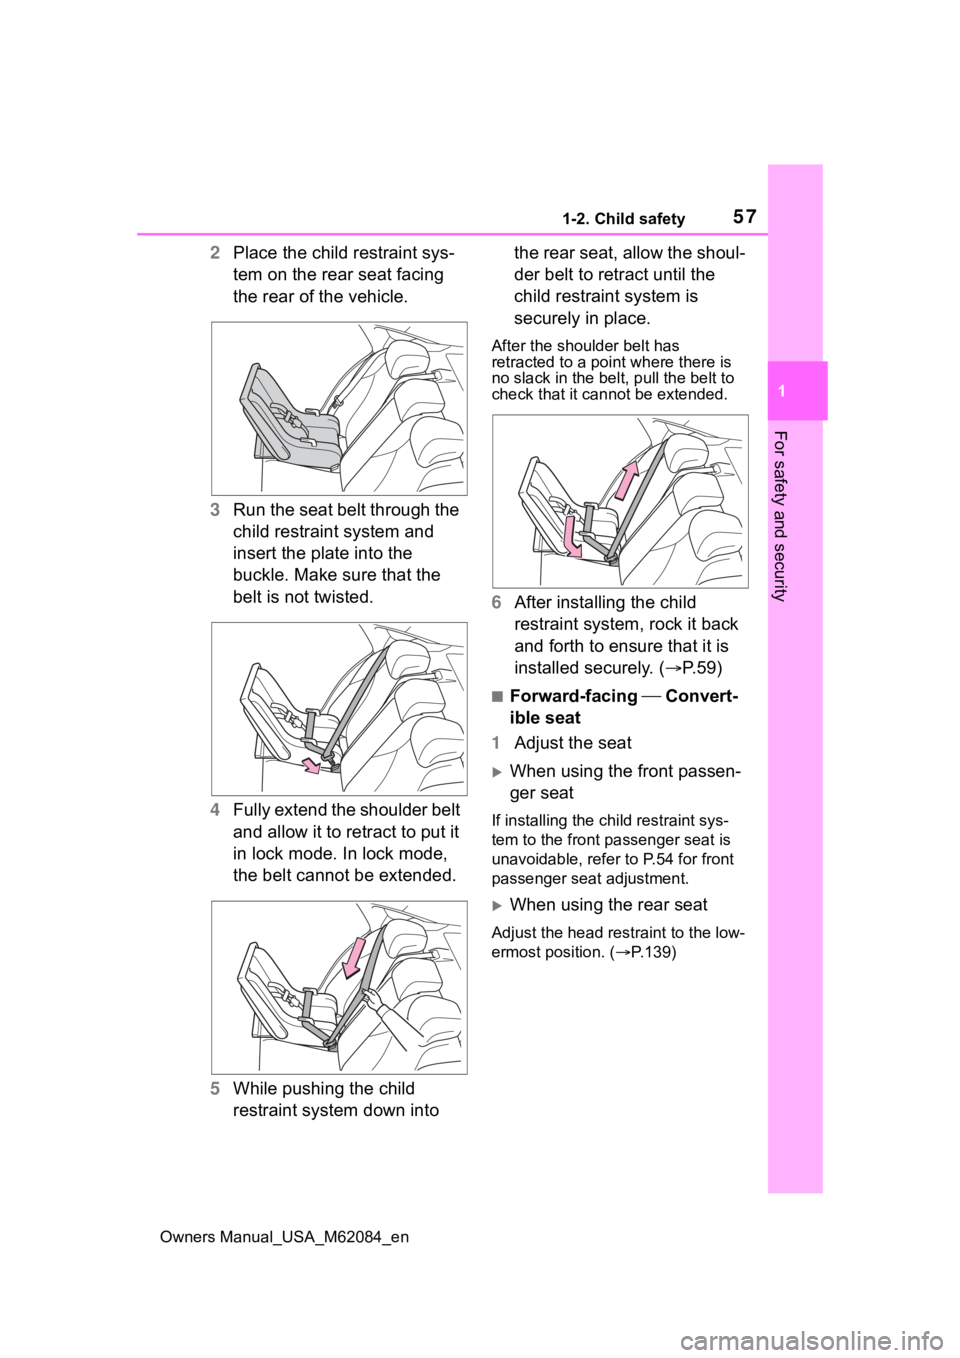
2 Place the child restraint sys-
tem on the rear seat facing
the rear of the vehicle.
3 Run the seat belt through the
child restraint system and
insert the plate into the
buckle. Make sure that the
belt is not twisted.
4 Fully extend the shoulder belt
and allow it to retract to put it
in lock mode. In lock mode,
the belt cannot be extended.
5 While pushing the child
restraint system down into the rear seat, allow the shoul-
der belt to retract until the
child restraint system is
securely in place.
After the shoulder belt has
retracted to a poi
nt where there is
no slack in the belt, pull the belt to
check that it cannot be extended.
6 After installing the child
restraint system, rock it back
and forth to ensure that it is
installed securely. ( P.59)
■Forward-facing Convert-
ible seat
1 Adjust the seat
When using the front passen-
ger seat
If installing the ch ild restraint sys-
tem to the front pa ssenger seat is
unavoidable, refer to P.54 for front
passenger seat adjustment.
When using the rear seat
Adjust the head rest raint to the low-
ermost position. ( P.139)
Page 58 of 556
581-2. Child safety
Owners Manual_USA_M62084_en
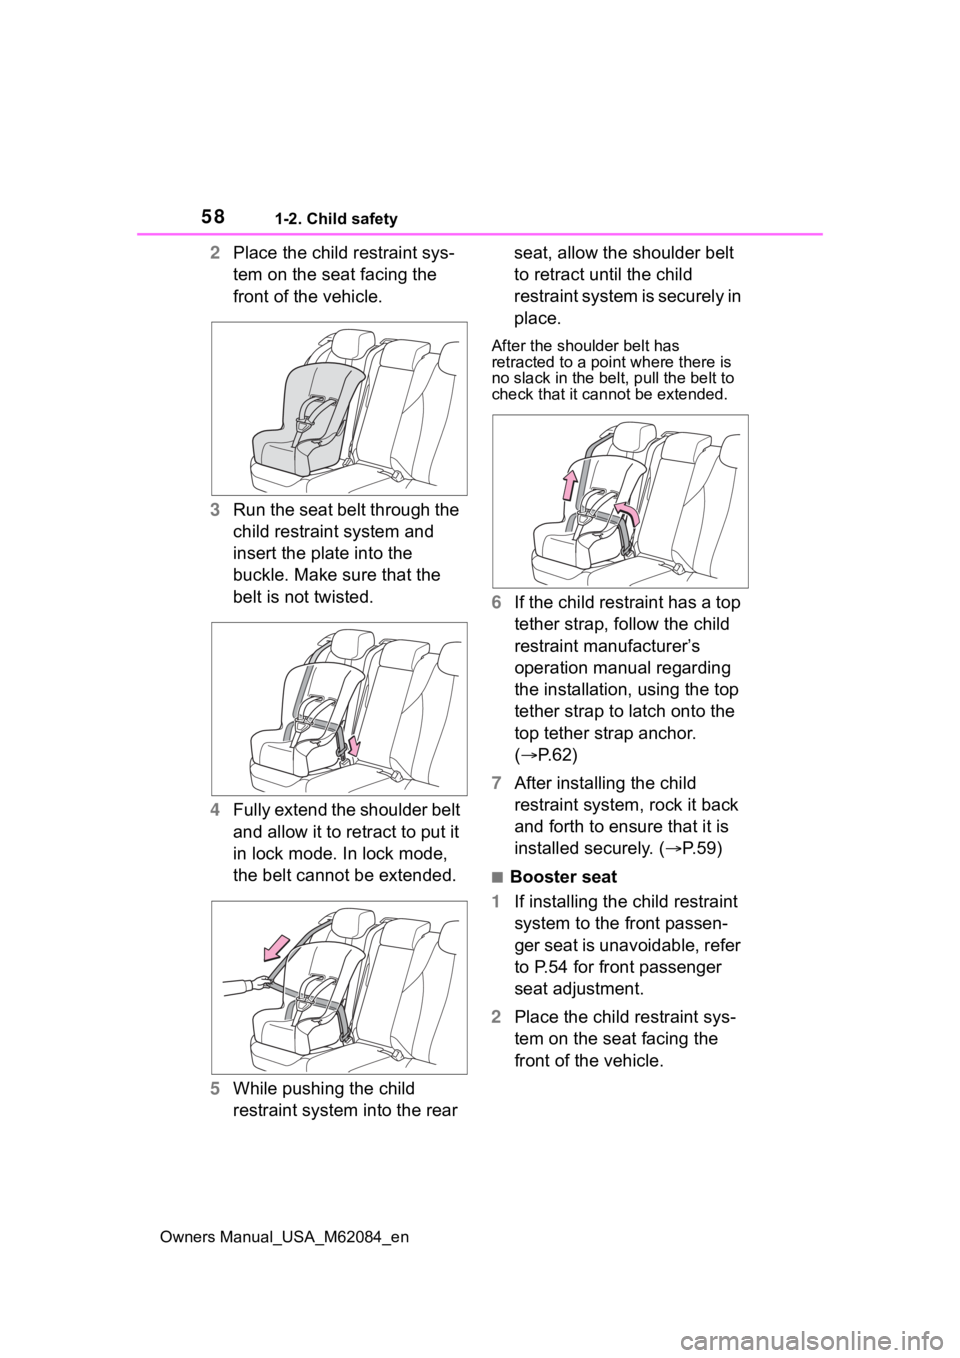
2Place the child restraint sys-
tem on the seat facing the
front of the vehicle.
3 Run the seat belt through the
child restraint system and
insert the plate into the
buckle. Make sure that the
belt is not twisted.
4 Fully extend the shoulder belt
and allow it to retract to put it
in lock mode. In lock mode,
the belt cannot be extended.
5 While pushing the child
restraint system into the rear seat, allow the shoulder belt
to retract until the child
restraint system is securely in
place.
After the shoulder belt has
retracted to a poi
nt where there is
no slack in the belt, pull the belt to
check that it cannot be extended.
6 If the child restraint has a top
tether strap, follow the child
restraint manufacturer’s
operation manual regarding
the installation, using the top
tether strap to latch onto the
top tether strap anchor.
( P.62)
7 After installing the child
restraint system, rock it back
and forth to ensure that it is
installed securely. ( P.59)
■Booster seat
1 If installing the child restraint
system to the front passen-
ger seat is unavoidable, refer
to P.54 for front passenger
seat adjustment.
2 Place the child restraint sys-
tem on the seat facing the
front of the vehicle.
Page 135 of 556
1354-3. Adjusting the seats
Owners Manual_USA_M62084_en
4
Before driving
4-3.Adjusting the seats
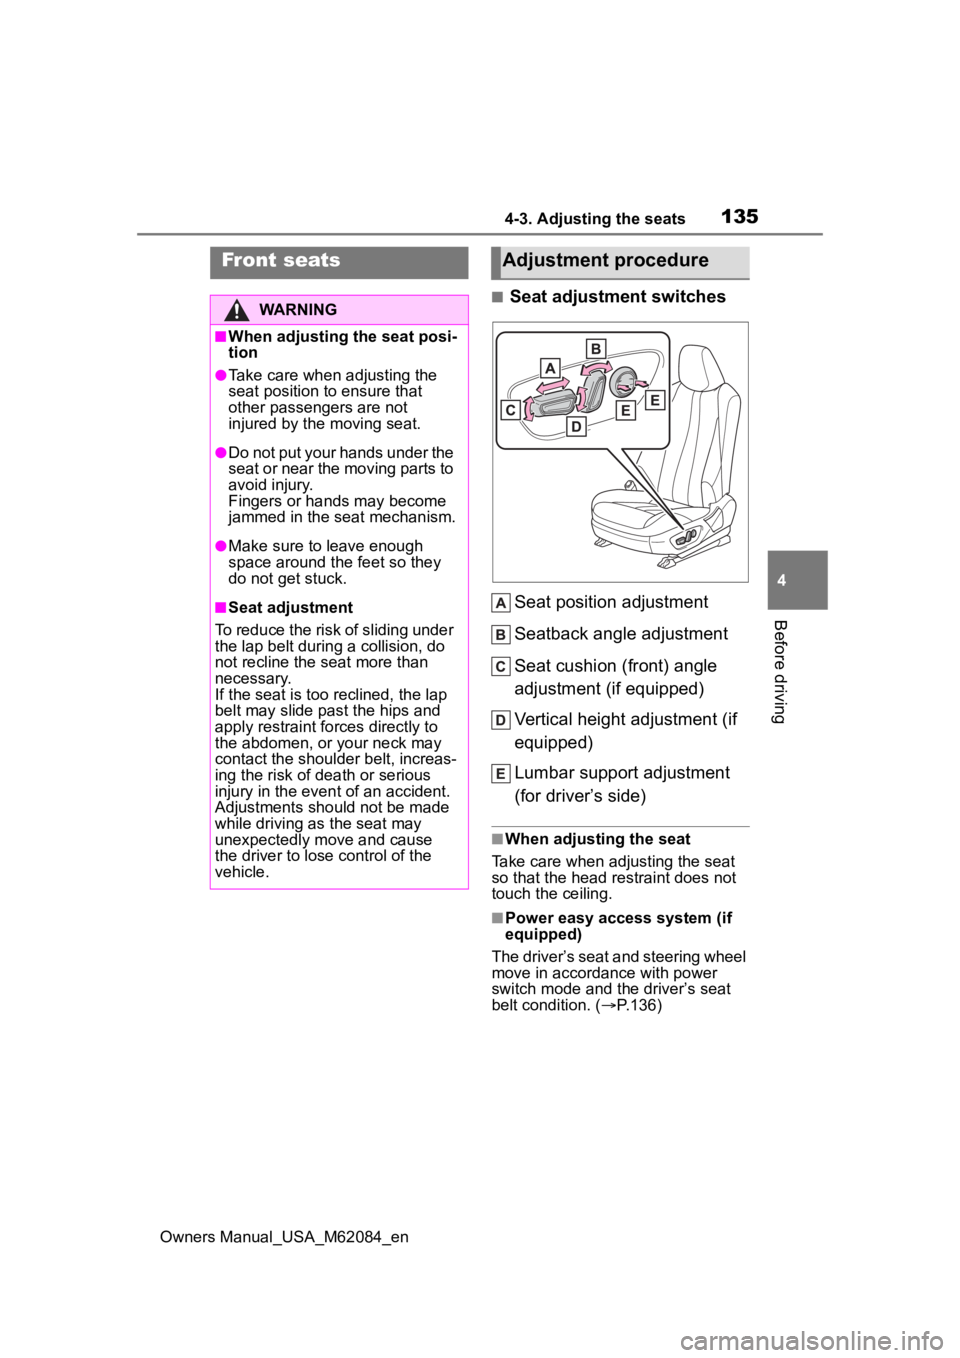
■Seat adjustment switches Seat position adjustment
Seatback angle adjustment
Seat cushion (front) angle
adjustment (if equipped)
Vertical height adjustment (if
equipped)
Lumbar support adjustment
(for driver’s side)
■When adjusting the seat
Take care when adjusting the seat
so that the head restraint does not
touch the ceiling.
■Power easy access system (if
equipped)
The driver’s seat and steering wheel
move in accordance with power
switch mode and th e driver’s seat
belt condition. ( P.136)
Front seats
WARNING
■When adjusting the seat posi-
tion
●Take care when adjusting the
seat position to ensure that
other passengers are not
injured by the moving seat.
●Do not put your hands under the
seat or near the moving parts to
avoid injury.
Fingers or hands may become
jammed in the seat mechanism.
●Make sure to leave enough
space around the feet so they
do not get stuck.
■Seat adjustment
To reduce the risk of sliding under
the lap belt during a collision, do
not recline the seat more than
necessary.
If the seat is too reclined, the lap
belt may slide past the hips and
apply restraint forces directly to
the abdomen, or your neck may
contact the shoulder belt, increas-
ing the risk of death or serious
injury in the event of an accident.
Adjustments should not be made
while driving as the seat may
unexpectedly move and cause
the driver to lose control of the
vehicle.
Adjustment procedure
Page 137 of 556
1374-3. Adjusting the seats
Owners Manual_USA_M62084_en
4
Before driving
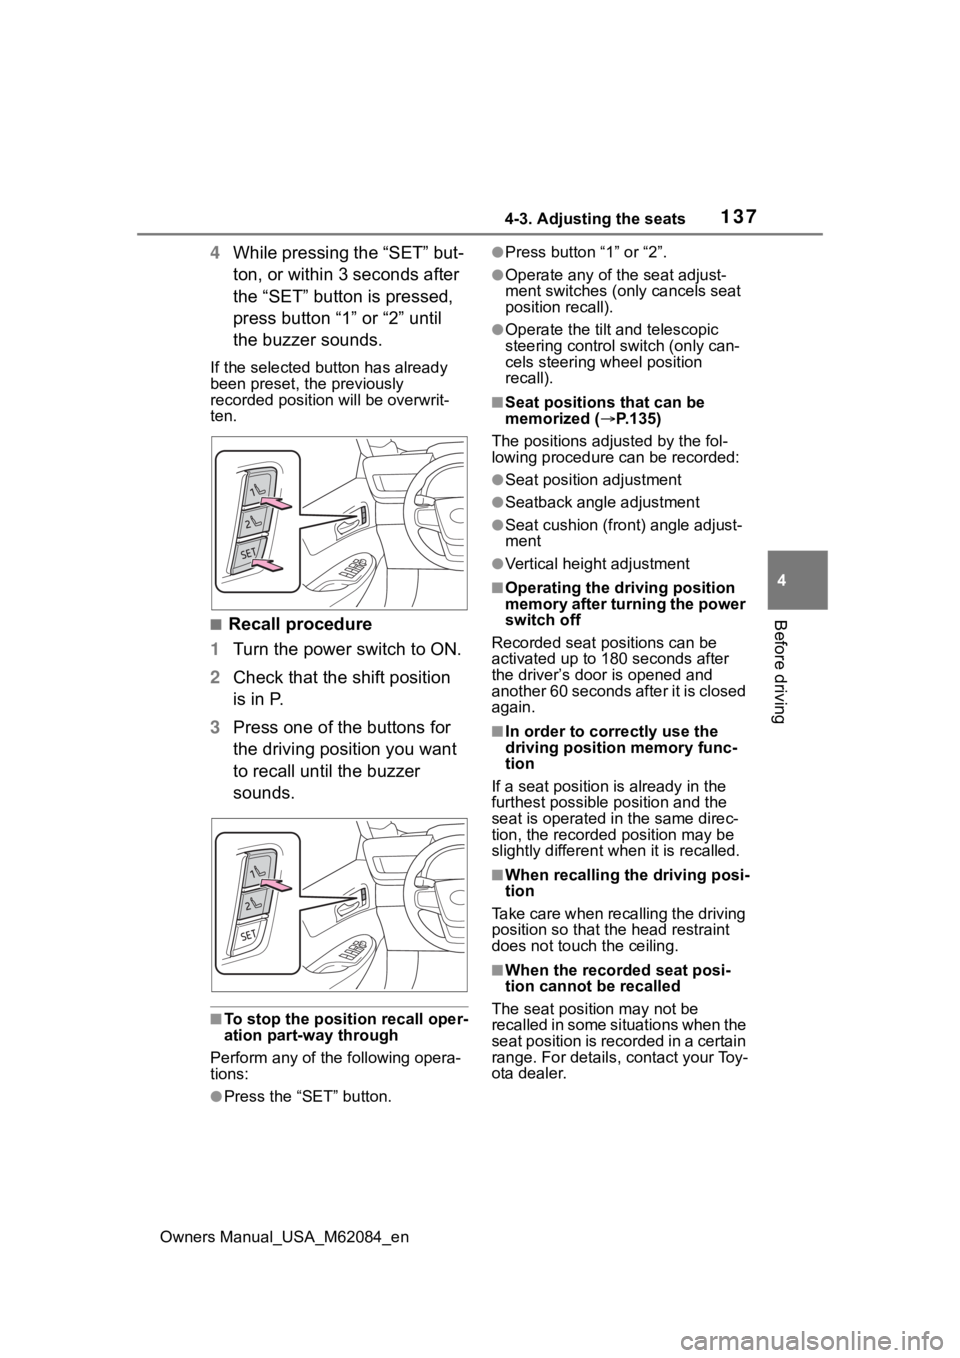
4 While pressing the “SET” but-
ton, or within 3 seconds after
the “SET” button is pressed,
press button “1” or “2” until
the buzzer sounds.
If the selected button has already
been preset, the previously
recorded position will be overwrit-
ten.
■Recall procedure
1 Turn the power switch to ON.
2 Check that the shift position
is in P.
3 Press one of the buttons for
the driving position you want
to recall until the buzzer
sounds.
■To stop the position recall oper-
ation part-way through
Perform any of the following opera-
tions:
●Press the “SET” button.
●Press button “1” or “2”.
●Operate any of t he seat adjust-
ment switches (only cancels seat
position recall).
●Operate the tilt and telescopic
steering control switch (only can-
cels steering wheel position
recall).
■Seat positions that can be
memorized ( P.135)
The positions adjusted by the fol-
lowing procedure can be recorded:
●Seat position adjustment
●Seatback angle adjustment
●Seat cushion (front) angle adjust-
ment
●Vertical height adjustment
■Operating the driving position
memory after turning the power
switch off
Recorded seat positions can be
activated up to 180 seconds after
the driver’s door is opened and
another 60 seconds after it is closed
again.
■In order to corre ctly use the
driving position memory func-
tion
If a seat position is already in the
furthest possible position and the
seat is operated in the same direc-
tion, the recorded position may be
slightly different w hen it is recalled.
■When recalling the driving posi-
tion
Take care when recalling the driving
position so that the head restraint
does not touch the ceiling.
■When the recorded seat posi-
tion cannot be recalled
The seat positi on may not be
recalled in some situations when the
seat position is recorded in a certain
range. For details, contact your Toy-
ota dealer.
Page 138 of 556
1384-3. Adjusting the seats
Owners Manual_USA_M62084_en
■Registering procedure
Record your driving position to
button “1” or “2” before perform-
ing the following:
Carry only the key you want to
register, and then close the
driver’s door.
If 2 or more keys are in the vehi-
cle, the driving position cannot
be recorded properly.
1 Turn the power switch to ON.
2 Check that the shift position
is in P.
3 Recall the driving position
that you want to record.
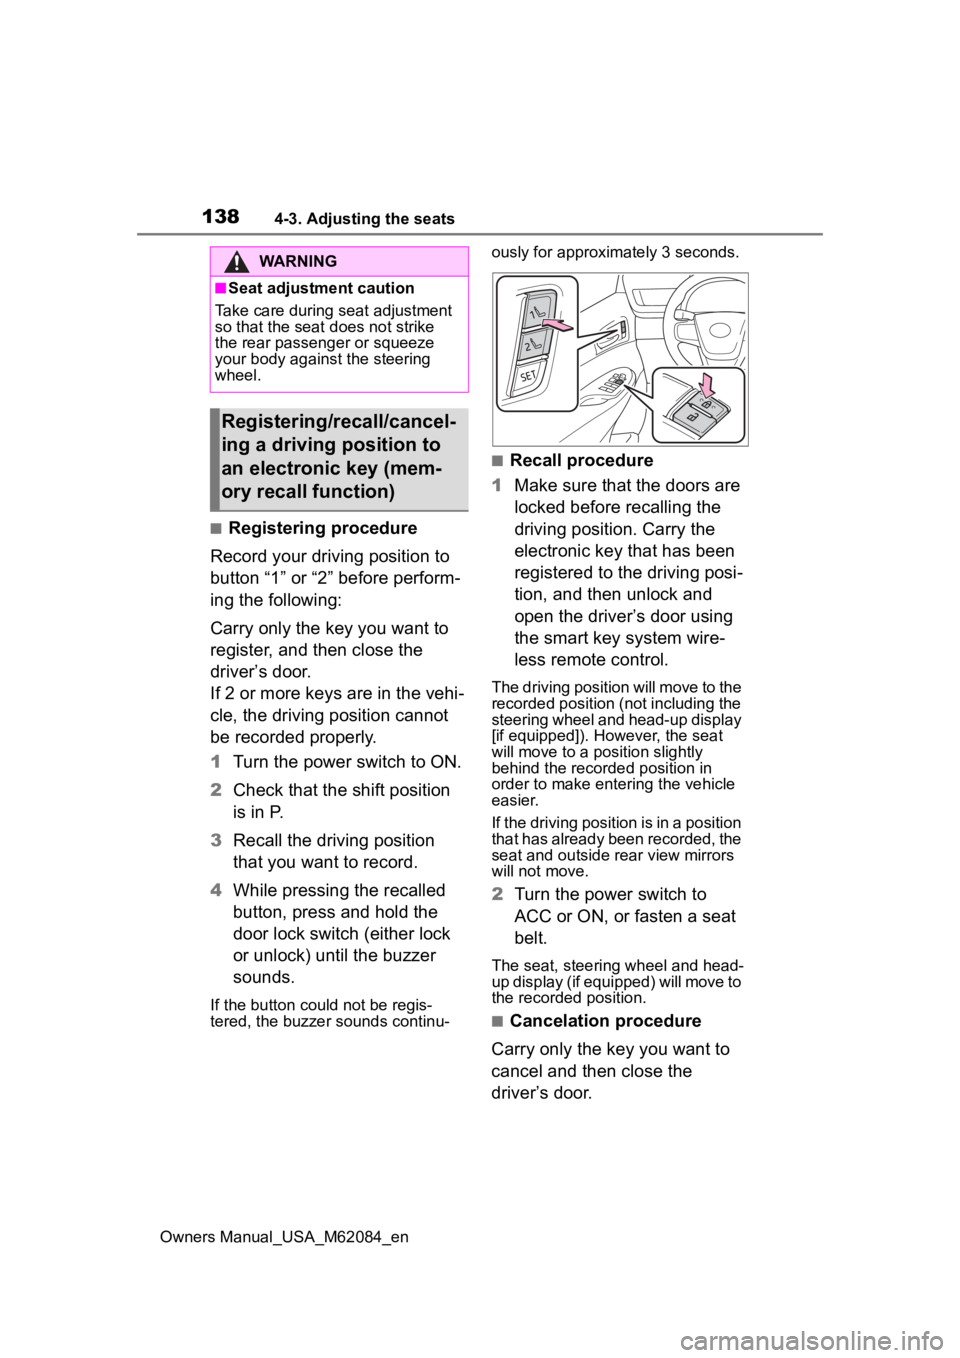
4 While pressing the recalled
button, press and hold the
door lock switch (either lock
or unlock) until the buzzer
sounds.
If the button could not be regis-
tered, the buzzer sounds continu- ously for approxim
ately 3 seconds.
■Recall procedure
1 Make sure that the doors are
locked before recalling the
driving position. Carry the
electronic key that has been
registered to the driving posi-
tion, and then unlock and
open the driver’s door using
the smart key system wire-
less remote control.
The driving position will move to the
recorded position (not including the
steering wheel and head-up display
[if equipped]). However, the seat
will move to a position slightly
behind the recorded position in
order to make entering the vehicle
easier.
If the driving position is in a position
that has already been recorded, the
seat and outside rear view mirrors
will not move.
2Turn the power switch to
ACC or ON, or fasten a seat
belt.
The seat, steering wheel and head-
up display (if equipped) will move to
the recorded position.
■Cancelation procedure
Carry only the key you want to
cancel and then close the
driver’s door.
WARNING
■Seat adjustment caution
Take care during seat adjustment
so that the seat d oes not strike
the rear passenger or squeeze
your body again st the steering
wheel.
Registering/recall/cancel-
ing a driving position to
an electronic key (mem-
ory recall function)
Page 141 of 556
1414-4. Adjusting the steering wheel and mirrors
Owners Manual_USA_M62084_en
4
Before driving
4-4.Adjusting the steering wheel and mirrors
Manual adjustment type
1 Hold the steering wheel and
push the lever down.
2 Adjust to the ideal position by
moving the steering wheel
horizontally and vertically.
After adjustment, pull the lever up
to secure the steering wheel.
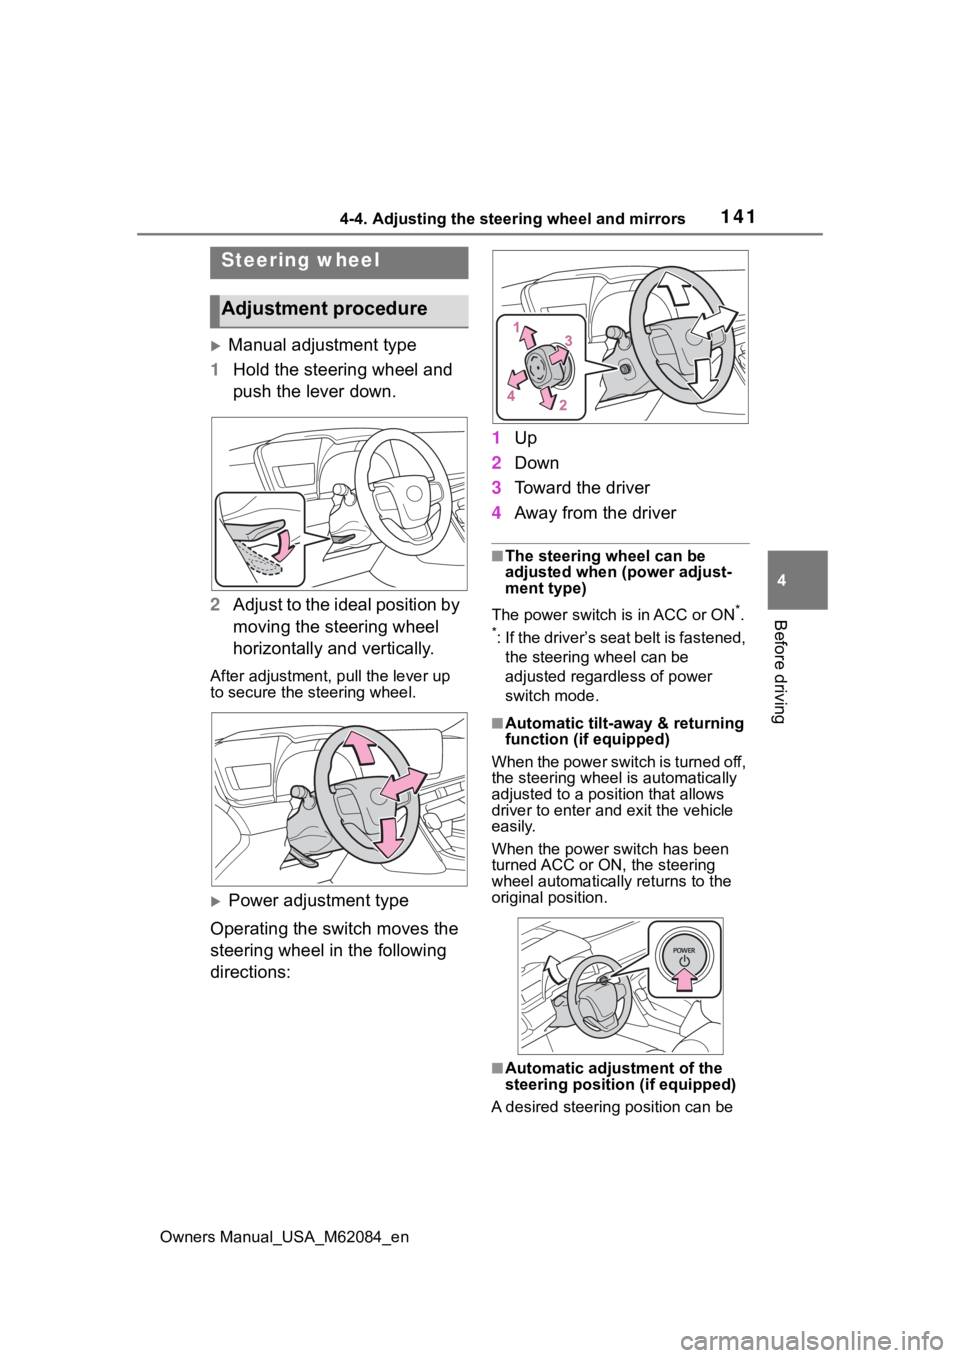
Power adjustment type
Operating the switch moves the
steering wheel in the following
directions: 1
Up
2 Down
3 Toward the driver
4 Away from the driver
■The steering wheel can be
adjusted when (power adjust-
ment type)
The power switch is in ACC or ON
*.
*: If the driver’s seat belt is fastened, the steering wheel can be
adjusted regardless of power
switch mode.
■Automatic tilt-away & returning
function (if equipped)
When the power switch is turned off,
the steering wheel is automatically
adjusted to a posit ion that allows
driver to enter and exit the vehicle
easily.
When the power switch has been
turned ACC or ON, the steering
wheel automatically returns to the
original position.
■Automatic adjustment of the
steering positi on (if equipped)
A desired steering position can be
Steering wheel
Adjustment procedure
Page 142 of 556
1424-4. Adjusting the steering wheel and mirrors
Owners Manual_USA_M62084_enentered to memory and recalled
automatically by the driving position
memory system. (
P.136)
■Power easy access system (if
equipped)
The steering wheel and driver’s seat
move in accordance with power
switch mode and the driver’s seat
belt condition. ( P.136)
■After adjusting the steering
wheel (manual adjustment type)
Make sure that the steering wheel is
securely locked.
The horn may not sound if the steer-
ing wheel is not securely locked.
■Customization
Some functions can be customized.
( P.498)
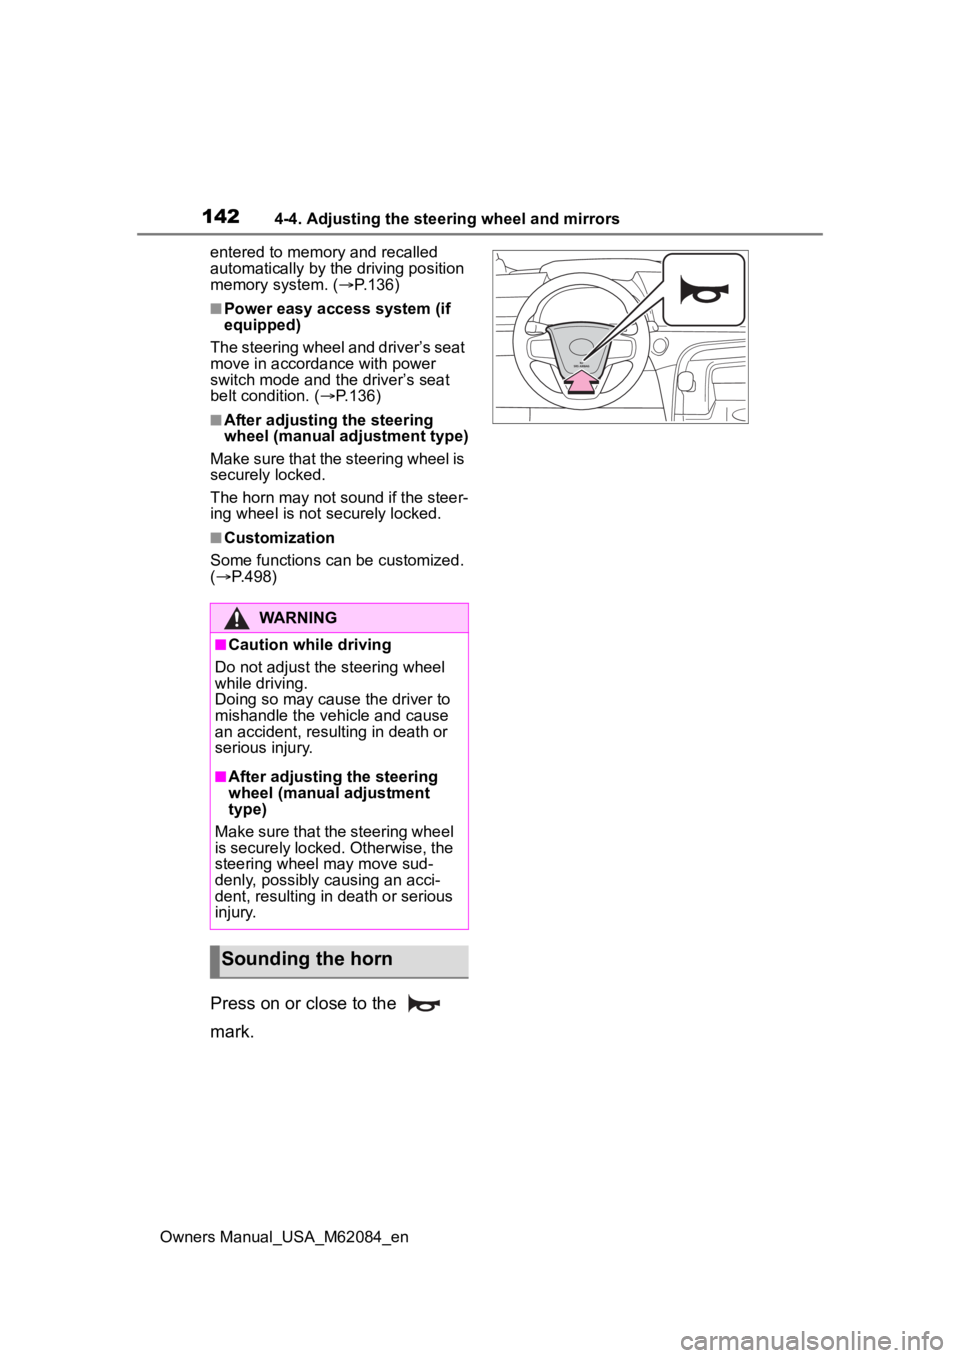
Press on or close to the
mark.
WARNING
■Caution while driving
Do not adjust the steering wheel
while driving.
Doing so may cause the driver to
mishandle the vehicle and cause
an accident, resul ting in death or
serious injury.
■After adjusting the steering
wheel (manual adjustment
type)
Make sure that the steering wheel
is securely locked. Otherwise, the
steering wheel may move sud-
denly, possibly causing an acci-
dent, resulting in death or serious
injury.
Sounding the horn
Page 428 of 556
4287-3. Do-it-yourself maintenance
Owners Manual_USA_M62084_en
■After a fuse is replaced
●When installing the lid, make sure
that the tab is installed securely.
●If the lights do not turn on even
after the fuse has been replaced,
a bulb may need replacement.
●If the replaced fuse blows again,
have the vehicle inspected by
your Toyota dealer.
■If there is an overload in a cir-
cuit
The fuses are designed to blow, pro-
tecting the wiring harness from
damage.
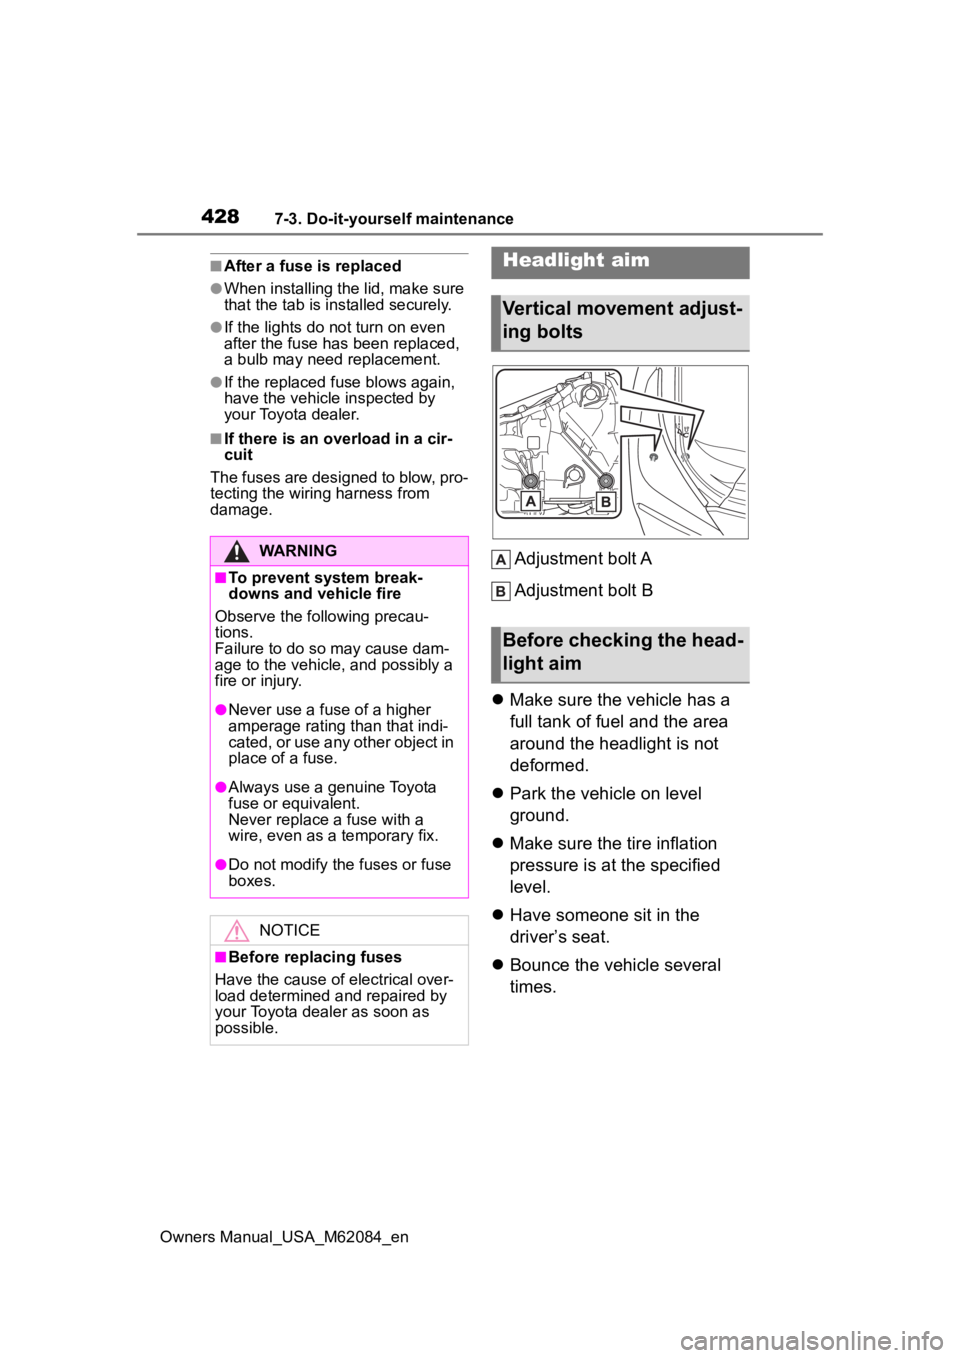
Adjustment bolt A
Adjustment bolt B
Make sure the vehicle has a
full tank of fuel and the area
around the headlight is not
deformed.
Park the vehicle on level
ground.
Make sure the tire inflation
pressure is at the specified
level.
Have someone sit in the
driver’s seat.
Bounce the vehicle several
times.WARNING
■To prevent system break-
downs and vehicle fire
Observe the following precau-
tions.
Failure to do so may cause dam-
age to the vehicle, and possibly a
fire or injury.
●Never use a fuse of a higher
amperage rating than that indi-
cated, or use any other object in
place of a fuse.
●Always use a genuine Toyota
fuse or equivalent.
Never replace a fuse with a
wire, even as a temporary fix.
●Do not modify the fuses or fuse
boxes.
NOTICE
■Before replacing fuses
Have the cause of electrical over-
load determined and repaired by
your Toyota dealer as soon as
possible.
Headlight aim
Vertical movement adjust-
ing bolts
Before checking the head-
light aim