brake light TOYOTA MIRAI 2023 Owner's Guide
[x] Cancel search | Manufacturer: TOYOTA, Model Year: 2023, Model line: MIRAI, Model: TOYOTA MIRAI 2023Pages: 572, PDF Size: 17.71 MB
Page 374 of 572
3746-4. Using the other interior features
Owners Manual_USA_M62064_en
This system allows the use of
electrical devices with a total
power consumption of 1500W at
120 VAC in the vehicle. Supply-
ing power to electrical devices
outside the vehicle is not recom-
mended, as it may violate the
laws and regulations of the
country or region where it is
used. When supplying power to
electrical devices outside the
vehicle, check the laws and reg-
ulations with the relevant local
government of each country or region in advance. Also, be
careful not to drag electrical
devices and cords when moving
the vehicle.
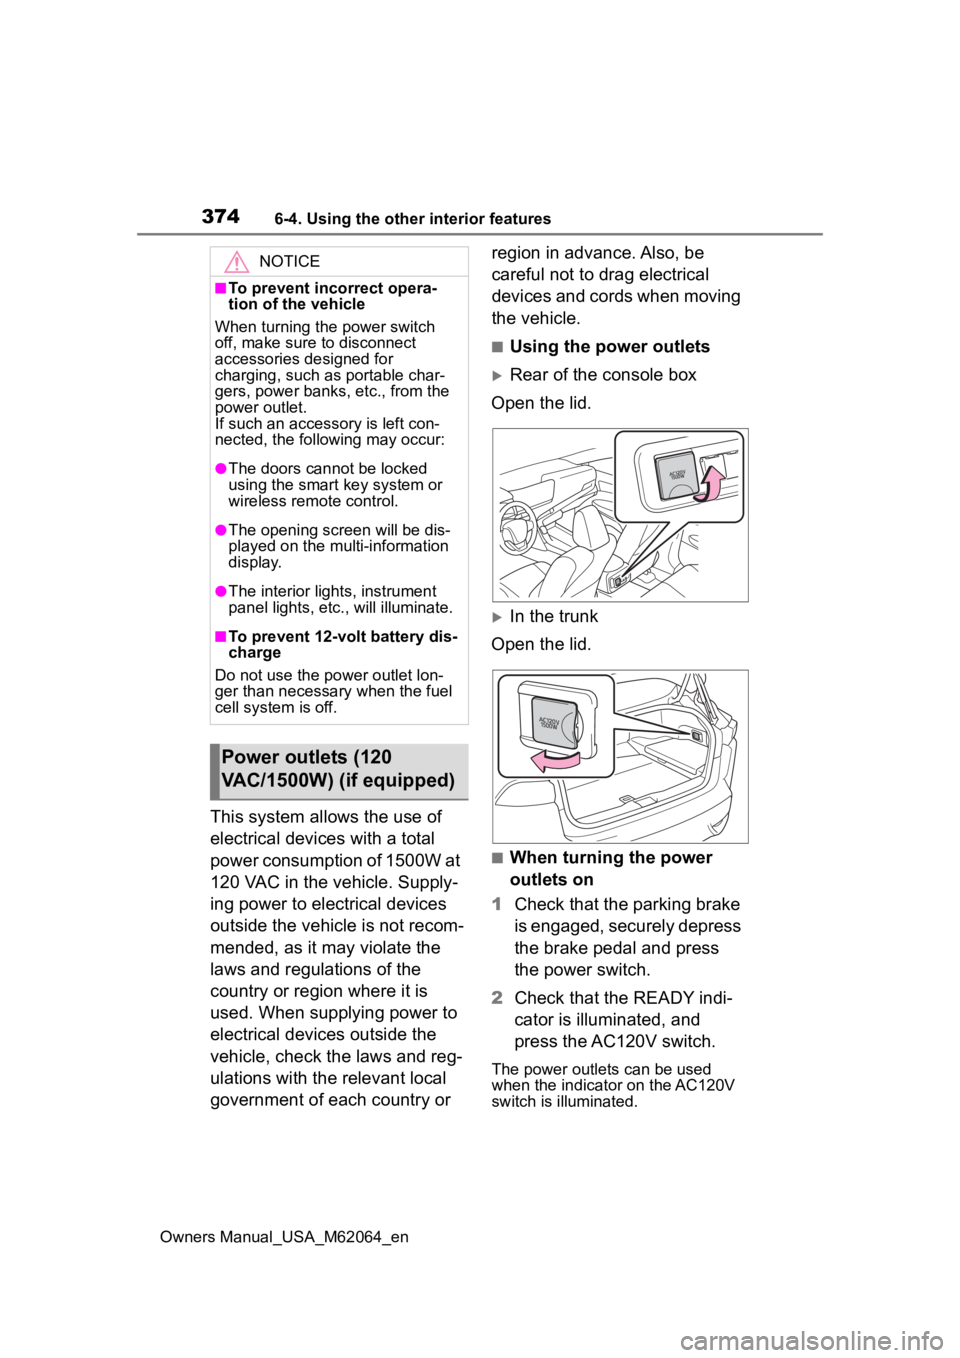
■Using the power outlets
Rear of the console box
Open the lid.
In the trunk
Open the lid.
■When turning the power
outlets on
1 Check that the parking brake
is engaged, securely depress
the brake pedal and press
the power switch.
2 Check that the READY indi-
cator is illuminated, and
press the AC120V switch.
The power outlets can be used
when the indicator on the AC120V
switch is illuminated.
NOTICE
■To prevent incorrect opera-
tion of the vehicle
When turning the power switch
off, make sure to disconnect
accessories designed for
charging, such as portable char-
gers, power banks , etc., from the
power outlet.
If such an accessory is left con-
nected, the following may occur:
●The doors cannot be locked
using the smart key system or
wireless remote control.
●The opening scr een will be dis-
played on the multi-information
display.
●The interior lights, instrument
panel lights, etc., will illuminate.
■To prevent 12-volt battery dis-
charge
Do not use the power outlet lon-
ger than necessary when the fuel
cell system is off.
Power outlets (120
VAC/1500W) (if equipped)
Page 395 of 572
3957-1. Maintenance and care
Owners Manual_USA_M62064_en
7
Maintenance and care
NOTICE
• If the vehicle becomes heavily soiled with dust or mud
• If liquids such as benzene and gasoline are spilled on the paint
surface
●If the paint is chipped or
scratched, have it repaired
immediately.
●To prevent the wheels from cor-
roding, remove any dirt and
store in a place with low humid-
ity when storing the wheels.
■Cleaning the exterior lights
●Wash carefully. Do not use
organic substances or scrub
with a hard brush.
This may damage the surfaces
of the lights.
●Do not apply wax to the sur-
faces of the lights.
Wax may cause damage to the
lenses.
■When washing the car
Do not remove the vehicle recep-
tacle cap and directly pour water
over the vehicle receptacle. If
water enters the vehicle recepta-
cle, damage may occur.
■When using an automatic car
wash
Set the wiper switch to the off
position.
If the wiper switch is in “AUTO”,
the wipers may operate and the
wiper blades may be damaged.
■When using a high pressure
car wash
●When washing the vehicle, do
not spray the camera or its sur-
rounding area directly with a
high pressure washer. Shock
applied from high pressure
water may cause the device to
not operate normally.
●Do not spray water directly on
the radar sensor which is
equipped behind the emblem.
Otherwise it may cause the
device to be damaged.
●Do not bring the nozzle tip close
to boots (rubber or resin manu-
factured cover), connectors or
the following parts. The parts
may be damaged if they come
into contact with high-pressure
water.
• Fuel cell stack
• Traction related parts
• Steering parts
• Suspension parts
• Brake parts
●Keep the cleaning nozzle at
least 11.9 in. (30 cm) away from
the vehicle body. Otherwise
resin section, s uch as moldings
and bumpers, may be deformed
and damaged.
Also, do not continuously hold the
nozzle in the same place.
●Do not spray the lower part of
the windshield continuously.
If water enters the air conditioning
system intake located near the
lower part of the windshield, the
air conditioning system may not
operate correctly.
Page 402 of 572
4027-2. Maintenance
Owners Manual_USA_M62064_en
Radiator/con-
denser
The radiator and
condenser should
be free from for-
eign objects.
( P.411)
Washer fluid
Is there sufficient
washer fluid?
( P.412)
Trun k
ItemsCheck points
12-volt batteryCheck the connec-
tions. ( P.413)
Vehicle interior
ItemsCheck points
Accelerator
pedal
• The accelerator
pedal should
move smoothly
(without uneven
pedal effort or
catching).
Transmission
“Park” mecha-
nism
• When parked on a slope and the
shift position is in
P, is the vehicle
securely
stopped?
ItemsCheck points
Brake pedal
• Does the brake pedal move
smoothly?
• Does the brake pedal have
appropriate
clearance from
the floor?
• Does the brake pedal have the
correct amount
of free play?
Brakes
• The vehicle should not pull to
one side when
the brakes are
applied.
• The brakes should work
effectively.
• The brake pedal should not feel
spongy.
• The brake pedal should not get
too close to the
floor when the
brakes are
applied.
Head
restraints
• Do the head restraints move
smoothly and
lock securely?
Indica-
tors/buzzers
• Do the indica-tors and buzzers
function prop-
erly?
Lights• Do all the lights come on?
ItemsCheck points
Page 404 of 572
4047-3. Do-it-yourself maintenance
Owners Manual_USA_M62064_en
7-3.Do-it-yourself maintenance
Do-it-yourself ser vice
precautions
If you perform maintenance
by yourself, be sure to fol-
low the correct procedure
as given in these sections.
Maintenance
ItemsParts and tools
12-volt battery
condition
( P.413)
•Grease
• Conventional
wrench (for ter-
minal clamp
bolts)
Brake fluid
level ( P.412)
• FMVSS No.116
DOT 3 or SAE
J1703 brake fluid
FMVSS No.116
DOT 4 or SAE
J1704 brake fluid
• Rag or paper towel
• Funnel (used only for adding
brake fluid)
Inverter cool-
ant level
( P.410)
• “Toyota Super
Long Life Cool-
ant” or a similar
high quality eth-
ylene glycol-
based non-sili-
cate, non-amine,
non-nitrite and
non-borate cool-
ant with long-life
hybrid organic
acid technology
For the U.S.A.:
“Toyota Super
Long Life Cool-
ant” is pre-mixed
with 50% cool-
ant and 50%
deionized water.
For Canada:
“Toyota Super
Long Life Cool-
ant” is pre-mixed
with 55% cool-
ant and 45%
deionized water.
• Funnel (used only for adding
coolant)
Fuses
( P.438)
• Fuse with same
amperage rating
as original
• Flathead screw- driver
Headlight aim
( P.442)• Phillips-head
screwdriver
Radiator and
condenser
( P.411)
ItemsParts and tools
Page 412 of 572
4127-3. Do-it-yourself maintenance
Owners Manual_USA_M62064_en
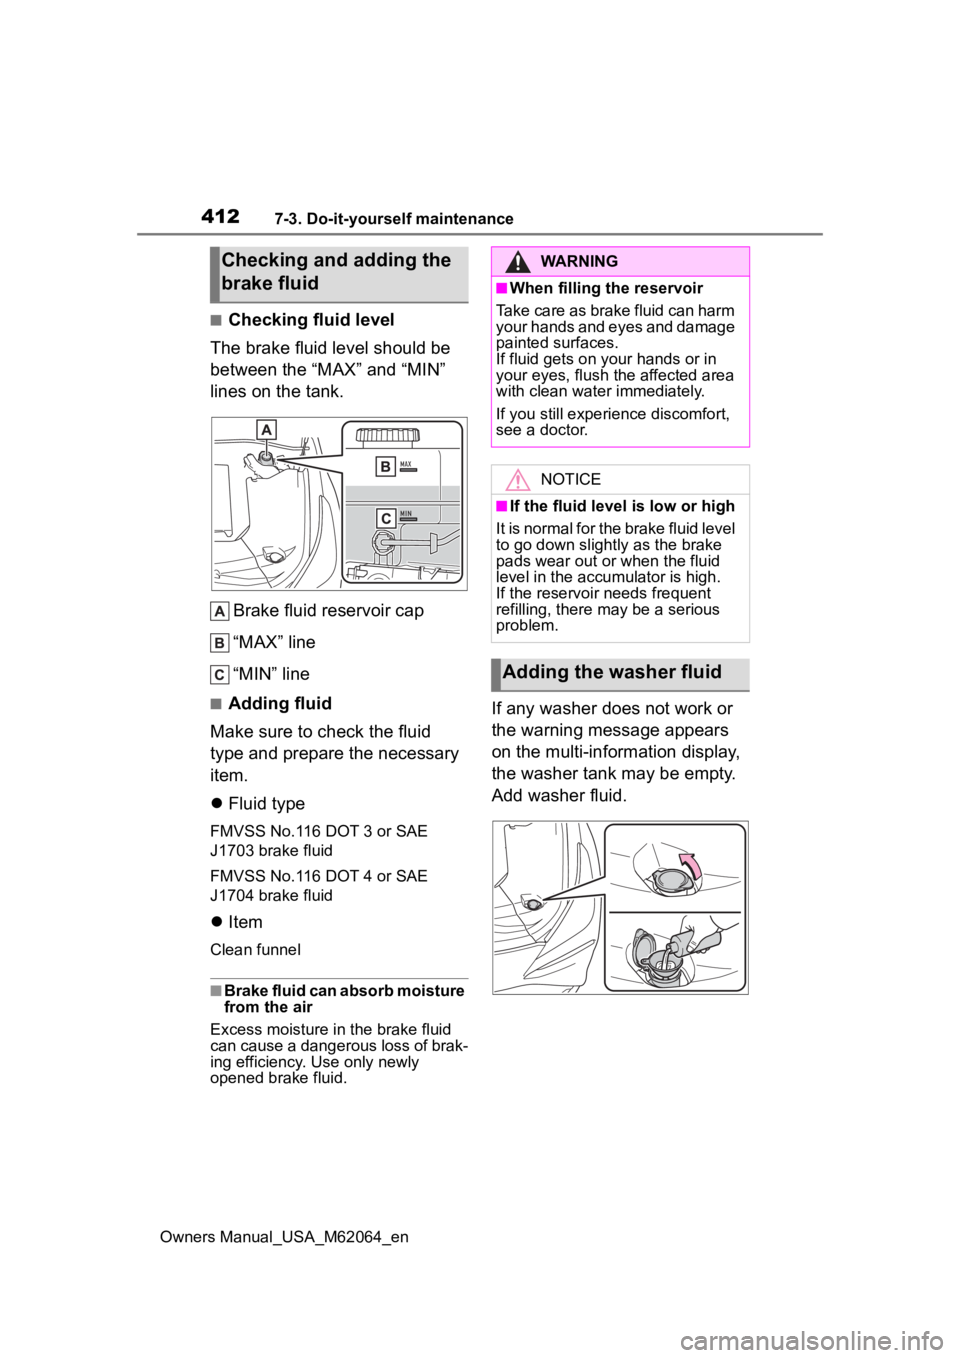
■Checking fluid level
The brake fluid level should be
between the “MAX” and “MIN”
lines on the tank.
Brake fluid reservoir cap
“MAX” line
“MIN” line
■Adding fluid
Make sure to check the fluid
type and prepare the necessary
item.
Fluid type
FMVSS No.116 DOT 3 or SAE
J1703 brake fluid
FMVSS No.116 DOT 4 or SAE
J1704 brake fluid
Item
Clean funnel
■Brake fluid can absorb moisture
from the air
Excess moisture in the brake fluid
can cause a dangerous loss of brak-
ing efficiency. Use only newly
opened brake fluid.
If any washer does not work or
the warning message appears
on the multi-information display,
the washer tank may be empty.
Add washer fluid.
Checking and adding the
brake fluidWARNING
■When filling the reservoir
Take care as brake fluid can harm
your hands and eyes and damage
painted surfaces.
If fluid gets on your hands or in
your eyes, flush the affected area
with clean water immediately.
If you still experi ence discomfort,
see a doctor.
NOTICE
■If the fluid level is low or high
It is normal for the brake fluid level
to go down slight ly as the brake
pads wear out or when the fluid
level in the accumulator is high.
If the reservoir needs frequent
refilling, there m ay be a serious
problem.
Adding the washer fluid
Page 414 of 572
4147-3. Do-it-yourself maintenance
Owners Manual_USA_M62064_en
●The power switch mode is
recorded by the vehicle. If the 12-
volt battery is reconnected, the
vehicle will return the power
switch mode to the status it was in
before the 12-volt battery was dis-
connected. Make sure to turn off
the power switch before discon-
necting the 12-volt battery. Take
extra care when connecting the
12-volt battery if the power switch
mode prior to discharge is
unknown.
●When the 12-volt b attery is recon-
nected, start the fuel cell system,
depress the brake pedal, and con-
firm that it is possible to shift into
each shift position.
If the system will not start even after
multiple attempts, contact your Toy-
ota dealer.
WARNING
■Chemicals in the 12-volt bat-
tery
The 12-volt battery contains poi-
sonous and corrosi ve sulfuric acid
and may produce hydrogen gas
which is flammable and explosive.
To reduce the risk of death or seri-
ous injury, take th e following pre-
cautions while working on or near
the 12-volt battery:
●Do not cause sparks by touch-
ing the 12-volt battery terminals
with tools.
●Do not smoke or light a match
near the 12-volt battery.
●Avoid contact with eyes, skin
and clothes.
●Never inhale or swallow electro-
lyte.
●Wear protective safety glasses
when working near the 12-volt
battery.
●Keep children away from the
12-volt battery.
■Where to safely charge the
12-volt battery
Always charge the 12-volt battery
in an open area. Do not charge
the 12-volt battery in a garage or
closed room where there is insuf-
ficient ventilation.
■Emergency measures regard-
ing electrolyte
●If electrolyte gets in your eyes
Flush your eyes with clean
water for at least 15 minutes
and get immediate medical
attention. If possible, continue
to apply water with a sponge or
cloth while traveling to the near-
est medical facility.
●If electrolyte gets on your skin
Wash the affected area thor-
oughly. If you feel pain or burn-
ing, get medical attention
immediately.
●If electrolyte gets on your
clothes
It can soak through clothing on
to your skin. Imm ediately take
off the clothing and follow the
procedure above if necessary.
●If you accidentally swallow elec-
trolyte
Drink a large quantity of water
or milk. Get emergency medical
attention immediately.
■When replacing the 12-volt
battery
Use a 12-volt battery designed for
this vehicle. Failu re to do so may
cause gas (hydrogen) to enter the
passenger compartment, causing
a fire or explosion.
For replacement of the 12-volt
battery, contact your Toyota
dealer.
Page 424 of 572
4247-3. Do-it-yourself maintenance
Owners Manual_USA_M62064_enbeginning.
●In the following situations, ID code
registration will not be started or
was not completed properly and
the system will no
t operate prop-
erly. Perform the ID code registra-
tion procedure again.
• If, when attempting to start ID
code registration, the tire pressure
warning light does not blink slowly
3 times.
• If, when the vehicle has been driven for about 20 minutes after
performing ID co de registration,
the tire pressur e warning light
blinks for approxi mately 1 minute
and then illu minates.
●If ID code registration cannot be
completed after performing the
above procedure, contact your
Toyota dealer.
Stop the vehicle in a safe
place on a hard, flat surface.
Set the parking brake.
Shift the shift position to P.
Stop the fuel cell system.
■Jack and tools
As your vehicle is not installed spare
tire, the following t ools for replacing
a tire are not included with your
vehicle. They can be purchased at
your Toyota dealer.
●Wheel nut wrench
●Jack
●Jack handle
Replacing the tire
When raising your vehicle
with a jack, position the jack
correctly.
Improper placement may
damage your vehicle or
cause injury.
If necessary tire replace-
ment seems difficult to per-
form, contact your Toyota
dealer.
Before jacking up the
vehicle
Page 426 of 572
4267-3. Do-it-yourself maintenance
Owners Manual_USA_M62064_en
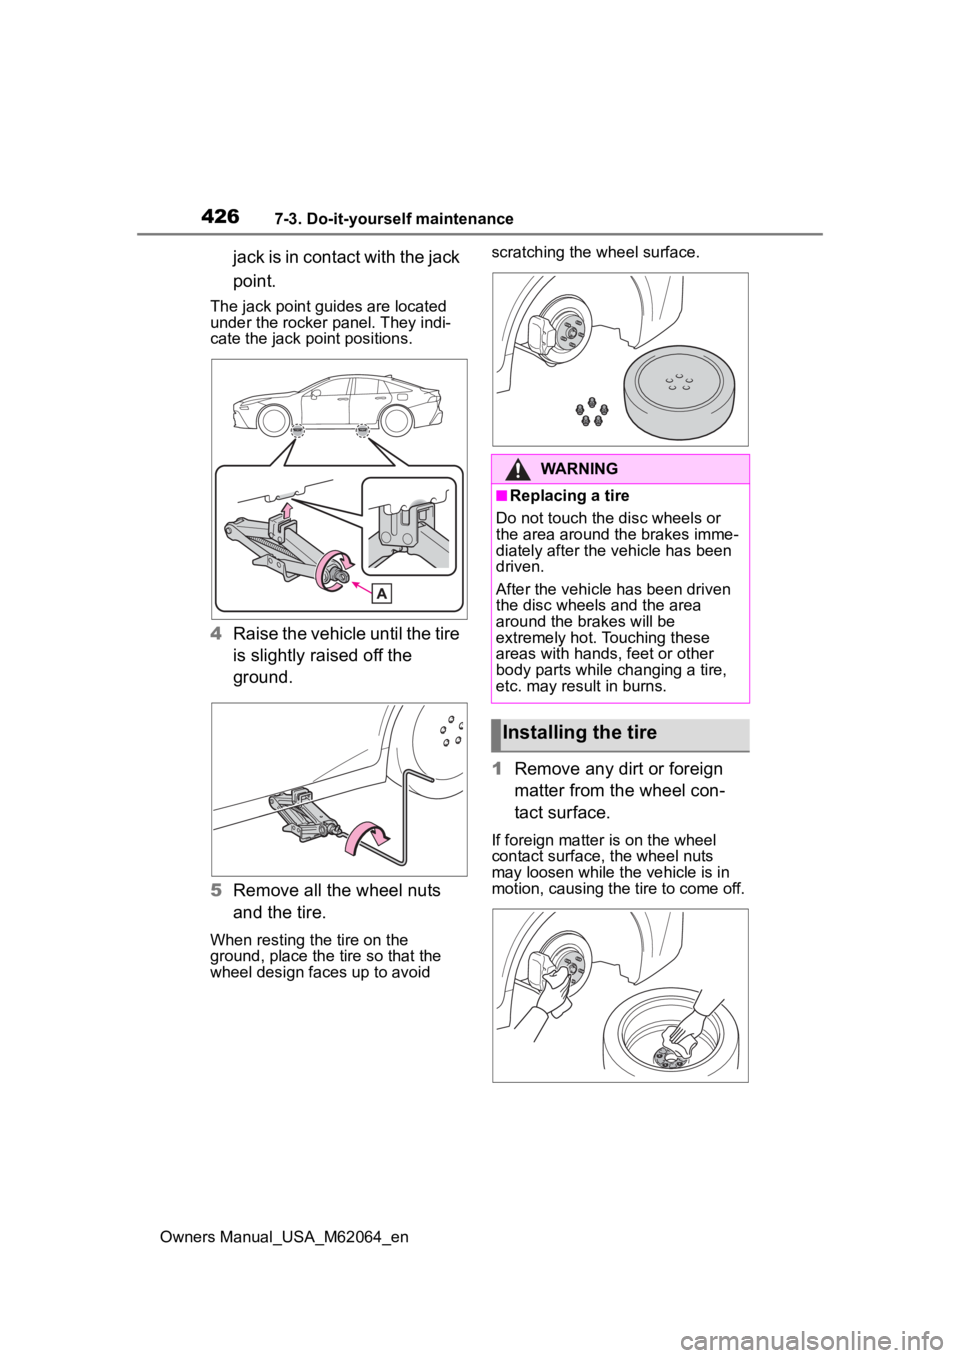
jack is in contact with the jack
point.
The jack point guides are located
under the rocker panel. They indi-
cate the jack point positions.
4Raise the vehicle until the tire
is slightly raised off the
ground.
5 Remove all the wheel nuts
and the tire.
When resting the tire on the
ground, place the tire so that the
wheel design faces up to avoid scratching the wheel surface.
1
Remove any dirt or foreign
matter from the wheel con-
tact surface.
If foreign matter is on the wheel
contact surface, the wheel nuts
may loosen while the vehicle is in
motion, causing the tire to come off.
WARNING
■Replacing a tire
Do not touch the disc wheels or
the area around the brakes imme-
diately after the vehicle has been
driven.
After the vehicle has been driven
the disc wheels and the area
around the br akes will be
extremely hot. Touching these
areas with hands, feet or other
body parts while changing a tire,
etc. may result in burns.
Installing the tire
Page 446 of 572
4468-1. Essential information
Owners Manual_USA_M62064_en
8-1.Essential information
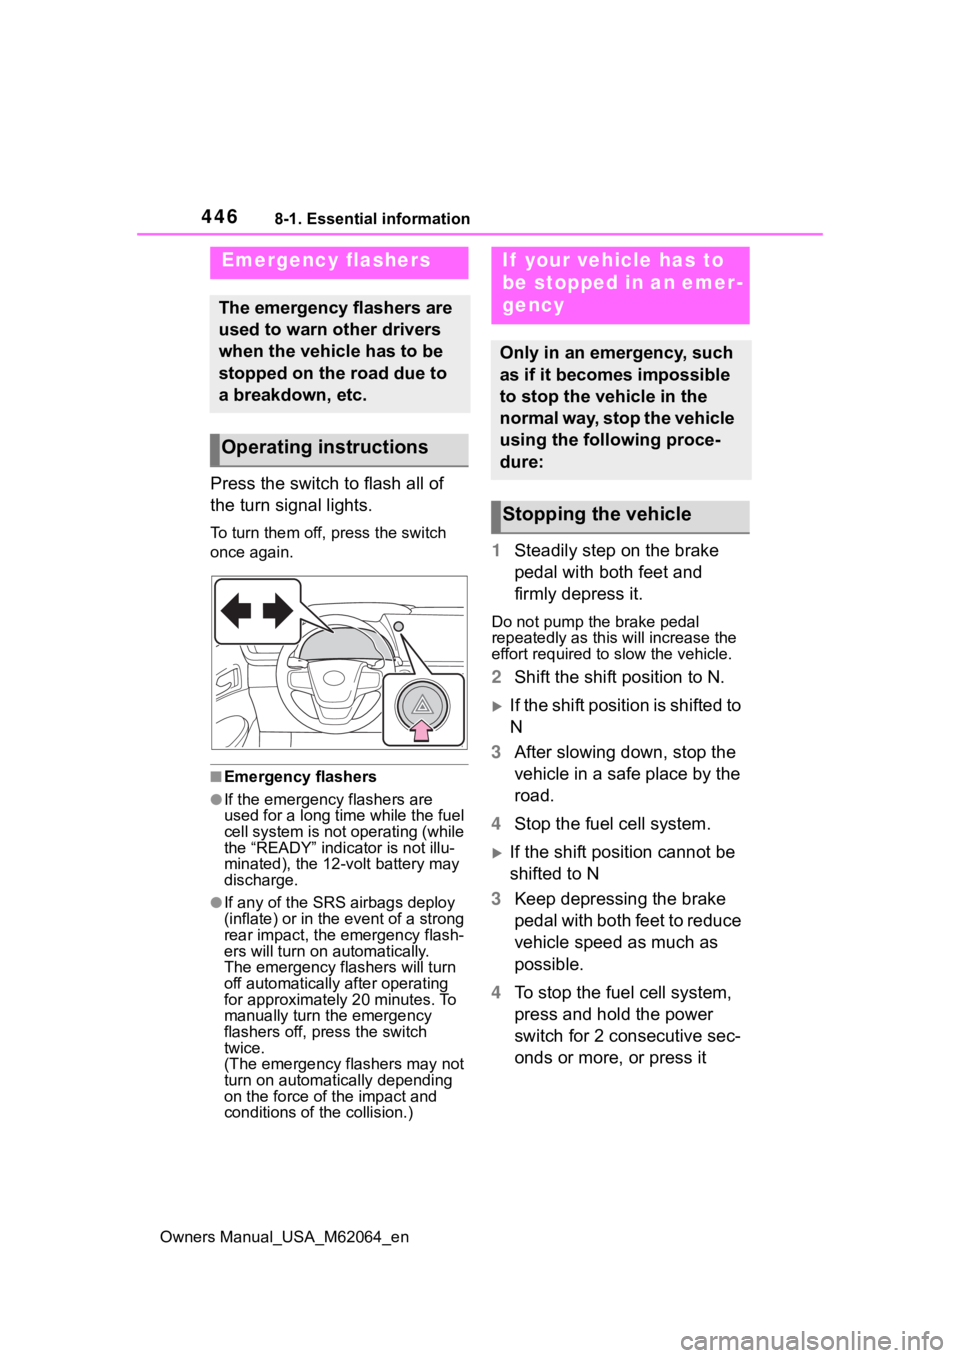
Press the switch to flash all of
the turn signal lights.
To turn them off, press the switch
once again.
■Emergency flashers
●If the emergency flashers are
used for a long time while the fuel
cell system is not operating (while
the “READY” indicator is not illu-
minated), the 12-volt battery may
discharge.
●If any of the SRS airbags deploy
(inflate) or in the event of a strong
rear impact, the emergency flash-
ers will turn on automatically.
The emergency flashers will turn
off automatically after operating
for approximately 20 minutes. To
manually turn t he emergency
flashers off, press the switch
twice.
(The emergency flashers may not
turn on automatically depending
on the force of the impact and
conditions of the collision.)
1 Steadily step on the brake
pedal with both feet and
firmly depress it.
Do not pump the brake pedal
repeatedly as this will increase the
effort required to slow the vehicle.
2Shift the shift position to N.
If the shift position is shifted to
N
3 After slowing down, stop the
vehicle in a safe place by the
road.
4 Stop the fuel cell system.
If the shift position cannot be
shifted to N
3 Keep depressing the brake
pedal with both feet to reduce
vehicle speed as much as
possible.
4 To stop the fuel cell system,
press and hold the power
switch for 2 consecutive sec-
onds or more, or press it
Emergency flashers
The emergency flashers are
used to warn other drivers
when the vehicle has to be
stopped on the road due to
a breakdown, etc.
Operating instructions
If your vehicle has to
be stopped in an emer-
gency
Only in an emergency, such
as if it becomes impossible
to stop the vehicle in the
normal way, stop the vehicle
using the following proce-
dure:
Stopping the vehicle
Page 454 of 572

4548-2. Steps to take in an emergency
Owners Manual_USA_M62064_en
■Hydrogen leak warning light (warning buzzer)
■Brake system warning light (warning buzzer)
■Brake system warning light (warning buzzer)
If a war ning light tur ns on or a war ning buzzer
sounds
Calmly perform the following actions if any of the warning
lights comes on or flashes. If a light comes on or flashes, but
then goes off, this does not necessarily indicate a malfunc-
tion in the system. However, if this continues to occur, have
the vehicle inspected by your Toyota dealer.
Actions to the warning lights or warning buzzers
Warning lightDetails/Actions
When a hydrogen gas leak is d etected, a buzzer sounds, a
light comes on, and a warning message is displayed on the
multi-information display.
P. 9 0
Warning lightDetails/Actions
(U.S.A.)
or
(Red)
(Canada)
Indicates that:
The brake fluid level is low; or
The brake system is malfunctioning
Immediately stop the vehicle in a safe place and con-
tact your Toyota dealer. C ontinuing to drive the vehi-
cle may be dangerous.
Warning lightDetails/Actions
(Yellow)
Indicates a malfunction in:
The regenerative braking system;
The electronically contr olled brake system; or
The parking brake system
Have the vehicle inspecte d by your Toyota dealer
immediately.