fuel pressure TOYOTA PRIUS 2020 Owners Manual (in English)
[x] Cancel search | Manufacturer: TOYOTA, Model Year: 2020, Model line: PRIUS, Model: TOYOTA PRIUS 2020Pages: 728, PDF Size: 15.79 MB
Page 17 of 728
17Pictorial index
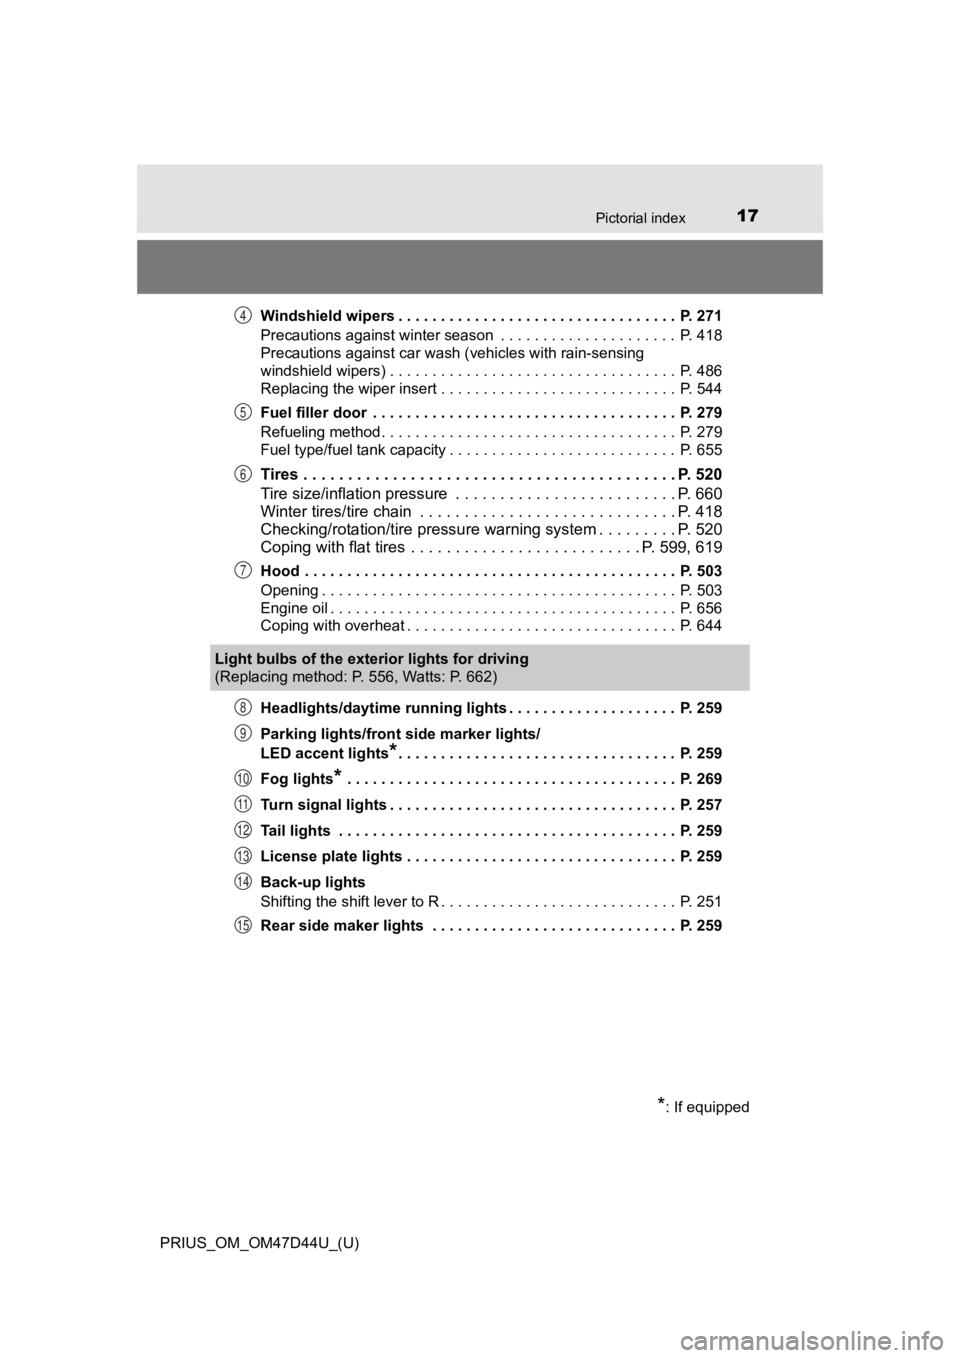
PRIUS_OM_OM47D44U_(U)Windshield wipers . . . . . . . . . . . . . . . . . . . . . . . . . . . . . . . . . P. 271
Precautions against winter season . . . . . . . . . . . . . . . . . . . . . P. 418
Precautions against car wash (vehicles with rain-sensing
windshield wipers) . . . . . . . . . . . . . . . . . . . . . . .
. . . . . . . . . . . P. 486
Replacing the wiper insert . . . . . . . . . . . . . . . . . . . . . . . . . . . . P. 544
Fuel filler door . . . . . . . . . . . . . . . . . . . . . . . . . . . . . . . . . . . . P. 279
Refueling method . . . . . . . . . . . . . . . . . . . . . . . . . . . . . . . . . . . P. 279
Fuel type/fuel tank capacity . . . . . . . . . . . . . . . . . . . . . . . . . . . P. 655
Tires . . . . . . . . . . . . . . . . . . . . . . . . . . . . . . . . . . . . . . . . . . P. 520
Tire size/inflation pressure . . . . . . . . . . . . . . . . . . . . . . . . . P. 660
Winter tires/tire chain . . . . . . . . . . . . . . . . . . . . . . . . . . . . . P. 418
Checking/rotation/tire pressur e warning system . . . . . . . . .P. 520
Coping with flat tires . . . . . . . . . . . . . . . . . . . . . . . . . . P. 599, 619
Hood . . . . . . . . . . . . . . . . . . . . . . . . . . . . . . . . . . . . . . . . . . . . P. 503
Opening . . . . . . . . . . . . . . . . . . . . . . . . . . . . . . . . . . . . . . . . . . P. 503
Engine oil . . . . . . . . . . . . . . . . . . . . . . . . . . . . . . . . . . . . . . . . . P. 656
Coping with overheat . . . . . . . . . . . . . . . . . . . . . . . . . . . . . . . . P. 644
Headlights/daytime running lights . . . . . . . . . . . . . . . . . . . . P. 259
Parking lights/front side marker lights/
LED accent lights
*. . . . . . . . . . . . . . . . . . . . . . . . . . . . . . . . . P. 259
Fog lights
* . . . . . . . . . . . . . . . . . . . . . . . . . . . . . . . . . . . . . . . P. 269
Turn signal lights . . . . . . . . . . . . . . . . . . . . . . . . . . . . . . . . . . P. 257
Tail lights . . . . . . . . . . . . . . . . . . . . . . . . . . . . . . . . . . . . . . . . P. 259
License plate lights . . . . . . . . . . . . . . . . . . . . . . . . . . . . . . . . P. 259
Back-up lights
Shifting the shift lever to R . . . . . . . . . . . . . . . . . . . . . . . . . . . . P. 251
Rear side maker lights . . . . . . . . . . . . . . . . . . . . . . . . . . . . . P. 259
4
5
6
7
Light bulbs of the exterior lights for driving
(Replacing method: P. 556, Watts: P. 662)
*: If equipped
8
9
10
11
12
13
14
15
Page 109 of 728
PRIUS_OM_OM47D44U_(U)
1092. Instrument cluster
2
Instrument cluster
*1: These lights turn on when the power switch is turned to ON mode to indi-
cate that a system check is being performed. They will turn off after the
hybrid system is on, or after a few seconds. There may be a malfunction in
a system if a light does not come on, or turn off. Have the veh icle
inspected by your Toyota dealer.
*2: The light flashes or illuminates to indicate a malfunction.
*3: The light flashes to indicate a malfunction.
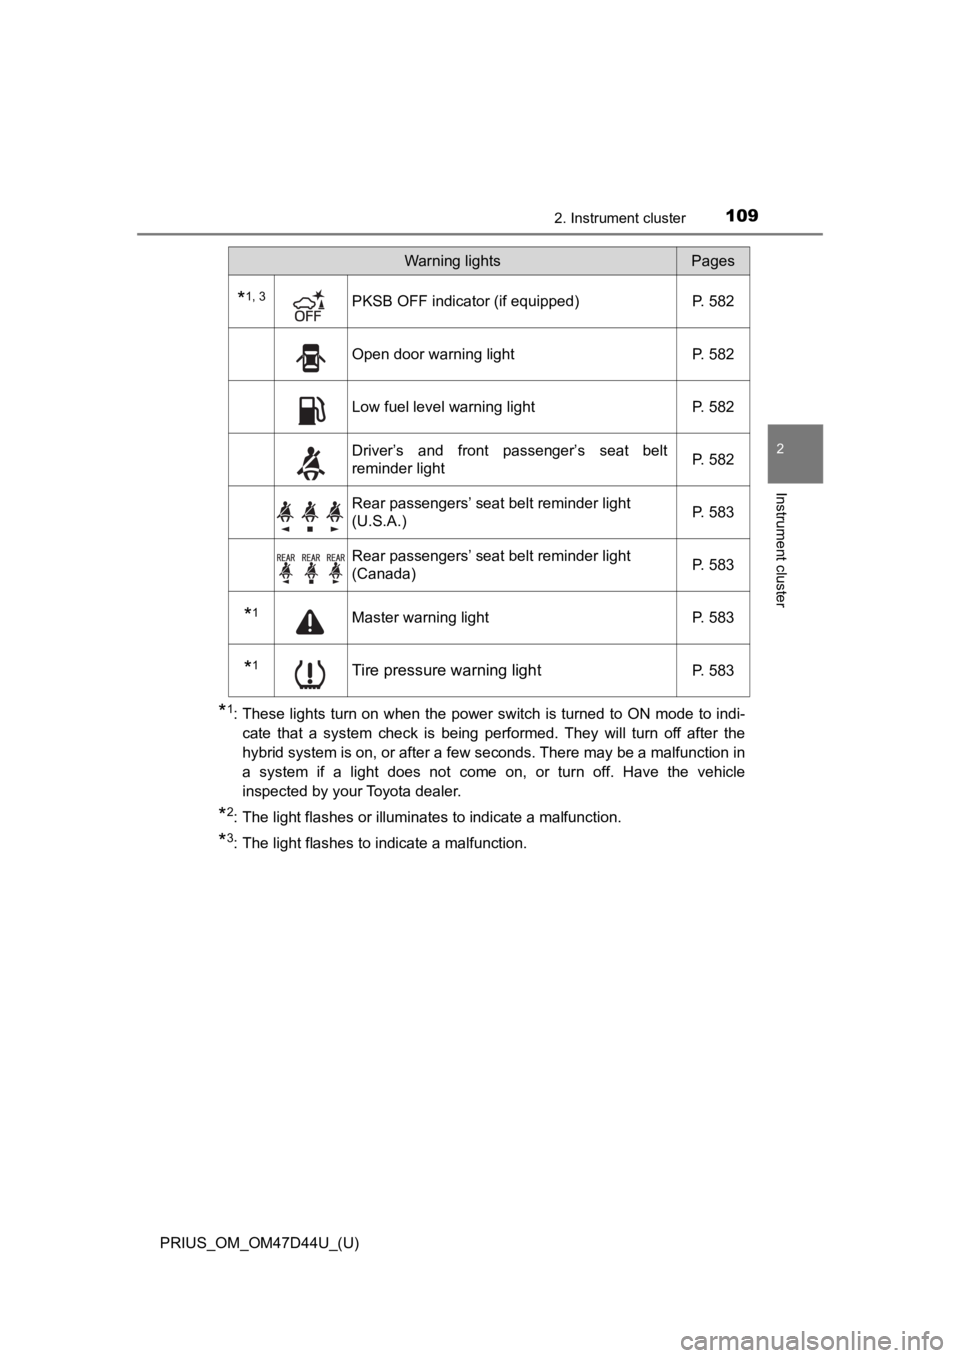
*1, 3PKSB OFF indicator (if equipped) P. 582
Open door warning light P. 582
Low fuel level warning lightP. 582
Driver’s and front passenger’s seat belt
reminder light P. 582
Rear passengers’ seat belt reminder light
(U.S.A.)
P. 583
Rear passengers’ seat belt reminder light
(Canada)P. 583
*1Master warning light
P. 583
*1Tire pressure warning lightP. 583
Warning lightsPages
Page 279 of 728
279
PRIUS_OM_OM47D44U_(U)
4-4. Refueling
4
Driving
Opening the fuel tank cap
●Turn the power switch off and ensure that all the doors and win -
dows are closed.
● Confirm the type of fuel.
■Fuel types
P. 663
■ Fuel tank opening for unleaded gasoline
To help prevent incorrect fueling, your vehicle has a fuel tank opening that
only accommodates the special nozzle on unleaded fuel pumps.
■ Gasoline price setting screen
After refueling more than approximately 1.3 gal. (5 L, 1.1 Imp. gal.) and turn-
ing the power switch to ON mode, the gasoline price setting screen will be
automatically displayed on the multi-information display. ( P. 101)
The fuel tank of your vehicle has a special structure, which
requires a reduction in fuel tank pressure before refueling. After
the opener switch has been pressed, it will take several second s
until the vehicle is r eady for refueling.
Before refueling the vehicle
Page 282 of 728
282
PRIUS_OM_OM47D44U_(U)
4-4. Refueling
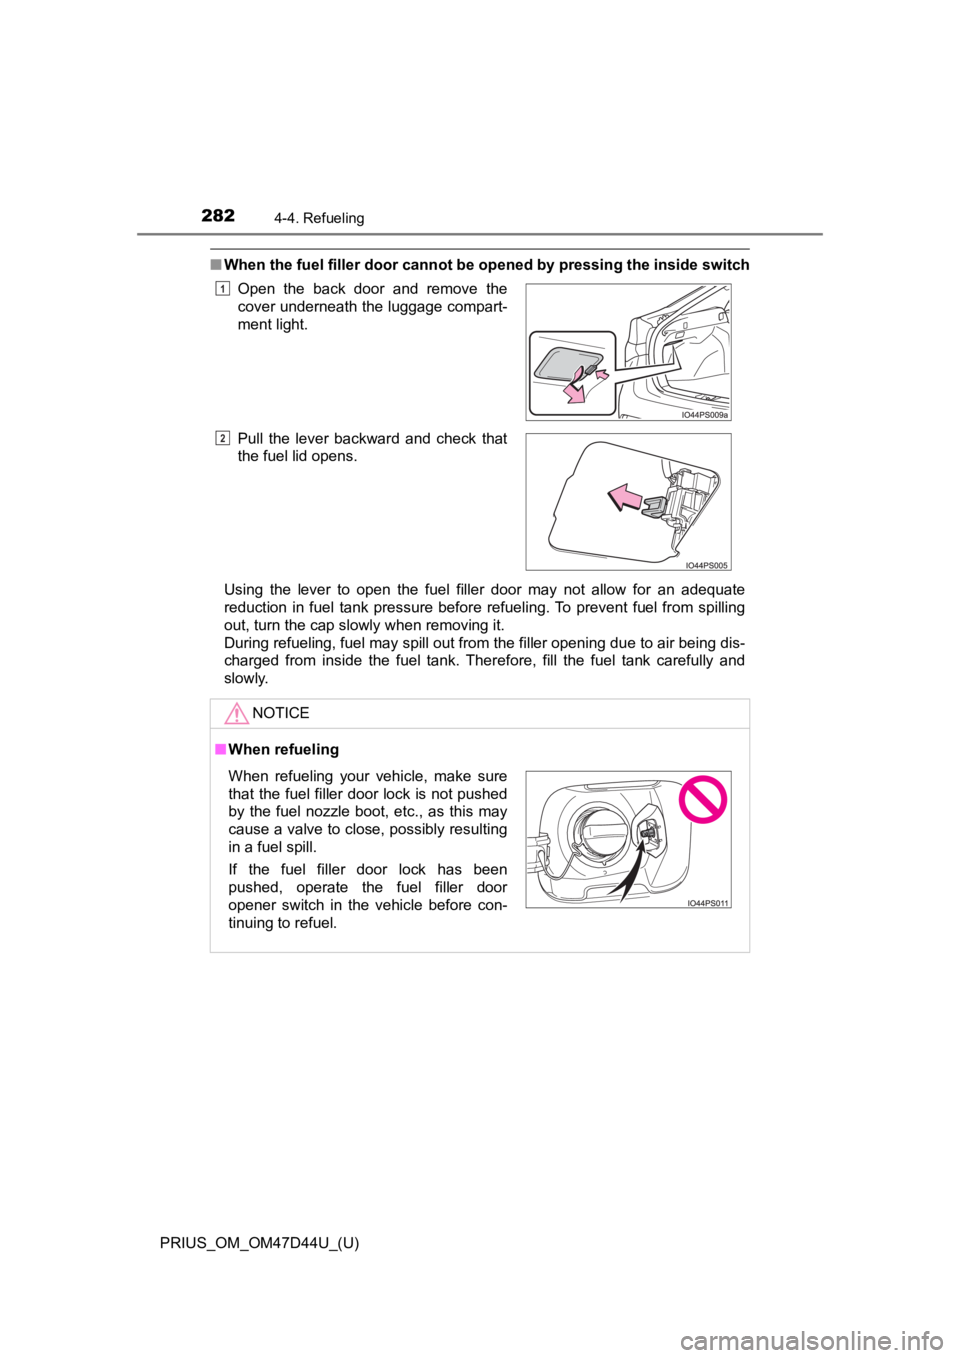
■When the fuel filler door cannot be opened by pressing the inside switch
Using the lever to open the fuel filler door may not allow for an adequate
reduction in fuel tank pressure before refueling. To prevent fu el from spilling
out, turn the cap slowly when removing it.
During refueling, fuel may spill out from the filler opening due to air being dis-
charged from inside the fuel tank. Therefore, fill the fuel tan k carefully and
slowly. Open the back door and remove the
cover underneath the luggage compart-
ment light.
Pull the lever backward and check that
the fuel lid opens.
NOTICE
■
When refueling
1
2
When refueling your vehicle, make sure
that the fuel filler door lock is not pushed
by the fuel nozzle boot, etc., as this may
cause a valve to close, possibly resulting
in a fuel spill.
If the fuel filler door lock has been
pushed, operate the fuel filler door
opener switch in the vehicle before con-
tinuing to refuel.
Page 417 of 728
PRIUS_OM_OM47D44U_(U)
4174-6. Driving tips
4
Driving
◆Checking tire inflation pressure
Make sure to check the tire inflation pressure frequently. Improper
tire inflation pressure can cause poor fuel economy.
Also, as snow tires can cause large amounts of friction, their use on
dry roads can lead to poor fuel economy. Use tires that are app ro-
priate for the season.
◆Luggage
Carrying heavy luggage will lead to poor fuel economy. Avoid carry-
ing unnecessary luggage. Installing a large roof rack will also cause
poor fuel economy.
◆Warming up before driving
Since the gasoline engine starts up and cuts out automatically
when cold, warming up the engine is unnecessary. Moreover, fre-
quently driving short distances will cause the engine to repeat edly
warm up, which can lead to excess fuel consumption.
Page 501 of 728
PRIUS_OM_OM47D44U_(U)
5016-3. Do-it-yourself maintenance
6
Maintenance and care
Tire inflation
pressure
( P. 530)• Tire pressure gauge
• Compressed air source
Washer fluid
( P. 518)• Water or washer fluid containing antifreeze (for win-
ter use)
• Funnel (used only for adding water or washer fluid)
WARNING
The engine compartment contains many mechanisms and fluids that may
move suddenly, become hot, or become electrically energized. To avoid death
or serious injury, observe the following precautions.
■ When working on the engine compartment
● Make sure that the “Accessory”, “Ignition ON” or mileage display
(P. 116) on the main display and the “READY” indicator are both off.
● Keep hands, clothing and tools away from the moving fan.
● Be careful not to touch the engine, power control unit, radiato r, exhaust
manifold, etc. right after driving as they may be hot. Oil and other fluids
may also be hot.
● Do not leave anything that may burn easily, such as paper and r ags, in the
engine compartment.
● Do not smoke, cause sparks or expose an open flame to fuel. Fuel fumes
are flammable.
■ When working near the electric cooling fans or radiator grille
Be sure the power switch is off.
With the power switch in ON mode, the electric cooling fans may automati-
cally start to run if the air conditioning is on and/or the coolant temperature
is high. (P. 512)
■ Safety glasses
Wear safety glasses to prevent flying or falling material, fluid spray, etc.
from getting in your eyes.
ItemsParts and tools
Page 531 of 728
PRIUS_OM_OM47D44U_(U)
5316-3. Do-it-yourself maintenance
6
Maintenance and care
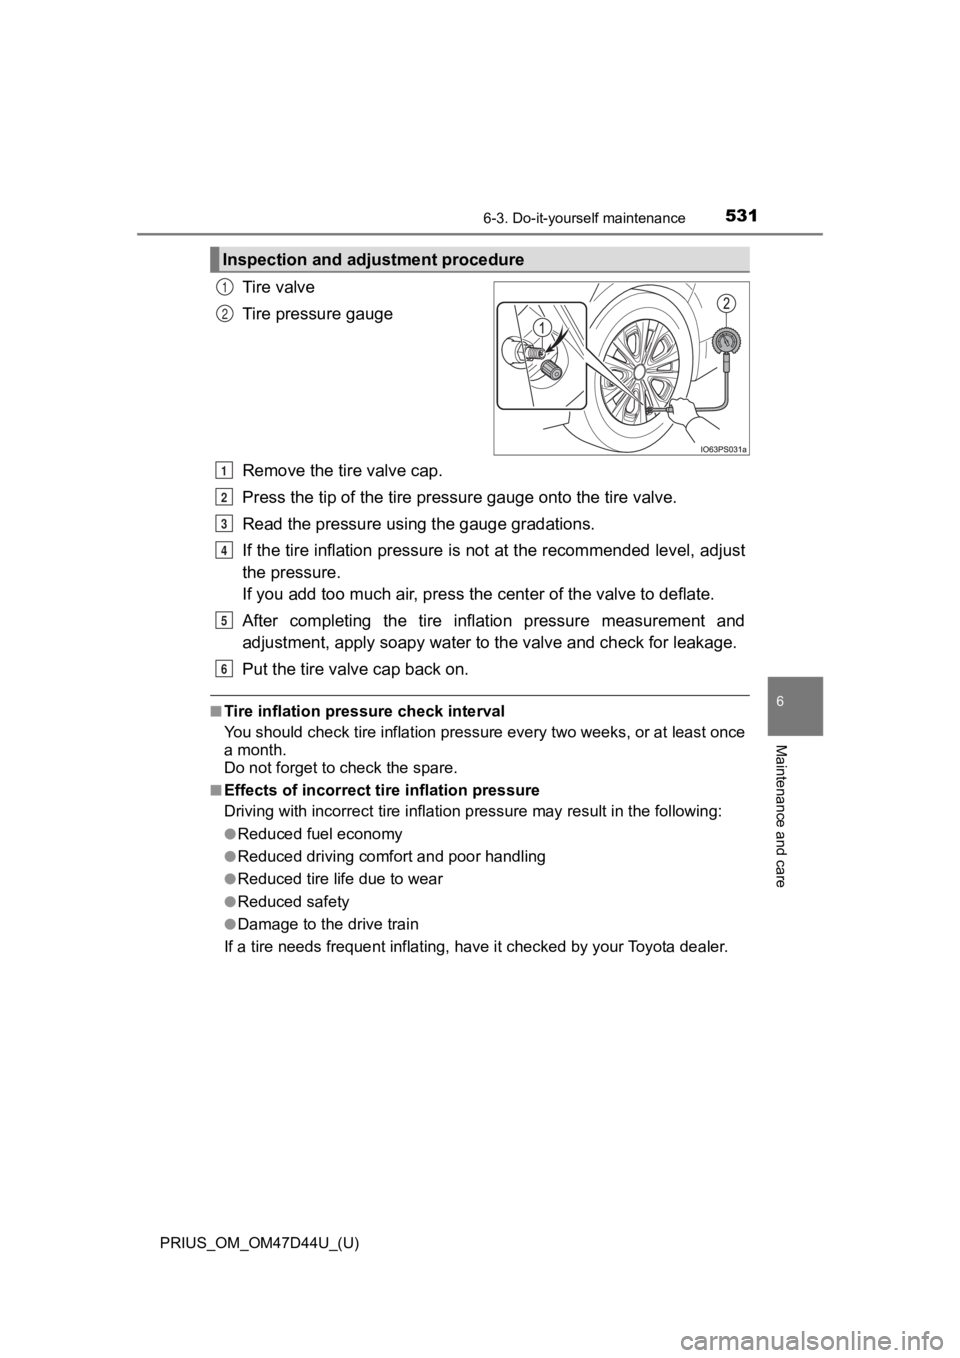
Tire valve
Tire pressure gauge
Remove the tire valve cap.
Press the tip of the tire pressure gauge onto the tire valve.
Read the pressure using the gauge gradations.
If the tire inflation pressure is not at the recommended level, adjust
the pressure.
If you add too much air, press the center of the valve to defla te.
After completing the tire inflation pressure measurement and
adjustment, apply soapy water to the valve and check for leakage.
Put the tire valve cap back on.
■Tire inflation pressure check interval
You should check tire inflation p ressure every two weeks, or at least once
a month.
Do not forget to check the spare.
■Effects of incorrect tire inflation pressure
Driving with incorrec t tire inflation pressure may result in th e following:
●Reduced fuel economy
●Reduced driving comfort and poor handling
●Reduced tire life due to wear
●Reduced safety
●Damage to the drive train
If a tire needs frequent inflating , have it checked by your Toyota dealer.
Inspection and adjustment procedure
1
2
1
2
3
4
5
6
Page 589 of 728
5897-2. Steps to take in an emergency
PRIUS_OM_OM47D44U_(U)
7
When trouble arises
WARNING
■Maintenance of the tires
Each tire, including the spare (if provided), should be checked monthly
when cold and inflated to the inflation pressure recommended by the
vehicle manufacturer on the vehicle placard or tire inflation p ressure
label (tire and load information label). (If your vehicle has t ires of a dif-
ferent size than the size indicated on the vehicle placard or t ire inflation
pressure label [tire and load information label], you should de termine
the proper tire inflation p ressure for those tires.)
As an added safety feature, your vehicle has been equipped with a tire
pressure monitoring system (TPMS -tire pressure warning system) that
illuminates a low tire pressure telltale (tire pressure warning light) when
one or more of your tires is significantly under-inflated. Acco rdingly,
when the low tire pressure telltale (tire pressure warning ligh t) illumi-
nates, you should stop and check your tires as soon as possible , and
inflate them to the proper pressure. Driving on a significantly under-
inflated tire causes the tire to overheat and can lead to tire failure.
Under-inflation also reduces fuel efficiency and tire tread lif e, and may
affect the vehicle’s handling and stopping ability.
Please note that the TPMS (tire pressure warning system) is not a sub-
stitute for proper tire maintenance, and it is the driver’s res ponsibility to
maintain correct tire pressure, even if under-inflation has not reached
the level to trigger illumination of the TPMS low tire pressure telltale (tire pressure warning light).
Your vehicle has also been equipped with a TPMS (tire pressure warn-
ing system) malfunction indicato r to indicate when the system is not
operating properly. The TPMS (tire pressure warning system) mal func-
tion indicator is combined with the low tire pressure telltale (tire pressure
warning light). When the system detects a malfunction, the tell tale will
flash for approximately one minute and then remain continuously illumi-
nated. This sequence will continue upon subsequent vehicle star t-ups
as long as the malfunction exists . When the malfunction indicator is illu-
minated, the system may not be able to detect or signal low tir e pres-
sure as intended.
TPMS (tire pressure warning system) malfunctions may occur for a vari-
ety of reasons, including the installation of replacement or alternate tires
or wheels on the vehicle that prevent the TPMS (tire pressure w arning
system) from functioning properly. Always check the TPMS (tire pres-
sure warning system) malfunction telltale after replacing one or more
tires or wheels on your vehicle to ensure that the replacement or alter-
nate tires and wheels allow the TPMS (tire pressure warning system) to
continue to function properly.
Page 617 of 728
6177-2. Steps to take in an emergency
PRIUS_OM_OM47D44U_(U)
7
When trouble arises
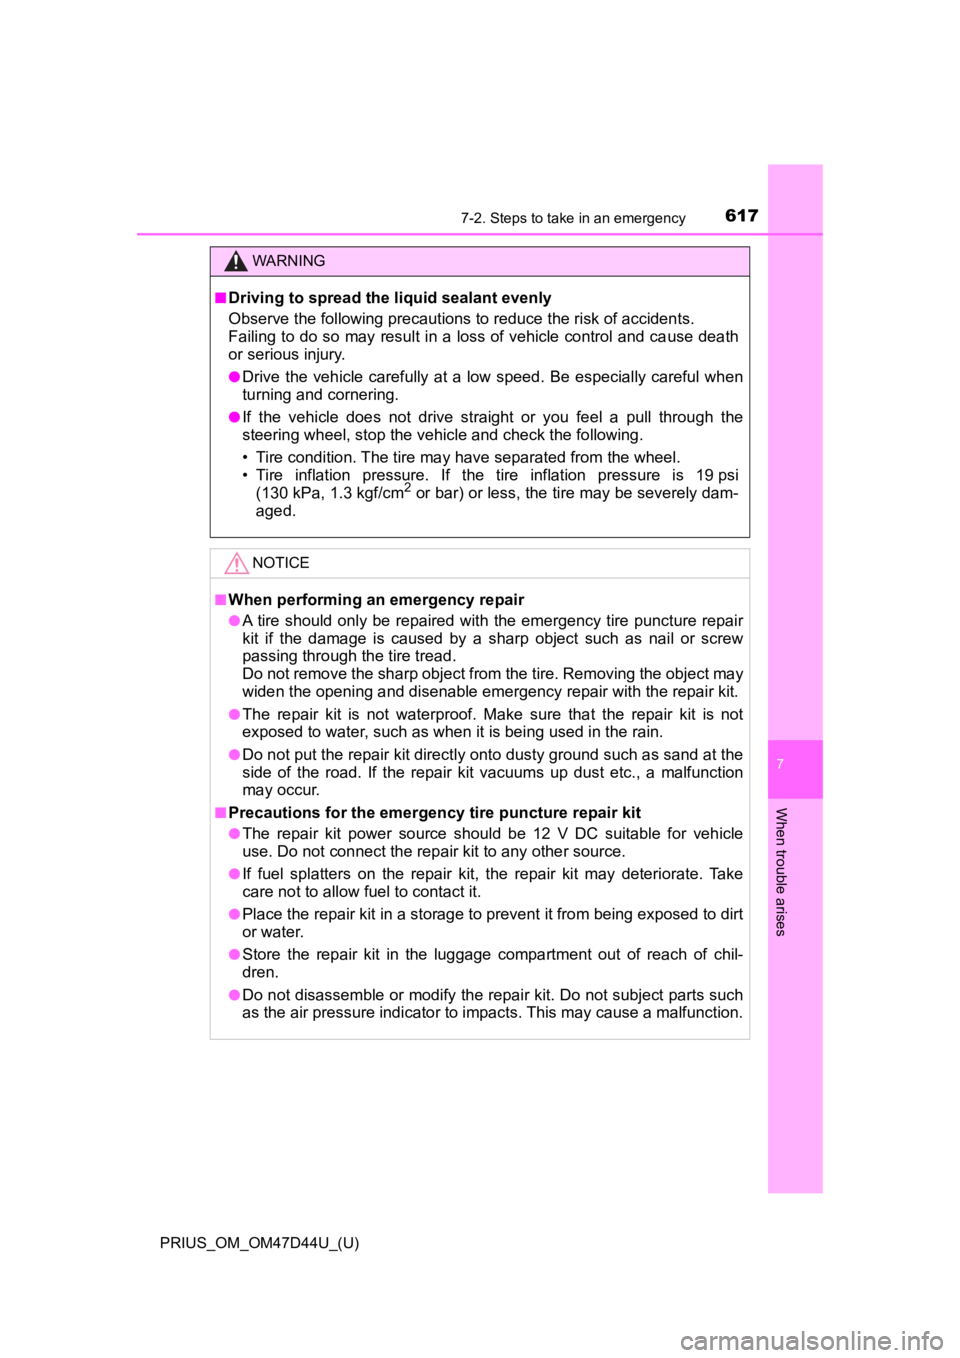
WARNING
■Driving to spread the liquid sealant evenly
Observe the following precautions to reduce the risk of accidents.
Failing to do so may result in a loss of vehicle control and ca use death
or serious injury.
●Drive the vehicle carefully at a low speed. Be especially careful when
turning and cornering.
●If the vehicle does not drive straight or you feel a pull throu gh the
steering wheel, stop the vehicle and check the following.
• Tire condition. The tire may have separated from the wheel.
• Tire inflation pressure. If the tire inflation pressure is 19 p si
(130 kPa, 1.3 kgf/cm
2 or bar) or less, the tire may be severely dam-
aged.
NOTICE
■When performing an emergency repair
●A tire should only be repaired with the emergency tire puncture repair
kit if the damage is caused by a sharp object such as nail or screw
passing through the tire tread.
Do not remove the sharp object from the tire. Removing the obje ct may
widen the opening and disenable e mergency repair with the repair kit.
●The repair kit is not waterproof. Make sure that the repair kit is not
exposed to water, such as when it is being used in the rain.
●Do not put the repair kit directly onto dusty ground such as sa nd at the
side of the road. If the repair kit vacuums up dust etc., a mal function
may occur.
■Precautions for the emergency tire puncture repair kit
●The repair kit power source should be 12 V DC suitable for vehi cle
use. Do not connect the repa ir kit to any other source.
●If fuel splatters on the repair kit, the repair kit may deterio rate. Take
care not to allow fuel to contact it.
●Place the repair kit in a storage to prevent it from being exposed to dirt
or water.
●Store the repair kit in the luggage compartment out of reach of chil-
dren.
●Do not disassemble or modify the repair kit. Do not subject par ts such
as the air pressure indicator to impacts. This may cause a malfunction.
Page 672 of 728
672
PRIUS_OM_OM47D44U_(U)
8-1. Specifications
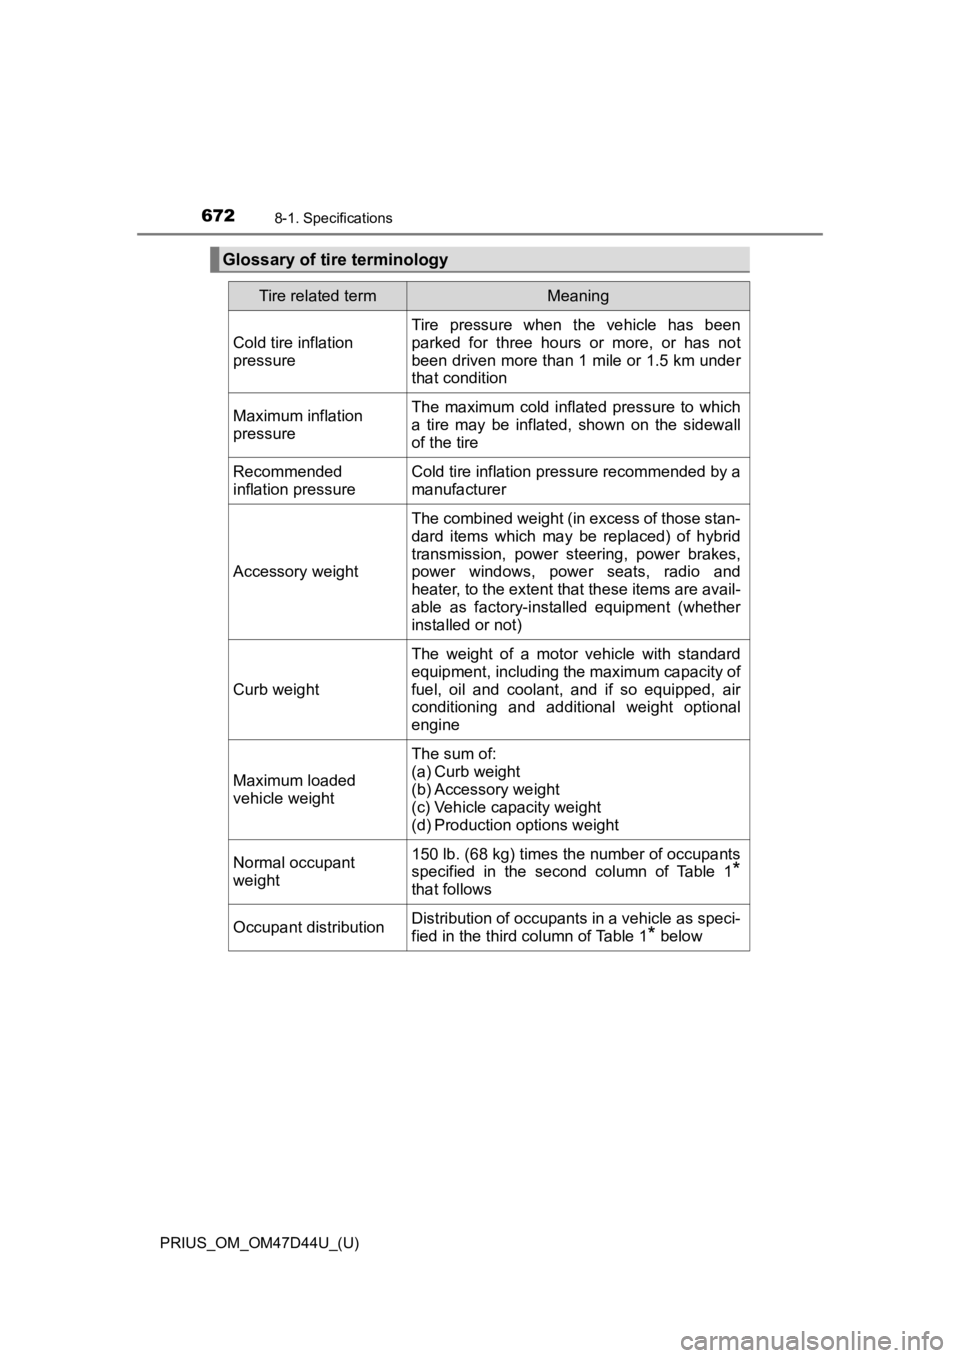
Glossary of tire terminology
Tire related termMeaning
Cold tire inflation
pressure
Tire pressure when the vehicle has been
parked for three hours or more, or has not
been driven more than 1 mile or 1.5 km under
that condition
Maximum inflation
pressureThe maximum cold inflated pressure to which
a tire may be inflated, shown on the sidewall
of the tire
Recommended
inflation pressureCold tire inflation pressure recommended by a
manufacturer
Accessory weight
The combined weight (in excess of those stan-
dard items which may be replaced) of hybrid
transmission, power steering, power brakes,
power windows, power seats, radio and
heater, to the extent that these items are avail-
able as factory-installed equipment (whether
installed or not)
Curb weight
The weight of a motor vehicle with standard
equipment, including the maximum capacity of
fuel, oil and coolant, and if so equipped, air
conditioning and additional weight optional
engine
Maximum loaded
vehicle weight
The sum of:
(a) Curb weight
(b) Accessory weight
(c) Vehicle capacity weight
(d) Production options weight
Normal occupant
weight150 lb. (68 kg) times the number of occupants
specified in the second column of Table 1
*
that follows
Occupant distributionDistribution of occupants in a vehicle as speci-
fied in the third column of Table 1
* below