key TOYOTA PRIUS C 2017 NHP10 / 1.G Manual PDF
[x] Cancel search | Manufacturer: TOYOTA, Model Year: 2017, Model line: PRIUS C, Model: TOYOTA PRIUS C 2017 NHP10 / 1.GPages: 596, PDF Size: 10.05 MB
Page 407 of 596

4077-2. Maintenance
7
Maintenance and care
PRIUS c_U (OM52J11U)
■Repair and replacement
It is recommended that genuine Toyota parts be used for repairs to ensure
performance of each system. If non-Toyota parts are used in replacement or if
a repair shop other than a Toyota dealer performs repairs, confirm the war-
ranty coverage.
■ Resetting the message indicating maintenance is required (U.S.A. only)
After the required maintenance is performed according to the maintenance
schedule, please reset the message.
To reset the message, follow the procedures described below:
Vehicles without a smart key system
Switch the display to the odometer ( →P. 99) and then turn the engine
switch off.
Turn the engine switch to the “ON” position. The multi-information display's
initial screen will be displayed for a few seconds. While the initial screen is
being displayed, press the “TRIP” steering switch ( →P. 97) 3 times, press-
ing and holding the switch on the third time.
Vehicles with a smart key system
Switch the display to the odometer ( →P. 99) and then turn the “POWER”
switch off.
Turn the “POWER” switch to ON mode. The multi-information display's ini-
tial screen will be displayed for a few seconds. While the initial screen is
being displayed, press the “TRIP” steering switch ( →P. 97) 3 times, press-
ing and holding the switch on the third time.
Continue to press and hold the button until the trip meter displays “000000”.
■ Allow inspection and repairs to be performed by a Toyota dealer
●Toyota technicians are well-trained specialists and are kept up to date with
the latest service information. They are well informed about the operations
of all systems on your vehicle.
● Keep a copy of the repair order. It proves that the maintenance that has
been performed is under warranty cove rage. If any problem should arise
while your vehicle is under warranty, your Toyota dealer will promptly take
care of it.
1
2
1
2
3
Page 414 of 596
4147-3. Do-it-yourself maintenance
PRIUS c_U (OM52J11U)
Washer fluid (→P. 427)
• Water or washer fluid containing antifreeze
(for winter use)
• Funnel (used only for adding water or washer
fluid)
WARNING
The engine compartment contains many mechanisms and fluids that may
move suddenly, become hot, or become electrically energized. To avoid
death or serious injury, observe the following precautions:
■ When working on the engine compartment
● Vehicles without a smart key system: Make sure that the engine switch is
in the “LOCK” position and the “READY” indicator is off.
Vehicles with a smart key system: Make sure that the indicator on the
“POWER” switch and the “READY” indicator are both off.
● Keep hands, clothing and tools away from the moving fan and engine
drive belt.
● Be careful not to touch the engine, power control unit, radiator, exhaust
manifold, etc. right after driving as they may be hot. Oil and other fluids
may also be hot.
● Do not leave anything that may burn easily, such as paper and rags, in the
engine compartment.
● Do not smoke, cause sparks or expose an open flame to fuel. Fuel fumes
are flammable.
■ When working near the electric cooling fan or radiator grille
Vehicles without a smart key system: The electric cooling fan may keep
rotating for about 3 minutes even after the engine switch is turned to the
“LOCK” position.
With the engine switch in the “ON” position, the electric cooling \
fan may
automatically start to run if the air conditioning is on and/or the coolant tem-
perature is high. Be sure the engine switch is in the “LOCK” position when
working near the electric cooling fan or radiator grille.
Vehicles with a smart key system: The electric cooling fan may keep rotat-
ing for about 3 minutes even after the “POWER” switch is off.
With the “POWER” switch in ON mode, the electric cooling fan may auto-
matically start to run if the air conditioning is on and/or the coolant tempera-
ture is high. Be sure the “POWER” switch is off when working near the
electric cooling fan or radiator grille.
ItemsCheck points
Page 430 of 596
4307-3. Do-it-yourself maintenance
PRIUS c_U (OM52J11U)■
When disconnecting the 12- volt battery terminals
Always disconnect the negative (-) terminal first.
■ After recharging/reconnecting the 12-vo lt battery (vehicles with a smart
key system)
● Unlocking the doors using the smart key system may not be possible imme-
diately after reconnecting the 12-volt battery. If this happens, use the wire-
less remote control or the mechanical key to lock/unlock the doors.
● Start the hybrid system with the “POWER” switch in ACCESSORY mode.
The hybrid system may not start with the “POWER” switch turned off. How-
ever, the hybrid system will operat e normally from the second attempt.
● The “POWER” switch mode is recorded by the vehicle. If the 12-volt battery
is reconnected, the vehicle will return the “POWER” switch mode to the sta-
tus it was in before the 12-volt battery was disconnected. Make sure to turn
off the power before disconnect the 12-volt battery. Take extra care when
connecting the 12-volt battery if the “POWER” switch mode prior to dis-
charge is unknown.
If the system will not start even after multiple attempts, contact your Toyota
dealer.
WARNING
■ Chemicals in the 12-volt battery
The 12-volt battery contains poisonous and corrosive sulfuric acid and may
produce hydrogen gas which is flammable and explosive. To reduce the risk
of death or serious injury, take the following precautions while working on or
near the 12-volt battery:
● Do not cause sparks by touching the 12-volt battery terminals with tools.
● Do not smoke or light a match near the 12-volt battery.
● Avoid contact with eyes, skin and clothes.
● Never inhale or swallow electrolyte.
● Wear protective safety glasses when working near the 12-volt battery.
● Keep children away from the 12-volt battery.
■ Where to safely charge the 12-volt battery
Always charge the 12-volt battery in an open area. Do not charge the 12-
volt battery in a garage or closed room where there is insufficient ventila-
tion.
Page 433 of 596
4337-3. Do-it-yourself maintenance
7
Maintenance and care
PRIUS c_U (OM52J11U)
Your vehicle is equipped with a tire pressure warning system that uses
tire pressure warning valves and tr ansmitters to detect low tire infla-
tion pressure before serious problems arise.
If the tire pressure drops below a predetermined level, the driver is
warned by a warning light. ( →P. 480)
◆Installing tire pressure warning valves and transmitters
When replacing tires or wheels, tire pressure warning valves and
transmitters must also be installed.
When new tire pressure warning valves and transmitters are
installed, new ID codes must be registered in the tire pressure
warning computer and the tire pr essure warning system must be
initialized. Have tire pressure warning valve and transmitter ID
codes registered by your Toyota dealer. ( →P. 434)
◆Initializing the tire pressure warning system
■The tire pressure warning system must be initialized in the fol-
lowing circumstances:
● When rotating front and rear tires which have different tire infla-
tion pressures
● When changing the tire size
When the tire pressure warning system is initialized, the current tire
inflation pressure is set as the benchmark pressure.
■How to initialize the tire pressure warning system
Park the vehicle in a safe place and turn the engine switch (vehi-
cles without a smart key system) or the “POWER” switch (vehi-
cles with a smart key system) off.
Initialization cannot be performed while the vehicle is moving.
Adjust the tire inflation pressure to the specified cold tire inflation
pressure level. ( →P. 539)
Make sure to adjust the tire pressu re to the specified cold tire infla-
tion pressure level. The tire pressure warning system will operate
based on this pressure level.
Tire pressure warning system
1
2
Page 434 of 596
4347-3. Do-it-yourself maintenance
PRIUS c_U (OM52J11U)
Turn the engine switch to the “ON” position (vehicles without a
smart key system) or “POWER” switch to ON mode (vehicles
with a smart key system).
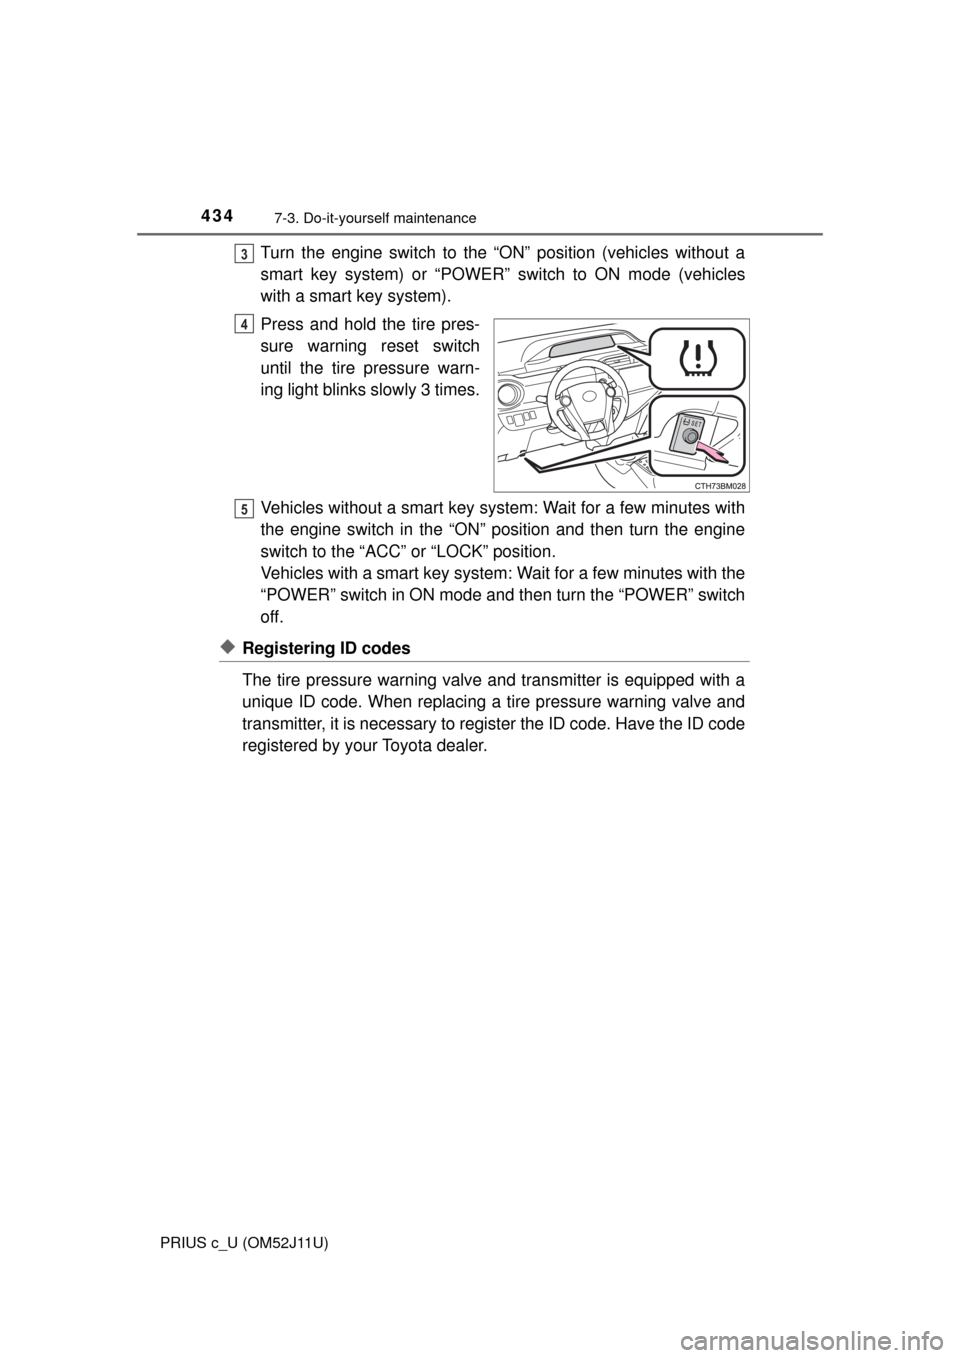
Press and hold the tire pres-
sure warning reset switch
until the tire pressure warn-
ing light blinks slowly 3 times.
Vehicles without a smart key system: Wait for a few minutes with
the engine switch in the “ON” position and then turn the engine
switch to the “ACC” or “LOCK” position.
Vehicles with a smart key system: Wait for a few minutes with the
“POWER” switch in ON mode and then turn the “POWER” switch
off.
◆Registering ID codes
The tire pressure warning valve and transmitter is equipped with a
unique ID code. When replacing a tire pressure warning valve and
transmitter, it is necessary to register the ID code. Have the ID code
registered by your Toyota dealer.
3
4
5
Page 446 of 596
4467-3. Do-it-yourself maintenance
PRIUS c_U (OM52J11U)
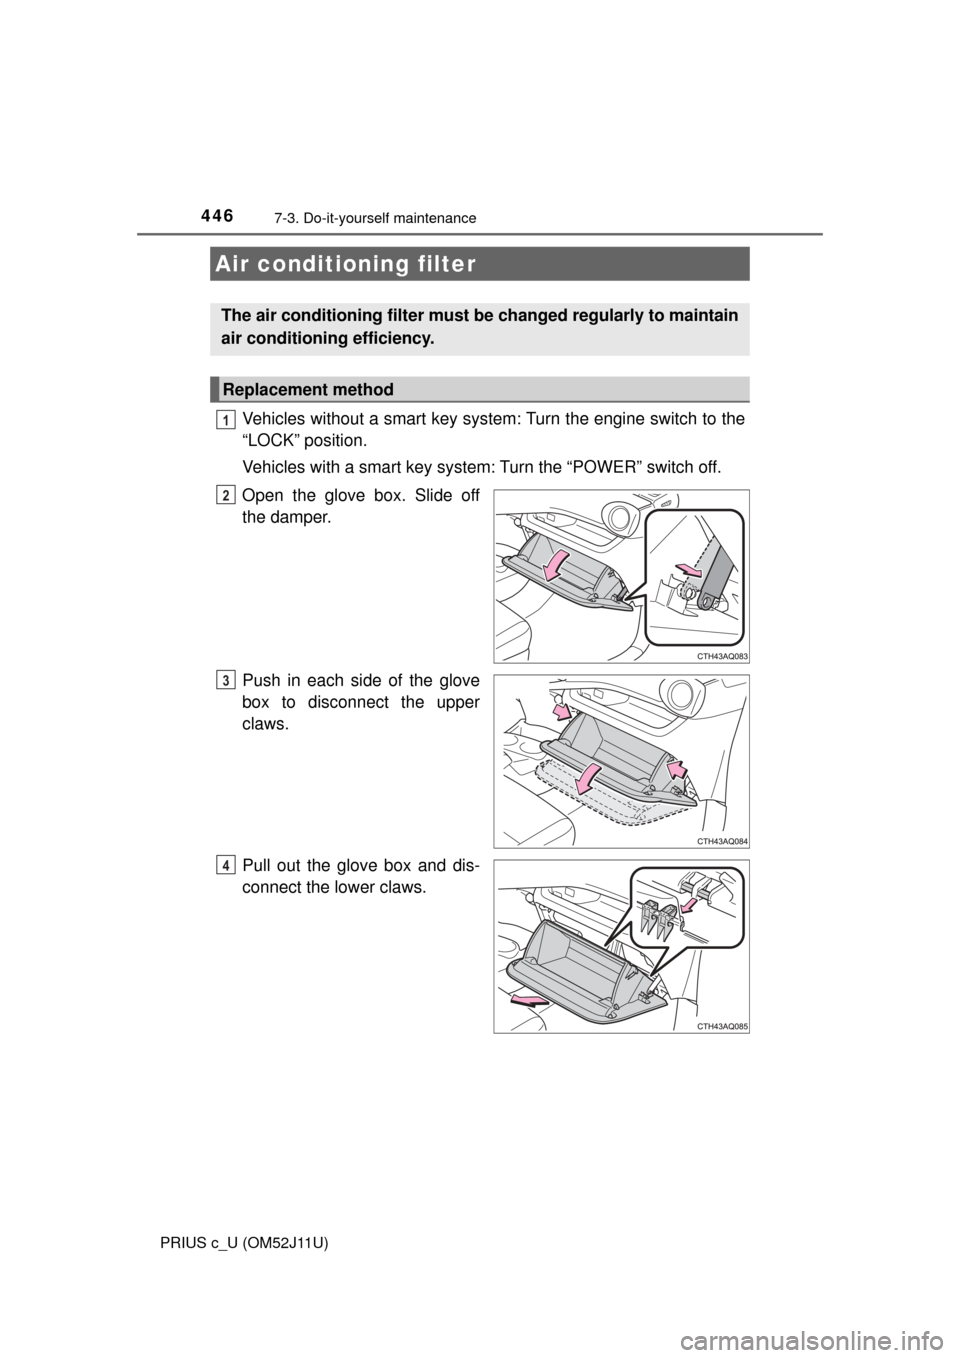
Vehicles without a smart key system: Turn the engine switch to the
“LOCK” position.
Vehicles with a smart key system: Turn the “POWER” switch off.
Open the glove box. Slide off
the damper.
Push in each side of the glove
box to disconnect the upper
claws.
Pull out the glove box and dis-
connect the lower claws.
Air conditioning filter
The air conditioning filter must be changed regularly to maintain
air conditioning efficiency.
Replacement method
1
2
3
4
Page 448 of 596
4487-3. Do-it-yourself maintenance
PRIUS c_U (OM52J11U)
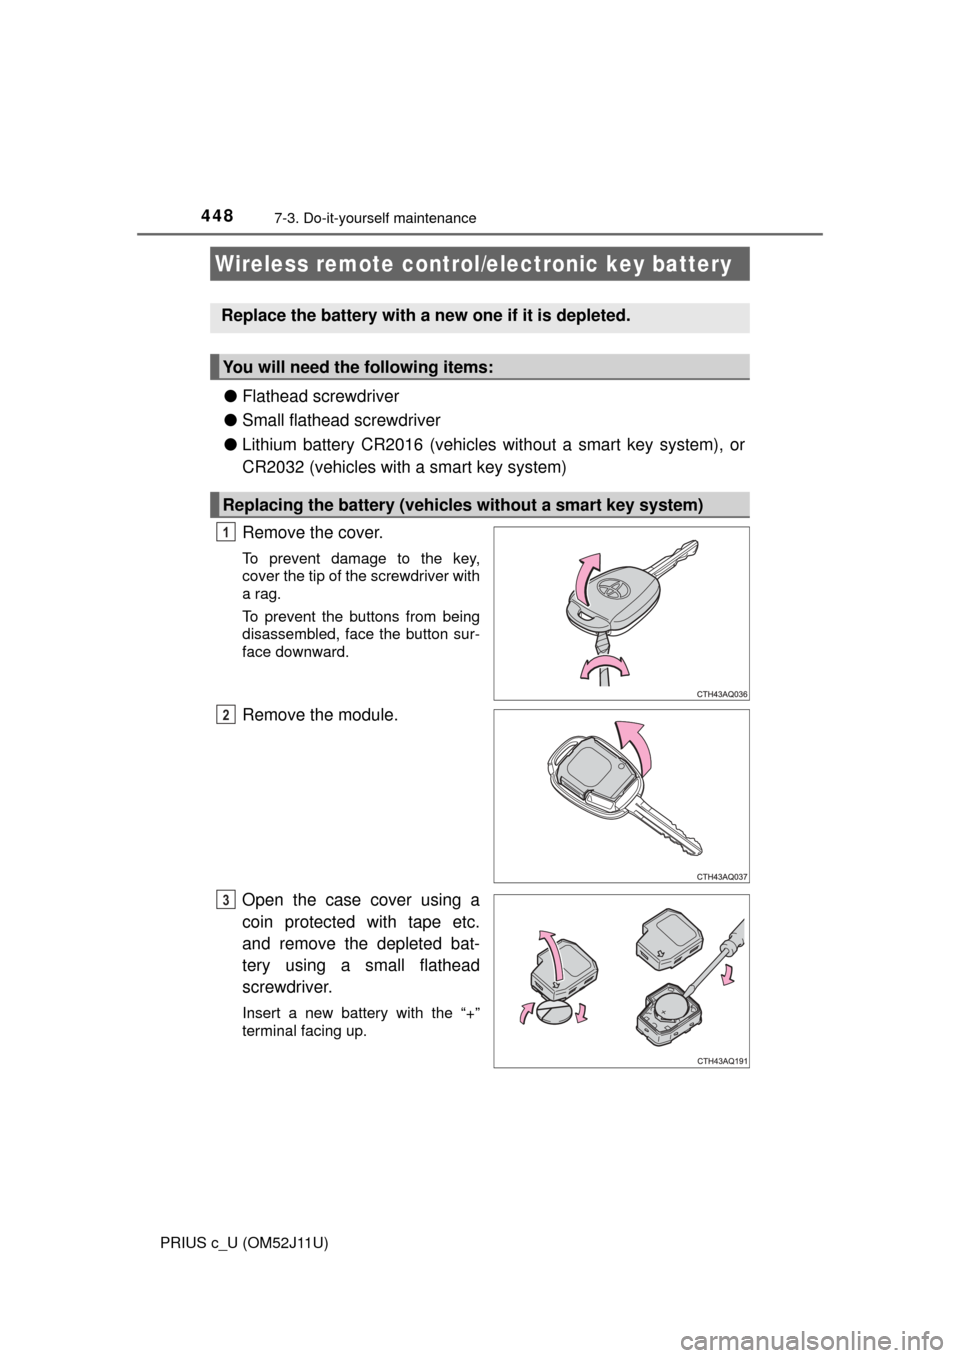
●Flathead screwdriver
● Small flathead screwdriver
● Lithium battery CR2016 (vehicles without a smart key system), or
CR2032 (vehicles with a smart key system)
Remove the cover.
To prevent damage to the key,
cover the tip of the screwdriver with
a rag.
To prevent the buttons from being
disassembled, face the button sur-
face downward.
Remove the module.
Open the case cover using a
coin protected with tape etc.
and remove the depleted bat-
tery using a small flathead
screwdriver.
Insert a new battery with the “+”
terminal facing up.
Wireless remote control/electronic key battery
Replace the battery with a new one if it is depleted.
You will need the following items:
Replacing the battery (vehicl es without a smart key system)
1
2
3
Page 449 of 596
4497-3. Do-it-yourself maintenance
7
Maintenance and care
PRIUS c_U (OM52J11U)
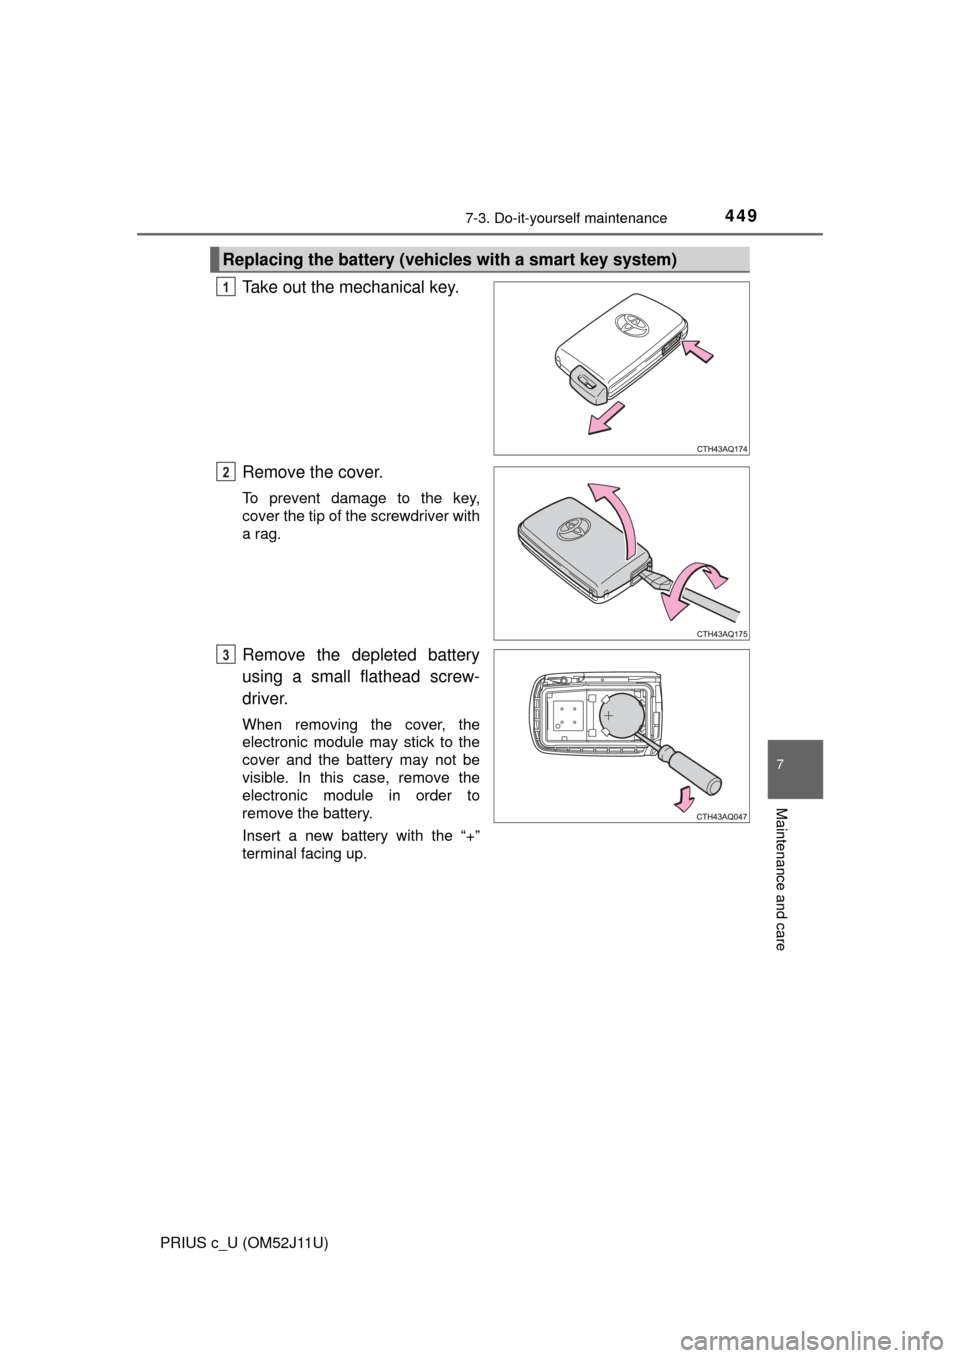
Take out the mechanical key.
Remove the cover.
To prevent damage to the key,
cover the tip of the screwdriver with
a rag.
Remove the depleted battery
using a small flathead screw-
driver.
When removing the cover, the
electronic module may stick to the
cover and the battery may not be
visible. In this case, remove the
electronic module in order to
remove the battery.
Insert a new battery with the “+”
terminal facing up.
Replacing the battery (vehicles with a smart key system)
1
2
3
Page 450 of 596
4507-3. Do-it-yourself maintenance
PRIUS c_U (OM52J11U)
■Use a CR2016 (vehicles without a sm art key system) or CR2032 (vehicles
with a smart key system) lithium battery
● Batteries can be purchased at your Toyota dealer, local electrical appliance
shops or camera stores.
● Replace only with the same or equivalent type recommended by the manu-
facturer.
● Dispose of used batteries according to local laws.
■ If the key battery is depleted
The following symptoms may occur:
●The smart key system (if equipped) and wireless remote control will not
function properly.
● The operational range will be reduced.
WARNING
■Removed battery and other parts
These parts are small and if swallowed by a child, they can cause choking.
Keep away from children. Failure to do so could result in death or serious
injury.
NOTICE
■For normal operation after replacing the battery
Observe the following precautions to prevent accidents:
● Always work with dry hands.
Moisture may cause the battery to rust.
● Do not touch or move any other component inside the remote control.
● Do not bend either of the battery terminals.
Page 451 of 596
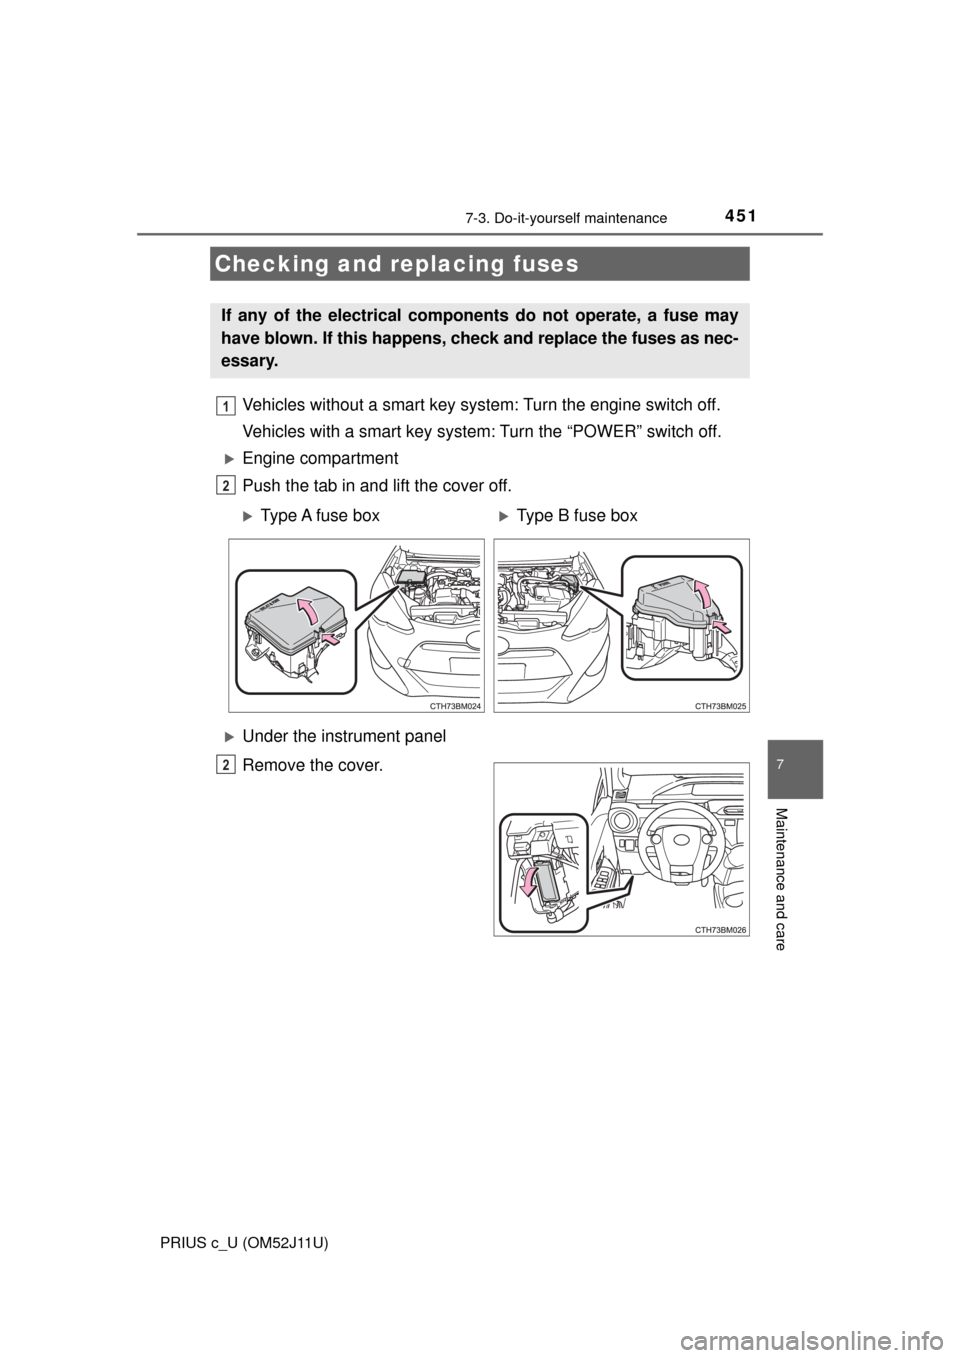
4517-3. Do-it-yourself maintenance
7
Maintenance and care
PRIUS c_U (OM52J11U)
Vehicles without a smart key system: Turn the engine switch off.
Vehicles with a smart key system: Turn the “POWER” switch off.
Engine compartment
Push the tab in and lift the cover off.
Under the instrument panel
Remove the cover.
Checking and replacing fuses
If any of the electrical components do not operate, a fuse may
have blown. If this happens, check and replace the fuses as nec-
essary.
1
2
Type A fuse boxType B fuse box
2