navigation TOYOTA PRIUS PLUG-IN HYBRID 2015 1.G Navigation Manual
[x] Cancel search | Manufacturer: TOYOTA, Model Year: 2015, Model line: PRIUS PLUG-IN HYBRID, Model: TOYOTA PRIUS PLUG-IN HYBRID 2015 1.GPages: 356, PDF Size: 6 MB
Page 89 of 356
89
2. ROUTE GUIDANCE
3
NAVIGATION SYSTEM
PRIUS_Navi_OM47A72U_(U)
14.06.16 20:56
5. SETTING ROUTE
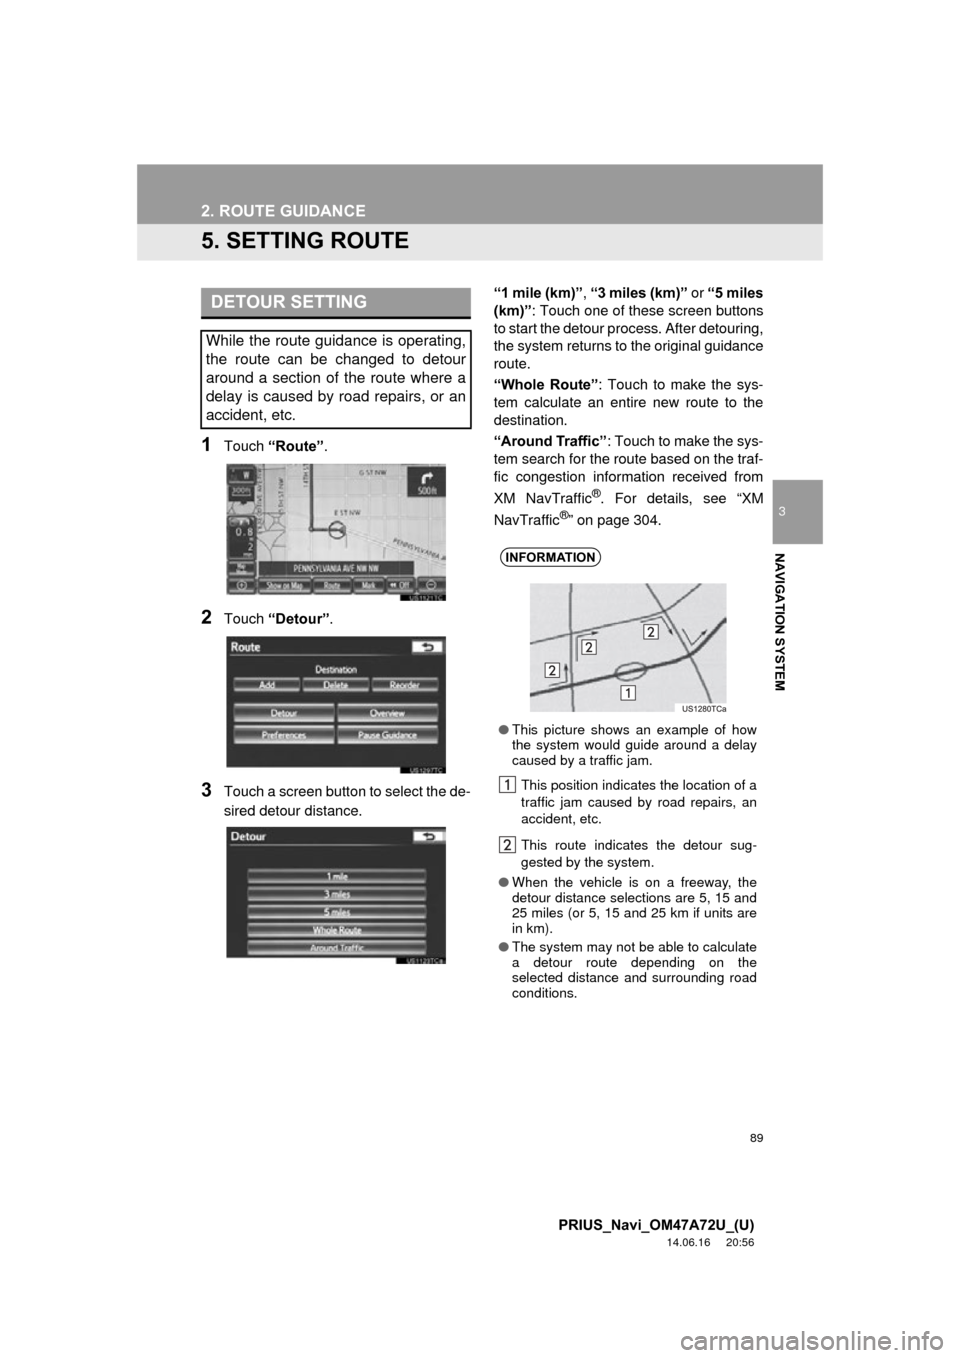
1Touch “Route” .
2Touch “Detour” .
3Touch a screen button to select the de-
sired detour distance. “1 mile (km)”,
“3 miles (km)” or “5 miles
(km)” : Touch one of these screen buttons
to start the detour pr ocess. After detouring,
the system returns to the original guidance
route.
“Whole Route” : Touch to make the sys-
tem calculate an entire new route to the
destination.
“Around Traffic” : Touch to make the sys-
tem search for the route based on the traf-
fic congestion information received from
XM NavTraffic
®. For details, see “XM
NavTraffic®” on page 304.
DETOUR SETTING
While the route guidance is operating,
the route can be changed to detour
around a section of the route where a
delay is caused by road repairs, or an
accident, etc.
INFORMATION
● This picture shows an example of how
the system would guide around a delay
caused by a traffic jam.
This position indicates the location of a
traffic jam caused by road repairs, an
accident, etc.
This route indicates the detour sug-
gested by the system.
● When the vehicle is on a freeway, the
detour distance selections are 5, 15 and
25 miles (or 5, 15 and 25 km if units are
in km).
● The system may not be able to calculate
a detour route depending on the
selected distance and surrounding road
conditions.
Page 91 of 356
91
2. ROUTE GUIDANCE
3
NAVIGATION SYSTEM
PRIUS_Navi_OM47A72U_(U)
14.06.16 20:56
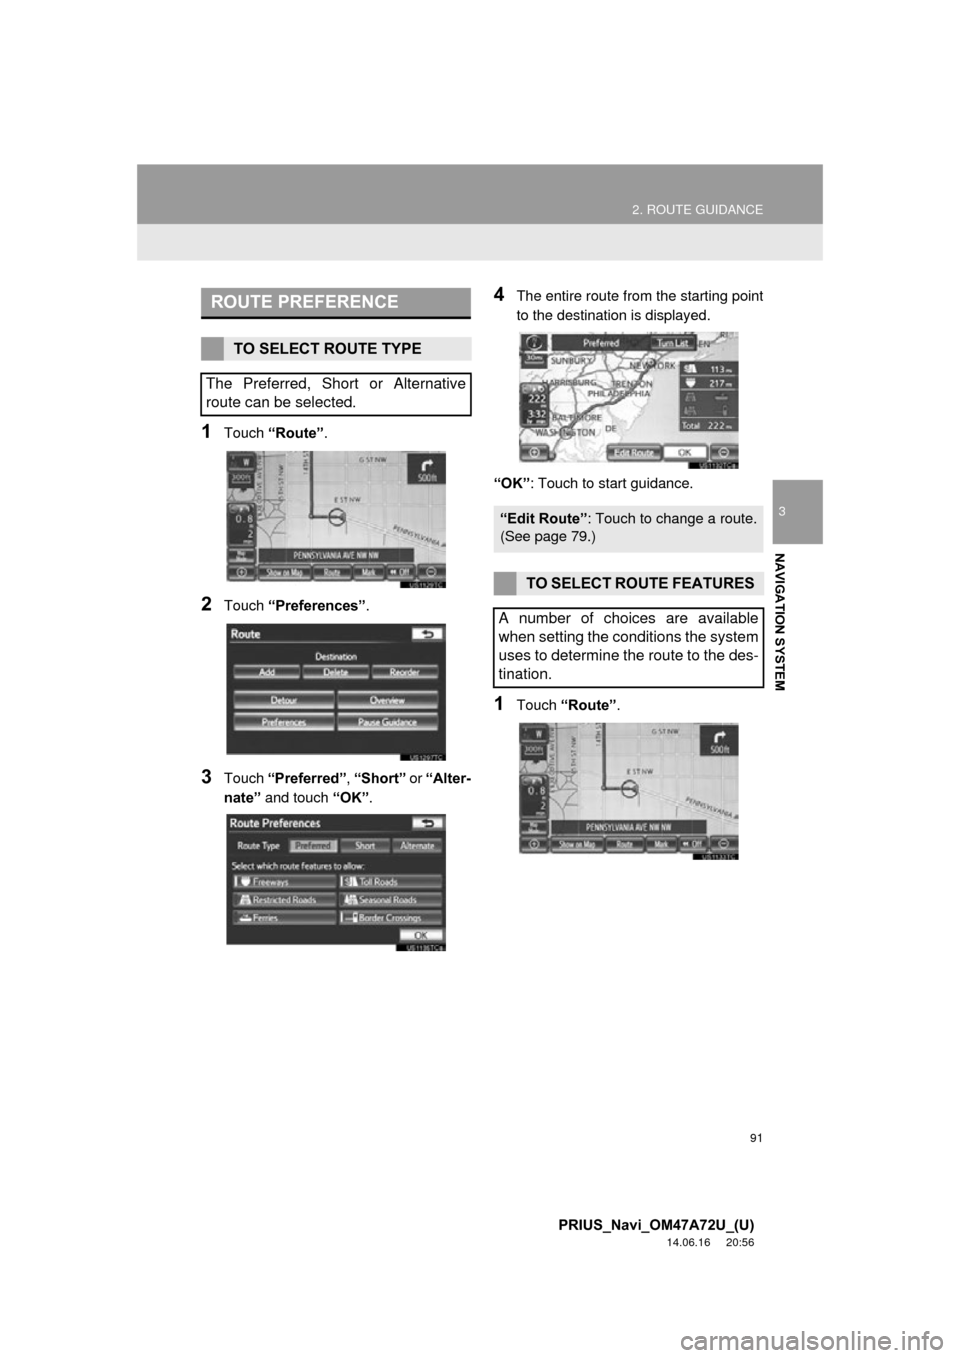
1Touch “Route” .
2Touch “Preferences” .
3Touch “Preferred” , “Short” or “Alter-
nate” and touch “OK”.
4The entire route from the starting point
to the destination is displayed.
“OK” : Touch to start guidance.
1Touch “Route” .
ROUTE PREFERENCE
TO SELECT ROUTE TYPE
The Preferred, Short or Alternative
route can be selected.
“Edit Route” : Touch to change a route.
(See page 79.)
TO SELECT ROUTE FEATURES
A number of choices are available
when setting the conditions the system
uses to determine the route to the des-
tination.
Page 93 of 356
93
2. ROUTE GUIDANCE
3
NAVIGATION SYSTEM
PRIUS_Navi_OM47A72U_(U)
14.06.16 20:56
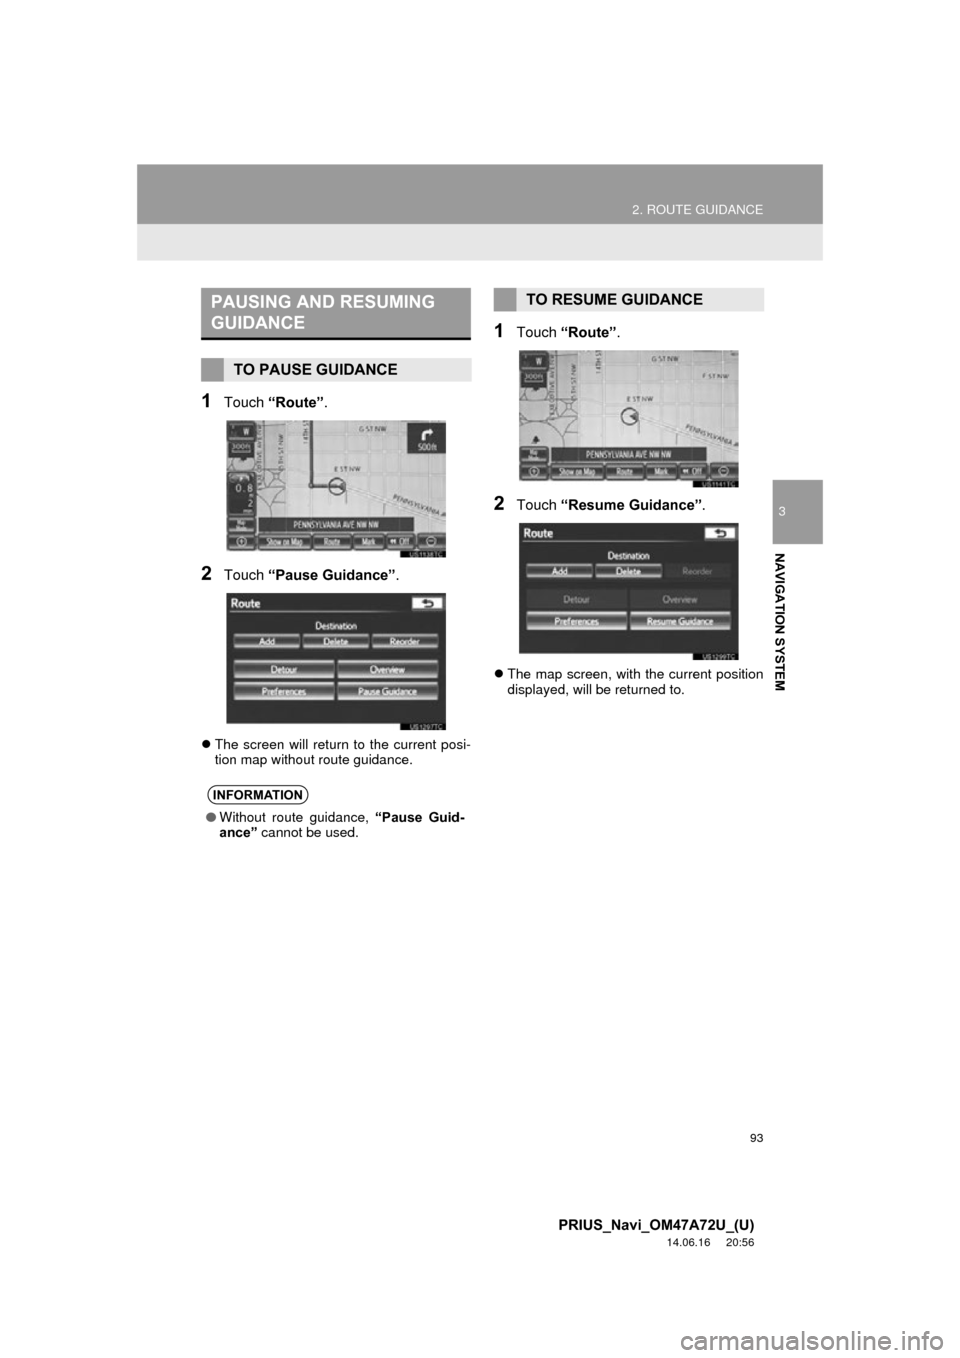
1Touch “Route” .
2Touch “Pause Guidance” .
The screen will return to the current posi-
tion map without route guidance.
1Touch “Route” .
2Touch “Resume Guidance” .
The map screen, with the current position
displayed, will be returned to.
PAUSING AND RESUMING
GUIDANCE
TO PAUSE GUIDANCE
INFORMATION
● Without route guidance, “Pause Guid-
ance” cannot be used.
TO RESUME GUIDANCE
Page 95 of 356
95
2. ROUTE GUIDANCE
3
NAVIGATION SYSTEM
PRIUS_Navi_OM47A72U_(U)
14.06.16 20:56
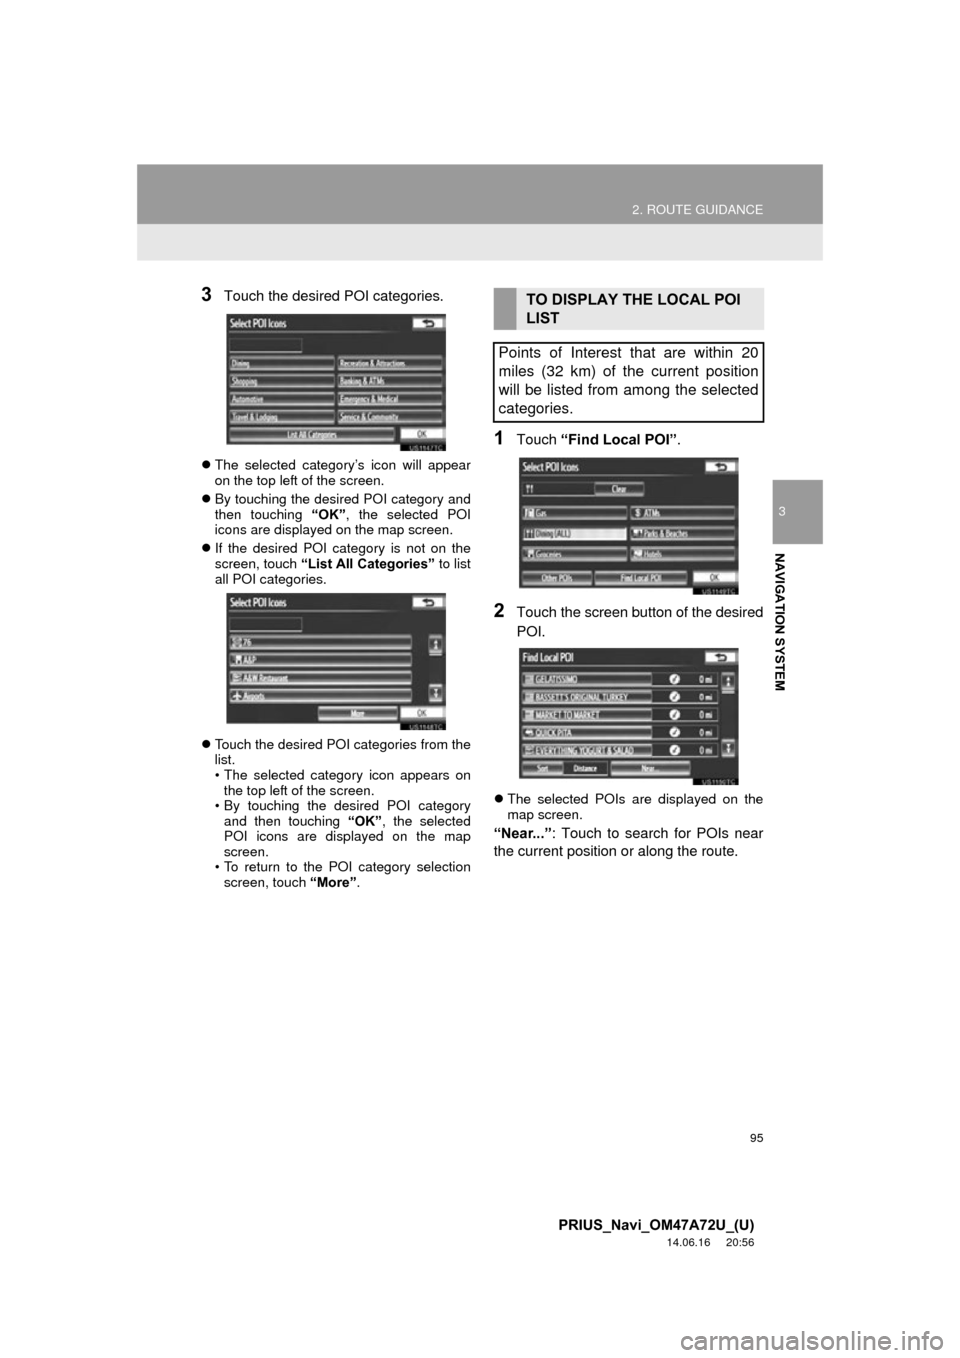
3Touch the desired POI categories.
The selected category’s icon will appear
on the top left of the screen.
By touching the desired POI category and
then touching “OK”, the selected POI
icons are displayed on the map screen.
If the desired POI category is not on the
screen, touch “List All Categories” to list
all POI categories.
Touch the desired POI categories from the
list.
• The selected category icon appears on
the top left of the screen.
• By touching the desired POI category and then touching “OK”, the selected
POI icons are displayed on the map
screen.
• To return to the POI category selection
screen, touch “More”.
1Touch “Find Local POI” .
2Touch the screen button of the desired
POI.
The selected POIs are displayed on the
map screen.
“Near...” : Touch to search for POIs near
the current position or along the route.
TO DISPLAY THE LOCAL POI
LIST
Points of Interest that are within 20
miles (32 km) of the current position
will be listed from among the selected
categories.
Page 97 of 356
97
2. ROUTE GUIDANCE
3
NAVIGATION SYSTEM
PRIUS_Navi_OM47A72U_(U)
14.06.16 20:56
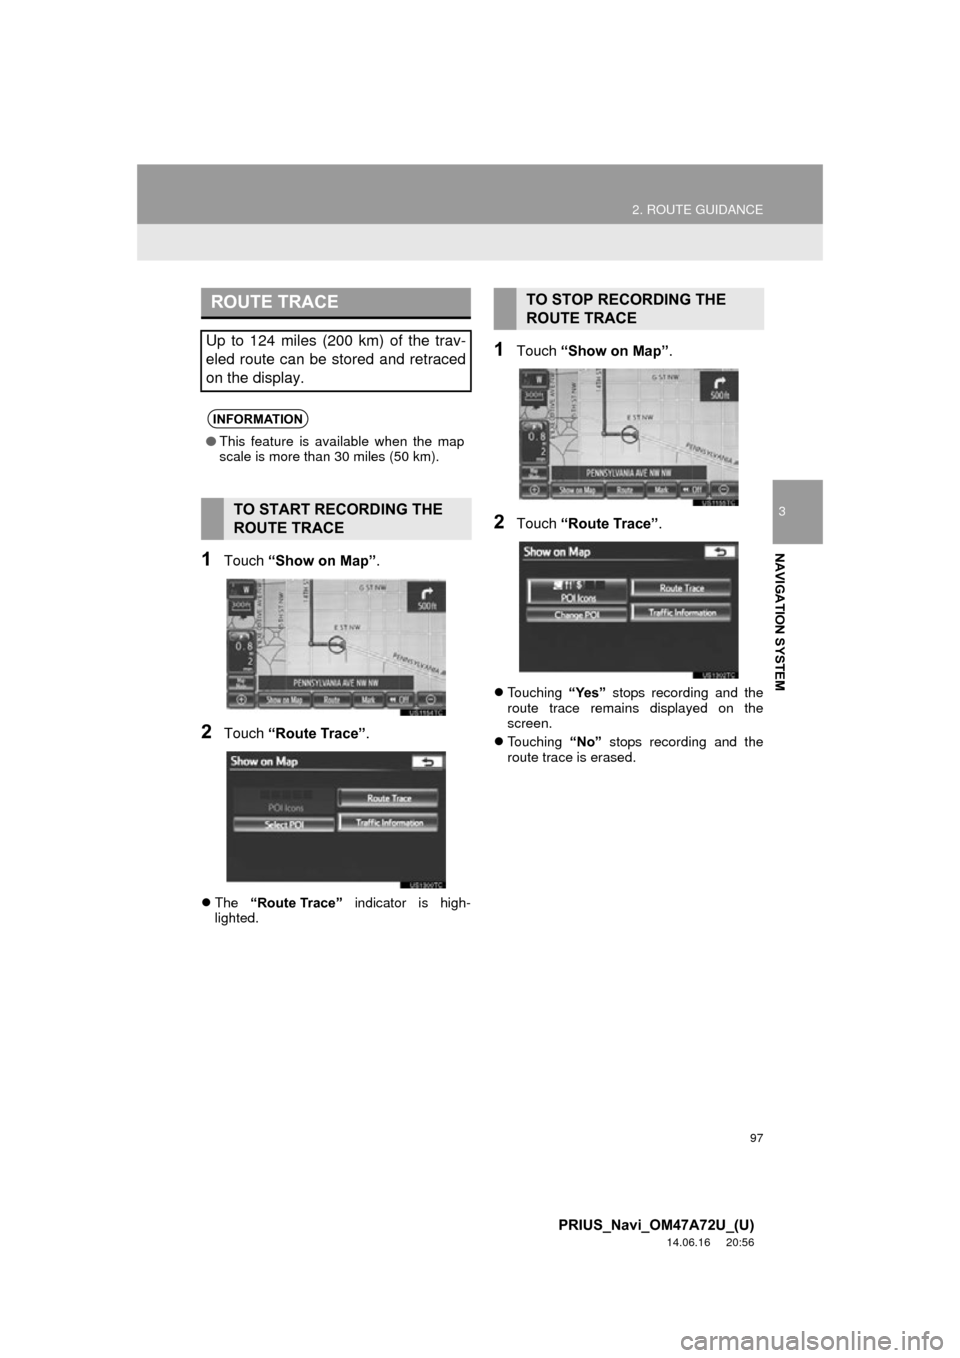
1Touch “Show on Map” .
2Touch “Route Trace” .
The “Route Trace” indicator is high-
lighted.
1Touch “Show on Map” .
2Touch “Route Trace” .
Touching “Yes” stops recording and the
route trace remains displayed on the
screen.
Touching “No” stops recording and the
route trace is erased.
ROUTE TRACE
Up to 124 miles (200 km) of the trav-
eled route can be stored and retraced
on the display.
INFORMATION
● This feature is available when the map
scale is more than 30 miles (50 km).
TO START RECORDING THE
ROUTE TRACE
TO STOP RECORDING THE
ROUTE TRACE
Page 98 of 356
98
PRIUS_Navi_OM47A72U_(U)
14.06.16 20:56
3. ADDRESS BOOK
1. NAVIGATION SETTINGS
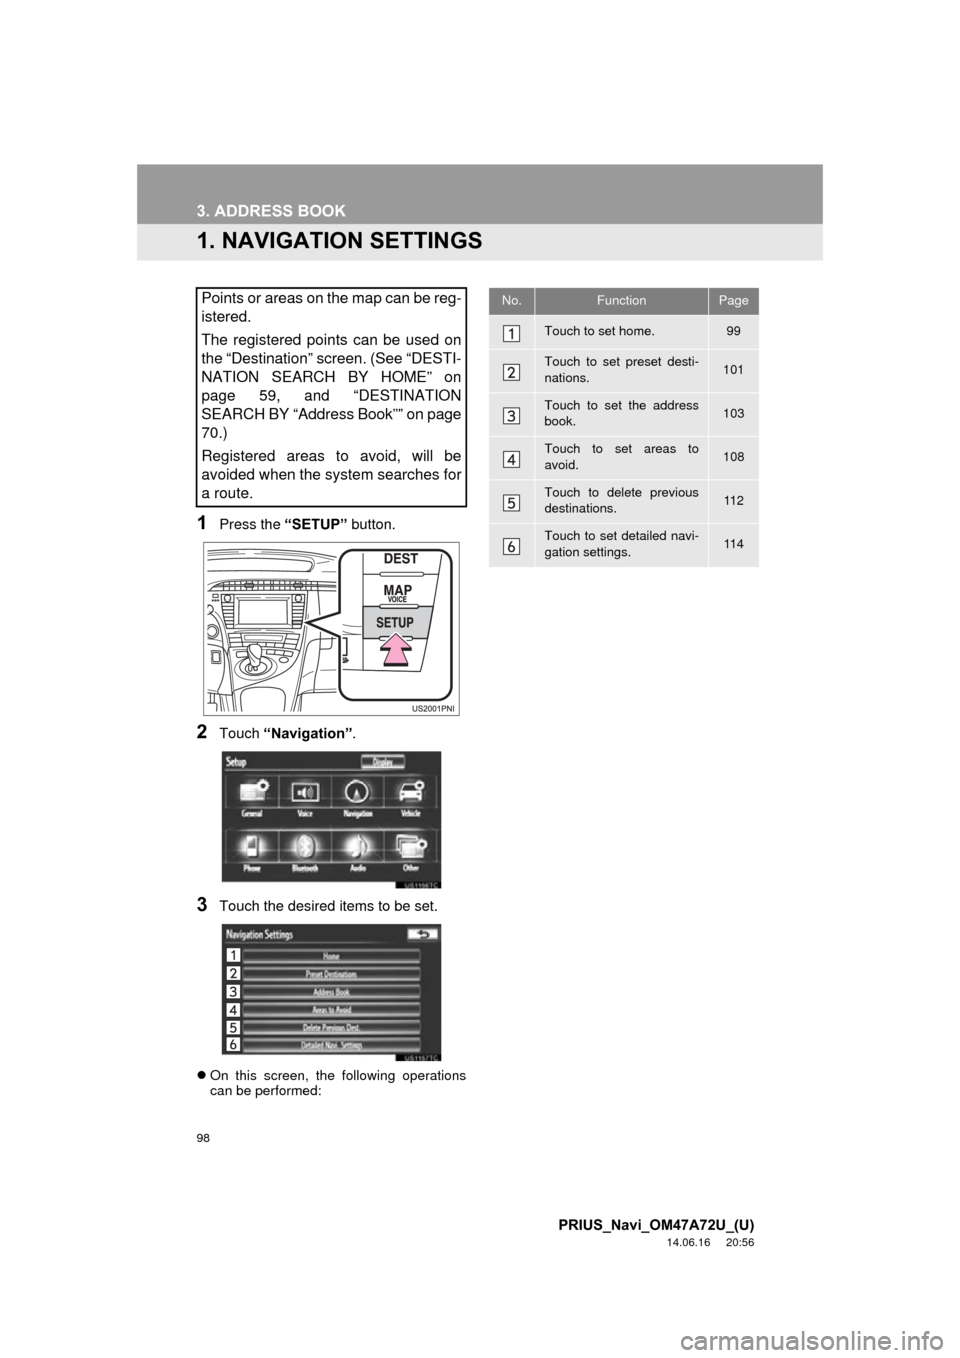
1Press the “SETUP” button.
2Touch “Navigation” .
3Touch the desired items to be set.
On this screen, the following operations
can be performed:
Points or areas on the map can be reg-
istered.
The registered points can be used on
the “Destination” screen. (See “DESTI-
NATION SEARCH BY HOME” on
page 59, and “DESTINATION
SEARCH BY “Address Book”” on page
70.)
Registered areas to avoid, will be
avoided when the system searches for
a route.No.FunctionPage
Touch to set home.99
Touch to set preset desti-
nations.101
Touch to set the address
book.103
Touch to set areas to
avoid.108
Touch to delete previous
destinations.11 2
Touch to set detailed navi-
gation settings.11 4
Page 99 of 356
99
3. ADDRESS BOOK
3
NAVIGATION SYSTEM
PRIUS_Navi_OM47A72U_(U)
14.06.16 20:56
1Press the “SETUP” button.
2Touch “Navigation” on the “Setup”
screen.
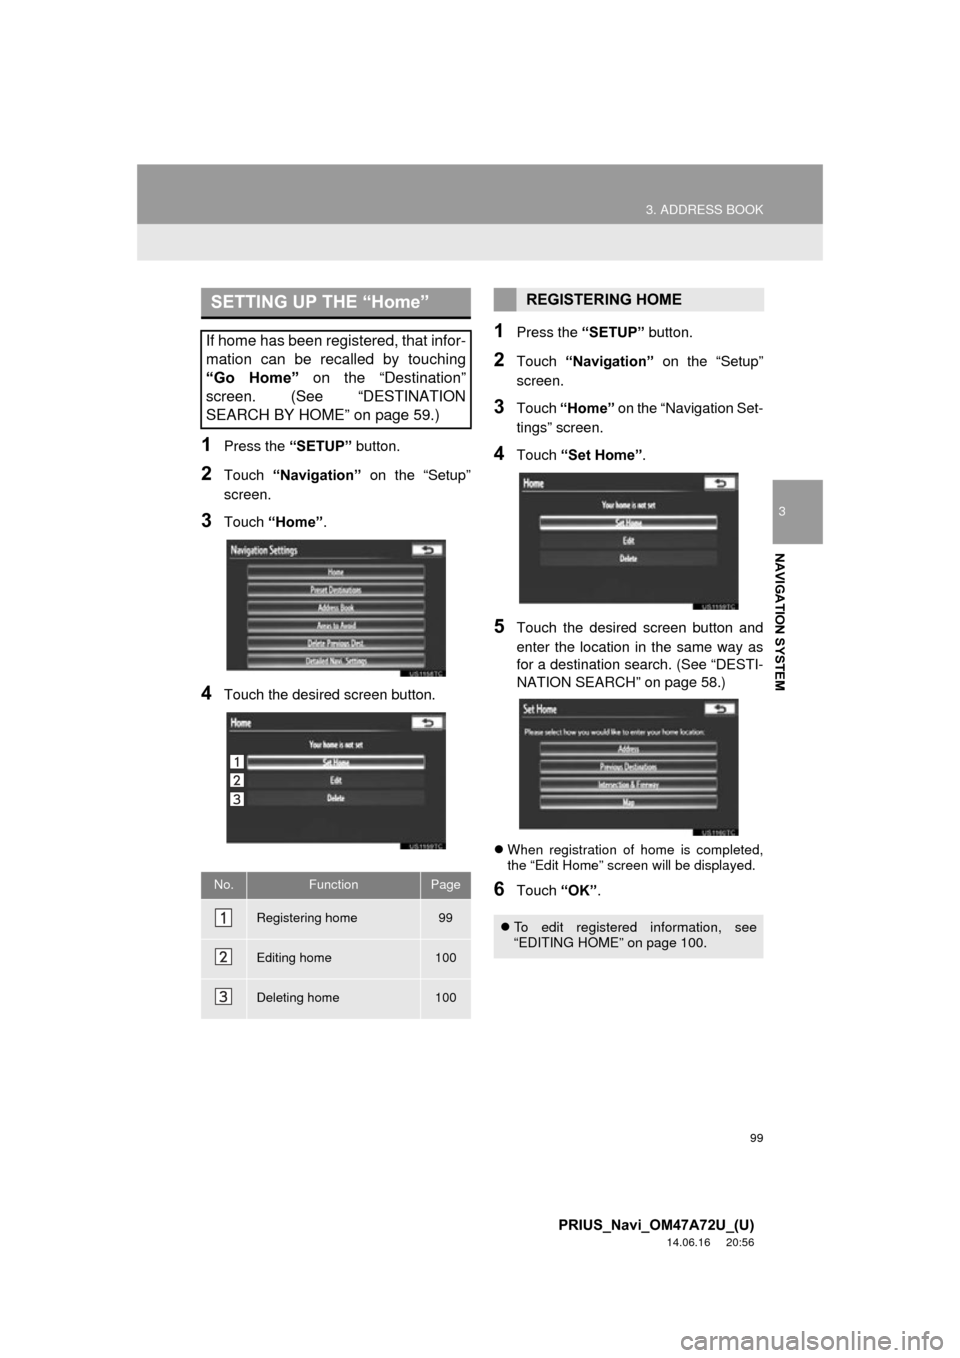
3Touch “Home” .
4Touch the desired screen button.
1Press the “SETUP” button.
2Touch “Navigation” on the “Setup”
screen.
3Touch “Home” on the “Navigation Set-
tings” screen.
4Touch “Set Home” .
5Touch the desired screen button and
enter the location in the same way as
for a destination search. (See “DESTI-
NATION SEARCH” on page 58.)
When registration of home is completed,
the “Edit Home” screen will be displayed.
6Touch “OK”.
SETTING UP THE “Home”
If home has been registered, that infor-
mation can be recalled by touching
“Go Home” on the “Destination”
screen. (See “DESTINATION
SEARCH BY HOME” on page 59.)
No.FunctionPage
Registering home99
Editing home100
Deleting home100
REGISTERING HOME
To edit registered information, see
“EDITING HOME” on page 100.
Page 100 of 356
100
3. ADDRESS BOOK
PRIUS_Navi_OM47A72U_(U)
14.06.16 20:56
1Press the “SETUP” button.
2Touch “Navigation” on the “Setup”
screen.
3Touch “Home” on the “Navigation Set-
tings” screen.
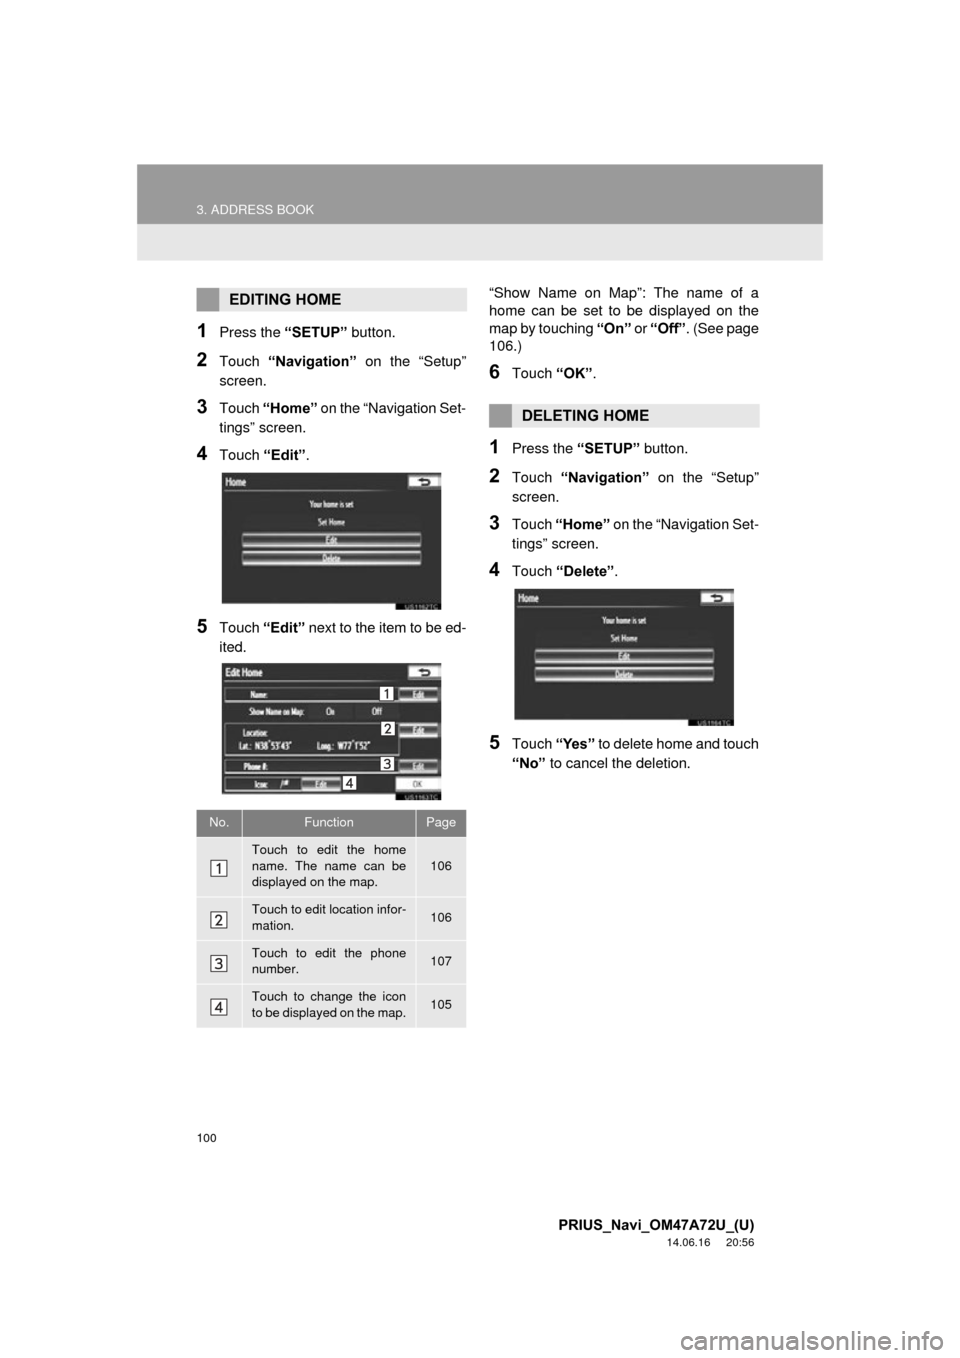
4Touch “Edit”.
5Touch “Edit” next to the item to be ed-
ited. “Show Name on Map”: The name of a
home can be set to be displayed on the
map by touching
“On” or “Off” . (See page
106.)
6Touch “OK”.
1Press the “SETUP” button.
2Touch “Navigation” on the “Setup”
screen.
3Touch “Home” on the “Navigation Set-
tings” screen.
4Touch “Delete” .
5Touch “Yes” to delete home and touch
“No” to cancel the deletion.
EDITING HOME
No.FunctionPage
Touch to edit the home
name. The name can be
displayed on the map.106
Touch to edit location infor-
mation.106
Touch to edit the phone
number.107
Touch to change the icon
to be displayed on the map.105
DELETING HOME
Page 101 of 356
101
3. ADDRESS BOOK
3
NAVIGATION SYSTEM
PRIUS_Navi_OM47A72U_(U)
14.06.16 20:56
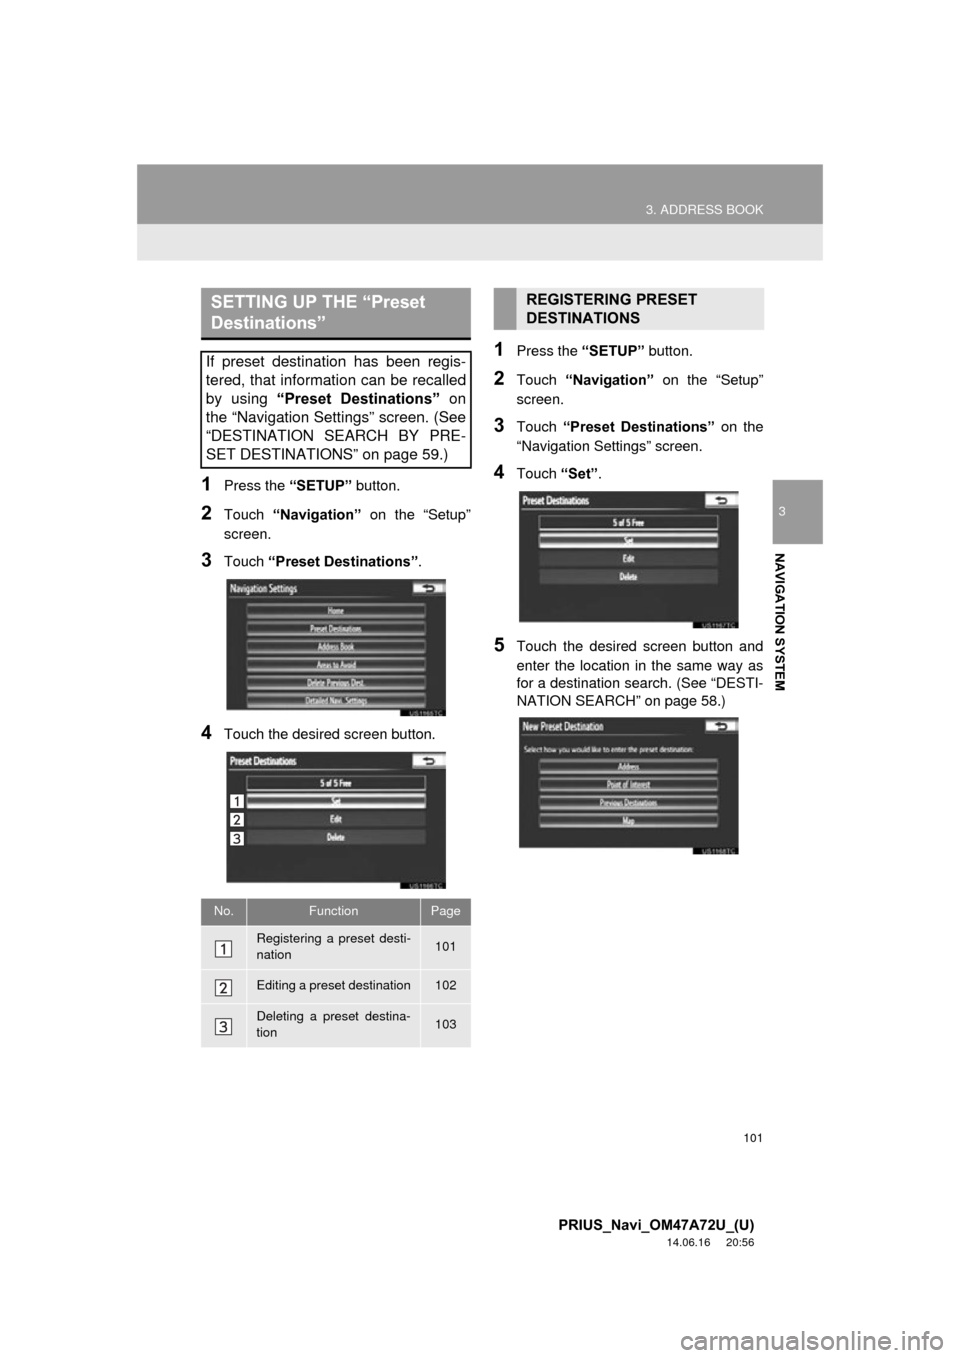
1Press the “SETUP” button.
2Touch “Navigation” on the “Setup”
screen.
3Touch “Preset Destinations” .
4Touch the desired screen button.
1Press the “SETUP” button.
2Touch “Navigation” on the “Setup”
screen.
3Touch “Preset Destinations” on the
“Navigation Settings” screen.
4Touch “Set”.
5Touch the desired screen button and
enter the location in the same way as
for a destination search. (See “DESTI-
NATION SEARCH” on page 58.)
SETTING UP THE “Preset
Destinations”
If preset destination has been regis-
tered, that information can be recalled
by using “Preset Destinations” on
the “Navigation Settings” screen. (See
“DESTINATION SEARCH BY PRE-
SET DESTINATIONS” on page 59.)
No.FunctionPage
Registering a preset desti-
nation101
Editing a preset destination102
Deleting a preset destina-
tion103
REGISTERING PRESET
DESTINATIONS
Page 102 of 356
102
3. ADDRESS BOOK
PRIUS_Navi_OM47A72U_(U)
14.06.16 20:56
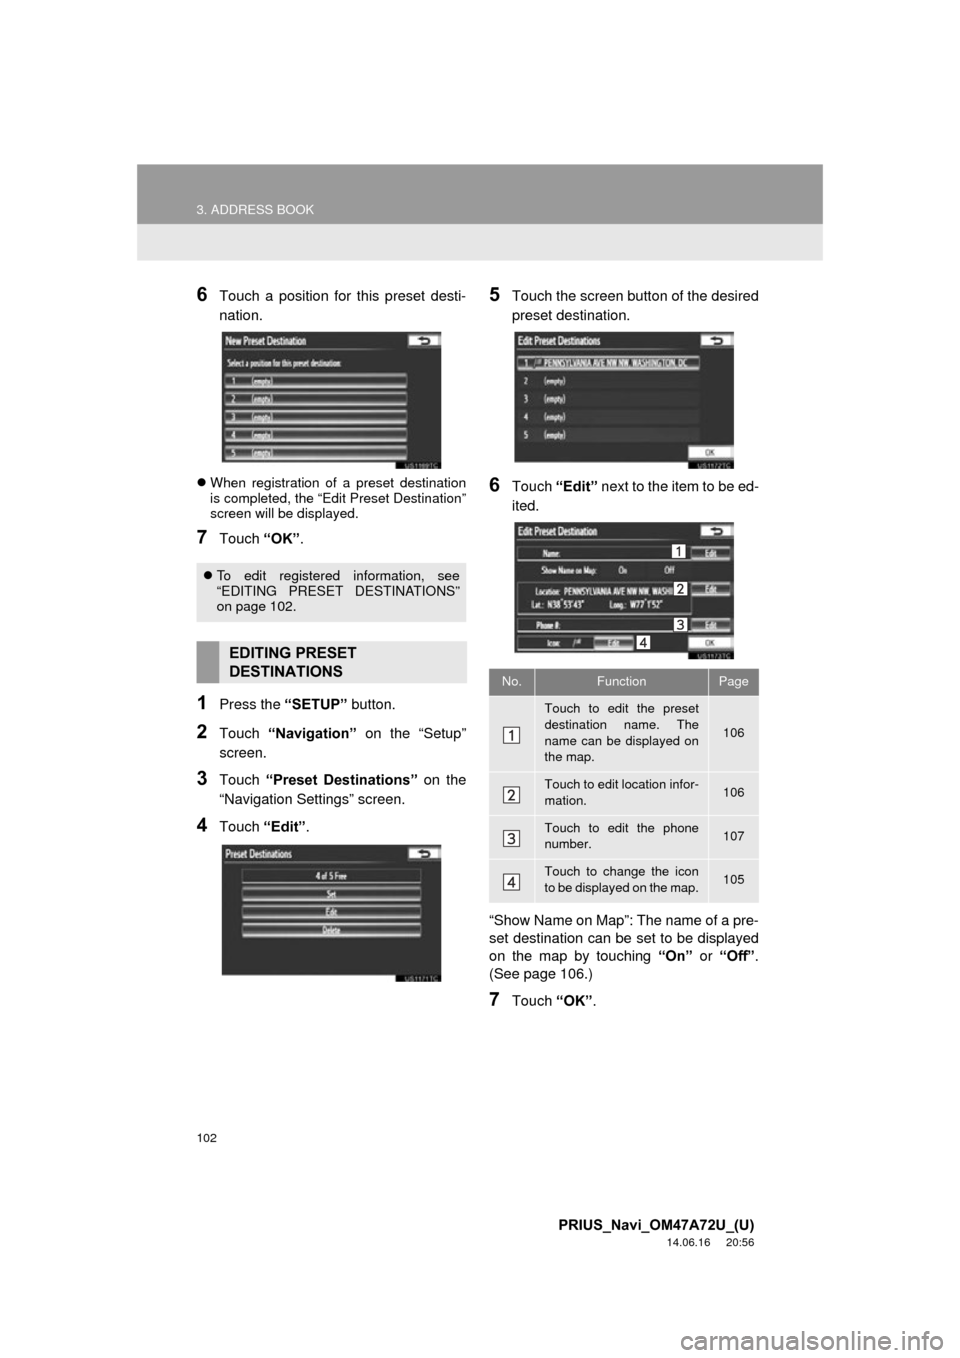
6Touch a position for this preset desti-
nation.
When registration of a preset destination
is completed, the “Edit Preset Destination”
screen will be displayed.
7Touch “OK”.
1Press the “SETUP” button.
2Touch “Navigation” on the “Setup”
screen.
3Touch “Preset Destinations” on the
“Navigation Settings” screen.
4Touch “Edit”.
5Touch the screen button of the desired
preset destination.
6Touch “Edit” next to the item to be ed-
ited.
“Show Name on Map”: The name of a pre-
set destination can be set to be displayed
on the map by touching “On” or “Off” .
(See page 106.)
7Touch “OK”.
To edit registered information, see
“EDITING PRESET DESTINATIONS”
on page 102.
EDITING PRESET
DESTINATIONS
No.FunctionPage
Touch to edit the preset
destination name. The
name can be displayed on
the map.
106
Touch to edit location infor-
mation.106
Touch to edit the phone
number.107
Touch to change the icon
to be displayed on the map.105