Charging schedule switch TOYOTA PRIUS PLUG-IN HYBRID 2020 User Guide
[x] Cancel search | Manufacturer: TOYOTA, Model Year: 2020, Model line: PRIUS PLUG-IN HYBRID, Model: TOYOTA PRIUS PLUG-IN HYBRID 2020Pages: 816, PDF Size: 132.85 MB
Page 179 of 816
1792-2. Charging
2
Plug-in hybrid system
Prius Plug-in Hybrid_OM_OM47D72E_(EE)
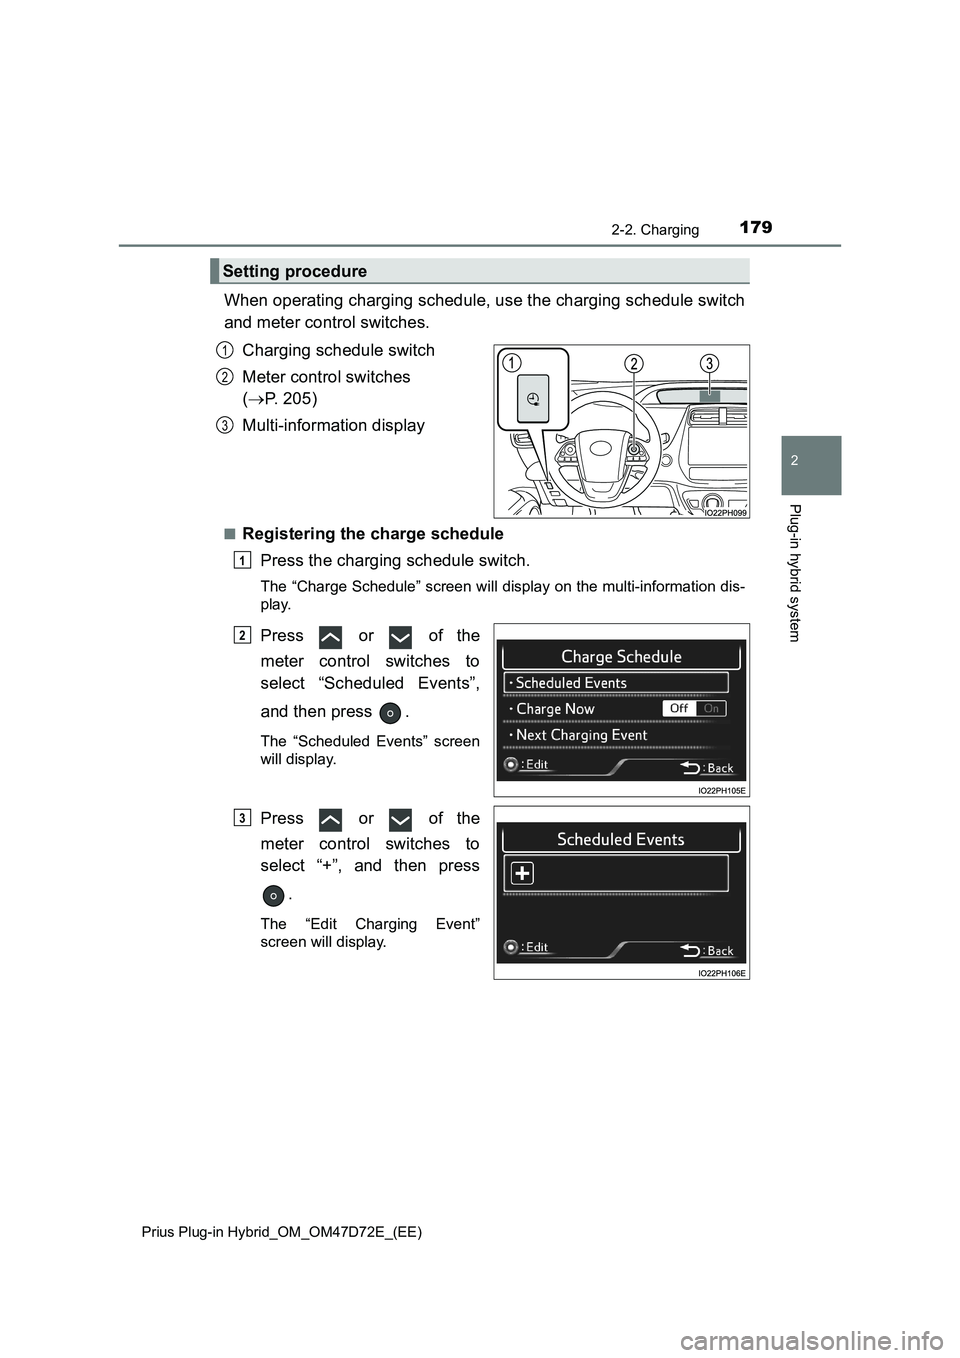
When operating charging schedule, use the charging schedule switch
and meter control switches.
Charging schedule switch
Meter control switches
(P. 205)
Multi-information display
■Registering the charge schedule
Press the charging schedule switch.
The “Charge Schedule” screen will display on the multi-information dis-
play.
Press or of the
meter control switches to
select “Scheduled Events”,
and then press .
The “Scheduled Events” screen
will display.
Press or of the
meter control switches to
select “+”, and then press
.
The “Edit Charging Event”
screen will display.
Setting procedure
1
2
3
1
2
3
Page 181 of 816
1812-2. Charging
2
Plug-in hybrid system
Prius Plug-in Hybrid_OM_OM47D72E_(EE)
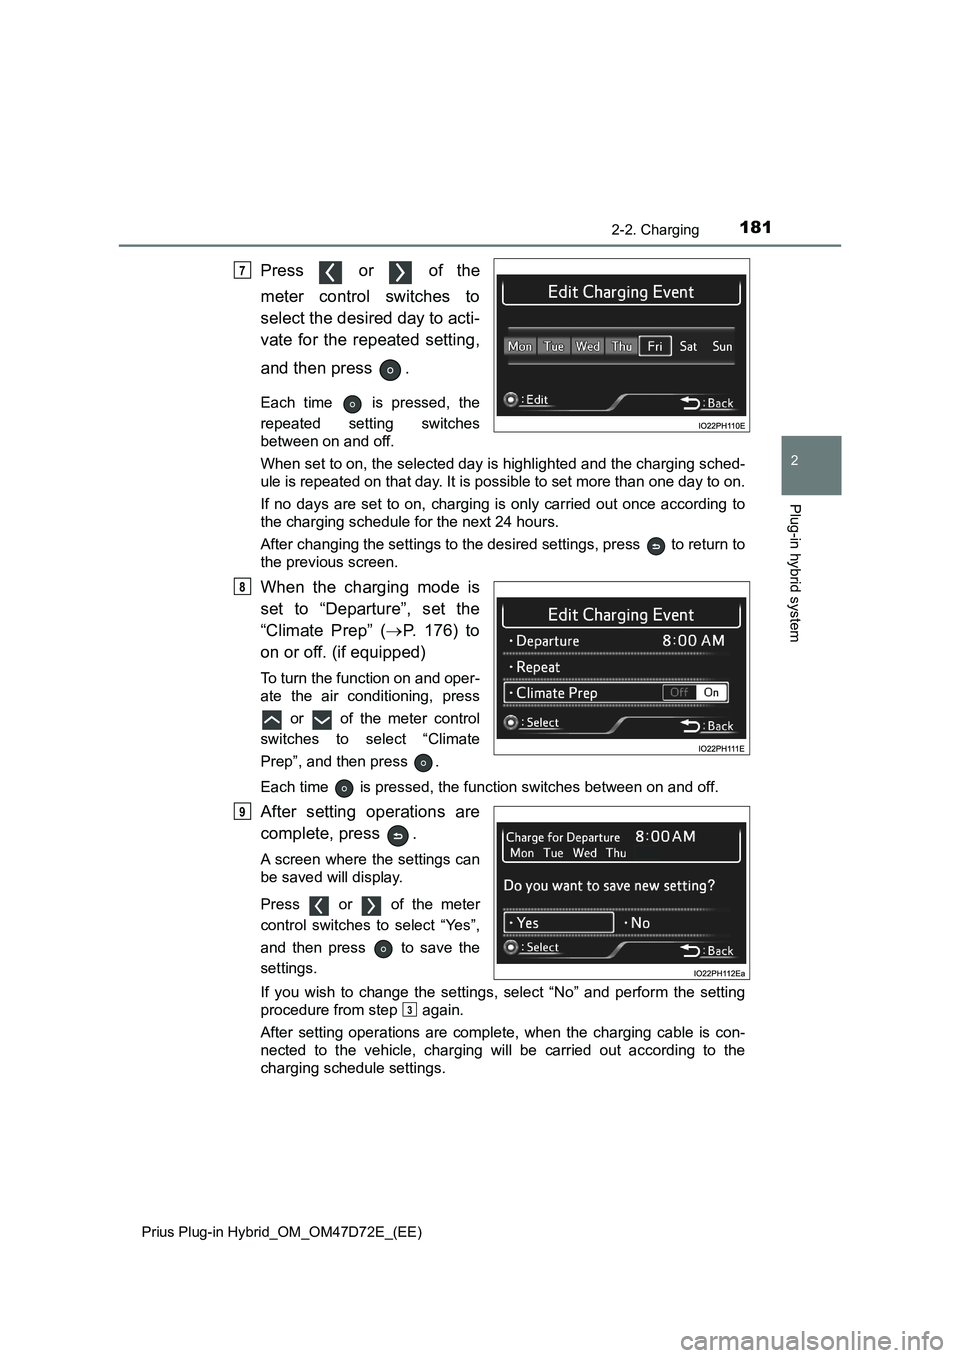
Press or of the
meter control switches to
select the desired day to acti-
vate for the repeated setting,
and then press .
Each time is pressed, the
repeated setting switches
between on and off.
When set to on, the selected day is highlighted and the charging sched-
ule is repeated on that day. It is possible to set more than one day to on.
If no days are set to on, charging is only carried out once according to
the charging schedule for the next 24 hours.
After changing the settings to the desired settings, press to return to
the previous screen.
When the charging mode is
set to “Departure”, set the
“Climate Prep” (P. 176) to
on or off. (if equipped)
To turn the function on and oper-
ate the air conditioning, press
or of the meter control
switches to select “Climate
Prep”, and then press .
Each time is pressed, the function switches between on and off.
After setting operations are
complete, press .
A screen where the settings can
be saved will display.
Press or of the meter
control switches to select “Yes”,
and then press to save the
settings.
If you wish to change the settings, select “No” and perform the setting
procedure from step again.
After setting operations are complete, when the charging cable is con-
nected to the vehicle, charging will be carried out according to the
charging schedule settings.
7
8
9
3
Page 182 of 816
1822-2. Charging
Prius Plug-in Hybrid_OM_OM47D72E_(EE)
■Changing the registered charge schedules
The registered charge schedules can be turned on, off, deleted or
modified.
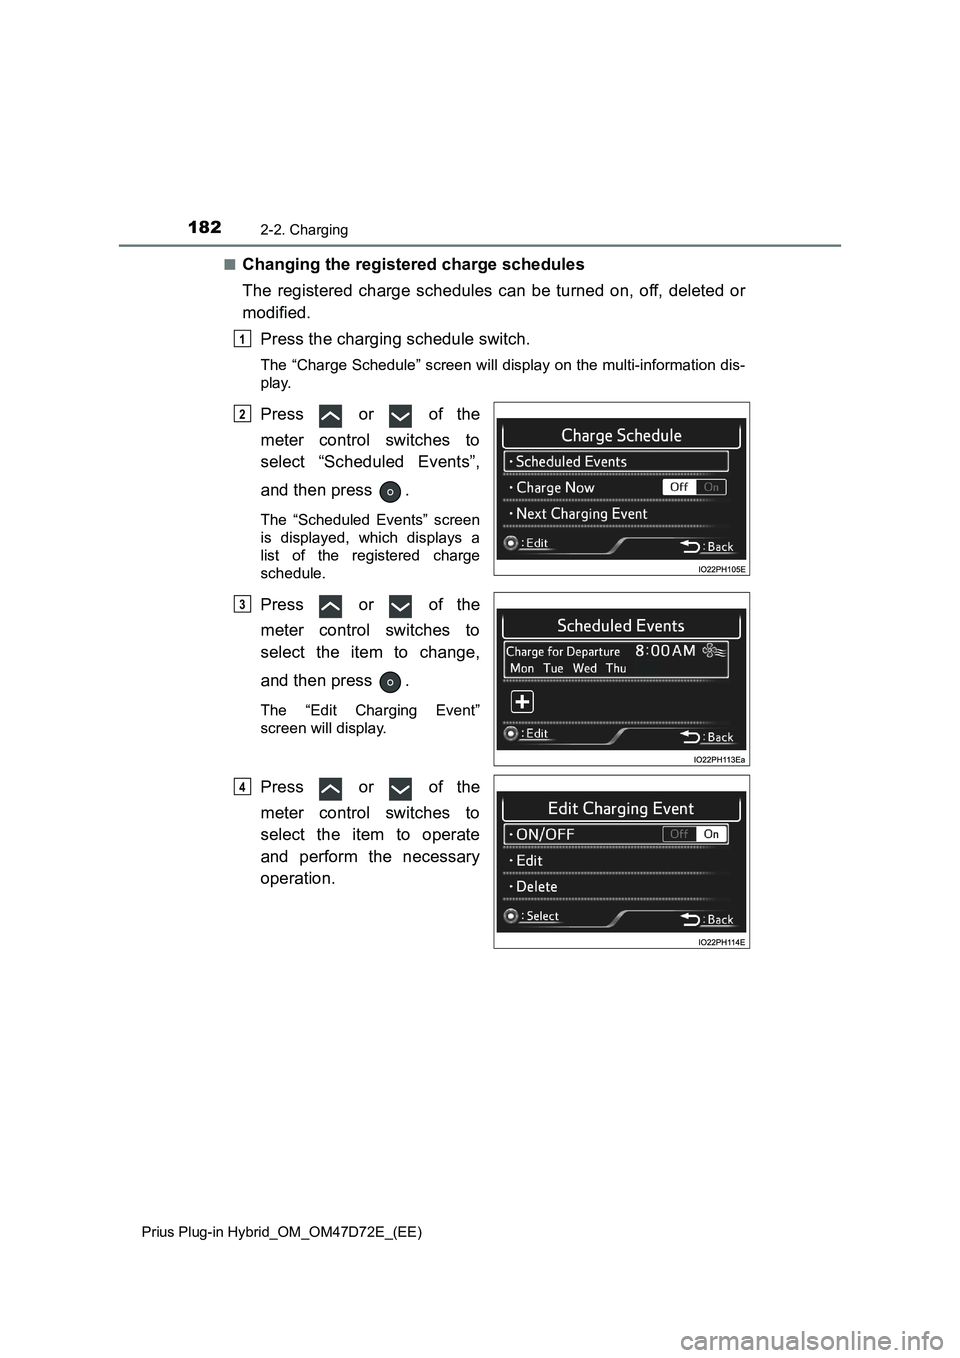
Press the charging schedule switch.
The “Charge Schedule” screen will display on the multi-information dis-
play.
Press or of the
meter control switches to
select “Scheduled Events”,
and then press .
The “Scheduled Events” screen
is displayed, which displays a
list of the registered charge
schedule.
Press or of the
meter control switches to
select the item to change,
and then press .
The “Edit Charging Event”
screen will display.
Press or of the
meter control switches to
select the item to operate
and perform the necessary
operation.
1
2
3
4
Page 183 of 816
1832-2. Charging
2
Plug-in hybrid system
Prius Plug-in Hybrid_OM_OM47D72E_(EE)
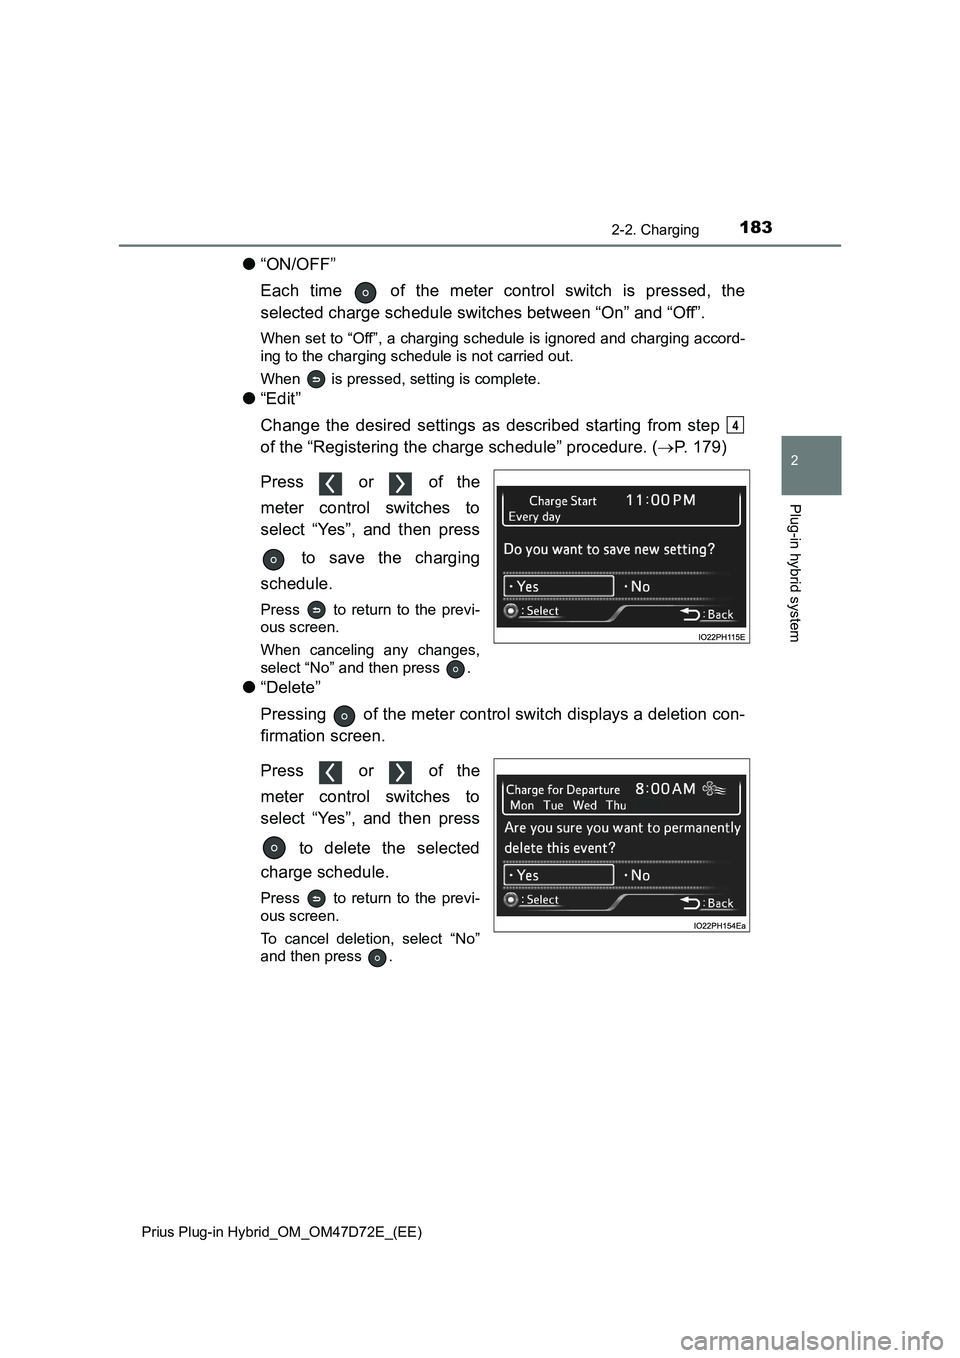
●“ON/OFF”
Each time of the meter control switch is pressed, the
selected charge schedule switches between “On” and “Off”.
When set to “Off”, a charging schedule is ignored and charging accord-
ing to the charging schedule is not carried out.
When is pressed, setting is complete.
●“Edit”
Change the desired settings as described starting from step
of the “Registering the charge schedule” procedure. (P. 179)
Press or of the
meter control switches to
select “Yes”, and then press
to save the charging
schedule.
Press to return to the previ-
ous screen.
When canceling any changes,
select “No” and then press .
●“Delete”
Pressing of the meter control switch displays a deletion con-
firmation screen.
Press or of the
meter control switches to
select “Yes”, and then press
to delete the selected
charge schedule.
Press to return to the previ-
ous screen.
To cancel deletion, select “No”
and then press .
4
Page 184 of 816
1842-2. Charging
Prius Plug-in Hybrid_OM_OM47D72E_(EE)
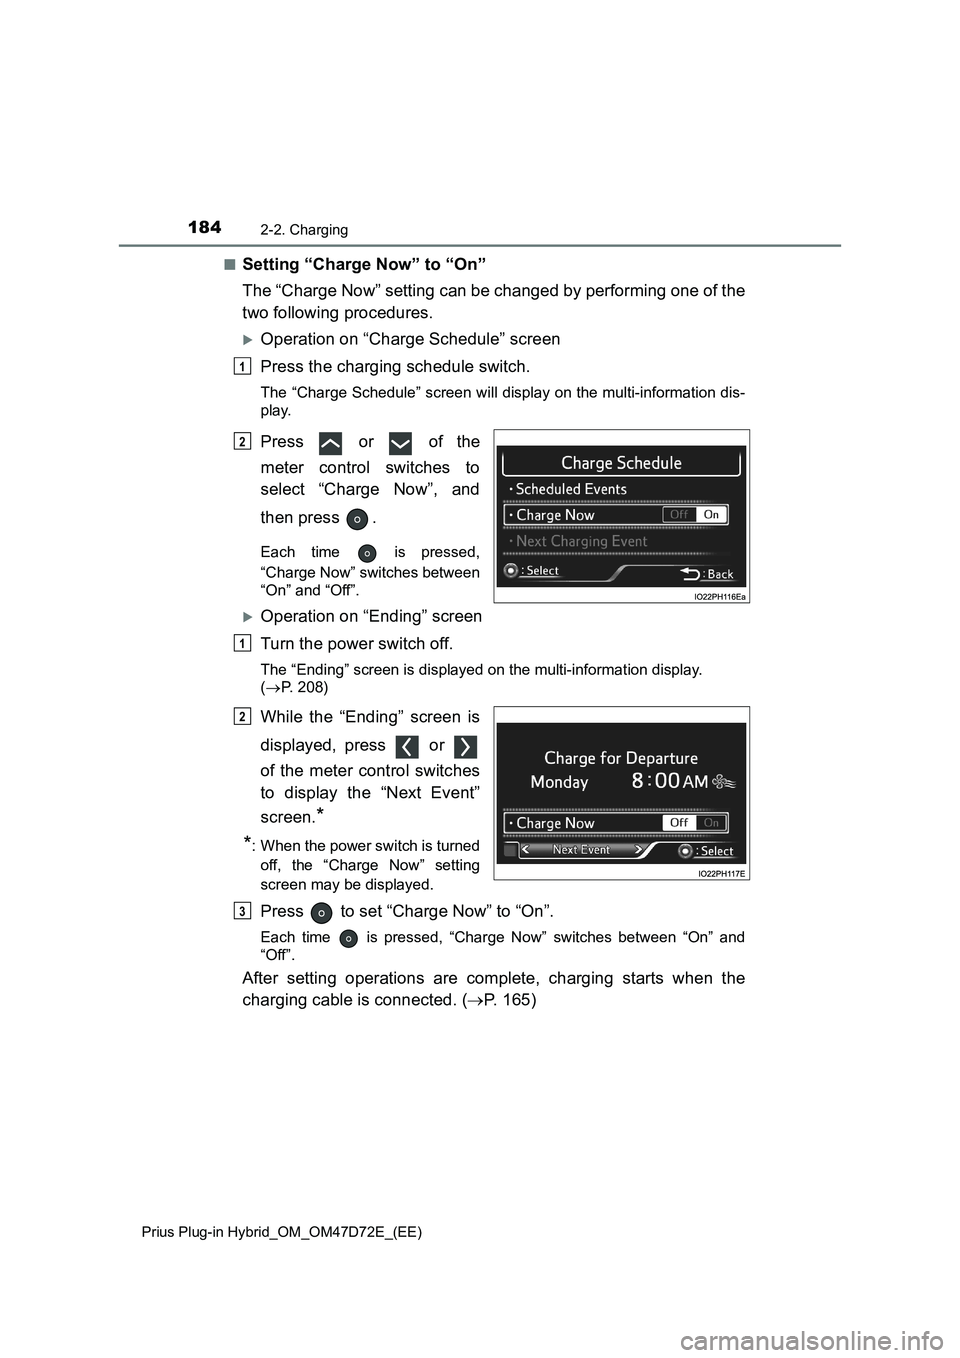
■Setting “Charge Now” to “On”
The “Charge Now” setting can be changed by performing one of the
two following procedures.
Operation on “Charge Schedule” screen
Press the charging schedule switch.
The “Charge Schedule” screen will display on the multi-information dis-
play.
Press or of the
meter control switches to
select “Charge Now”, and
then press .
Each time is pressed,
“Charge Now” switches between
“On” and “Off”.
Operation on “Ending” screen
Turn the power switch off.
The “Ending” screen is displayed on the multi-information display.
(P. 208)
While the “Ending” screen is
displayed, press or
of the meter control switches
to display the “Next Event”
screen.
*
*
: When the power switch is turned
off, the “Charge Now” setting
screen may be displayed.
Press to set “Charge Now” to “On”.
Each time is pressed, “Charge Now” switches between “On” and
“Off”.
After setting operations are complete, charging starts when the
charging cable is connected. (P. 165)
1
2
1
2
3
Page 185 of 816
1852-2. Charging
2
Plug-in hybrid system
Prius Plug-in Hybrid_OM_OM47D72E_(EE)
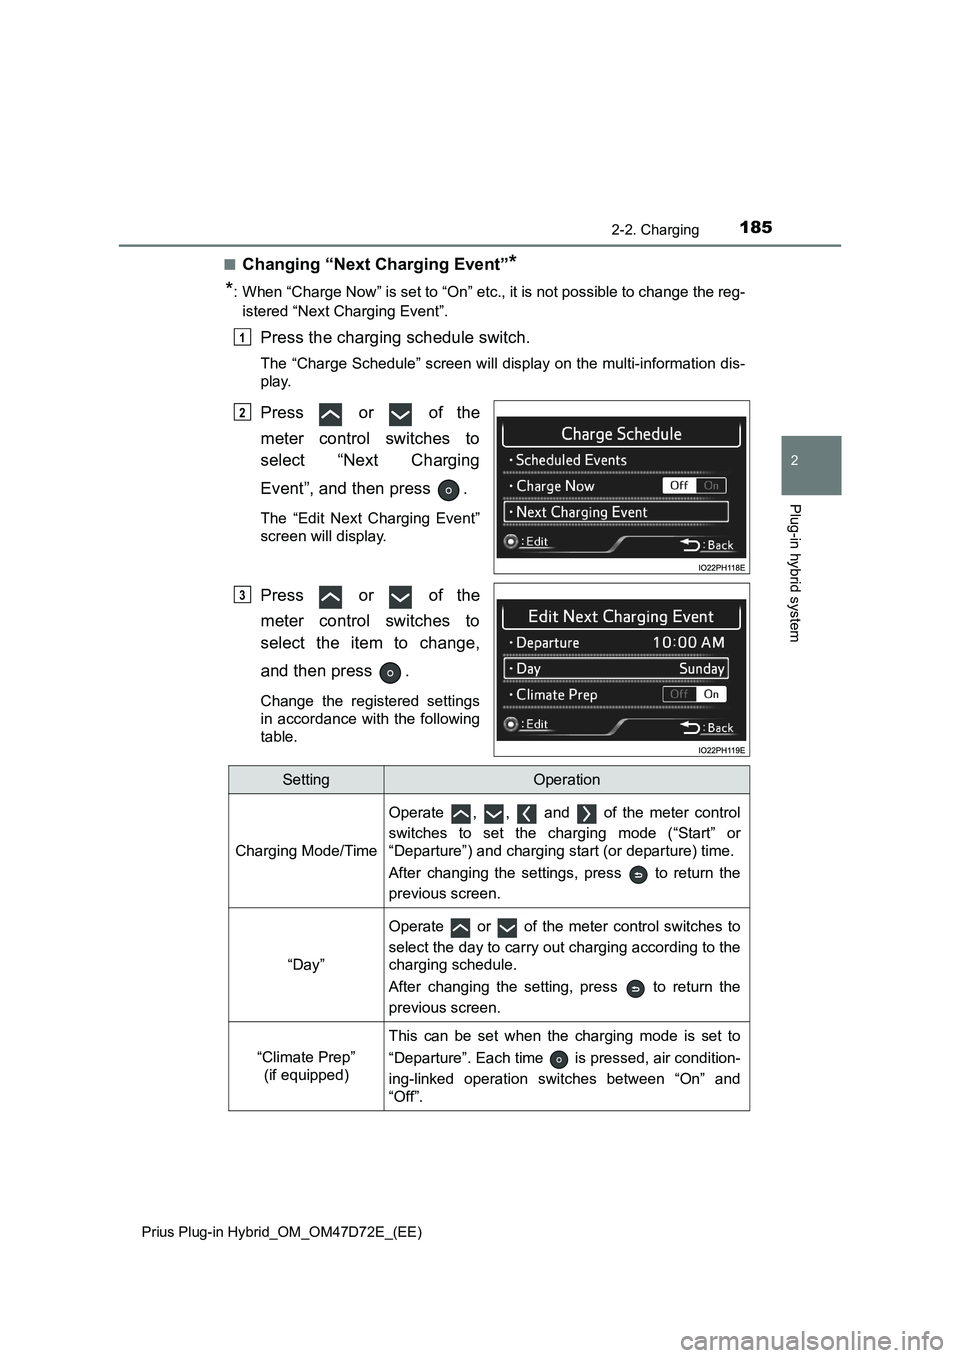
■Changing “Next Charging Event”*
*
: When “Charge Now” is set to “On” etc., it is not possible to change the reg-
istered “Next Charging Event”.
Press the charging schedule switch.
The “Charge Schedule” screen will display on the multi-information dis-
play.
Press or of the
meter control switches to
select “Next Charging
Event”, and then press .
The “Edit Next Charging Event”
screen will display.
Press or of the
meter control switches to
select the item to change,
and then press .
Change the registered settings
in accordance with the following
table.
1
2
3
SettingOperation
Charging Mode/Time
Operate , , and of the meter control
switches to set the charging mode (“Start” or
“Departure”) and charging start (or departure) time.
After changing the settings, press to return the
previous screen.
“Day”
Operate or of the meter control switches to
select the day to carry out charging according to the
charging schedule.
After changing the setting, press to return the
previous screen.
“Climate Prep”
(if equipped)
This can be set when the charging mode is set to
“Departure”. Each time is pressed, air condition-
ing-linked operation switches between “On” and
“Off”.
Page 186 of 816
1862-2. Charging
Prius Plug-in Hybrid_OM_OM47D72E_(EE)
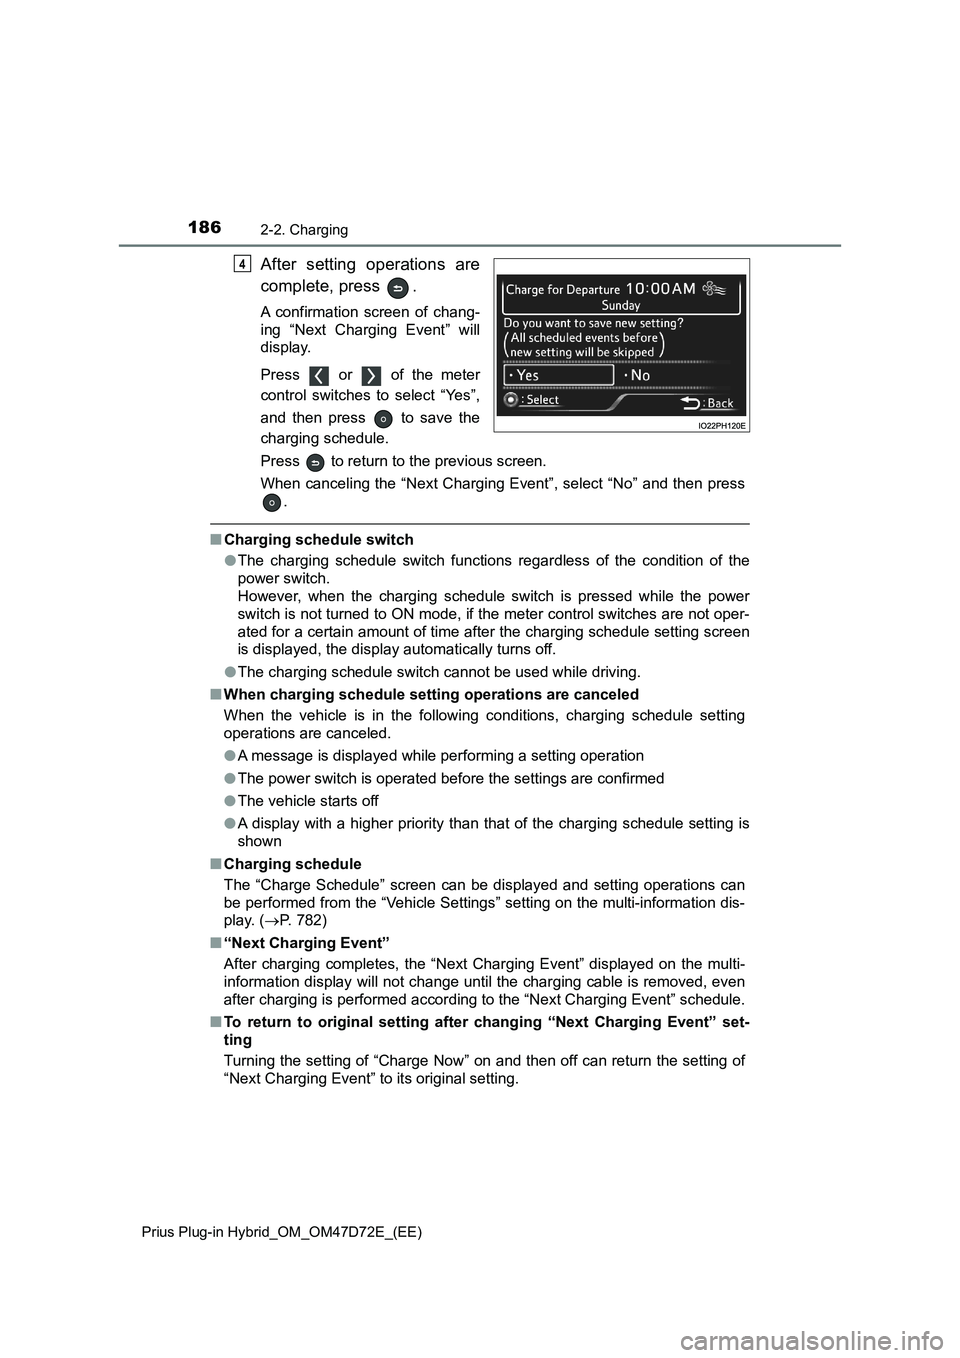
After setting operations are
complete, press .
A confirmation screen of chang-
ing “Next Charging Event” will
display.
Press or of the meter
control switches to select “Yes”,
and then press to save the
charging schedule.
Press to return to the previous screen.
When canceling the “Next Charging Event”, select “No” and then press
.
■Charging schedule switch
●The charging schedule switch functions regardless of the condition of the
power switch.
However, when the charging schedule switch is pressed while the power
switch is not turned to ON mode, if the meter control switches are not oper-
ated for a certain amount of time after the charging schedule setting screen
is displayed, the display automatically turns off.
●The charging schedule switch cannot be used while driving.
■When charging schedule setting operations are canceled
When the vehicle is in the following conditions, charging schedule setting
operations are canceled.
●A message is displayed while performing a setting operation
●The power switch is operated before the settings are confirmed
●The vehicle starts off
●A display with a higher priority than that of the charging schedule setting is
shown
■Charging schedule
The “Charge Schedule” screen can be displayed and setting operations can
be performed from the “Vehicle Settings” setting on the multi-information dis-
play. (P. 782)
■“Next Charging Event”
After charging completes, the “Next Charging Event” displayed on the multi-
information display will not change until the charging cable is removed, even
after charging is performed according to the “Next Charging Event” schedule.
■To return to original setting after changing “Next Charging Event” set-
ting
Turning the setting of “Charge Now” on and then off can return the setting of
“Next Charging Event” to its original setting.
4
Page 187 of 816
1872-2. Charging
2
Plug-in hybrid system
Prius Plug-in Hybrid_OM_OM47D72E_(EE)
■When “Next Charging Event” is changed while charging
● When the charging mode is “Departure”, the current charging is interrupted
or continued depending on the remaining time until the charging is com-
pleted.
● When the charging mode is “Start”, the current charging is interrupted, the
next charging will start at the set time.
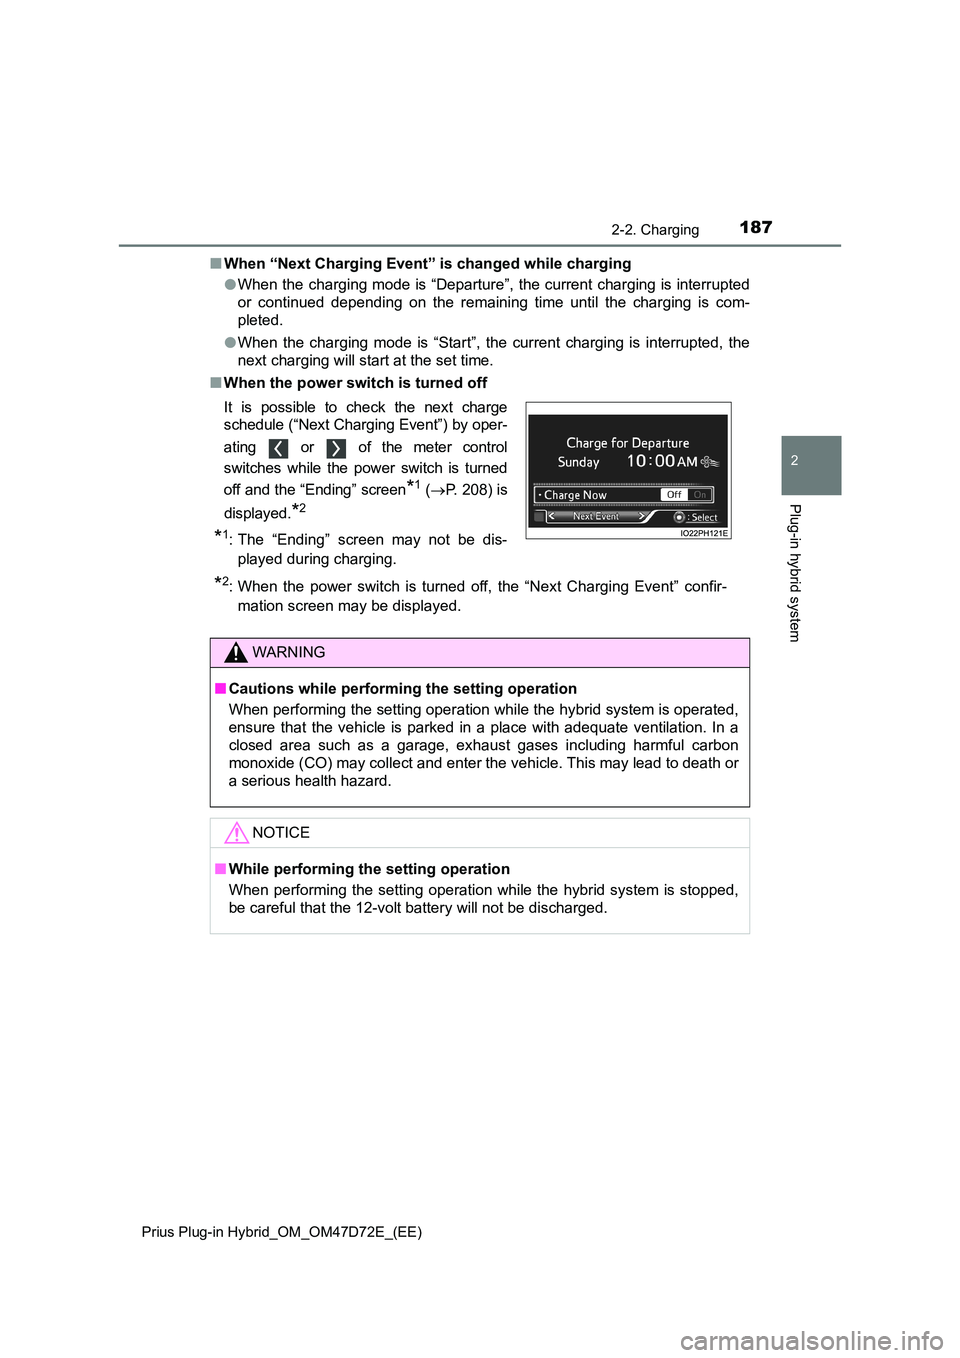
■ When the power switch is turned off
It is possible to check the next charge
schedule (“Next Charging Event”) by oper-
ating or of the meter control
switches while the power switch is turned
off and the “Ending” screen*1 ( P. 208) is
displayed.*2
*1: The “Ending” screen may not be dis-
played during charging.
*2: When the power switch is turned off, the “Next Charging Event” confir-
mation screen may be displayed.
WARNING
■ Cautions while performing the setting operation
When performing the setting operation while the hybrid system is operated,
ensure that the vehicle is parked in a place with adequate ventilation. In a
closed area such as a garage, exhaust gases including harmful carbon
monoxide (CO) may collect and enter the vehicle. This may lead to death or
a serious health hazard.
NOTICE
■ While performing the setting operation
When performing the setting operation while the hybrid system is stopped,
be careful that the 12-volt battery will not be discharged.
Page 199 of 816
1992-2. Charging
2
Plug-in hybrid system
Prius Plug-in Hybrid_OM_OM47D72E_(EE)
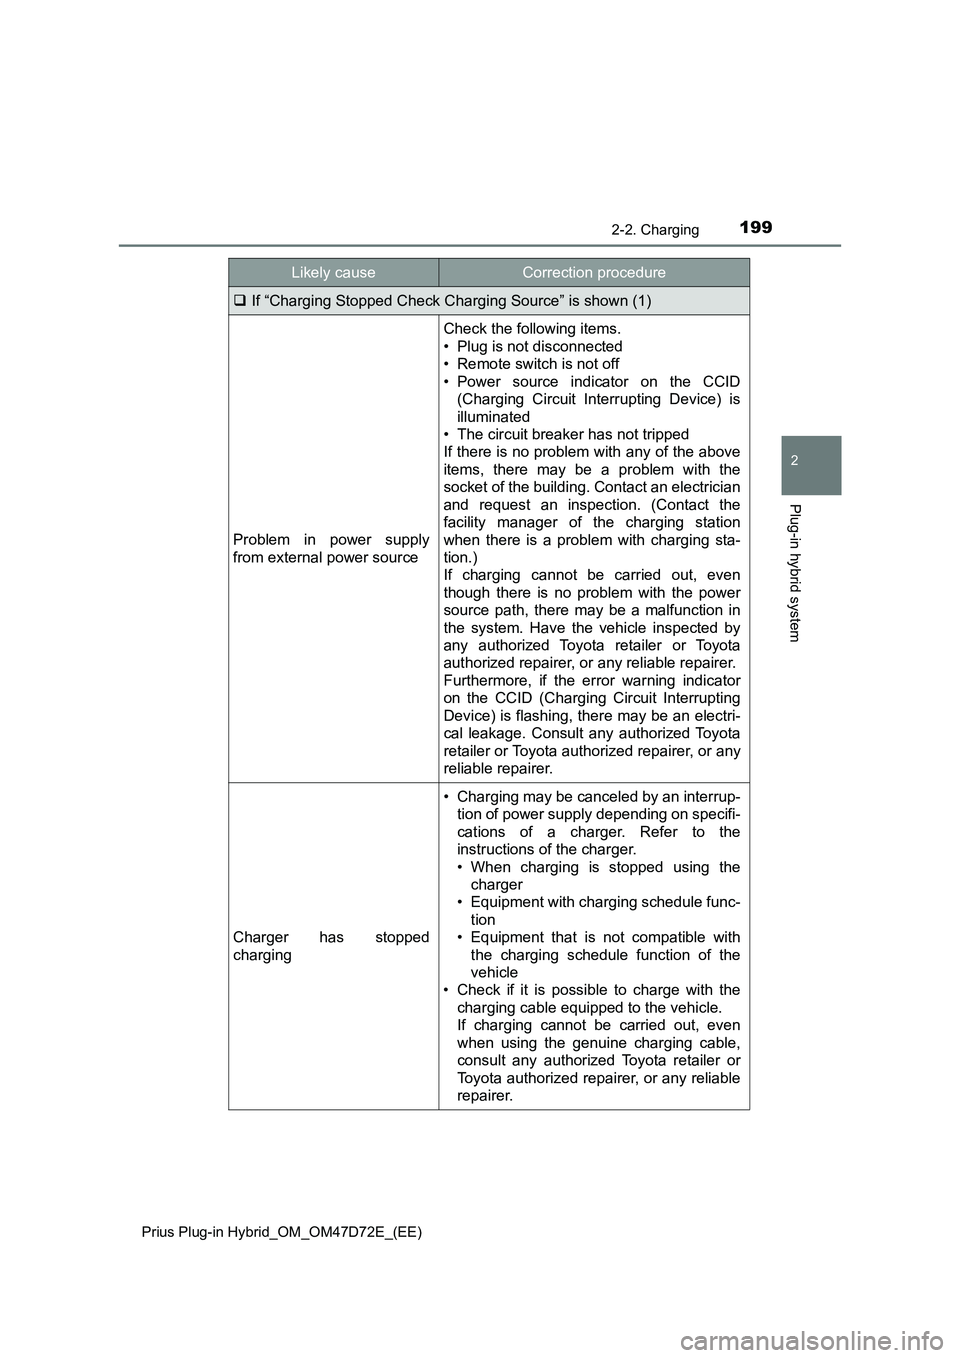
If “Charging Stopped Check Charging Source” is shown (1)
Problem in power supply
from external power source
Check the following items.
• Plug is not disconnected
• Remote switch is not off
• Power source indicator on the CCID
(Charging Circuit Interrupting Device) is
illuminated
• The circuit breaker has not tripped
If there is no problem with any of the above
items, there may be a problem with the
socket of the building. Contact an electrician
and request an inspection. (Contact the
facility manager of the charging station
when there is a problem with charging sta-
tion.)
If charging cannot be carried out, even
though there is no problem with the power
source path, there may be a malfunction in
the system. Have the vehicle inspected by
any authorized Toyota retailer or Toyota
authorized repairer, or any reliable repairer.
Furthermore, if the error warning indicator
on the CCID (Charging Circuit Interrupting
Device) is flashing, there may be an electri-
cal leakage. Consult any authorized Toyota
retailer or Toyota authorized repairer, or any
reliable repairer.
Charger has stopped
charging
• Charging may be canceled by an interrup-
tion of power supply depending on specifi-
cations of a charger. Refer to the
instructions of the charger.
• When charging is stopped using the
charger
• Equipment with charging schedule func-
tion
• Equipment that is not compatible with
the charging schedule function of the
vehicle
• Check if it is possible to charge with the
charging cable equipped to the vehicle.
If charging cannot be carried out, even
when using the genuine charging cable,
consult any authorized Toyota retailer or
Toyota authorized repairer, or any reliable
repairer.
Likely causeCorrection procedure
Page 212 of 816
2123. Instrument cluster
Prius Plug-in Hybrid_OM_OM47D72E_(EE)
■The meters and display illuminate when
The power switch is in ON mode.
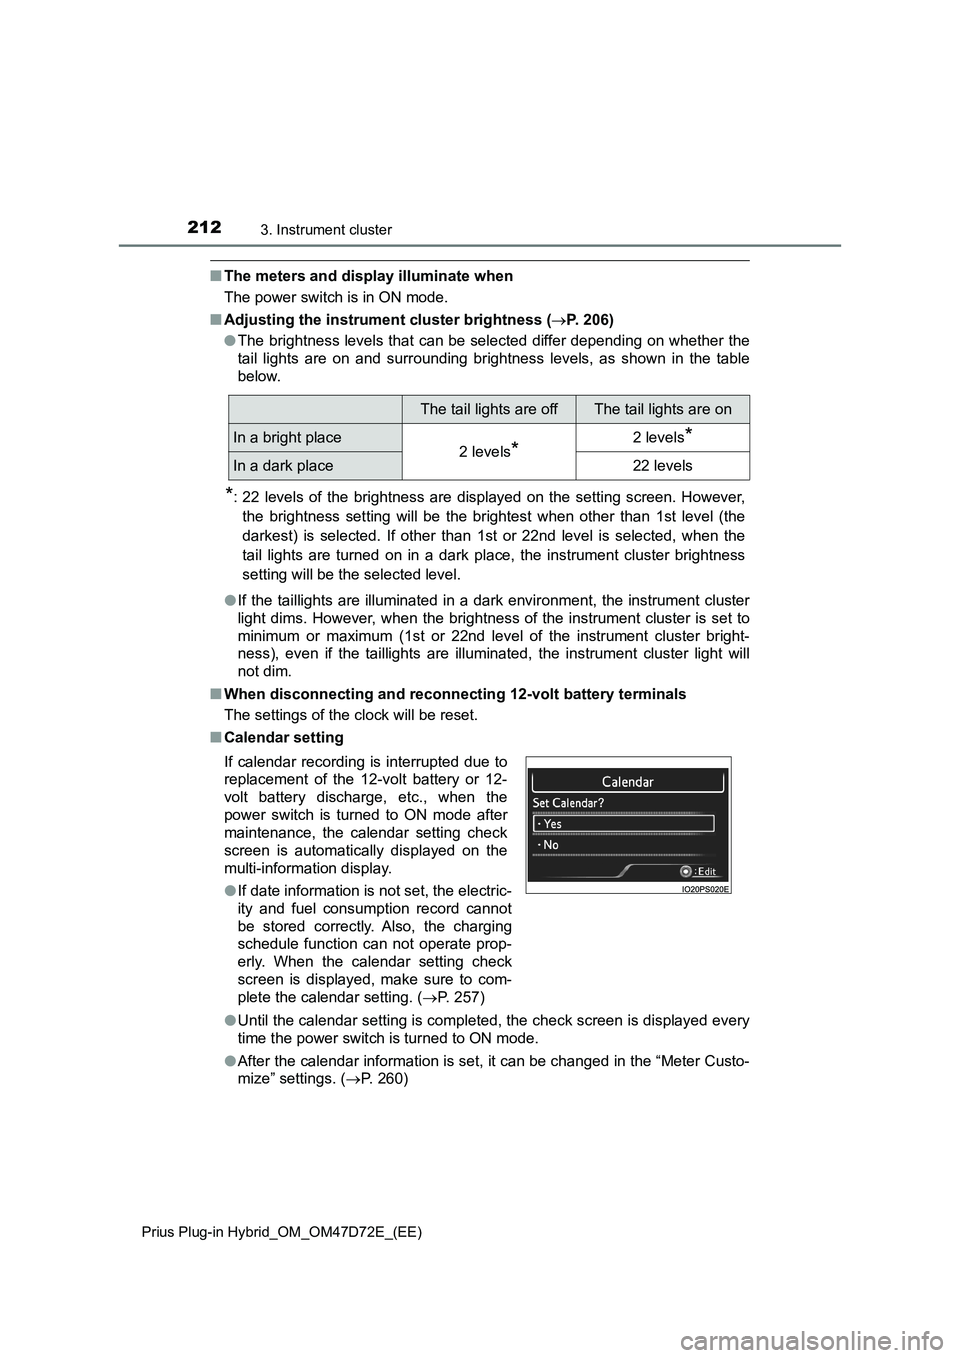
■Adjusting the instrument cluster brightness (P. 206)
●The brightness levels that can be selected differ depending on whether the
tail lights are on and surrounding brightness levels, as shown in the table
below.
*: 22 levels of the brightness are displayed on the setting screen. However,
the brightness setting will be the brightest when other than 1st level (the
darkest) is selected. If other than 1st or 22nd level is selected, when the
tail lights are turned on in a dark place, the instrument cluster brightness
setting will be the selected level.
●If the taillights are illuminated in a dark environment, the instrument cluster
light dims. However, when the brightness of the instrument cluster is set to
minimum or maximum (1st or 22nd level of the instrument cluster bright-
ness), even if the taillights are illuminated, the instrument cluster light will
not dim.
■When disconnecting and reconnecting 12-volt battery terminals
The settings of the clock will be reset.
■Calendar setting
●Until the calendar setting is completed, the check screen is displayed every
time the power switch is turned to ON mode.
●After the calendar information is set, it can be changed in the “Meter Custo-
mize” settings. (P. 260)
The tail lights are offThe tail lights are on
In a bright place2 levels*2 levels*
In a dark place22 levels
If calendar recording is interrupted due to
replacement of the 12-volt battery or 12-
volt battery discharge, etc., when the
power switch is turned to ON mode after
maintenance, the calendar setting check
screen is automatically displayed on the
multi-information display.
●If date information is not set, the electric-
ity and fuel consumption record cannot
be stored correctly. Also, the charging
schedule function can not operate prop-
erly. When the calendar setting check
screen is displayed, make sure to com-
plete the calendar setting. (P. 257)