display TOYOTA PRIUS PRIME 2018 Accessories, Audio & Navigation (in English)
[x] Cancel search | Manufacturer: TOYOTA, Model Year: 2018, Model line: PRIUS PRIME, Model: TOYOTA PRIUS PRIME 2018Pages: 308, PDF Size: 4.66 MB
Page 70 of 308
70
3. OTHER SETTINGS
PRIUS PRIME_Wide Navi_OM47C24U_(U)
17.10.16 11:18
2. VOICE SETTINGS
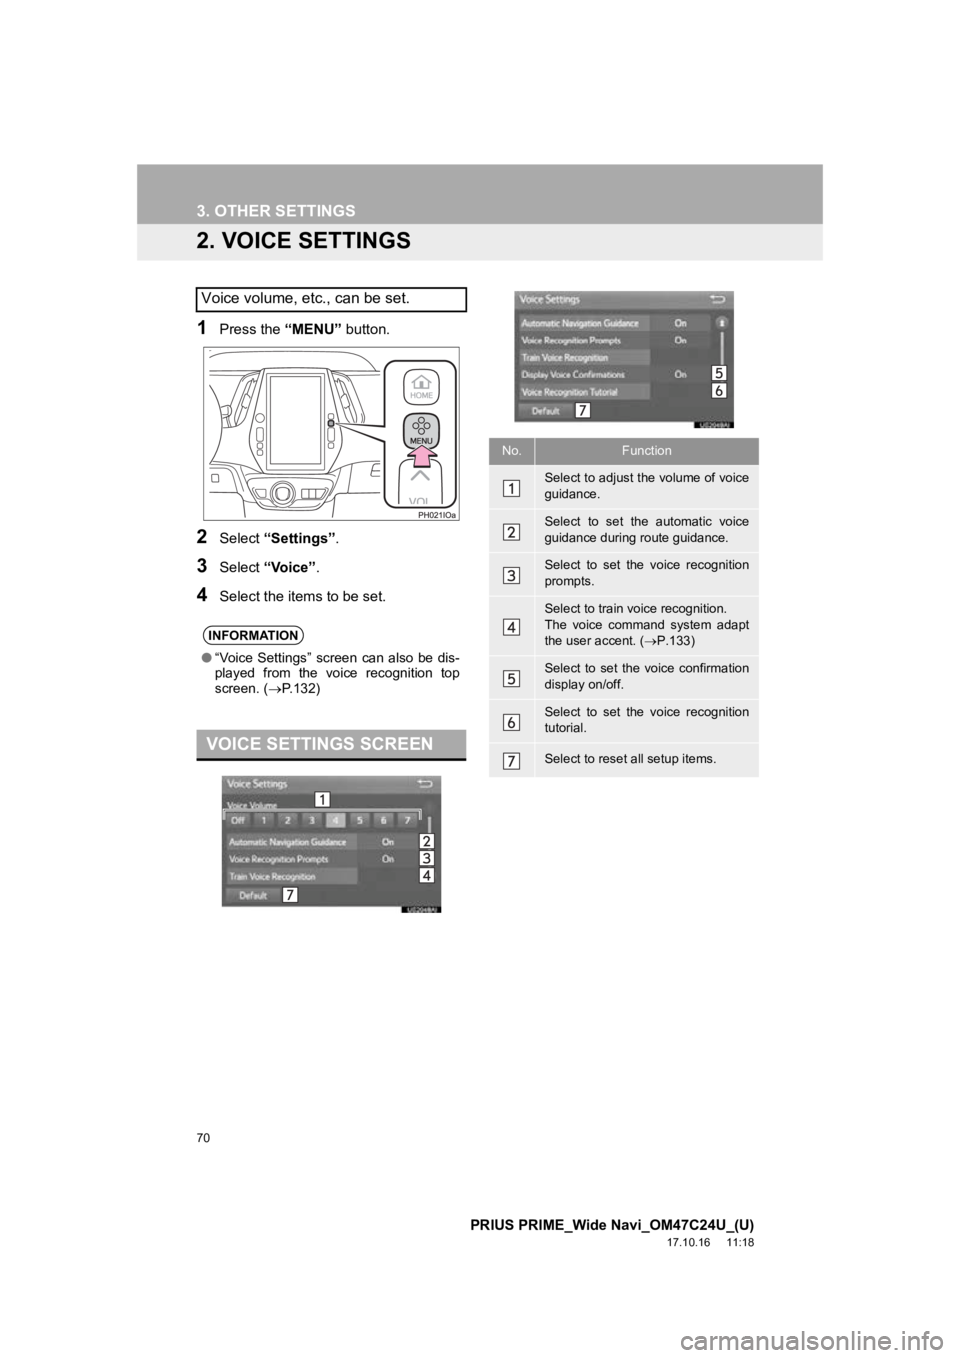
1Press the “MENU” button.
2Select “Settings” .
3Select “Voice” .
4Select the items to be set.
Voice volume, etc., can be set.
INFORMATION
●“Voice Settings” screen can also be dis-
played from the voice recognition top
screen. ( P.132)
VOICE SETTINGS SCREEN
No.Function
Select to adjust the volume of voice
guidance.
Select to set the automatic voice
guidance during route guidance.
Select to set the voice recognition
prompts.
Select to train voice recognition.
The voice command system adapt
the user accent. ( P.133)
Select to set the voice confirmation
display on/off.
Select to set the voice recognition
tutorial.
Select to reset all setup items.
Page 71 of 308
71
3. OTHER SETTINGS
PRIUS PRIME_Wide Navi_OM47C24U_(U)
17.10.16 11:18
BASIC FUNCTION
2
3. VEHICLE SETTINGS
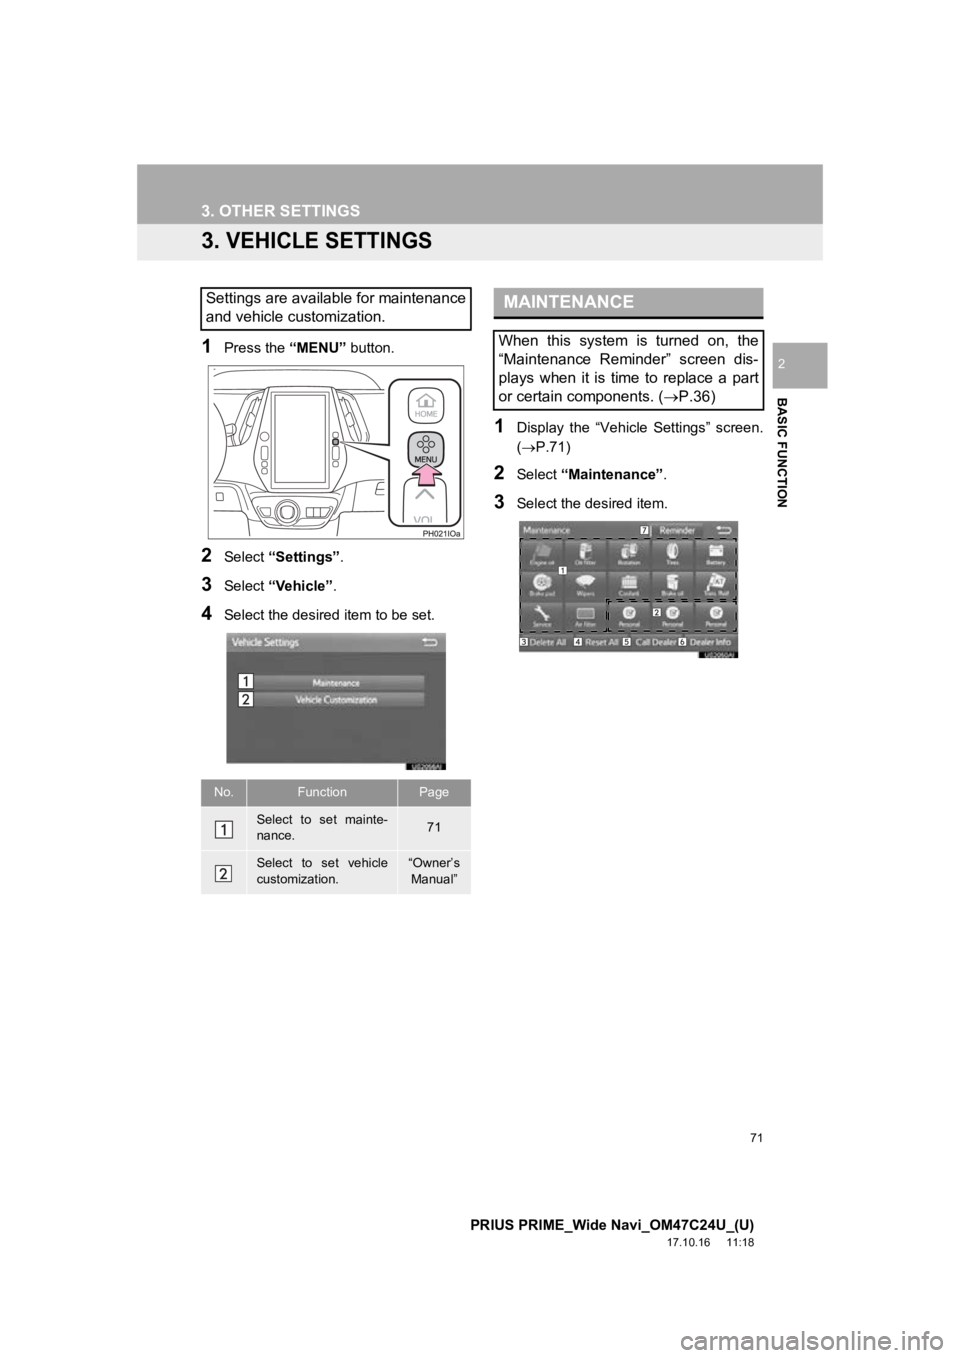
1Press the “MENU” button.
2Select “Settings” .
3Select “Vehicle”.
4Select the desired item to be set.
1Display the “Vehicle Settings” screen.
(P.71)
2Select “Maintenance” .
3Select the desired item.
Settings are available for maintenance
and vehicle customization.
No.FunctionPage
Select to set mainte-
nance.71
Select to set vehicle
customization.“Owner’s
Manual”
MAINTENANCE
When this system is turned on, the
“Maintenance Reminder” screen dis-
plays when it is time to replace a part
or certain components. ( P.36)
Page 72 of 308
72
3. OTHER SETTINGS
PRIUS PRIME_Wide Navi_OM47C24U_(U)
17.10.16 11:18
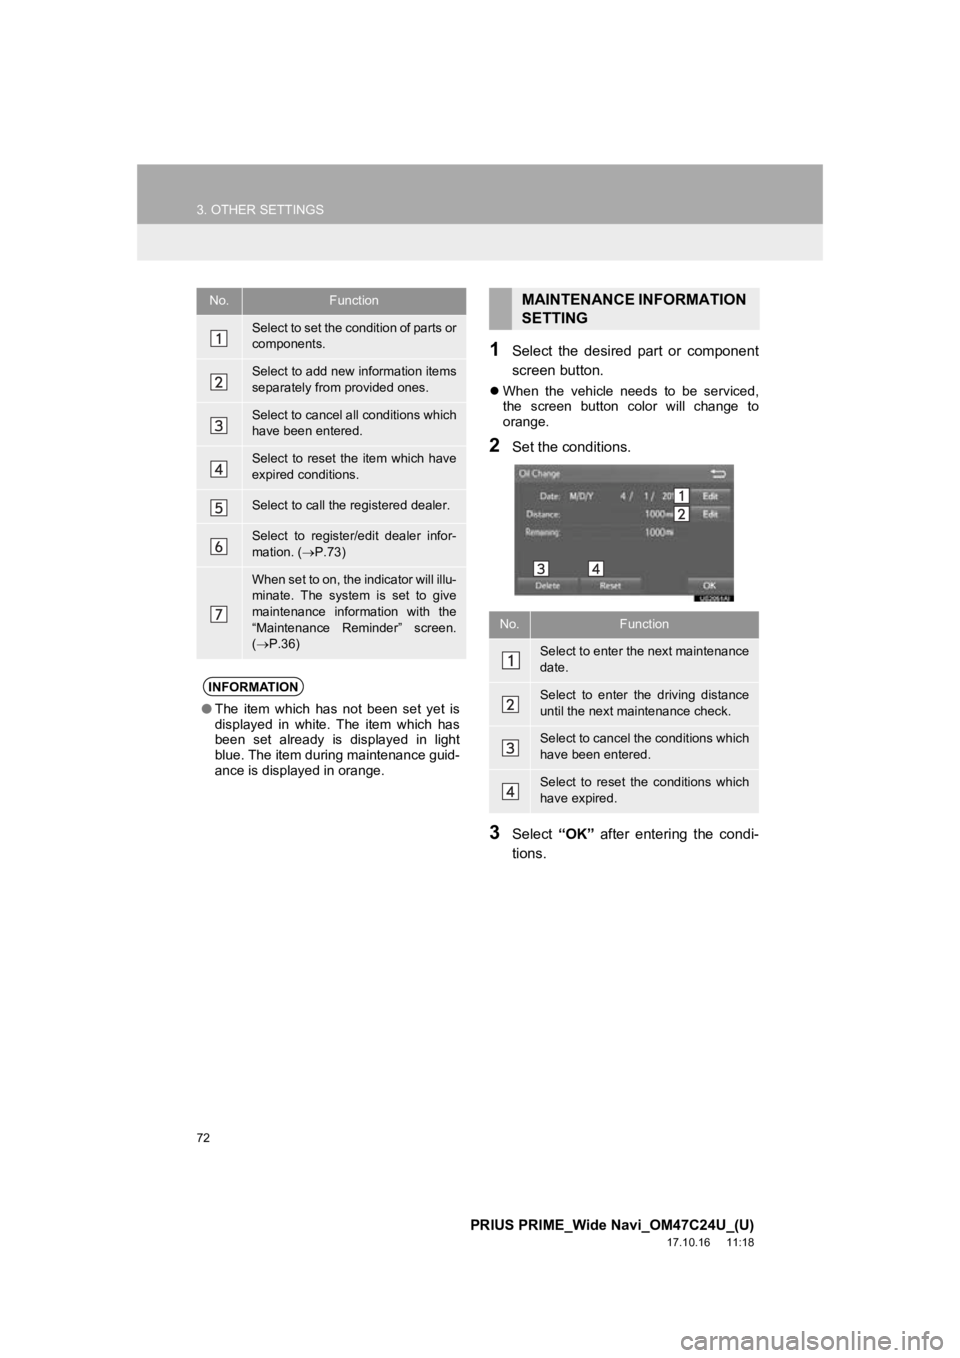
1Select the desired part or component
screen button.
When the vehicle needs to be serviced,
the screen button color will change to
orange.
2Set the conditions.
3Select “OK” after entering the condi-
tions.
No.Function
Select to set the condition of parts or
components.
Select to add new information items
separately from provided ones.
Select to cancel all conditions which
have been entered.
Select to reset the item which have
expired conditions.
Select to call the registered dealer.
Select to register/edit dealer infor-
mation. ( P.73)
When set to on, the indicator will illu-
minate. The system is set to give
maintenance information with the
“Maintenance Reminder” screen.
( P.36)
INFORMATION
● The item which has not been set yet is
displayed in white. The item which has
been set already is displayed in light
blue. The item during maintenance guid-
ance is displayed in orange.
MAINTENANCE INFORMATION
SETTING
No.Function
Select to enter the next maintenance
date.
Select to enter the driving distance
until the next maintenance check.
Select to cancel the conditions which
have been entered.
Select to reset the conditions which
have expired.
Page 73 of 308
73
3. OTHER SETTINGS
PRIUS PRIME_Wide Navi_OM47C24U_(U)
17.10.16 11:18
BASIC FUNCTION
2
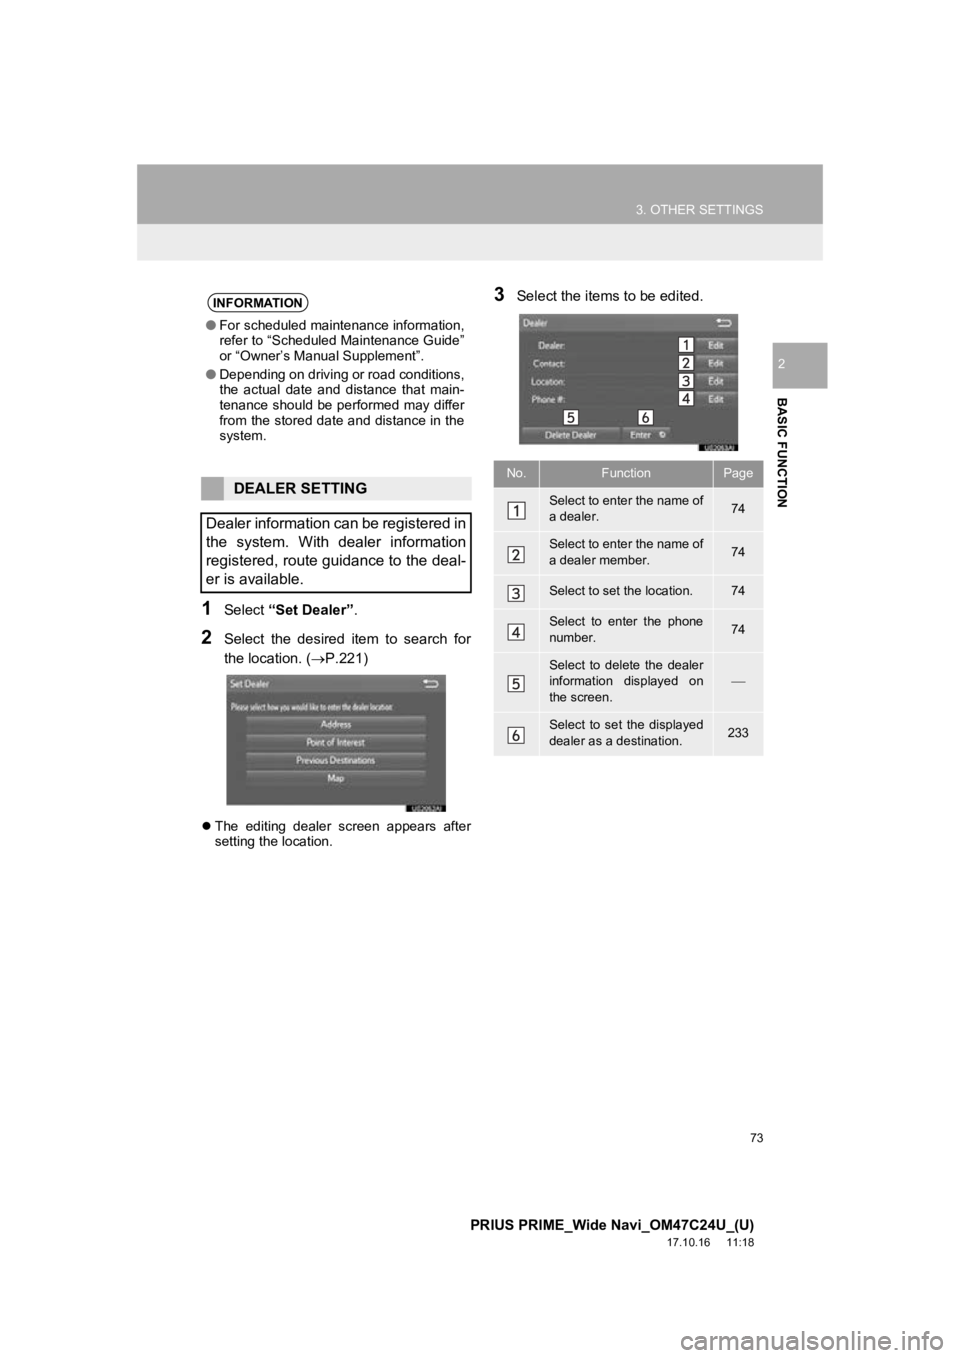
1Select “Set Dealer” .
2Select the desired item to search for
the location. (P.221)
The editing dealer screen appears after
setting the location.
3Select the items to be edited.INFORMATION
●For scheduled maintenance information,
refer to “Scheduled Maintenance Guide”
or “Owner’s Manual Supplement”.
● Depending on driving or road conditions,
the actual date and distance that main-
tenance should be performed may differ
from the stored date and distance in the
system.
DEALER SETTING
Dealer information can be registered in
the system. With dealer information
registered, route guidance to the deal-
er is available.
No.FunctionPage
Select to enter the name of
a dealer.74
Select to enter the name of
a dealer member.74
Select to set the location.74
Select to enter the phone
number.74
Select to delete the dealer
information displayed on
the screen.
Select to set the displayed
dealer as a destination.233
Page 76 of 308
76
PRIUS PRIME_Wide Navi_OM47C24U_(U)
17.10.16 11:18
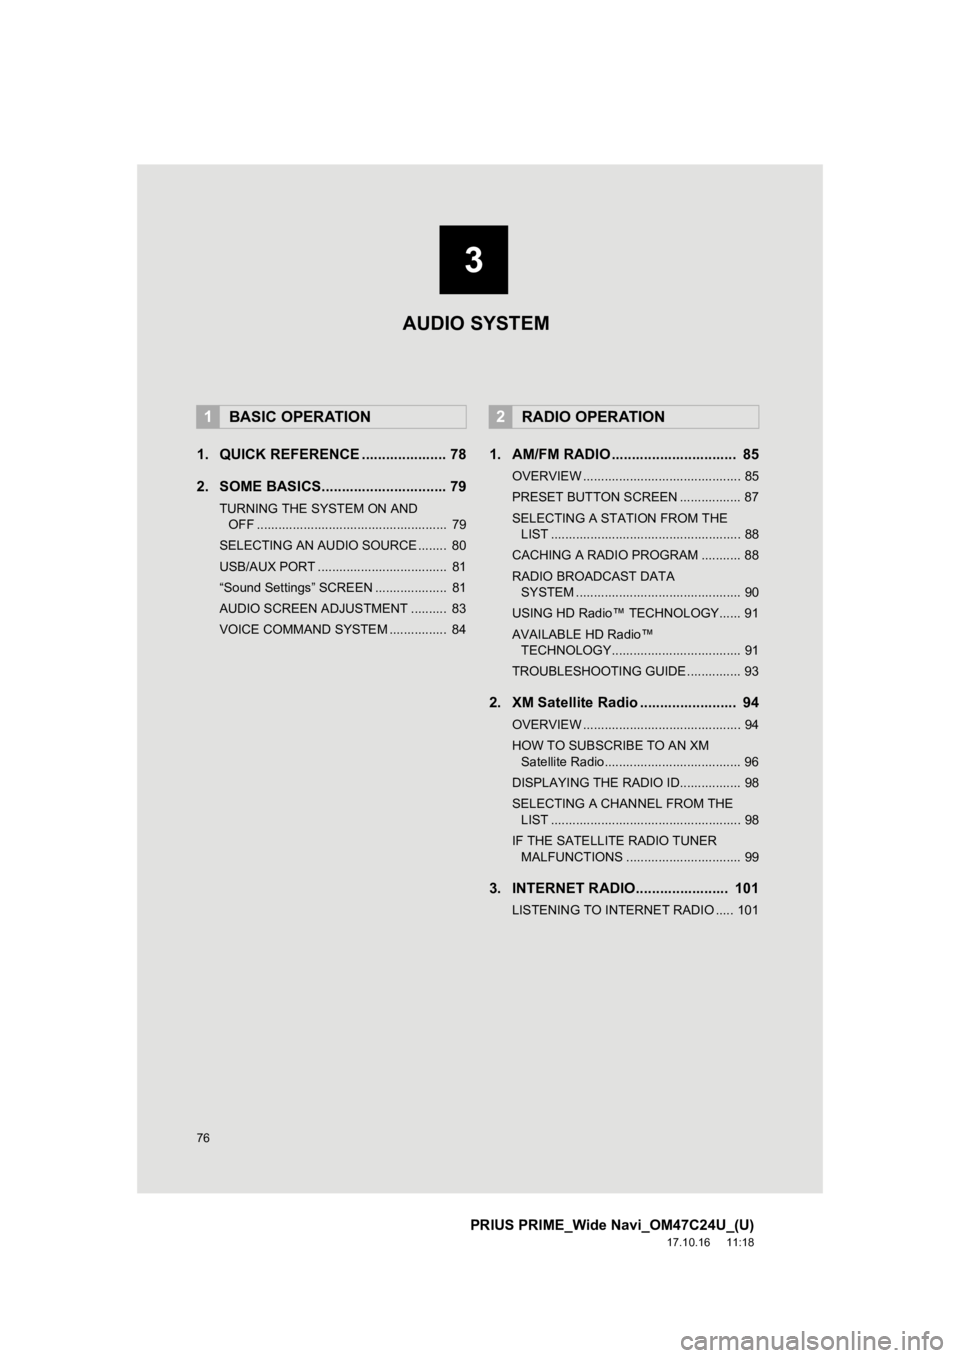
1. QUICK REFERENCE ..................... 78
2. SOME BASICS............................... 79
TURNING THE SYSTEM ON AND OFF ..................................................... 79
SELECTING AN AUDIO SOURCE ........ 80
USB/AUX PORT .................................... 81
“Sound Settings” SCREEN .................... 81
AUDIO SCREEN ADJUSTMENT .......... 83
VOICE COMMAND SYSTEM ................ 84
1. AM/FM RADIO ............................... 85
OVERVIEW ............................................ 85
PRESET BUTTON SCREEN ................. 87
SELECTING A STATION FROM THE LIST ..................................................... 88
CACHING A RADIO PROGRAM ........... 88
RADIO BROADCAST DATA SYSTEM .............................................. 90
USING HD Radio™ TECHNOLOGY...... 91
AVAILABLE HD Radio™ TECHNOLOGY.................................... 91
TROUBLESHOOTING GUIDE ............... 93
2. XM Satellite Radio ........................ 94
OVERVIEW ............................................ 94
HOW TO SUBSCRIBE TO AN XM Satellite Radio...................................... 96
DISPLAYING THE RADIO ID................. 98
SELECTING A CHANNEL FROM THE LIST ..................................................... 98
IF THE SATELLITE RADIO TUNER MALFUNCTIONS ................................ 99
3. INTERNET RADIO....................... 101
LISTENING TO INTERNET RADIO ..... 101
1BASIC OPERATION2RADIO OPERATION
3
AUDIO SYSTEM
Page 78 of 308
78
PRIUS PRIME_Wide Navi_OM47C24U_(U)
17.11.06 15:05
1. BASIC OPERATION
1. QUICK REFERENCE
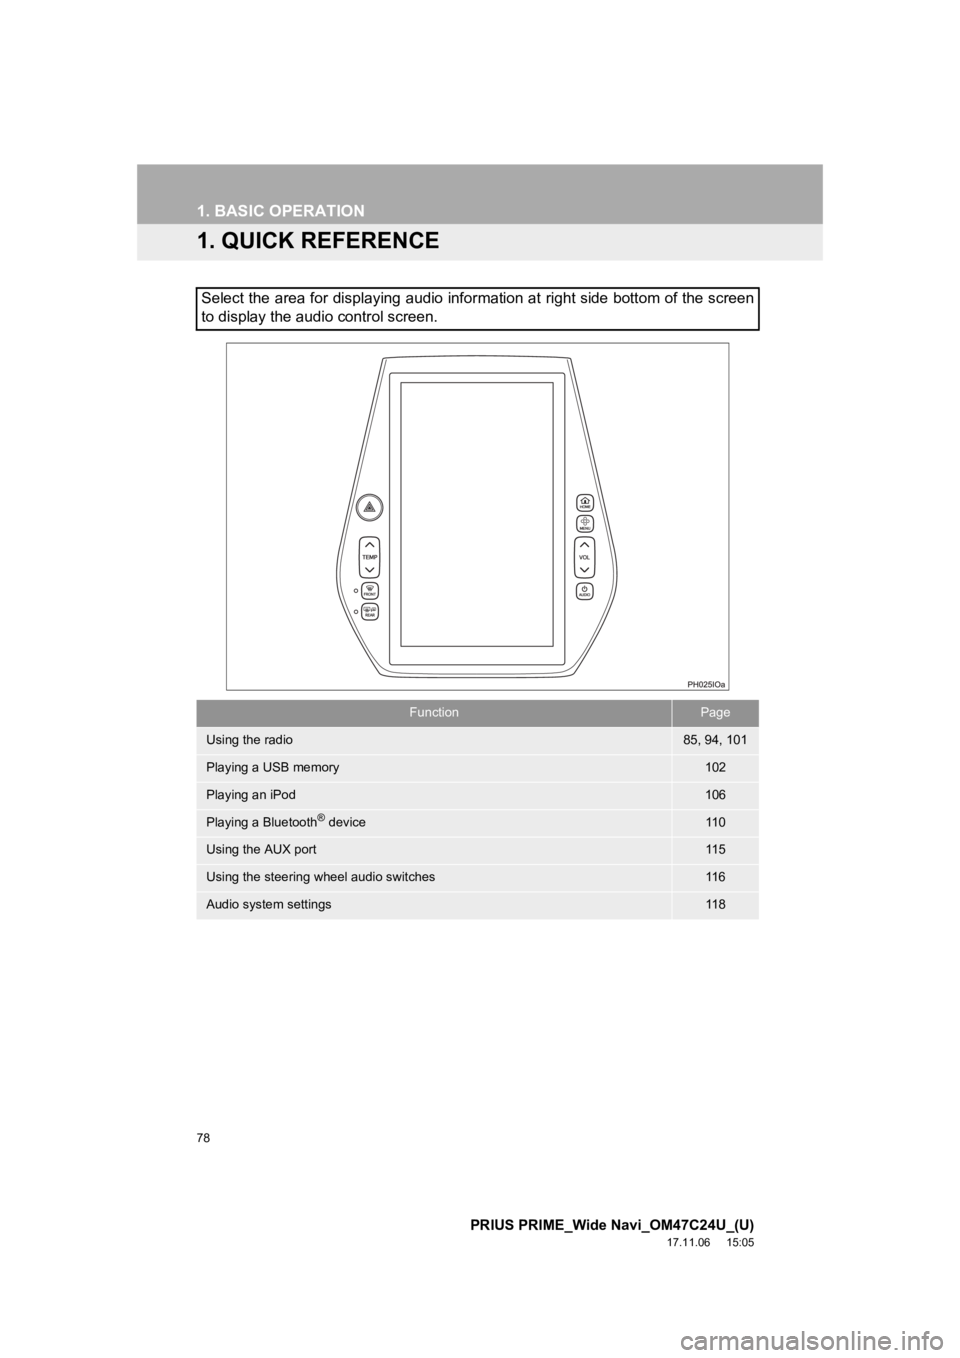
Select the area for displaying audio information at right side bottom of the screen
to display the audio control screen.
FunctionPage
Using the radio85, 94, 101
Playing a USB memory102
Playing an iPod106
Playing a Bluetooth® device11 0
Using the AUX port11 5
Using the steering wheel audio switches11 6
Audio system settings11 8
Page 80 of 308
80
1. BASIC OPERATION
PRIUS PRIME_Wide Navi_OM47C24U_(U)
17.11.06 15:05
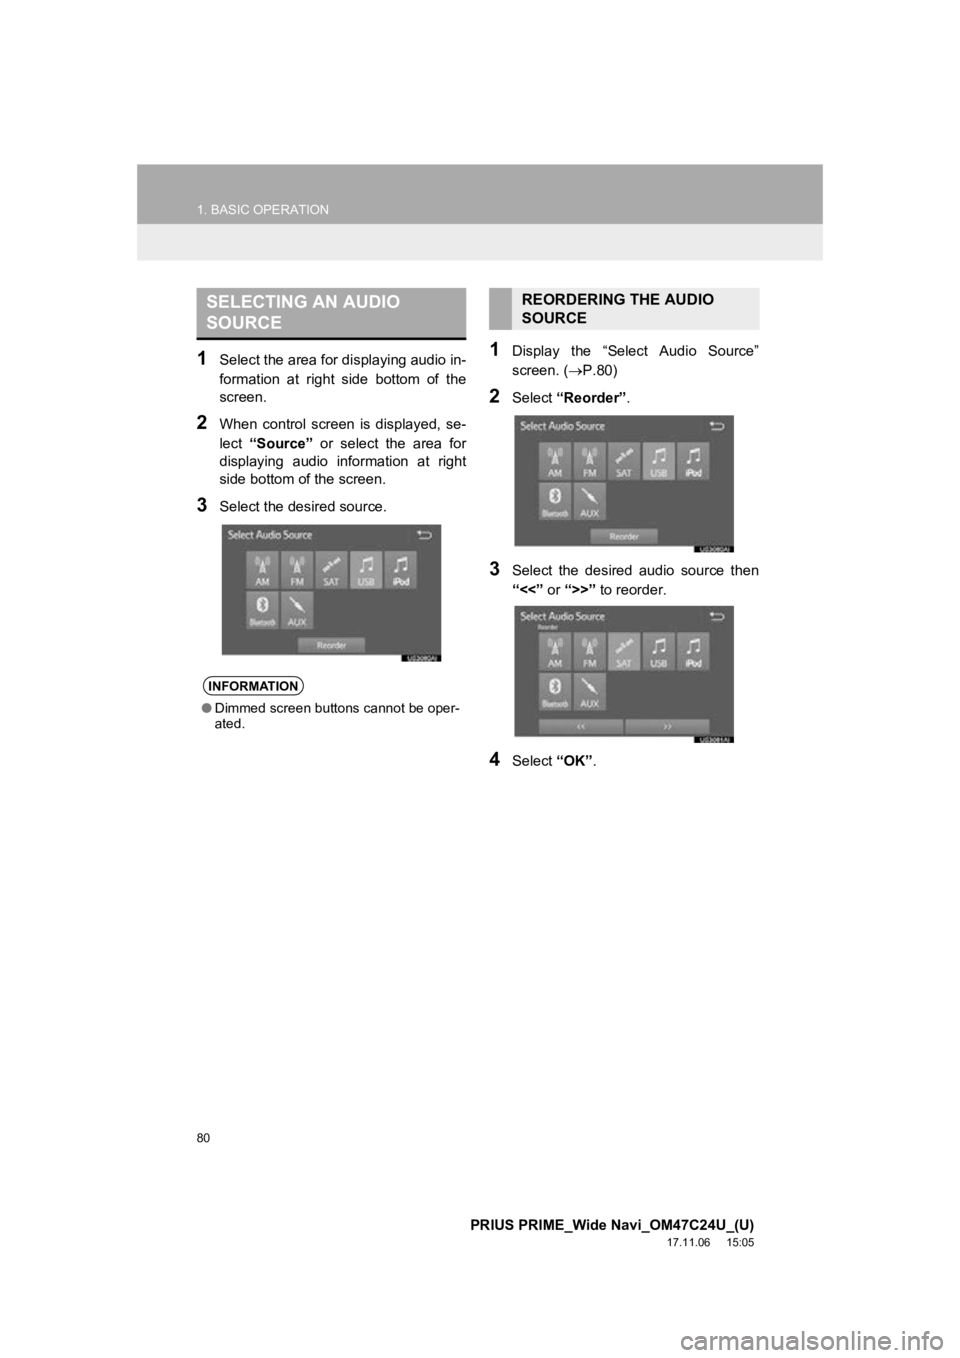
1Select the area for displaying audio in-
formation at right side bottom of the
screen.
2When control screen is displayed, se-
lect “Source” or select the area for
displaying audio information at right
side bottom of the screen.
3Select the desired source.
1Display the “Select Audio Source”
screen. ( P.80)
2Select “Reorder” .
3Select the desired audio source then
“<<” or “>>” to reorder.
4Select “OK”.
SELECTING AN AUDIO
SOURCE
INFORMATION
●Dimmed screen buttons cannot be oper-
ated.
REORDERING THE AUDIO
SOURCE
Page 81 of 308
81
1. BASIC OPERATION
PRIUS PRIME_Wide Navi_OM47C24U_(U)
17.11.06 15:05
AUDIO SYSTEM
3
1Open the cover and connect a device.
Turn on the power of the device if it is not
turned on.
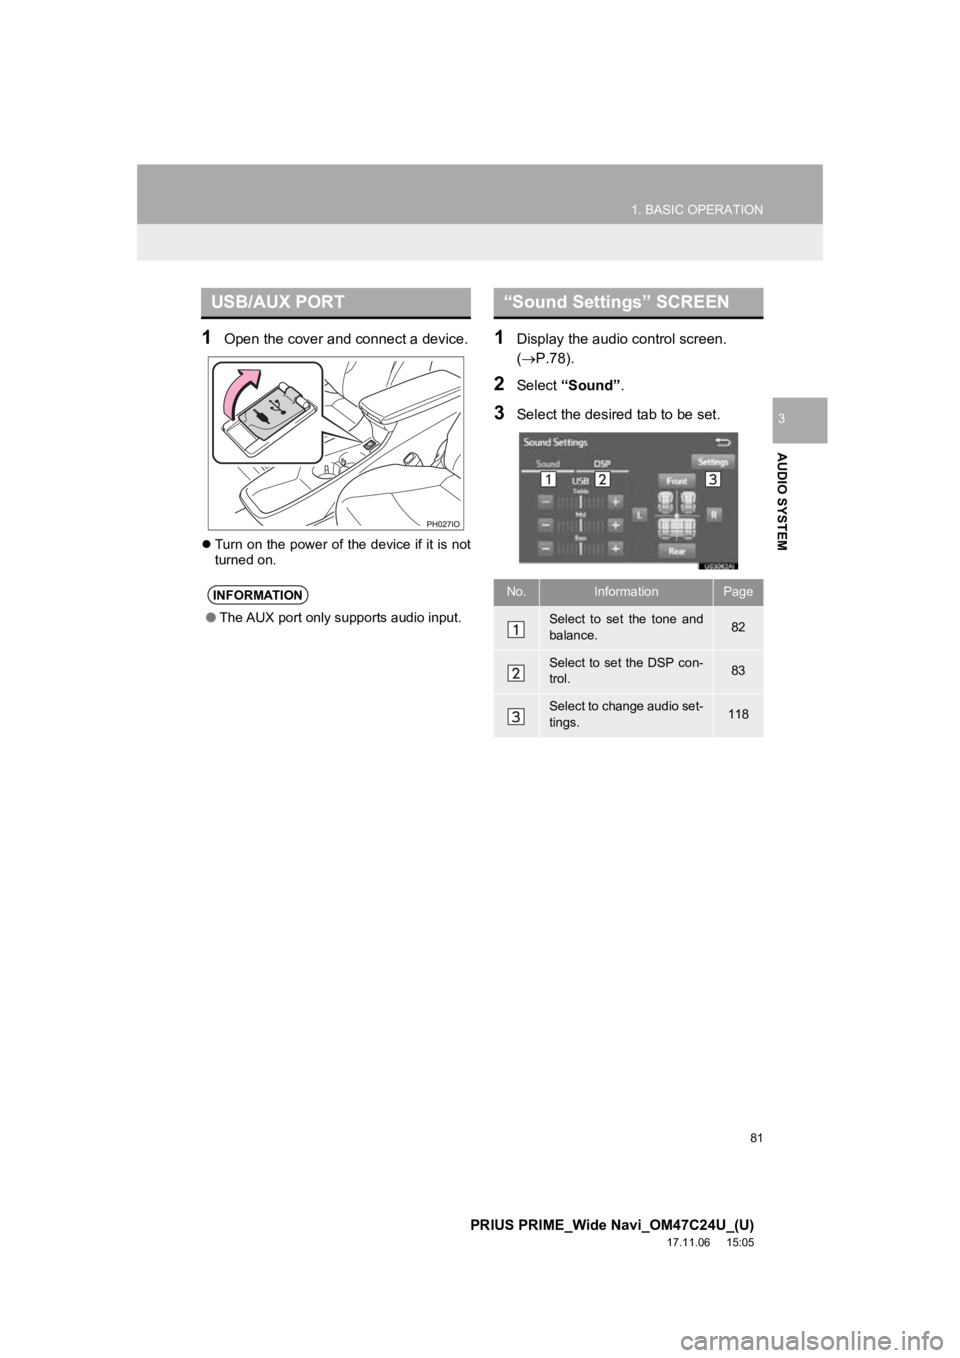
1Display the audio control screen.
(P.78).
2Select “Sound” .
3Select the desired tab to be set.
USB/AUX PORT
INFORMATION
●The AUX port only supports audio input.
“Sound Settings” SCREEN
No.InformationPage
Select to set the tone and
balance.82
Select to set the DSP con-
trol.83
Select to change audio set-
tings.118
Page 83 of 308
83
1. BASIC OPERATION
PRIUS PRIME_Wide Navi_OM47C24U_(U)
17.11.06 15:05
AUDIO SYSTEM
31Select the “DSP” tab and select the
desired item to be set.
Type A
2Select “Automatic Sound Levelizer” .
3Select “High”, “Mid”, “Low”, or
“Off” .
Type B
2Select “Automatic Sound Levelizer” .
3Select on or off.
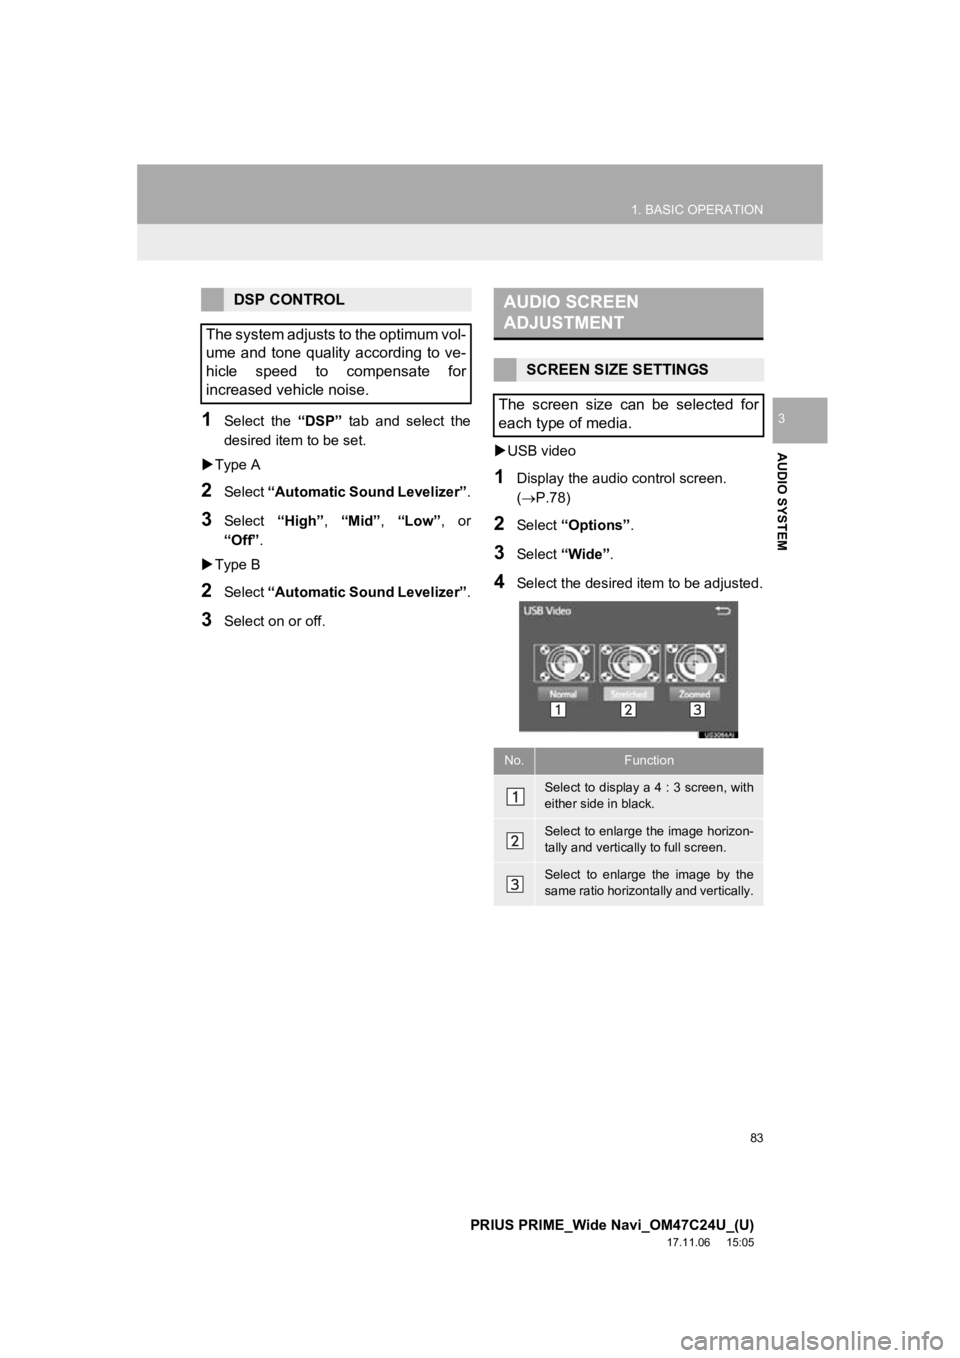
USB video
1Display the audio control screen.
(P.78)
2Select “Options”.
3Select “Wide” .
4Select the desired i tem to be adjusted.
DSP CONTROL
The system adjusts to the optimum vol-
ume and tone quality according to ve-
hicle speed to compensate for
increased vehicle noise.AUDIO SCREEN
ADJUSTMENT
SCREEN SIZE SETTINGS
The screen size can be selected for
each type of media.
No.Function
Select to display a 4 : 3 screen, with
either side in black.
Select to enlarge the image horizon-
tally and vertically to full screen.
Select to enlarge the image by the
same ratio horizontally and vertically.
Page 84 of 308
84
1. BASIC OPERATION
PRIUS PRIME_Wide Navi_OM47C24U_(U)
17.11.06 15:05
USB video
1Display the audio control screen.
(P.78)
2Select “Options”.
3Select “Display” .
4Select the desired i tem to be adjusted.
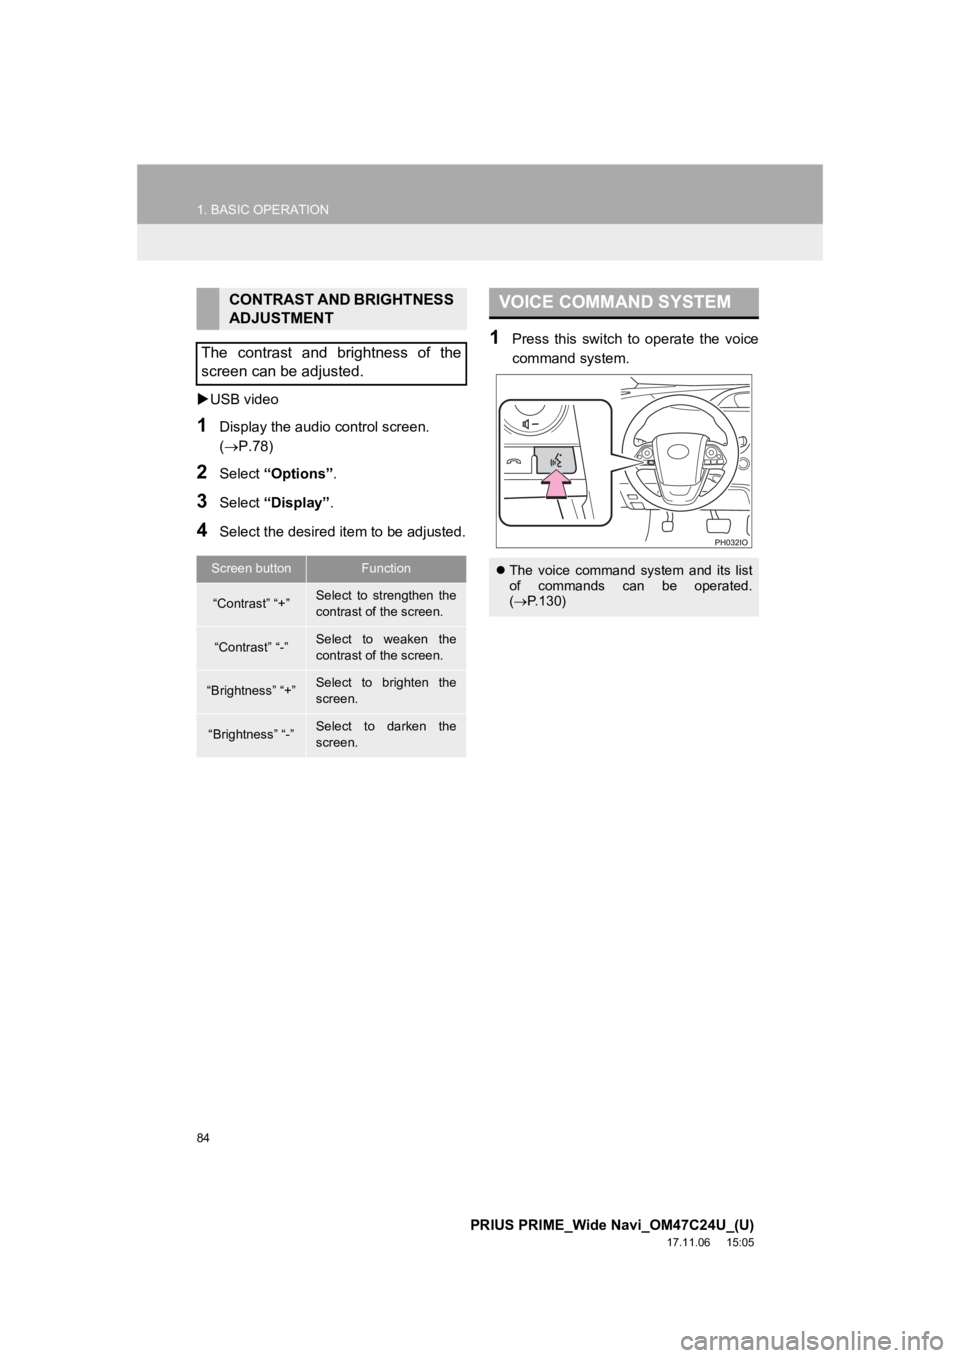
1Press this switch to operate the voice
command system.
CONTRAST AND BRIGHTNESS
ADJUSTMENT
The contrast and brightness of the
screen can be adjusted.
Screen buttonFunction
“Contrast” “+”Select to strengthen the
contrast of the screen.
“Contrast” “-”Select to weaken the
contrast of the screen.
“Brightness” “+”Select to brighten the
screen.
“Brightness” “-”Select to darken the
screen.
VOICE COMMAND SYSTEM
The voice command system and its list
of commands can be operated.
( P.130)