bulb TOYOTA PRIUS PRIME 2018 Owners Manual (in English)
[x] Cancel search | Manufacturer: TOYOTA, Model Year: 2018, Model line: PRIUS PRIME, Model: TOYOTA PRIUS PRIME 2018Pages: 788, PDF Size: 14.67 MB
Page 5 of 788
5
1
9 8
7
6 4 3
2
PRIUS PRIME_OM_OM47C17U_(U)
10
5
6-4. Using the other interior features
Other interior features ....... 531 • Sun visors ..................... 531
• Vanity mirrors................ 531
• Power outlets ................ 532
• Wireless charger ........... 533
• Coat hooks.................... 544
• Assist grips ................... 544
Garage door opener .......... 545
Safety Connect.................. 552 7-1. Maintenance and care
Cleaning and protecting the vehicle exterior .......... 560
Cleaning and protecting the vehicle interior ........... 565
7-2. Maintenance Maintenance requirements ................... 571
General maintenance ........ 574
Emission inspection and maintenance (I/M)
programs ......................... 577
7-3. Do-it-yourself maintenance Do-it-yourself service precautions ...................... 578
Hood .................................. 581
Positioning a floor jack....... 583
Engine compartment ......... 584
Tires................................... 598
Tire inflation pressure ........ 607
Wheels............................... 610
Replacing the tire............... 613
Air conditioning filter .......... 624
Wiper rubber replacement..................... 628
Electronic key battery ........ 631
Checking and replacing fuses ................................ 634
Headlight aim..................... 637
Light bulbs ......................... 639
7Maintenance and care
Page 17 of 788
17Pictorial index
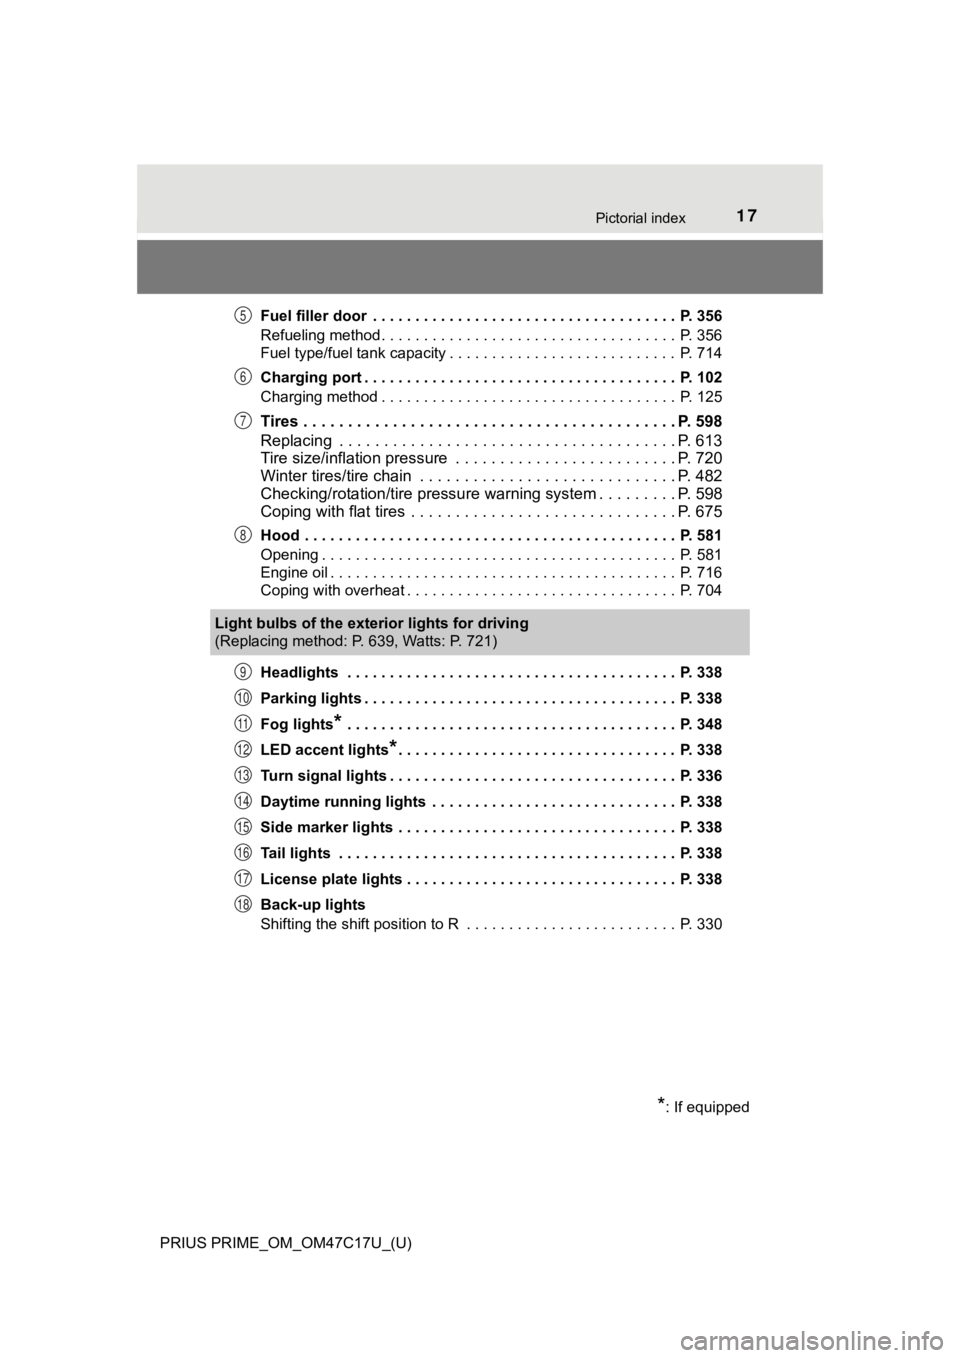
PRIUS PRIME_OM_OM47C17U_(U)Fuel filler door . . . . . . . . . . . . . . . . . . . . . . . . . . . . . . . . . . . . P. 356
Refueling method . . . . . . . . . . . . . . . . . . . . . . . . . . . . . . . . . . . P. 356
Fuel type/fuel tank capacity . . . . . . . . . . . . . . . . . . . . . . . . . . . P. 714
Charging port . . . . . . . . . . . . . . . . . . . . . . . . . . . . . . . . . . . . . P. 102
Charging method . . . . . . . . . . . . . . . . . . . . . . . . . . . . . . . . . . . P. 125
Tires . . . . . . . . . . . . . . . . . . . . . . . . . . . . .
. . . . . . . . . . . . . P. 598
Replacing . . . . . . . . . . . . . . . . . . . . . . . . . . . . . . . . . . . . . . P. 613
Tire size/inflation pressure . . . . . . . . . . . . . . . . . . . . . . . . . P. 720
Winter tires/tire chain . . . . . . . . . . . . . . . . . . . . . . . . . . . . . P. 482
Checking/rotation/tire pressur e warning system . . . . . . . . .P. 598
Coping with flat tires . . . . . . . . . . . . . . . . . . . . . . . . . . . . . . P. 675
Hood . . . . . . . . . . . . . . . . . . . . . . . . . . . . . . . . . . . . . . . . . . . . P. 581
Opening . . . . . . . . . . . . . . . . . . . . . . . . . . . . . . . . . . . . . . . . . . P. 581
Engine oil . . . . . . . . . . . . . . . . . . . . . . . . . . . . . . . . . . . . . . . . . P. 716
Coping with overheat . . . . . . . . . . . . . . . . . . . . . . . . . . . . . . . . P. 704
Headlights . . . . . . . . . . . . . . . . . . . . . . . . . . . . . . . . . . . . . . . P. 338
Parking lights . . . . . . . . . . . . . . . . . . . . . . . . . . . . . . . . . . . . . P. 338
Fog lights
* . . . . . . . . . . . . . . . . . . . . . . . . . . . . . . . . . . . . . . . P. 348
LED accent lights
*. . . . . . . . . . . . . . . . . . . . . . . . . . . . . . . . . P. 338
Turn signal lights . . . . . . . . . . . . . . . . . . . . . . . . . . . . . . . . . . P. 336
Daytime running lights . . . . . . . . . . . . . . . . . . . . . . . . . . . . . P. 338
Side marker lights . . . . . . . . . . . . . . . . . . . . . . . . . . . . . . . . . P. 338
Tail lights . . . . . . . . . . . . . . . . . . . . . . . . . . . . . . . . . . . . . . . . P. 338
License plate lights . . . . . . . . . . . . . . . . . . . . . . . . . . . . . . . . P. 338
Back-up lights
Shifting the shift position to R . . . . . . . . . . . . . . . . . . . . . . . . . P. 330
5
6
7
8
Light bulbs of the exterior lights for driving
(Replacing method: P. 639, Watts: P. 721)
*: If equipped
9
10
11
12
13
14
15
16
17
18
Page 336 of 788
336
PRIUS PRIME_OM_OM47C17U_(U)
5-2. Driving procedures
Turn signal lever
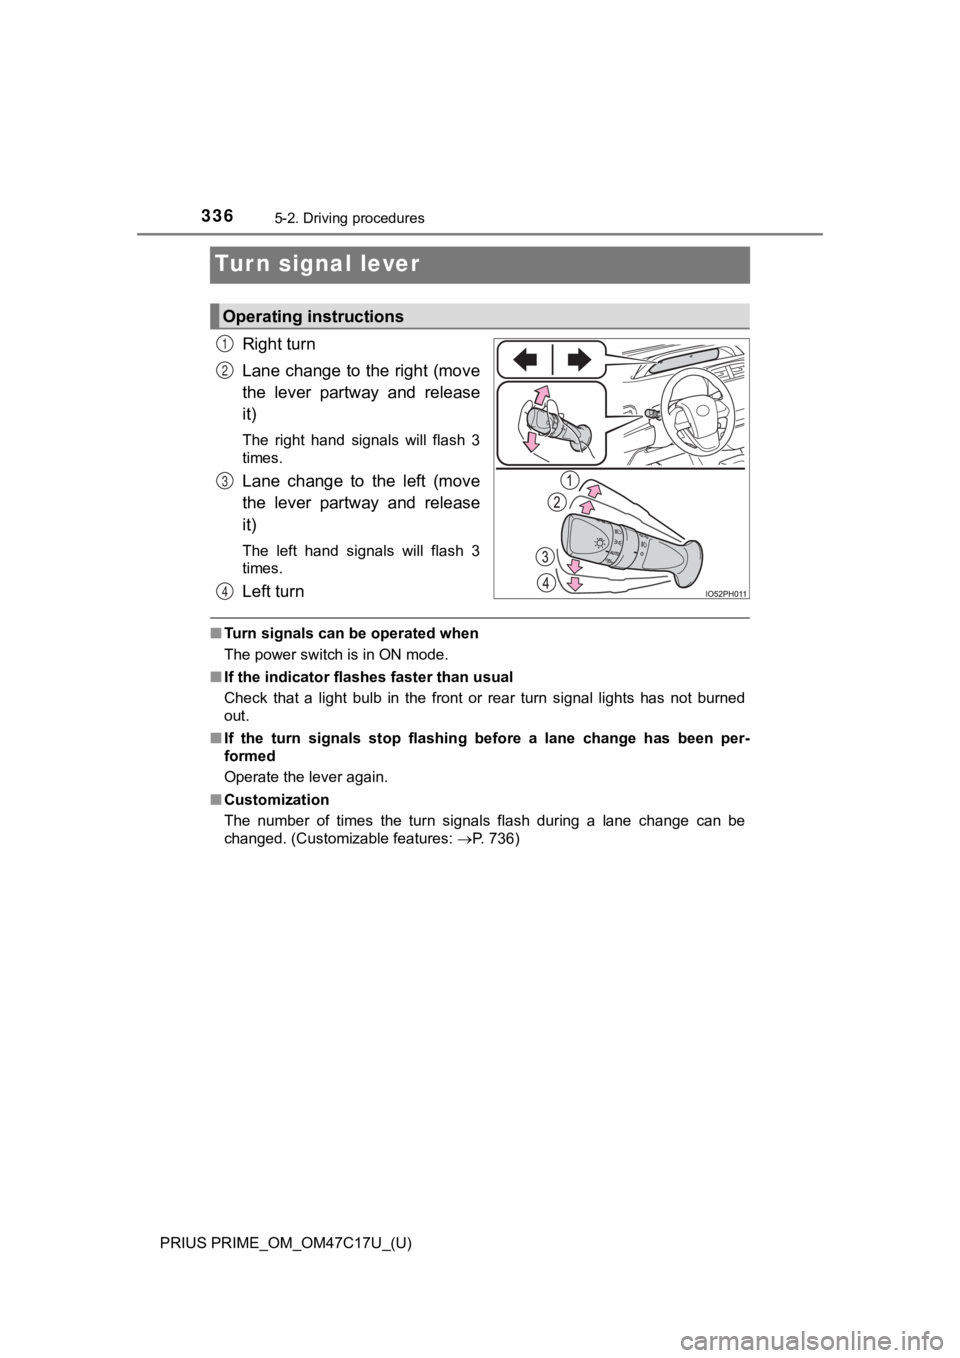
Right turn
Lane change to the right (move
the lever partway and release
it)
The right hand signals will flash 3
times.
Lane change to the left (move
the lever partway and release
it)
The left hand signals will flash 3
times.
Left turn
■Turn signals can be operated when
The power switch is in ON mode.
■ If the indicator flashes faster than usual
Check that a light bulb in the front or rear turn signal lights has not burned
out.
■ If the turn signals stop flashing before a lane change has been per-
formed
Operate the lever again.
■ Customization
The number of times the turn signals flash during a lane change can be
changed. (Customizable features: P. 736)
Operating instructions
1
2
3
4
Page 559 of 788
559
PRIUS PRIME_OM_OM47C17U_(U)
7Maintenance and care
7-1. Maintenance and careCleaning and protecting the vehicle exterior .......... 560
Cleaning and protecting the vehicle interior ........... 565
7-2. Maintenance Maintenance requirements ................... 571
General maintenance........ 574
Emission inspection and maintenance (I/M)
programs......................... 577
7-3. Do-it-yourself maintenance Do-it-yourself service precautions ..................... 578
Hood ................................. 581
Positioning a floor jack ...... 583
Engine compartment ......... 584
Tires .................................. 598
Tire inflation pressure ....... 607
Wheels .............................. 610
Replacing the tire .............. 613
Air conditioning filter.......... 624
Wiper rubber replacement .................... 628
Electronic key battery........ 631
Checking and replacing fuses ............................... 634
Headlight aim .................... 637
Light bulbs......................... 639
Page 578 of 788
578
PRIUS PRIME_OM_OM47C17U_(U)
7-3. Do-it-yourself maintenance
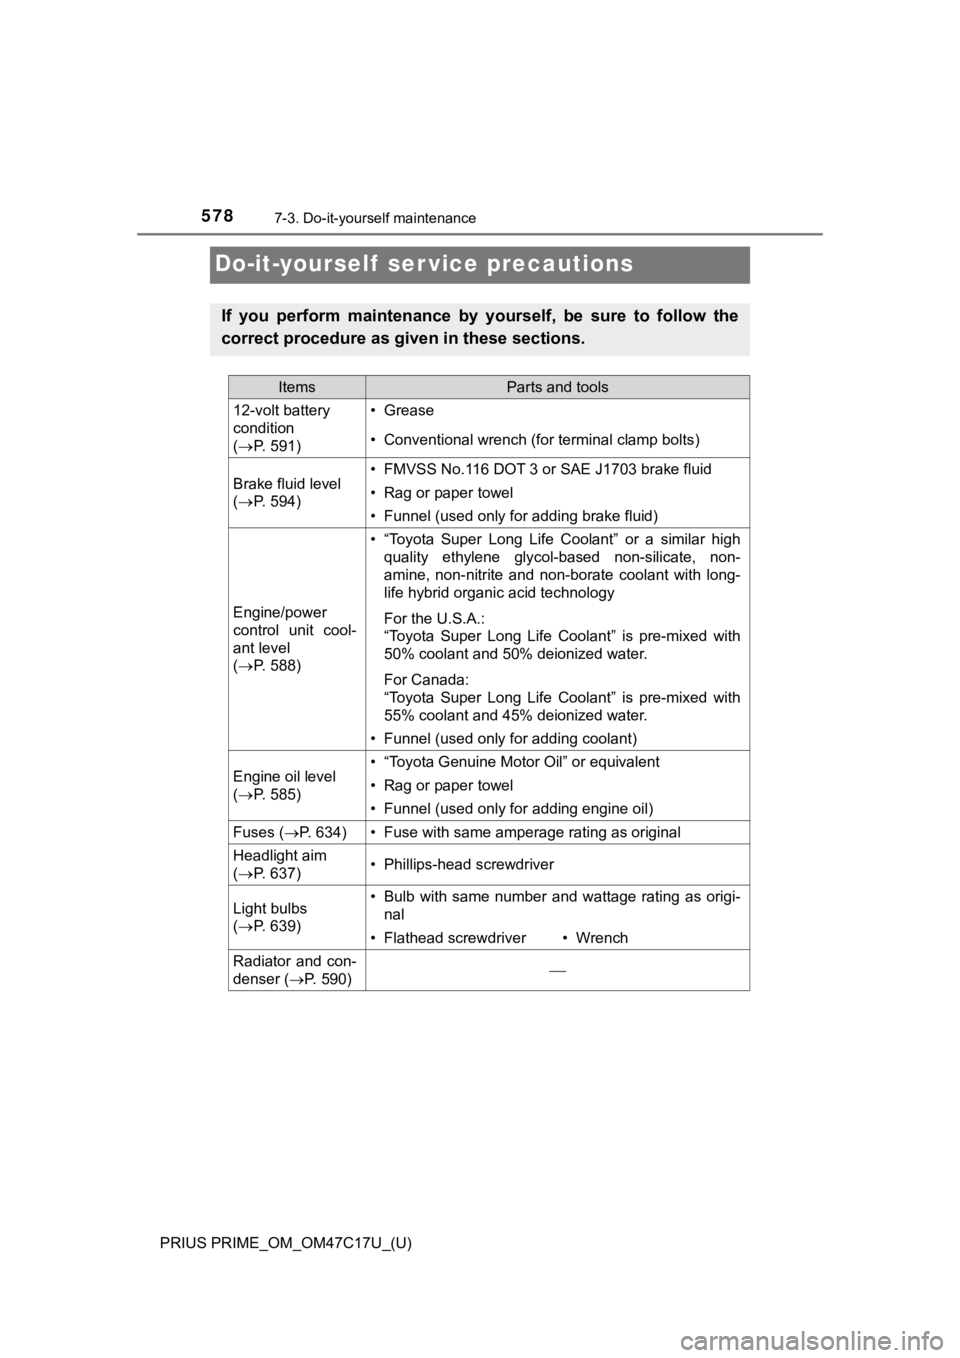
Do-it-yourself ser vice precautions
If you perform maintenance by yourself, be sure to follow the
correct procedure as given in these sections.
ItemsParts and tools
12-volt battery
condition
( P. 5 9 1 )•Grease
• Conventional wrench (for terminal clamp bolts)
Brake fluid level
( P. 5 9 4 )• FMVSS No.116 DOT 3 or SAE J1703 brake fluid
• Rag or paper towel
• Funnel (used only for adding brake fluid)
Engine/power
control unit cool-
ant level
( P. 5 8 8 )
• “Toyota Super Long Life Coolant” or a similar high
quality ethylene glycol-based non-silicate, non-
amine, non-nitrite and non-borate coolant with long-
life hybrid organic acid technology
For the U.S.A.:
“Toyota Super Long Life Coolant” is pre-mixed with
50% coolant and 50% deionized water.
For Canada:
“Toyota Super Long Life Coolant” is pre-mixed with
55% coolant and 45% deionized water.
• Funnel (used only for adding coolant)
Engine oil level
( P. 5 8 5 )• “Toyota Genuine Motor Oil” or equivalent
• Rag or paper towel
• Funnel (used only for adding engine oil)
Fuses ( P. 634)• Fuse with same amperage rating as original
Headlight aim
( P. 6 3 7 )• Phillips-head screwdriver
Light bulbs
( P. 6 3 9 )• Bulb with same number and wattage rating as origi-
nal
• Flathead screwdriver• Wrench
Radiator and con-
denser ( P. 590)
Page 636 of 788
636
PRIUS PRIME_OM_OM47C17U_(U)
7-3. Do-it-yourself maintenance
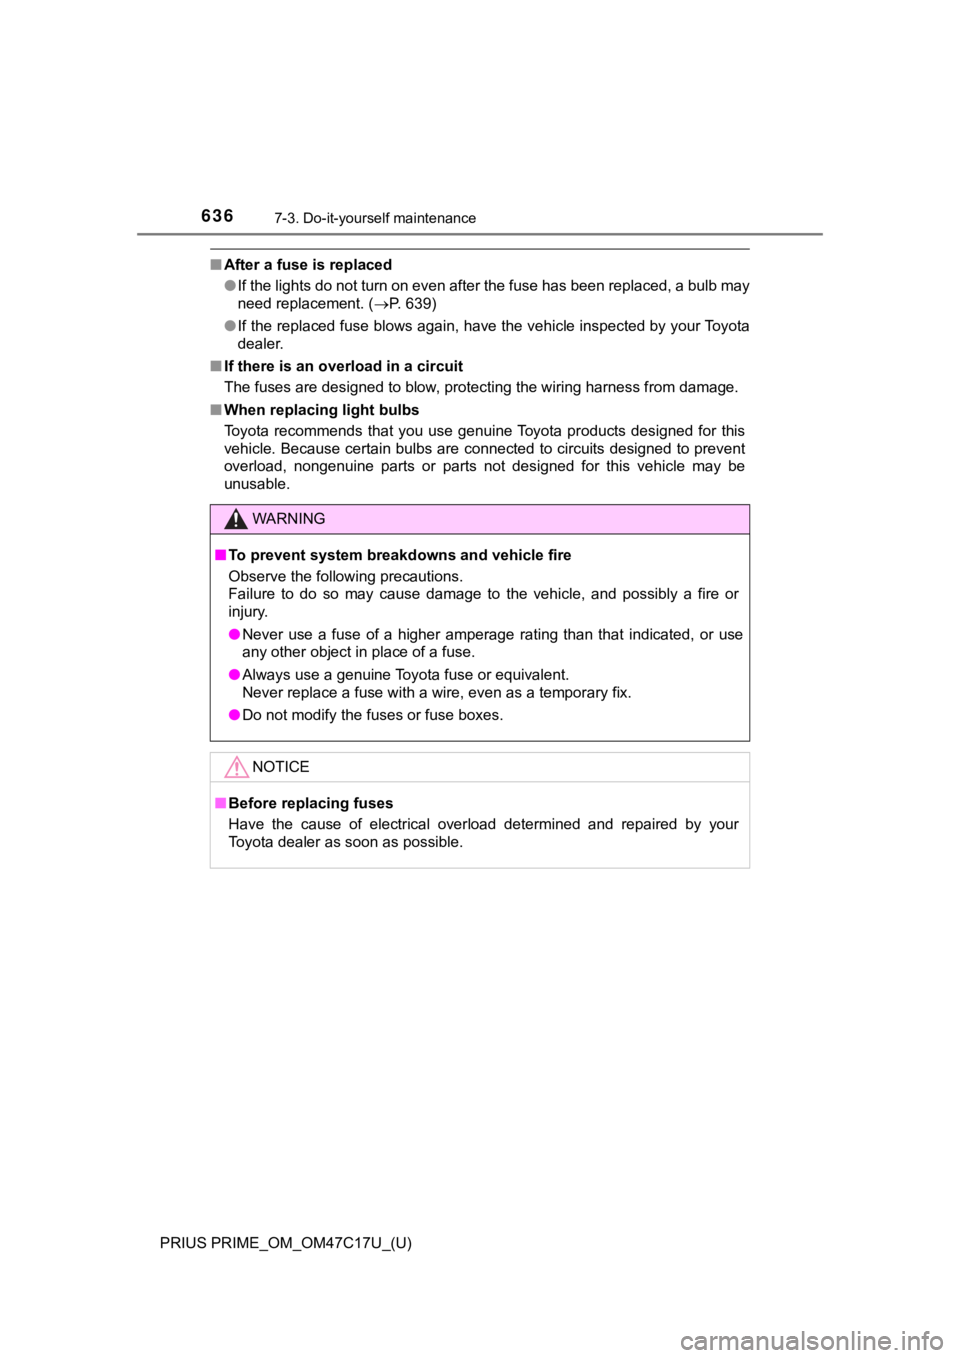
■After a fuse is replaced
●If the lights do not turn on even after the fuse has been repla ced, a bulb may
need replacement. ( P. 639)
● If the replaced fuse blows again, have the vehicle inspected by your Toyota
dealer.
■ If there is an overload in a circuit
The fuses are designed to blow, protecting the wiring harness f rom damage.
■ When replacing light bulbs
Toyota recommends that you use genuine Toyota products designed for this
vehicle. Because certain bulbs are connected to circuits designed to prevent
overload, nongenuine parts or parts not designed for this vehic le may be
unusable.
WARNING
■ To prevent system breakdowns and vehicle fire
Observe the following precautions.
Failure to do so may cause damage to the vehicle, and possibly a fire or
injury.
● Never use a fuse of a higher amperage rating than that indicate d, or use
any other object in place of a fuse.
● Always use a genuine Toyota fuse or equivalent.
Never replace a fuse with a wire, even as a temporary fix.
● Do not modify the fuses or fuse boxes.
NOTICE
■Before replacing fuses
Have the cause of electrical overload determined and repaired b y your
Toyota dealer as soon as possible.
Page 639 of 788
639
PRIUS PRIME_OM_OM47C17U_(U)
7-3. Do-it-yourself maintenance
7
Maintenance and care
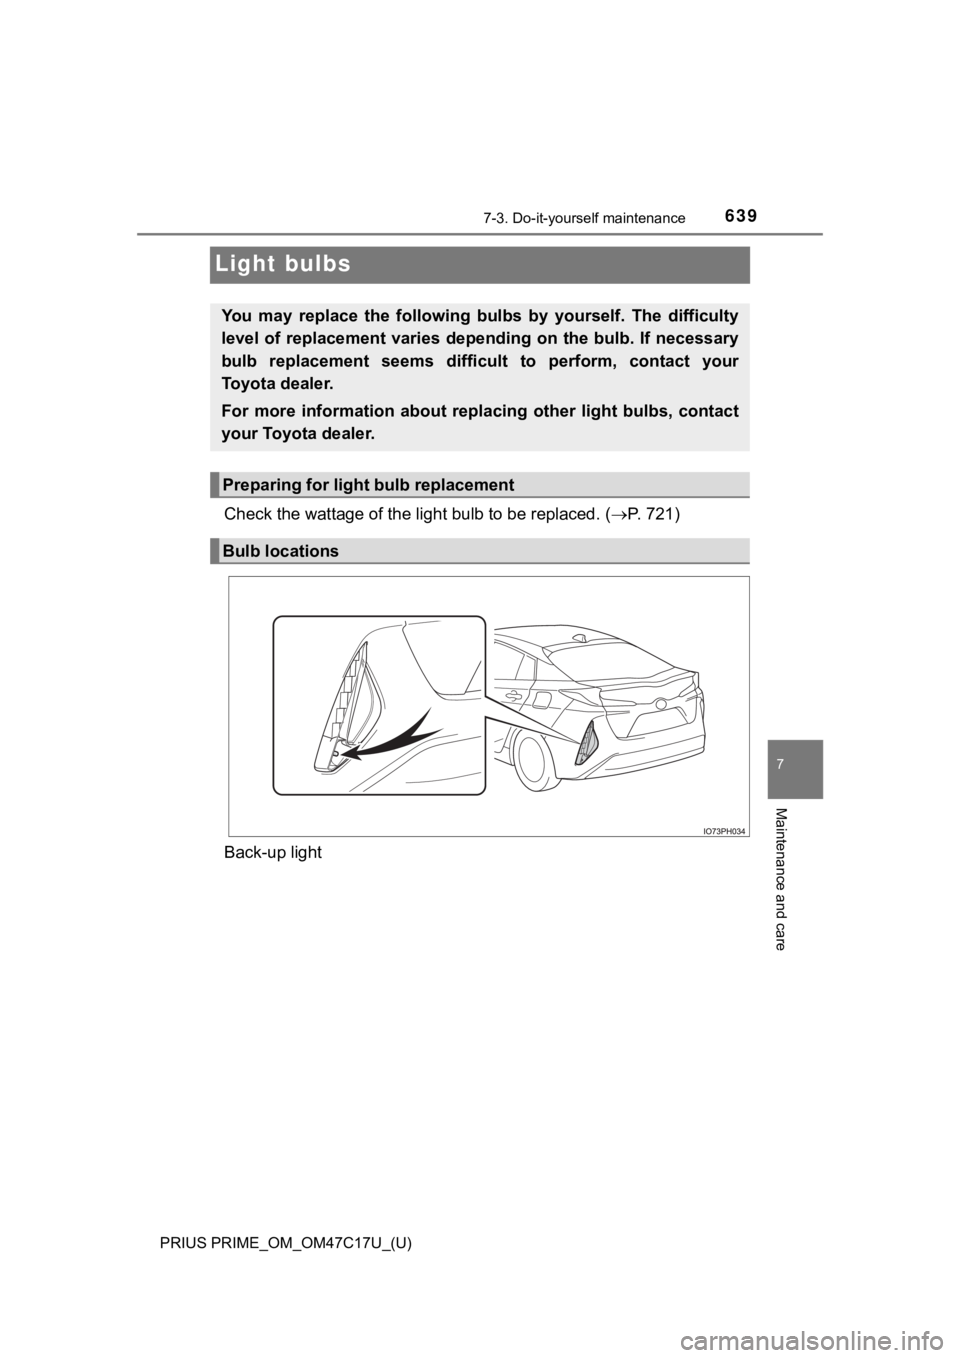
Light bulbs
Check the wattage of the light bulb to be replaced. ( P. 721)
Back-up light
You may replace the following bulbs by yourself. The difficulty
level of replacement varies de pending on the bulb. If necessary
bulb replacement seems diffic ult to perform, contact your
Toyota dealer.
For more information about replacing other light bulbs, contact
your Toyota dealer.
Preparing for light bulb replacement
Bulb locations
Page 640 of 788
640
PRIUS PRIME_OM_OM47C17U_(U)
7-3. Do-it-yourself maintenance
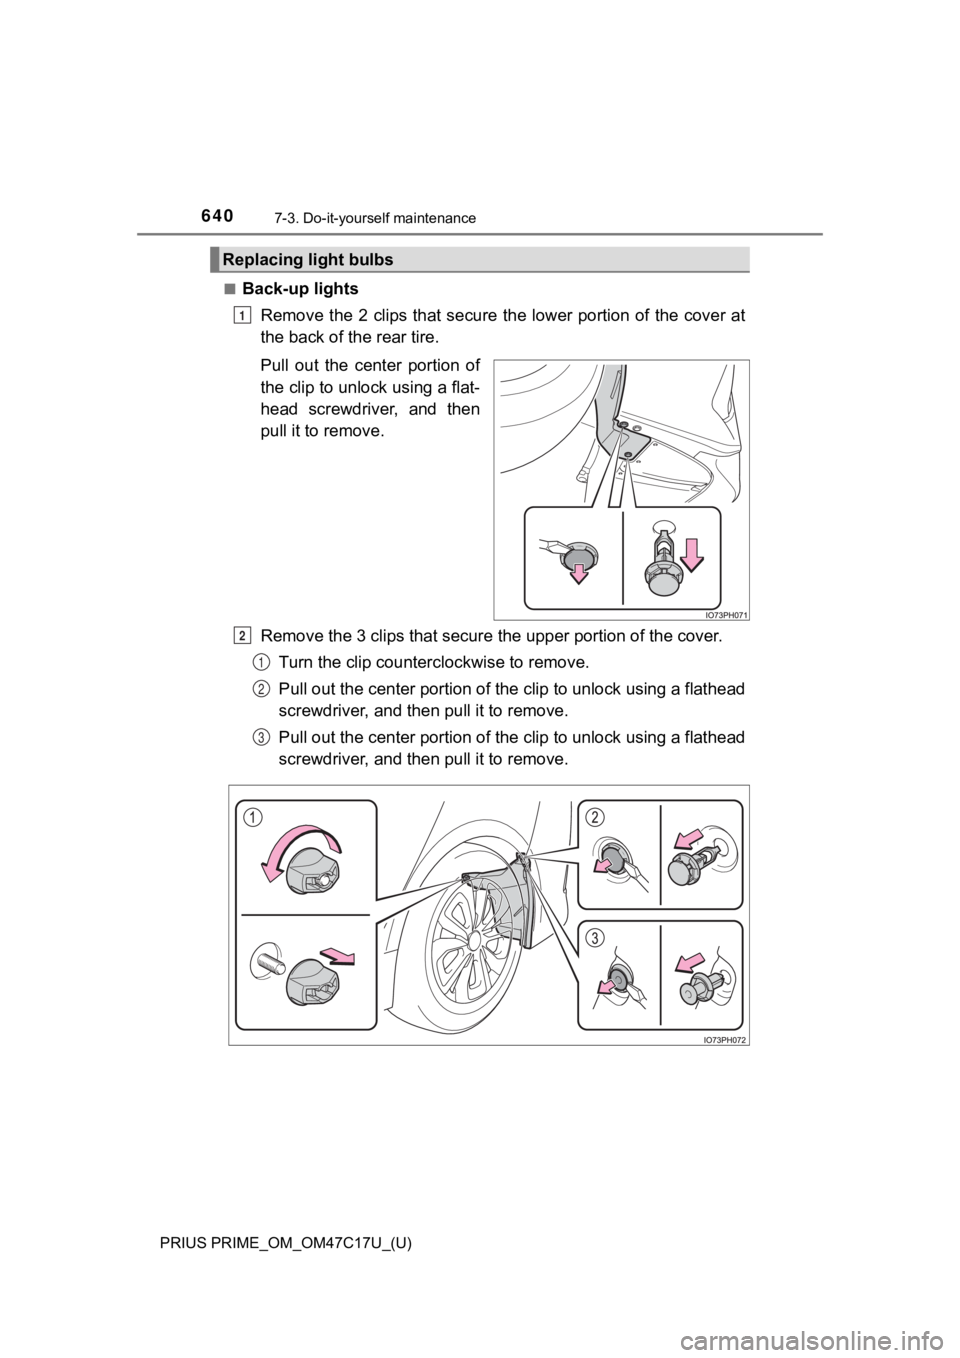
■Back-up lightsRemove the 2 clips that secure t he lower portion of the cover at
the back of the rear tire.
Pull out the center portion of
the clip to unlock using a flat-
head screwdriver, and then
pull it to remove.
Remove the 3 clips that secure the upper portion of the cover.
Turn the clip countercl ockwise to remove.
Pull out the center portion of the clip to unlock using a flathead
screwdriver, and th en pull it to remove.
Pull out the center portion of the clip to unlock using a flathead
screwdriver, and th en pull it to remove.
Replacing light bulbs
1
2
1
2
3
Page 641 of 788
PRIUS PRIME_OM_OM47C17U_(U)
6417-3. Do-it-yourself maintenance
7
Maintenance and care
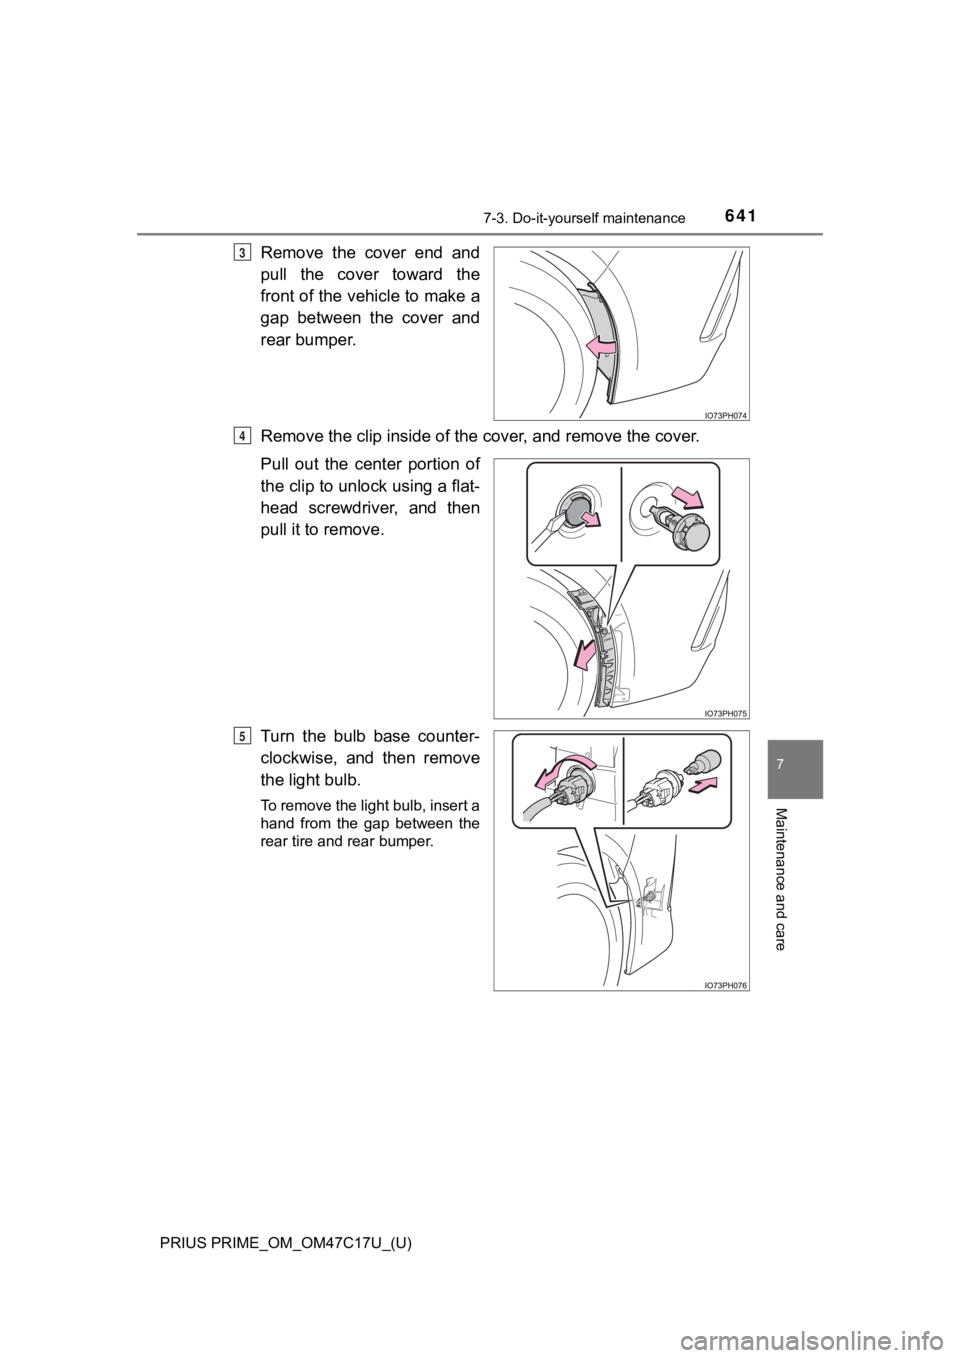
Remove the cover end and
pull the cover toward the
front of the vehicle to make a
gap between the cover and
rear bumper.
Remove the clip inside of the cover, and remove the cover.
Pull out the center portion of
the clip to unlock using a flat-
head screwdriver, and then
pull it to remove.
Turn the bulb base counter-
clockwise, and then remove
the light bulb.
To remove the light bulb, insert a
hand from the gap between the
rear tire and rear bumper.
3
4
5
Page 642 of 788
642
PRIUS PRIME_OM_OM47C17U_(U)
7-3. Do-it-yourself maintenance
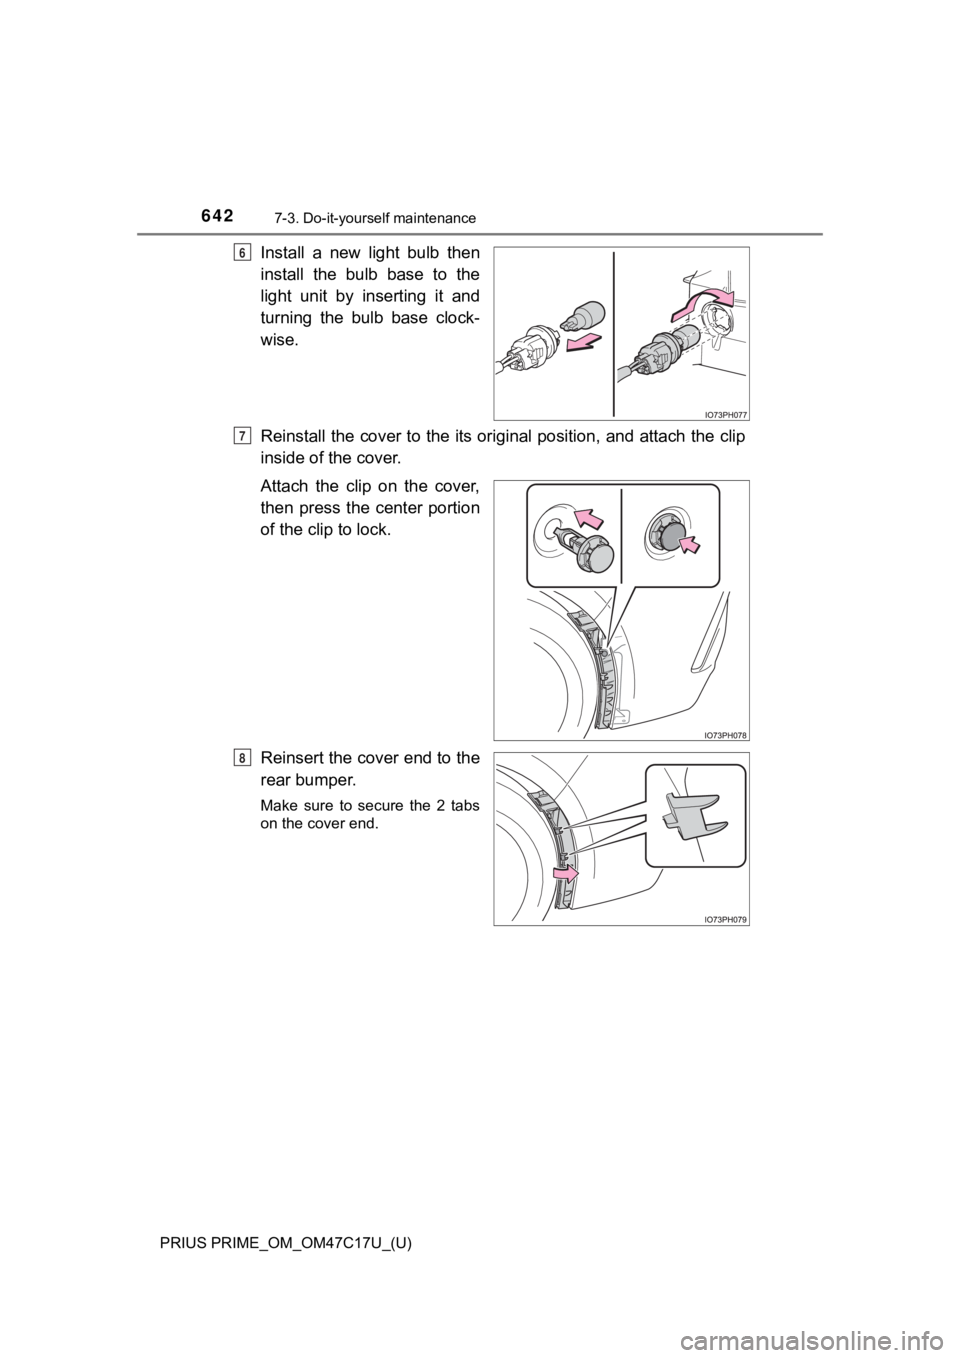
Install a new light bulb then
install the bulb base to the
light unit by inserting it and
turning the bulb base clock-
wise.
Reinstall the cover to the its original position, and attach the clip
inside of the cover.
Attach the clip on the cover,
then press the center portion
of the clip to lock.
Reinsert the cover end to the
rear bumper.
Make sure to secure the 2 tabs
on the cover end.
6
7
8