door lock TOYOTA PRIUS PRIME 2023 User Guide
[x] Cancel search | Manufacturer: TOYOTA, Model Year: 2023, Model line: PRIUS PRIME, Model: TOYOTA PRIUS PRIME 2023Pages: 680, PDF Size: 14.97 MB
Page 121 of 680
1212-2. Charging
2
Plug-in hybrid system
1Unlock the doors to unlock
the charging connector.
( P.102)
The charging co nnector will be
unlocked and the AC charging inlet
light will illuminate when the doors
are unlocked.
WARNING
●After connecting the charging
cable, confirm that it is not
wound around anything.
●If the power indicator on the
CCID (Charging Circuit Inter-
rupting Device) does not illumi-
nate after plugging the AC
charging cable into the socket-
outlet, unplug it immediately.
■If the error warning indicator
on the CCID (Charging Circuit
Interrupting Device) illumi-
nates or flashes during
charging
There may be an electrical leak-
age in the power source path, or
there may be a malfunction in the
AC charging cable or CCID
(Charging Circuit Interrupting
Device).
Refer to P.100 and follow the cor-
rection procedure. If the error
warning indicator does not turn off
even after performing the correc-
tion procedure, immediately stop
charging, remove the AC
charging cable and contact your
Toyota dealer. Continuing to
charge the vehicle in that condi-
tion may lead to unforeseen acci-
dents or serious injury.
■Onboard traction battery
charger
The onboard traction battery char-
ger is located under the luggage
compartment. Make sure to
observe the following precautions
regarding the onboard traction
battery charger. Failure to
observe these precautions may
result in death or serious injury
such as burns and electric
shocks.
●The onboard traction battery
charger is hot during charging.
Do not touch the onboard trac-
tion battery charger, as doing so
may result in burns.
●Do not disassemble, repair or
modify the onboard traction bat-
tery charger. When the onboard
traction battery charger needs
to be repaired, consult your
Toyota dealer.
NOTICE
■When charging
Do not insert the plug into the AC
charging inlet.
The AC charging inlet may be
damaged.
■Using private power genera-
tor
Do not use private power genera-
tors as a power source for
charging.
Doing so may make charging
unstable, the voltage may be
insufficient, and the charging
operation may stop.
■Charging station
Due to the environment in which
the power equipment is located,
charging may be unstable due to
noise, the voltage may be insuffi-
cient, and the charging operation
may stop.
After charging
Page 122 of 680
1222-2. Charging
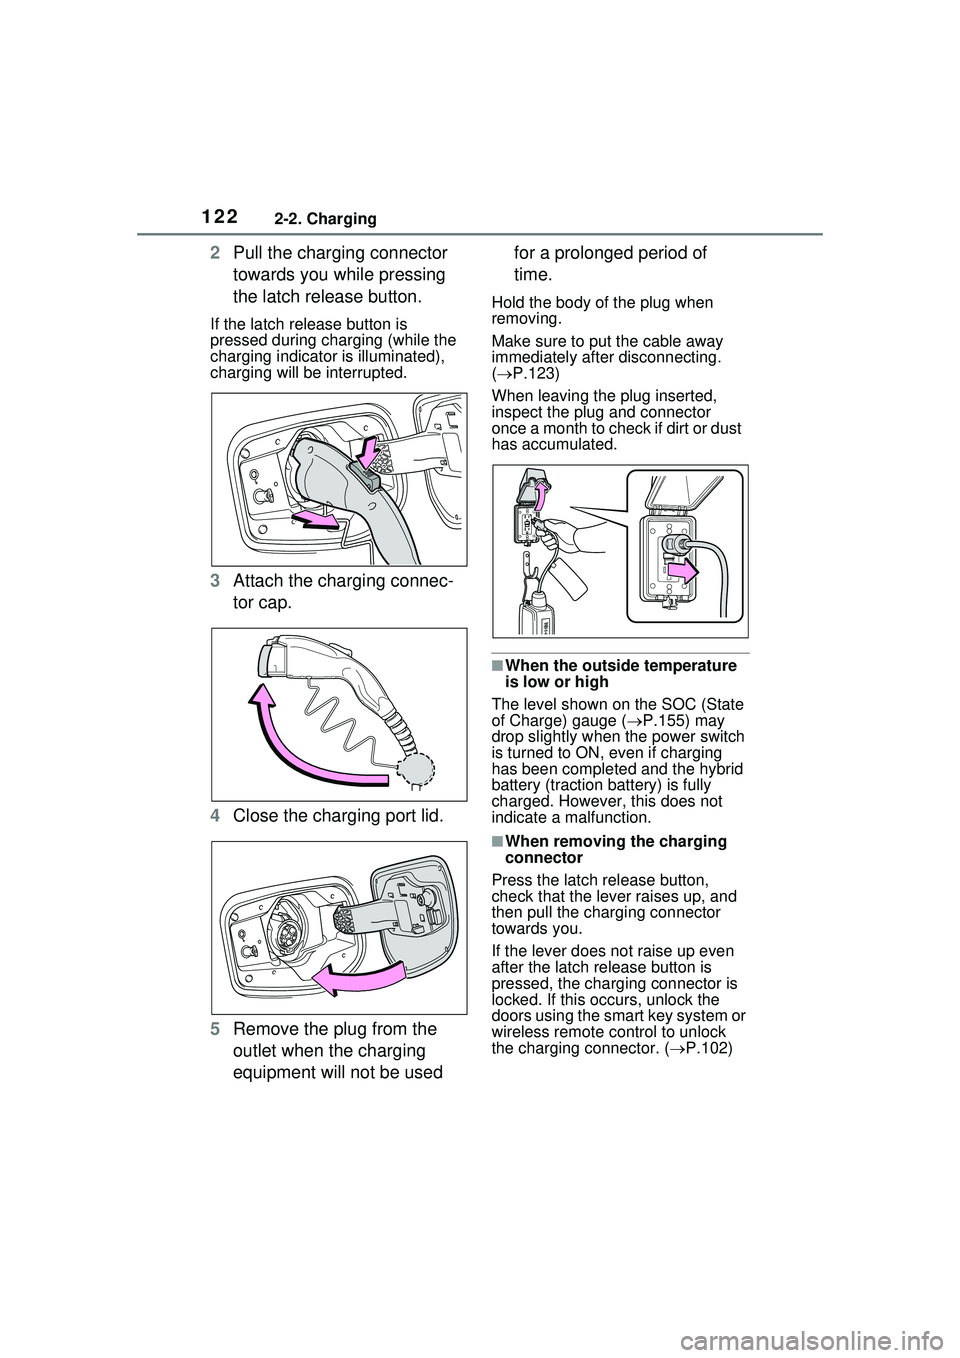
2Pull the charging connector
towards you while pressing
the latch release button.
If the latch release button is
pressed during charging (while the
charging indicator is illuminated),
charging will be interrupted.
3Attach the charging connec-
tor cap.
4 Close the charging port lid.
5 Remove the plug from the
outlet when the charging
equipment will not be used for a prolonged period of
time.
Hold the body of the plug when
removing.
Make sure to put the cable away
immediately after disconnecting.
(
P.123)
When leaving the plug inserted,
inspect the plug and connector
once a month to check if dirt or dust
has accumulated.
■When the outside temperature
is low or high
The level shown on the SOC (State
of Charge) gauge ( P.155) may
drop slightly when the power switch
is turned to ON, even if charging
has been completed and the hybrid
battery (traction battery) is fully
charged. However, this does not
indicate a malfunction.
■When removing the charging
connector
Press the latch release button,
check that the lever raises up, and
then pull the charging connector
towards you.
If the lever does not raise up even
after the latch release button is
pressed, the charging connector is
locked. If this occurs, unlock the
doors using the smart key system or
wireless remote control to unlock
the charging connector. ( P.102)
Page 141 of 680
1412-2. Charging
2
Plug-in hybrid system
■Charging indicator of the charging port flashes and charging
cannot be carried out.
*: Refer to P.96 for details regarding charging indicator of the charging port illumination and flashing.
Refer to the following table and carry out the appropriate correction
procedure.
■Charging does not start at desired time
Likely causeCorrection procedure
When charging indicator of the
charging port flashes normally
*:
Charging schedule is registered
When you wish to charge according
to the charging schedule, wait until
the set time.
To start charging, set “Charge Now”
to on. ( P.128, 132)
When charging indicator of the
charging port rapidly flashes
*: Mal-
function occurred in an external
power source or the vehicle
When a door is opened while the
power switch is off, a message will
be displayed on th e multi-information
display. Follow the instructions dis-
played by the message on the multi-
information display.
When charging schedule func tion does not operate nor-
mally
Likely causeCorrection procedure
The vehicle calendar and clock are
not set correctly
Check the calendar setting and set it
to the correct date. ( P.166)
Check the clock setting and set it to
the proper time.
*
Page 179 of 680
179
4
4
Before driving
Before driving
4-1. Key informationKeys ............................ 180
Digital Key ................... 183
4-2. Opening, closing and locking the doors
Side doors ................... 185
Back door .................... 191
Smart key system ....... 203
4-3. Adjusting the seats Front seats .................. 209
Rear seats................... 210
Head restraints............ 212
4-4. Adjusting the steering wheel and mirrors
Steering wheel ............ 215
Inside rear view mirror 216
Digital Rear-view Mirror .................................. 217
Outside rear view mirrors .................................. 225
4-5. Opening, closing the win- dows
Power windows ........... 227
4-6. Favorite settings Driving position memory.................................. 230
My Settings ................. 234
Page 181 of 680
1814-1. Key information
4
Before driving
■If a message regarding the state
of the electronic key or power
switch mode, etc. is shown
To prevent trapping the electronic
key inside the vehicle, leaving the
vehicle carrying the electronic key
on your person without turning the
power switch to OFF or other pas-
sengers from unintentionally taking
the key out of the vehicle, etc., a
message that prompts the user to
confirm the state of the electronic
key or power switch mode may be
shown on the multi-information dis-
play. In those cases, follow the
instructions on the display immedi-
ately.
■If “Key Battery Low Replace
Key Battery” is displayed on
the multi-information display
The electronic key has a low bat-
tery. Replace the electronic key bat-
tery. ( P.538)
■Replacing the battery
P.538
■Confirmation of the registered
key number
The number of keys already regis-
tered to the vehicle can be con-
firmed. Ask your Toyota dealer for
details.
■If “A New Key has been Regis-
tered Contact Your Dealer for
Details” is displayed on the
multi-information display
This message will be displayed
each time the driver’s door is
opened when the doors are
unlocked from the outside for
approximately 10 days after a new
electronic key has been registered.
If this message is displayed but you
have not had a new electronic key
registered, ask your Toyota dealer
to check if an unknown electronic
key (other than those in your pos-
session) has been registered.
NOTICE
■To prevent key damage
●Do not drop the keys, subject
them to strong shocks or bend
them.
●Do not expose the keys to high
temperatures for long periods of
time.
●Do not get the keys wet or wash
them in an ultrasonic washer,
etc.
●Do not attach me tallic or mag-
netic materials to the keys or
place the keys close to such
materials.
●Do not disassemble the keys.
●Do not attach a sticker or any-
thing else to the surface of the
electronic key.
●Do not place the keys near
objects that produce magnetic
fields, such as TVs, audio sys-
tems and induction cookers.
●Do not place the keys near
medical electrical equipment
such as low-fr equency therapy
equipment or microwave ther-
apy equipment, and do not
receive medical attention with
the keys on your person.
■Carrying the electronic key
on your person
Carry the electronic key 3.9 in.
(10 cm) or more away from elec-
tric appliances that are turned on.
Radio waves emitted from electric
appliances within 3.9 in. (10 cm)
of the electronic key may interfere
with the key, causing the key to
not function properly.
■In case of a smart key system
malfunction or other key-
related problems
P.587
Page 182 of 680
1824-1. Key information
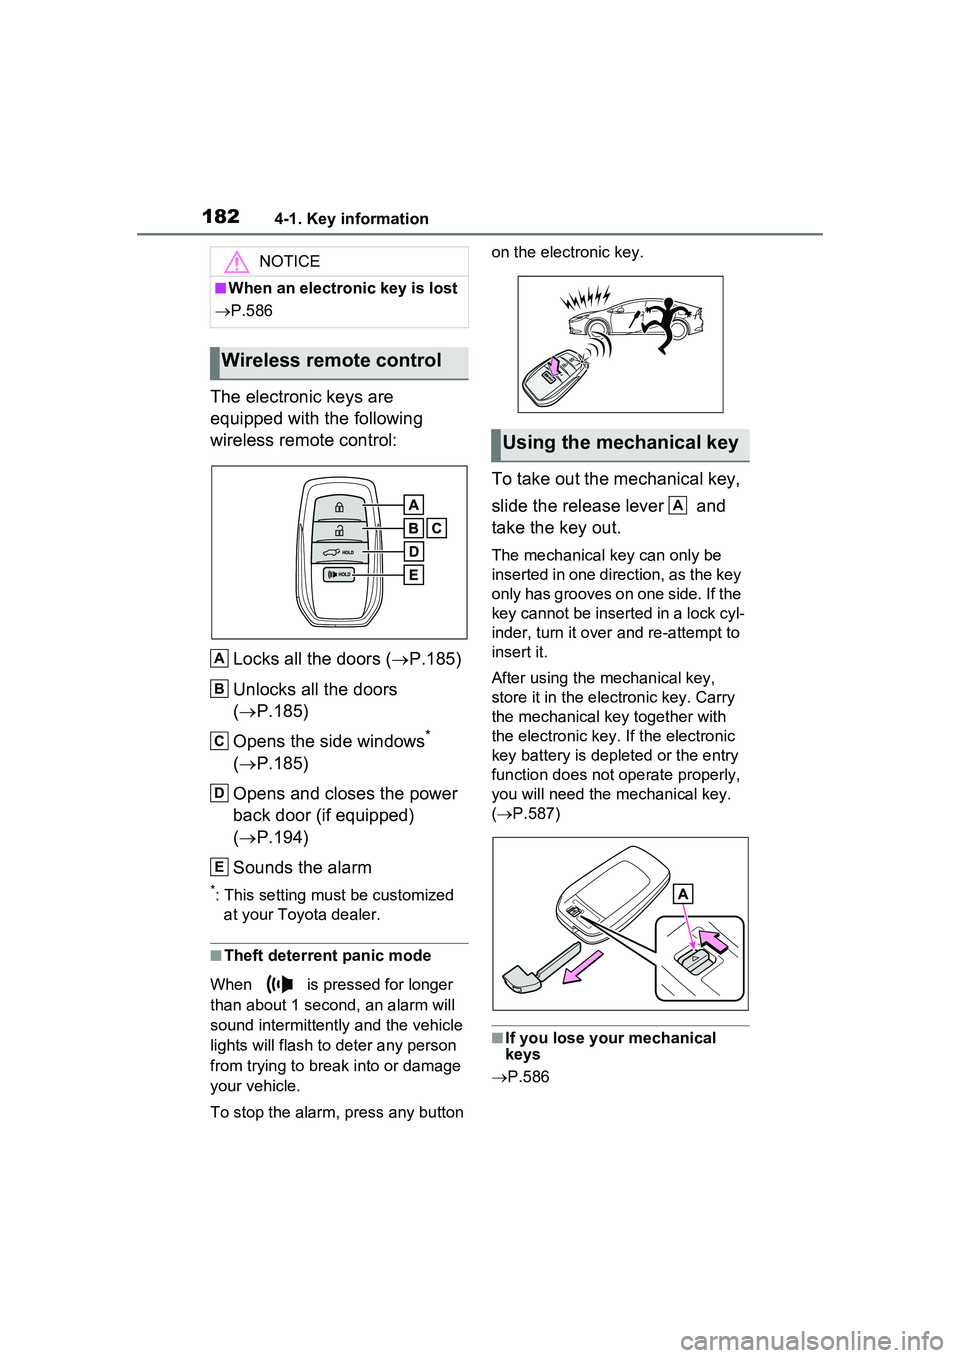
The electronic keys are
equipped with the following
wireless remote control:Locks all the doors ( P.185)
Unlocks all the doors
( P.185)
Opens the side windows
*
( P.185)
Opens and closes the power
back door (if equipped)
( P.194)
Sounds the alarm
*: This setting must be customized at your Toyota dealer.
■Theft deterrent panic mode
When is pressed for longer
than about 1 second, an alarm will
sound intermittently and the vehicle
lights will flash to deter any person
from trying to break into or damage
your vehicle.
To stop the alarm, press any button on the electronic key.
To take out the mechanical key,
slide the release lever and
take the key out.
The mechanical key can only be
inserted in one direction, as the key
only has grooves on one side. If the
key cannot be inserted in a lock cyl-
inder, turn it over
and re-attempt to
insert it.
After using the mechanical key,
store it in the electronic key. Carry
the mechanical key together with
the electronic key. If the electronic
key battery is depleted or the entry
function does not operate properly,
you will need the mechanical key.
( P.587)
■If you lose your mechanical
keys
P.586
NOTICE
■When an electronic key is lost
P.586
Wireless remote control
A
B
C
D
E
Using the mechanical key
A
Page 184 of 680
1844-1. Key information
Be sure to carry the electronic
key of the vehicle if traveling
to a location with unreliable
communications.
If the smartphone battery is
depleted, the smartphone
cannot be used as Digital
Key. If the battery level is low,
be sure to charge the smart-
phone prior to going out.
The Digital Key system is
related to the smart key sys-
tem. If the smart key system
has been deactivated in the
vehicle customization setting,
the Digital Key will also be
disabled.
Depending on the radio wave
environment, the Digital Key
may not be able to be used.
( P.205)
When transferring vehicle
ownership, make sure to
delete the Digital Keys.
If the vehicle is not operated
for 14 days or more, the Digi-
tal Key will not connect auto-
matically. Therefore, it may
take some time before the
system operates after a door
handle is touched.
A part of the services may be
stopped for a certain period of
time due to server mainte-
nance. However, registered
Digital Keys can be used
during the maintenance.
A smartphone with the Digital Key App enabled will be able
to lock and unlock the doors,
start the hybrid system and
perform any other operations
as same as the electronic key
of the vehicle. Be especially
careful not to lose the smart-
phone or allow it to be stolen.
If the smartphone is lost or
stolen, contact your Toyota
dealer immediately.
When taking your vehicle to a
Toyota dealer for an inspec-
tion or repairs, make sure to
bring an electronic key.
With the Digital Key alone, no
vehicle lights will illuminate
when approached to the vehi-
cle. Also, with the Digital Key
alone, some functions, such
as the power back door’s
close & lock (walk-away)
function, etc., cannot be used.
Page 185 of 680
1854-2. Opening, closing and locking the doors
4
Before driving
4-2.Opening, closing and locking the doors
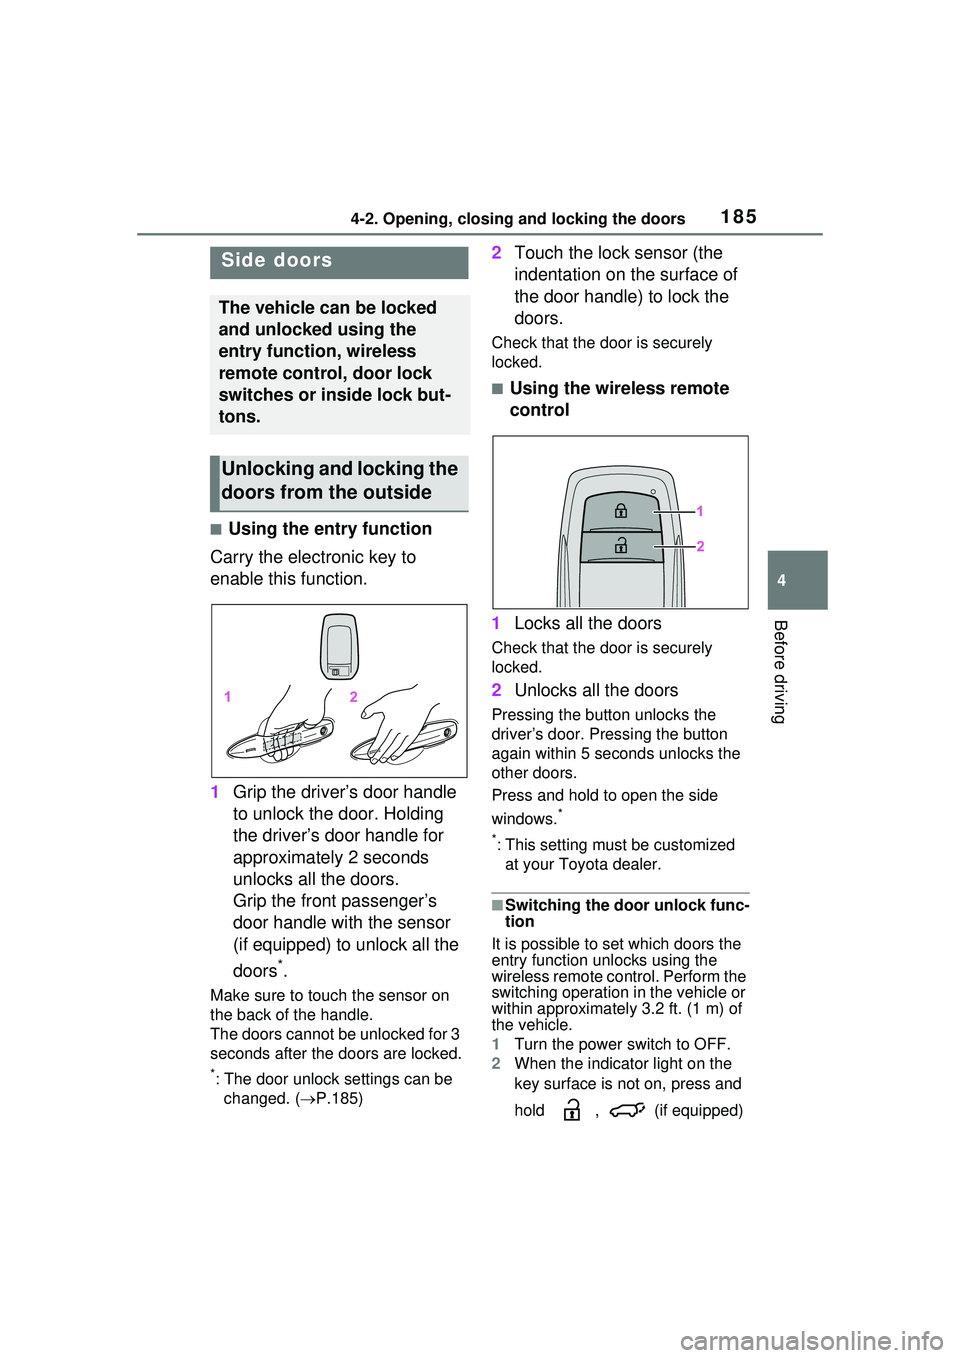
■Using the entry function
Carry the electronic key to
enable this function.
1 Grip the driver’s door handle
to unlock the door. Holding
the driver’s door handle for
approximately 2 seconds
unlocks all the doors.
Grip the front passenger’s
door handle with the sensor
(if equipped) to unlock all the
doors
*.
Make sure to touch the sensor on
the back of the handle.
The doors cannot be unlocked for 3
seconds after the doors are locked.
*: The door unlock settings can be
changed. ( P.185)
2 Touch the lock sensor (the
indentation on the surface of
the door handle) to lock the
doors.
Check that the do or is securely
locked.
■Using the wireless remote
control
1 Locks all the doors
Check that the do or is securely
locked.
2 Unlocks all the doors
Pressing the button unlocks the
driver’s door. Pressing the button
again within 5 seconds unlocks the
other doors.
Press and hold to open the side
windows.
*
*
: This setting must be customized at your Toyota dealer.
■Switching the door unlock func-
tion
It is possible to set which doors the
entry function unlocks using the
wireless remote control. Perform the
switching operation in the vehicle or
within approximately 3.2 ft. (1 m) of
the vehicle.
1 Turn the power switch to OFF.
2 When the indicator light on the
key surface is not on, press and
hold , (if equipped)
Side doors
The vehicle can be locked
and unlocked using the
entry function, wireless
remote control, door lock
switches or inside lock but-
tons.
Unlocking and locking the
doors from the outside
Page 186 of 680
1864-2. Opening, closing and locking the doors
or for approximately 5
seconds while pressing and
holding .
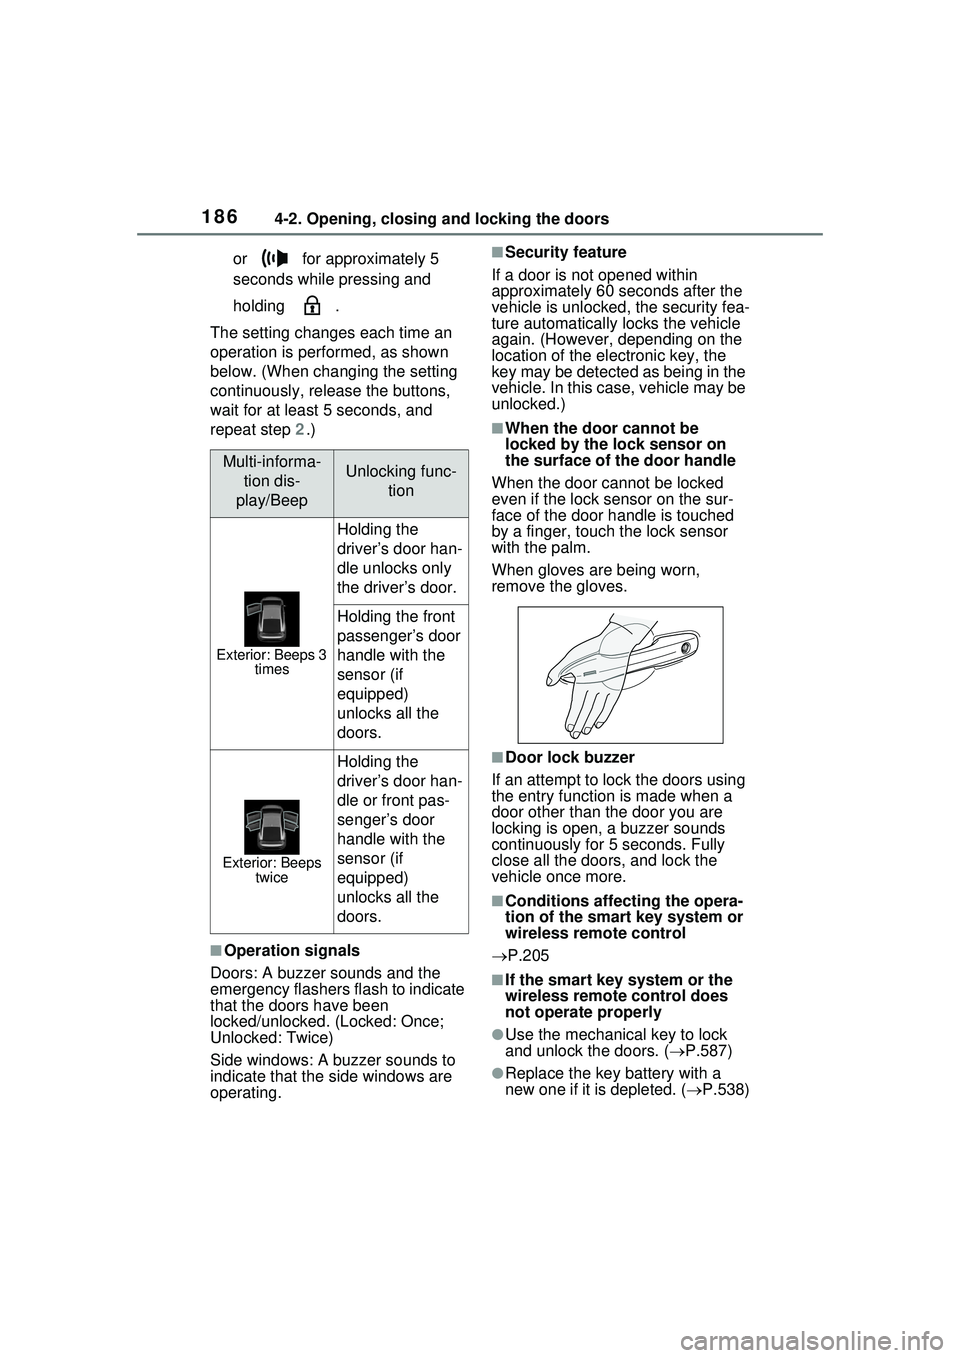
The setting changes each time an
operation is performed, as shown
below. (When changing the setting
continuously, release the buttons,
wait for at least 5 seconds, and
repeat step 2 .)
■Operation signals
Doors: A buzzer sounds and the
emergency flashers flash to indicate
that the doors have been
locked/unlocked. (Locked: Once;
Unlocked: Twice)
Side windows: A buzzer sounds to
indicate that the side windows are
operating.
■Security feature
If a door is not opened within
approximately 60 seconds after the
vehicle is unlocked, the security fea-
ture automatically locks the vehicle
again. (However, depending on the
location of the electronic key, the
key may be detected as being in the
vehicle. In this case, vehicle may be
unlocked.)
■When the door cannot be
locked by the lock sensor on
the surface of the door handle
When the door cannot be locked
even if the lock sensor on the sur-
face of the door handle is touched
by a finger, touch the lock sensor
with the palm.
When gloves are being worn,
remove the gloves.
■Door lock buzzer
If an attempt to lock the doors using
the entry function is made when a
door other than the door you are
locking is open, a buzzer sounds
continuously for 5 seconds. Fully
close all the doors, and lock the
vehicle once more.
■Conditions affecting the opera-
tion of the smart key system or
wireless remote control
P.205
■If the smart key system or the
wireless remote control does
not operate properly
●Use the mechanical key to lock
and unlock the doors. ( P.587)
●Replace the key battery with a
new one if it is depleted. ( P.538)
Multi-informa-
tion dis-
play/BeepUnlocking func- tion
Exterior: Beeps 3 times
Holding the
driver’s door han-
dle unlocks only
the driver’s door.
Holding the front
passenger’s door
handle with the
sensor (if
equipped)
unlocks all the
doors.
Exterior: Beeps twice
Holding the
driver’s door han-
dle or front pas-
senger’s door
handle with the
sensor (if
equipped)
unlocks all the
doors.
Page 187 of 680
1874-2. Opening, closing and locking the doors
4
Before driving
■If the 12-volt battery is dis-
charged
The doors cannot be locked and
unlocked using the smart key sys-
tem or wireless remote control. Lock
or unlock the doors using the
mechanical key. ( P.587)
■Customization
Settings (e.g. unlocking function
using a key) can be changed.
(Customizable features: P.618)
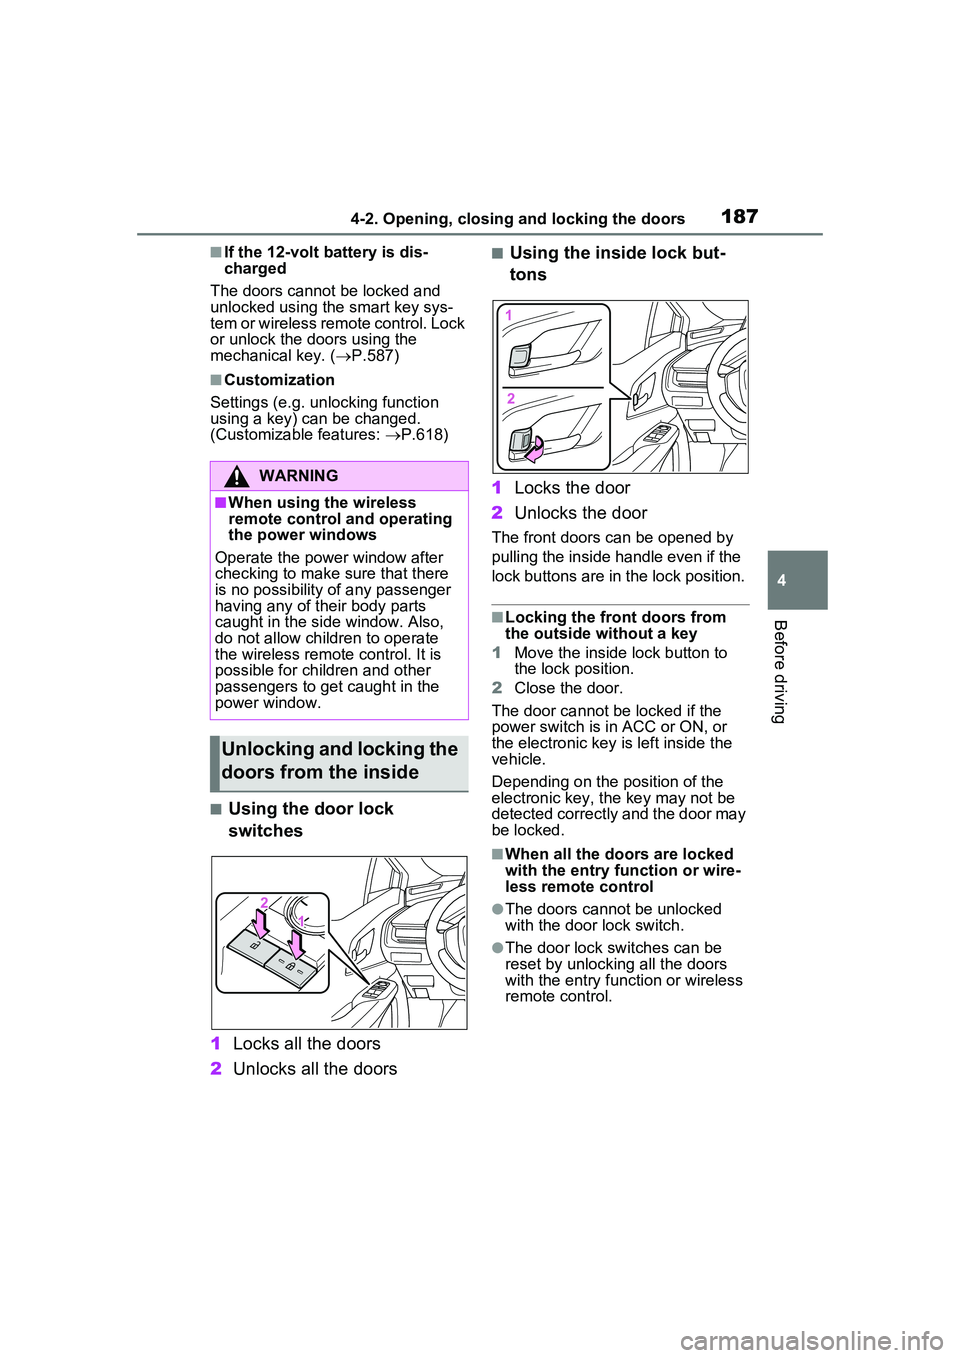
■Using the door lock
switches
1 Locks all the doors
2 Unlocks all the doors
■Using the inside lock but-
tons
1 Locks the door
2 Unlocks the door
The front doors can be opened by
pulling the inside handle even if the
lock buttons are in the lock position.
■Locking the front doors from
the outside without a key
1 Move the inside lock button to
the lock position.
2 Close the door.
The door cannot be locked if the
power switch is in ACC or ON, or
the electronic key is left inside the
vehicle.
Depending on the position of the
electronic key, the key may not be
detected correctly and the door may
be locked.
■When all the doors are locked
with the entry function or wire-
less remote control
●The doors cannot be unlocked
with the door lock switch.
●The door lock switches can be
reset by unlocking all the doors
with the entry function or wireless
remote control.
WARNING
■When using the wireless
remote control and operating
the power windows
Operate the power window after
checking to make sure that there
is no possibility of any passenger
having any of their body parts
caught in the side window. Also,
do not allow children to operate
the wireless remote control. It is
possible for children and other
passengers to get caught in the
power window.
Unlocking and locking the
doors from the inside