navigation TOYOTA PRIUS V 2012 Accessories, Audio & Navigation (in English)
[x] Cancel search | Manufacturer: TOYOTA, Model Year: 2012, Model line: PRIUS V, Model: TOYOTA PRIUS V 2012Pages: 228, PDF Size: 3.73 MB
Page 33 of 228
33
2
APPLICATION-“Map”
2. DESTINATION SEARCH
1. DESTINATION SEARCH
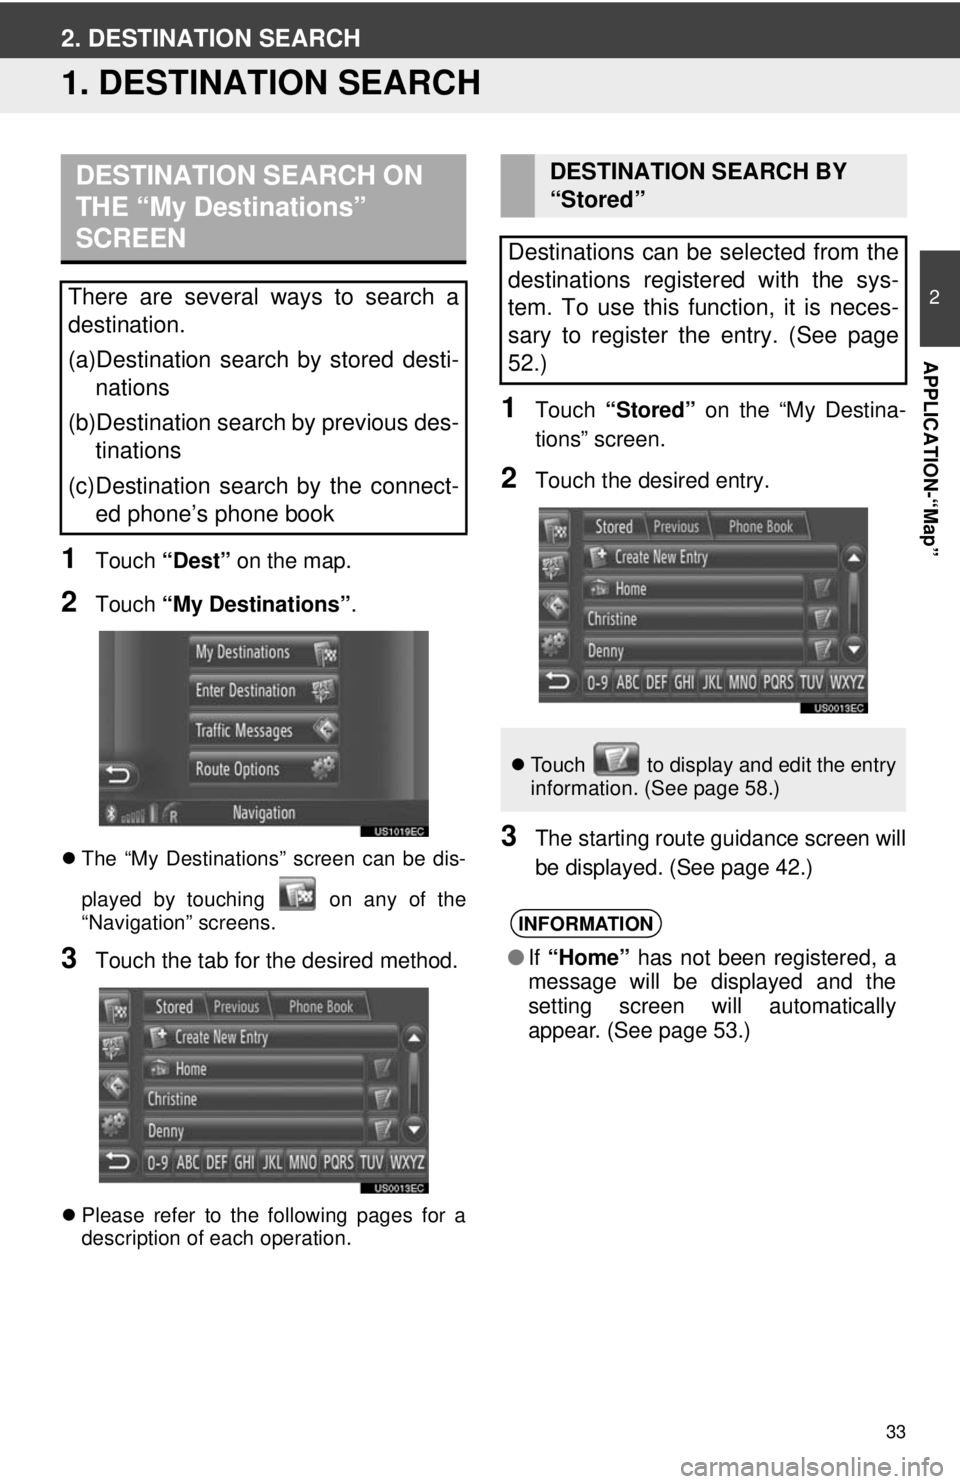
1Touch “Dest” on the map.
2Touch “My Destinations” .
The “My Destinations” screen can be dis-
played by touching on any of the
“Navigation” screens.
3Touch the tab for the desired method.
Please refer to the following pages for a
description of each operation.
1Touch “Stored” on the “My Destina-
tions” screen.
2Touch the desired entry.
3The starting route guidance screen will
be displayed. (See page 42.)
DESTINATION SEARCH ON
THE “My Destinations”
SCREEN
There are several ways to search a
destination.
(a)Destination search by stored desti- nations
(b)Destination search by previous des- tinations
(c)Destination search by the connect- ed phone’s phone book
DESTINATION SEARCH BY
“Stored”
Destinations can be selected from the
destinations registered with the sys-
tem. To use this function, it is neces-
sary to register the entry. (See page
52.)
Touch to display and edit the entry
information. (See page 58.)
INFORMATION
●If “Home” has not been registered, a
message will be displayed and the
setting screen will automatically
appear. (See page 53.)
Page 35 of 228
35
2. DESTINATION SEARCH
2
APPLICATION-“Map”
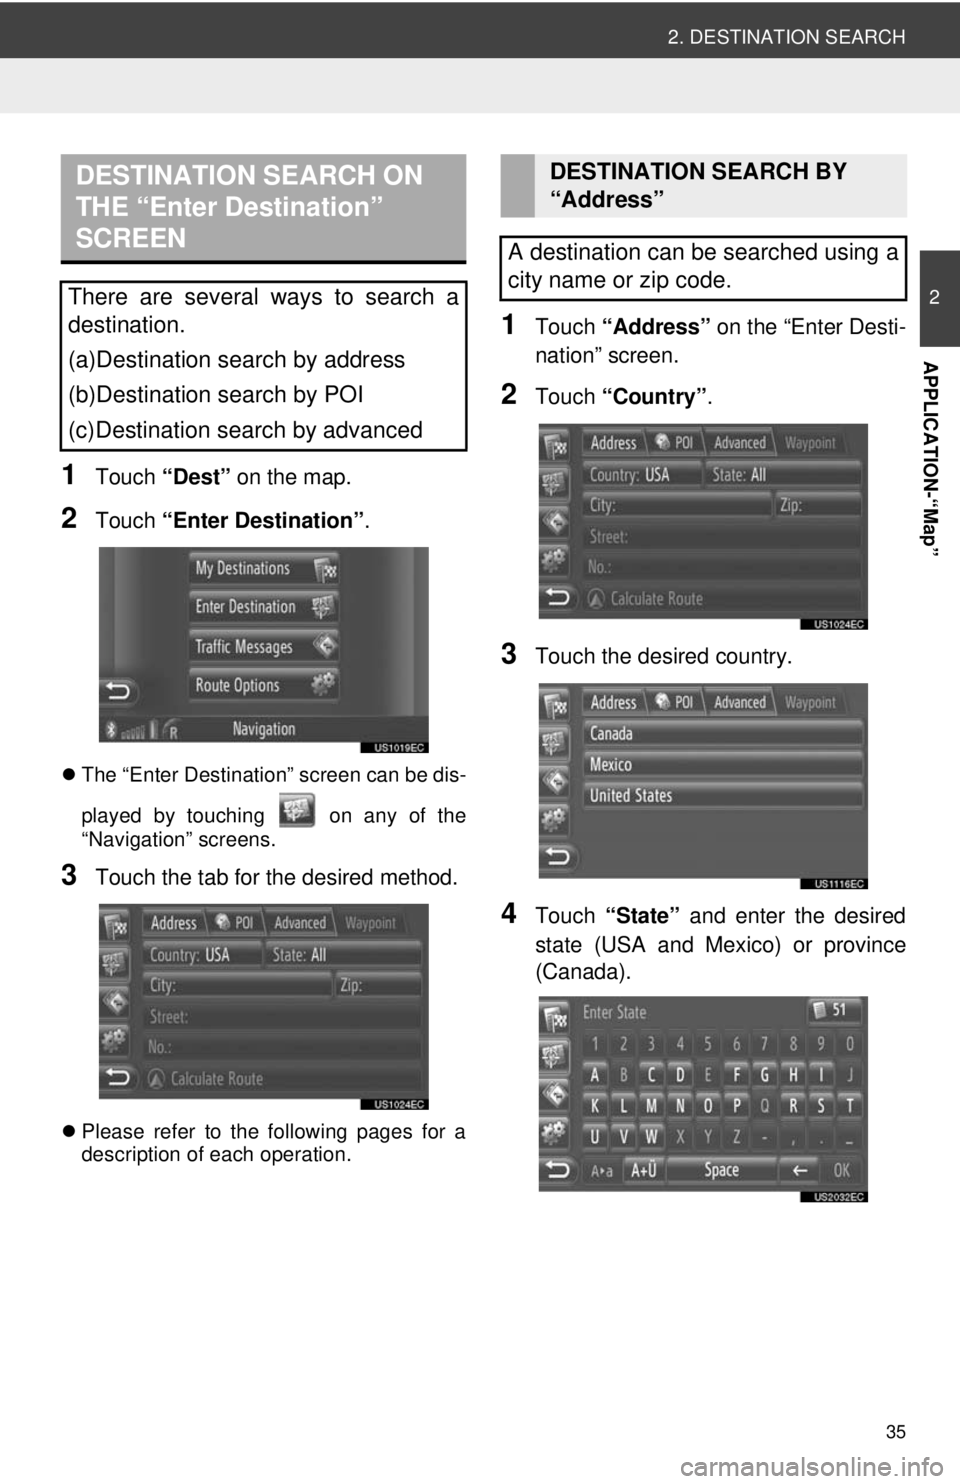
1Touch “Dest” on the map.
2Touch “Enter Destination” .
The “Enter Destination” screen can be dis-
played by touching on any of the
“Navigation” screens.
3Touch the tab for the desired method.
Please refer to the following pages for a
description of each operation.
1Touch “Address” on the “Enter Desti-
nation” screen.
2Touch “Country” .
3Touch the desired country.
4Touch “State” and enter the desired
state (USA and Mexico) or province
(Canada).
DESTINATION SEARCH ON
THE “Enter Destination”
SCREEN
There are several ways to search a
destination.
(a)Destination search by address
(b)Destination search by POI
(c)Destination search by advanced
DESTINATION SEARCH BY
“Address”
A destination can be searched using a
city name or zip code.
Page 39 of 228
39
2. DESTINATION SEARCH
2
APPLICATION-“Map”
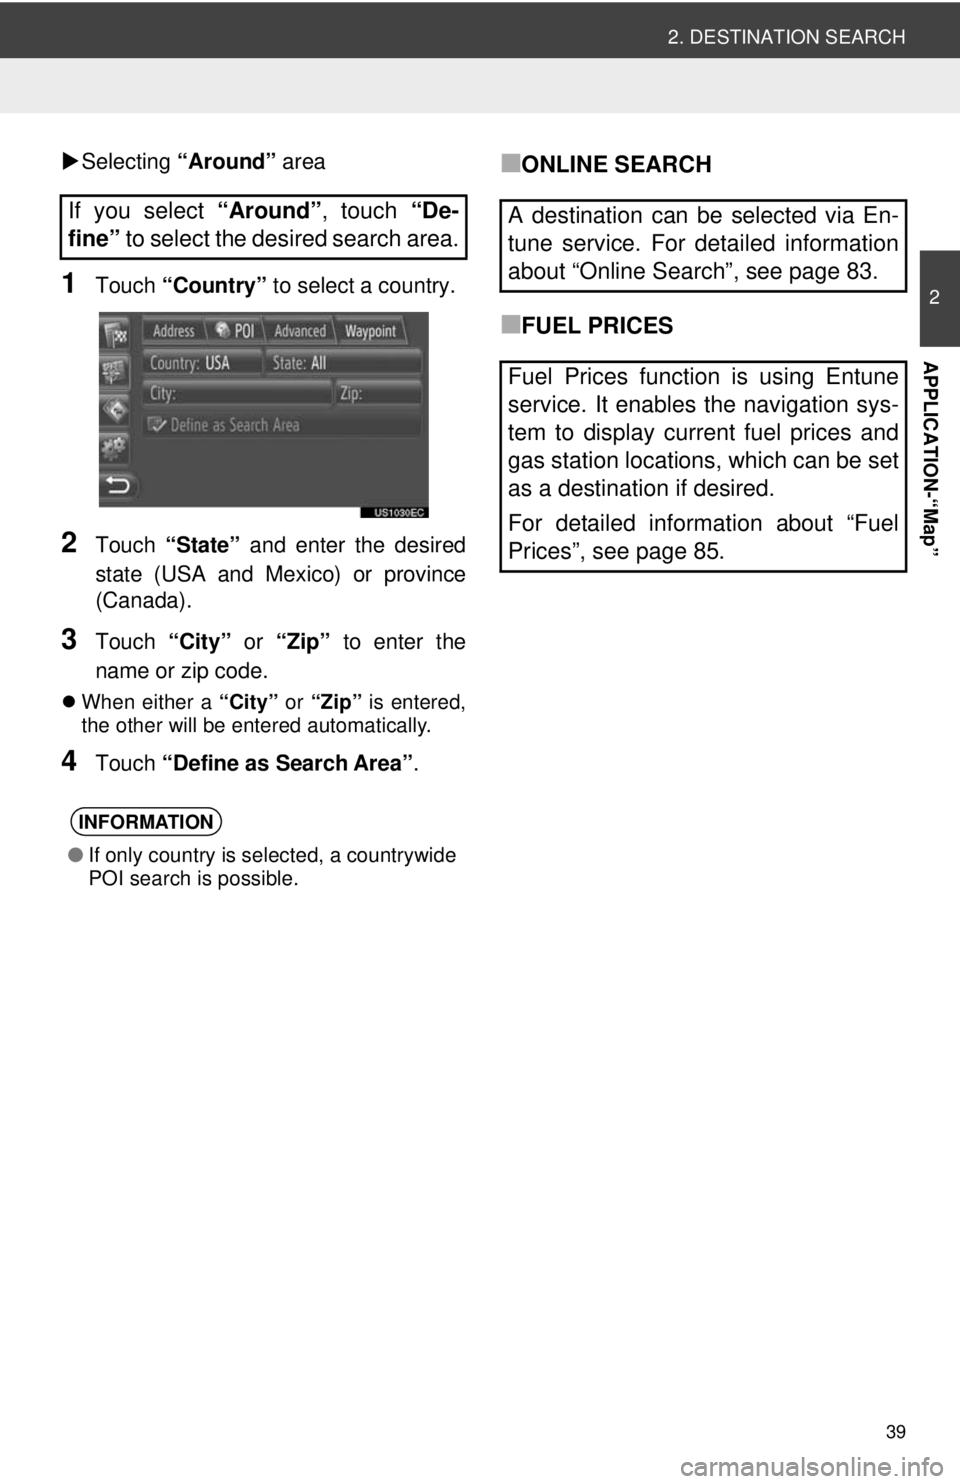
Selecting “Around” area
1Touch “Country” to select a country.
2Touch “State” and enter the desired
state (USA and Mexico) or province
(Canada).
3Touch “City” or “Zip” to enter the
name or zip code.
When either a “City” or “Zip” is entered,
the other will be entered automatically.
4Touch “Define as Search Area” .
■ONLINE SEARCH
■FUEL PRICES
If you select
“Around”, touch “De-
fine” to select the desired search area.
INFORMATION
●If only country is selected, a countrywide
POI search is possible.
A destination can be selected via En-
tune service. For detailed information
about “Online Search”, see page 83.
Fuel Prices function is using Entune
service. It enables the navigation sys-
tem to display current fuel prices and
gas station locations, which can be set
as a destination if desired.
For detailed information about “Fuel
Prices”, see page 85.
Page 45 of 228
45
3. ROUTE GUIDANCE
2
APPLICATION-“Map”
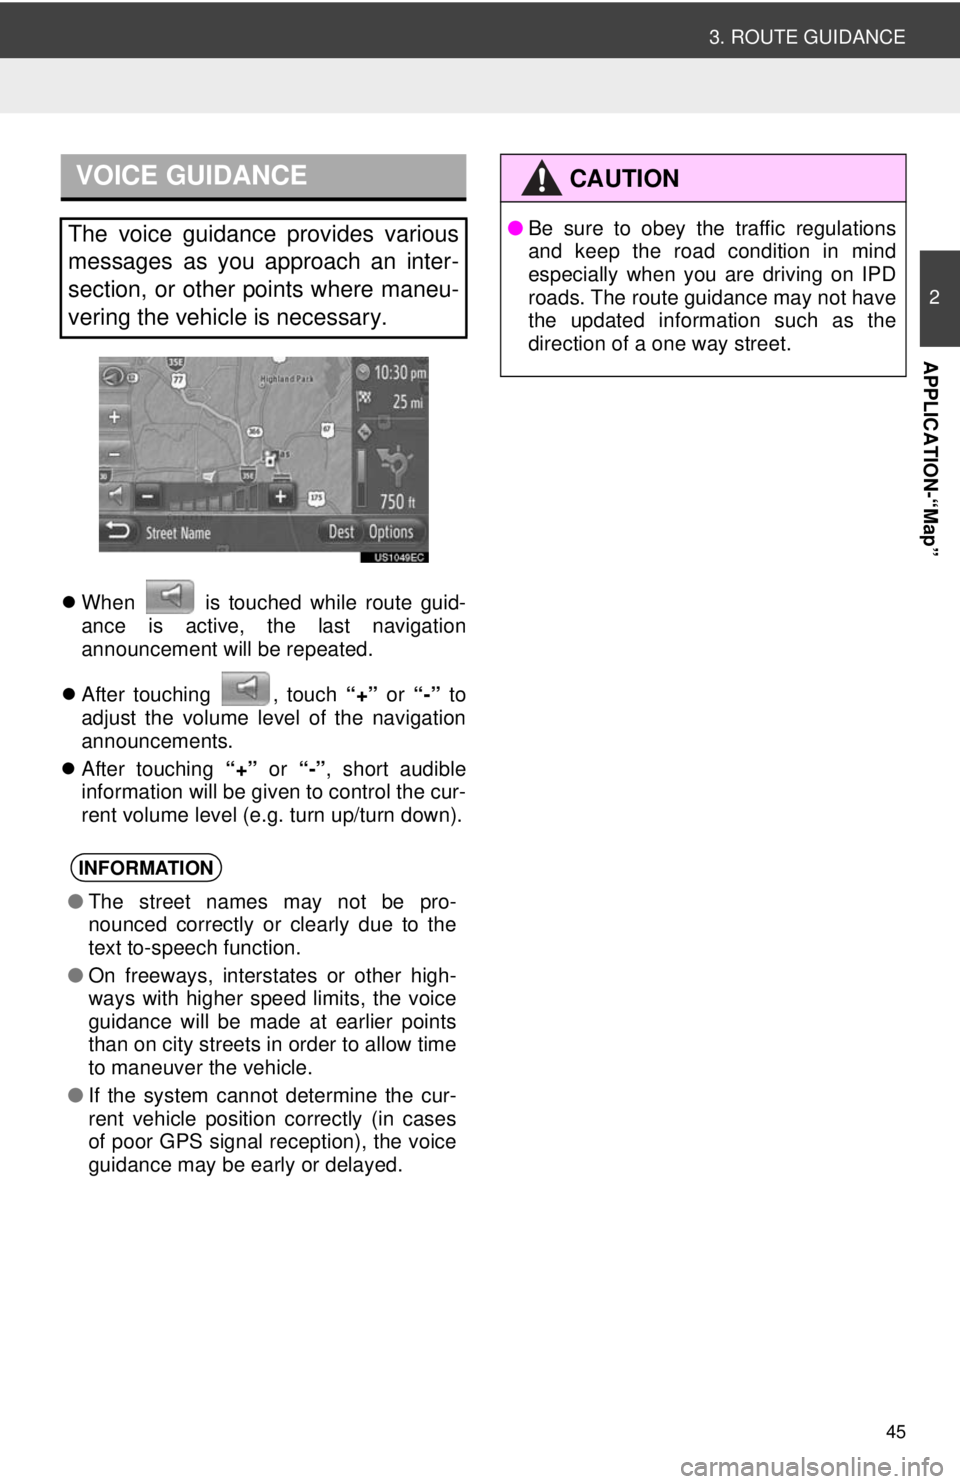
When is touched while route guid-
ance is active, the last navigation
announcement will be repeated.
After touching , touch “+” or “-” to
adjust the volume level of the navigation
announcements.
After touching “+” or “-” , short audible
information will be given to control the cur-
rent volume level (e.g. turn up/turn down).
VOICE GUIDANCE
The voice guidance provides various
messages as you approach an inter-
section, or other points where maneu-
vering the vehicle is necessary.
INFORMATION
● The street names may not be pro-
nounced correctly or clearly due to the
text to-speech function.
● On freeways, interstates or other high-
ways with higher speed limits, the voice
guidance will be made at earlier points
than on city streets in order to allow time
to maneuver the vehicle.
● If the system cannot determine the cur-
rent vehicle position correctly (in cases
of poor GPS signal reception), the voice
guidance may be early or delayed.
CAUTION
● Be sure to obey the traffic regulations
and keep the road condition in mind
especially when you are driving on IPD
roads. The route guidance may not have
the updated information such as the
direction of a one way street.
Page 49 of 228
49
3. ROUTE GUIDANCE
2
APPLICATION-“Map”
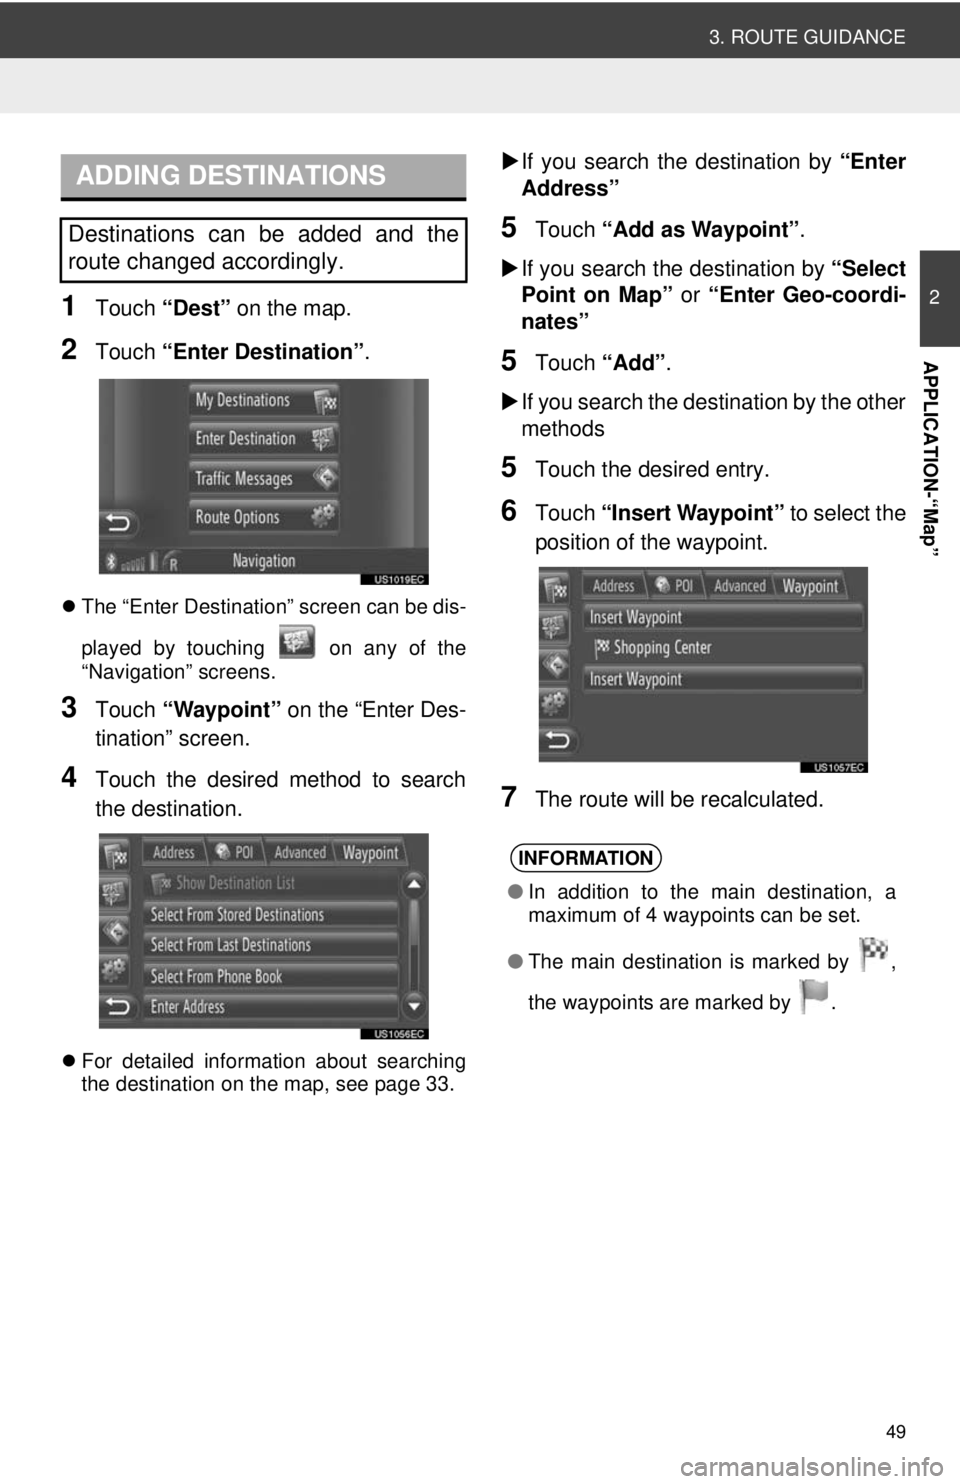
1Touch “Dest” on the map.
2Touch “Enter Destination” .
The “Enter Destination” screen can be dis-
played by touching on any of the
“Navigation” screens.
3Touch “Waypoint” on the “Enter Des-
tination” screen.
4Touch the desired method to search
the destination.
For detailed information about searching
the destination on the map, see page 33.
If you search the destination by “Enter
Address”
5Touch “Add as Waypoint” .
If you search the destination by “Select
Point on Map” or “Enter Geo-coordi-
nates”
5Touch “Add”.
If you search the destination by the other
methods
5Touch the desired entry.
6Touch “Insert Waypoint” to select the
position of the waypoint.
7The route will be recalculated.
ADDING DESTINATIONS
Destinations can be added and the
route changed accordingly.
INFORMATION
● In addition to the main destination, a
maximum of 4 waypoints can be set.
● The main destination is marked by ,
t
he waypoints are marked by .
Page 52 of 228
52
4. MY DESTINATIONS
1. REGISTERING A ENTRY
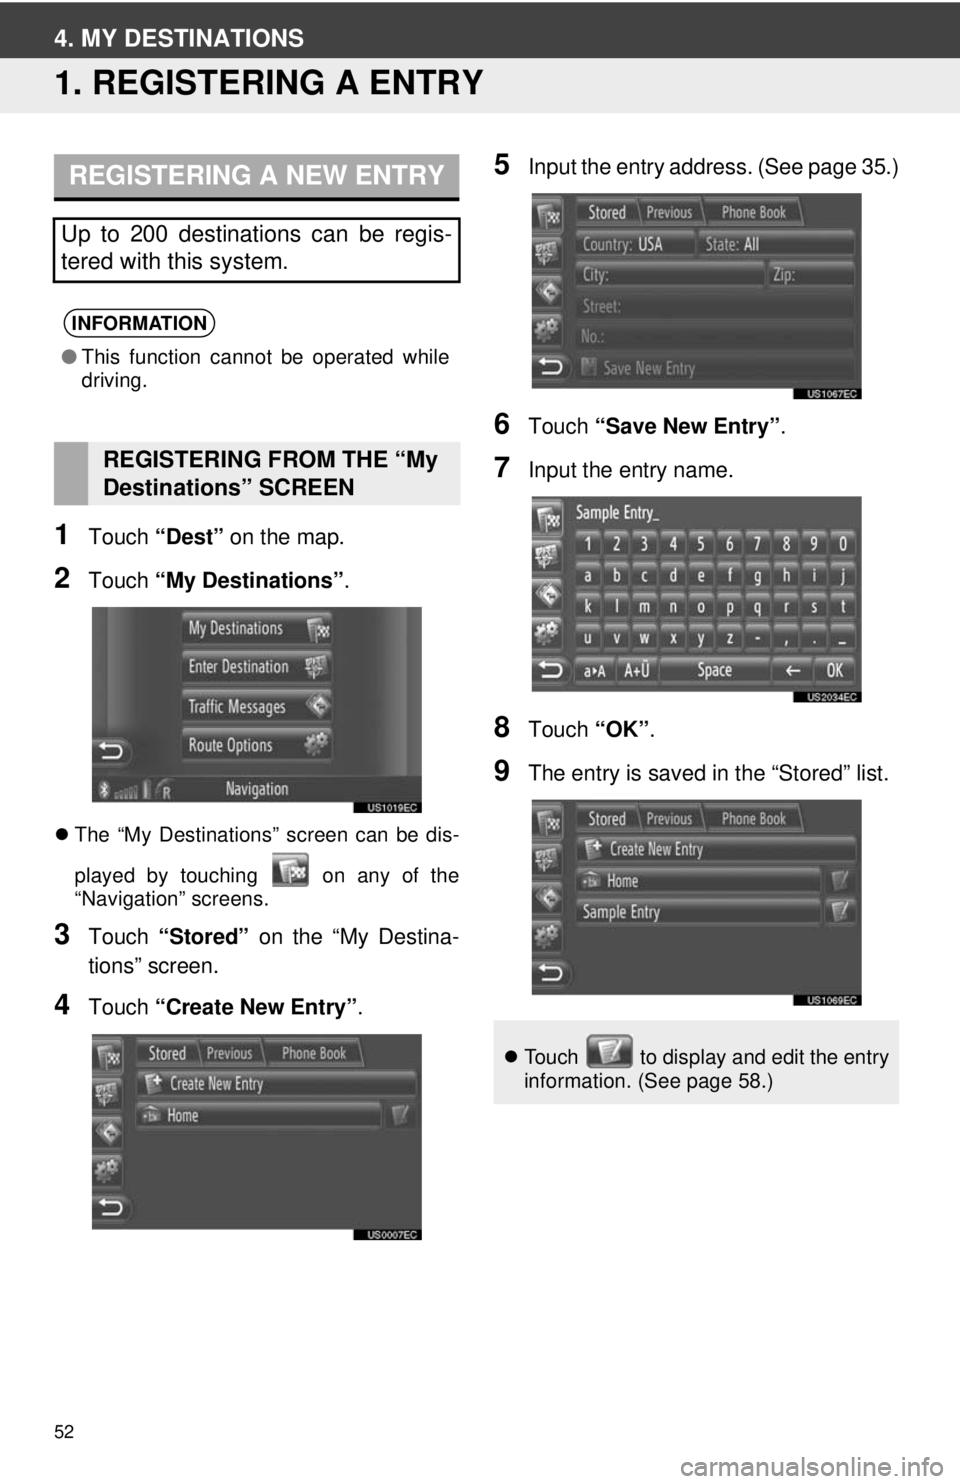
1Touch “Dest” on the map.
2Touch “My Destinations”.
The “My Destinations” screen can be dis-
played by touching on any of the
“Navigation” screens.
3Touch “Stored” on the “My Destina-
tions” screen.
4Touch “Create New Entry” .
5Input the entry address. (See page 35.)
6Touch “Save New Entry” .
7Input the entry name.
8Touch “OK”.
9The entry is saved in the “Stored” list.
REGISTERING A NEW ENTRY
Up to 200 destinations can be regis-
tered with this system.
INFORMATION
●This function cannot be operated while
driving.
REGISTERING FROM THE “My
Destinations” SCREEN
Touch to display and edit the entry
information. (See page 58.)
Page 56 of 228
56
4. MY DESTINATIONS
■LOADING ADDRESSES VIA A USB
MEMORY
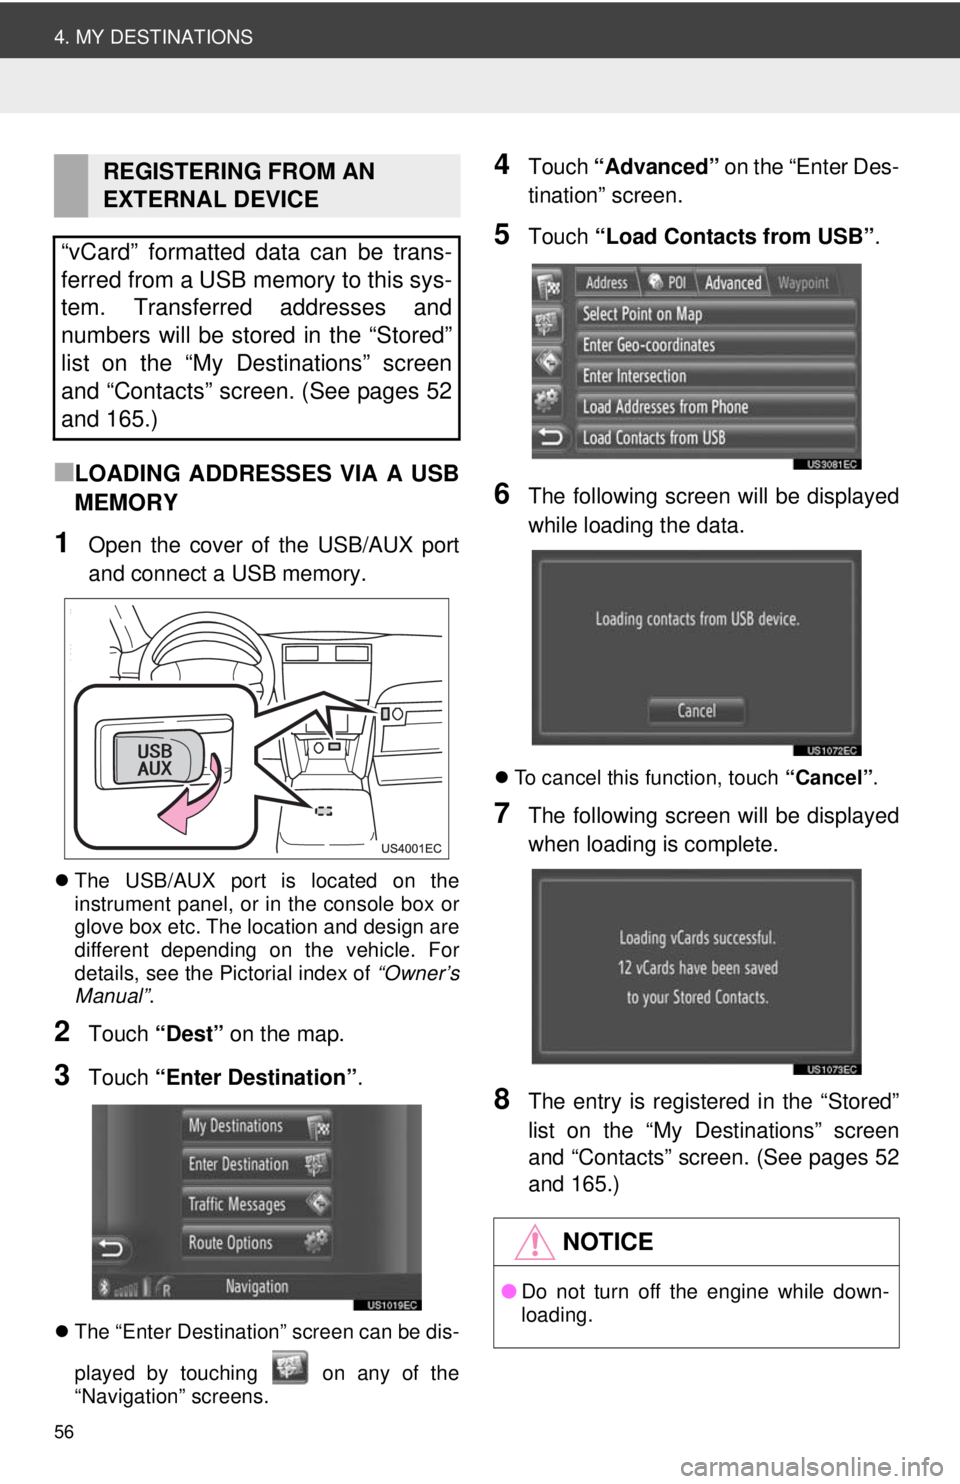
1Open the cover of the USB/AUX port
and connect a USB memory.
The USB/AUX port is located on the
instrument panel, or in the console box or
glove box etc. The location and design are
different depending on the vehicle. For
details, see the Pictorial index of “Owner’s
Manual” .
2Touch “Dest” on the map.
3Touch “Enter Destination” .
The “Enter Destination” screen can be dis-
played by touching on any of the
“Navigation” screens.
4Touch “Advanced” on the “Enter Des-
tination” screen.
5Touch “Load Contacts from USB” .
6The following screen will be displayed
while loading the data.
To cancel this function, touch “Cancel”.
7The following screen will be displayed
when loading is complete.
8The entry is registered in the “Stored”
list on the “My Destinations” screen
and “Contacts” screen. (See pages 52
and 165.)
REGISTERING FROM AN
EXTERNAL DEVICE
“vCard” formatted data can be trans-
ferred from a USB memory to this sys-
tem. Transferred addresses and
numbers will be stored in the “Stored”
list on the “My Destinations” screen
and “Contacts” screen. (See pages 52
and 165.)
NOTICE
● Do not turn off the engine while down-
loading.
Page 61 of 228
61
2
APPLICATION-“Map”
5. NAVIGATION SETTING
1. MAP SETTINGS
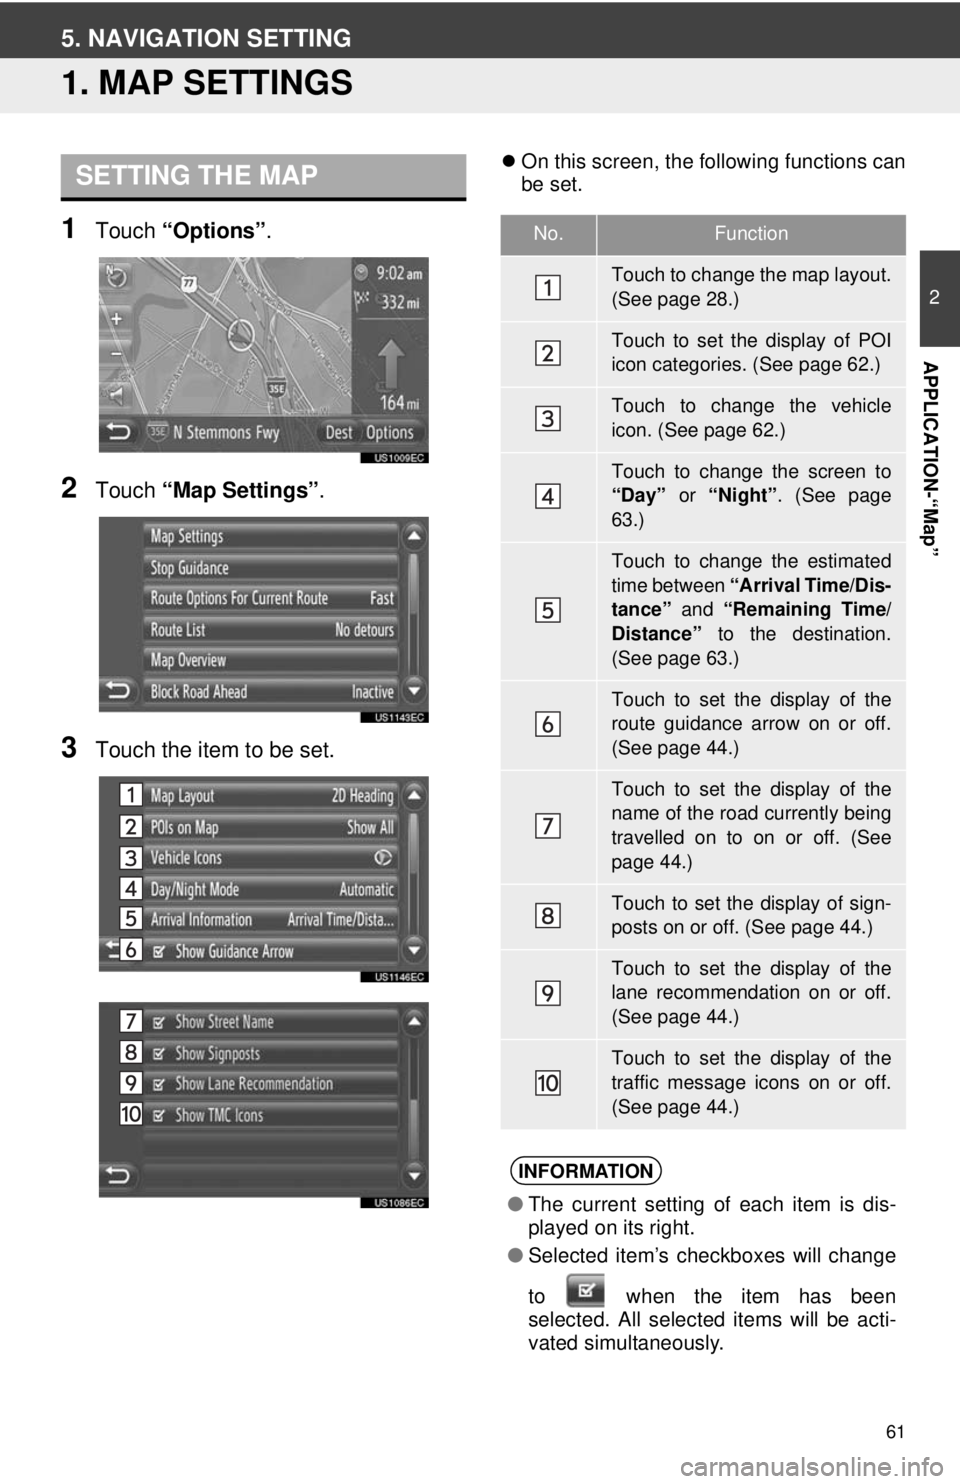
1Touch “Options”.
2Touch “Map Settings” .
3Touch the item to be set.
On this screen, the following functions can
be set.SETTING THE MAP
No.Function
Touch to change the map layout.
(See page 28.)
Touch to set the display of POI
icon categories. (See page 62.)
Touch to change the vehicle
icon. (See page 62.)
Touch to change the screen to
“Day” or “Night”. (See page
63.)
Touch to change the estimated
time between “Arrival Time/Dis-
tance” and “Remaining Time/
Distance” to the destination.
(See page 63.)
Touch to set the display of the
route guidance arrow on or off.
(See page 44.)
Touch to set the display of the
name of the road currently being
travelled on to on or off. (See
page 44.)
Touch to set the display of sign-
posts on or off. (See page 44.)
Touch to set the display of the
lane recommendation on or off.
(See page 44.)
Touch to set the display of the
traffic message icons on or off.
(See page 44.)
INFORMATION
● The current setting of each item is dis-
played on its right.
● Selected item’s checkboxes will change
to when the item has been
se
lected. All selected items will be acti-
vated simultaneously.
Page 62 of 228
62
5. NAVIGATION SETTING
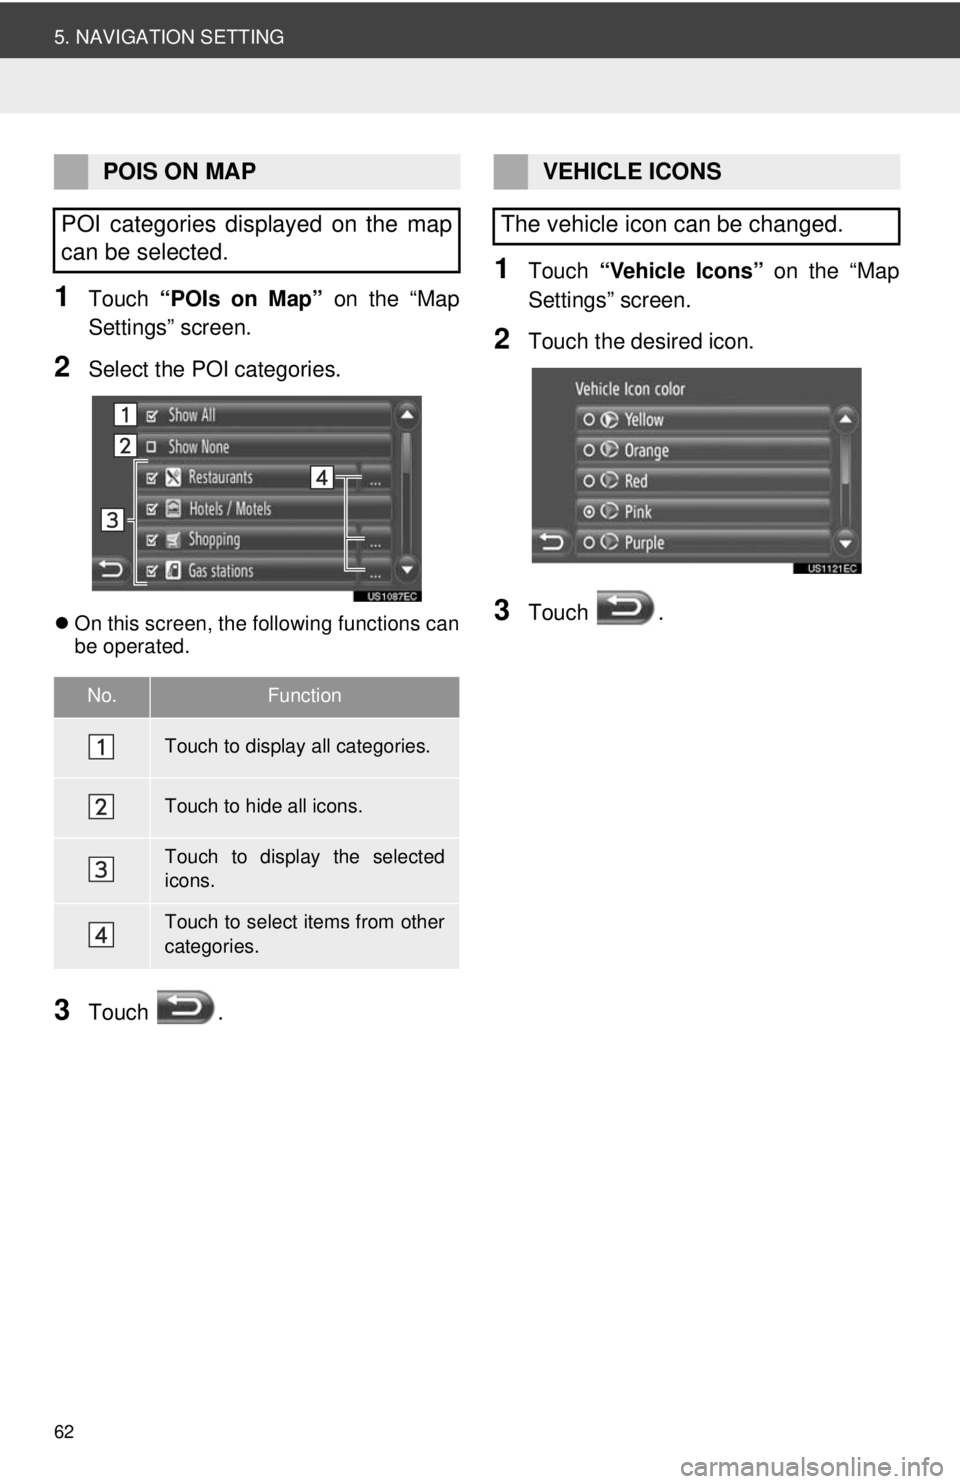
1Touch “POIs on Map” on the “Map
Settings” screen.
2Select the POI categories.
On this screen, the following functions can
be operated.
3Touch .
1Touch “Vehicle Icons” on the “Map
Settings” screen.
2Touch the desired icon.
3Touch .
POIS ON MAP
POI categories displayed on the map
can be selected.
No.Function
Touch to display all categories.
Touch to hide all icons.
Touch to display the selected
icons.
Touch to select items from other
categories.
VEHICLE ICONS
The vehicle icon can be changed.
Page 63 of 228
63
5. NAVIGATION SETTING
2
APPLICATION-“Map”
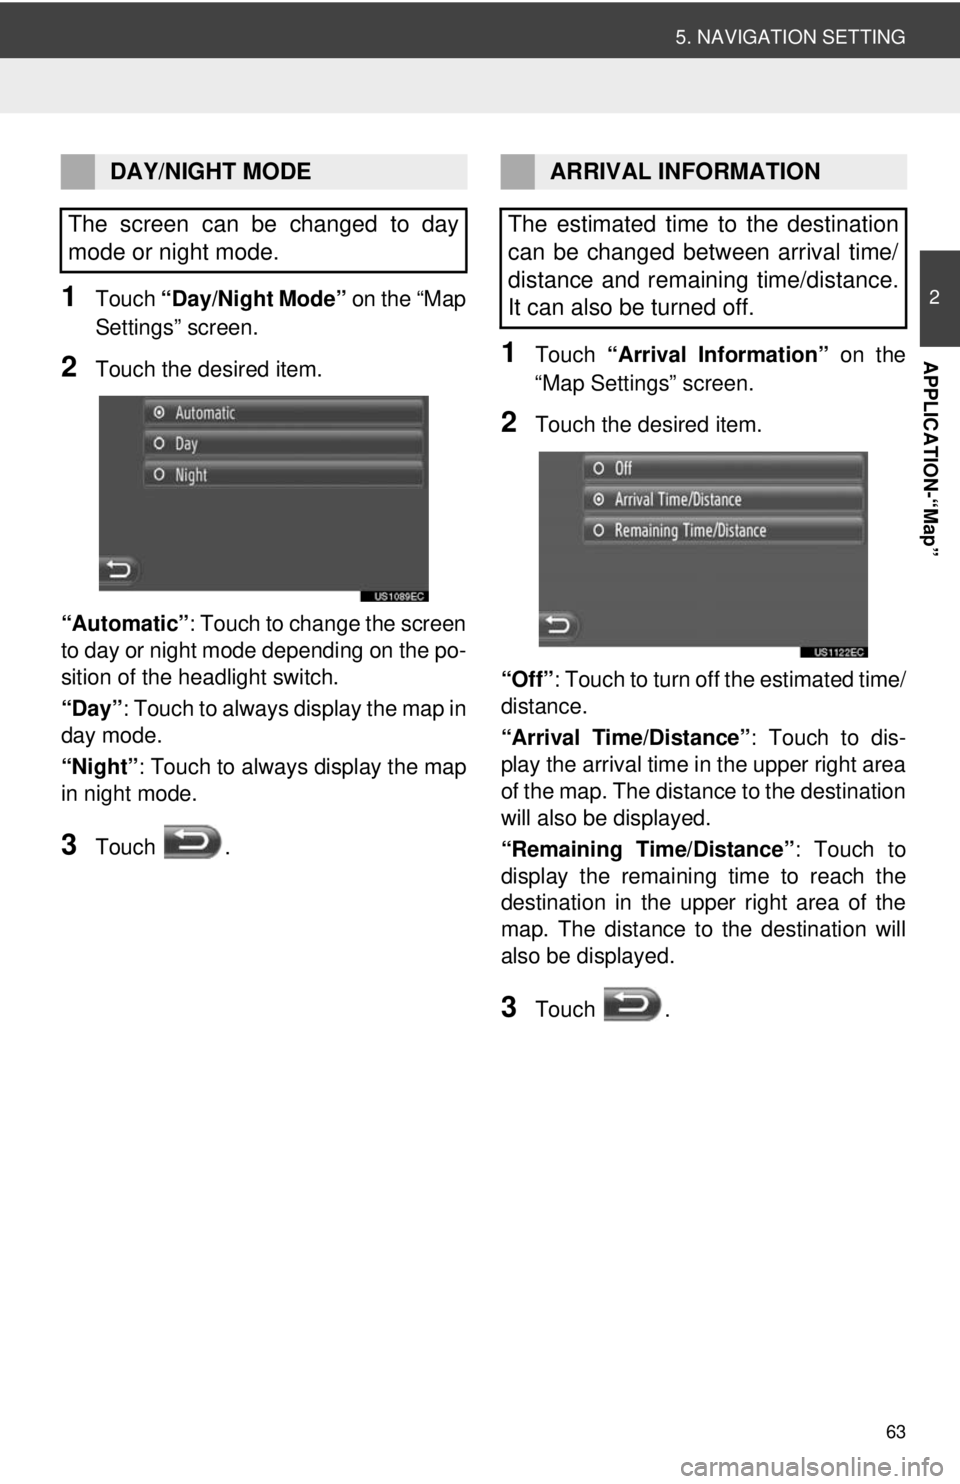
1Touch “Day/Night Mode” on the “Map
Settings” screen.
2Touch the desired item.
“Automatic” : Touch to change the screen
to day or night mode depending on the po-
sition of the headlight switch.
“Day” : Touch to always display the map in
day mode.
“Night”: Touch to always display the map
in night mode.
3Touch .
1Touch “Arrival Information” on the
“Map Settings” screen.
2Touch the desired item.
“Off” : Touch to turn off the estimated time/
distance.
“Arrival Time/Distance” : Touch to dis-
play the arrival time in the upper right area
of the map. The dist ance to the destination
will also be displayed.
“Remaining Time/Distance” : Touch to
display the remaining time to reach the
destination in the upper right area of the
map. The distance to the destination will
also be displayed.
3Touch .
DAY/NIGHT MODE
The screen can be changed to day
mode or night mode.ARRIVAL INFORMATION
The estimated time to the destination
can be changed between arrival time/
distance and remaining time/distance.
It can also be turned off.