navigation TOYOTA PRIUS V 2012 Accessories, Audio & Navigation (in English)
[x] Cancel search | Manufacturer: TOYOTA, Model Year: 2012, Model line: PRIUS V, Model: TOYOTA PRIUS V 2012Pages: 228, PDF Size: 3.73 MB
Page 74 of 228
74
1. APPLICATIONS OPERATION
1. QUICK REFERENCE
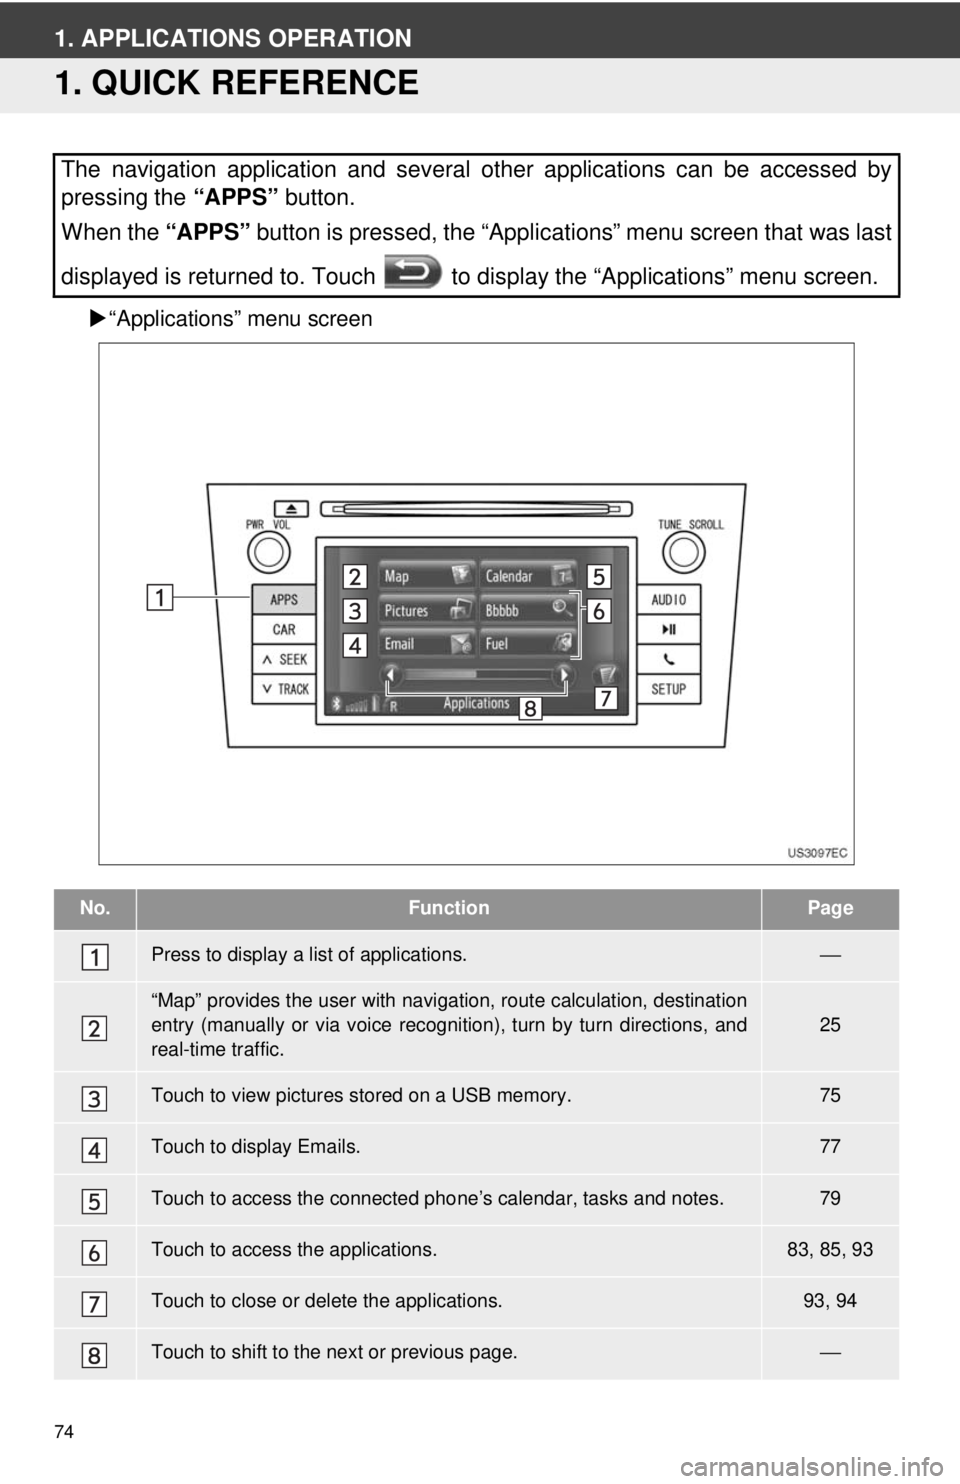
“Applications” menu screen
The navigation application and several other applications can be accessed by
pressing the “APPS” button.
When the “APPS” button is pressed, the “Applications” menu screen that was last
displayed is returned to. Touch to display the “Applications” menu screen.
No.FunctionPage
Press to display a list of applications.⎯
“Map” provides the user with navigat ion, route calculation, destination
entry (manually or via voice recognition), turn by turn directions, and
real-time traffic.25
Touch to view pictures stored on a USB memory.75
Touch to display Emails.77
Touch to access the connected pho ne’s calendar, tasks and notes.79
Touch to access the applications.83, 85, 93
Touch to close or delete the applications.93, 94
Touch to shift to the next or previous page.⎯
Page 82 of 228
82
2. ENTUNE SERVICE
Entune is available in the 48 states,
D.C. and Alaska.
The following personal data can be
deleted and returned to their default set-
tings:
• Downloaded contents
• Radio stations that were listened to
• Input history
AVAILABILITY OF SERVICE
INFORMATION
●When using Entune, depending on the
details of your cellular phone contract,
data usage fees may apply. Confirm
data usage fees before using this ser-
vice.
● In this section, the required operations
to activate application, connect a cellular
phone to the navigation system and reg-
istration steps for Entune are explained.
For details regarding Entune operations
and each of the application, refer to
http://www.toyota.com/entune/
.
INITIALIZING PERSONAL
DATA
The personal data used in application
can be reset. (See “DELETE PER-
SONAL DATA” on page 199.)
INFORMATION
●Once initialized, data will be erased. Pay
close attention when initializing the data.
Page 83 of 228
83
3
APPLICATION-THE OTHERS
2. ENTUNE SERVICE
2. OPERATING NAVIGATION FUNCTION USING ENTUNE SERVICE
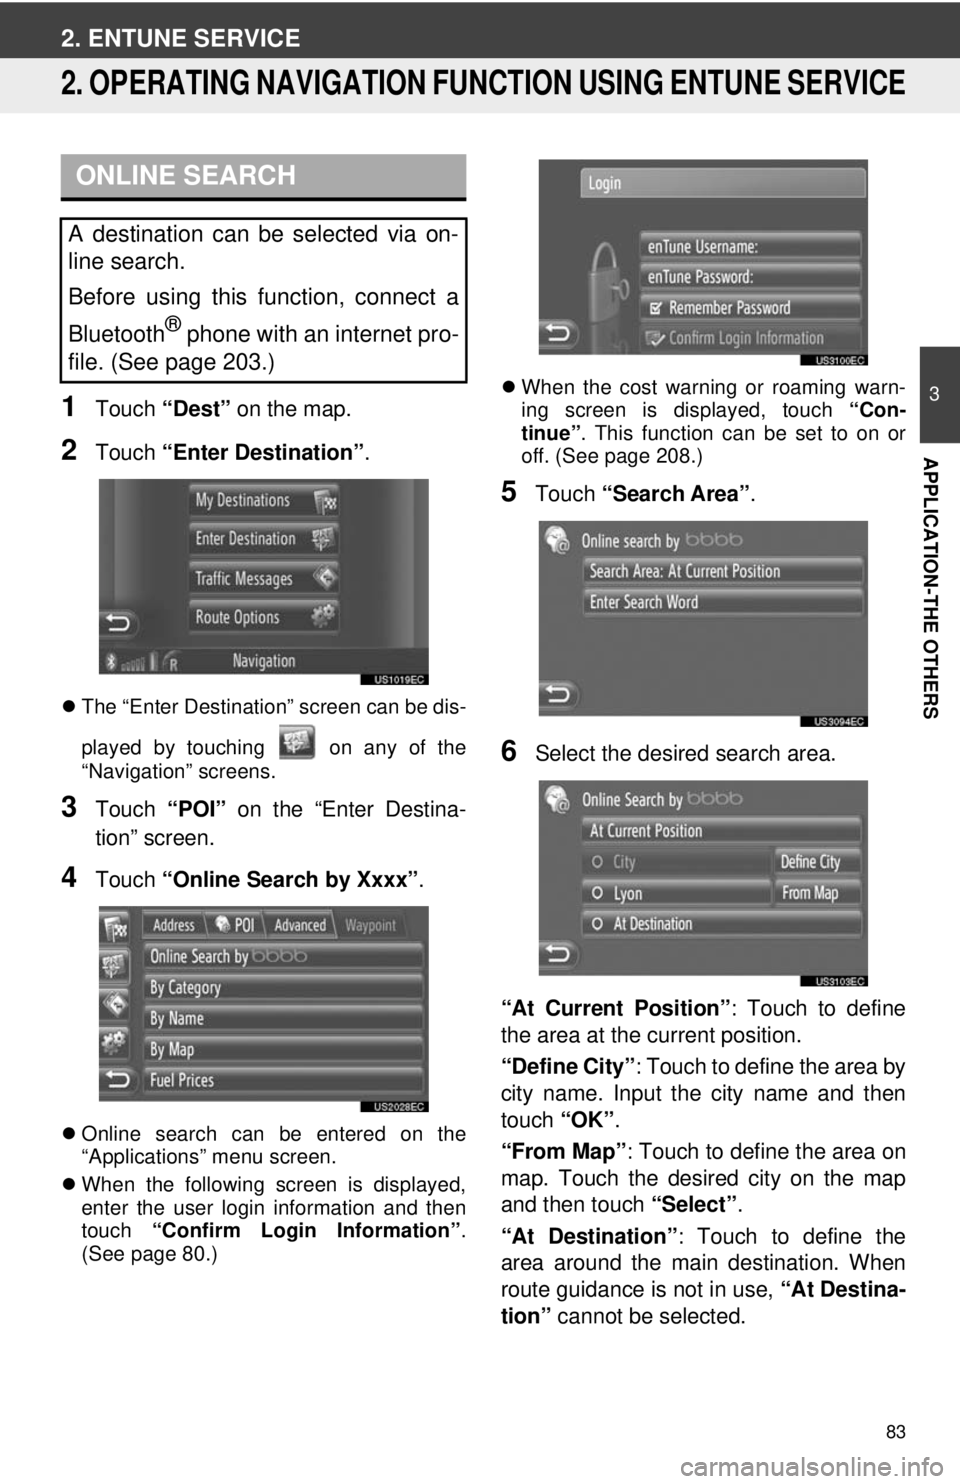
1Touch “Dest” on the map.
2Touch “Enter Destination” .
The “Enter Destination” screen can be dis-
played by touching on any of the
“Navigation” screens.
3Touch “POI” on the “Enter Destina-
tion” screen.
4Touch “Online Search by Xxxx” .
Online search can be entered on the
“Applications” menu screen.
When the following screen is displayed,
enter the user login information and then
touch “Confirm Login Information” .
(See page 80.)
When the cost warning or roaming warn-
ing screen is displayed, touch “Con-
tinue” . This function can be set to on or
off. (See page 208.)
5Touch “Search Area” .
6Select the desired search area.
“At Current Position”: Touch to define
the area at the current position.
“Define City” : Touch to define the area by
city name. Input the city name and then
touch “OK”.
“From Map” : Touch to define the area on
map. Touch the desired city on the map
and then touch “Select”.
“At Destination” : Touch to define the
area around the main destination. When
route guidance is not in use, “At Destina-
tion” cannot be selected.
ONLINE SEARCH
A destination can be selected via on-
line search.
Before using this function, connect a
Bluetooth
® phone with an internet pro-
file. (See page 203.)
Page 85 of 228
85
2. ENTUNE SERVICE
3
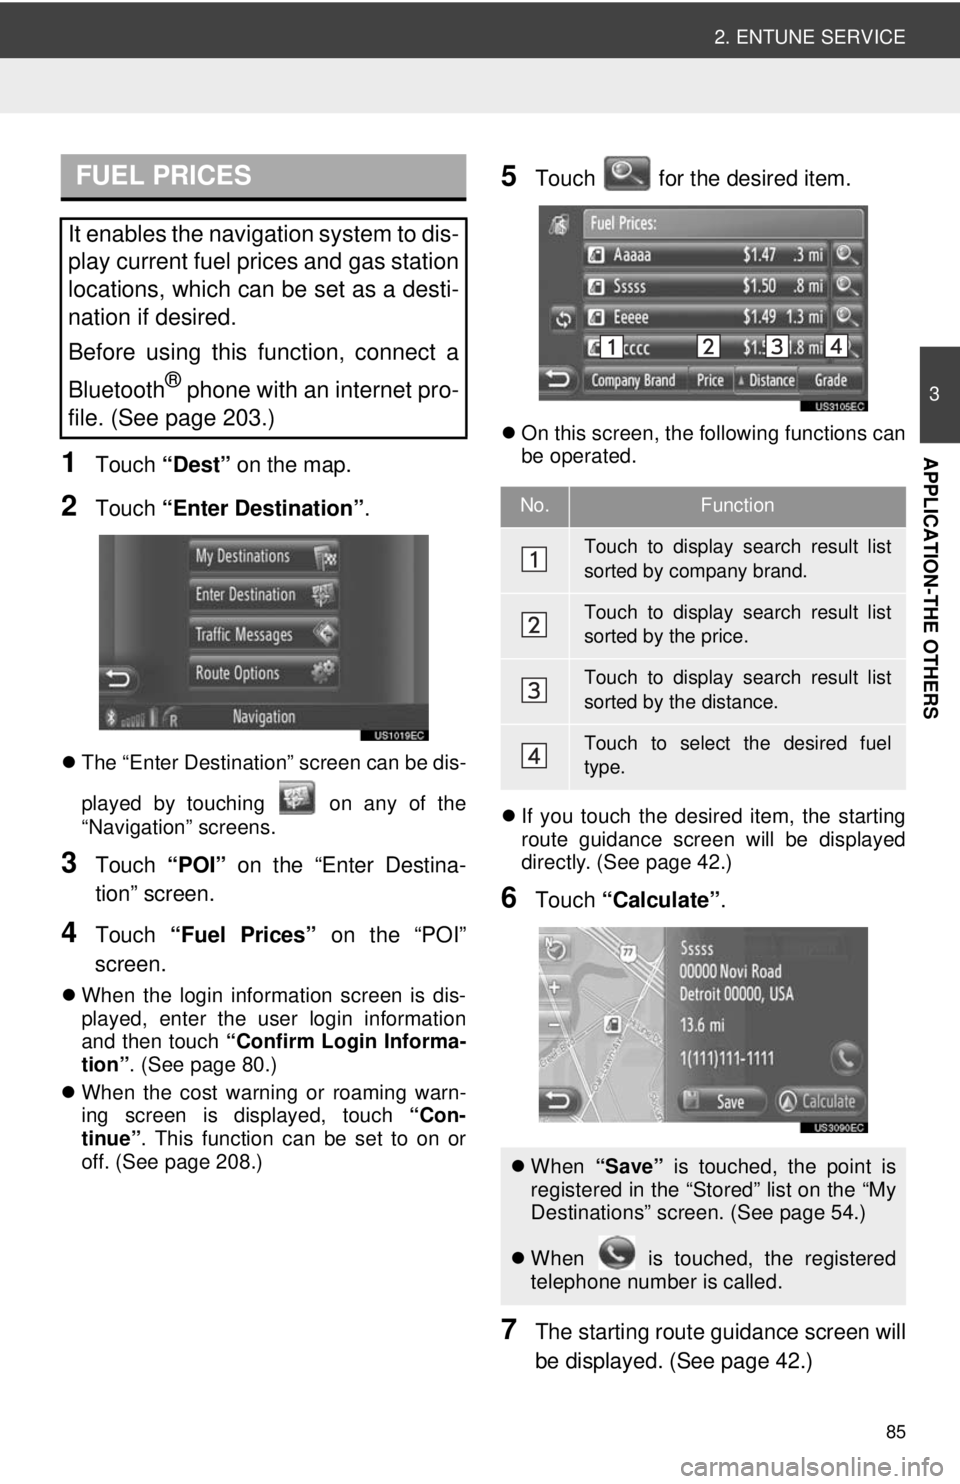
APPLICATION-THE OTHERS1Touch “Dest” on the map.
2Touch “Enter Destination” .
The “Enter Destination” screen can be dis-
played by touching on any of the
“Navigation” screens.
3Touch “POI” on the “Enter Destina-
tion” screen.
4Touch “Fuel Prices” on the “POI”
screen.
When the login information screen is dis-
played, enter the user login information
and then touch “Confirm Login Informa-
tion” . (See page 80.)
When the cost warning or roaming warn-
ing screen is displayed, touch “Con-
tinue” . This function can be set to on or
off. (See page 208.)
5Touch for the desired item.
On this screen, the following functions can
be operated.
If you touch the desired item, the starting
route guidance screen will be displayed
directly. (See page 42.)
6Touch “Calculate” .
7The starting route guidance screen will
be displayed. (See page 42.)
FUEL PRICES
It enables the navigation system to dis-
play current fuel prices and gas station
locations, which can be set as a desti-
nation if desired.
Before using this function, connect a
Bluetooth
® phone with an internet pro-
file. (See page 203.)
No.Function
Touch to display search result list
sorted by company brand.
Touch to display search result list
sorted by the price.
Touch to display search result list
sorted by the distance.
Touch to select the desired fuel
type.
When “Save” is touched, the point is
registered in the “Stored” list on the “My
Destinations” screen. (See page 54.)
When is touched, the registered
telephone number is called.
Page 86 of 228
86
2. ENTUNE SERVICE
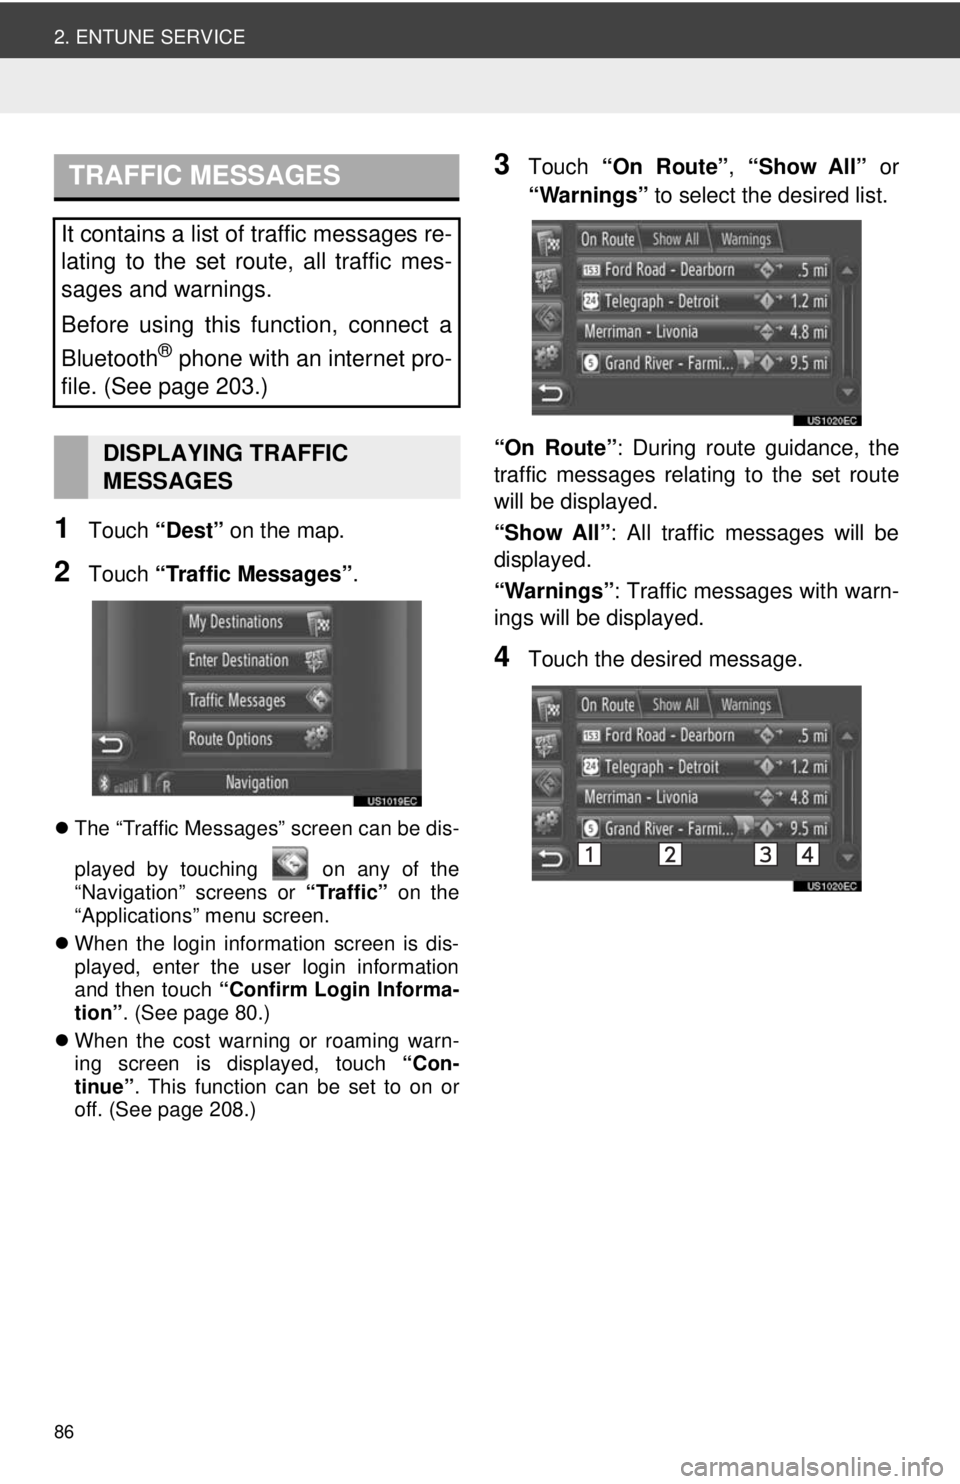
1Touch “Dest” on the map.
2Touch “Traffic Messages” .
The “Traffic Messages” screen can be dis-
played by touching on any of the
“Navigation” screens or “Traffic” on the
“Applications” menu screen.
When the login information screen is dis-
played, enter the user login information
and then touch “Confirm Login Informa-
tion” . (See page 80.)
When the cost warning or roaming warn-
ing screen is displayed, touch “Con-
tinue” . This function can be set to on or
off. (See page 208.)
3Touch “On Route”, “Show All” or
“Warnings” to select the desired list.
“On Route” : During route guidance, the
traffic messages relating to the set route
will be displayed.
“Show All” : All traffic messages will be
displayed.
“Warnings” : Traffic messages with warn-
ings will be displayed.
4Touch the desired message.
TRAFFIC MESSAGES
It contains a list of traffic messages re-
lating to the set route, all traffic mes-
sages and warnings.
Before using this function, connect a
Bluetooth
® phone with an internet pro-
file. (See page 203.)
DISPLAYING TRAFFIC
MESSAGES
Page 90 of 228
90
2. ENTUNE SERVICE
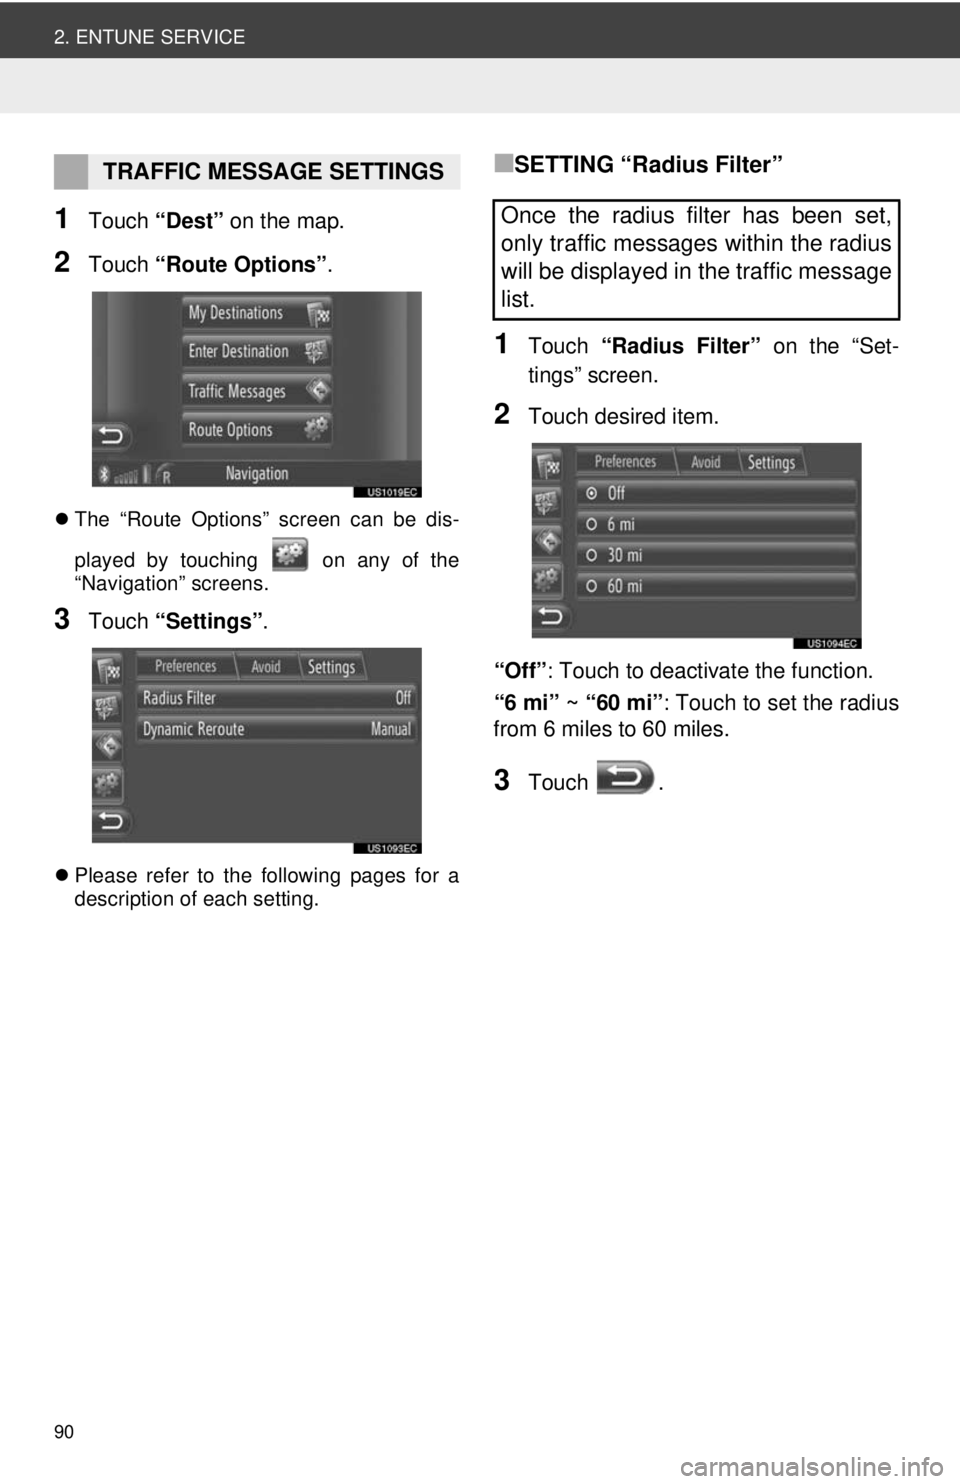
1Touch “Dest” on the map.
2Touch “Route Options” .
The “Route Options” screen can be dis-
played by touching on any of the
“Navigation” screens.
3Touch “Settings” .
Please refer to the following pages for a
description of each setting.
■SETTING “Radius Filter”
1Touch “Radius Filter” on the “Set-
tings” screen.
2Touch desired item.
“Off”: Touch to deactivate the function.
“6 mi” ~ “60 mi” : Touch to set the radius
from 6 miles to 60 miles.
3Touch .
TRAFFIC MESSAGE SETTINGS
Once the radius filter has been set,
only traffic messages within the radius
will be displayed in the traffic message
list.
Page 91 of 228
91
2. ENTUNE SERVICE
3
APPLICATION-THE OTHERS
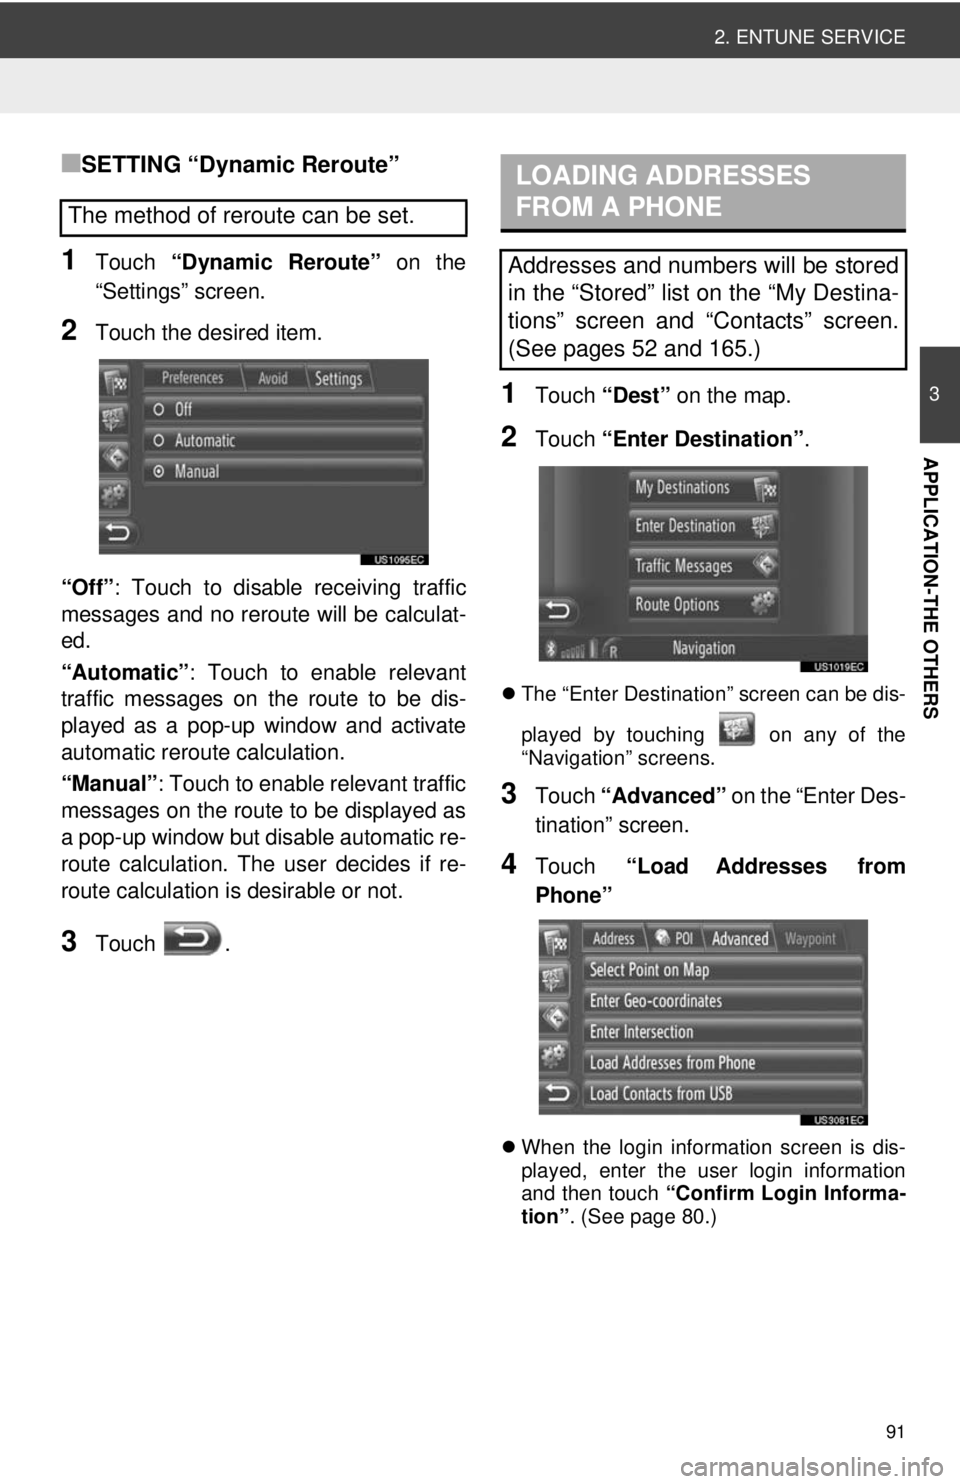
■SETTING “Dynamic Reroute”
1Touch “Dynamic Reroute” on the
“Settings” screen.
2Touch the desired item.
“Off” : Touch to disable receiving traffic
messages and no reroute will be calculat-
ed.
“Automatic” : Touch to enable relevant
traffic messages on the route to be dis-
played as a pop-up window and activate
automatic reroute calculation.
“Manual” : Touch to enable relevant traffic
messages on the route to be displayed as
a pop-up window but disable automatic re-
route calculation. The user decides if re-
route calculation is desirable or not.
3Touch .
1Touch “Dest” on the map.
2Touch “Enter Destination” .
The “Enter Destination” screen can be dis-
played by touching on any of the
“Navigation” screens.
3Touch “Advanced” on the “Enter Des-
tination” screen.
4Touch “Load Addresses from
Phone”
When the login information screen is dis-
played, enter the user login information
and then touch “Confirm Login Informa-
tion” . (See page 80.)
The method of reroute can be set.
LOADING ADDRESSES
FROM A PHONE
Addresses and numbers will be stored
in the “Stored” list on the “My Destina-
tions” screen and “Contacts” screen.
(See pages 52 and 165.)
Page 186 of 228
186
1. VOICE COMMAND SYSTEM OPERATION
1. VOICE COMMAND SYSTEM
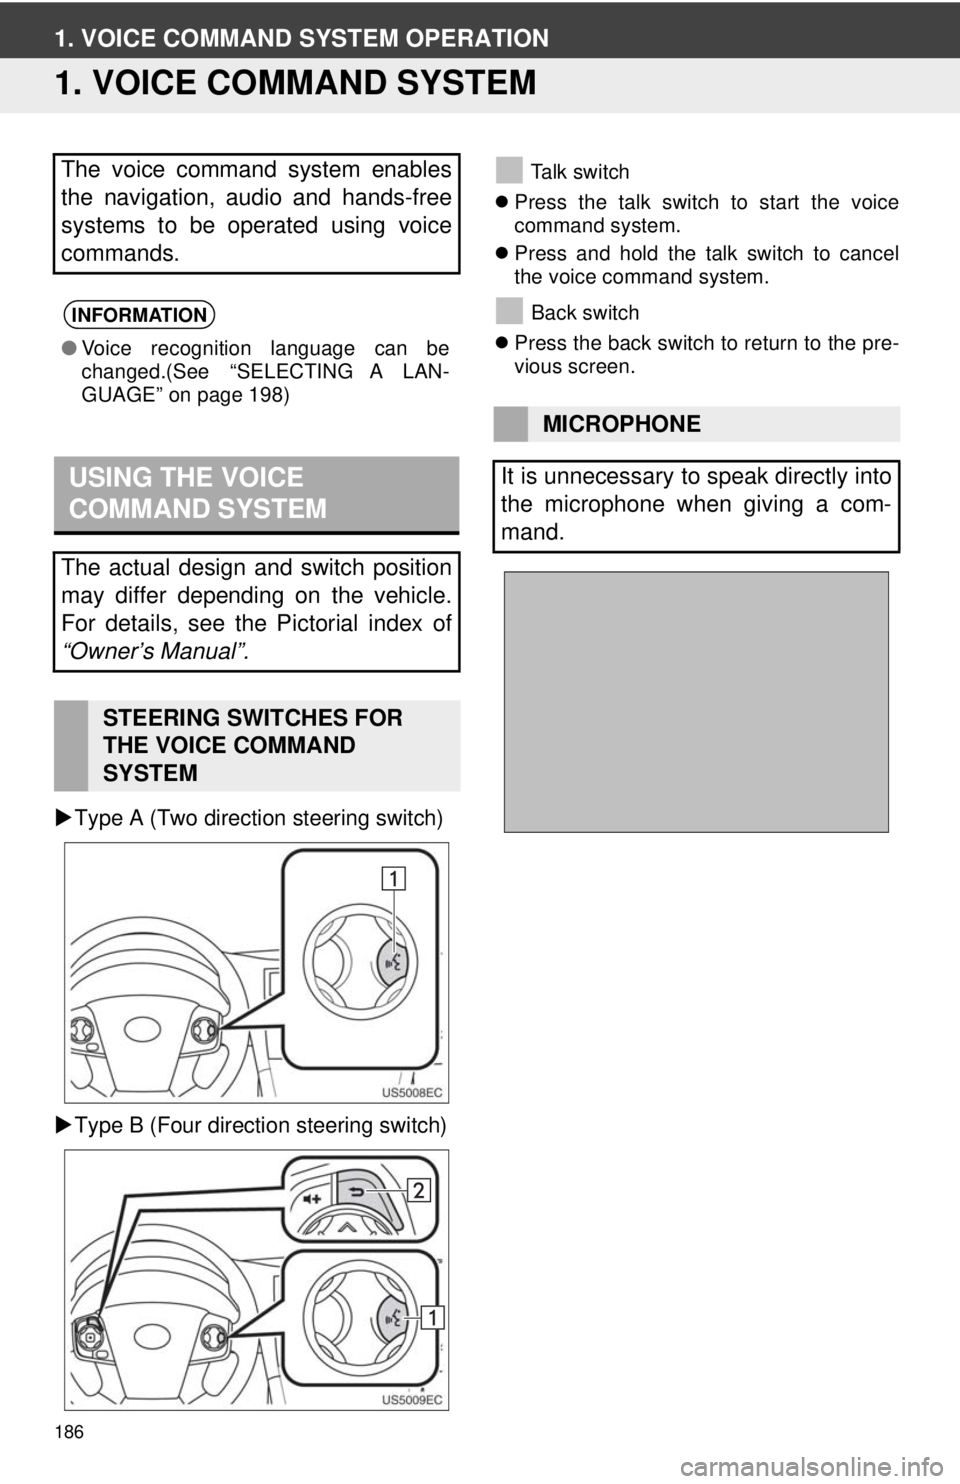
Type A (Two direction steering switch)
Type B (Four direction steering switch)
Talk switch
Press the talk switch to start the voice
command system.
Press and hold the talk switch to cancel
the voice command system.
Back switch
Press the back switch to return to the pre-
vious screen.The voice command system enables
the navigation, audio and hands-free
systems to be operated using voice
commands.
INFORMATION
●Voice recognition language can be
changed.(See “SELECTING A LAN-
GUAGE” on page 198)
USING THE VOICE
COMMAND SYSTEM
The actual design and switch position
may differ depending on the vehicle.
For details, see the Pictorial index of
“Owner’s Manual”.
STEERING SWITCHES FOR
THE VOICE COMMAND
SYSTEM
MICROPHONE
It is unnecessary to speak directly into
the microphone when giving a com-
mand.
Page 198 of 228
198
1. SETUP OPERATION
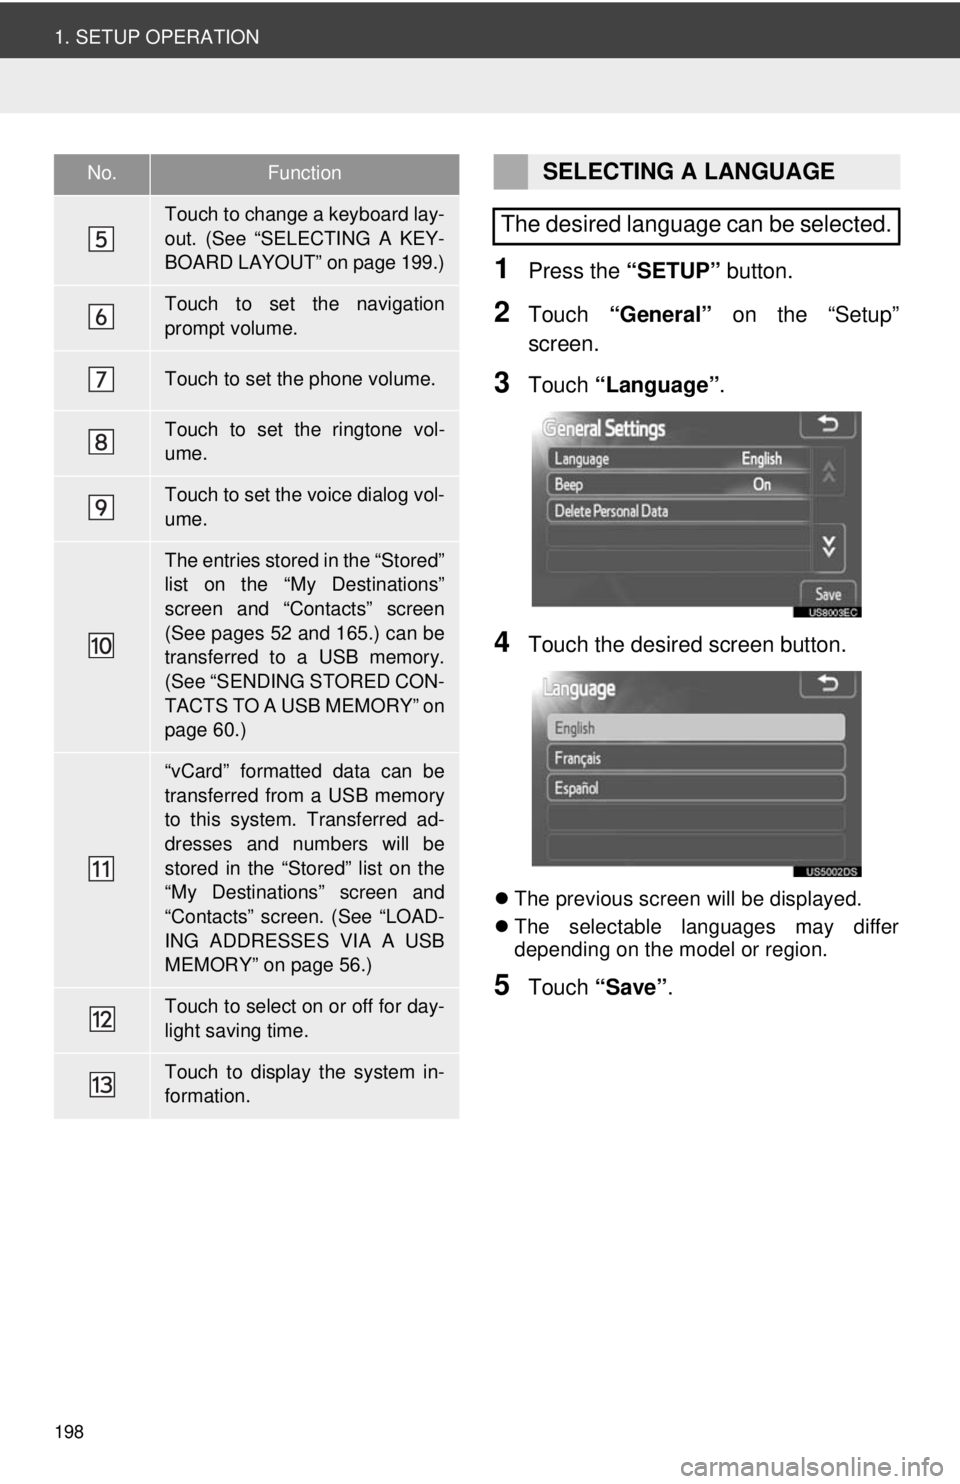
1Press the “SETUP” button.
2Touch “General” on the “Setup”
screen.
3Touch “Language” .
4Touch the desired screen button.
The previous screen will be displayed.
The selectable languages may differ
depending on the model or region.
5Touch “Save” .
Touch to change a keyboard lay-
out. (See “SELECTING A KEY-
BOARD LAYOUT” on page 199.)
Touch to set the navigation
prompt volume.
Touch to set the phone volume.
Touch to set the ringtone vol-
ume.
Touch to set the voice dialog vol-
ume.
The entries stored in the “Stored”
list on the “My Destinations”
screen and “Contacts” screen
(See pages 52 and 165.) can be
transferred to a USB memory.
(See “SENDING STORED CON-
TACTS TO A USB MEMORY” on
page 60.)
“vCard” formatted data can be
transferred from a USB memory
to this system. Transferred ad-
dresses and numbers will be
stored in the “Stored” list on the
“My Destinations” screen and
“Contacts” screen. (See “LOAD-
ING ADDRESSES VIA A USB
MEMORY” on page 56.)
Touch to select on or off for day-
light saving time.
Touch to display the system in-
formation.
No.FunctionSELECTING A LANGUAGE
The desired language can be selected.
Page 224 of 228

224
ALPHABETICAL INDEX
G
“General” ................................................. 197
General settings ..................................... 197
H
HD Radio™ ............................................. 106
HD Radio™ broadcasting ....................... 106
Home ........................................................ 52
How to subscribe to an XM
®
Satellite Radio ..................................... 112
How to subscribe ................................. 112
Satellite tuner technology notice ......... 112
I
If the satellite radio tuner malfunctions ... 115
“Information” screen ............................... 190
Input screen ............................................. 14
Inserting or ejecting a disc ...................... 117
Ejecting a disc ..................................... 117
Inserting a disc .................................... 117
iPod ........................................................ 123 About iPod .......................................... 145
Compatible models.............................. 145
iPod cover art .......................................... 127
L
“Language” ..............................................197
Limitations of the navigation system ........ 66
List screen ................................................ 16
M
“Map” .........................................................19
Map icons ................................................. 29 POI icons .............................................. 29
Traffic messages .................................. 86
Map information ....................................... 68
Map layout.................................................28
Map screen .............................................. 25
Map settings ............................................. 61
MP3 .........................................................117
MP3/WMA files........................................117 Playable bit rates .................................148
Sampling frequency .............................148
Multicasting (only when listening to an HD Radio™ channel)..................109
“My Destinations” ................................33, 52