headlight bulb TOYOTA PRIUS V 2013 Owners Manual (in English)
[x] Cancel search | Manufacturer: TOYOTA, Model Year: 2013, Model line: PRIUS V, Model: TOYOTA PRIUS V 2013Pages: 568, PDF Size: 10.58 MB
Page 422 of 568
422
4-3. Do-it-yourself maintenance
PRIUS v_OM_OM47820U_(U)
Light bulbs
You may replace the following bulbs by yourself. The difficulty level
of replacement varies depending on the bulb. As there is a danger
that components may be damaged, we recommend that replacement
is carried out by your Toyota dealer.
■Preparing for light bulb replacement
Check the wattage of the light bulb to be replaced. ( P. 508)
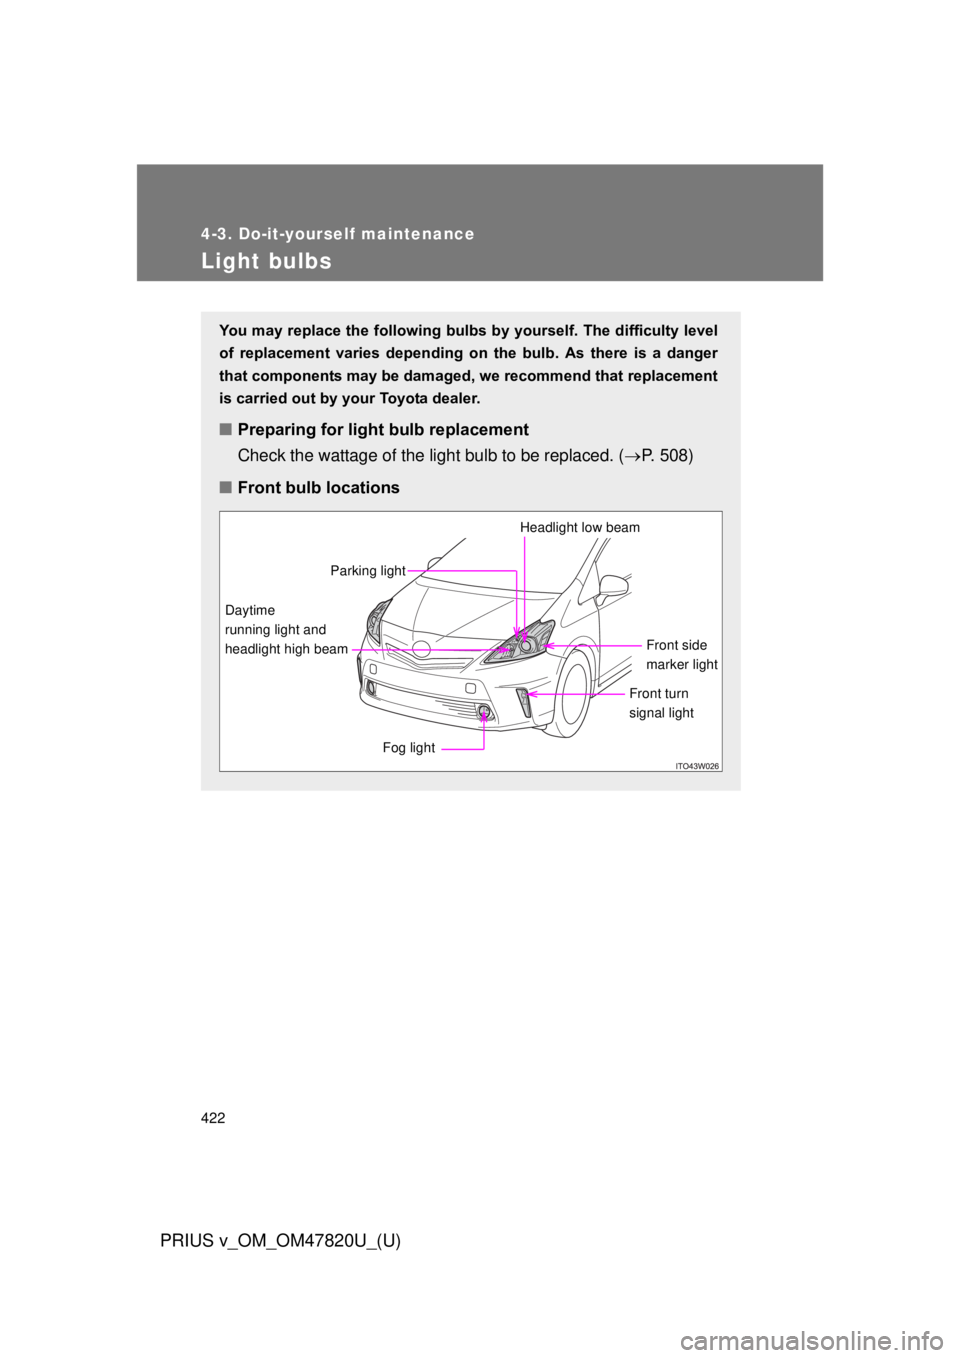
■ Front bulb locations
Front side
marker light
Headlight low beam
Daytime
running light and
headlight high beam
Fog light
Front turn
signal light
Parking light
Page 424 of 568
424 4-3. Do-it-yourself maintenance
PRIUS v_OM_OM47820U_(U)
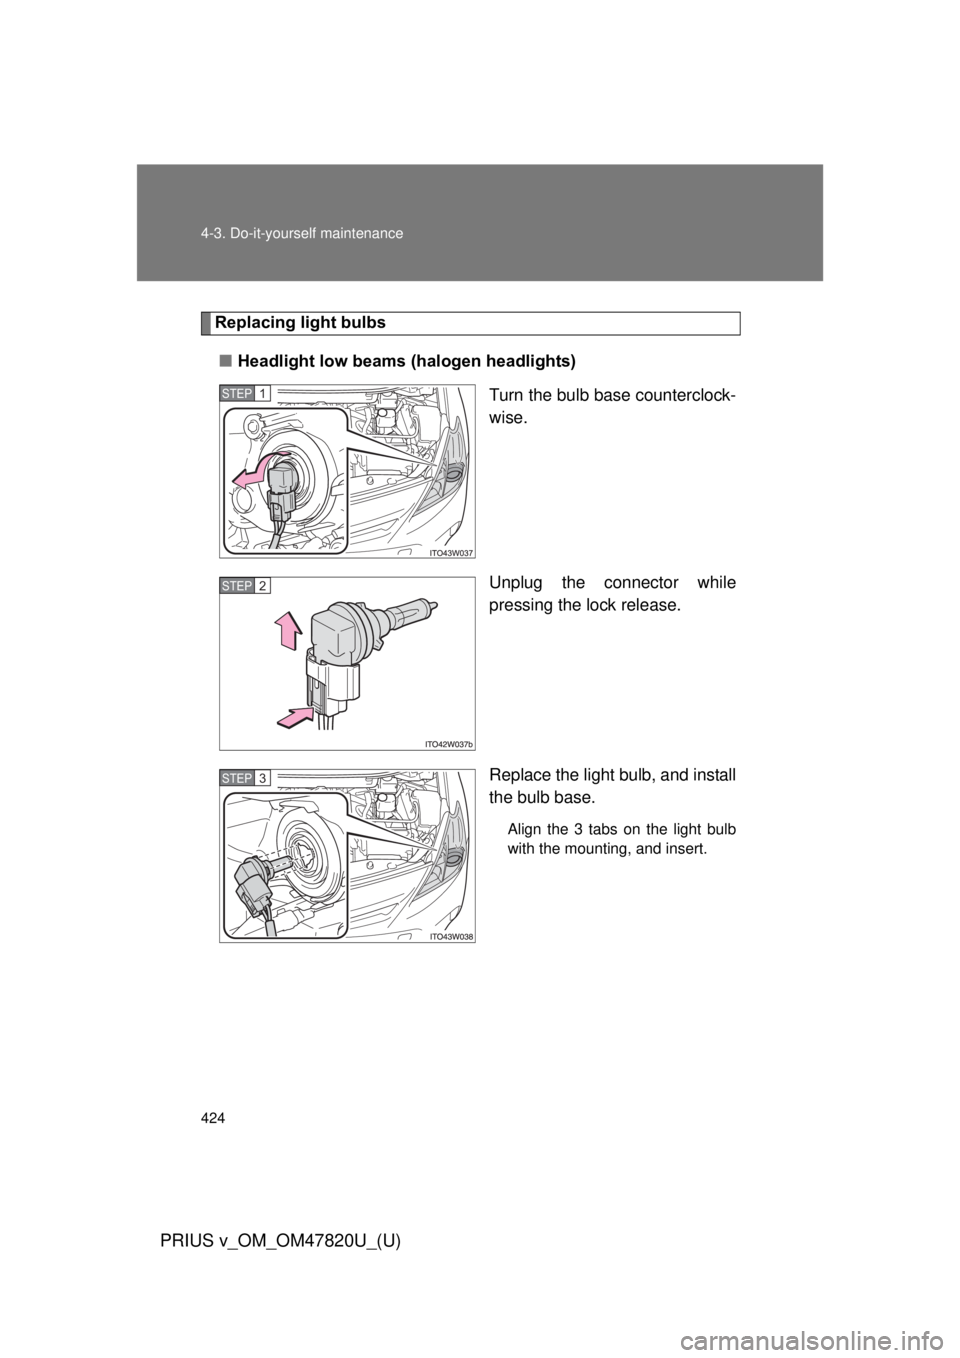
Replacing light bulbs■ Headlight low beams (halogen headlights)
Turn the bulb base counterclock-
wise.
Unplug the connector while
pressing the lock release.
Replace the light bulb, and install
the bulb base.
Align the 3 tabs on the light bulb
with the mounting, and insert.
STEP 1
STEP 2
STEP 3
Page 425 of 568
425
4-3. Do-it-yourself maintenance
PRIUS v_OM_OM47820U_(U)
4
Maintenance and care
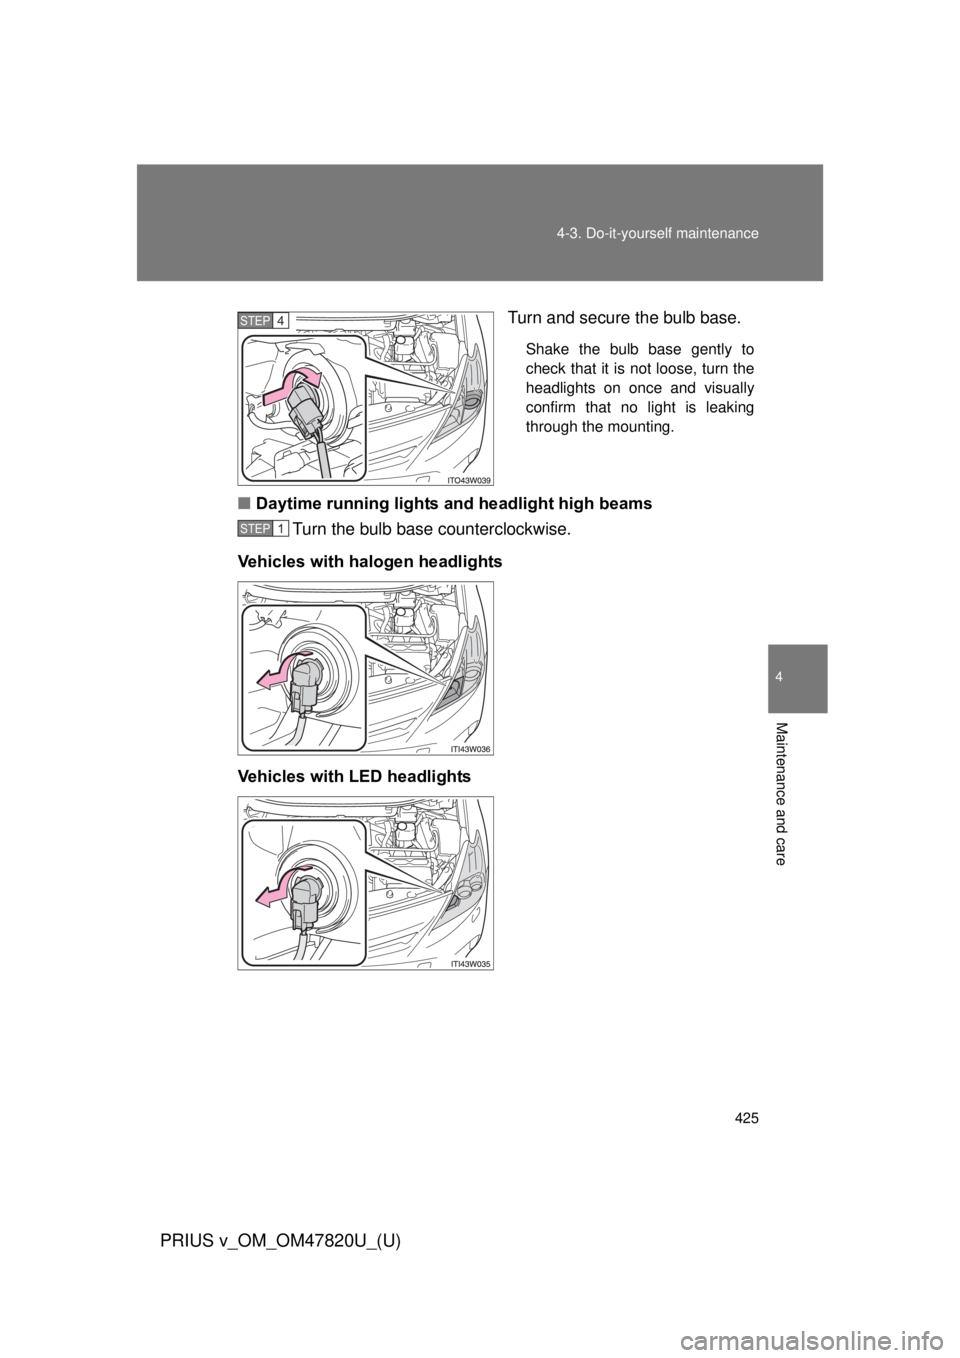
Turn and secure the bulb base.
Shake the bulb base gently to
check that it is not loose, turn the
headlights on once and visually
confirm that no light is leaking
through the mounting.
■
Daytime running lights and headlight high beams
Turn the bulb base counterclockwise.
Vehicles with halogen headlights
Vehicles with LED headlights
STEP 4
STEP 1
Page 426 of 568
426 4-3. Do-it-yourself maintenance
PRIUS v_OM_OM47820U_(U)
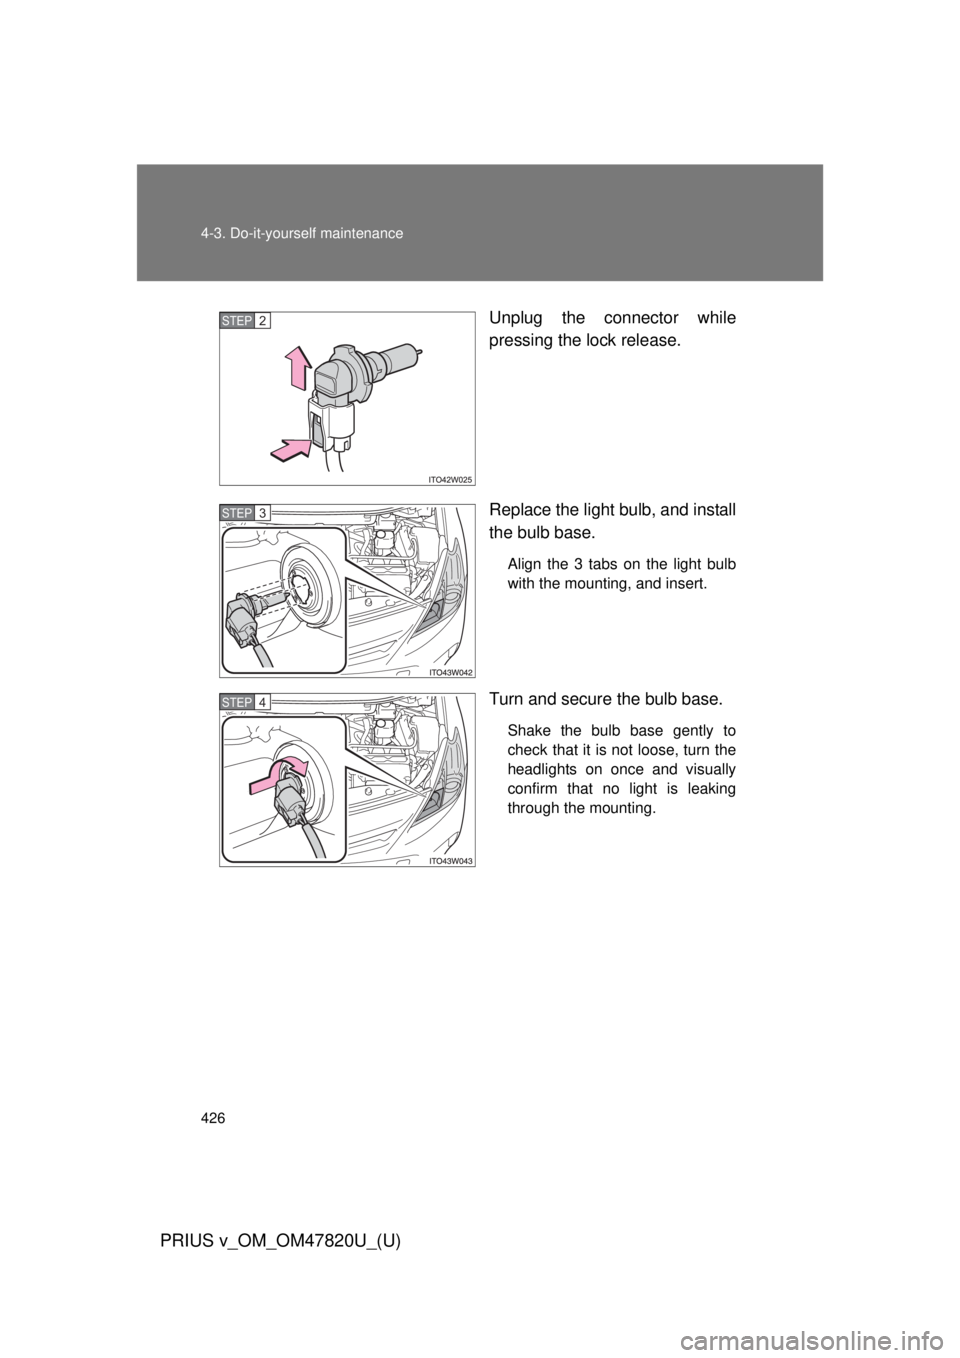
Unplug the connector while
pressing the lock release.
Replace the light bulb, and install
the bulb base.
Align the 3 tabs on the light bulb
with the mounting, and insert.
Turn and secure the bulb base.
Shake the bulb base gently to
check that it is not loose, turn the
headlights on once and visually
confirm that no light is leaking
through the mounting.
STEP 2
STEP 3
STEP 4
Page 427 of 568

427
4-3. Do-it-yourself maintenance
PRIUS v_OM_OM47820U_(U)
4
Maintenance and care
■
Parking lights
Turn the bulb base counterclockwise.
Vehicles with halogen headlights
Vehicles with LED headlights
Remove the light bulb.
When installing, reverse the steps listed.
STEP 1
STEP 2
STEP 3
Page 428 of 568
428 4-3. Do-it-yourself maintenance
PRIUS v_OM_OM47820U_(U)
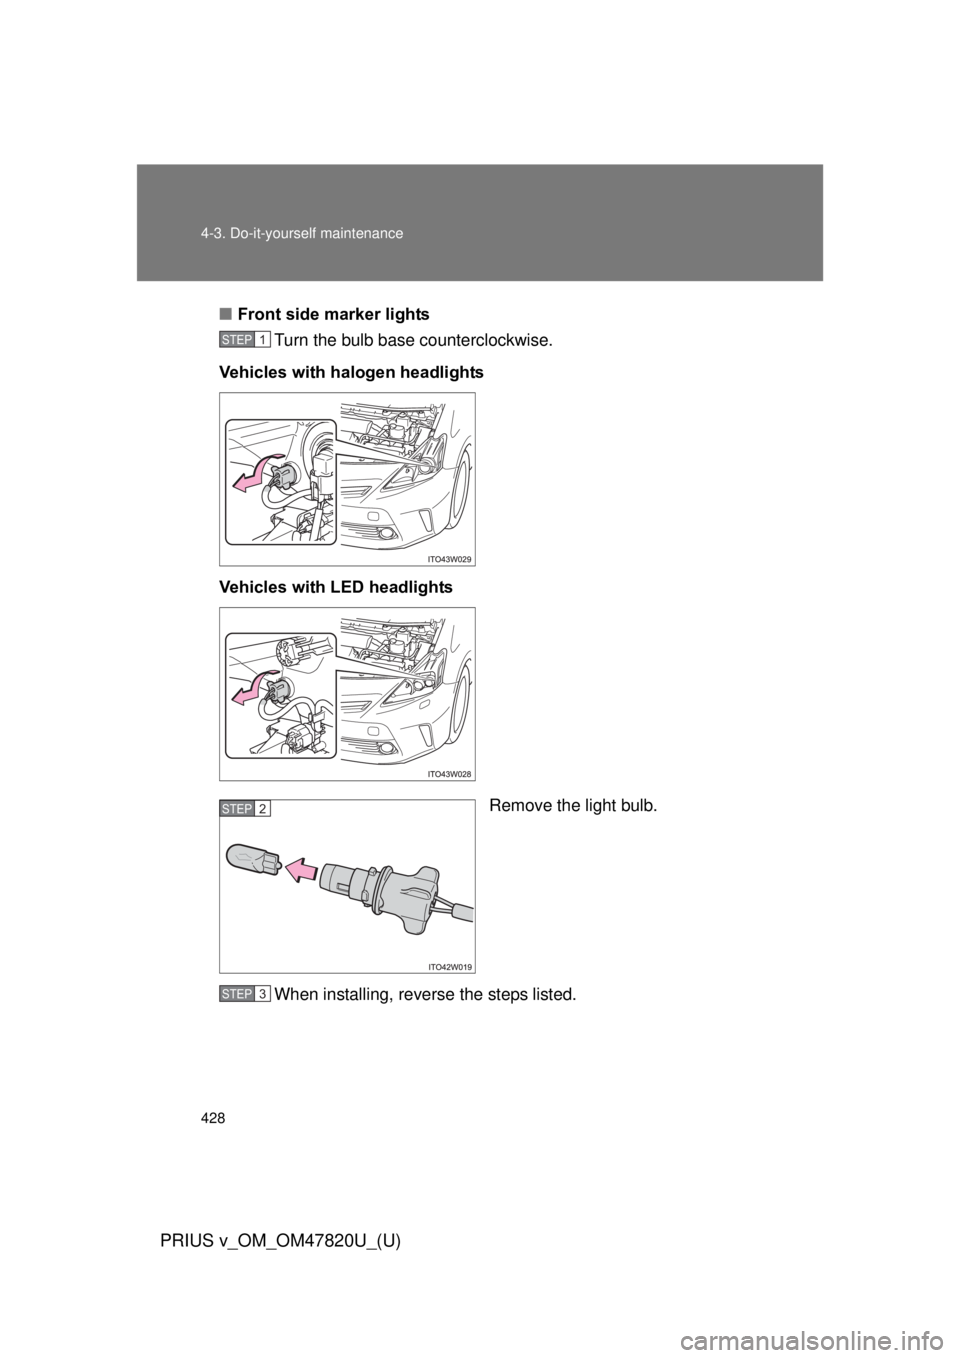
■Front side marker lights
Turn the bulb base counterclockwise.
Vehicles with halogen headlights
Vehicles with LED headlights
Remove the light bulb.
When installing, reverse the steps listed.
STEP 1
STEP 2
STEP 3
Page 434 of 568
434 4-3. Do-it-yourself maintenance
PRIUS v_OM_OM47820U_(U)
■Replacing the following bulbs
If any of the lights listed below has burnt out, have it replaced by
your Toyota dealer.
● Headlight low beams (LED type)
● Stop lights
● Tail lights
● Rear side marker lights
● High mounted stoplight
■LED lights
The headlight low beams (LED type), stop lights, tail lights, rear side marker
lights and high mounted stoplight consist of a number of LEDs. If any of the
LEDs burn out, take your vehicle to your Toyota dealer to have the light
replaced.
■ Condensation build-up on the inside of the lens
Contact your Toyota dealer for more information in the following situations.
Temporary condensation build-up on the inside of the headlight lens does
not indicate a malfunction.
● Large drops of water have built up on the inside of the lens.
● Water has built up inside the headlight.
■ When replacing light bulbs
P. 420
Page 435 of 568
435
4-3. Do-it-yourself maintenance
PRIUS v_OM_OM47820U_(U)
4
Maintenance and care
CAUTION
■
Replacing light bulbs
● Be sure to stop the hybrid system and turn off the lights. Do not attempt to
replace the bulb immediately after turning off the lights.
The bulbs become very hot and may cause burns.
● Do not touch the glass portion of the light bulb with bare hands. Hold the
bulb by the plastic or metal portion.
If the bulb is scratched or dropped, it may blow out or crack.
● Fully install light bulbs and any parts used to secure them. Failure to do so
may result in heat damage, fire, or water entering the headlight unit. This
may damage the headlights or cause condensation to build up on the lens.
■ To prevent damage or fire
Make sure bulbs are fully seated and locked.
Page 508 of 568
508 6-1. Specifications
PRIUS v_OM_OM47820U_(U)
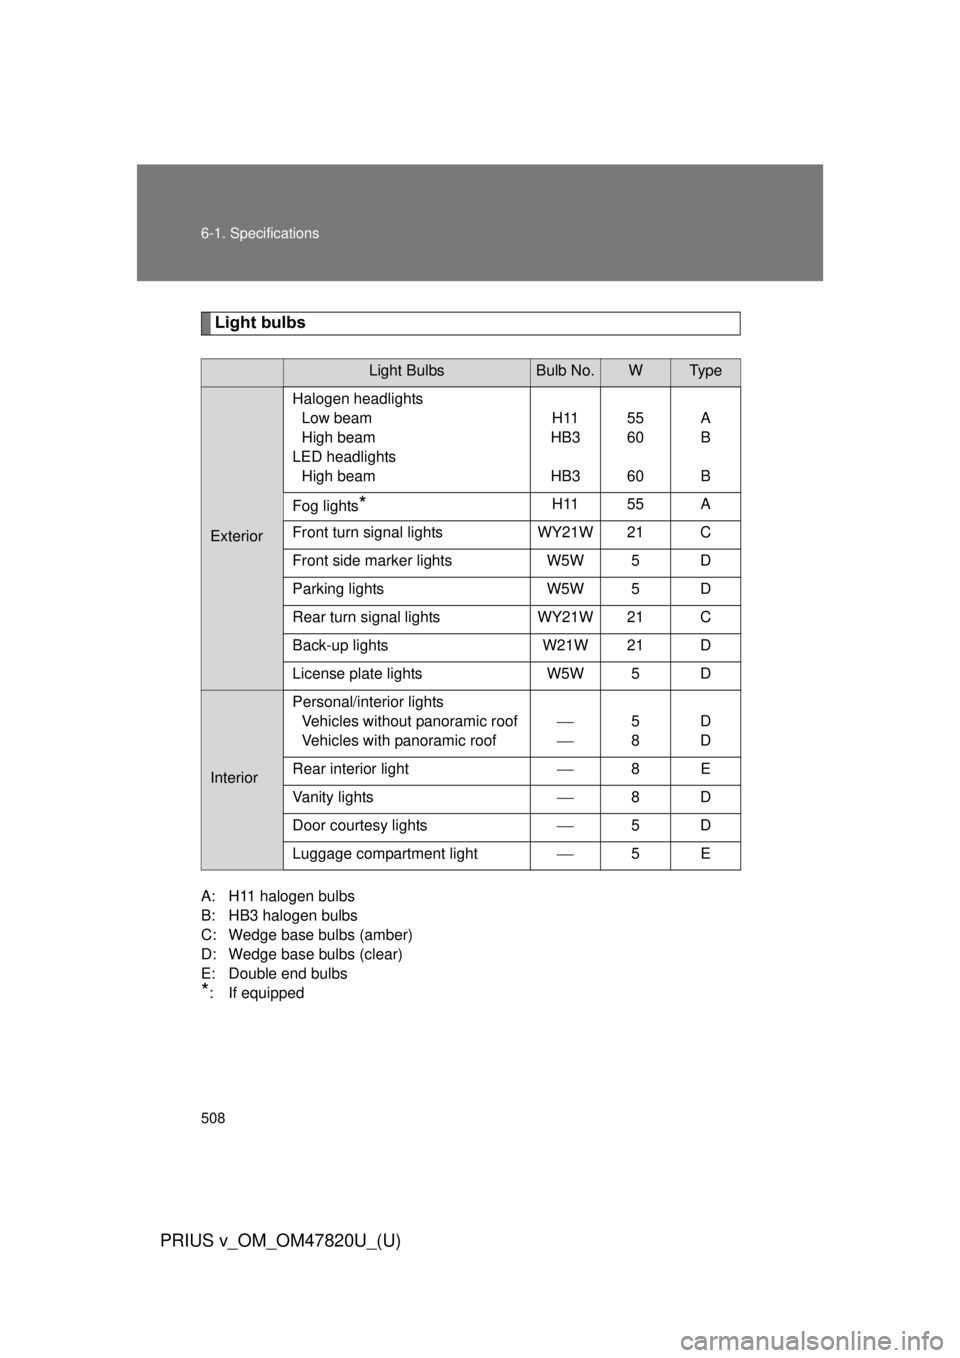
Light bulbs
A: H11 halogen bulbs
B: HB3 halogen bulbs
C: Wedge base bulbs (amber)
D: Wedge base bulbs (clear)
E: Double end bulbs
*
: If equipped
Light BulbsBulb No.WTy p e
Exterior Halogen headlights
Low beam
High beam
LED headlights High beam H11
HB3
HB3 55
60
60A
B
B
Fog lights
*H11 55 A
Front turn signal lights WY21W 21 C
Front side marker lights W5W 5 D
Parking lights W5W 5 D
Rear turn signal lights WY21W 21 C
Back-up lights W21W 21 D
License plate lights W5W 5 D
InteriorPersonal/interior lights
Vehicles without panoramic roof
Vehicles with panoramic roof
5
8D
D
Rear interior light 8E
Vanity lights 8D
Door courtesy lights 5D
Luggage compartment light 5E
Page 554 of 568
554
PRIUS v_OM_OM47820U_(U)
Alphabetical index
Alphabetical index
A/CAir conditioning filter ..............407
Automatic air conditioning
system ................................280
ABS ...........................................252
Air conditioning filter............... 407
Air conditioning system Air conditioning filter ..............407
Automatic air conditioning
system ................................280
Steering wheel climate remote control switches ......293
Airbags Airbag operating conditions............................ 128
Airbag precautions for your child .................................... 132
Airbag warning light............... 448
Curtain shield airbag operating
conditions............................ 128
Curtain shield airbag
precautions .........................132
Front passenger occupant classification system ...........138
General airbag precautions ...132
Knee airbag ...........................124
Locations of airbags ..............124
Modification and disposal of airbags ................................137
Proper driving posture ...........122
Side airbag operating
conditions............................ 128
Side airbag precautions ........ 132
Side and curtain shield airbags
operating conditions............128
Side and curtain shield airbags
precautions .........................132
SRS airbags .......................... 124
SRS airbag instructions for Canadian owners. ............... 540 Antenna .................................... 356
Anti-lock brake system ........... 252
Armrest ..................................... 321
Assist grips .............................. 326
Audio input
*
Audio remote control
switches
*
Audio system*
Audio/video system*
Automatic air conditioning system Air conditioning filter.............. 407
Air conditioning system ......... 280
Automatic air conditioning system ................................ 280
Steering wheel climate remote control switches ...... 293
Automatic headlight leveling
system .................................... 220
Automatic light control system .................................... 213
AUX port
*
Auxiliary box .................... 312, 330
Back door Back door ................................ 79
Smart key system .. ................. 57
Wireless remote control .......... 72
Back-up lights
Replacing light bulbs ............. 422
Wattage................................. 508
Battery
Checking ............................... 386
If the 12-volt battery is discharged .......................... 483
Preparing and checking before winter ....................... 273
A
B