TOYOTA PRIUS V 2017 ZVW40 / 1.G Owners Manual
PRIUS V 2017 ZVW40 / 1.G
TOYOTA
TOYOTA
https://www.carmanualsonline.info/img/14/6668/w960_6668-0.png
TOYOTA PRIUS V 2017 ZVW40 / 1.G Owners Manual
Trending: front bumper, warning lights, oil dipstick, tire type, windshield wipers, washer fluid, cruise control
Page 471 of 624
PRIUS v_OM_OM47B23U_(U)
4717-3. Do-it-yourself maintenance
7
Maintenance and care
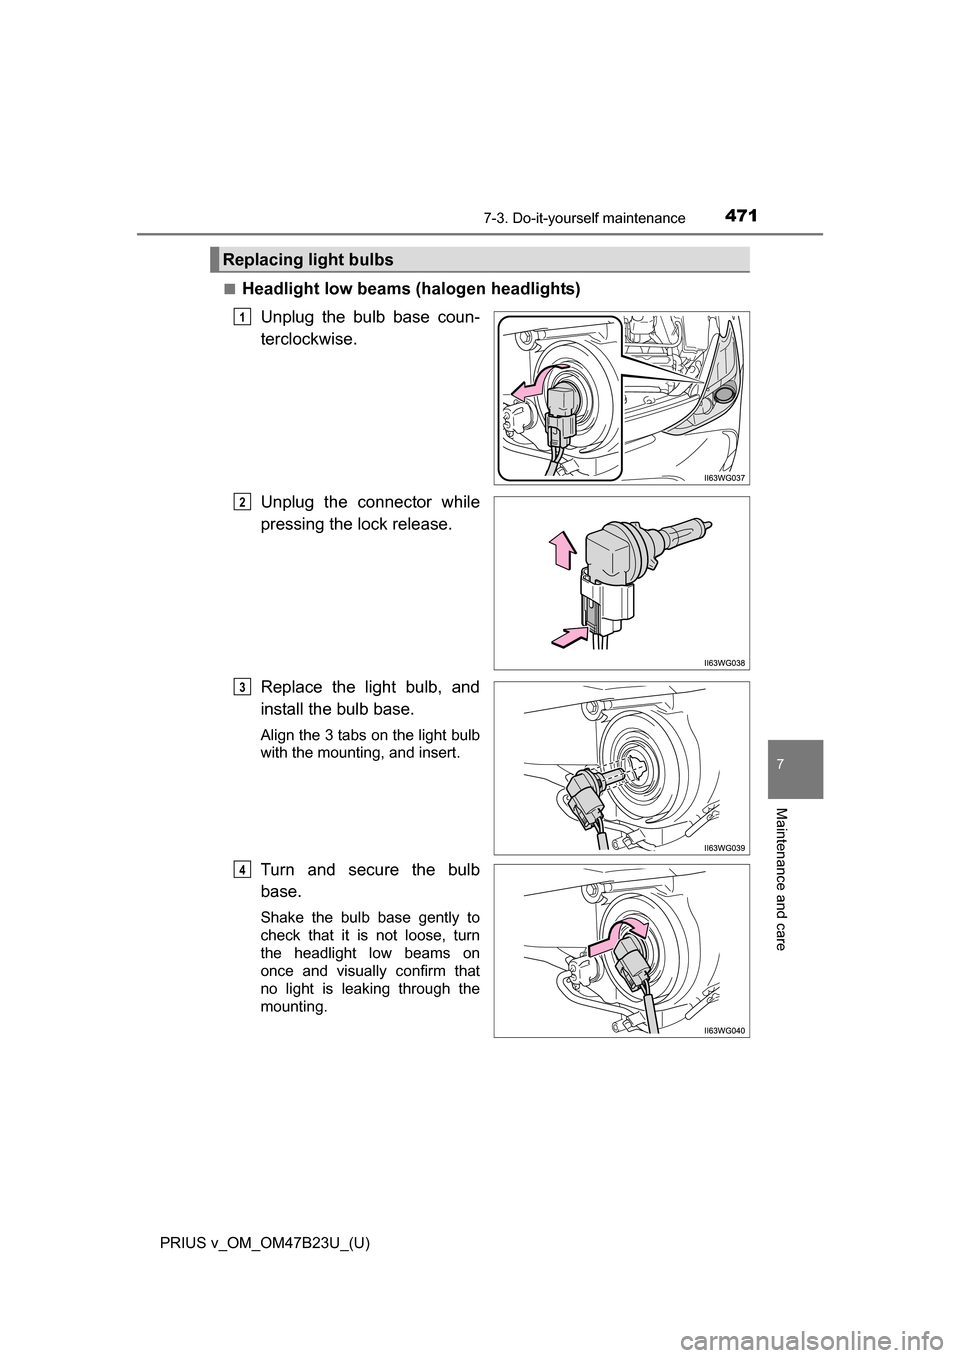
■Headlight low beams (halogen headlights)Unplug the bulb base coun-
terclockwise.
Unplug the connector while
pressing the lock release.
Replace the light bulb, and
install the bulb base.
Align the 3 tabs on the light bulb
with the mounting, and insert.
Turn and secure the bulb
base.
Shake the bulb base gently to
check that it is not loose, turn
the headlight low beams on
once and visually confirm that
no light is leaking through the
mounting.
Replacing light bulbs
1
2
3
4
Page 472 of 624
472
PRIUS v_OM_OM47B23U_(U)
7-3. Do-it-yourself maintenance
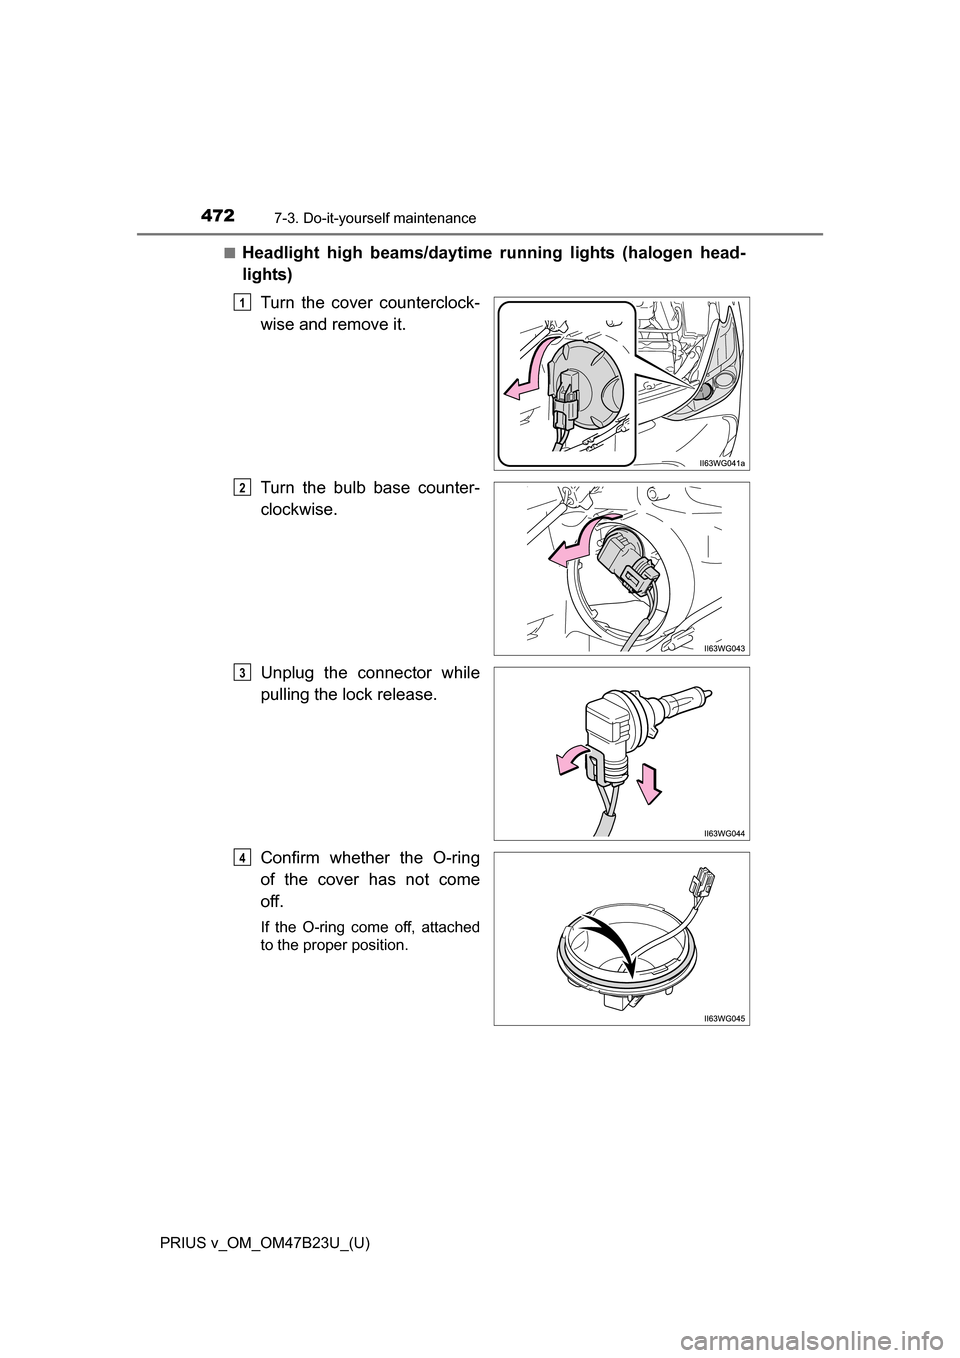
■Headlight high beams/daytime running lights (halogen head-
lights)
Turn the cover counterclock-
wise and remove it.
Turn the bulb base counter-
clockwise.
Unplug the connector while
pulling the lock release.
Confirm whether the O-ring
of the cover has not come
off.
If the O-ring come off, attached
to the proper position.
1
2
3
4
Page 473 of 624
PRIUS v_OM_OM47B23U_(U)
4737-3. Do-it-yourself maintenance
7
Maintenance and care
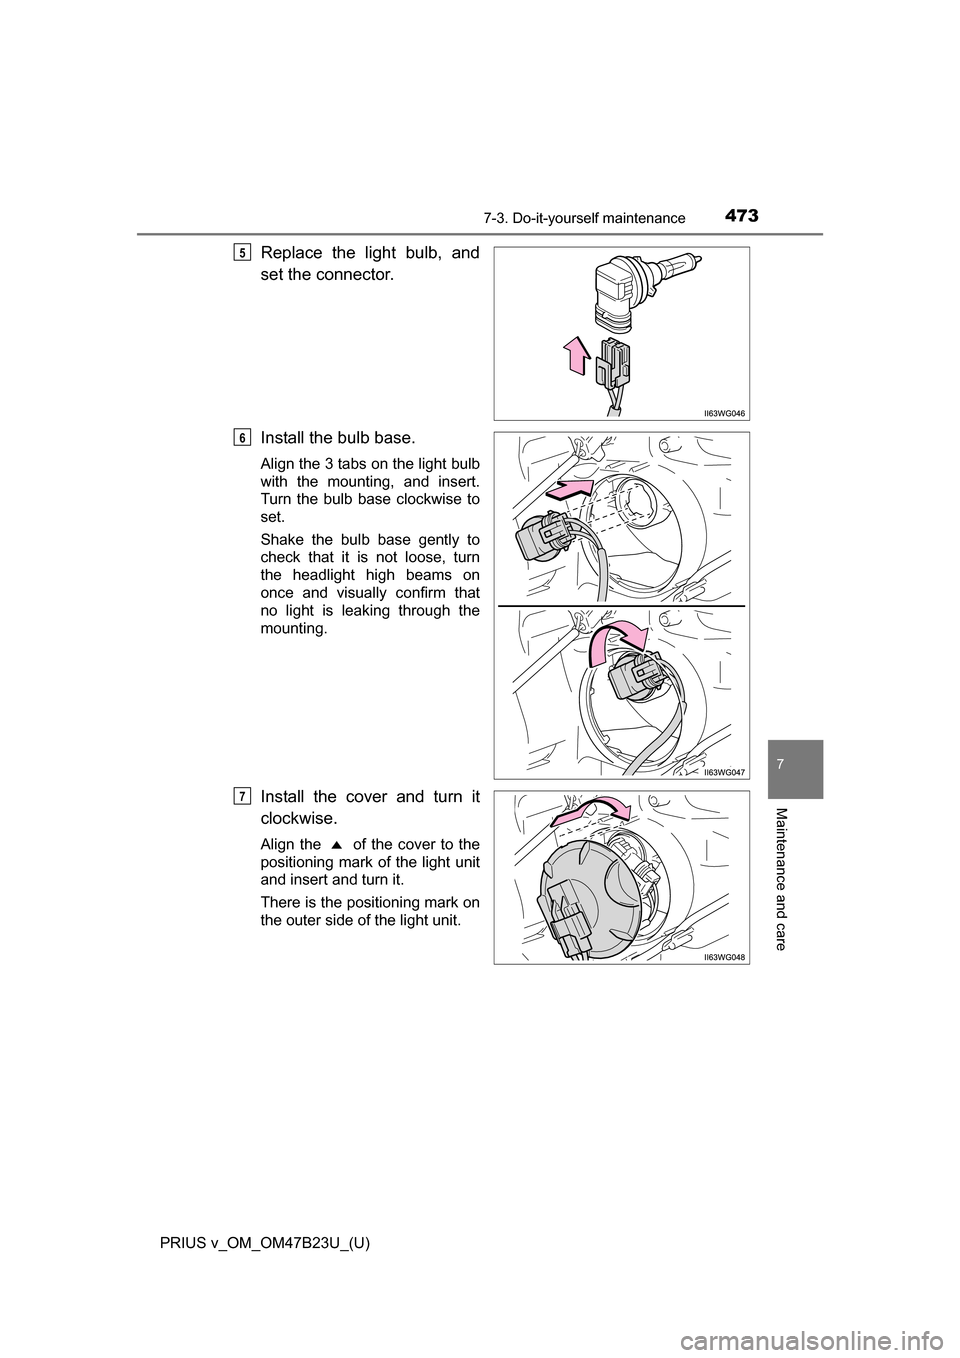
Replace the light bulb, and
set the connector.
Install the bulb base.
Align the 3 tabs on the light bulb
with the mounting, and insert.
Turn the bulb base clockwise to
set.
Shake the bulb base gently to
check that it is not loose, turn
the headlight high beams on
once and visually confirm that
no light is leaking through the
mounting.
Install the cover and turn it
clockwise.
Align the of the cover to the
positioning mark of the light unit
and insert and turn it.
There is the positioning mark on
the outer side of the light unit.
5
6
7
Page 474 of 624
474
PRIUS v_OM_OM47B23U_(U)
7-3. Do-it-yourself maintenance
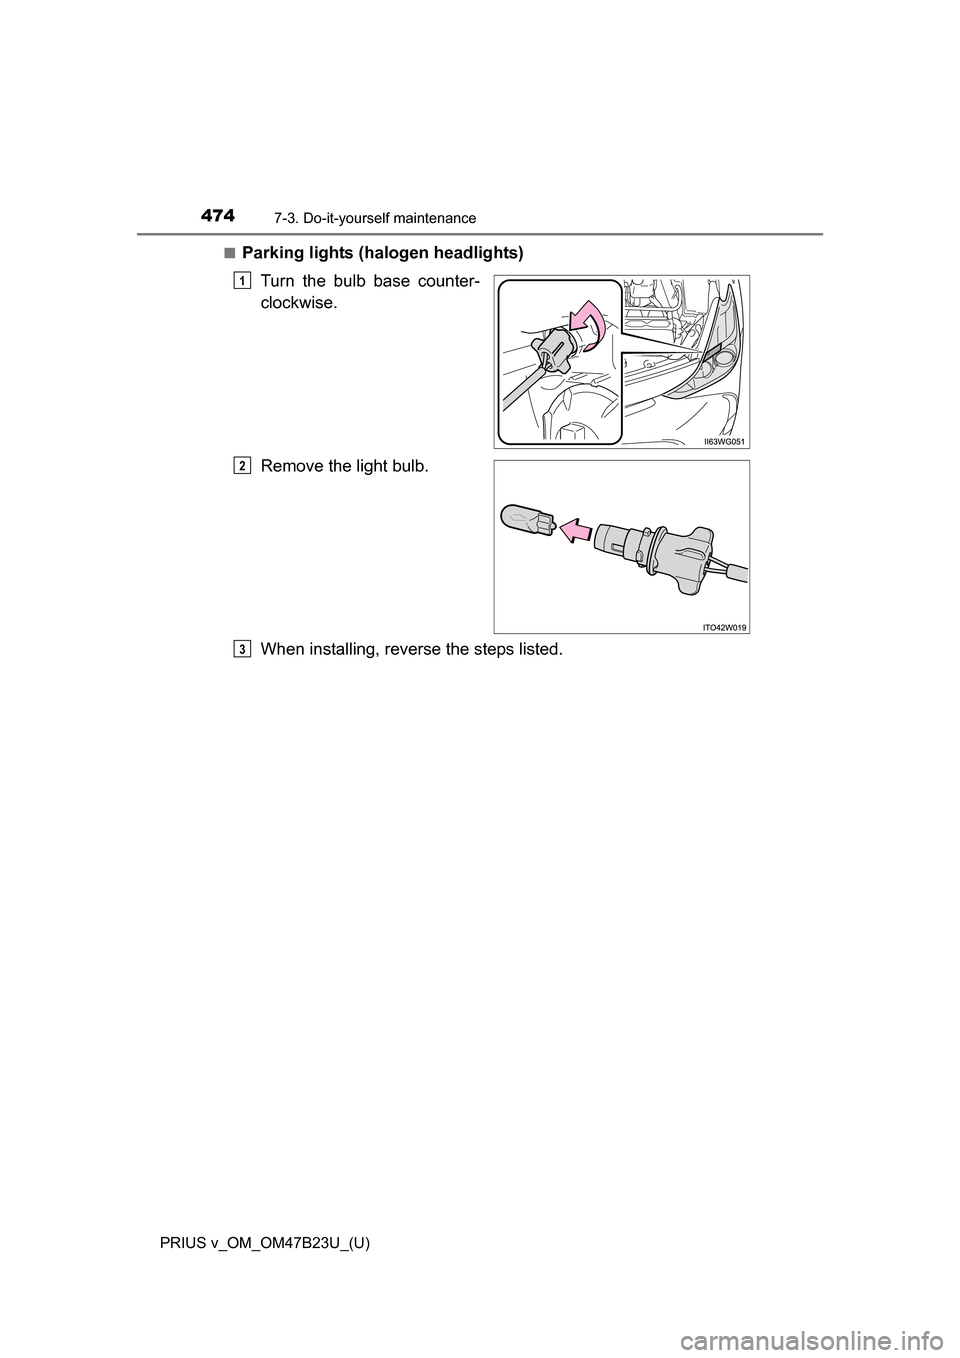
■Parking lights (halogen headlights)Turn the bulb base counter-
clockwise.
Remove the light bulb.
When installing, reverse the steps listed.
1
2
3
Page 475 of 624
PRIUS v_OM_OM47B23U_(U)
4757-3. Do-it-yourself maintenance
7
Maintenance and care
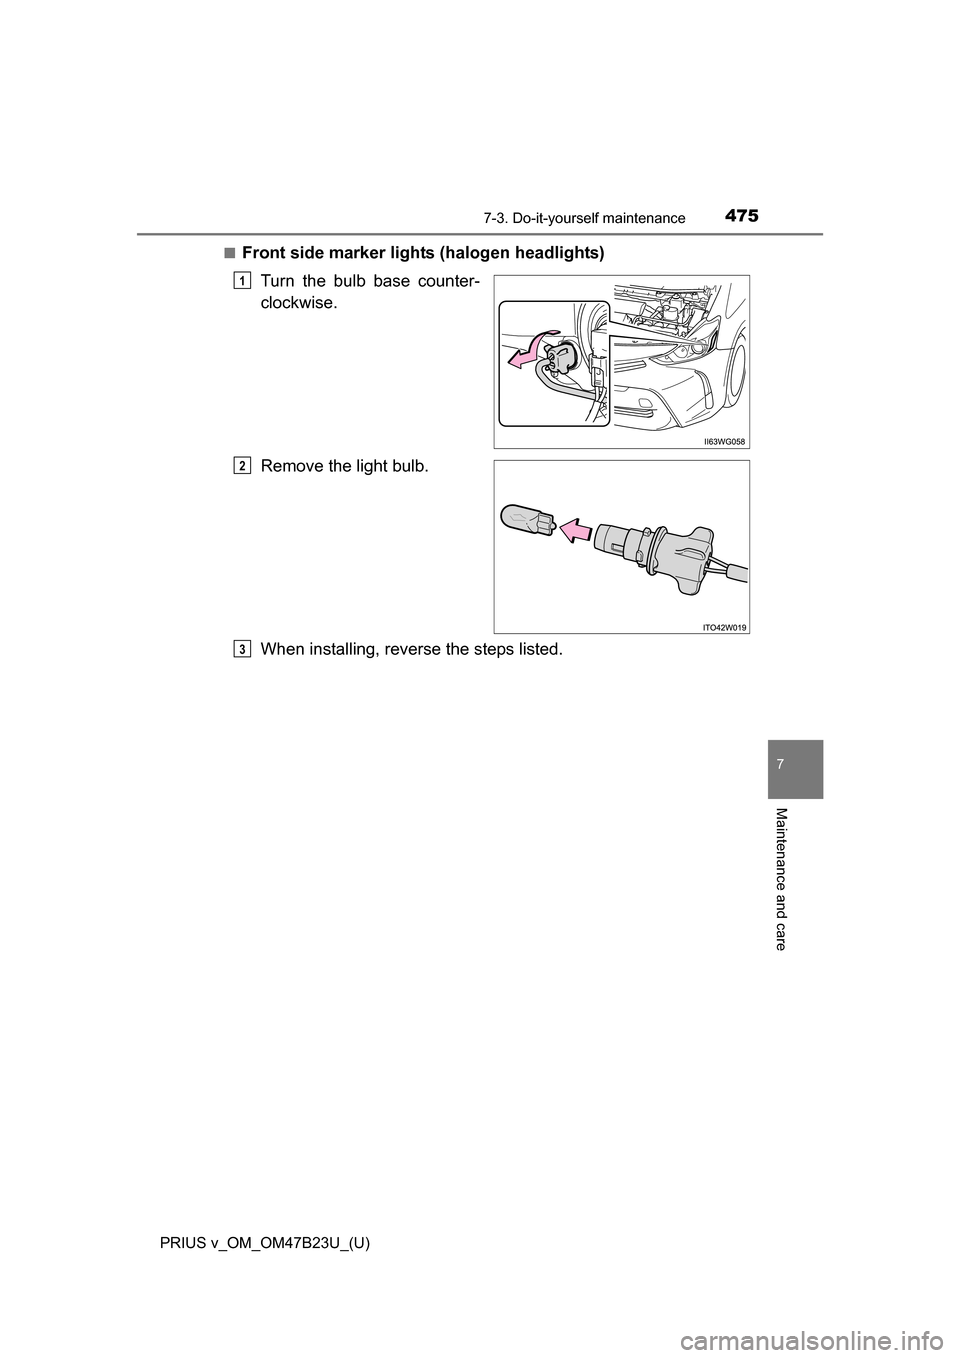
■Front side marker lights (halogen headlights)Turn the bulb base counter-
clockwise.
Remove the light bulb.
When installing, reverse the steps listed.
1
2
3
Page 476 of 624
476
PRIUS v_OM_OM47B23U_(U)
7-3. Do-it-yourself maintenance
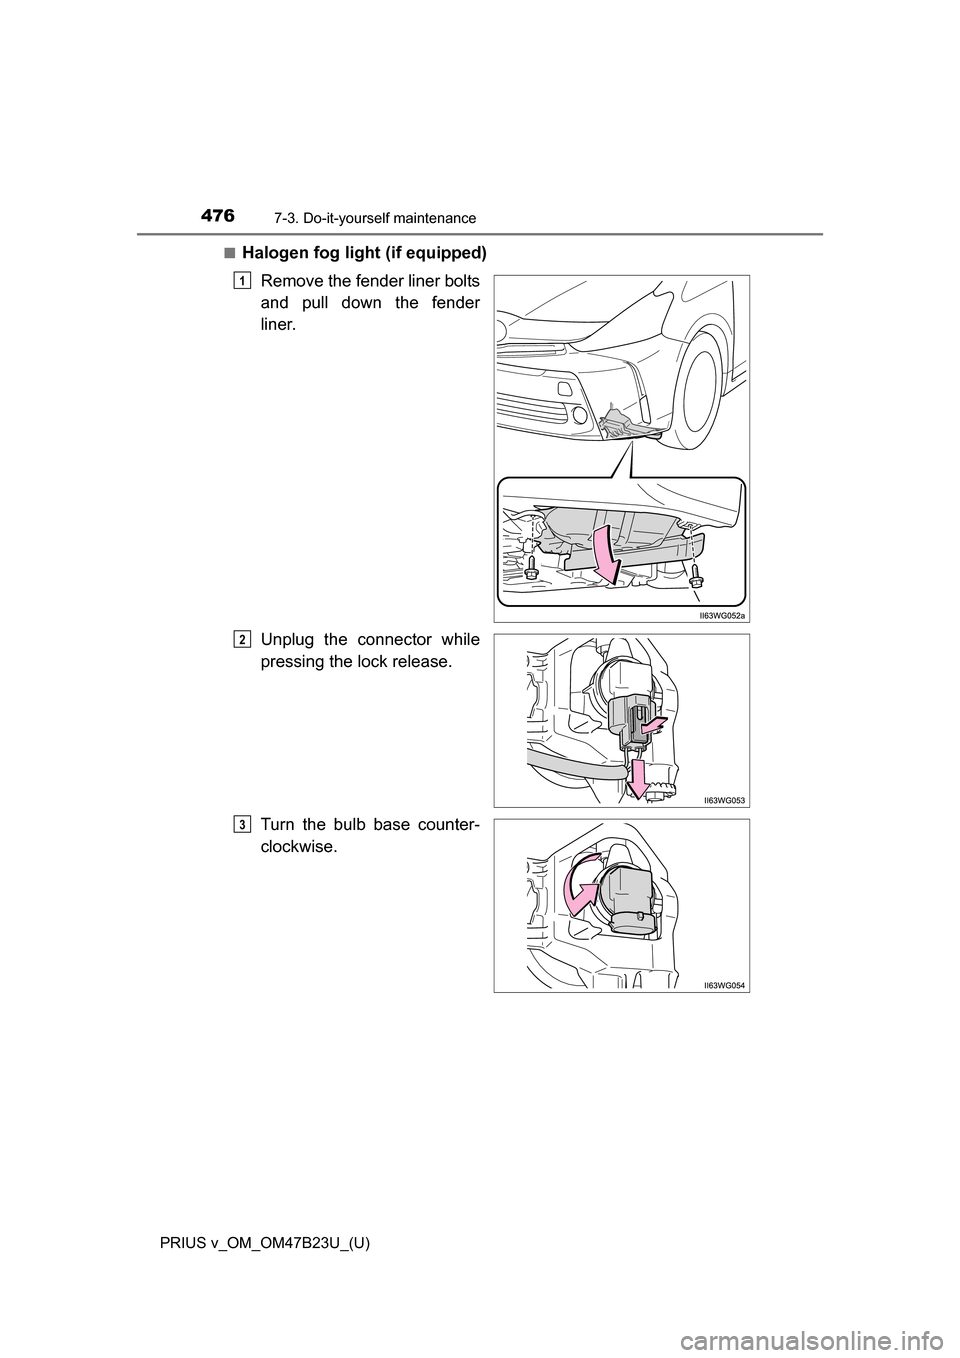
■Halogen fog light (if equipped)Remove the fender liner bolts
and pull down the fender
liner.
Unplug the connector while
pressing the lock release.
Turn the bulb base counter-
clockwise.
1
2
3
Page 477 of 624
PRIUS v_OM_OM47B23U_(U)
4777-3. Do-it-yourself maintenance
7
Maintenance and care
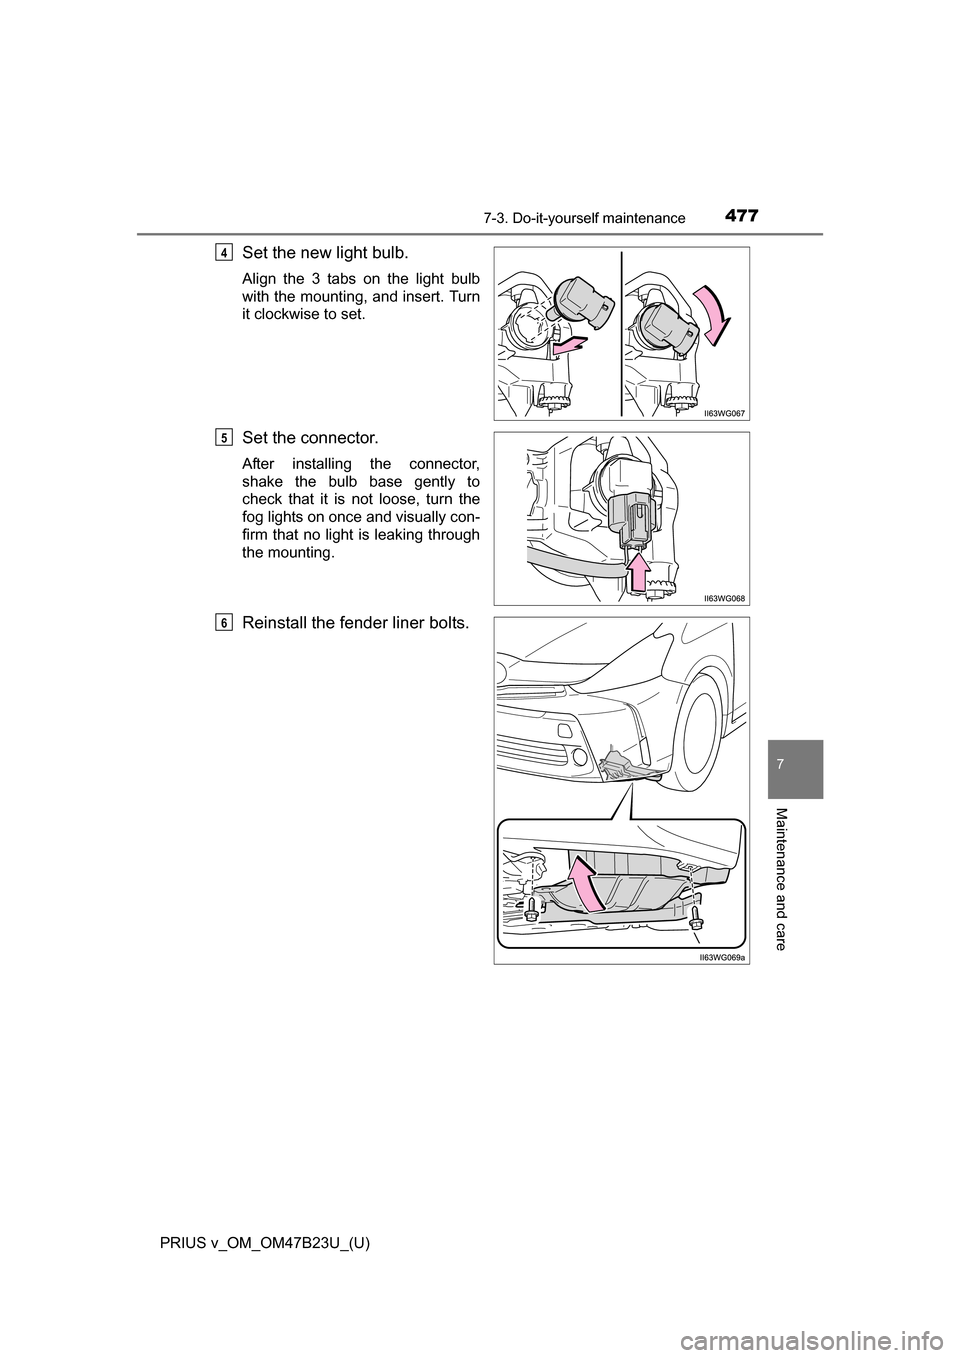
Set the new light bulb.
Align the 3 tabs on the light bulb
with the mounting, and insert. Turn
it clockwise to set.
Set the connector.
After installing the connector,
shake the bulb base gently to
check that it is not loose, turn the
fog lights on once and visually con-
firm that no light is leaking through
the mounting.
Reinstall the fender liner bolts.
4
5
6
Page 478 of 624
478
PRIUS v_OM_OM47B23U_(U)
7-3. Do-it-yourself maintenance
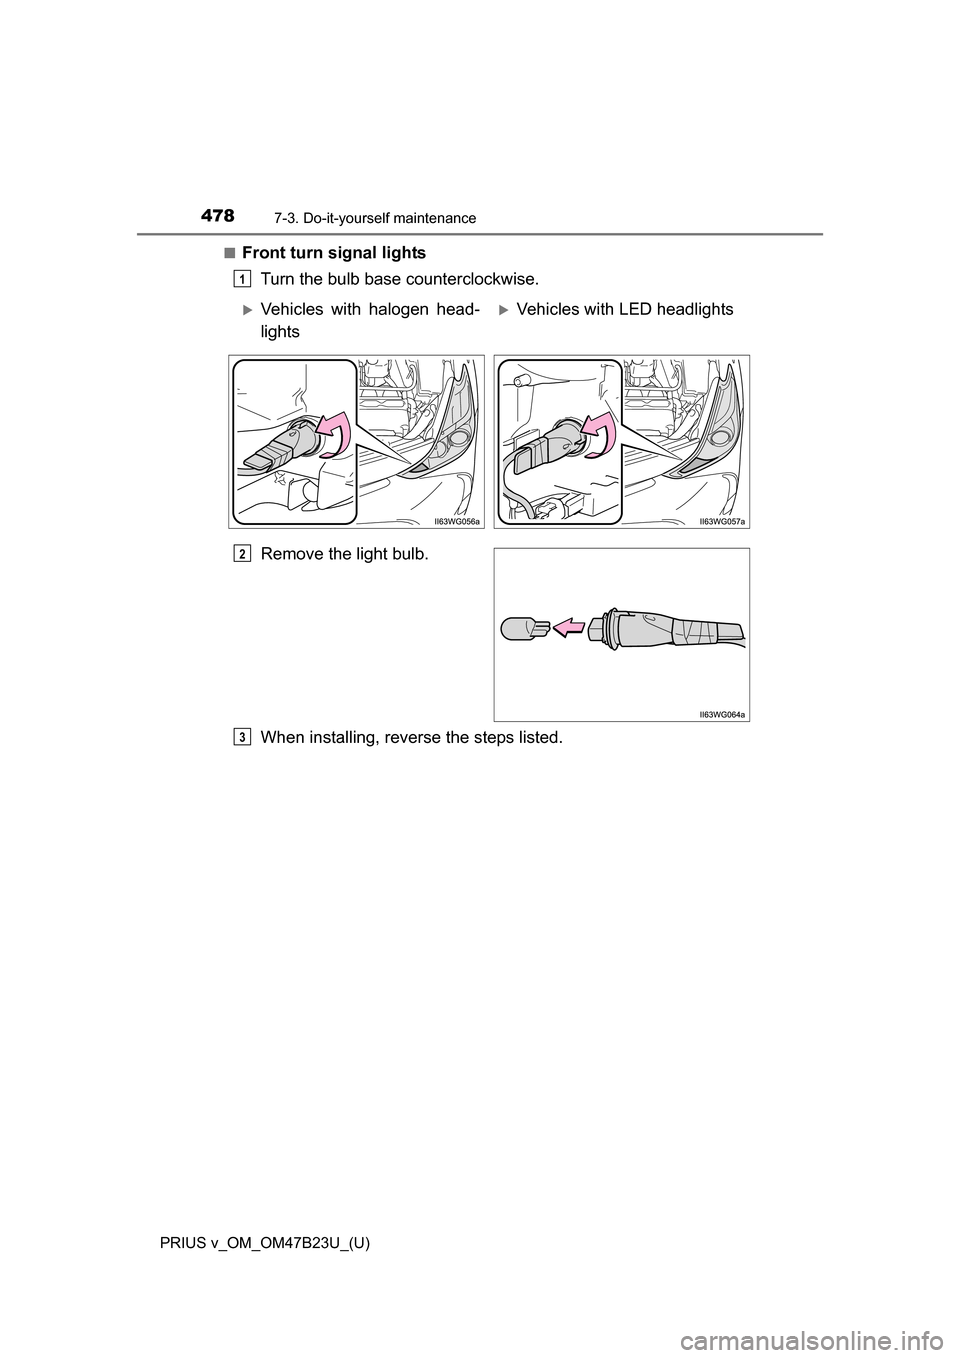
■Front turn signal lightsTurn the bulb base counterclockwise.
Remove the light bulb.
When installing, reverse the steps listed.
1
Vehicles with halogen head-
lightsVehicles with LED headlights
2
3
Page 479 of 624
PRIUS v_OM_OM47B23U_(U)
4797-3. Do-it-yourself maintenance
7
Maintenance and care
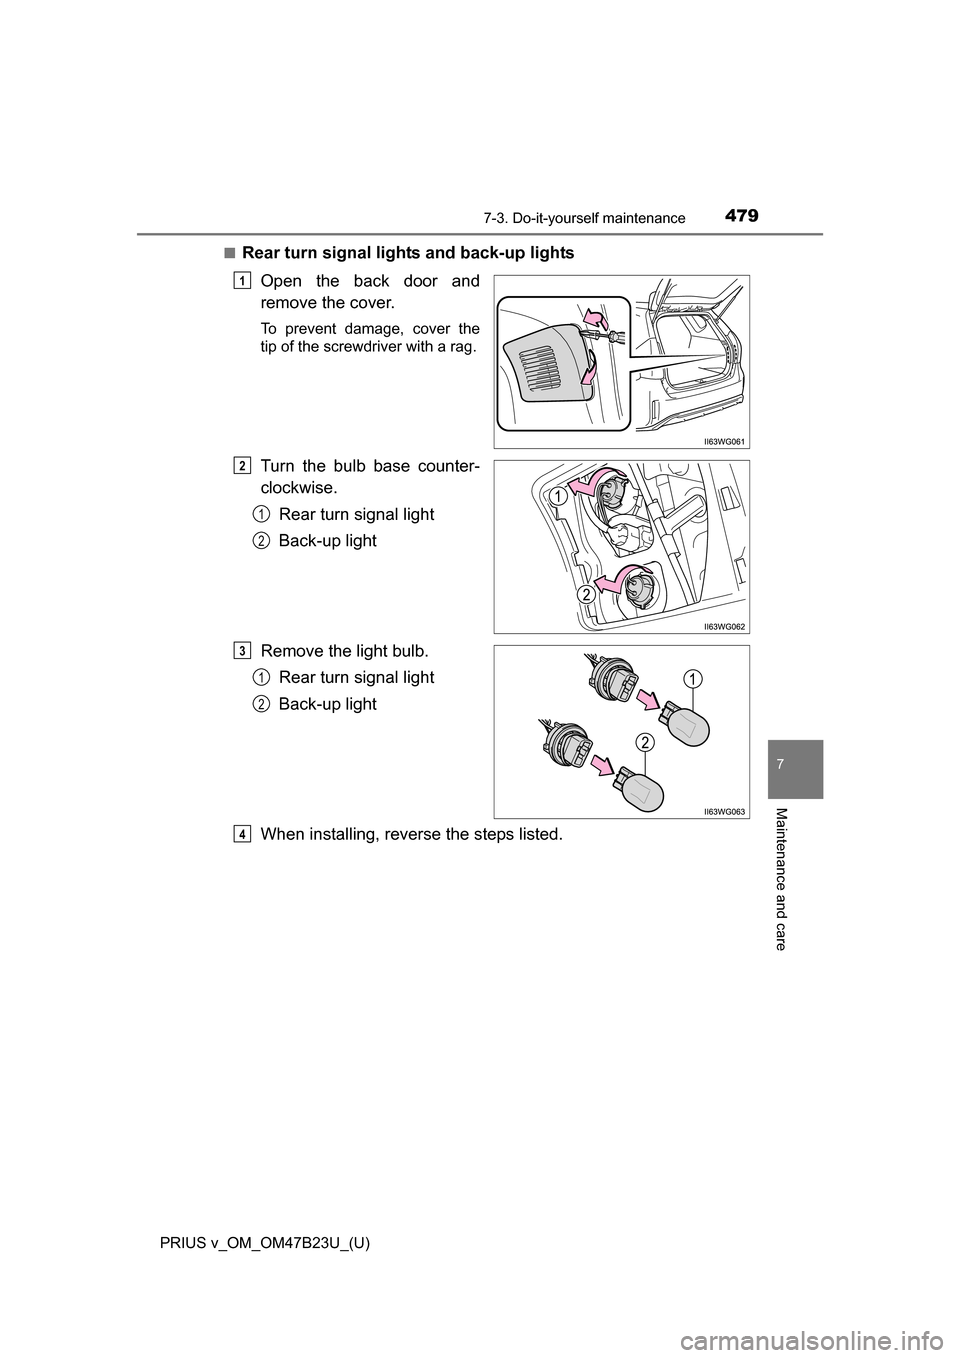
■Rear turn signal lights and back-up lightsOpen the back door and
remove the cover.
To prevent damage, cover the
tip of the screwdriver with a rag.
Turn the bulb base counter-
clockwise.Rear turn signal light
Back-up light
Remove the light bulb. Rear turn signal light
Back-up light
When installing, reverse the steps listed.
1
2
1
2
3
1
2
4
Page 480 of 624
480
PRIUS v_OM_OM47B23U_(U)
7-3. Do-it-yourself maintenance
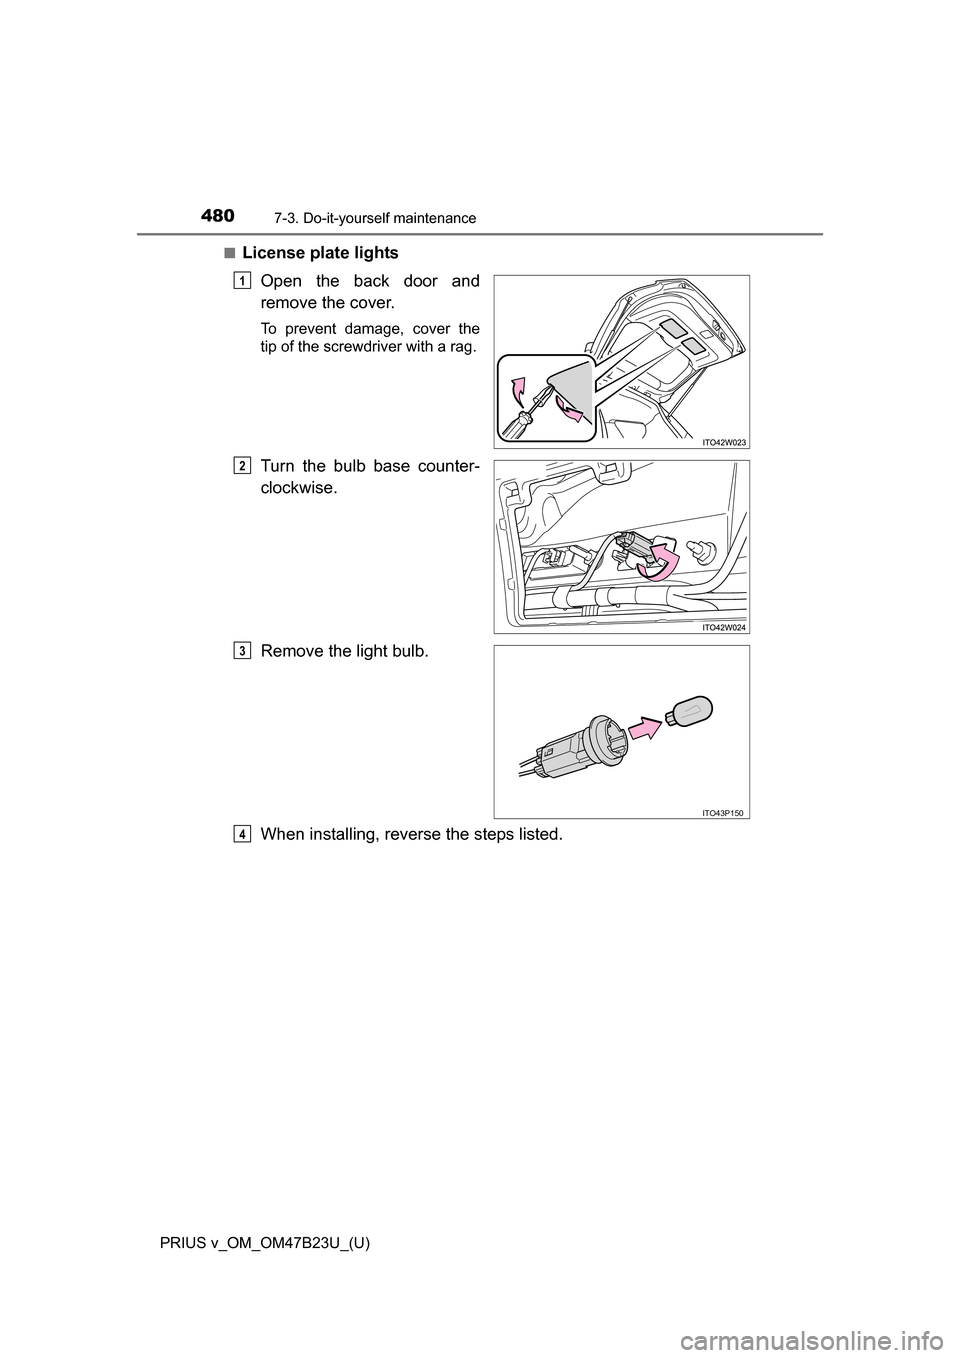
■License plate lightsOpen the back door and
remove the cover.
To prevent damage, cover the
tip of the screwdriver with a rag.
Turn the bulb base counter-
clockwise.
Remove the light bulb.
When installing, reverse the steps listed.
1
2
ITO43P150
3
4
Trending: warning light, sat nav, battery location, clock setting, remote control, horn, bluetooth
