engine TOYOTA PROACE 2017 Owners Manual
[x] Cancel search | Manufacturer: TOYOTA, Model Year: 2017, Model line: PROACE, Model: TOYOTA PROACE 2017Pages: 516, PDF Size: 91.65 MB
Page 322 of 516
322
Starting using another
battery
Never try to start the engine by connecting a battery charger.Never use a 24 V or higher battery b o o s t e r.First check that the slave battery has a nominal voltage of 12 V and a capacity at least equal to that of the discharged battery.The two vehicles must not be in contact with each other.Switch off the electrical consumers on both vehicles (audio system, wipers, lighting, ...).Ensure that the jump lead cables do not pass close to moving parts of the engine (cooling fan, belts, ...).Do not disconnect the (+) terminal when the engine is running.
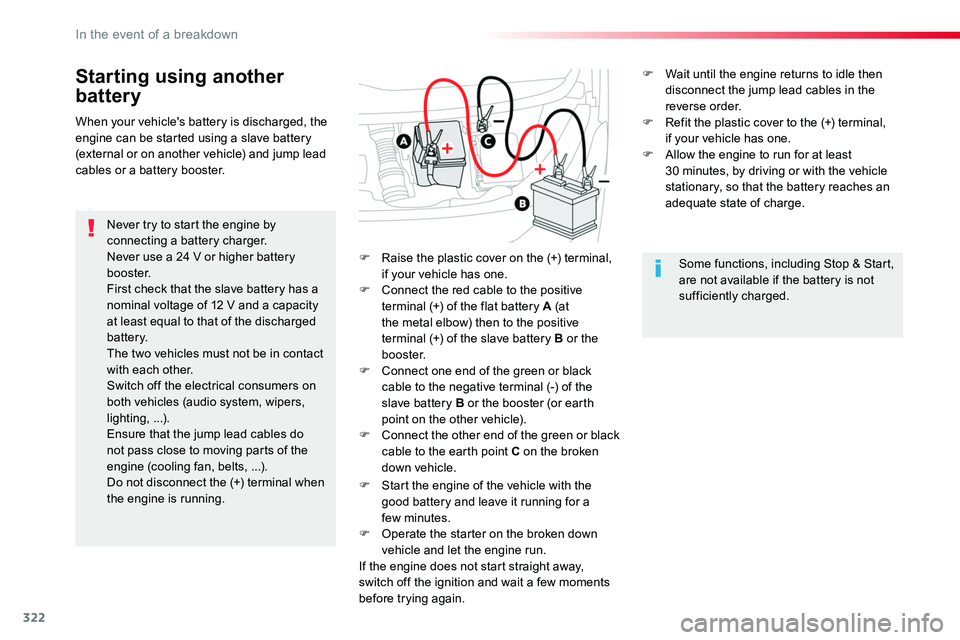
F Raise the plastic cover on the (+) terminal, if your vehicle has one.F Connect the red cable to the positive terminal (+) of the flat battery A (at the metal elbow) then to the positive terminal (+) of the slave battery B or the b o o s t e r.F Connect one end of the green or black cable to the negative terminal (-) of the slave battery B or the booster (or earth point on the other vehicle).F Connect the other end of the green or black cable to the earth point C on the broken down vehicle.
F Start the engine of the vehicle with the good battery and leave it running for a few minutes.
F Operate the starter on the broken down vehicle and let the engine run.If the engine does not start straight away, switch off the ignition and wait a few moments before trying again.
When your vehicle's battery is discharged, the engine can be started using a slave battery (external or on another vehicle) and jump lead cables or a battery booster.
Some functions, including Stop & Start, are not available if the battery is not sufficiently charged.
F Wait until the engine returns to idle then disconnect the jump lead cables in the reverse order.F Refit the plastic cover to the (+) terminal, if your vehicle has one.F Allow the engine to run for at least 30 minutes, by driving or with the vehicle stationary, so that the battery reaches an adequate state of charge.
In the event of a breakdown
Page 324 of 516
324
Do not force the lever as locking will not be possible if the clamp is not
positioned correctly; start the procedure again.
Disconnecting the battery
In order to maintain an adequate state of charge for starting the engine, it is recommended that the battery be disconnected if the vehicle is taken out of service for a long period.Wait 2 minutes after switching off the ignition before disconnecting the battery.F close the windows and the doors before disconnecting the battery,F switch off all electrical consumers (audio system, wipers, lighting, ...),F switch off the ignition and wait for four minutes.Having exposed the battery, it is only necessary to disconnect the (+) terminal.
Quick release terminal
Disconnecting the (+) terminal
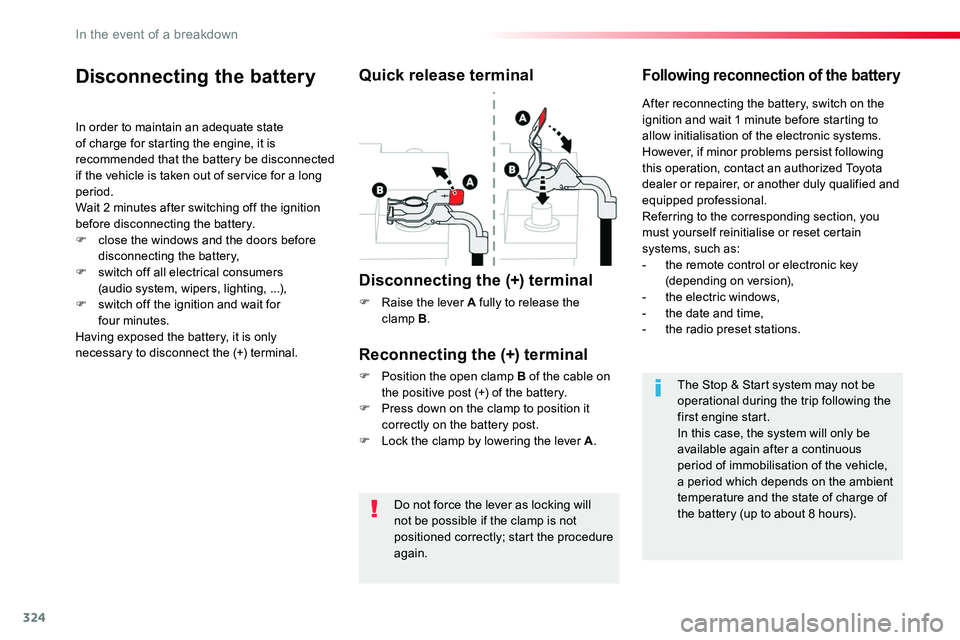
F Raise the lever A fully to release the clamp B.
Following reconnection of the battery
Reconnecting the (+) terminal
F Position the open clamp B of the cable on the positive post (+) of the battery.F Press down on the clamp to position it correctly on the battery post.F Lock the clamp by lowering the lever A.
After reconnecting the battery, switch on the ignition and wait 1 minute before starting to allow initialisation of the electronic systems.However, if minor problems persist following this operation, contact an authorized Toyota dealer or repairer, or another duly qualified and equipped professional.Referring to the corresponding section, you must yourself reinitialise or reset certain systems, such as:- the remote control or electronic key (depending on version),- the electric windows,- the date and time,- the radio preset stations.
The Stop & Start system may not be operational during the trip following the first engine start.In this case, the system will only be available again after a continuous period of immobilisation of the vehicle, a period which depends on the ambient temperature and the state of charge of the battery (up to about 8 hours).
In the event of a breakdown
Page 325 of 516
325
Battery capacity
Vehicle lengthRating in Ah (Ampere hours)
Compact (L0)480
Standard (L1)640
Long (L2)720 / 800
Always replace the battery by one of equivalent specification.
To w i n g
Access to the tools
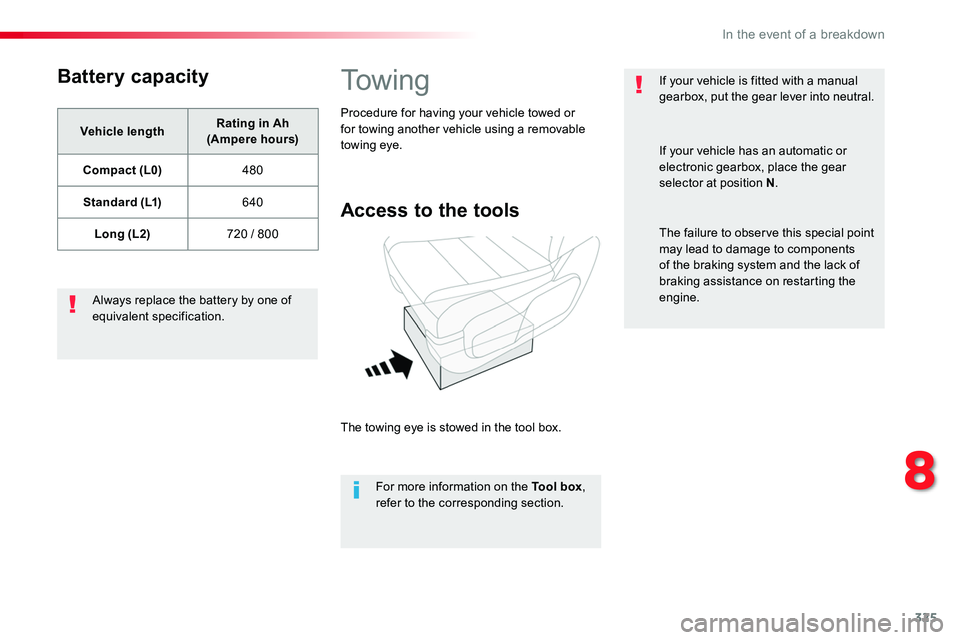
The towing eye is stowed in the tool box.
For more information on the Tool box, refer to the corresponding section.
Procedure for having your vehicle towed or for towing another vehicle using a removable towing eye.
If your vehicle is fitted with a manual gearbox, put the gear lever into neutral.
If your vehicle has an automatic or electronic gearbox, place the gear selector at position N.
The failure to observe this special point may lead to damage to components of the braking system and the lack of braking assistance on restarting the engine.
8
In the event of a breakdown
Page 326 of 516
326
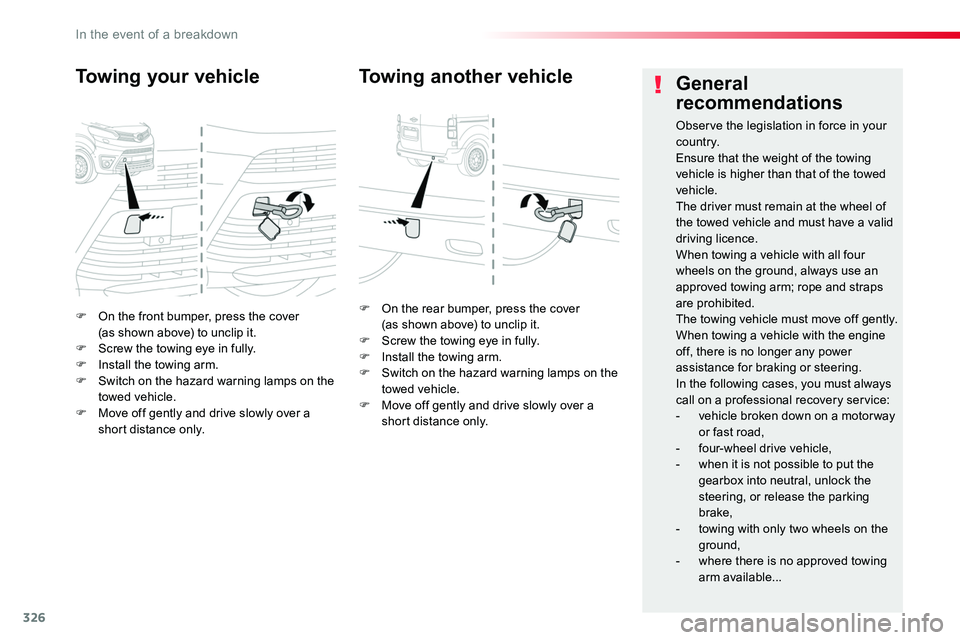
F On the front bumper, press the cover (as shown above) to unclip it.F Screw the towing eye in fully.F Install the towing arm.F Switch on the hazard warning lamps on the towed vehicle.F Move off gently and drive slowly over a short distance only.
Towing your vehicle
F On the rear bumper, press the cover (as shown above) to unclip it.F Screw the towing eye in fully.F Install the towing arm.F Switch on the hazard warning lamps on the towed vehicle.F Move off gently and drive slowly over a short distance only.
Towing another vehicleGeneral
recommendations
Observe the legislation in force in your c o unt r y.Ensure that the weight of the towing vehicle is higher than that of the towed vehicle.The driver must remain at the wheel of the towed vehicle and must have a valid driving licence.When towing a vehicle with all four wheels on the ground, always use an approved towing arm; rope and straps are prohibited.The towing vehicle must move off gently.When towing a vehicle with the engine off, there is no longer any power assistance for braking or steering.In the following cases, you must always call on a professional recovery service:- vehicle broken down on a motor way or fast road,- four-wheel drive vehicle,- when it is not possible to put the gearbox into neutral, unlock the
steering, or release the parking brake,- towing with only two wheels on the
ground,- where there is no approved towing arm available...
In the event of a breakdown
Page 327 of 516
327
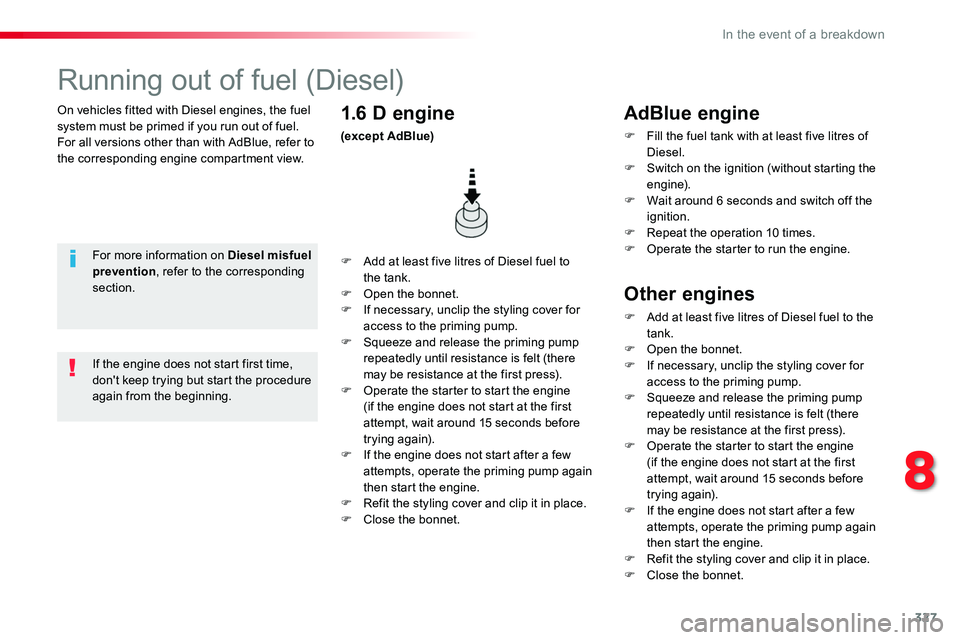
On vehicles fitted with Diesel engines, the fuel system must be primed if you run out of fuel.For all versions other than with AdBlue, refer to the corresponding engine compartment view.
Running out of fuel (Diesel)
For more information on Diesel misfuel prevention, refer to the corresponding section.
F Add at least five litres of Diesel fuel to the tank.F Open the bonnet.F If necessary, unclip the styling cover for access to the priming pump.F Squeeze and release the priming pump repeatedly until resistance is felt (there may be resistance at the first press).F Operate the starter to start the engine (if the engine does not start at the first attempt, wait around 15 seconds before trying again).F If the engine does not start after a few attempts, operate the priming pump again then start the engine.F Refit the styling cover and clip it in place.F Close the bonnet.
1.6 D engine
(except AdBlue)
If the engine does not start first time, don't keep trying but start the procedure again from the beginning.
AdBlue engine
F Fill the fuel tank with at least five litres of Diesel.F Switch on the ignition (without starting the engine).F Wait around 6 seconds and switch off the ignition.F Repeat the operation 10 times.F Operate the starter to run the engine.
Other engines
F Add at least five litres of Diesel fuel to the tank.F Open the bonnet.F If necessary, unclip the styling cover for access to the priming pump.F Squeeze and release the priming pump repeatedly until resistance is felt (there
may be resistance at the first press).F Operate the starter to start the engine (if the engine does not start at the first attempt, wait around 15 seconds before trying again).F If the engine does not start after a few attempts, operate the priming pump again then start the engine.F Refit the styling cover and clip it in place.F Close the bonnet.
8
In the event of a breakdown
Page 332 of 516
332
Engines
Engine characteristics
The engine characteristics (capacity, maximum power, maximum power speed, fuel, CO2 emissions...) for your vehicle are given in the registration document, as well as in sales brochures.These characteristics correspond to the values type-approved on a test bed, under conditions defined in European legislation (Directive 1999/99/EC).For more information, contact an authorized Toyota dealer or repairer, or another duly qualified and equipped professional.
Weights
The kerb weight is equal to the unladen weight + driver (75 kg).The GTW and towed load values indicated apply up to a maximum altitude of 1 000 metres; the towed load mentioned must be reduced by 10 % for every additional 1 000 metres.The weight of the braked trailer can be increased, within the GTW limit, on condition that the GV W of the towing vehicle is reduced by the same amount.The recommended nose weight is the vertical load on the towbar ball (removable with or without tools).
High ambient temperatures may result in a reduction in the per formance of the vehicle to protect the engine; when the ambient temperature is higher than 37 °C, limit the towed weight.
If the ambient temperature is high, it is recommended that the engine be allowed to idle for 1 to 2 minutes after the vehicle comes to a stop, to facilitate its cooling.
Towing with a lightly loaded vehicle can adversely affect roadholding.Braking distances are increased when towing a trailer.Never exceed 60 mph (100 km/h) when towing (comply with the legislation in force in your country).
GV W: gross vehicle weight, the maximum authorised vehicle weight.GT W: gross train weight, the maximum authorised weight of vehicle plus trailer.
Weights and towed
loads
The maximum weights and towed loads for your vehicle are given are given in the registration document, as well as in sales brochures.These values are also present on the manufacturer's plate or label.For more information, contact an authorized Toyota dealer or repairer, or another duly qualified and equipped professional.
Technical data
Page 335 of 516
335
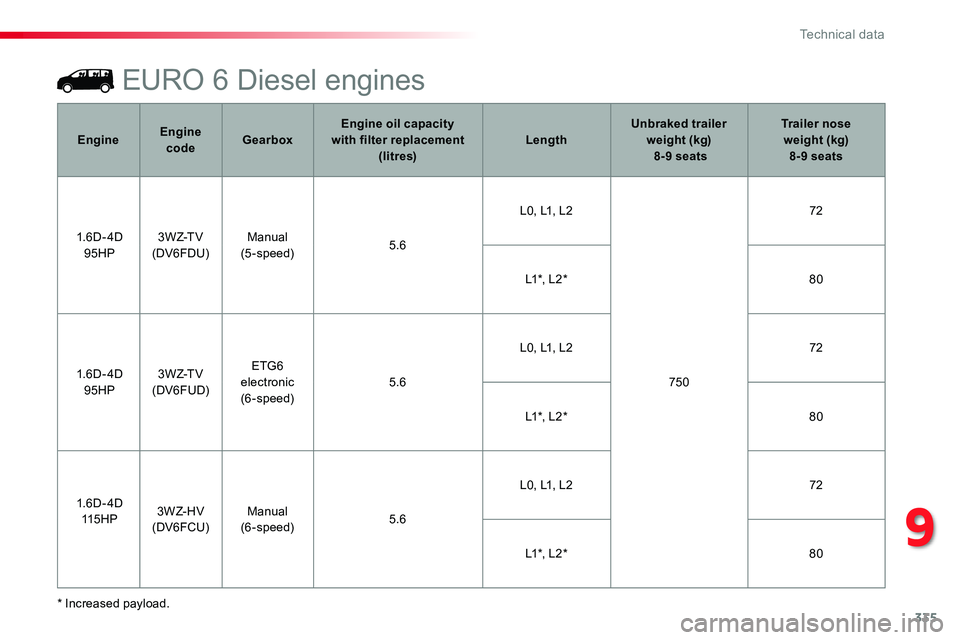
EURO 6 Diesel engines
* Increased payload.
EngineEngine codeGearboxEngine oil capacity with filter replacement (litres)LengthUnbraked trailer weight (kg) 8-9 seats
Trailer nose weight (kg) 8-9 seats
1.6D- 4D 95HP3 W Z-T V(DV6FDU)Manual(5-speed)5.6
L0, L1, L2
750
72
L1 *, L 2 *80
1.6D- 4D 95HP3 W Z-T V(DV6 FUD)
ETG6 electronic(6-speed)5.6
L0, L1, L272
L1 *, L 2 *80
1.6D- 4D 115 H P3 W Z- H V(DV6FCU)Manual(6-speed)5.6
L0, L1, L272
L1 *, L 2 *80
9
Technical data
Page 336 of 516
336
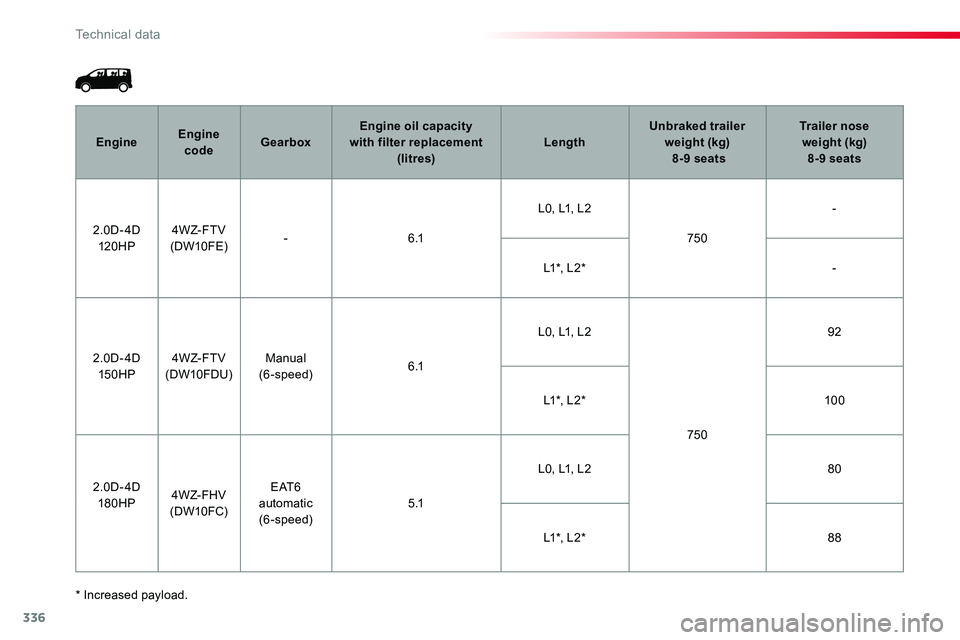
* Increased payload.
EngineEngine codeGearboxEngine oil capacity with filter replacement (litres)LengthUnbraked trailer weight (kg) 8-9 seats
Trailer nose weight (kg) 8-9 seats
2.0D- 4D 120 H P4W Z- F T V(DW10FE)-6 .1
L0, L1, L2
750
-
L1 *, L 2 *-
2.0D- 4D 150HP4W Z- F T V(DW10FDU)Manual(6-speed)6 .1
L0, L1, L2
750
92
L1 *, L 2 *10 0
2.0D- 4D 180HP4W Z- FH V(DW10 FC)
E AT 6 automatic(6-speed)5 .1
L0, L1, L280
L1 *, L 2 *88
Technical data
Page 342 of 516
342
FM/87.5 MHz
87.5MHz 12:13
23 °C 87.5 MHz
First steps
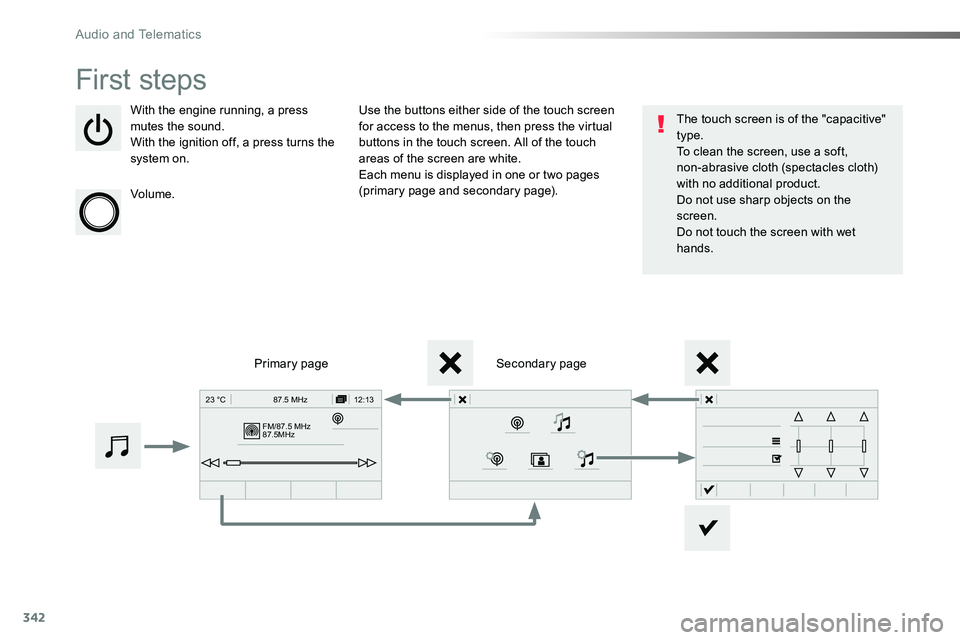
With the engine running, a press mutes the sound.With the ignition off, a press turns the system on.
Volume.
Use the buttons either side of the touch screen for access to the menus, then press the virtual buttons in the touch screen. All of the touch areas of the screen are white.Each menu is displayed in one or two pages (primary page and secondary page).
Secondary pagePrimary page
The touch screen is of the "capacitive" type.To clean the screen, use a soft, non-abrasive cloth (spectacles cloth) with no additional product.Do not use sharp objects on the screen.Do not touch the screen with wet hands.
Audio and Telematics
Page 428 of 516
428
QUESTIONANSWERSOLUTION
There is a difference in sound quality between the different audio sources.
For optimum sound quality, the audio settings for Loudness, Ambience, Treble, Bass and Volume can be adapted to the different sound sources, which may result in audible differences when changing source.
Check that the audio settings for Loudness, Ambience, Treble, Bass and Volume are adapted to the sources listened to. Adjust the Balance, Treble and Bass to the middle position, select the "None" musical ambience and set the loudness correction to the "Active" position in CD mode or to the "Inactive" position in radio mode.
With the engine off, the system switches off after a few minutes of use.
When the engine is switched off, the system's operating time depends on the state of charge of the battery.The switch-off is normal: the system switches to economy mode and switches off to prevent discharging of the vehicle's battery.
Start the vehicle's engine to increase the battery charge.
Audio and Telematics