engine TOYOTA PROACE 2017 Owners Manual
[x] Cancel search | Manufacturer: TOYOTA, Model Year: 2017, Model line: PROACE, Model: TOYOTA PROACE 2017Pages: 516, PDF Size: 91.65 MB
Page 281 of 516
281
Checks
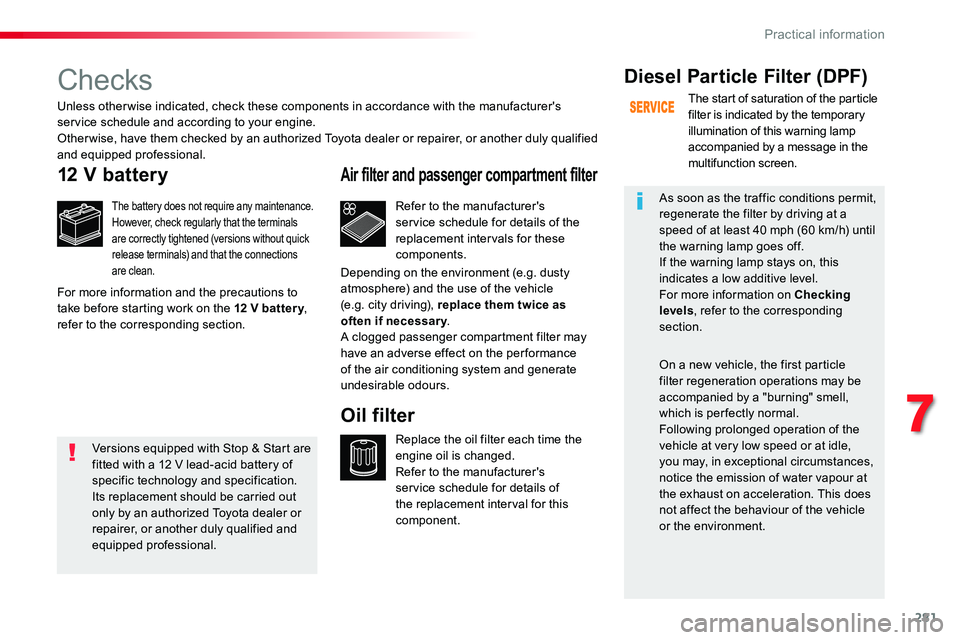
12 V battery
The battery does not require any maintenance.However, check regularly that the terminals are correctly tightened (versions without quick release terminals) and that the connections are clean.
Refer to the manufacturer's service schedule for details of the replacement intervals for these components.
Air filter and passenger compartment filter
Replace the oil filter each time the engine oil is changed.Refer to the manufacturer's service schedule for details of the replacement interval for this component.
Oil filter
Diesel Particle Filter (DPF)
The start of saturation of the particle filter is indicated by the temporary illumination of this warning lamp accompanied by a message in the multifunction screen.
As soon as the traffic conditions permit, regenerate the filter by driving at a speed of at least 40 mph (60 km/h) until the warning lamp goes off.If the warning lamp stays on, this indicates a low additive level.For more information on Checking levels, refer to the corresponding section.
On a new vehicle, the first particle filter regeneration operations may be accompanied by a "burning" smell, which is per fectly normal.Following prolonged operation of the
vehicle at very low speed or at idle, you may, in exceptional circumstances, notice the emission of water vapour at the exhaust on acceleration. This does not affect the behaviour of the vehicle or the environment.
Unless otherwise indicated, check these components in accordance with the manufacturer's service schedule and according to your engine.Other wise, have them checked by an authorized Toyota dealer or repairer, or another duly qualified and equipped professional.
For more information and the precautions to take before starting work on the 12 V batter y, refer to the corresponding section.
Depending on the environment (e.g. dusty atmosphere) and the use of the vehicle (e.g. city driving), replace them twice as often if necessar y.A clogged passenger compartment filter may have an adverse effect on the per formance of the air conditioning system and generate undesirable odours.
Versions equipped with Stop & Start are fitted with a 12 V lead-acid battery of specific technology and specification.Its replacement should be carried out only by an authorized Toyota dealer or repairer, or another duly qualified and equipped professional.
7
Practical information
Page 283 of 516
283
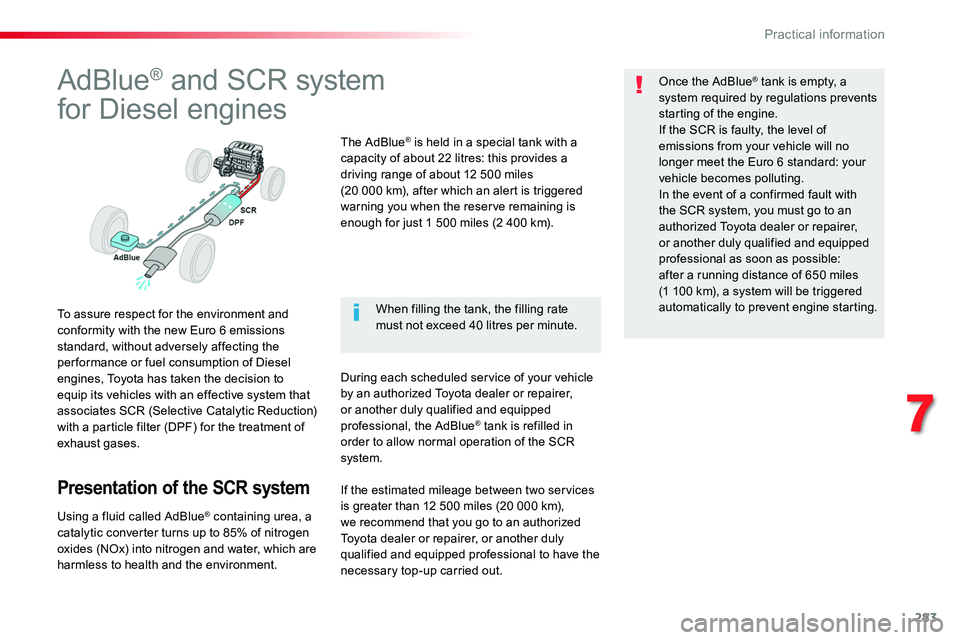
AdBlue® and SCR system
for Diesel engines
To assure respect for the environment and conformity with the new Euro 6 emissions standard, without adversely affecting the per formance or fuel consumption of Diesel engines, Toyota has taken the decision to equip its vehicles with an effective system that associates SCR (Selective Catalytic Reduction) with a particle filter (DPF) for the treatment of exhaust gases.
Presentation of the SCR system
Using a fluid called AdBlue® containing urea, a catalytic converter turns up to 85% of nitrogen
oxides (NOx) into nitrogen and water, which are harmless to health and the environment.
The AdBlue® is held in a special tank with a capacity of about 22 litres: this provides a driving range of about 12 500 miles (20 000 km), after which an alert is triggered warning you when the reserve remaining is enough for just 1 500 miles (2 400 km).
During each scheduled service of your vehicle by an authorized Toyota dealer or repairer, or another duly qualified and equipped professional, the AdBlue® tank is refilled in order to allow normal operation of the SCR system.
Once the AdBlue® tank is empty, a system required by regulations prevents starting of the engine.If the SCR is faulty, the level of emissions from your vehicle will no longer meet the Euro 6 standard: your vehicle becomes polluting.In the event of a confirmed fault with the SCR system, you must go to an authorized Toyota dealer or repairer, or another duly qualified and equipped professional as soon as possible: after a running distance of 650 miles (1 100 km), a system will be triggered automatically to prevent engine starting.When filling the tank, the filling rate must not exceed 40 litres per minute.
If the estimated mileage between two services is greater than 12 500 miles (20 000 km), we recommend that you go to an authorized Toyota dealer or repairer, or another duly qualified and equipped professional to have the necessary top-up carried out.
7
Practical information
Page 284 of 516
284
Topping-up the AdBlue®
Filling the AdBlue® tank is an operation included in every routine service on your vehicle by an authorized Toyota dealer or repairer, or another duly qualified and equipped professional.Nevertheless, given the capacity of the tank, it may be necessary to top-up the fluid between services, more particularly if an alert (warning lamps and a message) signals the requirement.You can go to an authorized Toyota dealer or repairer, or another duly qualified and equipped professional.If you envisage topping-up yourself, please read the following warnings carefully.
Precautions in use
Keep AdBlue® out of the reach of children, in its original bottle.Never transfer AdBlue® to another container: it would lose its purity.
Use only AdBlue® fluid that meets the ISO 22241 standard.
Never dilute AdBlue® with water.Never pour AdBlue® into the Diesel fuel tank.
The supply in a non-drip bottle simplifies topping-up. You can obtain 1.89 litre (half a US gallon) bottles from an authorized Toyota dealer or repairer, or another duly qualified and equipped professional.
Never top-up from an AdBlue® dispenser reserved for heavy goods vehicles.
AdBlue® is a urea-based solution. This liquid is non-flammable, colourless and odourless (kept in a cool area).In the event of contact with the skin, wash the affected area with soap and water. In the event of contact with the eyes, wash (irrigate) the eyes with large amounts of water or with an eye wash solution for at least 15 minutes. If a burning sensation or irritation persists, get medical attention.If swallowed, immediately wash out the mouth with clean water and then drink plenty of water.In certain conditions (high ambient temperature, for example), the risk of release of ammonia cannot be excluded: do not inhale the fluid. Ammonia vapour has an irritant effect on mucous membranes (eyes, nose and throat).ImportantIf your vehicle's AdBlue® tank is completely empty (which is confirmed by the alert messages and the impossibility of starting the engine) you must add at least 3.8 litres (so two 1.89 litre bottles).
Practical information
Page 285 of 516
285
Recommendations on storage
Never store bottles of AdBlue® in your vehicle.
AdBlue® freezes at about -11°C and deteriorates above 25°C. It is recommended that bottles be stored in a cool area and protected from direct sunlight.Under these conditions, the fluid can be kept for at least a year.If the additive has frozen, it can be used once it has completely thawed out.
Procedure
Before starting the top-up procedure, ensure that the vehicle is parked on a flat and level sur face.
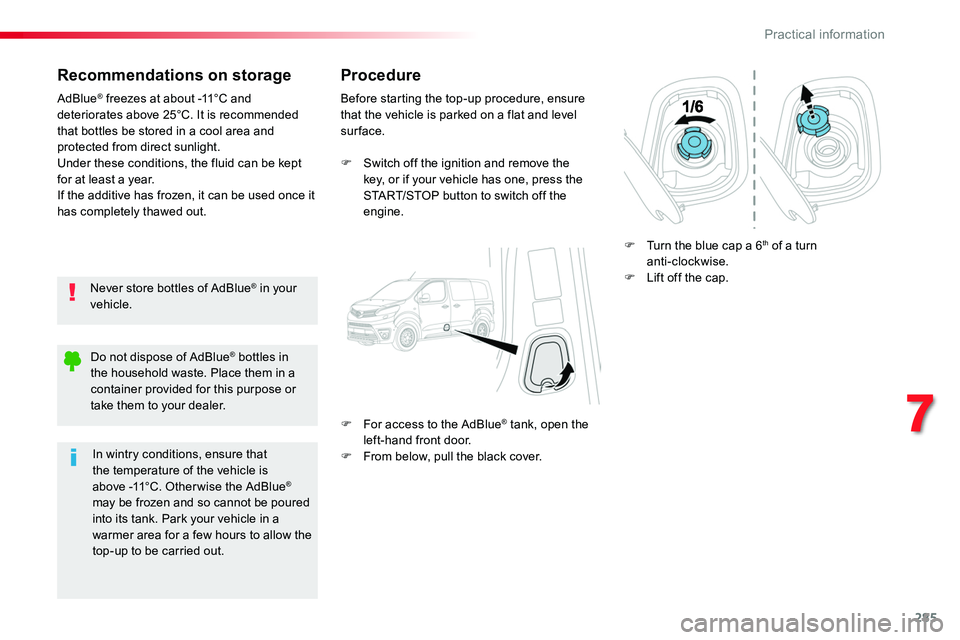
F Switch off the ignition and remove the key, or if your vehicle has one, press the START/STOP button to switch off the engine.
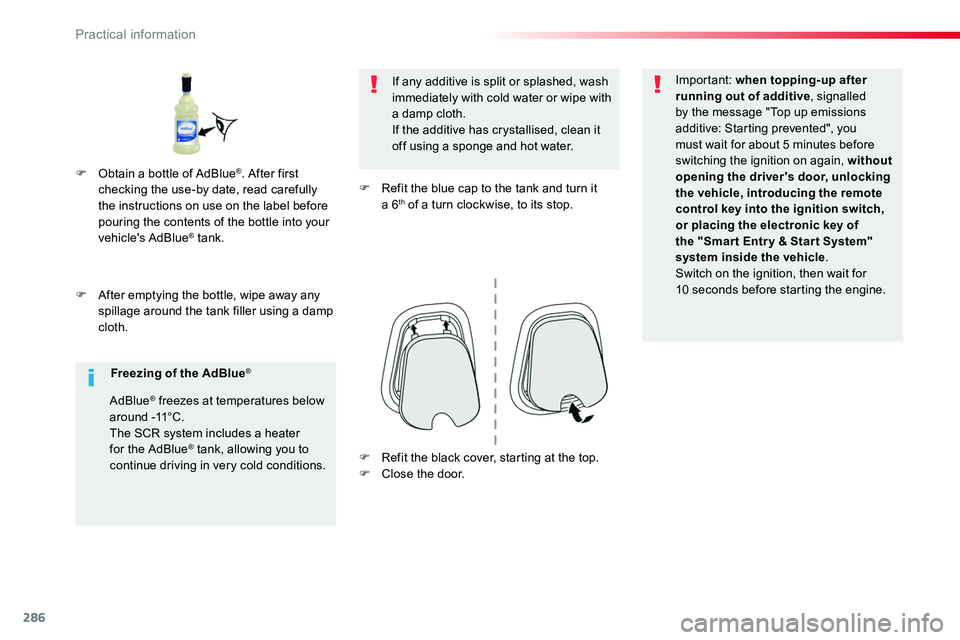
F For access to the AdBlue® tank, open the left-hand front door.F From below, pull the black cover.
F Turn the blue cap a 6th of a turn anti-clockwise.F Lift off the cap.
Do not dispose of AdBlue® bottles in the household waste. Place them in a container provided for this purpose or take them to your dealer.
In wintry conditions, ensure that the temperature of the vehicle is above -11°C. Other wise the AdBlue® may be frozen and so cannot be poured into its tank. Park your vehicle in a warmer area for a few hours to allow the top-up to be carried out.
7
Practical information
Page 286 of 516
286
F After emptying the bottle, wipe away any spillage around the tank filler using a damp cloth.
If any additive is split or splashed, wash immediately with cold water or wipe with a damp cloth.If the additive has crystallised, clean it off using a sponge and hot water.
F Refit the blue cap to the tank and turn it a 6th of a turn clockwise, to its stop.
Important: when topping-up after running out of additive, signalled by the message "Top up emissions additive: Starting prevented", you must wait for about 5 minutes before switching the ignition on again, without opening the driver's door, unlocking the vehicle, introducing the remote control key into the ignition switch, or placing the electronic key of the "Smar t Entr y & Star t System" system inside the vehicle.Switch on the ignition, then wait for 10 seconds before starting the engine.
F Obtain a bottle of AdBlue®. After first checking the use-by date, read carefully the instructions on use on the label before pouring the contents of the bottle into your vehicle's AdBlue® tank.
Freezing of the AdBlue®
AdBlue® freezes at temperatures below around -11°C.
The SCR system includes a heater for the AdBlue® tank, allowing you to continue driving in very cold conditions.F Refit the black cover, starting at the top.F Close the door.
Practical information
Page 292 of 516
292
Repair procedure
1. Sealing
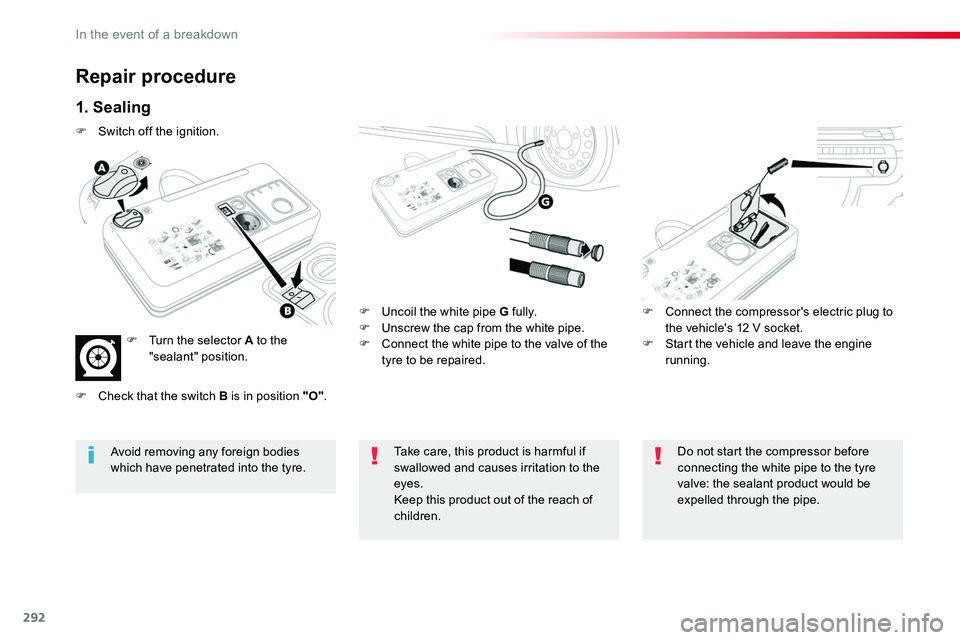
F Uncoil the white pipe G fully.F Unscrew the cap from the white pipe.F Connect the white pipe to the valve of the tyre to be repaired.
F Connect the compressor's electric plug to the vehicle's 12 V socket.F Start the vehicle and leave the engine running.
Take care, this product is harmful if swallowed and causes irritation to the eyes.Keep this product out of the reach of children.
Avoid removing any foreign bodies which have penetrated into the tyre.
Do not start the compressor before connecting the white pipe to the tyre valve: the sealant product would be expelled through the pipe.
F Switch off the ignition.
F Turn the selector A to the "sealant" position.
F Check that the switch B is in position "O".
In the event of a breakdown
Page 294 of 516
294
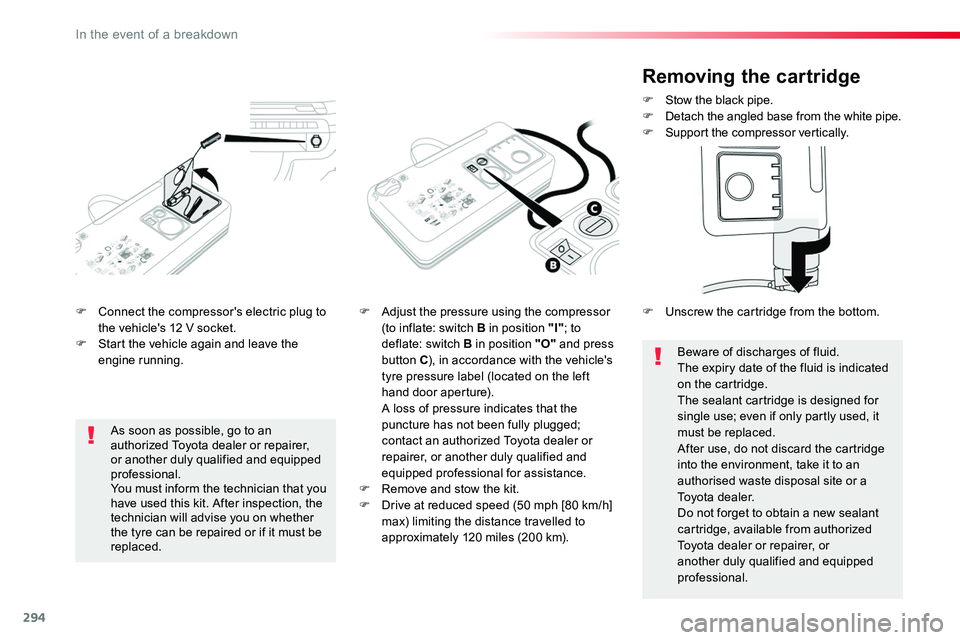
F Connect the compressor's electric plug to the vehicle's 12 V socket.F Start the vehicle again and leave the engine running.
F Adjust the pressure using the compressor (to inflate: switch B in position "I"; to deflate: switch B in position "O" and press button C), in accordance with the vehicle's tyre pressure label (located on the left hand door aperture). A loss of pressure indicates that the puncture has not been fully plugged;
contact an authorized Toyota dealer or repairer, or another duly qualified and equipped professional for assistance.F Remove and stow the kit.F Drive at reduced speed (50 mph [80 km/h] max) limiting the distance travelled to approximately 120 miles (200 km).
As soon as possible, go to an authorized Toyota dealer or repairer, or another duly qualified and equipped professional.You must inform the technician that you have used this kit. After inspection, the technician will advise you on whether the tyre can be repaired or if it must be replaced.
Removing the cartridge
F Stow the black pipe.F Detach the angled base from the white pipe.F Support the compressor vertically.
Beware of discharges of fluid.The expiry date of the fluid is indicated on the cartridge.The sealant cartridge is designed for single use; even if only partly used, it must be replaced.After use, do not discard the cartridge into the environment, take it to an authorised waste disposal site or a Toyota dealer.Do not forget to obtain a new sealant cartridge, available from authorized Toyota dealer or repairer, or another duly qualified and equipped professional.
F Unscrew the cartridge from the bottom.
In the event of a breakdown
Page 295 of 516
295
Checking / adjusting tyre
pressures
You can also use the compressor without injecting any product, to check and if necessary adjust your tyre pressures.
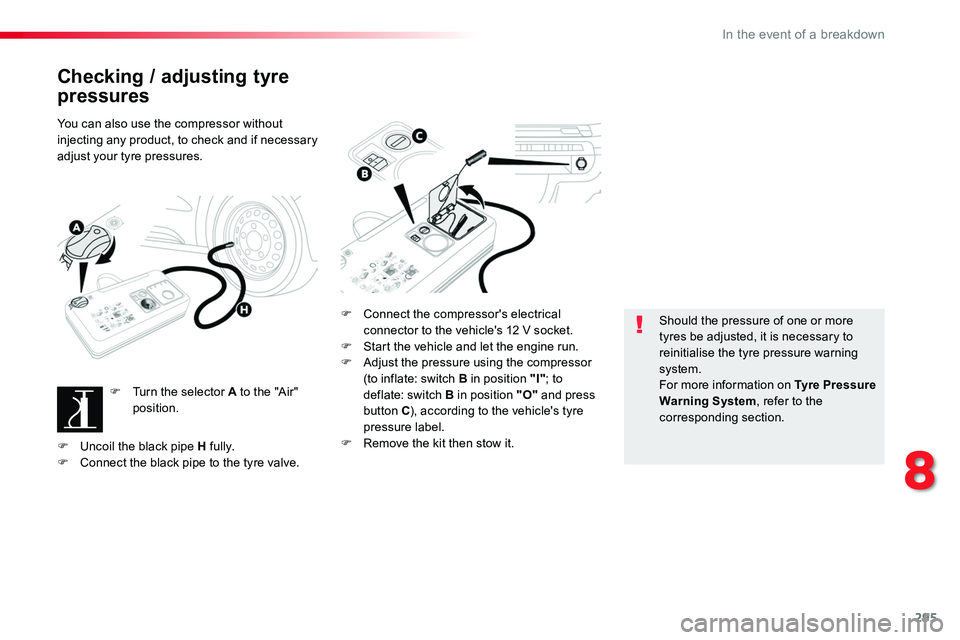
F Turn the selector A to the "Air" position.
F Connect the compressor's electrical connector to the vehicle's 12 V socket.F Start the vehicle and let the engine run.F Adjust the pressure using the compressor (to inflate: switch B in position "I"; to deflate: switch B in position "O" and press button C), according to the vehicle's tyre pressure label.F Remove the kit then stow it.
Should the pressure of one or more tyres be adjusted, it is necessary to reinitialise the tyre pressure warning system.For more information on Tyre Pressure Warning System, refer to the corresponding section.
F Uncoil the black pipe H fully.F Connect the black pipe to the tyre valve.
8
In the event of a breakdown
Page 320 of 516
320
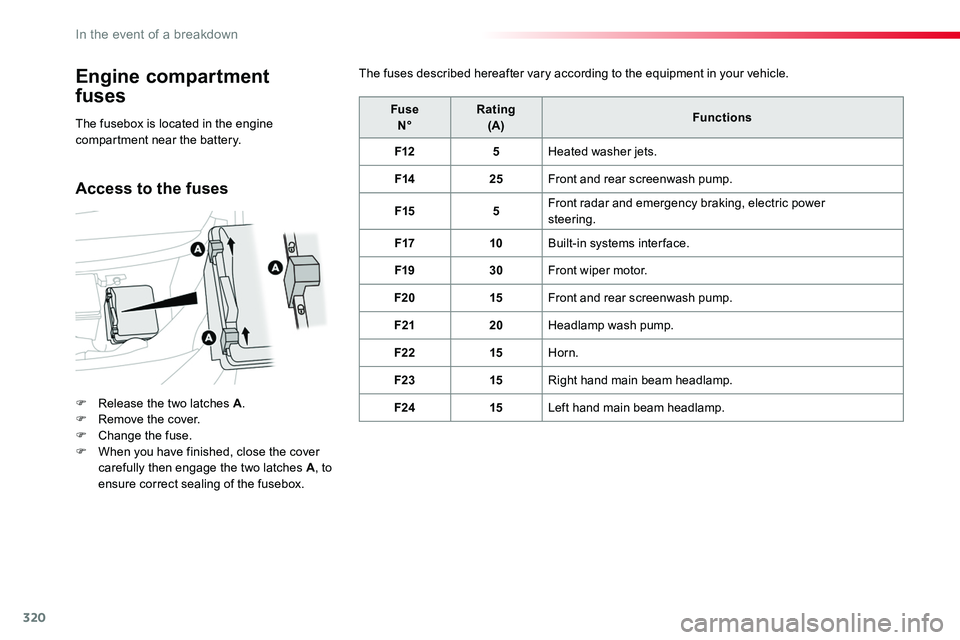
Engine compartment
fuses
F Release the two latches A.F Remove the cover.F Change the fuse.F When you have finished, close the cover carefully then engage the two latches A, to ensure correct sealing of the fusebox.
FuseN°Rating(A)Functions
F125Heated washer jets.
F1425Front and rear screenwash pump.
F155Front radar and emergency braking, electric power steering.
F1710Built-in systems inter face.
F1930Front wiper motor.
F2015Front and rear screenwash pump.
F2120Headlamp wash pump.
F2215Horn.
F2315Right hand main beam headlamp.
F2415Left hand main beam headlamp.
The fusebox is located in the engine compartment near the battery.
The fuses described hereafter vary according to the equipment in your vehicle.
Access to the fuses
In the event of a breakdown
Page 321 of 516
321
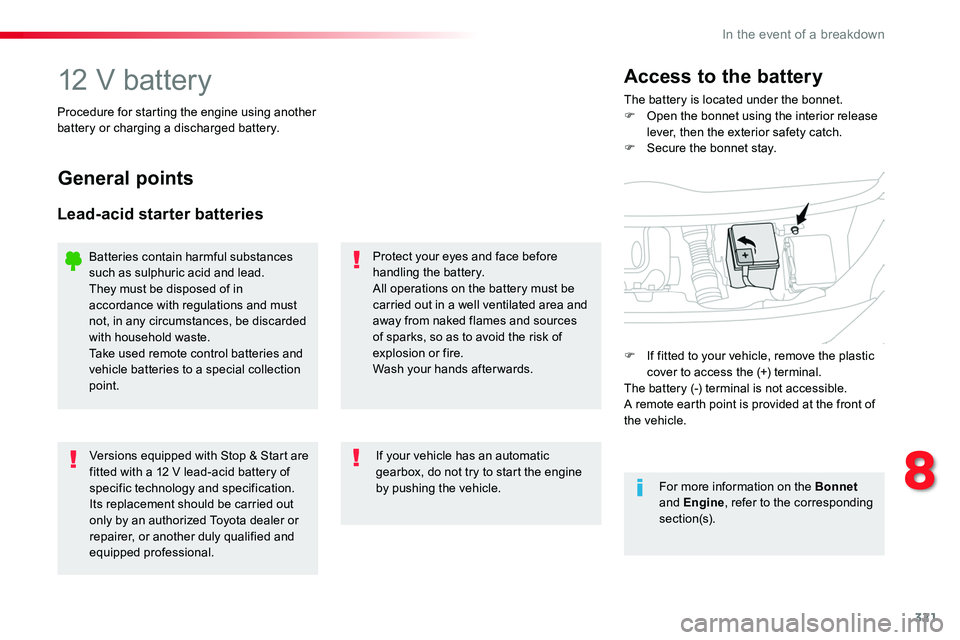
12 V batteryThe battery is located under the bonnet.F Open the bonnet using the interior release lever, then the exterior safety catch.F Secure the bonnet stay.
Access to the battery
Procedure for starting the engine using another battery or charging a discharged battery.
General points
Lead-acid starter batteries
Protect your eyes and face before handling the battery.All operations on the battery must be carried out in a well ventilated area and away from naked flames and sources of sparks, so as to avoid the risk of explosion or fire.Wash your hands afterwards.
Versions equipped with Stop & Start are fitted with a 12 V lead-acid battery of specific technology and specification.Its replacement should be carried out only by an authorized Toyota dealer or repairer, or another duly qualified and equipped professional.
If your vehicle has an automatic gearbox, do not try to start the engine by pushing the vehicle.
Batteries contain harmful substances such as sulphuric acid and lead.They must be disposed of in accordance with regulations and must not, in any circumstances, be discarded with household waste.Take used remote control batteries and vehicle batteries to a special collection point.
For more information on the Bonnet and Engine, refer to the corresponding section(s).
F If fitted to your vehicle, remove the plastic cover to access the (+) terminal.The battery (-) terminal is not accessible.A remote earth point is provided at the front of the vehicle.
8
In the event of a breakdown