tyre pressure TOYOTA PROACE 2019 (in English) User Guide
[x] Cancel search | Manufacturer: TOYOTA, Model Year: 2019, Model line: PROACE, Model: TOYOTA PROACE 2019Pages: 516, PDF Size: 90.91 MB
Page 262 of 516
262
Tyre Pressure Warning System (TPWS)
The system monitors the pressures in the four tyres, once the vehicle is moving.It compares the information given by the four wheel speed sensors with reference values, which must be reinitialised ever y time the tyre pressures are adjusted or a wheel changed.The system triggers an alert as soon as it detects a drop in the inflation pressure of one or more tyres.
The Tyre Pressure Warning System (TPWS) does not replace the need for vigilance on the part of the driver.This system does not avoid the need to check the tyre pressures (including the spare wheel) every month as well as before a long journey.Driving with under-inflated tyres impairs road holding, extends braking distances and causes premature tyre wear, particularly under arduous conditions (high loading, high speed, long journey).
System which automatically checks the pressures of the tyres while driving.
The tyre pressures defined for your vehicle can be found on the tyre pressure label.For more information on the Identification markings, refer to the corresponding section.Tyre pressures should be checked when the tyres are "cold" (vehicle stopped for 1 hour or after a journey of less than 6 miles (10 km) at moderate speeds).Other wise (when hot), add 0.3 bar to the pressures shown on the label.
Driving with under-inflated tyres
increases fuel consumption.Snow chains
The system does not have to be reinitialised after fitting or removing snow chains.
Spare wheel
The steel spare wheel does not have an tyre pressure warning sensor.
Driving
Page 263 of 516
263
Tyre Pressure WarningReinitialisation
Before reinitialising the system, ensure that the pressures of the four tyres are correct for the use of the vehicle and in line with the recommendations on the tyre pressure label.The tyre pressure warning can only be relied on if the reinitialisation of the system has been done with the pressures in the four tyres correctly adjusted.The tyre pressure warning system does not give a warning if a pressure is incorrect at the time of reinitialisation.
This is given by fixed illumination of this warning lamp, accompanied by an audible signal and, depending on equipment, the display of a message.
It is necessary to reinitialise the system every time one or more tyre pressures are adjusted, and after changing one or more wheels.
F Reduce speed immediately, avoid excessive steering movements and sudden braking.F Stop the vehicle as soon as it is safe to do so.
F In the event of a puncture, use the temporary puncture repair kit or the spare wheel (depending on equipment),orF if you have a compressor, such as the one in the temporary puncture repair kit, check the pressures of the four tyres when cold,
orF if it is not possible to make this check immediately, drive carefully at reduced speed.
The loss of pressure detected does not always cause visible bulging of the tyre. Do not satisfy yourself with just a visual check.The alert is maintained until the system is reinitialised.
Initialisation of the system is done with the ignition on and the vehicle stationary.
The new pressure settings registered are considered to be reference values by the system.
6
Driving
Page 264 of 516
264
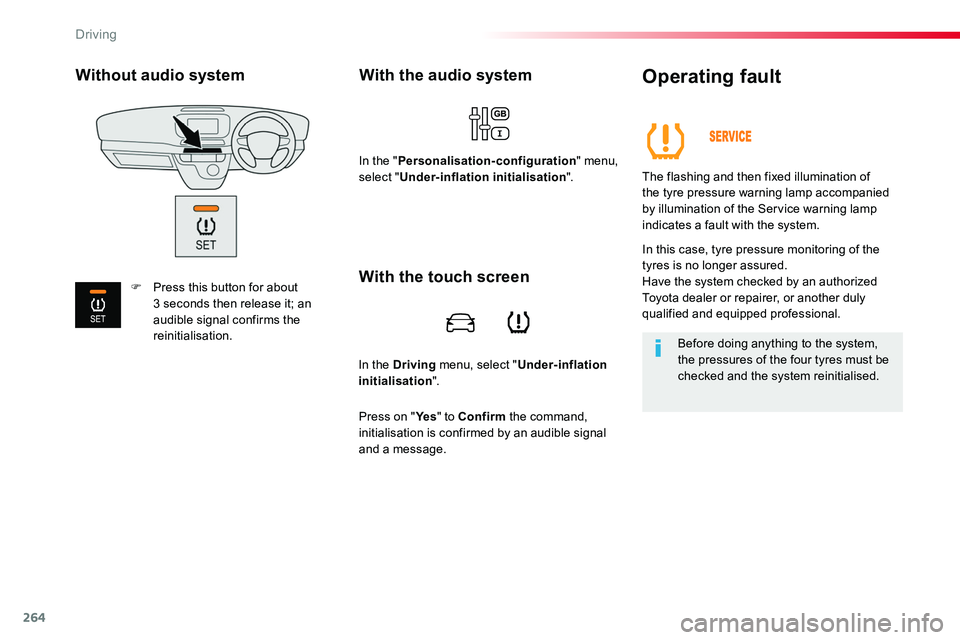
In the Driving menu, select "Under-inflation initialisation".
With the audio system
In the "Personalisation-configuration" menu, select "Under-inflation initialisation".
Operating fault
The flashing and then fixed illumination of the tyre pressure warning lamp accompanied by illumination of the Service warning lamp
indicates a fault with the system.
In this case, tyre pressure monitoring of the tyres is no longer assured.Have the system checked by an authorized Toyota dealer or repairer, or another duly qualified and equipped professional.
Before doing anything to the system, the pressures of the four tyres must be checked and the system reinitialised.
With the touch screen
Press on "Ye s" to Confirm the command, initialisation is confirmed by an audible signal and a message.
Without audio system
F Press this button for about 3 seconds then release it; an audible signal confirms the reinitialisation.
Driving
Page 289 of 516
289
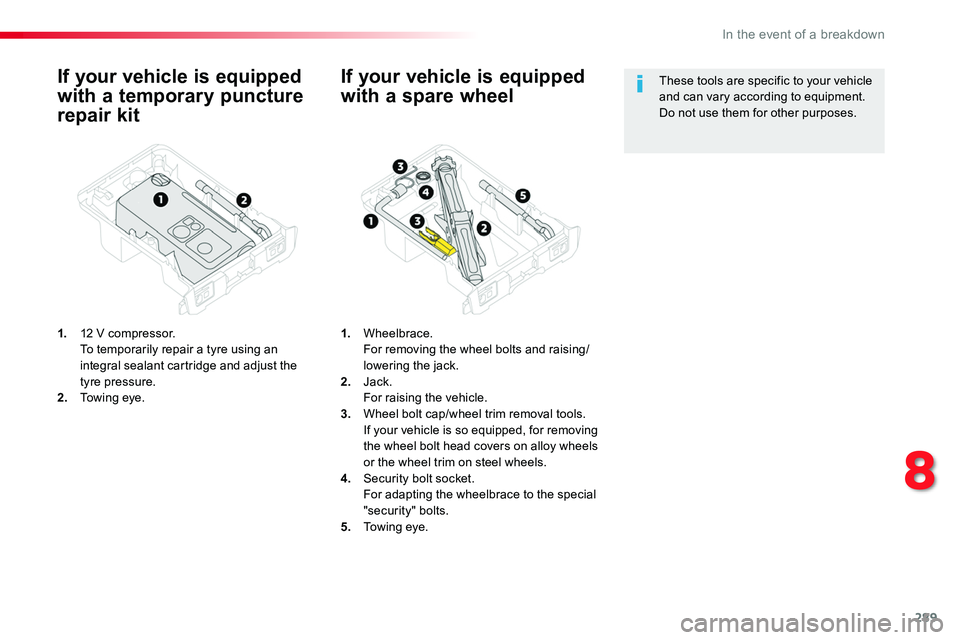
If your vehicle is equipped
with a temporary puncture
repair kit
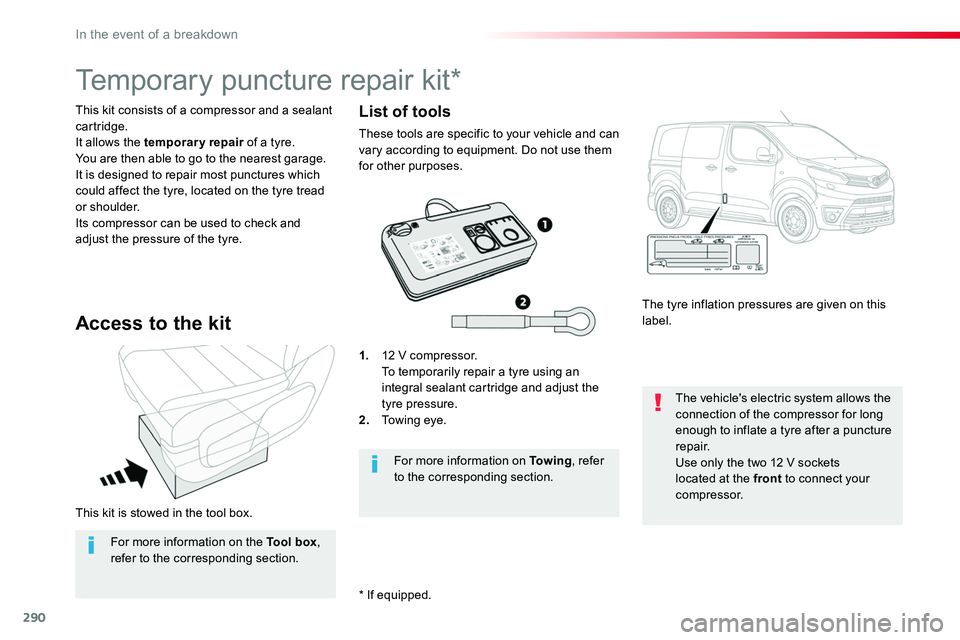
1. 12 V compressor. To temporarily repair a tyre using an integral sealant cartridge and adjust the tyre pressure.2. Towing eye.
If your vehicle is equipped
with a spare wheel
1. Wheelbrace. For removing the wheel bolts and raising/lowering the jack.2. Jack. For raising the vehicle.3. Wheel bolt cap/wheel trim removal tools. If your vehicle is so equipped, for removing the wheel bolt head covers on alloy wheels or the wheel trim on steel wheels.4. Security bolt socket. For adapting the wheelbrace to the special "security" bolts.5. Towing eye.
These tools are specific to your vehicle and can vary according to equipment. Do not use them for other purposes.
8
In the event of a breakdown
Page 290 of 516
290
This kit is stowed in the tool box.
This kit consists of a compressor and a sealant cartridge.It allows the temporary repair of a tyre.You are then able to go to the nearest garage.It is designed to repair most punctures which could affect the tyre, located on the tyre tread or shoulder.Its compressor can be used to check and adjust the pressure of the tyre.
Temporary puncture repair kit*
Access to the kit
1. 12 V compressor. To temporarily repair a tyre using an integral sealant cartridge and adjust the tyre pressure.2. Towing eye.
The tyre inflation pressures are given on this label.
The vehicle's electric system allows the connection of the compressor for long
enough to inflate a tyre after a puncture repair.Use only the two 12 V sockets located at the front to connect your compressor.
For more information on To w i n g, refer to the corresponding section.
List of tools
These tools are specific to your vehicle and can vary according to equipment. Do not use them for other purposes.
For more information on the Tool box, refer to the corresponding section.
* If equipped.
In the event of a breakdown
Page 291 of 516
291
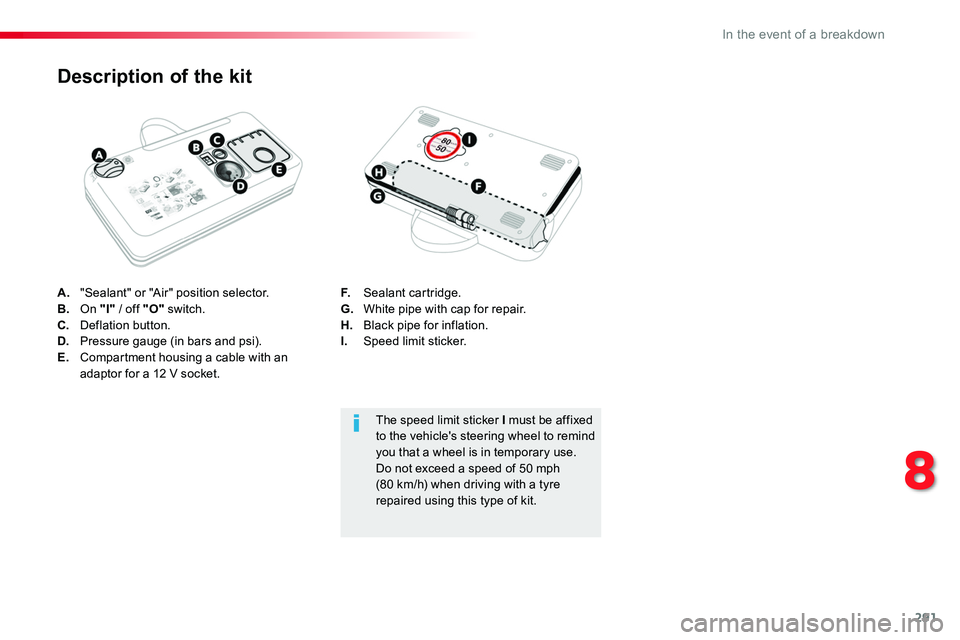
A. "Sealant" or "Air" position selector.B. On "I" / off "O" switch.C. Deflation button.D. Pressure gauge (in bars and psi).E. Compartment housing a cable with an adaptor for a 12 V socket.
Description of the kit
F. Sealant cartridge.G. White pipe with cap for repair.H. Black pipe for inflation.I. Speed limit sticker.
The speed limit sticker I must be affixed to the vehicle's steering wheel to remind you that a wheel is in temporary use.Do not exceed a speed of 50 mph (80 km/h) when driving with a tyre repaired using this type of kit.
8
In the event of a breakdown
Page 293 of 516
293
If after around 5 to 7 minutes the pressure is not attained, this indicates that the tyre is not repairable; contact an authorized Toyota dealer or repairer, or another duly qualified and equipped professional for assistance.
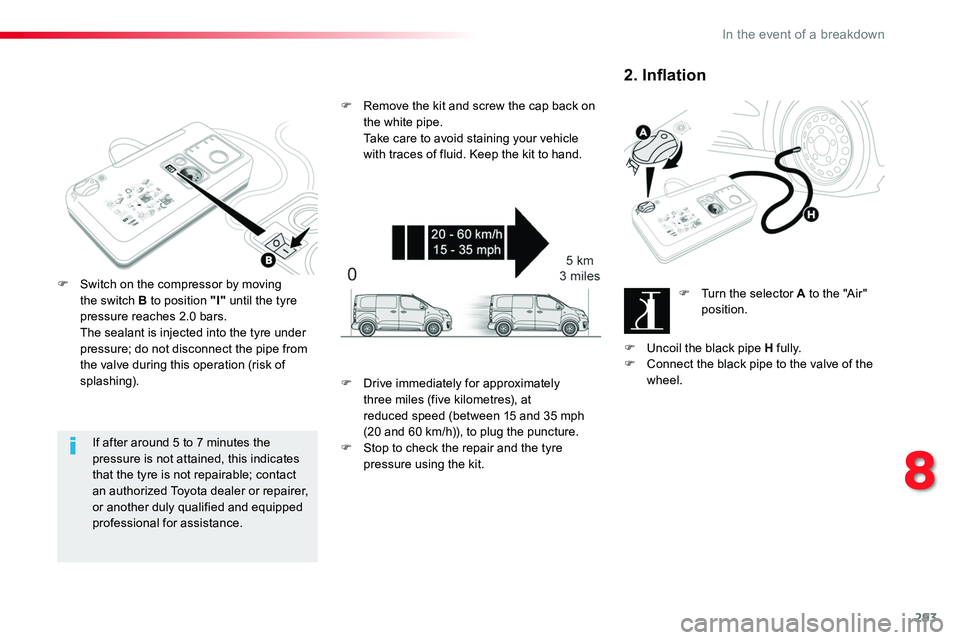
F Switch on the compressor by moving the switch B to position "I" until the tyre pressure reaches 2.0 bars. The sealant is injected into the tyre under pressure; do not disconnect the pipe from the valve during this operation (risk of splashing).
F Remove the kit and screw the cap back on the white pipe. Take care to avoid staining your vehicle with traces of fluid. Keep the kit to hand.
2. Inflation
F Turn the selector A to the "Air" position.
F Uncoil the black pipe H fully.F Connect the black pipe to the valve of the wheel.F Drive immediately for approximately three miles (five kilometres), at reduced speed (between 15 and 35 mph (20 and 60 km/h)), to plug the puncture.F Stop to check the repair and the tyre pressure using the kit.
8
In the event of a breakdown
Page 294 of 516
294
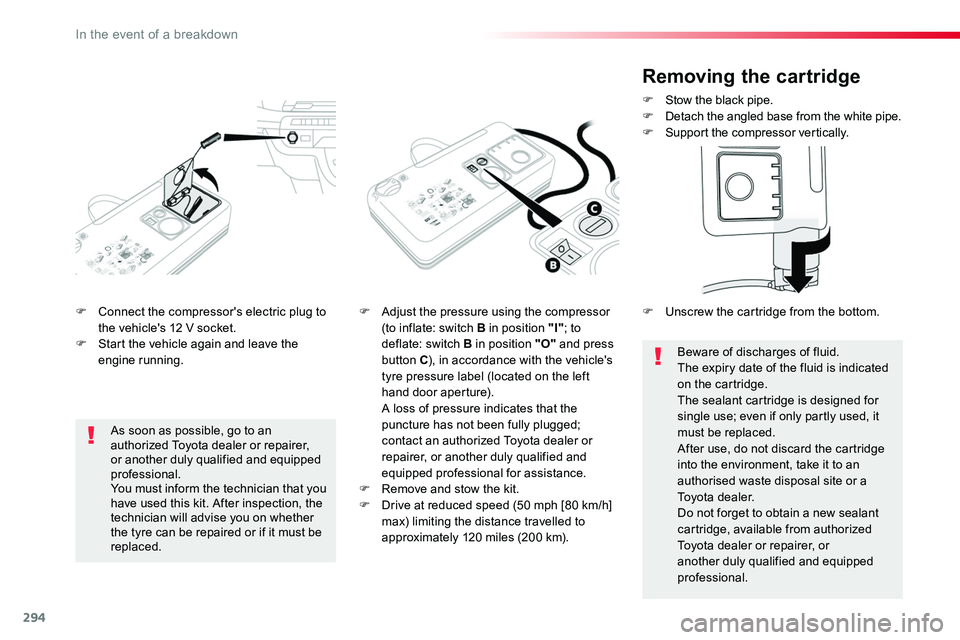
F Connect the compressor's electric plug to the vehicle's 12 V socket.F Start the vehicle again and leave the engine running.
F Adjust the pressure using the compressor (to inflate: switch B in position "I"; to deflate: switch B in position "O" and press button C), in accordance with the vehicle's tyre pressure label (located on the left hand door aperture). A loss of pressure indicates that the puncture has not been fully plugged;
contact an authorized Toyota dealer or repairer, or another duly qualified and equipped professional for assistance.F Remove and stow the kit.F Drive at reduced speed (50 mph [80 km/h] max) limiting the distance travelled to approximately 120 miles (200 km).
As soon as possible, go to an authorized Toyota dealer or repairer, or another duly qualified and equipped professional.You must inform the technician that you have used this kit. After inspection, the technician will advise you on whether the tyre can be repaired or if it must be replaced.
Removing the cartridge
F Stow the black pipe.F Detach the angled base from the white pipe.F Support the compressor vertically.
Beware of discharges of fluid.The expiry date of the fluid is indicated on the cartridge.The sealant cartridge is designed for single use; even if only partly used, it must be replaced.After use, do not discard the cartridge into the environment, take it to an authorised waste disposal site or a Toyota dealer.Do not forget to obtain a new sealant cartridge, available from authorized Toyota dealer or repairer, or another duly qualified and equipped professional.
F Unscrew the cartridge from the bottom.
In the event of a breakdown
Page 295 of 516
295
Checking / adjusting tyre
pressures
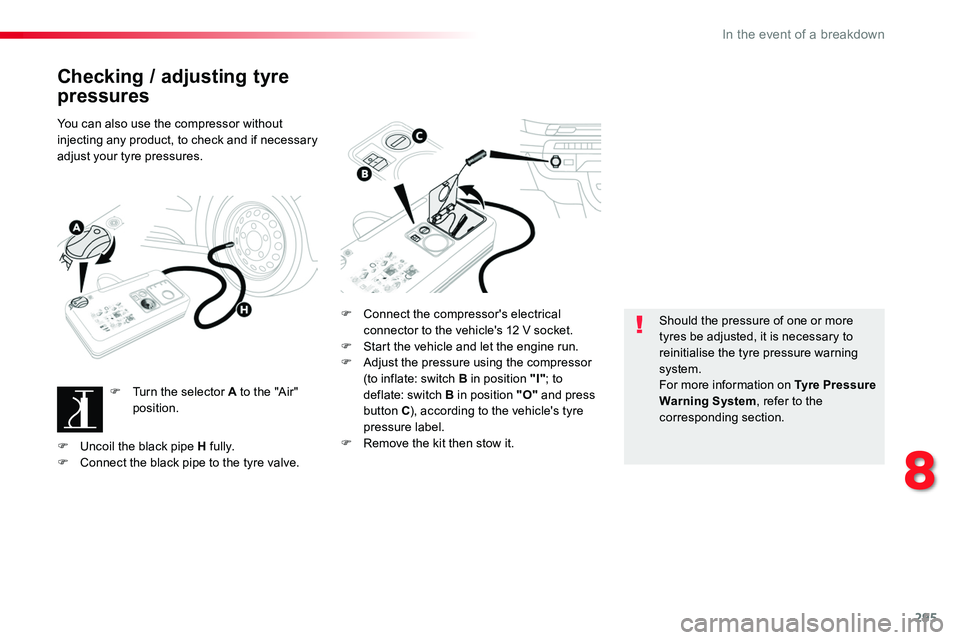
You can also use the compressor without injecting any product, to check and if necessary adjust your tyre pressures.
F Turn the selector A to the "Air" position.
F Connect the compressor's electrical connector to the vehicle's 12 V socket.F Start the vehicle and let the engine run.F Adjust the pressure using the compressor (to inflate: switch B in position "I"; to deflate: switch B in position "O" and press button C), according to the vehicle's tyre pressure label.F Remove the kit then stow it.
Should the pressure of one or more tyres be adjusted, it is necessary to reinitialise the tyre pressure warning system.For more information on Tyre Pressure Warning System, refer to the corresponding section.
F Uncoil the black pipe H fully.F Connect the black pipe to the tyre valve.
8
In the event of a breakdown
Page 302 of 516
302
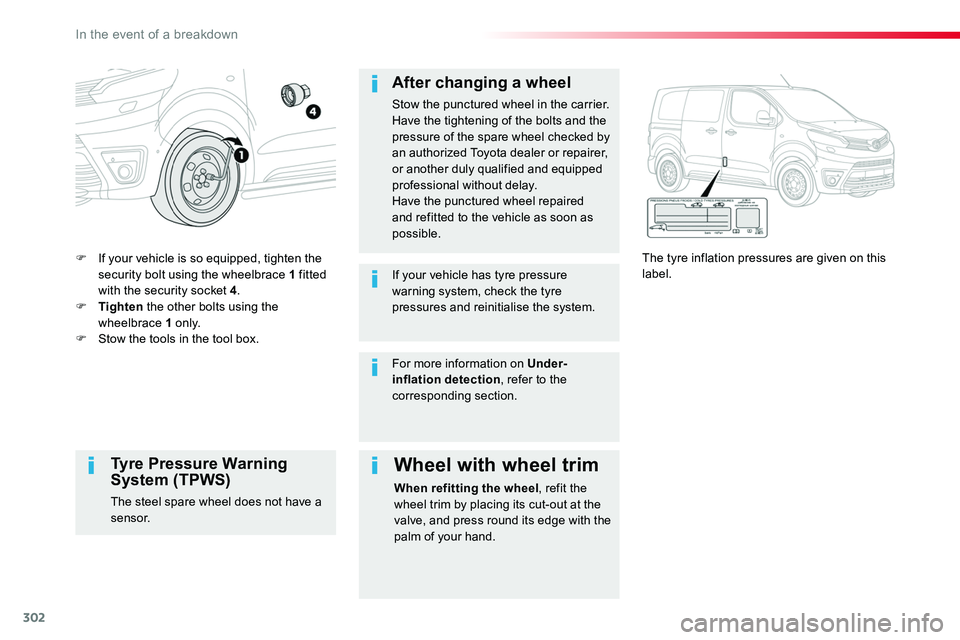
F If your vehicle is so equipped, tighten the security bolt using the wheelbrace 1 fitted with the security socket 4.F Tighten the other bolts using the wheelbrace 1 o n l y.F Stow the tools in the tool box.
The tyre inflation pressures are given on this label.
After changing a wheel
Stow the punctured wheel in the carrier.Have the tightening of the bolts and the pressure of the spare wheel checked by an authorized Toyota dealer or repairer, or another duly qualified and equipped professional without delay.Have the punctured wheel repaired and refitted to the vehicle as soon as possible.
If your vehicle has tyre pressure warning system, check the tyre pressures and reinitialise the system.
Tyre Pressure Warning System (TPWS)
The steel spare wheel does not have a sensor.
Wheel with wheel trim
When refitting the wheel, refit the wheel trim by placing its cut-out at the valve, and press round its edge with the palm of your hand.
For more information on Under-inflation detection, refer to the corresponding section.
In the event of a breakdown