ECU TOYOTA PROACE 2020 Owners Manual (in English)
[x] Cancel search | Manufacturer: TOYOTA, Model Year: 2020, Model line: PROACE, Model: TOYOTA PROACE 2020Pages: 430, PDF Size: 48.01 MB
Page 47 of 430
47
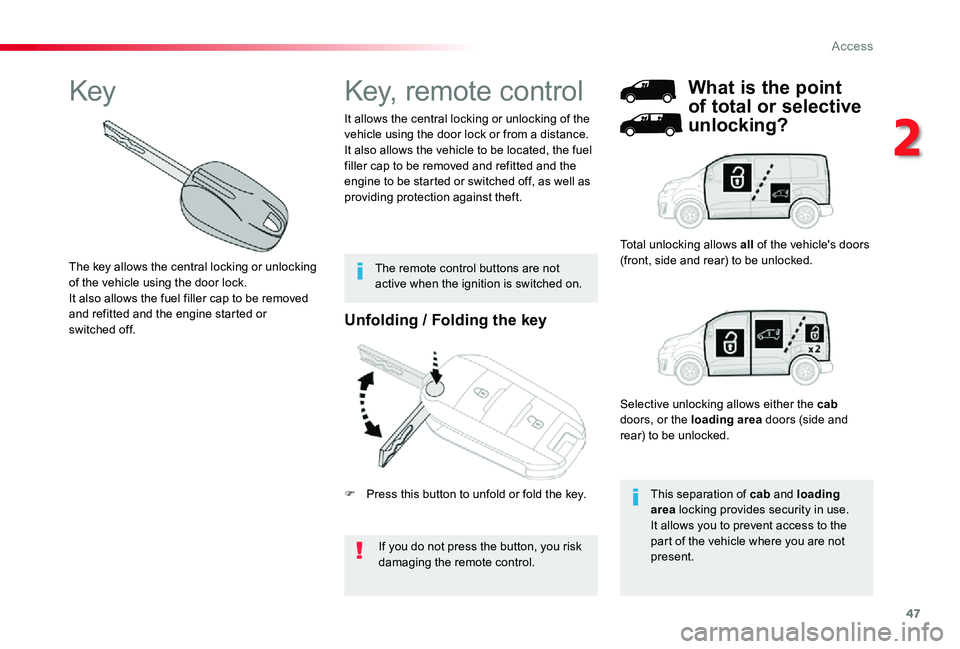
Unfolding / Folding the key
If you do not press the button, you risk damaging the remote control.
It allows the central locking or unlocking of the vehicle using the door lock or from a distance.It also allows the vehicle to be located, the fuel filler cap to be removed and refitted and the engine to be started or switched off, as well as providing protection against theft.
Key, remote control
This separation of cab and loading area locking provides security in use.It allows you to prevent access to the part of the vehicle where you are not present.
What is the point
of total or selective
unlocking?
Total unlocking allows all of the vehicle's doors (front, side and rear) to be unlocked.The remote control buttons are not active when the ignition is switched on.
Selective unlocking allows either the cab doors, or the loading area doors (side and rear) to be unlocked.
Key
The key allows the central locking or unlocking of the vehicle using the door lock.It also allows the fuel filler cap to be removed and refitted and the engine started or switched off.
F Press this button to unfold or fold the key.
2
Access
Page 55 of 430
55
"Smart Entry & Start
System"
It allows the central locking or unlocking of the vehicle from a distance.It is also used to locate and start the vehicle, as well as providing protection against theft.
Remote control
This separation of cab and loading area locking provide security in use.It allows you to prevent access to the part of the vehicle where you are not present.
What is the point
of total or selective
unlocking?
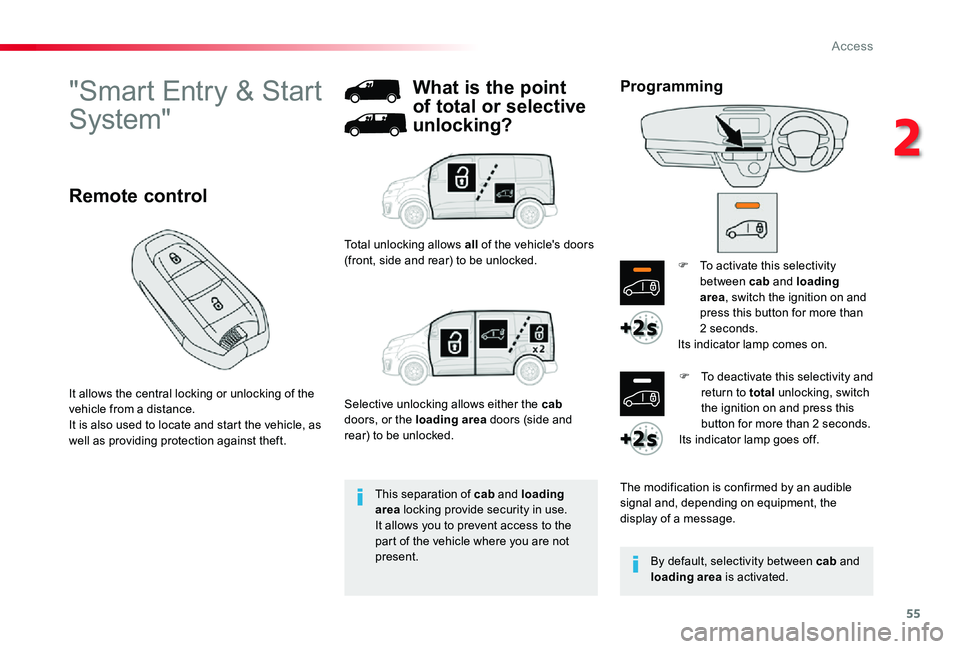
Total unlocking allows all of the vehicle's doors (front, side and rear) to be unlocked.
Selective unlocking allows either the cab doors, or the loading area doors (side and rear) to be unlocked.
F To activate this selectivity between cab and loading area, switch the ignition on and press this button for more than 2 seconds.Its indicator lamp comes on.
The modification is confirmed by an audible signal and, depending on equipment, the display of a message.
F To deactivate this selectivity and return to total unlocking, switch the ignition on and press this button for more than 2 seconds.Its indicator lamp goes off.
By default, selectivity between cab and loading area is activated.
Programming
2
Access
Page 106 of 430
106
Smart Cargo
Removing the flap
Removable flap
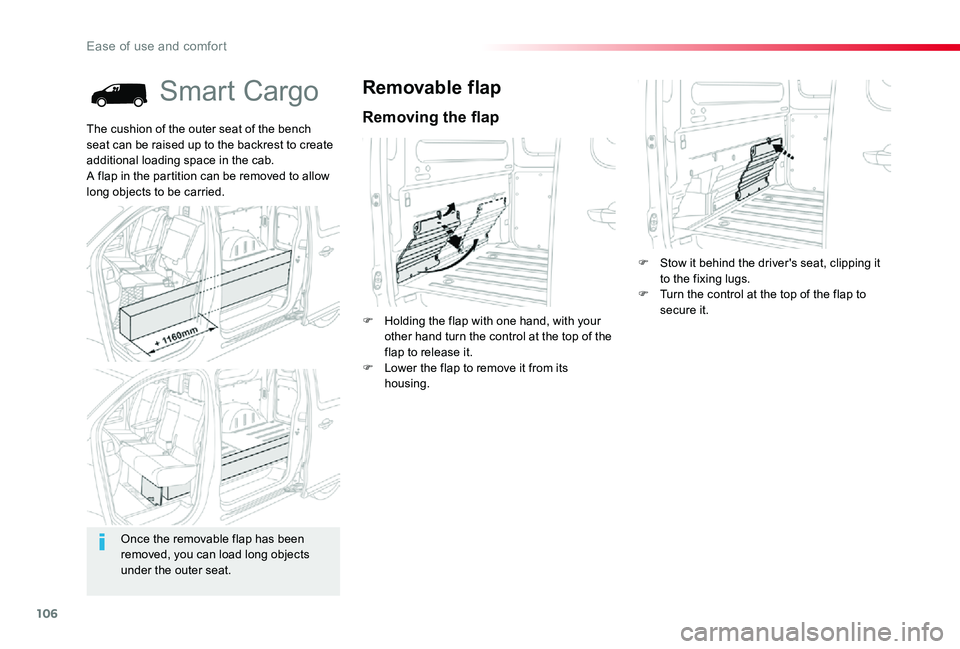
F Holding the flap with one hand, with your other hand turn the control at the top of the flap to release it.F Lower the flap to remove it from its housing.
The cushion of the outer seat of the bench seat can be raised up to the backrest to create additional loading space in the cab.A flap in the partition can be removed to allow long objects to be carried.
Once the removable flap has been removed, you can load long objects under the outer seat.
F Stow it behind the driver's seat, clipping it to the fixing lugs.F Turn the control at the top of the flap to secure it.
Ease of use and comfort
Page 107 of 430
107
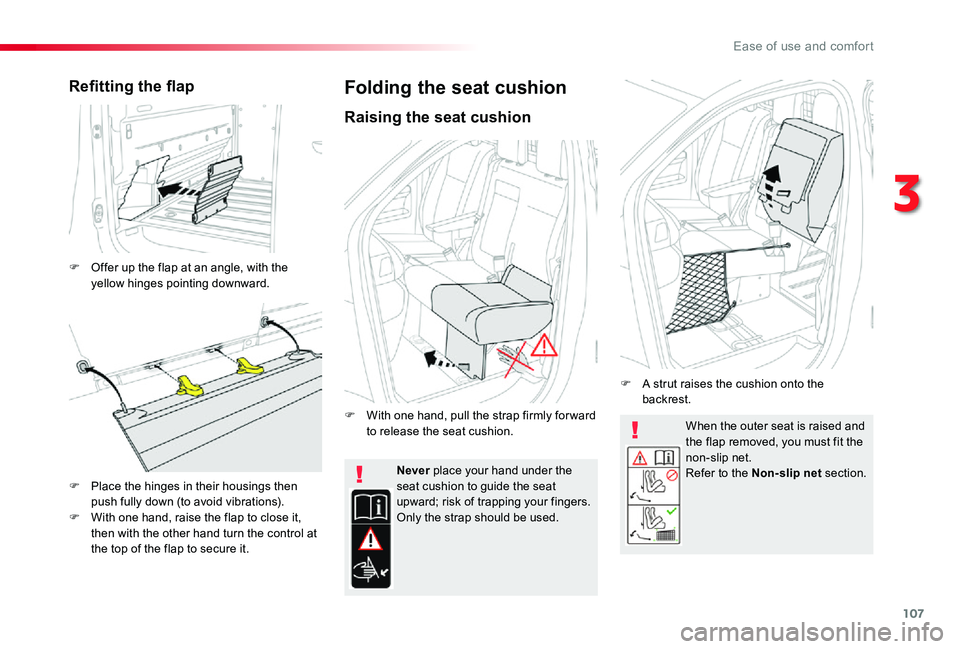
When the outer seat is raised and the flap removed, you must fit the non-slip net.Refer to the Non-slip net section.Never place your hand under the seat cushion to guide the seat upward; risk of trapping your fingers.Only the strap should be used.
Refitting the flap
F Offer up the flap at an angle, with the yellow hinges pointing downward.
F Place the hinges in their housings then push fully down (to avoid vibrations).F With one hand, raise the flap to close it, then with the other hand turn the control at the top of the flap to secure it.
Folding the seat cushion
Raising the seat cushion
F With one hand, pull the strap firmly for ward to release the seat cushion.
F A strut raises the cushion onto the backrest.
3
Ease of use and comfort
Page 108 of 430
108
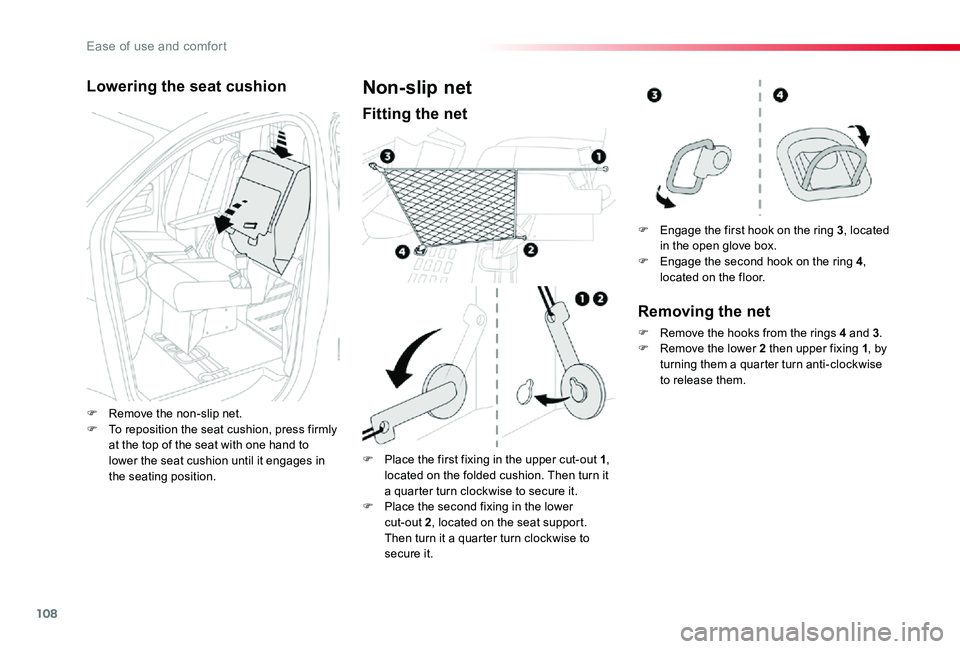
Lowering the seat cushion
F Remove the non-slip net.F To reposition the seat cushion, press firmly at the top of the seat with one hand to lower the seat cushion until it engages in the seating position.
Non-slip net
Fitting the net
F Place the first fixing in the upper cut-out 1, located on the folded cushion. Then turn it a quarter turn clockwise to secure it.F Place the second fixing in the lower cut-out 2, located on the seat support. Then turn it a quarter turn clockwise to secure it.
F Engage the first hook on the ring 3, located in the open glove box.F Engage the second hook on the ring 4, located on the floor.
Removing the net
F Remove the hooks from the rings 4 and 3.F Remove the lower 2 then upper fixing 1, by turning them a quarter turn anti-clockwise to release them.
Ease of use and comfort
Page 118 of 430
118
No not attach anything to the cab fixing structure.Do not exceed the number of passengers indicated on the registration certificate.In the rear, the loading area is intended for carrying goods only.You are advised to place heavy goods or objects as far for ward as possible in the loading area (towards the cab) and secure them by means of straps using the stowing rings on the floor.The rear seat belt frames are not intended for securing transported articles.
The storage boxes can be removed* and are extracted* from the rear, allowing long objects to be housed under the bench seat.
* Depending on the country of sale.
Crew cab, folding
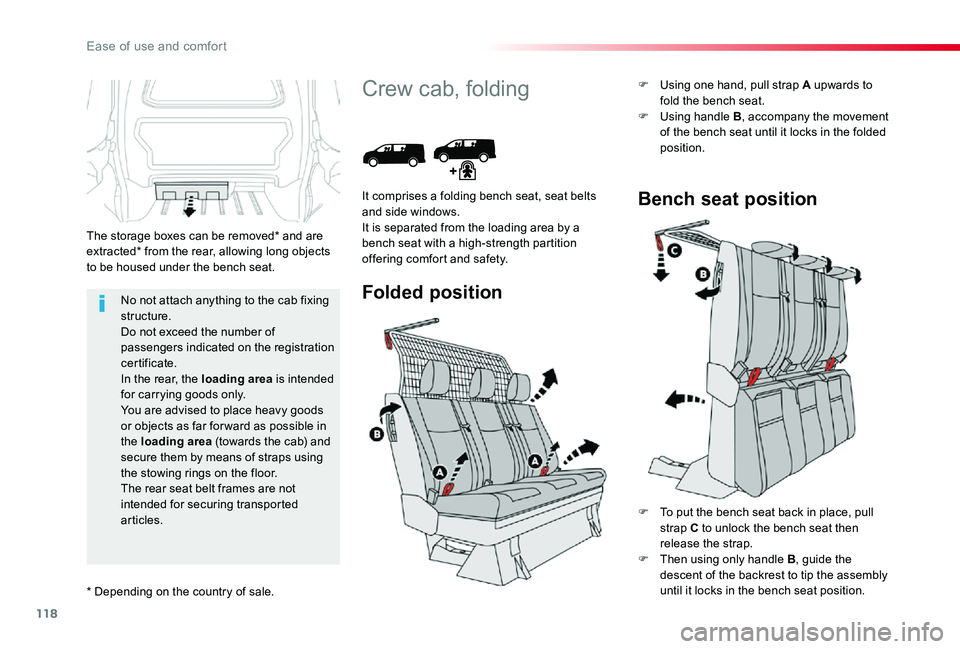
Folded position
It comprises a folding bench seat, seat beltsand side windows.It is separated from the loading area by abench seat with a high-strength partitionoffering comfort and safety.
F Using one hand, pull strap A upwards to fold the bench seat.F Using handle B, accompany the movement of the bench seat until it locks in the folded position.
Bench seat position
F To put the bench seat back in place, pull strap C to unlock the bench seat then release the strap.F Then using only handle B, guide the descent of the backrest to tip the assembly until it locks in the bench seat position.
Ease of use and comfort
Page 119 of 430
119
Do not attach anything to the cab fixingstructure.Do not exceed the number of passengers indicated on the registration certificate.In the rear, the load space is intended for carrying goods only.You are advised to place the goods orheavy objects as far for wards as possible in the load space (towards the cab) and secure them by means of straps using the stowing rings on the f l o o r.The rear seat belt fittings are not designed to secure the load.
Never put your hand underneath thebench seat to guide it downwards, youcould have your fingers trapped.Ensure there are no objects or feetbeneath the bench seat or obstructing the fixation system, preventing the assembly from being correctly locked.
Mats
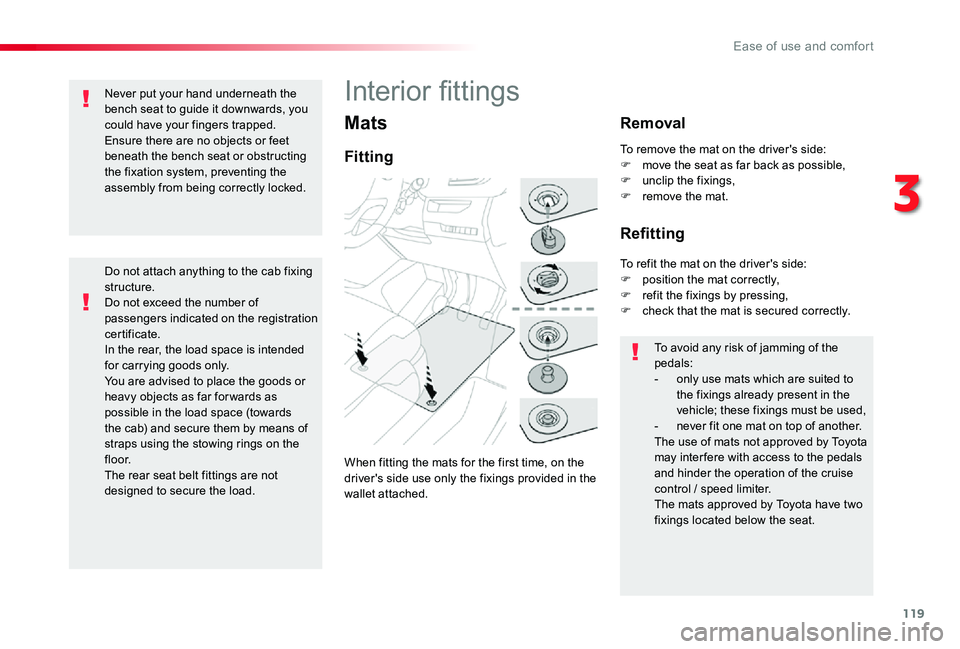
Fitting
Removal
Refitting
To avoid any risk of jamming of the pedals:- only use mats which are suited to the fixings already present in the vehicle; these fixings must be used,- never fit one mat on top of another.The use of mats not approved by Toyota may inter fere with access to the pedals and hinder the operation of the cruise control / speed limiter.The mats approved by Toyota have two fixings located below the seat.
To remove the mat on the driver's side:F move the seat as far back as possible,F unclip the fixings,F remove the mat.
To refit the mat on the driver's side:F position the mat correctly,F refit the fixings by pressing,F check that the mat is secured correctly.
Interior fittings
When fitting the mats for the first time, on the driver's side use only the fixings provided in the wallet attached.
3
Ease of use and comfort
Page 122 of 430
122
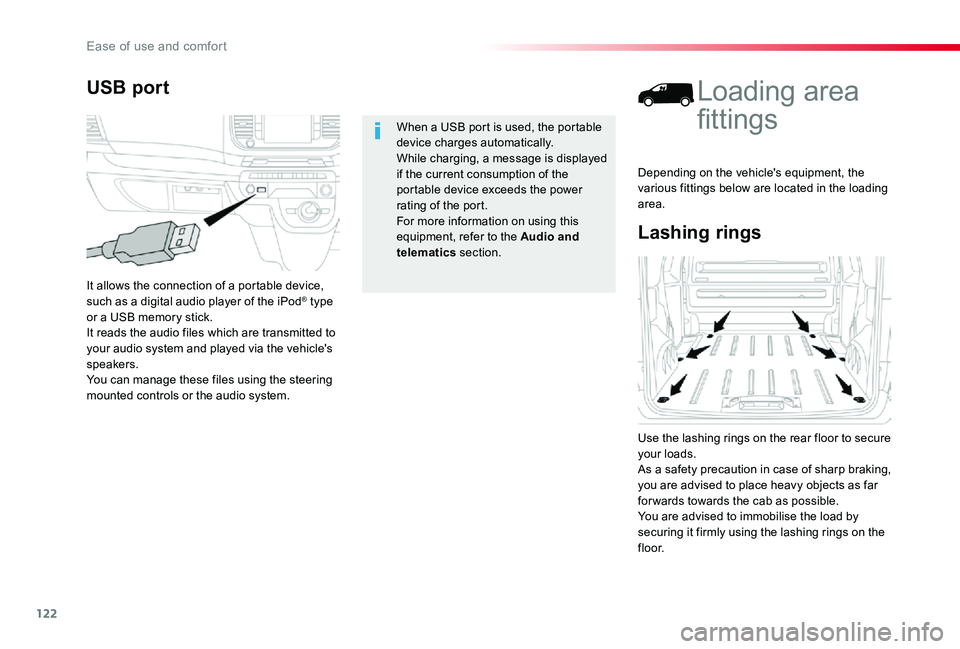
Lashing rings
Loading area
fittings
Use the lashing rings on the rear floor to secure your loads.As a safety precaution in case of sharp braking, you are advised to place heavy objects as far for wards towards the cab as possible.You are advised to immobilise the load by securing it firmly using the lashing rings on the
f l o o r.
Depending on the vehicle's equipment, the various fittings below are located in the loading area.
USB port
It allows the connection of a portable device, such as a digital audio player of the iPod® type or a USB memory stick.It reads the audio files which are transmitted to your audio system and played via the vehicle's speakers.You can manage these files using the steering mounted controls or the audio system.
When a USB port is used, the portable device charges automatically.While charging, a message is displayed if the current consumption of the portable device exceeds the power rating of the port.For more information on using this equipment, refer to the Audio and
telematics section.
Ease of use and comfort
Page 124 of 430
124
Fit the net
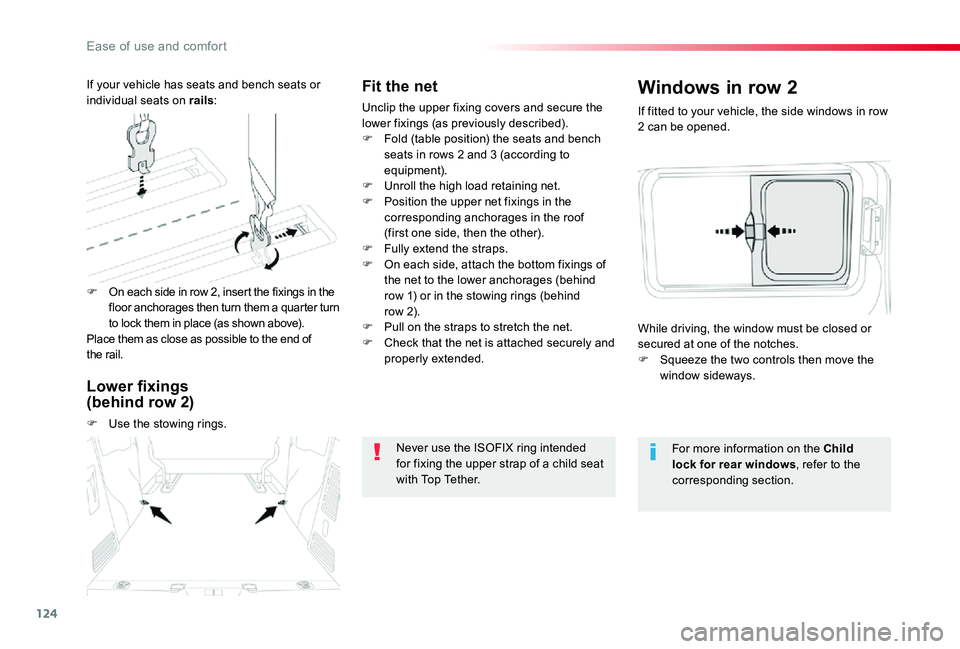
Unclip the upper fixing covers and secure the lower fixings (as previously described).F Fold (table position) the seats and bench seats in rows 2 and 3 (according to equipment).F Unroll the high load retaining net.F Position the upper net fixings in the corresponding anchorages in the roof (first one side, then the other).
F Fully extend the straps.F On each side, attach the bottom fixings of the net to the lower anchorages (behind row 1) or in the stowing rings (behind row 2).F Pull on the straps to stretch the net.F Check that the net is attached securely and properly extended.
Never use the ISOFIX ring intended for fixing the upper strap of a child seat with Top Tether.
If fitted to your vehicle, the side windows in row 2 can be opened.
Windows in row 2
For more information on the Child lock for rear windows, refer to the corresponding section.
While driving, the window must be closed or secured at one of the notches.F Squeeze the two controls then move the window sideways.
F On each side in row 2, insert the fixings in the floor anchorages then turn them a quarter turn to lock them in place (as shown above).Place them as close as possible to the end of the rail.
If your vehicle has seats and bench seats or individual seats on rails:
Lower fixings (behind row 2)
F Use the stowing rings.
Ease of use and comfort
Page 169 of 430
169
Advice
In the event of an impact
Depending on the nature and seriousness of the impact, the pretensioning device may be deployed before and independently of the airbags. Deployment of the pretensioners is accompanied by a slight discharge of harmless smoke and a noise, due to the activation of the pyrotechnic cartridge incorporated in the system.In all cases, the airbag warning lamp comes on.Following an impact, have the seat belts system checked, and if necessary replaced, by an authorized Toyota dealer or repairer, or another duly qualified and equipped professional.
In order to be effective, a seat belt must:- be tightened as close to the body as possible,- be pulled in front of you with a smooth movement, checking that it does not twist,- be used to restrain only one person,- not bear any trace of cuts or fraying,- not be converted or modified to avoid affecting its performance.In accordance with current safety regulations, for all repairs on your vehicle's seat belts, go to a qualified workshop with the skills and equipment needed, which a Toyota dealer is able to provide.Have your seat belts checked regularly by an authorized Toyota dealer or repairer, or another duly qualified and equipped professional, particularly if the straps show signs of damage.Clean the seat belt straps with soapy water or a textile cleaning product, sold by Toyota dealers.After folding or moving a seat or rear bench seat, ensure that the seat belt is positioned and reeled in correctly.
Recommendations for children
Use a suitable child seat if the passenger is less than 12 years old or shorter than one and a half metres.Never use the same seat belt to secure more than one person.Never allow a child to travel on your lap.For more information on Child seats, refer to the corresponding section.
The driver must ensure that passengers use the seat belts correctly and that they are all fastened before setting off.Wherever you are seated in the vehicle, always fasten your seat belt, even for short journeys.Do not interchange the seat belt buckles as they will not fulfill their role fully.The seat belts are fitted with an inertia reel permitting automatic adjustment of the length of the strap to your size. The seat belt is stowed automatically when not in use.Before and after use, ensure that the seat belt is reeled in correctly.The lower part of the strap must be positioned as low as possible on the pelvis.The upper part must be positioned in the hollow of the shoulder.The inertia reels are fitted with an automatic locking device which comes into operation in the event of a collision, emergency braking or if the vehicle rolls over. You can release the device by pulling the strap firmly and then releasing it so that it reels in slightly.
5
Safety