open bonnet TOYOTA PROACE CITY VERSO 2021 Owners Manual
[x] Cancel search | Manufacturer: TOYOTA, Model Year: 2021, Model line: PROACE CITY VERSO, Model: TOYOTA PROACE CITY VERSO 2021Pages: 272, PDF Size: 57.64 MB
Page 5 of 272
5
Overview
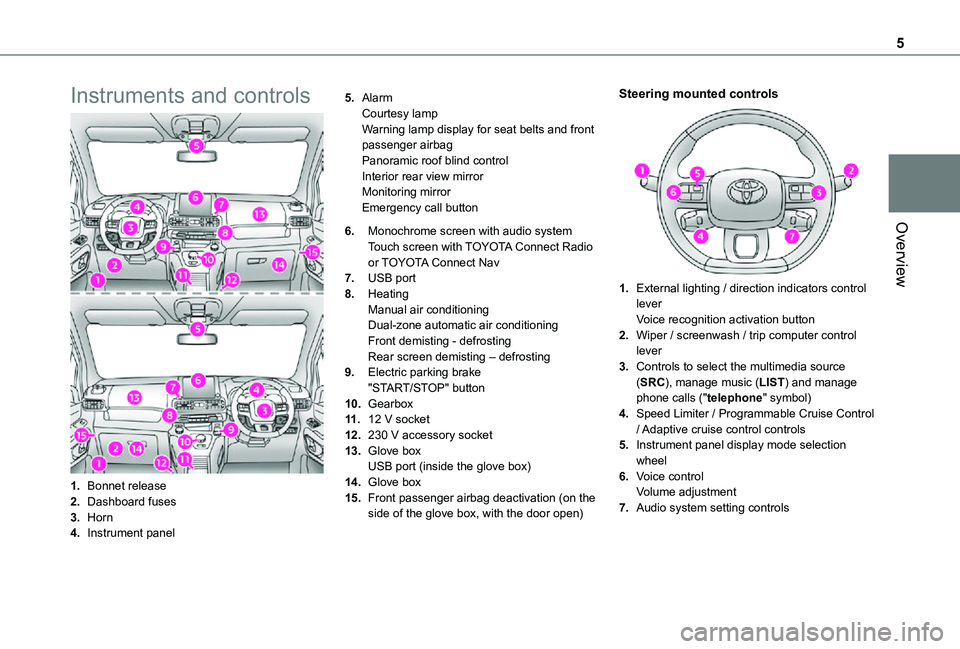
Instruments and controls
1.Bonnet release
2.Dashboard fuses
3.Horn
4.Instrument panel
5.AlarmCourtesy lampWarning lamp display for seat belts and front passenger airbagPanoramic roof blind controlInterior rear view mirrorMonitoring mirrorEmergency call button
6.Monochrome screen with audio system
Touch screen with TOYOTA Connect Radio or TOYOTA Connect Nav
7.USB port
8.HeatingManual air conditioningDual-zone automatic air conditioningFront demisting - defrostingRear screen demisting – defrosting
9.Electric parking brake"START/STOP" button
10.Gearbox
11 .12 V socket
12.230 V accessory socket
13.Glove boxUSB port (inside the glove box)
14.Glove box
15.Front passenger airbag deactivation (on the side of the glove box, with the door open)
Steering mounted controls
1.External lighting / direction indicators control leverVoice recognition activation button
2.Wiper / screenwash / trip computer control lever
3.Controls to select the multimedia source (SRC), manage music (LIST) and manage phone calls ("telephone" symbol)
4.Speed Limiter / Programmable Cruise Control / Adaptive cruise control controls
5.Instrument panel display mode selection wheel
6.Voice controlVolume adjustment
7.Audio system setting controls
Page 34 of 272

34
Doors and door clearances
When open, a door projects beyond the body. Allow adequate clearance when parking alongside walls, lamp-posts, high pavements, etc.
NOTIC E
When open, a door never projects beyond the rear bumper.
On a steep slope
Take care when opening doors while the vehicle is on a slope facing uphill. The sloping terrain could cause the door to open more quickly than usual.On a steep slope, manually guide the side door to help it to close.If the vehicle is on a slope facing downhill, the door may not stay open, instead closing suddenly, with a risk of injury. Always hold the door to ensure that it does not close unexpectedly.
WARNI NG
On a steep slope, the door's weight may cause it to move, opening or closing suddenly as a result.Avoid leaving the vehicle unsupervised on a steep slope with one or more doors open. If this advice is not followed, injuries or damage may occur if a person or an object is trapped or caught.
Alarm
System which protects and provides a deterrent against theft and break-ins.
WARNI NG
Self-protection functionThe system checks for the disconnection of any of its components.The alarm is triggered if the battery, button or siren wiring is disconnected or damaged.For all work on the alarm system, contact a TOYOTA dealer or a qualified workshop.
Exterior perimeter
The system checks whether the vehicle is opened.The alarm is triggered if anyone tries to open one of the doors or the bonnet.
Volumetric
The system checks for any variation in volume in the passenger compartment.
Page 35 of 272

35
Access
2
The alarm is triggered if anyone breaks a window, enters the passenger compartment or moves inside the vehicle.
NOTIC E
If your vehicle is fitted with Additional Heating / Ventilation, volumetric monitoring is not compatible with this system.For more information on Additional Heating / Ventilation, refer to the corresponding section.
Anti-tilt monitoring
The system checks for any change in the attitude of the vehicle.The alarm is triggered if the vehicle is lifted or moved.
NOTIC E
When the vehicle is parked, the alarm will not be triggered if the vehicle is knocked.
Locking the vehicle with full
alarm system
Activation
► Switch off the engine and exit the vehicle.► Lock the vehicle using the remote control or the "Keyless Entry and Starting" system.
The monitoring system is active: the red indicator lamp in the button flashes every second and the direction indicators come on for about 2 seconds.
NOTIC E
Following an instruction to lock the vehicle, the exterior perimeter monitoring is activated after 5 seconds and the interior volumetric
and anti-tilt monitoring after 45 seconds.
NOTIC E
If an opening (door, boot or bonnet) is not closed properly, the vehicle is not locked but the exterior perimeter monitoring will be activated after 45 seconds at the same time as the interior volumetric and anti-tilt monitoring.
Deactivation
► Press the unlocking button on the remote control.or► Unlock the vehicle with the Keyless Entry and Starting system.The monitoring system is deactivated: the
indicator lamp in the button goes off and the direction indicators flash for about 2 seconds.
NOTIC E
When the vehicle automatically locks itself again (as happens if a door or the boot is not opened within 30 seconds of unlocking), the monitoring system is also reactivated automatically.
Locking the vehicle
with exterior perimeter
monitoring only
Disable volumetric and anti-tilt monitoring to avoid unwanted alarm triggering in certain cases, such as:– Slightly open window or sunroof. – Washing the vehicle.– Changing a wheel.– Towing your vehicle.– Transport on a ship or ferry.
Deactivating the interior volumetric
and anti-tilt monitoring
► Switch off the ignition and within 10 seconds press the alarm button until its red indicator lamp is on fixed.► Get out of the vehicle.► Immediately lock the vehicle using the remote control or the "Keyless Entry and Starting" system.
Page 114 of 272

11 4
NOTIC E
With an automatic gearbox, the system is only active in manual operation.
The information appears in the instrument panel, in the form of an ascending or descending arrow and the recommended gear.
NOTIC E
The system adapts its gear shift recommendation according to the driving conditions (slope, load, etc.) and the driver’s requirements (power, acceleration, braking, etc.).The system never suggests:– engaging first gear;– engaging reverse.
Stop & Start
The Stop & Start function puts the engine temporarily into standby - STOP mode - during phases when the vehicle is stopped (red lights, queues, etc.). The engine restarts automatically - START mode - as soon as the driver wishes to move off again.Primarily designed for urban use, the function is intended to reduce fuel consumption and exhaust emissions as well as the noise level when stationary.
The function does not affect the functionalities of the vehicle, in particular the braking.
WARNI NG
Opening the bonnetBefore doing anything under the bonnet, deactivate the Stop & Start system to avoid any risk of injury caused by the engine restarting automatically.
WARNI NG
Driving on flooded roadsBefore entering into a flooded area, it is strongly recommended that you deactivate the Stop & Start system.For more information on Driving recommendations, particularly on flooded roads, refer to the corresponding section.
Deactivation/Activation
With button
► To deactivate or reactivate the system, press this button.The indicator lamp is lit when the system is deactivated.
With audio system/touch screen
The system is activated and deactivated via the vehicle configuration menu.
WARNI NG
If the system has been deactivated in STOP mode, the engine restarts immediately.
NOTIC E
The system reactivates automatically
whenever the engine is started by the driver.
Page 158 of 272

158
If the height exceeds 40 cm (1 ft 3"), adapt the speed of the vehicle to the profile of the road to avoid damaging the roof bars or the roof rack and the fixings on the vehicle.Refer to national legislation in order to comply with the regulations for transporting objects that are longer than the vehicle.
WARNI NG
In the event of loading a 7-seat model (not exceeding 40 cm (1 ft 3") in height) on the roof, do not exceed the following loads:– Three transverse bars bolted to the roof: 100 kg (220 lb).– An aluminium rack: 70 kg (154 lb).– A steel rack: 65 kg (143 lb).
W ARNI NG
As a safety measure and to avoid damaging the roof, it is essential to use the roof bars and racks approved for your vehicle.Observe the instructions on fitting and use contained in the guide supplied with the roof bars and racks.
To fit the transverse roof bars or a roof rack, use the fixing points provided for this purpose:► Remove the fixing covers installed on the vehicle.► Put each fixing in place and lock them on the roof one by one.► Ensure that the roof bars or the roof rack are correctly fitted (by shaking them).The bars are adaptable for each fixing point.
Bonnet
WARNI NG
Stop & StartBefore doing anything under the bonnet, you must switch off the ignition to avoid any risk of injury resulting from an automatic change to START mode.
NOTIC E
The location of the interior bonnet release lever prevents opening the bonnet when the left-hand front door is closed.
WARNI NG
When the engine is hot, handle the exterior safety catch and the bonnet stay with care (risk of burns), using the protected area.When the bonnet is open, take care not to damage the safety catch.Do not open the bonnet under very windy conditions.
Page 159 of 272

159
Practical information
7
WARNI NG
Cooling of the engine when stoppedThe engine cooling fan may start after the engine has been switched off.Take care with objects or clothing that could be caught in the blades of the fan!
Opening
► Open the left-hand front door.
► Pull the release lever, located at the bottom of the door frame, towards you.► Lift the safety catch and raise the bonnet.
► Unclip the stay from its housing and place it in the support slot to hold the bonnet open.
Closing
► Take the stay out of the support slot.► Clip the stay in its housing.► Lower the bonnet and release it near the end of its travel.► Pull on the bonnet to check that it is locked correctly.
WARNI NG
Because of the presence of electrical equipment under the bonnet, it is recommended that exposure to water (rain, washing, etc.) be limited.
Engine compartment
The engine represented is an example given for illustration purposes only.The locations of the following elements may vary:– Air filter.– Engine oil dipstick.– Engine oil filler cap.
Petrol engine
Diesel engine
1.Screenwash fluid reservoir
2.Engine coolant reservoir
3.Brake fluid reservoir
4.Battery / Fuses
5.Remote earth point (-)
Page 177 of 272

177
In the event of a breakdown
8
WARNI NG
Changing a bulb must only be done with the ignition off and after the lamp has been switched off for several minutes - risk of serious burns!Do not touch the bulb directly with your fingers, use a lint-free cloth.It is essential only to use anti-ultraviolet (UV) type bulbs, so as not to damage the headlamp.Always replace a failed bulb with a new bulb of the same type and specification.
WARNI NG
Opening the bonnet / Accessing the bulbsWith the engine warm, proceed with caution - risk of burns!Take care with objects or clothing that could be caught in the blades of the cooling fan - risk of strangulation!
NOTIC E
Halogen bulbs (Hx)To ensure good quality lighting, check that the bulb is correctly positioned in its housing.
WARNI NG
After changing a bulbTo refit, carry out the fitting operations in reverse order.Close the protective cover very carefully to guarantee the sealing of the lamps.
Light-emitting diode (LED)
headlamps and lamps
Depending on version, the affected types of headlamps / lamps are:– Daytime running lamps / sidelamps.
WARNI NG
For the replacement of this type of bulb, you must contact a TOYOTA dealer or a qualified workshop.
Types of bulb
Various types of bulb are fitted on the vehicle. To remove them:
Type AAll-glass bulb: pull gently as it is fitted by pressure.
Type BBayonet bulb: press on the bulb then turn it anti-clockwise.
Type CHalogen bulb: release the retaining spring from its housing.
Type DHalogen bulb: turn the bulb anti-clockwise.
NOTIC E
When each operation has been completed, check the operation of the lighting.
Page 185 of 272

185
In the event of a breakdown
8
WARNI NG
Versions equipped with Stop & Start are fitted with a 12 V lead-acid battery with special technology and specifications.It should only be replaced by a TOYOTA dealer or a qualified workshop.
Access to the battery
The battery is located under the bonnet.► Open the bonnet using the interior release lever, then the exterior safety catch.► Secure the bonnet stay.
The battery (-) terminal is not accessible.There is a remote earth point near the battery.
NOTIC E
For more information on the Bonnet and the Engine, refer to the corresponding sections.
Starting using another
battery
When your vehicle's battery is discharged, the engine can be started using a backup battery (external or from another vehicle) and jump leads or using a battery booster.
WARNI NG
Never start the engine by connecting a battery charger.Never use a 24 V or higher battery booster.Check beforehand that the backup battery has a nominal voltage of 12 V and a capacity at least equal to that of the discharged battery.The two vehicles must not be in contact with each other.Switch off all the electrical consumers on both vehicles (audio system, wipers, lighting, etc.).Make sure that the jump leads are not close to the moving parts of the engine (fan, belt, etc.).Do not disconnect the (+) terminal while the engine is running.
► Connect the red cable to the (+) terminal of flat battery A (at the metal elbow), then to the (+) terminal of backup battery B or the booster.► Connect one end of the green or black cable to the (-) terminal of backup battery B or the booster (or to an earth point on the assisting vehicle).► Connect the other end of the green or black cable to earth point C on the broken down vehicle.► Start the engine of the assisting vehicle and leave it running for a few minutes.► Operate the starter on the broken down vehicle and let the engine run.If the engine does not start straight away, switch off the ignition and wait a few moments before trying again.► Wait for it to return to idle.► Disconnect the jump leads in reverse order.► Allow the engine to run for at least 30 minutes, by driving or with the vehicle
Page 253 of 272
253
Alphabetical index
L
Labels 4, 46Labels, identification 194Lamps, parking 68Lamps, rear 180Lane departure warning active 136, 141LEDs - Light-emitting diodes 68, 177–178Level, AdBlue® 162Level, brake fluid 161Level, Diesel additive 162–163Level, engine coolant 16, 161Level, engine oil 160Levels and checks 159–161Level, screenwash fluid 72, 161Light-emitting diodes - LEDs 68, 177–178Lighting 66Lighting, exterior 66Lighting, guide-me home 68–69Lighting, welcome 69Loading 157Load reduction mode 157
Locating your vehicle 24Locking 23, 25–27Locking from the inside 31Low fuel level 151–152Lumbar 40
M
Maintenance (advice) 167
Maintenance, routine 120, 162Manoeuvring aids (recommendations) 11 9Markings, identification 194Mat 48, 120Memorising a speed 133Menu 216Menu, main 197Menus (audio) 210–2 11, 224–225Messages 244Messages, quick 244Mirror, child surveillance 44Mirror, rear view 43Mirrors, door 42–43, 61, 139Misfuel prevention 153Mountings, ISOFIX 94MP3 CD 201
N
Navigation 230–232Navigation, connected 232–235
Net 53–54Net, high load retaining 52Number plate lamps 181
O
Obstacle detection 143Oil change 160Oil consumption 160
OIl, engine 160On-board tools 169–170Opening the bonnet 158–159Opening the boot 23Opening the doors 23
P
Pads, brake 163Paint 168, 194Paint colour code 194Park Assist 147Parking brake 105, 164Parking brake, electric 105–108, 164Parking sensors, audible and visual 143Parking sensors, front 144Parking sensors, rear 143Plates, identification 194Player, Apple® 202, 214, 241Player, MP3 CD 201Player, USB 200, 214, 240
Port, USB 50, 200, 214, 235, 240Pressures, tyres 164, 172, 176, 194Pre-tensioning seat belts 85Priming the fuel system 169Profiles 219, 245Programmable cruise control 126Protecting children 86, 89–93, 96–98Puncture 170, 173