headlamp TOYOTA PROACE VERSO 2020 Owner's Manual
[x] Cancel search | Manufacturer: TOYOTA, Model Year: 2020, Model line: PROACE VERSO, Model: TOYOTA PROACE VERSO 2020Pages: 418, PDF Size: 39.32 MB
Page 194 of 418
194
When towing
Distribution of loads
F Distribute the load in the trailer so that the heaviest items are as close as possible to the axle and the nose weight approaches the maximum permitted without exceeding it.Air density decreases with altitude, thus reducing engine per formance. Above 1 000 metres, the maximum towed load must be reduced by 10 % for every 1 000 metres of altitude.
Side wind
F Take into account the increased sensitivity to side wind.
Cooling
Towing a trailer on a slope increases the temperature of the coolant.As the fan is electrically controlled, its cooling capacity is not dependent on the engine speed.F To lower the engine speed, reduce your speed.The maximum towed load on a long incline depends on the gradient and the ambient temperature.In all cases, keep a check on the coolant temperature.
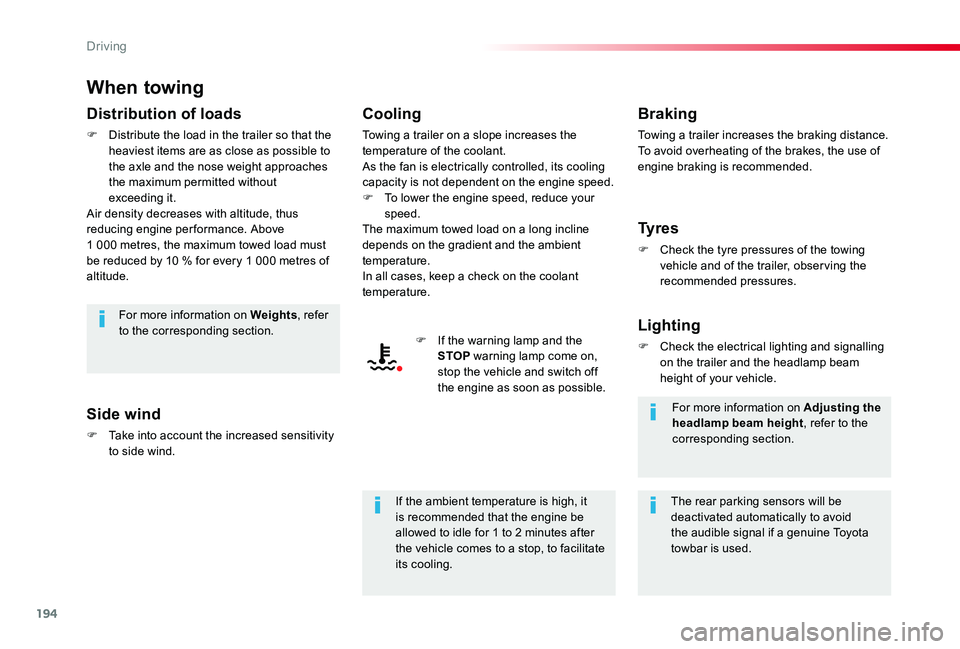
F If the warning lamp and the STOP warning lamp come on, stop the vehicle and switch off the engine as soon as possible.
Braking
Towing a trailer increases the braking distance.To avoid overheating of the brakes, the use of engine braking is recommended.
Ty r e s
F Check the tyre pressures of the towing vehicle and of the trailer, obser ving the recommended pressures.
Lighting
F Check the electrical lighting and signalling on the trailer and the headlamp beam height of your vehicle.
For more information on Weights, refer to the corresponding section.
The rear parking sensors will be deactivated automatically to avoid the audible signal if a genuine Toyota towbar is used.
If the ambient temperature is high, it is recommended that the engine be allowed to idle for 1 to 2 minutes after the vehicle comes to a stop, to facilitate its cooling.
For more information on Adjusting the headlamp beam height, refer to the corresponding section.
Driving
Page 243 of 418
243
Deactivation / Activation of
the alert and the braking
By default, the function is automatically activated at every engine start.
Autonomous emergency braking system with Pedestrian Detection
If the driver does not brake sufficiently to avoid an accident, this system will complete the braking.This emergency braking system will not act if you press the brake pedal.
In the event of a fault, you are alerted by the illumination of this warning lamp, accompanied by an audible signal and a message.Contact an authorized Toyota dealer or repairer, or another duly qualified and equipped professional.
Operating fault
There may be inter ference in the operation of the camera or it not work at all in the following situations:- poor visibility (inadequate street lighting, falling snow or rain, fog, ...),- dazzle (headlamps of an approaching vehicle on the other side of the road, low sun, reflection on a wet road, leaving a tunnel, alternating between light and shade, ...),- the area in front of the windscreen: dirty, misty, frosty, snow-covered, damaged or covered by a sticker.The operation of the radar, located in the front bumper, may be disturbed in certain weather conditions: with accumulations of snow, ice, mud, ...
With audio system or touch screen
This system can be deactivated or activated via the vehicle configuration menu.
6
Driving
Page 248 of 418
248
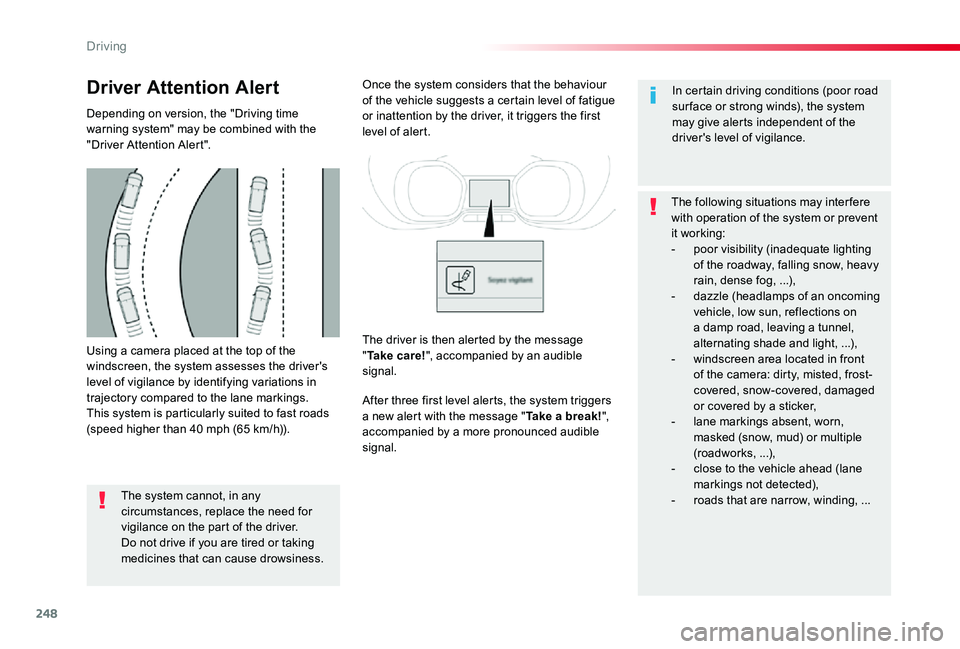
Using a camera placed at the top of the windscreen, the system assesses the driver's level of vigilance by identifying variations in trajectory compared to the lane markings.This system is particularly suited to fast roads (speed higher than 40 mph (65 km/h)).
Driver Attention Alert
Depending on version, the "Driving time warning system" may be combined with the "Driver Attention Alert".
The system cannot, in any circumstances, replace the need for vigilance on the part of the driver.Do not drive if you are tired or taking medicines that can cause drowsiness.
Once the system considers that the behaviour of the vehicle suggests a certain level of fatigue or inattention by the driver, it triggers the first level of alert.
After three first level alerts, the system triggers a new alert with the message "Take a break!", accompanied by a more pronounced audible
signal.
In certain driving conditions (poor road sur face or strong winds), the system may give alerts independent of the driver's level of vigilance.
The following situations may interfere with operation of the system or prevent it working:- poor visibility (inadequate lighting of the roadway, falling snow, heavy rain, dense fog, ...),- dazzle (headlamps of an oncoming vehicle, low sun, reflections on a damp road, leaving a tunnel, alternating shade and light, ...),- windscreen area located in front of the camera: dirty, misted, frost-covered, snow-covered, damaged or covered by a sticker,- lane markings absent, worn, masked (snow, mud) or multiple
(roadworks, ...),- close to the vehicle ahead (lane markings not detected),- roads that are narrow, winding, ...
The driver is then alerted by the message "Ta k e c a r e !", accompanied by an audible signal.
Driving
Page 266 of 418
266
Energy economy mode
System which manages the duration of use of certain functions to conser ve a sufficient level of charge in the battery.After the engine has stopped, you can still use functions such as the audio and telematics system, windscreen wipers, dipped beam headlamps, courtesy lamps, etc. for a maximum combined duration of about forty minutes.
Switching to economy
mode
A message appears in the instrument panel screen indicating that the vehicle has switched to economy mode and the active functions are put on standby.If a telephone call is being made at this time, it will be maintained for around 10 minutes with the Bluetooth hands-free system of your audio system.
Exiting economy mode
These functions are reactivated automatically next time the vehicle is driven.In order to restore the use of these functions immediately, start the engine and let it run:- for less than ten minutes, to use the equipment for approximately five minutes,- for more than ten minutes, to use the equipment for up to approximately thirty minutes.Let the engine run for the duration specified to ensure that the battery charge is sufficient.Do not repeatedly and continuously restart the engine in order to charge the battery.
A flat battery prevents the engine from starting.For more information on the 12 V batter y, refer to the corresponding section.
Load reduction mode
System which manages the use of certain functions according to the level of charge remaining in the battery.When the vehicle is being driven, the load reduction function temporarily deactivates certain functions, such as the air conditioning, the heated rear screen...The deactivated functions are reactivated automatically as soon as conditions permit.
Practical information
Page 272 of 418
272
* According to engine.
Diesel engine
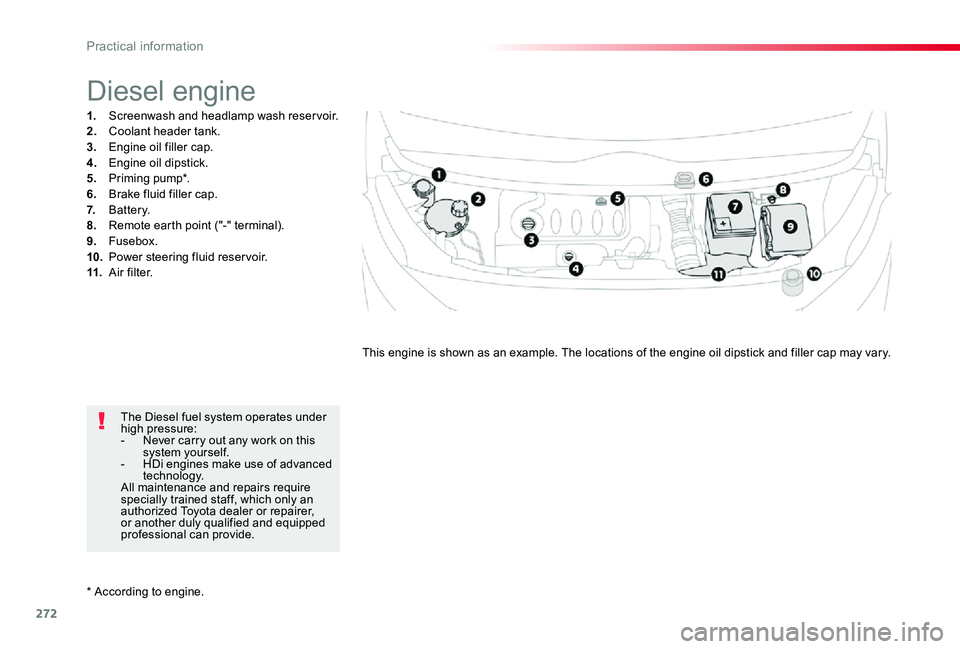
1. Screenwash and headlamp wash reser voir.2. Coolant header tank.3. Engine oil filler cap.4. Engine oil dipstick.5. Priming pump*.6. Brake fluid filler cap.7. Battery.8. Remote earth point ("-" terminal).9. Fusebox.10. Power steering fluid reservoir.11. A i r f i l t e r.
This engine is shown as an example. The locations of the engine oil dipstick and filler cap may vary.
The Diesel fuel system operates under high pressure:- Never carry out any work on this system yourself.- HDi engines make use of advanced technology.All maintenance and repairs require specially trained staff, which only an authorized Toyota dealer or repairer, or another duly qualified and equipped professional can provide.
Practical information
Page 275 of 418
275
Changing the coolant
The coolant does not have to be replaced at routine services.
Fluid specification
The coolant must conform to the manufacturer's recommendations.
The check and top-up must be done with the engine cold.A low coolant level presents the risk of serious damage to your engine.
If the ambient temperature is high, it is recommended that the engine be allowed to idle for 1 to 2 minutes after the vehicle comes to a stop, to facilitate its cooling.
Avoid prolonged contact of used oil or fluids with the skin.Most of these fluids are harmful to health or indeed very corrosive.
Do not discard used oil or fluids into sewers or onto the ground.Take used oil to an authorized Toyota dealer or repairer, or another duly qualified and equipped professional (France) or to an authorised waste disposal site.
Used products
To p p i n g - u p
This additive must be topped-up by an authorized Toyota dealer or repairer, or another duly qualified and equipped professional without delay.
Diesel additive level (Diesel
engine with particle filter)
A low additive level is indicated by illumination of this warning lamp, accompanied by an audible warning and a message in the instrument panel screen.
Fluid specification
For optimum cleaning and to avoid freezing, this fluid must not be topped up with or replaced with plain water.
Screenwash and headlamp
wash fluid
In the case of vehicles fitted with headlamp washers, the low fluid level is indicated by an audible signal and a message in the instrument panel screen.Top up the reser voir when you next stop the vehicle.
In wintry conditions, the use of an ethyl alcohol or methanol base fluid is recommended.
7
Practical information
Page 298 of 418
298
Changing a bulb
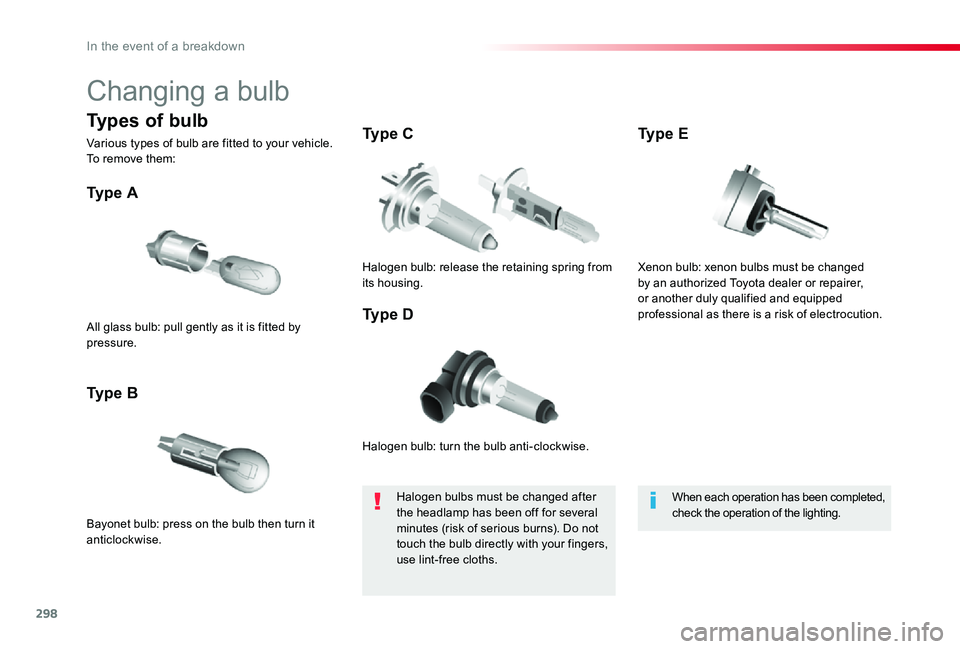
Halogen bulb: turn the bulb anti-clockwise.
Ty p e A
Bayonet bulb: press on the bulb then turn it anticlockwise.
Ty p e B
Ty p e C
Ty p e DAll glass bulb: pull gently as it is fitted by pressure.
Halogen bulb: release the retaining spring from its housing.
Halogen bulbs must be changed after the headlamp has been off for several minutes (risk of serious burns). Do not touch the bulb directly with your fingers, use lint-free cloths.
When each operation has been completed, check the operation of the lighting.
Types of bulb
Various types of bulb are fitted to your vehicle. To remove them:
Xenon bulb: xenon bulbs must be changed by an authorized Toyota dealer or repairer, or another duly qualified and equipped professional as there is a risk of electrocution.
Ty p e E
In the event of a breakdown
Page 299 of 418
299
Front lamps
Xenon headlamps
For more information on Changing a bulb and in particular the types of bulb, refer to the corresponding section.
Halogen headlamps
For more information on Changing a bulb and in particular the types of bulb, refer to the corresponding section.
For H7 type bulbs with lugs... take care to obser ve their correct installation so as to ensure the best lighting performance.
Front fog lamps
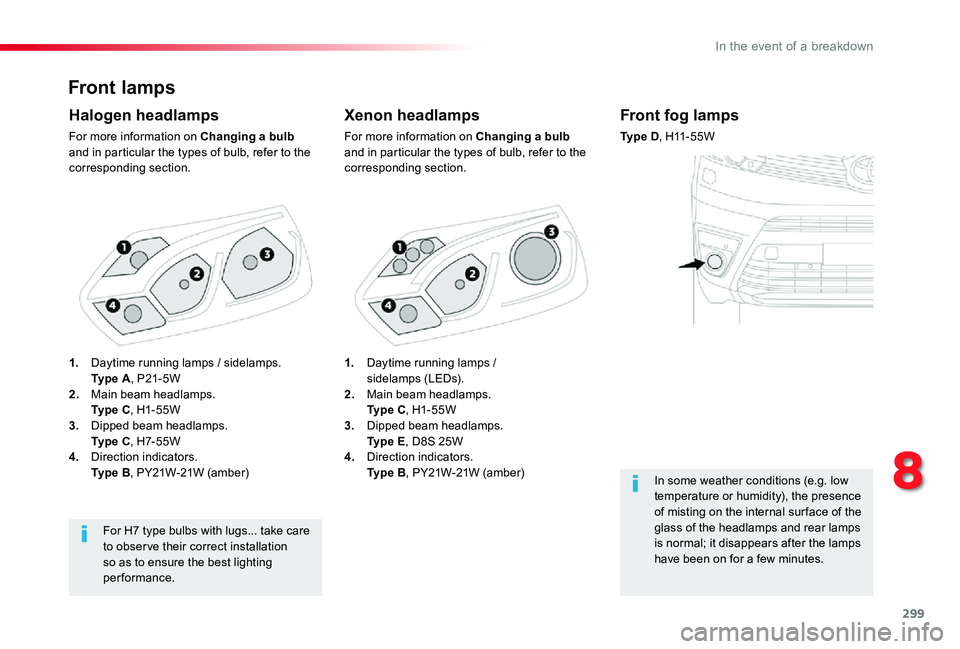
Ty p e D, H11-55W
In some weather conditions (e.g. low temperature or humidity), the presence of misting on the internal sur face of the glass of the headlamps and rear lamps is normal; it disappears after the lamps
have been on for a few minutes.
1. Daytime running lamps / sidelamps (LEDs).2. Main beam headlamps. Ty p e C, H1-55W3. Dipped beam headlamps. Ty p e E, D8S 25W4. Direction indicators. Ty p e B, PY21W-21W (amber)
1. Daytime running lamps / sidelamps. Ty p e A, P21-5W 2. Main beam headlamps. Ty p e C, H1-55W3. Dipped beam headlamps. Ty p e C, H7-55W4. Direction indicators. Ty p e B, PY21W-21W (amber)
8
In the event of a breakdown
Page 300 of 418

300
Direction indicator side
repeater
Ty p e A, W Y5W-5W (amber)
The headlamps have polycarbonate lenses with a protective coating:F do not clean them using a dr y or abrasive cloth, nor with a detergent or solvent product,F use a sponge and soapy water or a pH neutral product,F when using a high pressure washer on persistent marks, do not keep the lance directed towards the lamps or their edges for too long, so as not to damage their protective coating and seals.
Changing a bulb should only be done after the headlamp has been switched off for several minutes (risk of serious burns).F Do not touch the bulb directly with your fingers, use a lint-free cloth.It is imperative to use only anti-ultraviolet (UV) type bulbs to avoid damaging the headlamp.Always replace a failed bulb with a new bulb with the same type and specification.
- Push the repeater towards the rear and disengage it.- When refitting, engage the repeater towards the front and then bring it towards the rear.
Amber coloured bulbs (direction indicators and side repeaters) must be replaced with bulbs of identical specification and colour.
In the event of a breakdown
Page 301 of 418
301
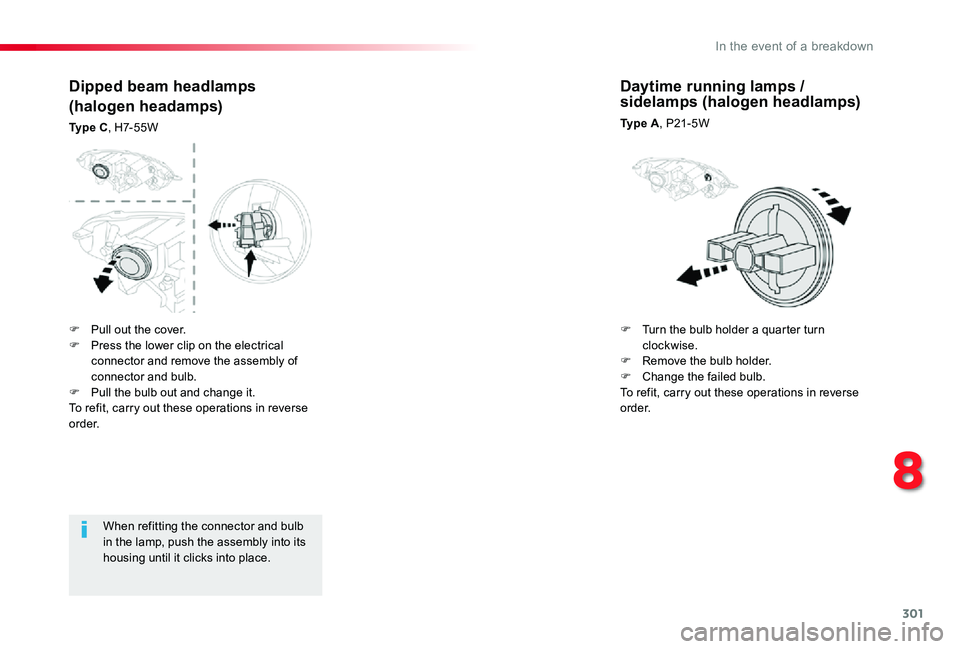
When refitting the connector and bulb in the lamp, push the assembly into its housing until it clicks into place.
Dipped beam headlamps
(halogen headamps)
Ty p e C, H7-55W
Daytime running lamps / sidelamps (halogen headlamps)
Ty p e A, P21-5W
F Pull out the cover. F Press the lower clip on the electrical connector and remove the assembly of connector and bulb.F Pull the bulb out and change it.To refit, carry out these operations in reverse o r d e r.
F Turn the bulb holder a quarter turn clockwise.F Remove the bulb holder.F Change the failed bulb. To refit, carry out these operations in reverse o r d e r.
8
In the event of a breakdown