Charging TOYOTA PROACE VERSO 2022 Owner's Manual
[x] Cancel search | Manufacturer: TOYOTA, Model Year: 2022, Model line: PROACE VERSO, Model: TOYOTA PROACE VERSO 2022Pages: 360, PDF Size: 70.79 MB
Page 207 of 360
207
Practical information
7
Manual reset procedureThe control unit can be reset by simultaneously disconnecting the chargi\
ng connector and the wall socket.Then, reconnect the wall socket first. For more information, refer to the handbook.
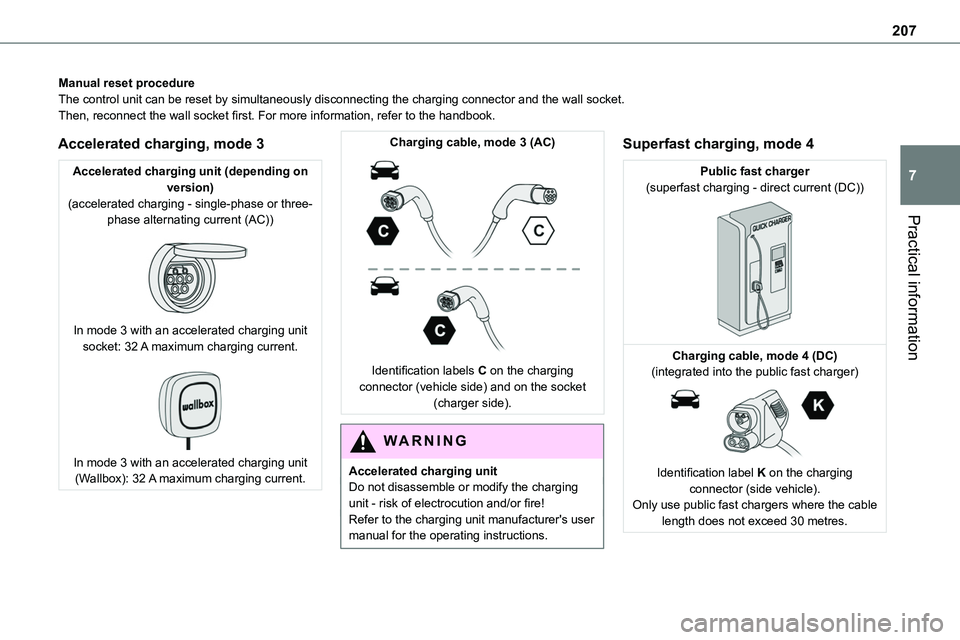
Accelerated charging, mode 3
Accelerated charging unit (depending on version)(accelerated charging - single-phase or three-phase alternating current (AC))
In mode 3 with an accelerated charging unit socket: 32 A maximum charging current.
In mode 3 with an accelerated charging unit (Wallbox): 32 A maximum charging current.
Charging cable, mode 3 (AC)
Identification labels C on the charging connector (vehicle side) and on the socket (charger side).
WARNI NG
Accelerated charging unitDo not disassemble or modify the charging unit - risk of electrocution and/or fire!Refer to the charging unit manufacturer's user
manual for the operating instructions.
Superfast charging, mode 4
Public fast charger(superfast charging - direct current (DC))
Charging cable, mode 4 (DC)(integrated into the public fast charger)
Identification label K on the charging connector (side vehicle).Only use public fast chargers where the cable length does not exceed 30 metres.
Page 208 of 360
208
Charging the traction
battery (Electric)
To recharge, connect the vehicle to a domestic electricity supply (domestic or accelerated charging) or to a fast public charger (superfast charging).For a full charge, follow the desired charging procedure without pausing it, until it ends
automatically. Charging can be either immediate or deferred (except fast public charger, mode 4).You can stop domestic or accelerated charging at any time by unlocking the vehicle and removing the nozzle. For superfast charging, refer to the fast public charger.For more information on the charging displays on the Instrument panel and the Touch screen, refer to the corresponding section.
NOTIC E
It is also possible to monitor the charging progress using the MyToyota application (Available soon).For more information on Remote functions, refer to the corresponding section.
NOTIC E
Lounge modeWhen the vehicle is connected, it is possible to switch on the ignition and use certain functions such as the audio and telematics system and the air conditioning system for several hours.
WARNI NG
As a safety measure, the engine will not start if the charging cable is plugged into the connector on the vehicle. A warning is displayed on the instrument panel.
NOTIC E
Cooling the traction batteryThe cooling fan in the engine compartment comes on during charging to cool the on-board charger and the traction battery.
NOTIC E
Vehicle immobilised for 1 to 12 monthsDischarge the traction battery down to 2 or 3 bars on the charge level indicator on the instrument panel.Do not connect the charging cable.
Always park the vehicle in a place with temperatures between -10°C and 30°C (parking in a place with extreme temperatures can damage the traction battery).Disconnect the cable from the (+) terminal of the accessory battery in the engine compartment.Connect a 12 V battery charger to the (+) and (-) terminals of the accessory battery about
every 3 months in order to recharge the accessory battery and maintain an operating voltage.
Precautions
Electric vehicles were developed in accordance with the guidelines on maximum electromagnetic fields issued by the International Commission on Non-Ionizing Radiation Protection (ICNIRP - 1998 Guidelines).
Wearers of pacemakers or equivalent devices
The electric vehicles have been developed in accordance with the guidelines on the maximum levels for electromagnetic fields issued by the International Commission on Non-Ionizing Radiation Protection (ICNIRP - 1998 Guidelines).
Page 209 of 360
209
Practical information
7
WARNI NG
If in doubtDomestic or accelerated charging: do not remain inside or near the vehicle, or near the charging cable or charging unit, even for a short time.Superfast charging: do not use the system yourself and avoid approaching public fast
charging points. Leave the area and ask a third party to recharge the vehicle.
For domestic or accelerated charging
WARNI NG
Before chargingDepending on the context:► Have a professional check that the electrical system to be used complies with applicable standards and is compatible with the vehicle.► Have a professional electrician install a dedicated domestic power socket or accelerated charging unit (Wallbox) compatible with the vehicle.You should preferably use the charging cable available as an accessory.For more information, contact a any authorized Toyota retailer or Toyota authorized repairer, or any reliable repairer.
WARNI NG
(During charging)While charging is in progress, unlocking the vehicle will cause the charging to stop.If no action is taken on one of the openings (door or boot) or on the charging nozzle, the vehicle will lock again after 30 seconds and charging will resume automatically.
Never work under the bonnet:– Some areas remain very hot, even an hour after charging ends - risk of burns!– The fan may start at any time - risk of cuts or strangulation!
WARNI NG
After chargingCheck that the charging flap is closed.Do not leave the cable connected to the domestic power socket - risk of short-circuit or electrocution in the event of contact with or immersion in water!
For superfast charging
NOTIC E
Before chargingCheck that the fast public charging station and its charging cable are compatible with the vehicle.
If the exterior temperature is below:– 0°C, charging times may be extended.– -20°C, charging is still possible, but charging times may be extended even further (the battery has to be heated first).
WARNI NG
After charging
Check that the charging flap is closed.
Connection
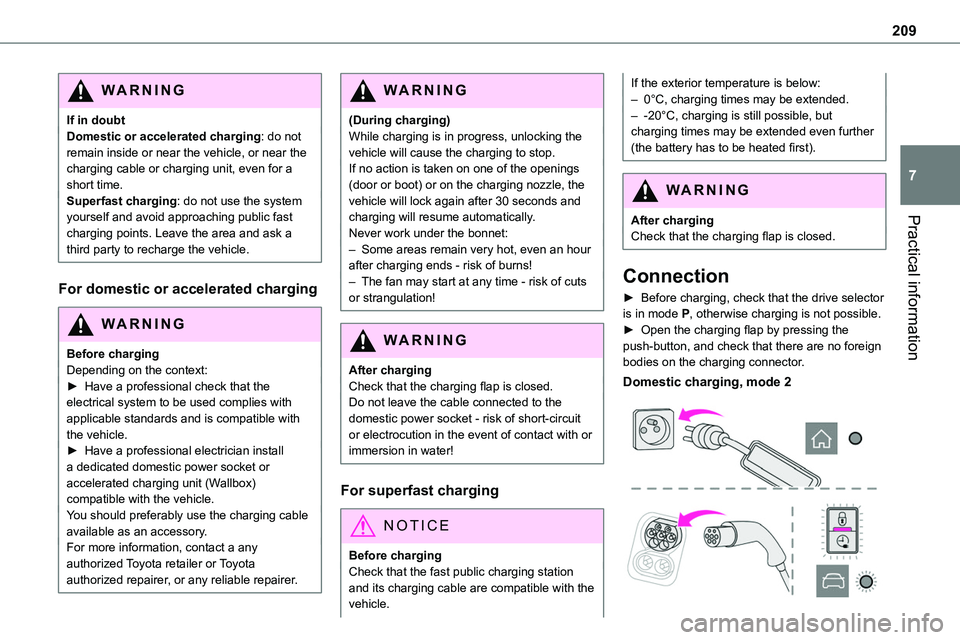
► Before charging, check that the drive selector is in mode P, otherwise charging is not possible.► Open the charging flap by pressing the push-button, and check that there are no foreign bodies on the charging connector.
Domestic charging, mode 2
Page 210 of 360
210
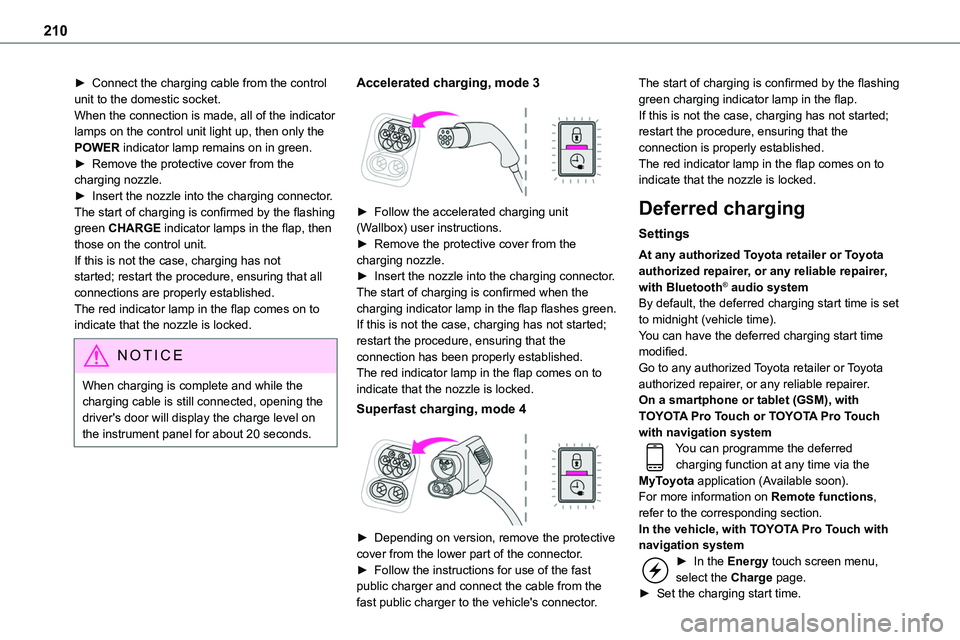
► Connect the charging cable from the control unit to the domestic socket.When the connection is made, all of the indicator lamps on the control unit light up, then only the POWER indicator lamp remains on in green.► Remove the protective cover from the charging nozzle.► Insert the nozzle into the charging connector.The start of charging is confirmed by the flashing
green CHARGE indicator lamps in the flap, then those on the control unit.If this is not the case, charging has not started; restart the procedure, ensuring that all connections are properly established.The red indicator lamp in the flap comes on to indicate that the nozzle is locked.
NOTIC E
When charging is complete and while the charging cable is still connected, opening the driver's door will display the charge level on the instrument panel for about 20 seconds.
Accelerated charging, mode 3
► Follow the accelerated charging unit (Wallbox) user instructions.► Remove the protective cover from the charging nozzle.► Insert the nozzle into the charging connector.The start of charging is confirmed when the charging indicator lamp in the flap flashes green.If this is not the case, charging has not started; restart the procedure, ensuring that the connection has been properly established.The red indicator lamp in the flap comes on to indicate that the nozzle is locked.
Superfast charging, mode 4
► Depending on version, remove the protective cover from the lower part of the connector.► Follow the instructions for use of the fast public charger and connect the cable from the fast public charger to the vehicle's connector.
The start of charging is confirmed by the flashing green charging indicator lamp in the flap.If this is not the case, charging has not started; restart the procedure, ensuring that the connection is properly established.The red indicator lamp in the flap comes on to indicate that the nozzle is locked.
Deferred charging
Settings
At any authorized Toyota retailer or Toyota authorized repairer, or any reliable repairer, with Bluetooth® audio systemBy default, the deferred charging start time is set to midnight (vehicle time).You can have the deferred charging start time modified.Go to any authorized Toyota retailer or Toyota authorized repairer, or any reliable repairer.On a smartphone or tablet (GSM), with TOYOTA Pro Touch or TOYOTA Pro Touch with navigation systemYou can programme the deferred charging function at any time via the MyToyota application (Available soon).For more information on Remote functions, refer to the corresponding section.In the vehicle, with TOYOTA Pro Touch with navigation system► In the Energy touch screen menu, select the Charge page.► Set the charging start time.
Page 211 of 360
2 11
Practical information
7
► Press OK.The setting is saved in the system.
Activation
NOTIC E
Deferred charging is only possible with modes 2 and 3.
► After programming the deferred charging, connect your vehicle to the desired charging equipment.
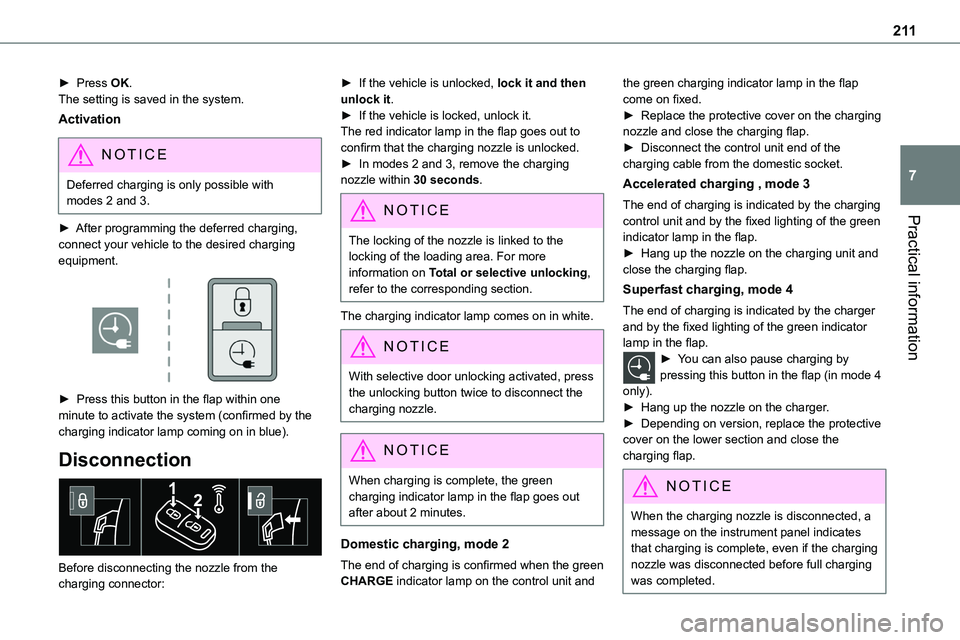
► Press this button in the flap within one minute to activate the system (confirmed by the
charging indicator lamp coming on in blue).
Disconnection
Before disconnecting the nozzle from the charging connector:
► If the vehicle is unlocked, lock it and then unlock it.► If the vehicle is locked, unlock it.The red indicator lamp in the flap goes out to confirm that the charging nozzle is unlocked.► In modes 2 and 3, remove the charging nozzle within 30 seconds.
NOTIC E
The locking of the nozzle is linked to the locking of the loading area. For more information on Total or selective unlocking, refer to the corresponding section.
The charging indicator lamp comes on in white.
NOTIC E
With selective door unlocking activated, press the unlocking button twice to disconnect the charging nozzle.
NOTIC E
When charging is complete, the green charging indicator lamp in the flap goes out after about 2 minutes.
Domestic charging, mode 2
The end of charging is confirmed when the green CHARGE indicator lamp on the control unit and
the green charging indicator lamp in the flap come on fixed.► Replace the protective cover on the charging nozzle and close the charging flap.► Disconnect the control unit end of the charging cable from the domestic socket.
Accelerated charging , mode 3
The end of charging is indicated by the charging control unit and by the fixed lighting of the green
indicator lamp in the flap.► Hang up the nozzle on the charging unit and close the charging flap.
Superfast charging, mode 4
The end of charging is indicated by the charger and by the fixed lighting of the green indicator lamp in the flap.► You can also pause charging by pressing this button in the flap (in mode 4 only).► Hang up the nozzle on the charger.► Depending on version, replace the protective cover on the lower section and close the charging flap.
NOTIC E
When the charging nozzle is disconnected, a message on the instrument panel indicates
that charging is complete, even if the charging nozzle was disconnected before full charging was completed.
Page 215 of 360
215
Practical information
7
Roof racks
NOTIC E
Max. authorised load weight:– Compact: 140 kg,– Medium and Long: 170 kg.
To fit a roof rack, use the fixing points provided for this purpose:► Place the roof rack on the roof aligned with the fixing points and secure each one to the roof in turn.► Ensure that the roof rack is correctly fitted (by shaking it).
Bonnet
WARNI NG
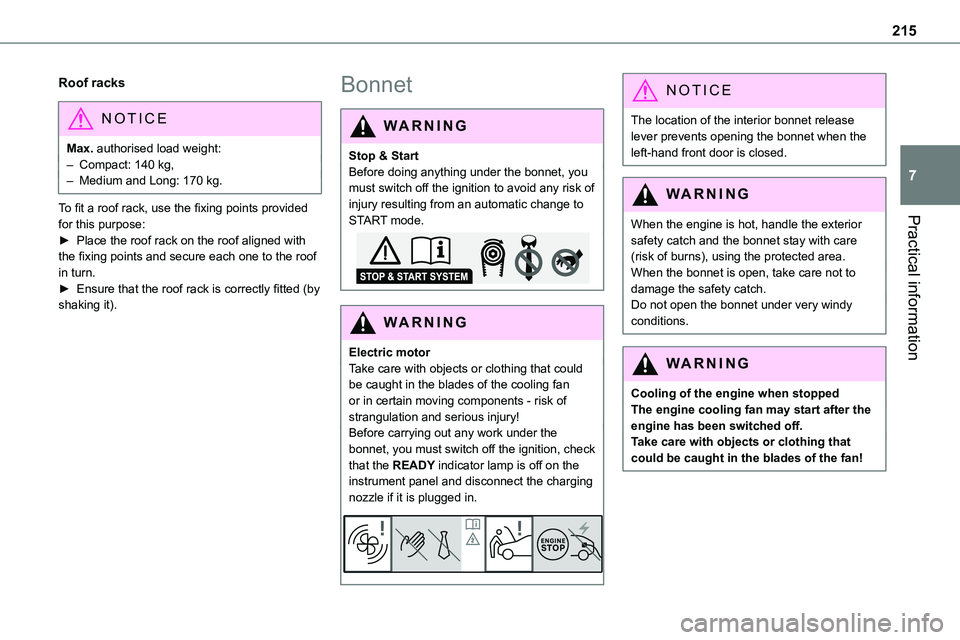
Stop & StartBefore doing anything under the bonnet, you must switch off the ignition to avoid any risk of injury resulting from an automatic change to START mode.
WARNI NG
Electric motorTake care with objects or clothing that could be caught in the blades of the cooling fan or in certain moving components - risk of strangulation and serious injury!Before carrying out any work under the bonnet, you must switch off the ignition, check that the READY indicator lamp is off on the instrument panel and disconnect the charging nozzle if it is plugged in.
NOTIC E
The location of the interior bonnet release lever prevents opening the bonnet when the left-hand front door is closed.
WARNI NG
When the engine is hot, handle the exterior safety catch and the bonnet stay with care (risk of burns), using the protected area.When the bonnet is open, take care not to damage the safety catch.Do not open the bonnet under very windy conditions.
WARNI NG
Cooling of the engine when stoppedThe engine cooling fan may start after the engine has been switched off.Take care with objects or clothing that could be caught in the blades of the fan!
Page 217 of 360
217
Practical information
7
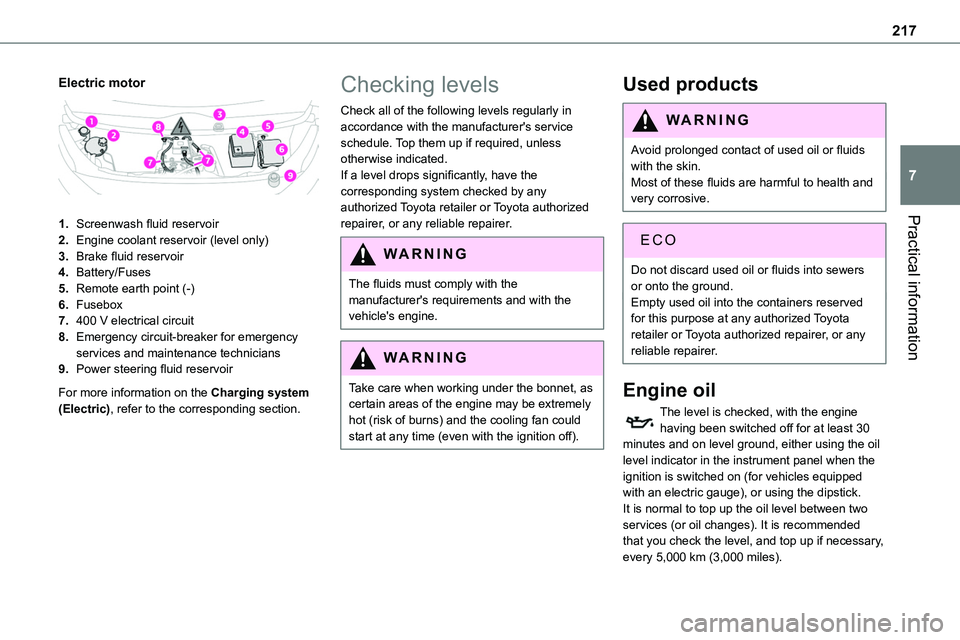
Electric motor
1.Screenwash fluid reservoir
2.Engine coolant reservoir (level only)
3.Brake fluid reservoir
4.Battery/Fuses
5.Remote earth point (-)
6.Fusebox
7.400 V electrical circuit
8.Emergency circuit-breaker for emergency services and maintenance technicians
9.Power steering fluid reservoir
For more information on the Charging system (Electric), refer to the corresponding section.
Checking levels
Check all of the following levels regularly in accordance with the manufacturer's service schedule. Top them up if required, unless otherwise indicated.If a level drops significantly, have the corresponding system checked by any authorized Toyota retailer or Toyota authorized
repairer, or any reliable repairer.
WARNI NG
The fluids must comply with the manufacturer's requirements and with the vehicle's engine.
WARNI NG
Take care when working under the bonnet, as certain areas of the engine may be extremely hot (risk of burns) and the cooling fan could start at any time (even with the ignition off).
Used products
WARNI NG
Avoid prolonged contact of used oil or fluids with the skin.Most of these fluids are harmful to health and very corrosive.
ECO
Do not discard used oil or fluids into sewers or onto the ground.Empty used oil into the containers reserved for this purpose at any authorized Toyota retailer or Toyota authorized repairer, or any reliable repairer.
Engine oil
The level is checked, with the engine having been switched off for at least 30 minutes and on level ground, either using the oil level indicator in the instrument panel when the ignition is switched on (for vehicles equipped with an electric gauge), or using the dipstick.It is normal to top up the oil level between two services (or oil changes). It is recommended that you check the level, and top up if necessary, every 5,000 km (3,000 miles).
Page 248 of 360
248
Fuse N°Rating(Amps)Functions
F2215Horn.
F2315Right-hand main beam headlamp.
F2415Left-hand
main beam headlamp.
12 V battery / Accessory
battery
Procedure for starting the engine using another battery or charging a discharged battery.
Lead-acid starter batteries
ECO
Batteries contain harmful substances such as sulphuric acid and lead.They must be disposed of in accordance with regulations and must not, in any circumstances, be discarded with household waste.Take used remote control batteries and vehicle batteries to a special collection point.
WARNI NG
Protect your eyes and face before handling the battery.All operations on the battery must be carried out in a well ventilated area and away from naked flames and sources of sparks, so as to avoid the risk of explosion or fire.Wash your hands afterwards.
Electric motor
NOTIC E
Flat accessory batteryIt is no longer possible to start the motor or recharge the traction battery.
WARNI NG
Precautions before working on the accessory batterySelect mode P, switch off the ignition, check that the instrument panel is off and that the vehicle is not plugged in.
WARNI NG
Jump-starting another vehicleDo not use the accessory battery to jump-start another vehicle or to charge another vehicle's battery.
WARNI NG
Always replace the battery with one of equivalent specification.
Access to the battery
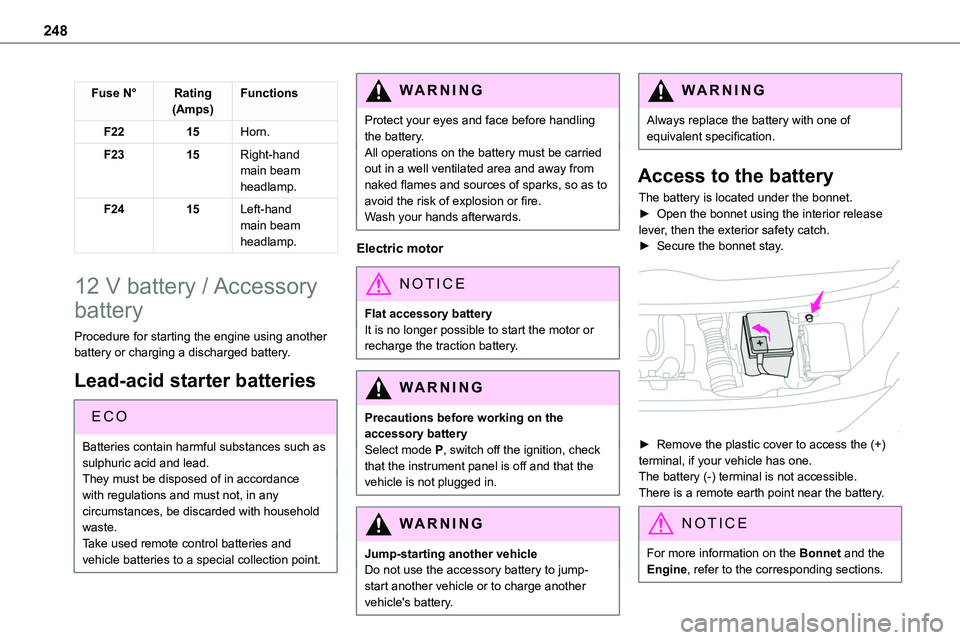
The battery is located under the bonnet.► Open the bonnet using the interior release
lever, then the exterior safety catch.► Secure the bonnet stay.
► Remove the plastic cover to access the (+) terminal, if your vehicle has one.The battery (-) terminal is not accessible.There is a remote earth point near the battery.
NOTIC E
For more information on the Bonnet and the Engine, refer to the corresponding sections.
Page 250 of 360
250
Charging the battery using a
battery charger
For optimum service life of the battery, it is essential to maintain an adequate state of charge.In some circumstances, it may be necessary to charge the battery:– When using the vehicle mainly for short
journeys.– If the vehicle is to be taken off the road for several weeks.Consult any authorized Toyota retailer or Toyota authorized repairer, or any reliable repairer.
WARNI NG
To charge the vehicle's battery yourself, use only a charger compatible with lead-acid batteries with a nominal voltage of 12 V.
WARNI NG
Follow the instructions provided by the manufacturer of the charger.Never reverse polarities.
NOTIC E
It is not necessary to disconnect the battery.
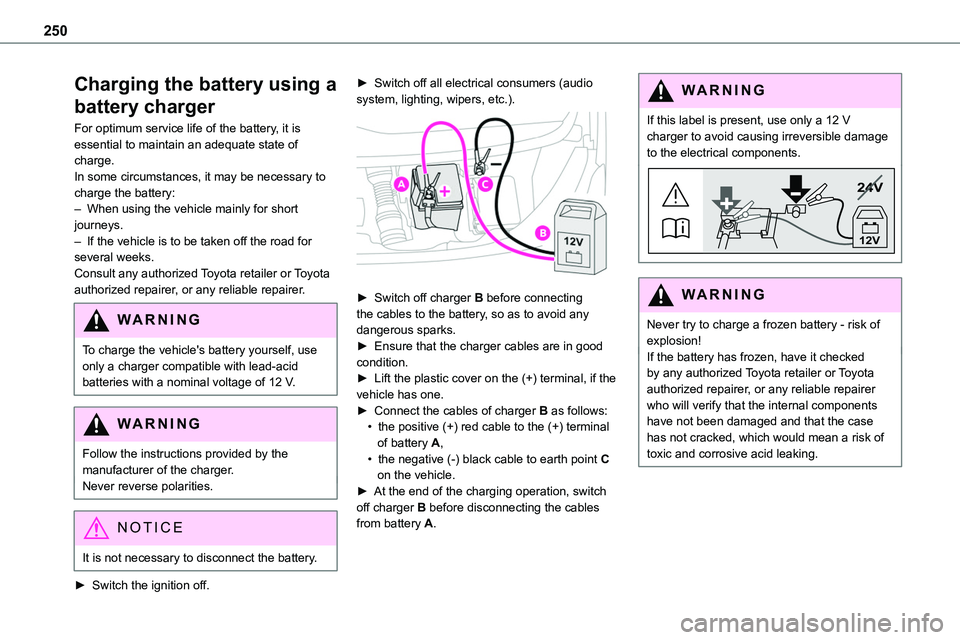
► Switch the ignition off.
► Switch off all electrical consumers (audio system, lighting, wipers, etc.).
► Switch off charger B before connecting the cables to the battery, so as to avoid any dangerous sparks.► Ensure that the charger cables are in good condition.► Lift the plastic cover on the (+) terminal, if the vehicle has one.► Connect the cables of charger B as follows:• the positive (+) red cable to the (+) terminal of battery A,• the negative (-) black cable to earth point C on the vehicle.► At the end of the charging operation, switch off charger B before disconnecting the cables from battery A.
WARNI NG
If this label is present, use only a 12 V charger to avoid causing irreversible damage to the electrical components.
24V
12V
WARNI NG
Never try to charge a frozen battery - risk of explosion!If the battery has frozen, have it checked by any authorized Toyota retailer or Toyota authorized repairer, or any reliable repairer who will verify that the internal components have not been damaged and that the case
has not cracked, which would mean a risk of toxic and corrosive acid leaking.
Page 259 of 360
259
Technical data
9
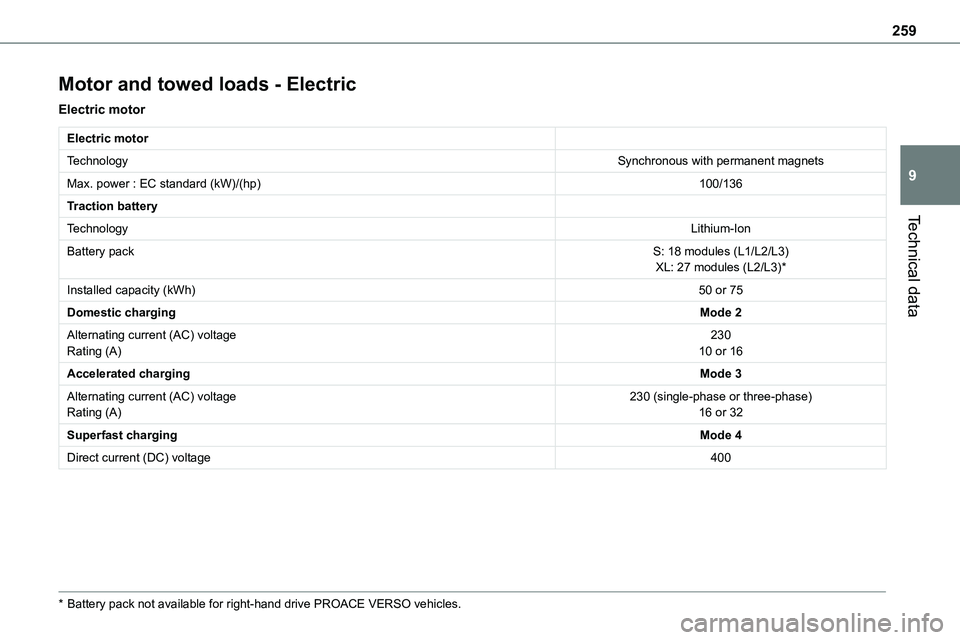
Motor and towed loads - Electric
Electric motor
Electric motor
TechnologySynchronous with permanent magnets
Max. power : EC standard (kW)/(hp)100/136
Traction battery
TechnologyLithium-Ion
Battery packS: 18 modules (L1/L2/L3)XL: 27 modules (L2/L3)*
Installed capacity (kWh)50 or 75
Domestic chargingMode 2
Alternating current (AC) voltageRating (A)23010 or 16
Accelerated chargingMode 3
Alternating current (AC) voltageRating (A)230 (single-phase or three-phase)16 or 32
Superfast chargingMode 4
Direct current (DC) voltage400
* Battery pack not available for right-hand drive PROACE VERSO vehicles.