TOYOTA RAV4 1996 Service Repair Manual
Manufacturer: TOYOTA, Model Year: 1996,
Model line: RAV4,
Model: TOYOTA RAV4 1996
Pages: 1354, PDF Size: 30.43 MB
TOYOTA RAV4 1996 Service Repair Manual
RAV4 1996
TOYOTA
TOYOTA
https://www.carmanualsonline.info/img/14/57462/w960_57462-0.png
TOYOTA RAV4 1996 Service Repair Manual
Trending: horn, transmission, radiator, width, roof, power steering fluid, Generator
Page 651 of 1354
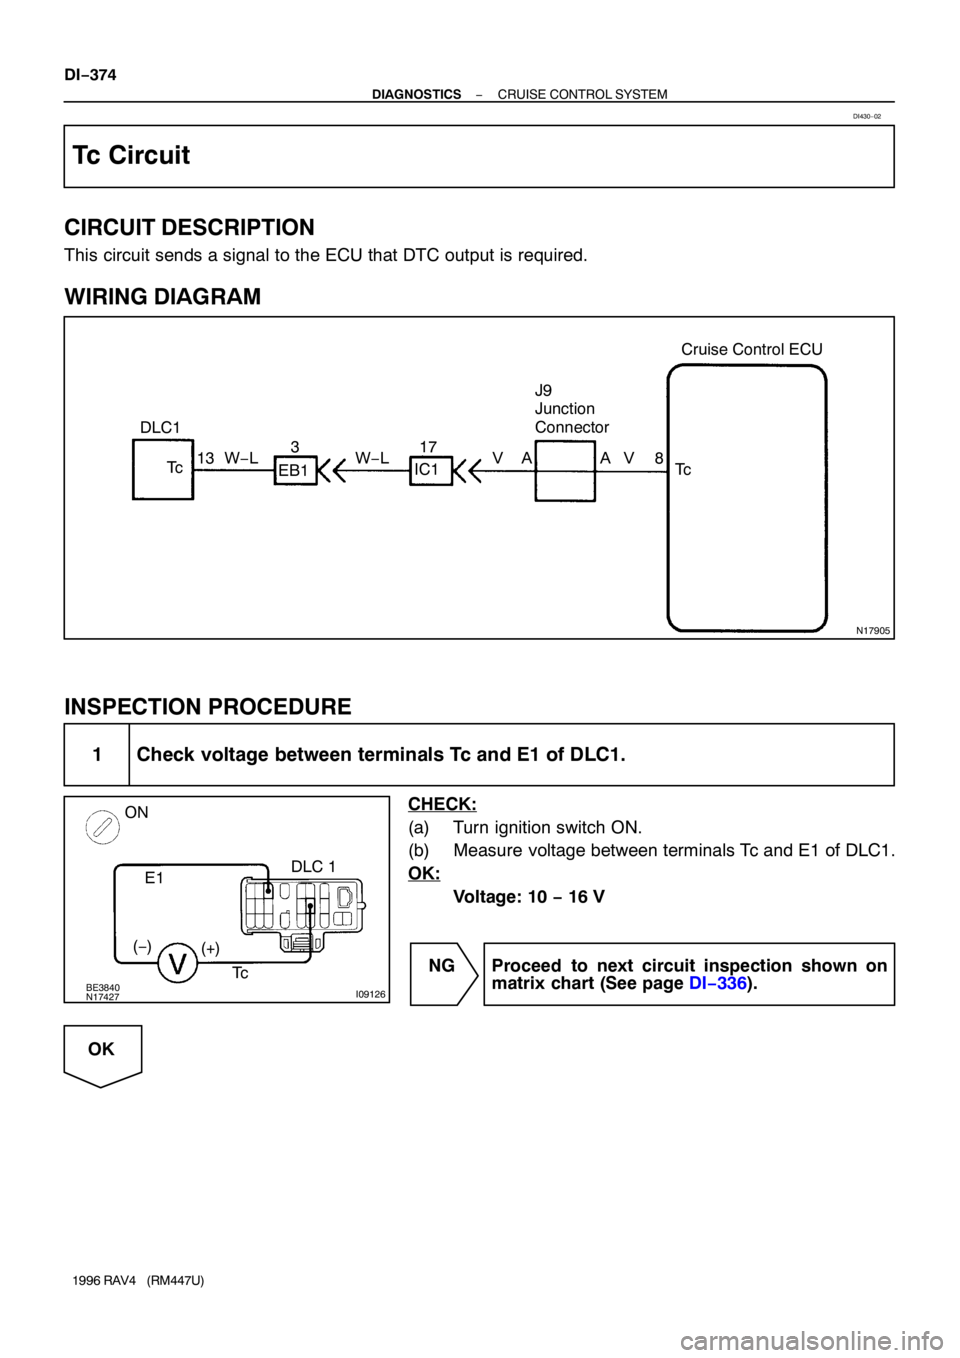
N17905
DLC1Cruise Control ECU
J9
Junction
Connector
13 W−L317
VA AV 8
Tc Tc
EB1IC1 W−L
BE3840N17427I09126
ON
DLC 1
E1
Tc (−)
(+)
DI−374
− DIAGNOSTICSCRUISE CONTROL SYSTEM
1996 RAV4 (RM447U)
Tc Circuit
CIRCUIT DESCRIPTION
This circuit sends a signal to the ECU that DTC output is required.
WIRING DIAGRAM
INSPECTION PROCEDURE
1 Check voltage between terminals Tc and E1 of DLC1.
CHECK:
(a) Turn ignition switch ON.
(b) Measure voltage between terminals Tc and E1 of DLC1.
OK:
Voltage: 10 − 16 V
NG Proceed to next circuit inspection shown on
matrix chart (See page DI−336).
OK
DI430−02
Page 652 of 1354
− DIAGNOSTICSCRUISE CONTROL SYSTEM
DI−375
1996 RAV4 (RM447U)
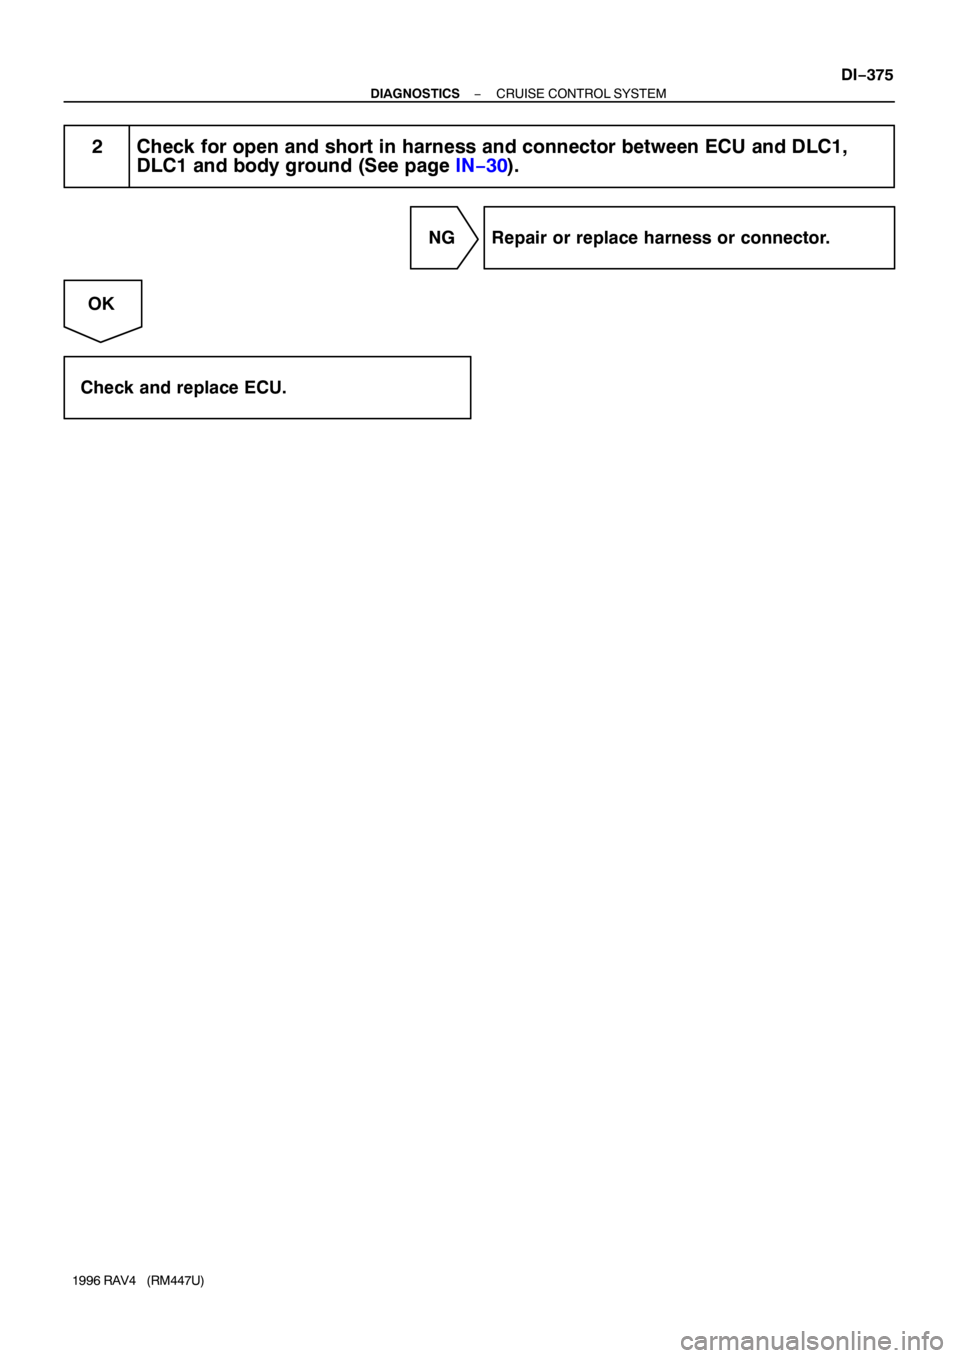
2 Check for open and short in harness and connector between ECU and DLC1,
DLC1 and body ground (See page IN−30).
NG Repair or replace harness or connector.
OK
Check and replace ECU.
Page 653 of 1354
DI−376
− DIAGNOSTICSCRUISE CONTROL SYSTEM
1996 RAV4 (RM447U)
Actuator Control Cable Inspection
CHECK:
(a) Check that the actuator, control cable and throttle link are properly installed and that the cable and link
are connected correctly.
(b) Check that the actuator and bell crank are operating smoothly.
(c) Check that the cable is not loose or too tight.
HINT:
�If the control cable is very loose, the vehicle’s loss of speed going uphill will be large.
�If the control cable is too tight, the idle RPM will become high.
DI431−01
Page 654 of 1354
EC05E−01
− EMISSION CONTROLEMISSION CONTROL SYSTEM
EC−1
1996 RAV4 (RM447U)
EMISSION CONTROL SYSTEM
PURPOSE
The emission control systems are installed to reduce the amount of HC, CO and NOx exhausted from the
engine ((3), (4) and (5)), to prevent the atmospheric release of blow−by gas−containing HC (1) and evapo-
rated fuel containing HC being released from the fuel tank (2).
The function of each system is shown in the following table.
SystemAbbreviationFunction
(1) Positive Crankcase Ventilation
(2) Evaporative Emission Control
(3) Exhaust Gas Recirculation
(4) Three−Way Catalytic Converter
(5) Sequential Multiport Fuel Injection*PCV
EVAP
EGR
TWC
SFIReduces HC
Reduces evaporated HC
Reduces NOx
Reduces HC, CO and NOx
Injects a precisely timed, optimum amount of fuel for reduced
exhaust emissions
Remark: * For inspection and repair of the SFI system, refer to the SFI section in this manual.
Page 655 of 1354
EC05F−04
EC−2
− EMISSION CONTROLPARTS LAYOUT AND SCHEMATIC DRAWING
1996 RAV4 (RM447U)
PARTS LAYOUT AND SCHEMATIC DRAWING
LOCATION
Page 656 of 1354
EC05G−03
− EMISSION CONTROLPARTS LAYOUT AND SCHEMATIC DRAWING
EC−3
1996 RAV4 (RM447U)
DRAWING
Page 657 of 1354
N00929
Clean Hose
Cylinder Head Side
N00930
Air Intake
Chamber
Side
Clean Hose
EC05H−04
P00989
EC−4− EMISSION CONTROLPOSITIVE CRANKCASE VENTILATION (PCV)
SYSTEM
1996 RAV4 (RM447U)
POSITIVE CRANKCASE
VENTILATION (PCV) SYSTEM
INSPECTION
1. REMOVE PCV VALVE
2. INSTALL CLEAN HOSE TO PCV VALVE
3. INSPECT PCV VALVE OPERATION
(a) Blow into the cylinder head side, and check that air
passes through easily.
CAUTION:
Do not suck air through the valve. Petroleum substances
inside the valve are harmful.
(b) Blow air into the intake manifold side, and check that air
passes through with difficulty.
If operation is not as specified, replace the PCV valve.
4. REMOVE CLEAN HOSE FROM PCV VALVE
5. REINSTALL PCV VALVE
6. VISUALLY INSPECT HOSES, CONNECTIONS AND
GASKETS
Check for cracks, leaks or damage.
Page 658 of 1354

EC05I−03
EC3069Check Valve (Vacuum Valve)Gasket
S01428
S01451
Port E
Port D
Port A
Compressed
Air
Port B
S01452
Port C Port D Port A
Compressed
Air
Port B
− EMISSION CONTROLEVAPORATIVE EMISSION (EVAP) CONTROL SYSTEM
EC−5
1996 RAV4 (RM447U)
EVAPORATIVE EMISSION (EVAP)
CONTROL SYSTEM
INSPECTION
1. VISUALLY INSPECT LINES AND CONNECTIONS
Look for loose connections, sharp bends or damage.
2. VISUALLY INSPECT FUEL TANK
Look for deformation, cracks or fuel leakage.
3. VISUALLY INSPECT FUEL TANK CAP
Check if the cap and/or gasket are deformed or damaged.
If necessary, repair or replace the cap.
4. DISCONNECT EVAP HOSES FROM CHARCOAL CAN-
ISTER
5. VISUALLY INSPECT CHARCOAL CANISTER
Look for cracks or damage.
6. CHECK FOR CLOGGED FILTER, AND STUCK CHECK
VALVE AND DIAPHRAGM
(a) Install a plug to port E.
(b) While holding port B closed, blow air (1.76 kPa, 18
gf/cm
2, 0.26 psi) into port A and check that air flows from
port D.
(c) While holding port B and port D closed, blow air (1.76 kPa,
18 gf/cm
2, 0.26 psi) into port A and check that air does not
flow from port C.
Page 659 of 1354
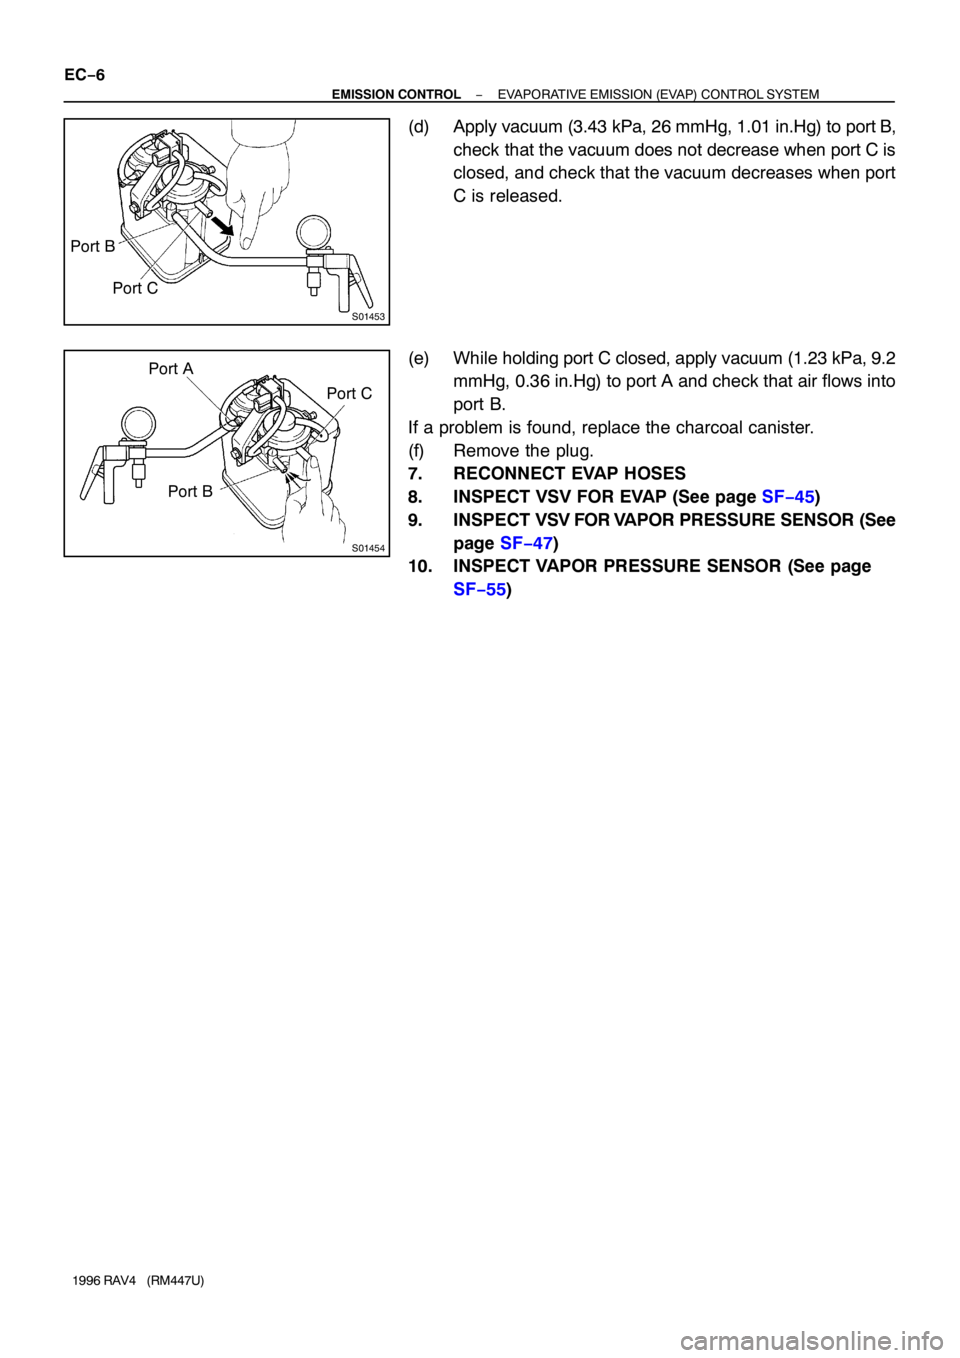
S01453
Port B
Port C
S01454
Port A
Port BPort C EC−6
− EMISSION CONTROLEVAPORATIVE EMISSION (EVAP) CONTROL SYSTEM
1996 RAV4 (RM447U)
(d) Apply vacuum (3.43 kPa, 26 mmHg, 1.01 in.Hg) to port B,
check that the vacuum does not decrease when port C is
closed, and check that the vacuum decreases when port
C is released.
(e) While holding port C closed, apply vacuum (1.23 kPa, 9.2
mmHg, 0.36 in.Hg) to port A and check that air flows into
port B.
If a problem is found, replace the charcoal canister.
(f) Remove the plug.
7. RECONNECT EVAP HOSES
8. INSPECT VSV FOR EVAP (See page SF−45)
9. INSPECT VSV FOR VAPOR PRESSURE SENSOR (See
page SF−47)
10. INSPECT VAPOR PRESSURE SENSOR (See page
SF−55)
Page 660 of 1354
EC05J−03
− EMISSION CONTROLEXHAUST GAS RECIRCULATION (EGR) SYSTEM
EC−7
1996 RAV4 (RM447U)
EXHAUST GAS RECIRCULATION (EGR) SYSTEM
COMPONENTS
Trending: engine, oil viscosity, Gage Assy, oil filter, driver seat adjustment, İdle, key


