steering column TOYOTA RAV4 2006 Service Repair Manual
[x] Cancel search | Manufacturer: TOYOTA, Model Year: 2006, Model line: RAV4, Model: TOYOTA RAV4 2006Pages: 2000, PDF Size: 45.84 MB
Page 328 of 2000

PP–80PREPARATION – STEERING COLUMN
PP
EQUIPMENT
Torque wench -
Drill -
Page 421 of 2000
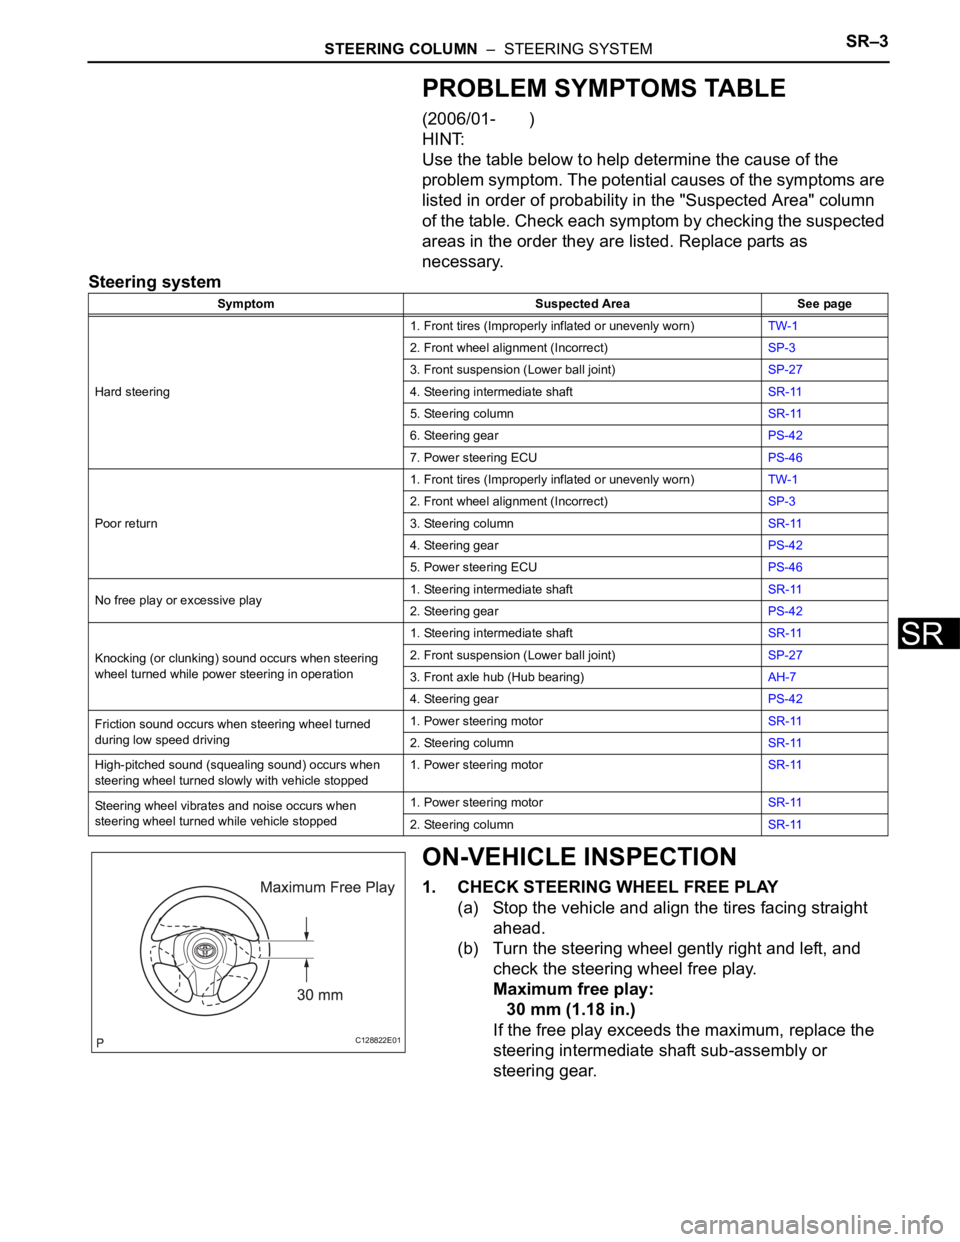
STEERING COLUMN – STEERING SYSTEMSR–3
SR
PROBLEM SYMPTOMS TABLE
(2006/01- )
HINT:
Use the table below to help determine the cause of the
problem symptom. The potential causes of the symptoms are
listed in order of probability in the "Suspected Area" column
of the table. Check each symptom by checking the suspected
areas in the order they are listed. Replace parts as
necessary.
Steering system
ON-VEHICLE INSPECTION
1. CHECK STEERING WHEEL FREE PLAY
(a) Stop the vehicle and align the tires facing straight
ahead.
(b) Turn the steering wheel gently right and left, and
check the steering wheel free play.
Maximum free play:
30 mm (1.18 in.)
If the free play exceeds the maximum, replace the
steering intermediate shaft sub-assembly or
steering gear.
Symptom Suspected Area See page
Hard steering1. Front tires (Improperly inflated or unevenly worn)TW-1
2. Front wheel alignment (Incorrect)SP-3
3. Front suspension (Lower ball joint)SP-27
4. Steering intermediate shaftSR-11
5. Steering columnSR-11
6. Steering gearPS-42
7. Power steering ECUPS-46
Poor return1. Front tires (Improperly inflated or unevenly worn)TW-1
2. Front wheel alignment (Incorrect)SP-3
3. Steering columnSR-11
4. Steering gearPS-42
5. Power steering ECUPS-46
No free play or excessive play1. Steering intermediate shaftSR-11
2. Steering gearPS-42
Knocking (or clunking) sound occurs when steering
wheel turned while power steering in operation1. Steering intermediate shaftSR-11
2. Front suspension (Lower ball joint)SP-27
3. Front axle hub (Hub bearing)AH-7
4. Steering gearPS-42
Friction sound occurs when steering wheel turned
during low speed driving1. Power steering motorSR-11
2. Steering columnSR-11
High-pitched sound (squealing sound) occurs when
steering wheel turned slowly with vehicle stopped1. Power steering motorSR-11
Steering wheel vibrates and noise occurs when
steering wheel turned while vehicle stopped1. Power steering motorSR-11
2. Steering columnSR-11
C128822E01
Page 422 of 2000
SR–4STEERING COLUMN – STEERING SYSTEM
SR
REPAIR
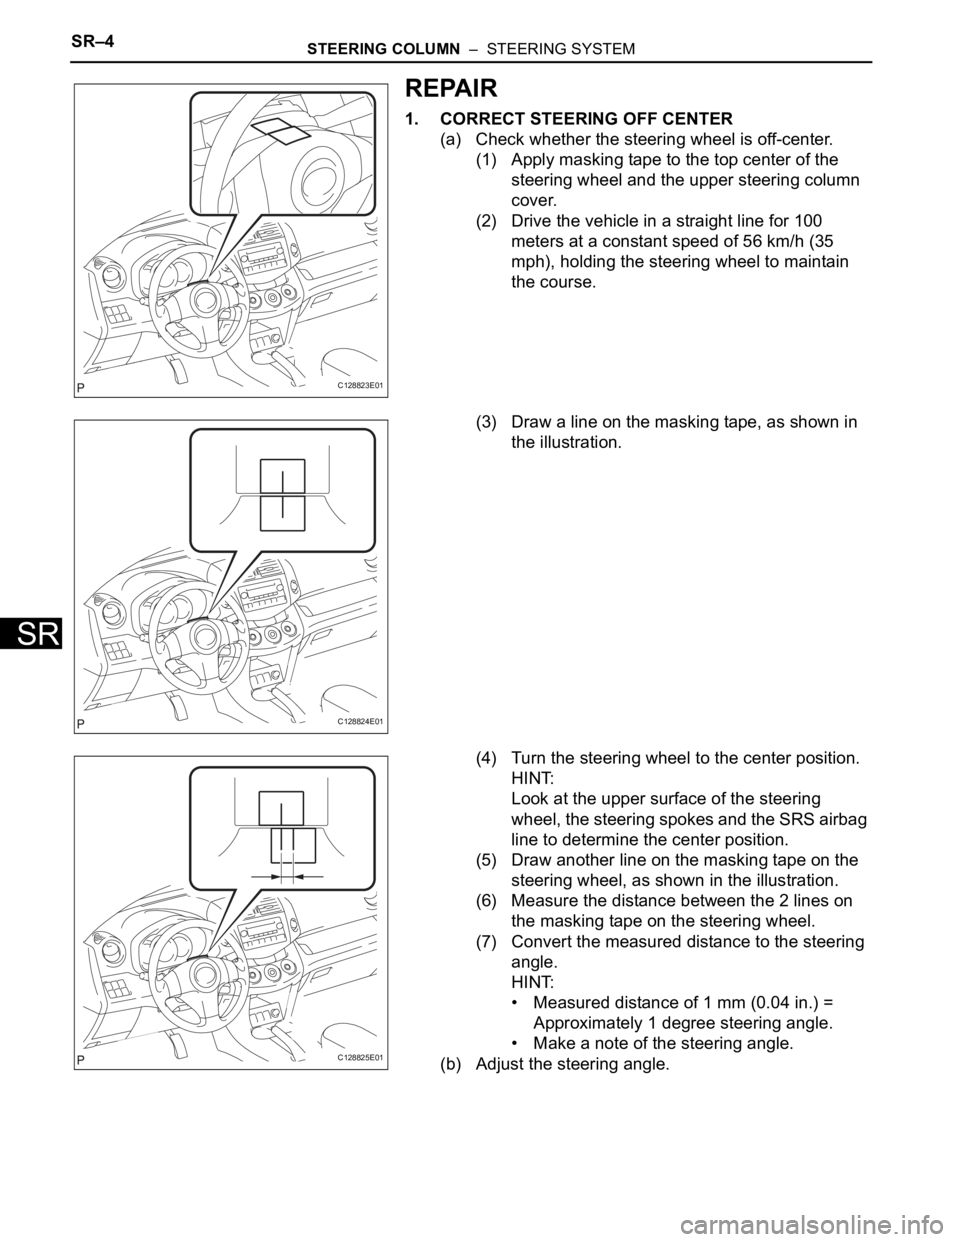
1. CORRECT STEERING OFF CENTER
(a) Check whether the steering wheel is off-center.
(1) Apply masking tape to the top center of the
steering wheel and the upper steering column
cover.
(2) Drive the vehicle in a straight line for 100
meters at a constant speed of 56 km/h (35
mph), holding the steering wheel to maintain
the course.
(3) Draw a line on the masking tape, as shown in
the illustration.
(4) Turn the steering wheel to the center position.
HINT:
Look at the upper surface of the steering
wheel, the steering spokes and the SRS airbag
line to determine the center position.
(5) Draw another line on the masking tape on the
steering wheel, as shown in the illustration.
(6) Measure the distance between the 2 lines on
the masking tape on the steering wheel.
(7) Convert the measured distance to the steering
angle.
HINT:
• Measured distance of 1 mm (0.04 in.) =
Approximately 1 degree steering angle.
• Make a note of the steering angle.
(b) Adjust the steering angle.
C128823E01
C128824E01
C128825E01
Page 423 of 2000
STEERING COLUMN – STEERING SYSTEMSR–5
SR
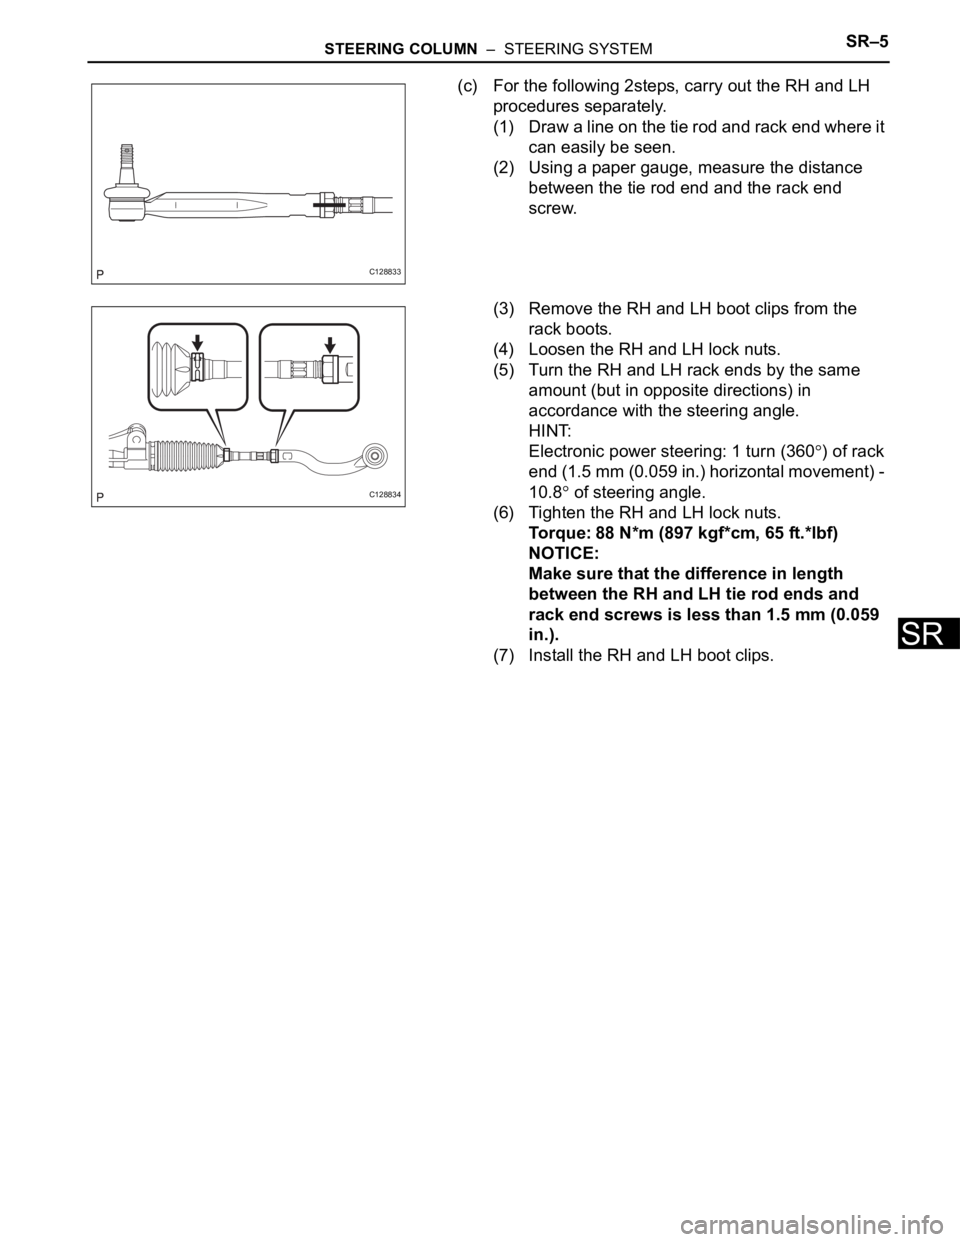
(c) For the following 2steps, carry out the RH and LH
procedures separately.
(1) Draw a line on the tie rod and rack end where it
can easily be seen.
(2) Using a paper gauge, measure the distance
between the tie rod end and the rack end
screw.
(3) Remove the RH and LH boot clips from the
rack boots.
(4) Loosen the RH and LH lock nuts.
(5) Turn the RH and LH rack ends by the same
amount (but in opposite directions) in
accordance with the steering angle.
HINT:
Electronic power steering: 1 turn (360
) of rack
end (1.5 mm (0.059 in.) horizontal movement) -
10.8
of steering angle.
(6) Tighten the RH and LH lock nuts.
Torque: 88 N*m (897 kgf*cm, 65 ft.*lbf)
NOTICE:
Make sure that the difference in length
between the RH and LH tie rod ends and
rack end screws is less than 1.5 mm (0.059
in.).
(7) Install the RH and LH boot clips.
C128833
C128834
Page 425 of 2000

POWER STEERING – ELECTRONIC POWER STEERING SYSTEMPS–5
PS
SYSTEM DESCRIPTION
1. DESCRIPTION
The EPS (Electronic Power Steering) system generates
torque through the operation of the motor and the
reduction gear installed on the column shaft in order to
assist steering effort.
The power steering ECU determines directions and the
amount of assisting power in accordance with vehicle
speed signals and signals from the torque sensor built
into the steering column assembly. As a result, the power
steering adjusts the steering effort so that it is lighter
during low speed driving and heavier during high speed
driving.
(a) Power steering ECU:
The power steering ECU calculates assisting power
based on steering torque signals from the torque
sensor and vehicle speed signals from the skid
control ECU.
(b) Torque sensor:
The torque sensor detects the steering effort
generated when the steering wheel is turned and
converts it to an electrical signal.
(c) EPS motor:
The EPS motor is activated by the current from the
power steering ECU and generates torque to assist
the steering effort.
(d) Motor rotation angle sensor:
The motor rotation angle sensor consists of the
resolver sensor, which excels in reliability and
durability. The rotation angle sensor detects the
rotation angle of the motor and outputs it to the
power steering ECU. As a result, it ensures efficient
EPS control.
Page 453 of 2000
LI–126LIGHTING – IGNITION KEY CYLINDER LIGHT
LI
INSTALLATION
1. INSTALL TRANSPONDER KEY AMPLIFIER (See page
SR-18)
2. INSTALL STEERING COLUMN COVER (See page SR-
20)
3. INSTALL STEERING WHEEL ASSEMBLY (See page
SR-21)
4. PLACE FRONT WHEELS FACING STRAIGHT AHEAD
5. INSPECT STEERING WHEEL CENTER POINT
6. INSTALL STEERING PAD ASSEMBLY (See page RS-
336)
7. CONNECT CABLE TO NEGATIVE BATTERY
TERMINAL
8. INSPECT STEERING PAD ASSEMBLY (See page RS-
337)
9. CHECK SRS WARNING LIGHT
(a) Check the SRS warning light (see page RS-337).
Page 908 of 2000
2AZ-FE STARTING – IGNITION SWITCHST–19
ST
If the result is not as specified, replace the switch
assembly.
INSTALLATION
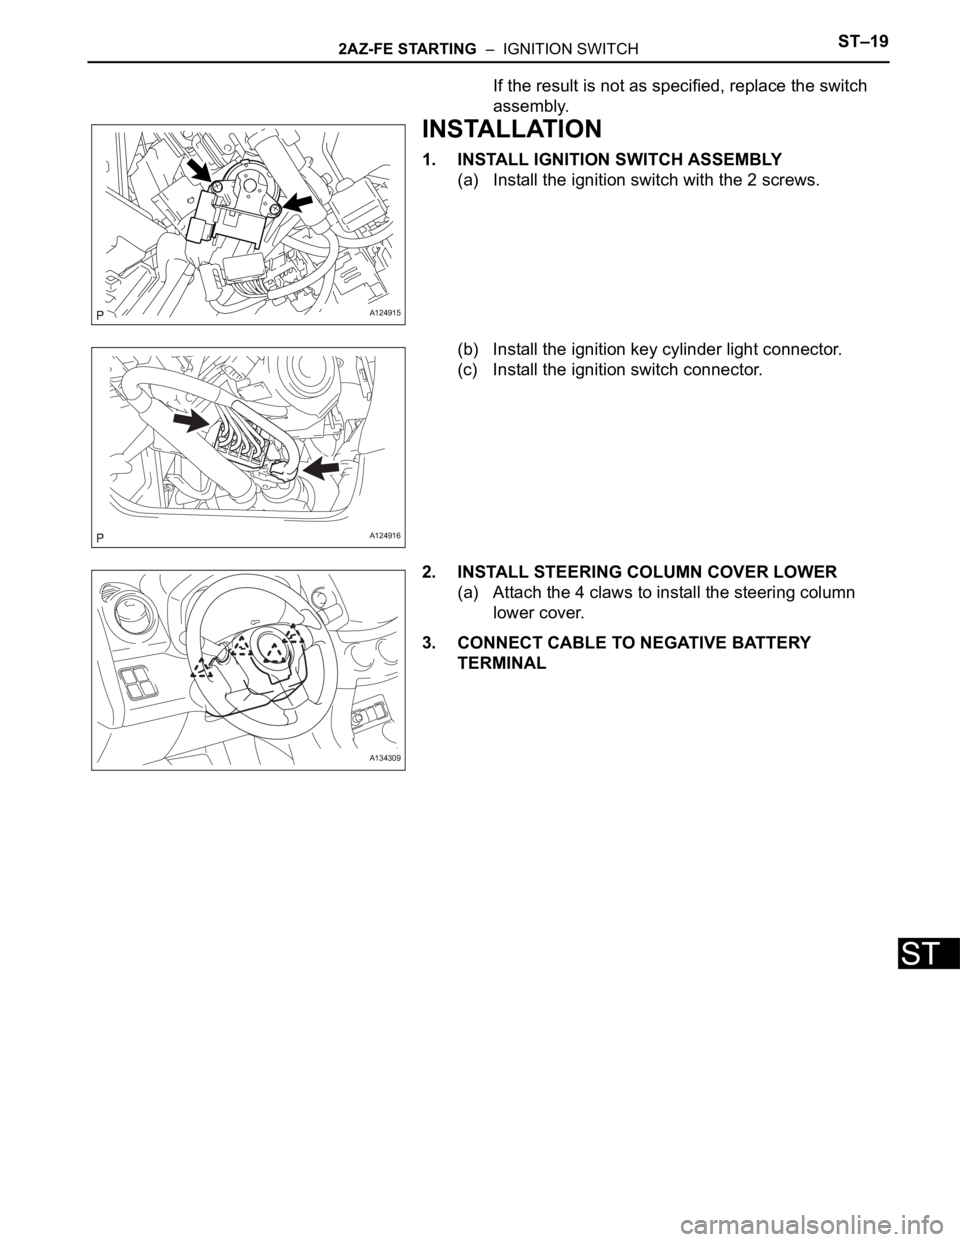
1. INSTALL IGNITION SWITCH ASSEMBLY
(a) Install the ignition switch with the 2 screws.
(b) Install the ignition key cylinder light connector.
(c) Install the ignition switch connector.
2. INSTALL STEERING COLUMN COVER LOWER
(a) Attach the 4 claws to install the steering column
lower cover.
3. CONNECT CABLE TO NEGATIVE BATTERY
TERMINAL
A124915
A124916
A134309
Page 919 of 2000
2GR-FE STARTING – IGNITION SWITCHST–19
ST
INSTALLATION
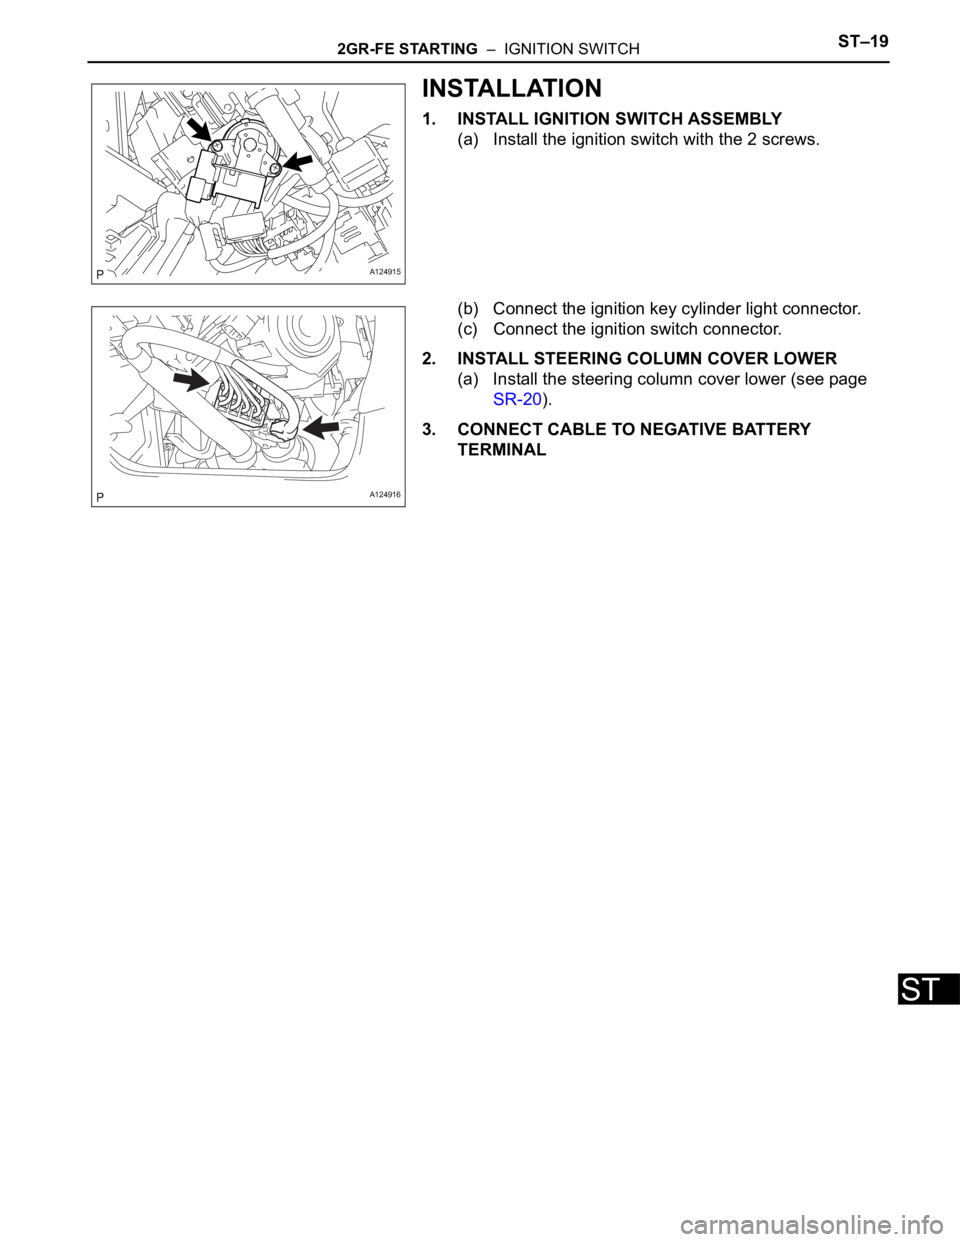
1. INSTALL IGNITION SWITCH ASSEMBLY
(a) Install the ignition switch with the 2 screws.
(b) Connect the ignition key cylinder light connector.
(c) Connect the ignition switch connector.
2. INSTALL STEERING COLUMN COVER LOWER
(a) Install the steering column cover lower (see page
SR-20).
3. CONNECT CABLE TO NEGATIVE BATTERY
TERMINAL
A124915
A124916
Page 1343 of 2000
GF1A TRANSFER – ACTIVE TORQUE CONTROL 4WD SYSTEMTF–15
TF
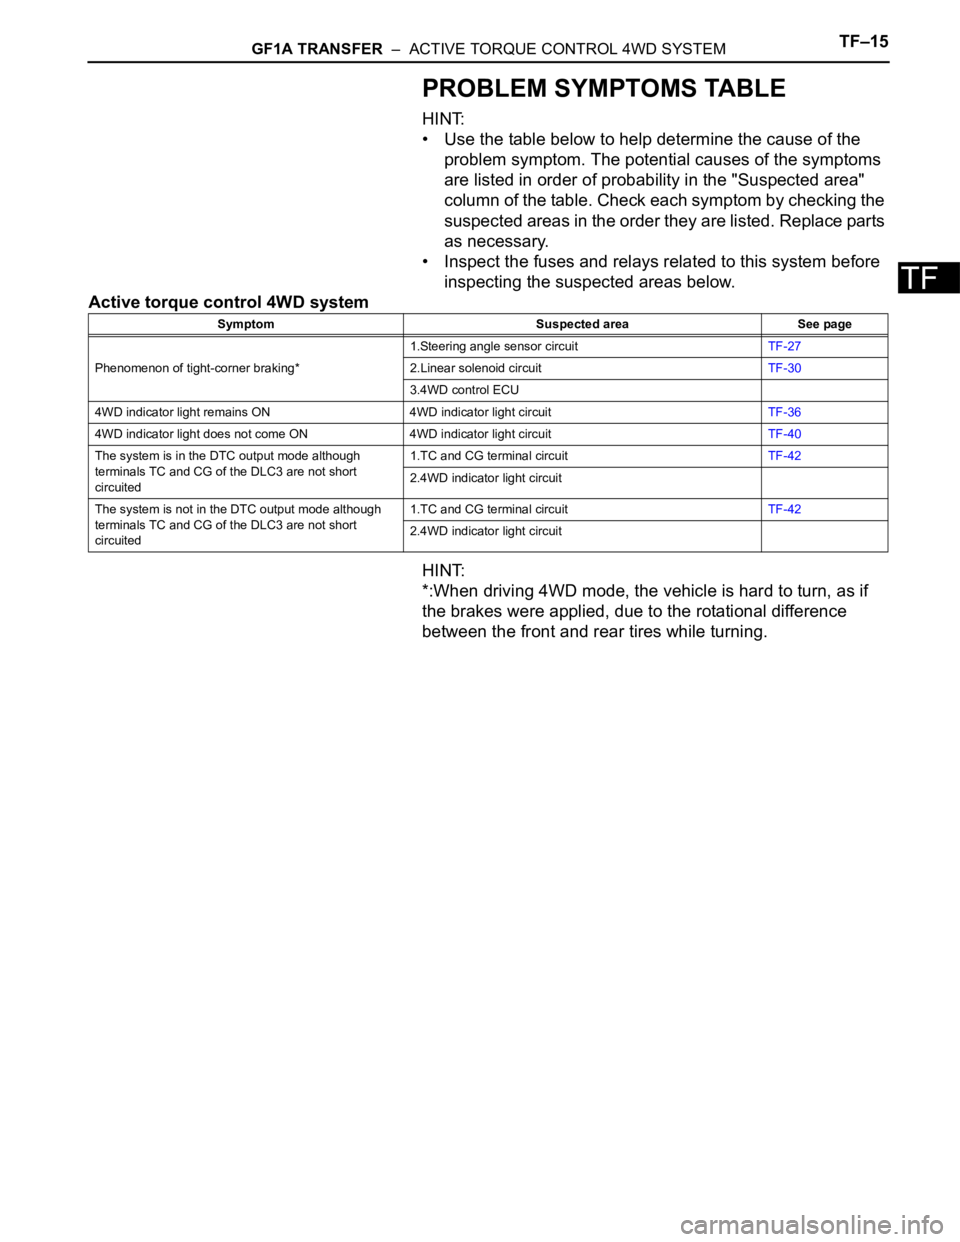
PROBLEM SYMPTOMS TABLE
HINT:
• Use the table below to help determine the cause of the
problem symptom. The potential causes of the symptoms
are listed in order of probability in the "Suspected area"
column of the table. Check each symptom by checking the
suspected areas in the order they are listed. Replace parts
as necessary.
• Inspect the fuses and relays related to this system before
inspecting the suspected areas below.
Active torque control 4WD system
HINT:
*:When driving 4WD mode, the vehicle is hard to turn, as if
the brakes were applied, due to the rotational difference
between the front and rear tires while turning.
Symptom Suspected area See page
Phenomenon of tight-corner braking*1.Steering angle sensor circuitTF-27
2.Linear solenoid circuitTF-30
3.4WD control ECU
4WD indicator light remains ON 4WD indicator light circuitTF-36
4WD indicator light does not come ON 4WD indicator light circuitTF-40
The system is in the DTC output mode although
terminals TC and CG of the DLC3 are not short
circuited1.TC and CG terminal circuitTF-42
2.4WD indicator light circuit
The system is not in the DTC output mode although
terminals TC and CG of the DLC3 are not short
circuited1.TC and CG terminal circuitTF-42
2.4WD indicator light circuit
Page 1545 of 2000
BC–42BRAKE CONTROL – VEHICLE STABILITY CONTROL SYSTEM
BC
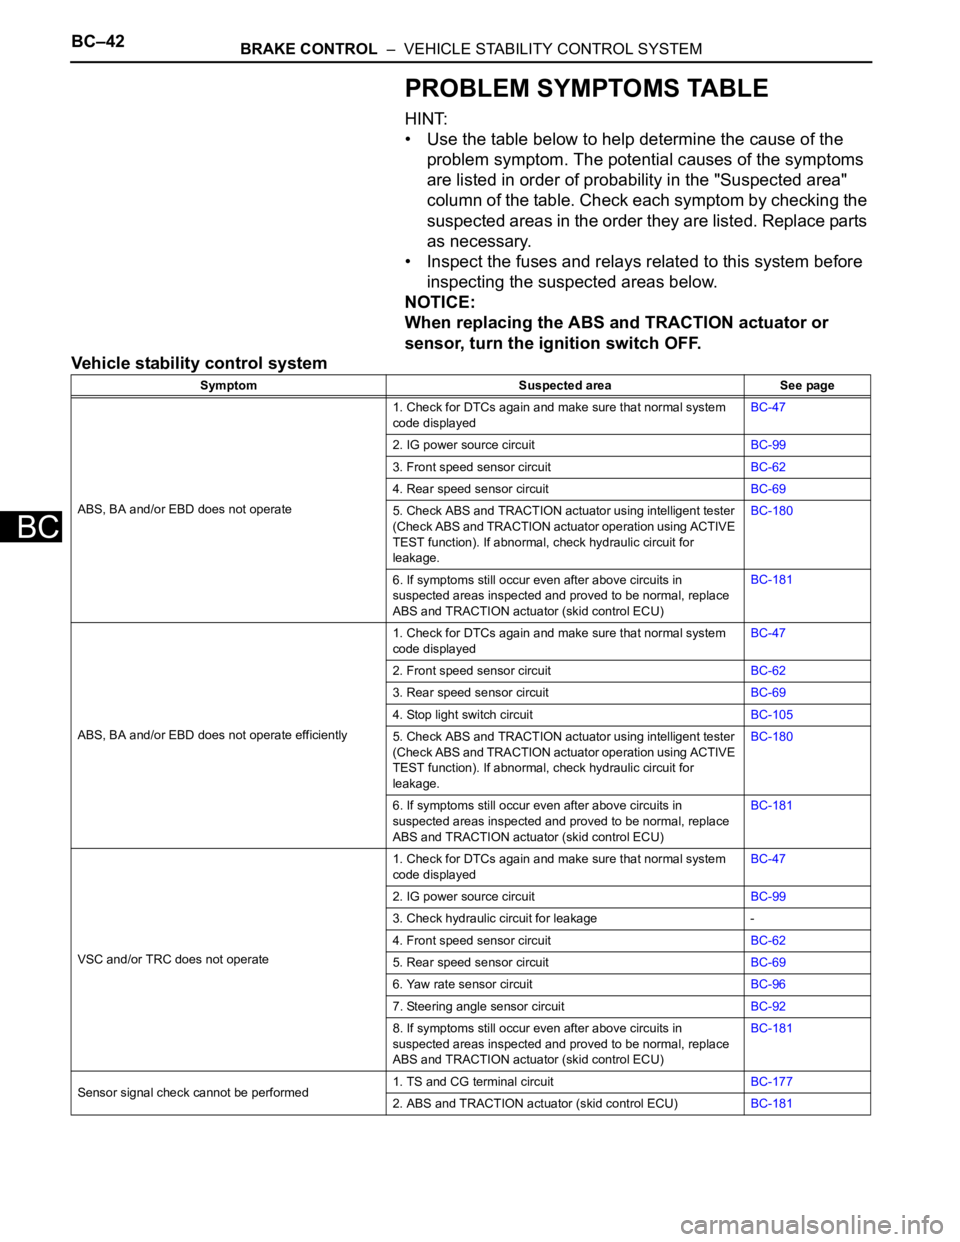
PROBLEM SYMPTOMS TABLE
HINT:
• Use the table below to help determine the cause of the
problem symptom. The potential causes of the symptoms
are listed in order of probability in the "Suspected area"
column of the table. Check each symptom by checking the
suspected areas in the order they are listed. Replace parts
as necessary.
• Inspect the fuses and relays related to this system before
inspecting the suspected areas below.
NOTICE:
When replacing the ABS and TRACTION actuator or
sensor, turn the ignition switch OFF.
Vehicle stability control system
Symptom Suspected area See page
ABS, BA and/or EBD does not operate1. Check for DTCs again and make sure that normal system
code displayedBC-47
2. IG power source circuitBC-99
3. Front speed sensor circuitBC-62
4. Rear speed sensor circuitBC-69
5. Check ABS and TRACTION actuator using intelligent tester
(Check ABS and TRACTION actuator operation using ACTIVE
TEST function). If abnormal, check hydraulic circuit for
leakage.BC-180
6. If symptoms still occur even after above circuits in
suspected areas inspected and proved to be normal, replace
ABS and TRACTION actuator (skid control ECU)BC-181
ABS, BA and/or EBD does not operate efficiently1. Check for DTCs again and make sure that normal system
code displayedBC-47
2. Front speed sensor circuitBC-62
3. Rear speed sensor circuitBC-69
4. Stop light switch circuitBC-105
5. Check ABS and TRACTION actuator using intelligent tester
(Check ABS and TRACTION actuator operation using ACTIVE
TEST function). If abnormal, check hydraulic circuit for
leakage.BC-180
6. If symptoms still occur even after above circuits in
suspected areas inspected and proved to be normal, replace
ABS and TRACTION actuator (skid control ECU)BC-181
VSC and/or TRC does not operate1. Check for DTCs again and make sure that normal system
code displayedBC-47
2. IG power source circuitBC-99
3. Check hydraulic circuit for leakage -
4. Front speed sensor circuitBC-62
5. Rear speed sensor circuitBC-69
6. Yaw rate sensor circuitBC-96
7. Steering angle sensor circuitBC-92
8. If symptoms still occur even after above circuits in
suspected areas inspected and proved to be normal, replace
ABS and TRACTION actuator (skid control ECU)BC-181
Sensor signal check cannot be performed1. TS and CG terminal circuitBC-177
2. ABS and TRACTION actuator (skid control ECU)BC-181