TOYOTA RAV4 2010 XA30 / 3.G Owners Manual
RAV4 2010 XA30 / 3.G
TOYOTA
TOYOTA
https://www.carmanualsonline.info/img/14/6691/w960_6691-0.png
TOYOTA RAV4 2010 XA30 / 3.G Owners Manual
Trending: oil capacity, jack, fuel cap release, jacking, change wheel, headlight bulb, Transmission
Page 431 of 513
430
5-2. Steps to take in an emergency
If you have a flat tire (vehicles with standard tires)
Remove the flat tire and replace it with the spare provided.
■Before jacking up the vehicle
●Stop the vehicle on a hard, flat surface.
● Set the parking brake.
● Shift the shift lever to P.
● Stop the engine.
● Turn on the emergency flashers.
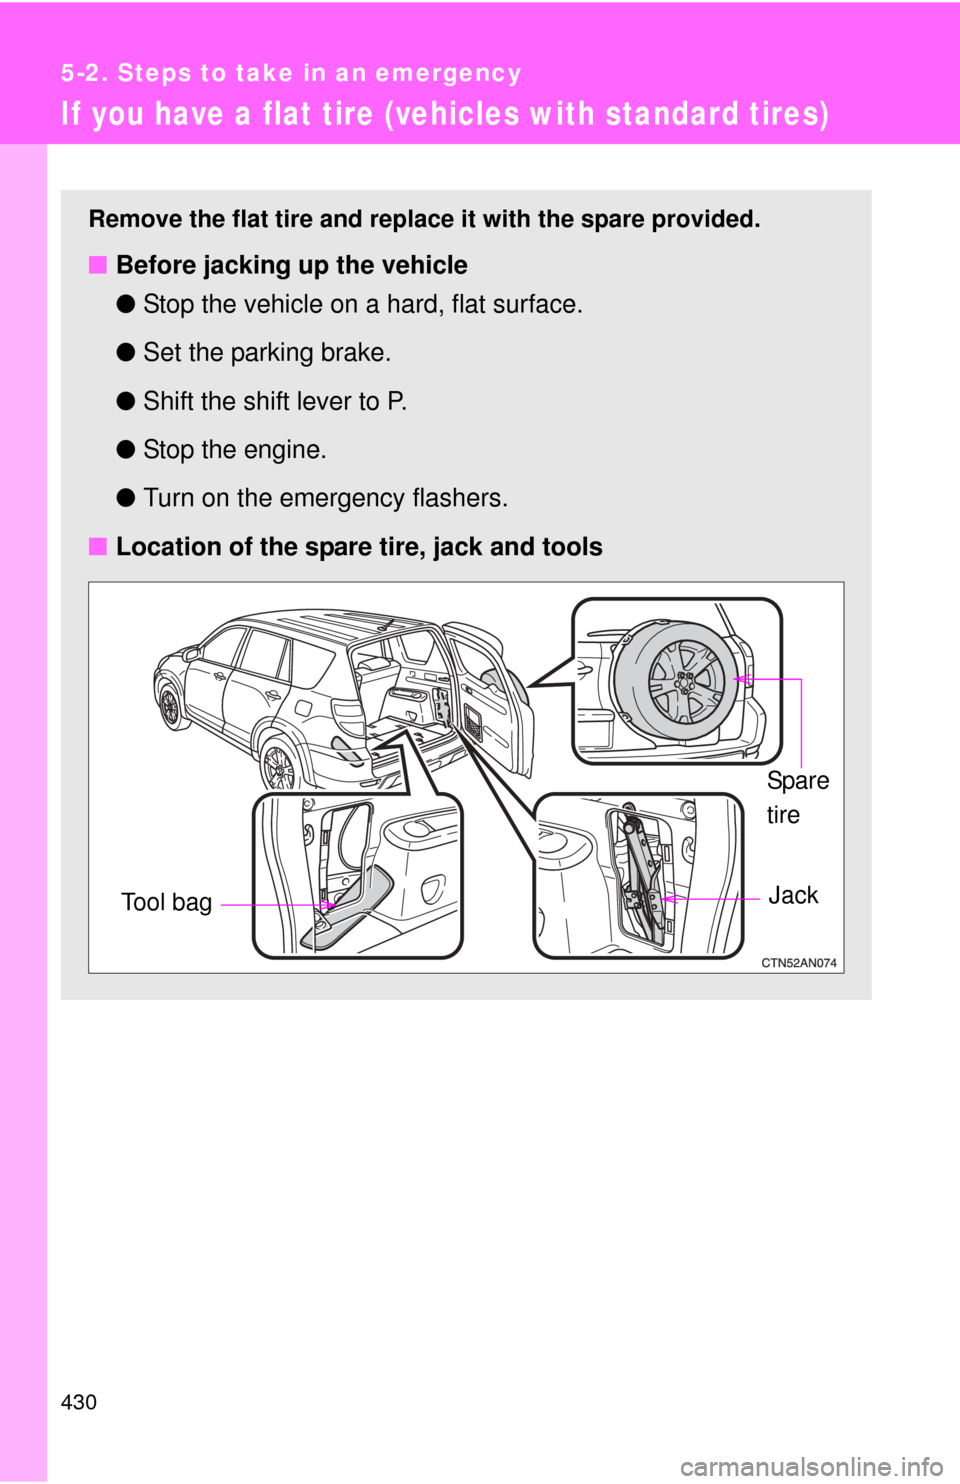
■ Location of the spare tire, jack and tools
Spa re
tire
Tool bag
Jack
Page 432 of 513
5
When trouble arises
431
5-2. Steps to take in an emergency
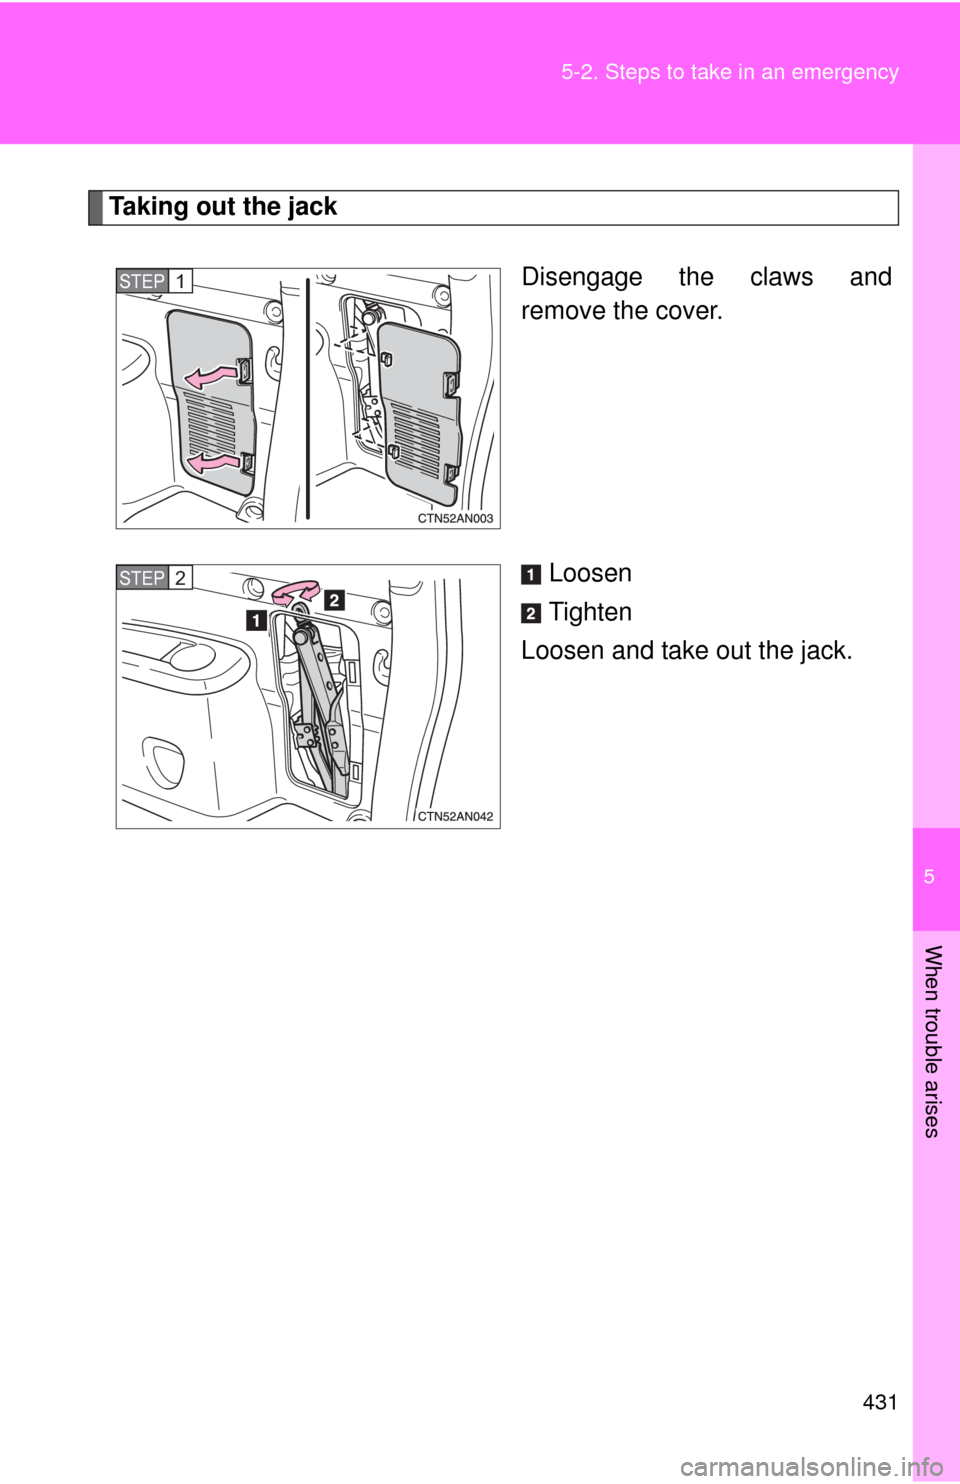
Taking out the jack
Disengage the claws and
remove the cover.
Loosen
Tighten
Loosen and take out the jack.
STEP 1
STEP 2
Page 433 of 513
432 5-2. Steps to take in an emergency
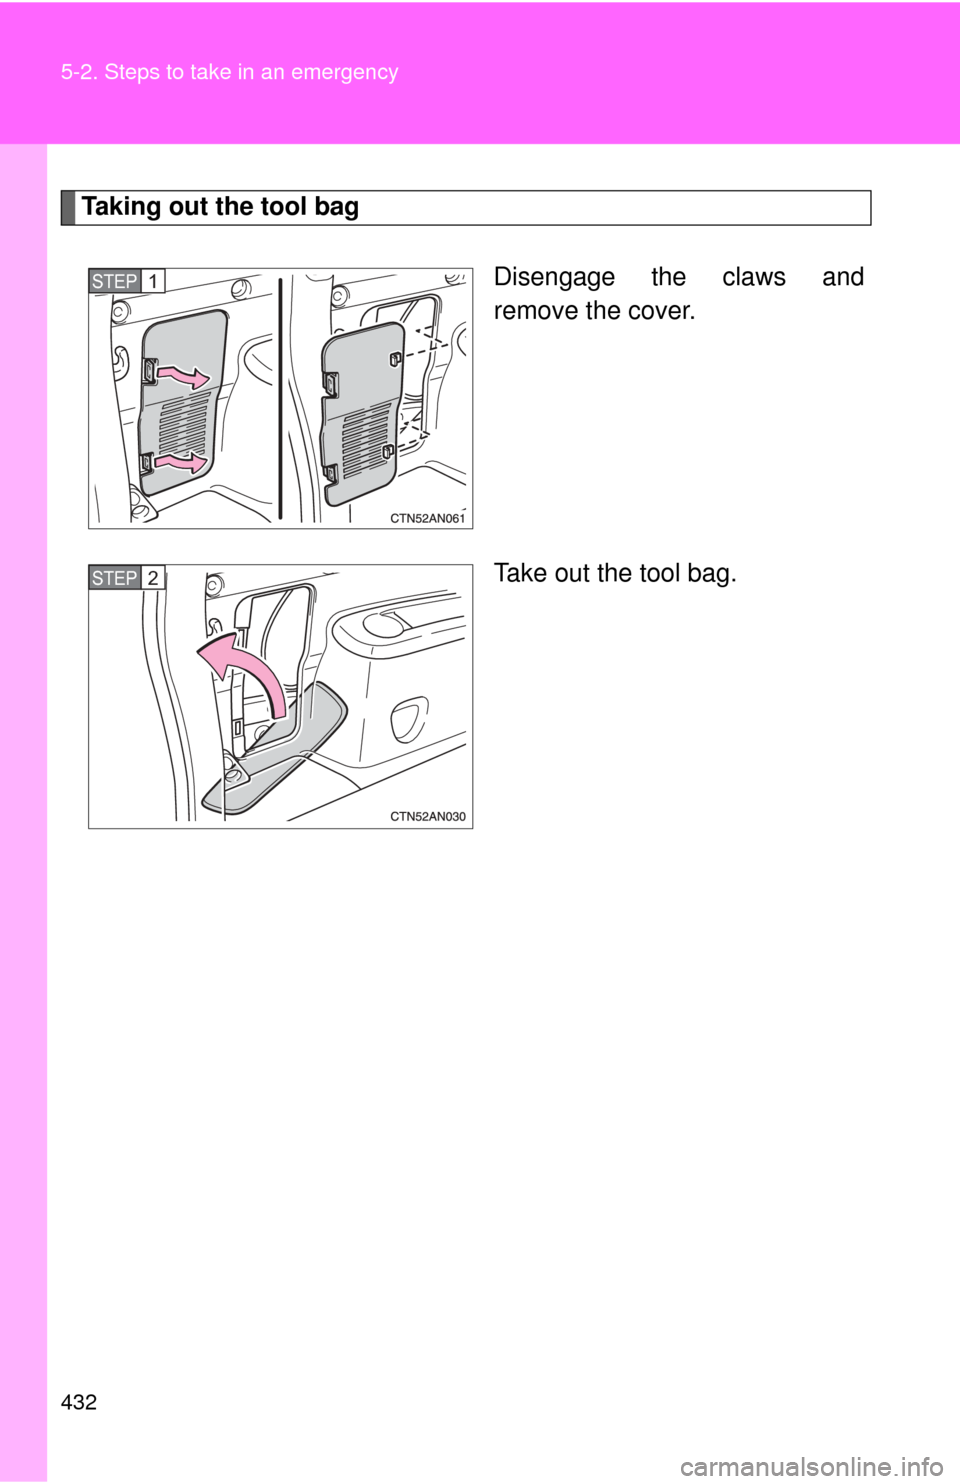
Taking out the tool bagDisengage the claws and
remove the cover.
Take out the tool bag.
STEP 1
STEP 2
Page 434 of 513
5
When trouble arises
433
5-2. Steps to take in an emergency
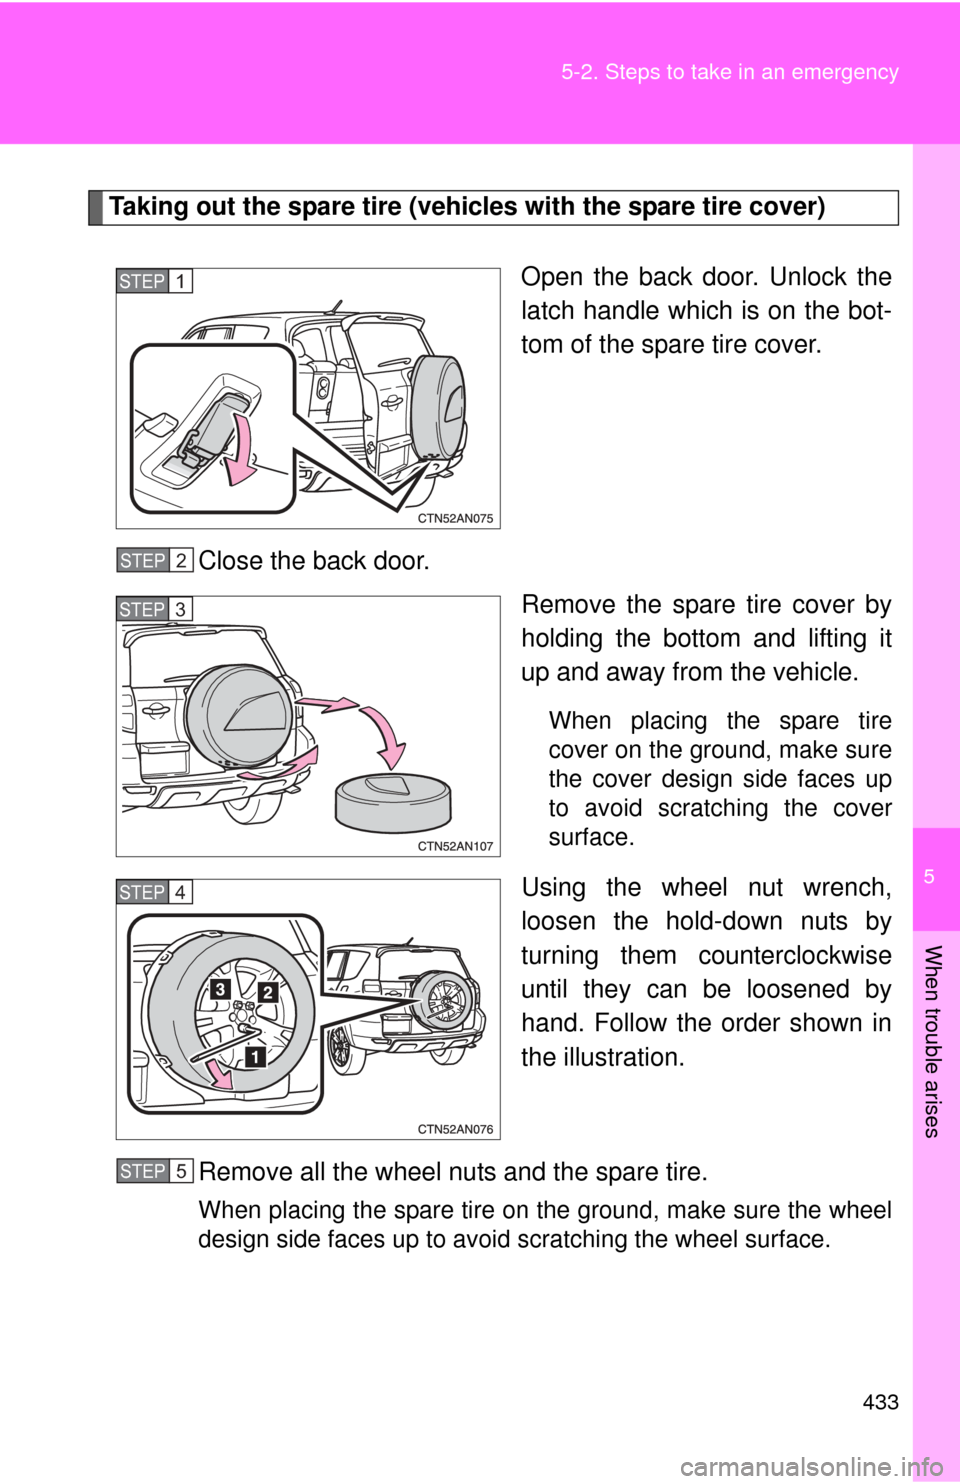
Taking out the spare tire (vehicles with the spare tire cover)
Open the back door. Unlock the
latch handle which is on the bot-
tom of the spare tire cover.
Close the back door. Remove the spare tire cover by
holding the bottom and lifting it
up and away from the vehicle.
When placing the spare tire
cover on the ground, make sure
the cover design side faces up
to avoid scratching the cover
surface.
Using the wheel nut wrench,
loosen the hold-down nuts by
turning them counterclockwise
until they can be loosened by
hand. Follow the order shown in
the illustration.
Remove all the wheel nuts and the spare tire.
When placing the spare tire on the ground, make sure the wheel
design side faces up to avoid scratching the wheel surface.
STEP 1
STEP 2
STEP 3
STEP 4
STEP 5
Page 435 of 513
434 5-2. Steps to take in an emergency
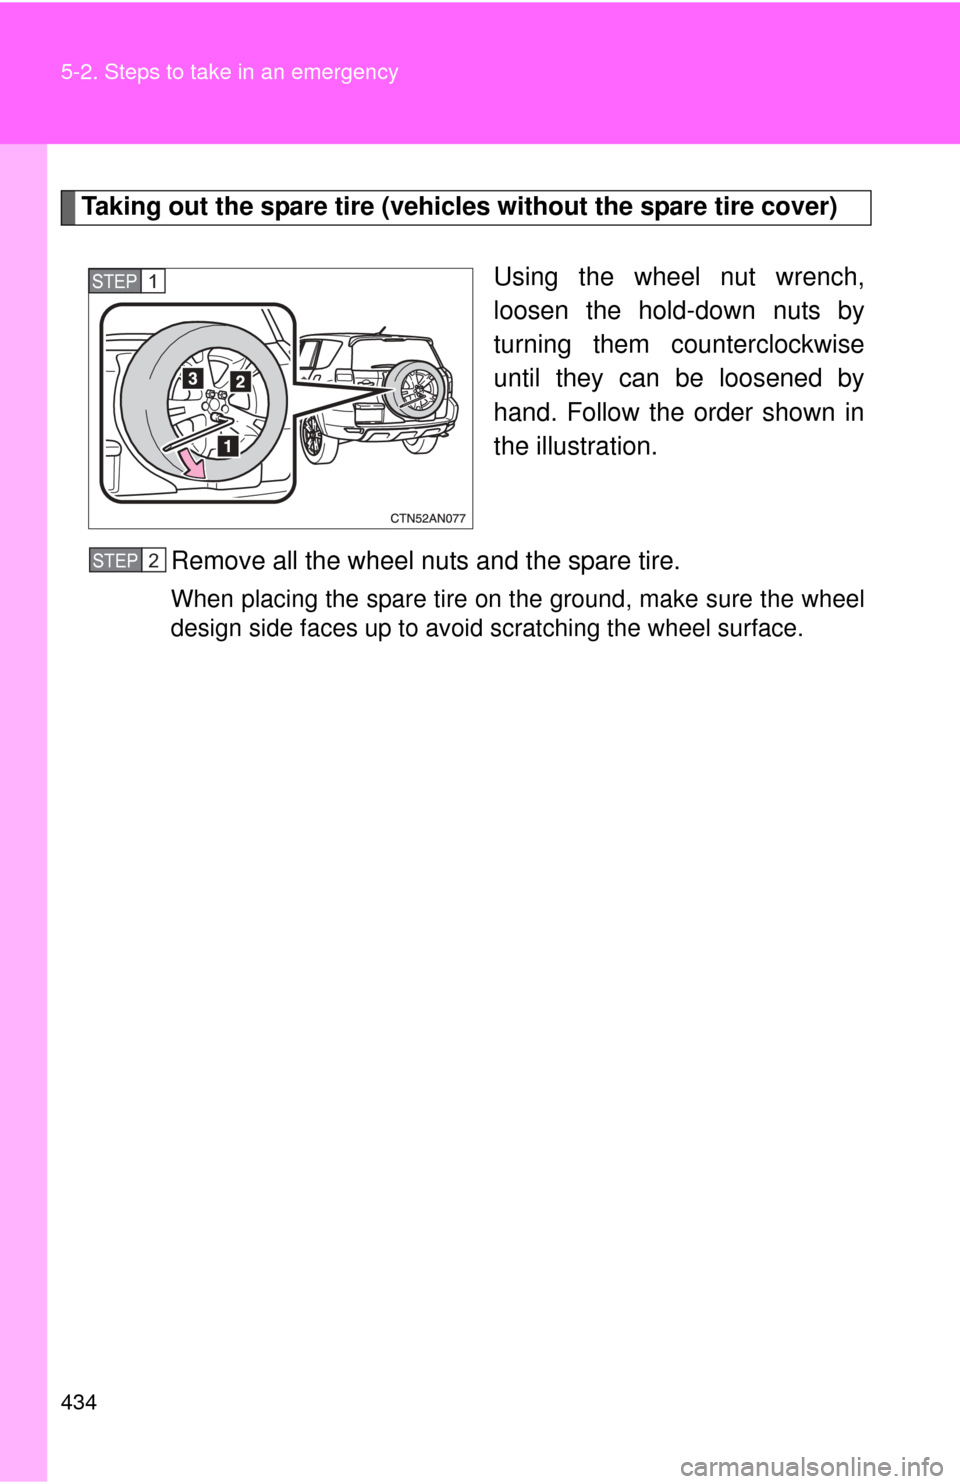
Taking out the spare tire (vehicles without the spare tire cover) Using the wheel nut wrench,
loosen the hold-down nuts by
turning them counterclockwise
until they can be loosened by
hand. Follow the order shown in
the illustration.
Remove all the wheel nuts and the spare tire.
When placing the spare tire on the ground, make sure the wheel
design side faces up to avoid scratching the wheel surface.
STEP 1
STEP 2
Page 436 of 513
5
When trouble arises
435
5-2. Steps to take in an emergency
Replacing a flat tire
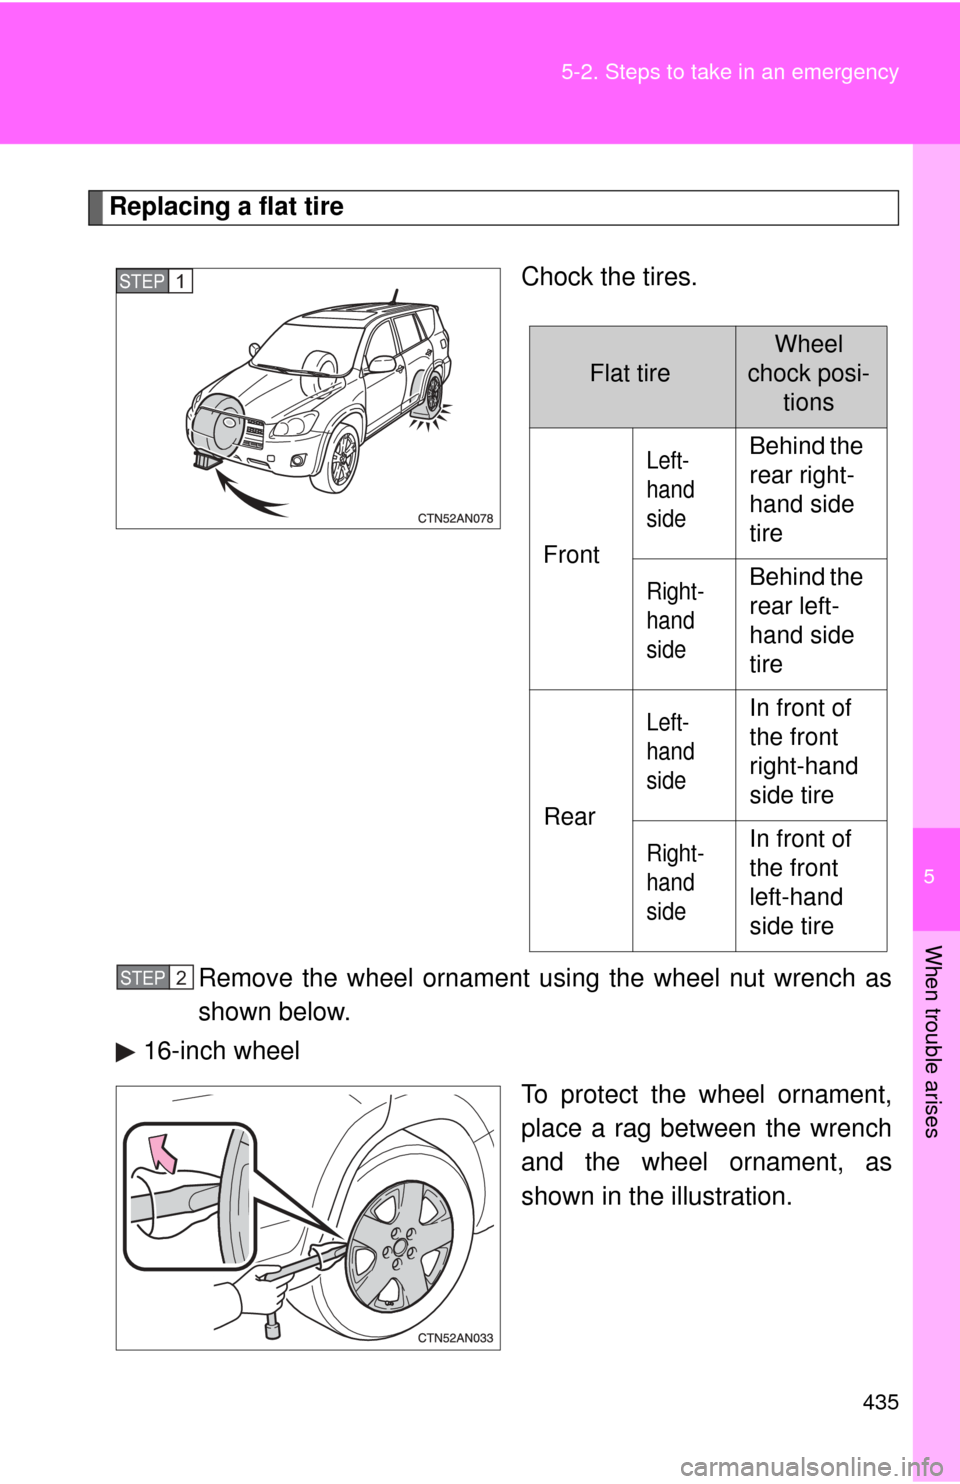
Chock the tires.
Remove the wheel ornament using the wheel nut wrench as
shown below.
16-inch wheel
To protect the wheel ornament,
place a rag between the wrench
and the wheel ornament, as
shown in the illustration.
STEP 1
Flat tire
Wheel
chock posi- tions
Front
Left-
hand
sideBehind the
rear right-
hand side
tire
Right-
hand
sideBehind the
rear left-
hand side
tire
Rear
Left-
hand
sideIn front of
the front
right-hand
side tire
Right-
hand
sideIn front of
the front
left-hand
side tire
STEP 2
Page 437 of 513
436 5-2. Steps to take in an emergency
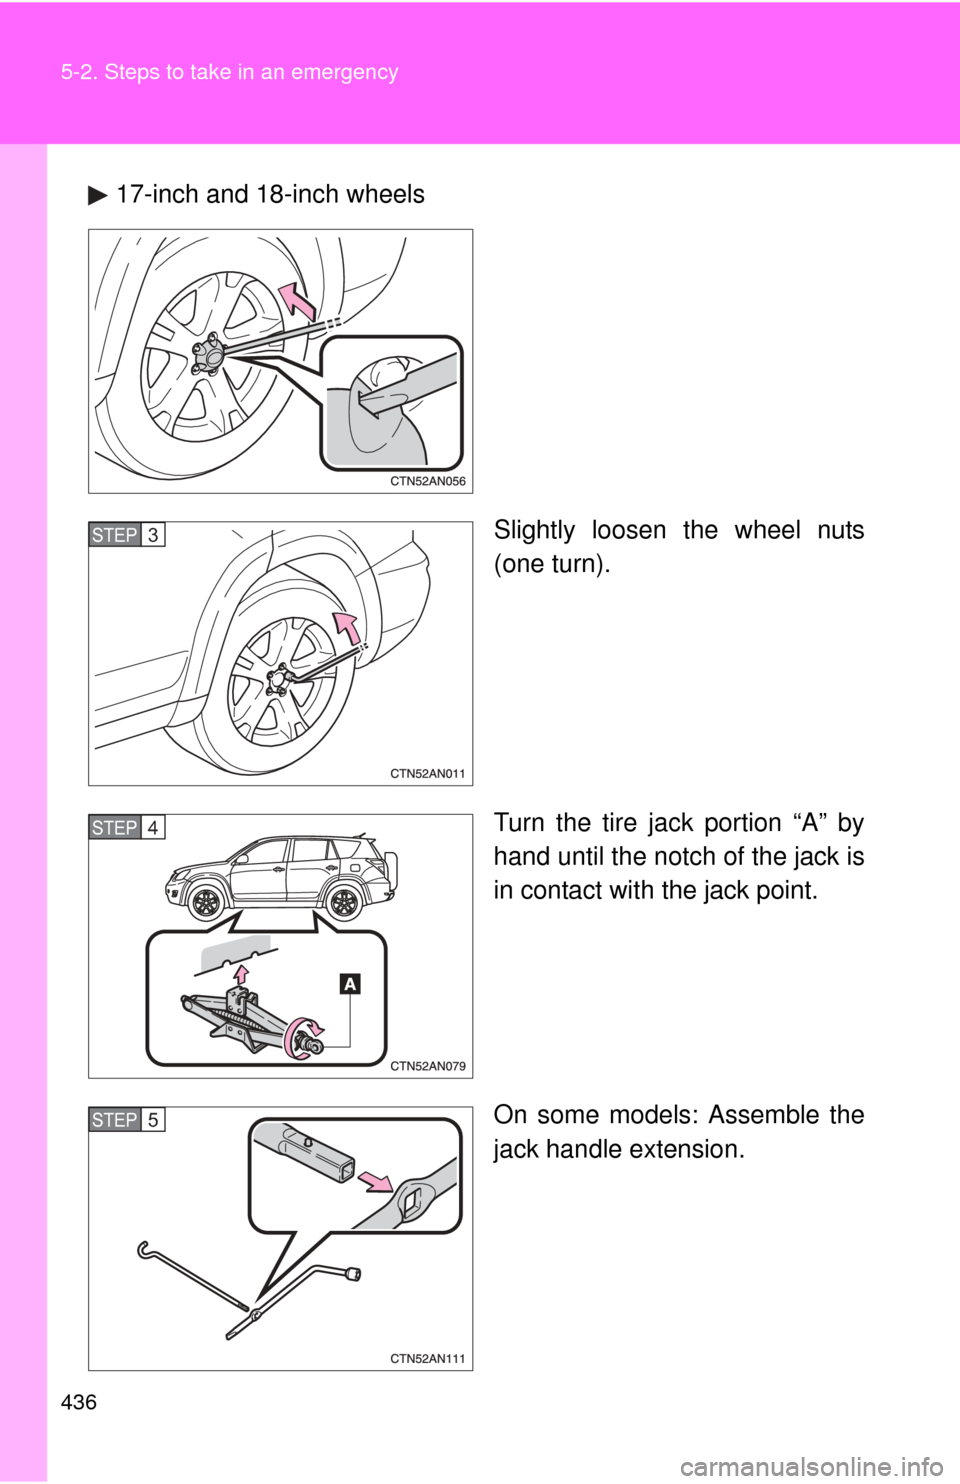
17-inch and 18-inch wheelsSlightly loosen the wheel nuts
(one turn).
Turn the tire jack portion “A” by
hand until the notch of the jack is
in contact with the jack point.
On some models: Assemble the
jack handle extension.
STEP 3
STEP 4
STEP 5
Page 438 of 513
5
When trouble arises
437
5-2. Steps to take in an emergency
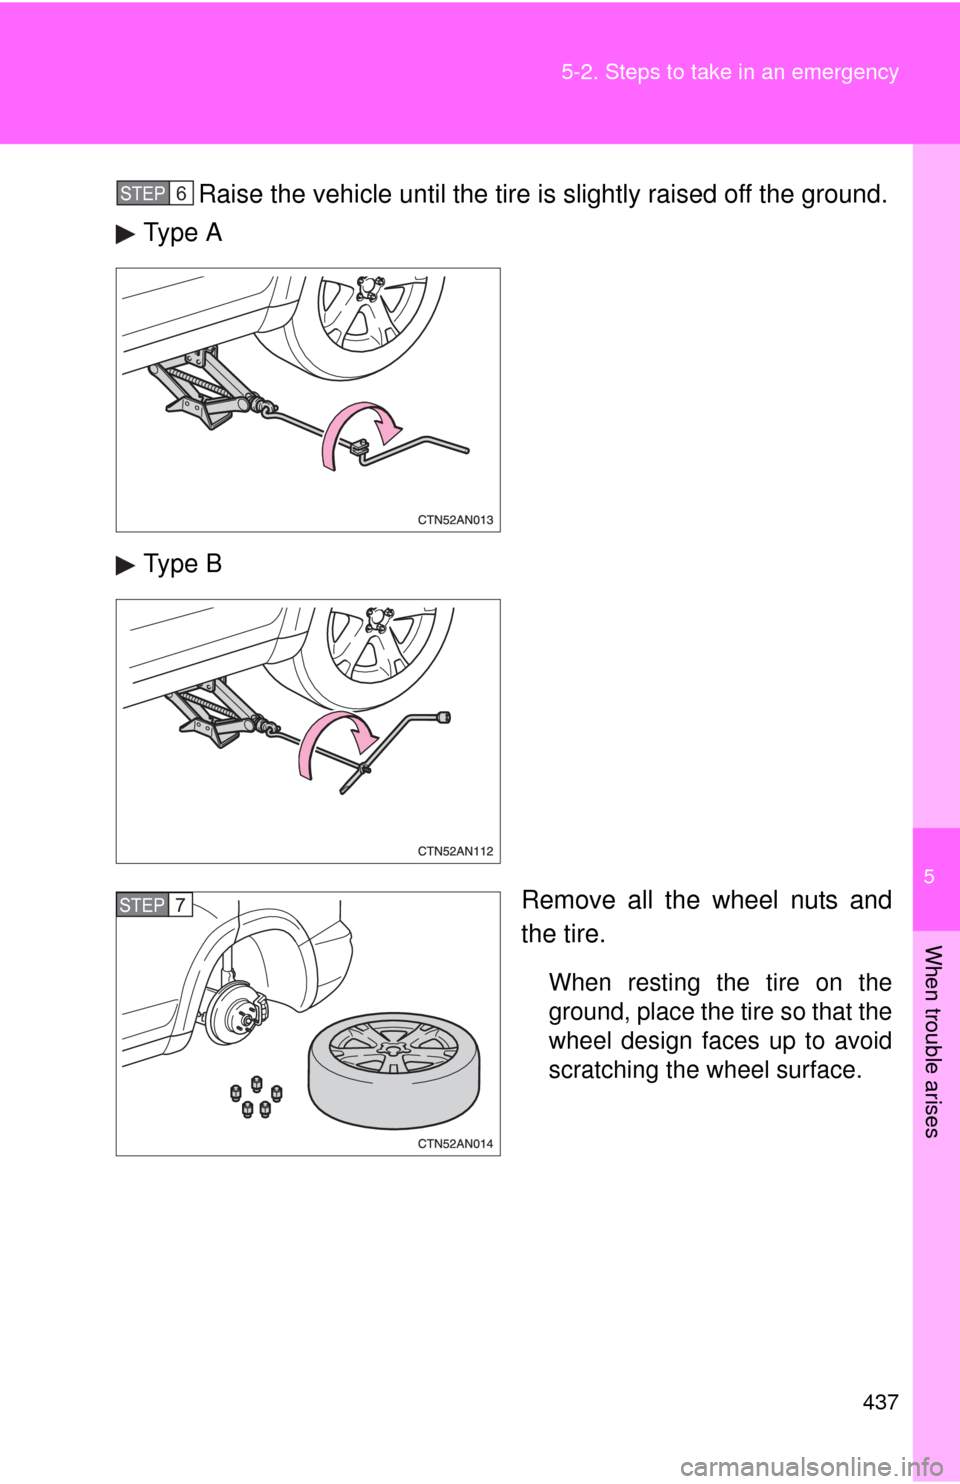
Raise the vehicle until the tire is slightly raised off the ground.
Type A
Type B
Remove all the wheel nuts and
the tire.
When resting the tire on the
ground, place the tire so that the
wheel design faces up to avoid
scratching the wheel surface.
STEP 6
STEP 7
Page 439 of 513
438 5-2. Steps to take in an emergency
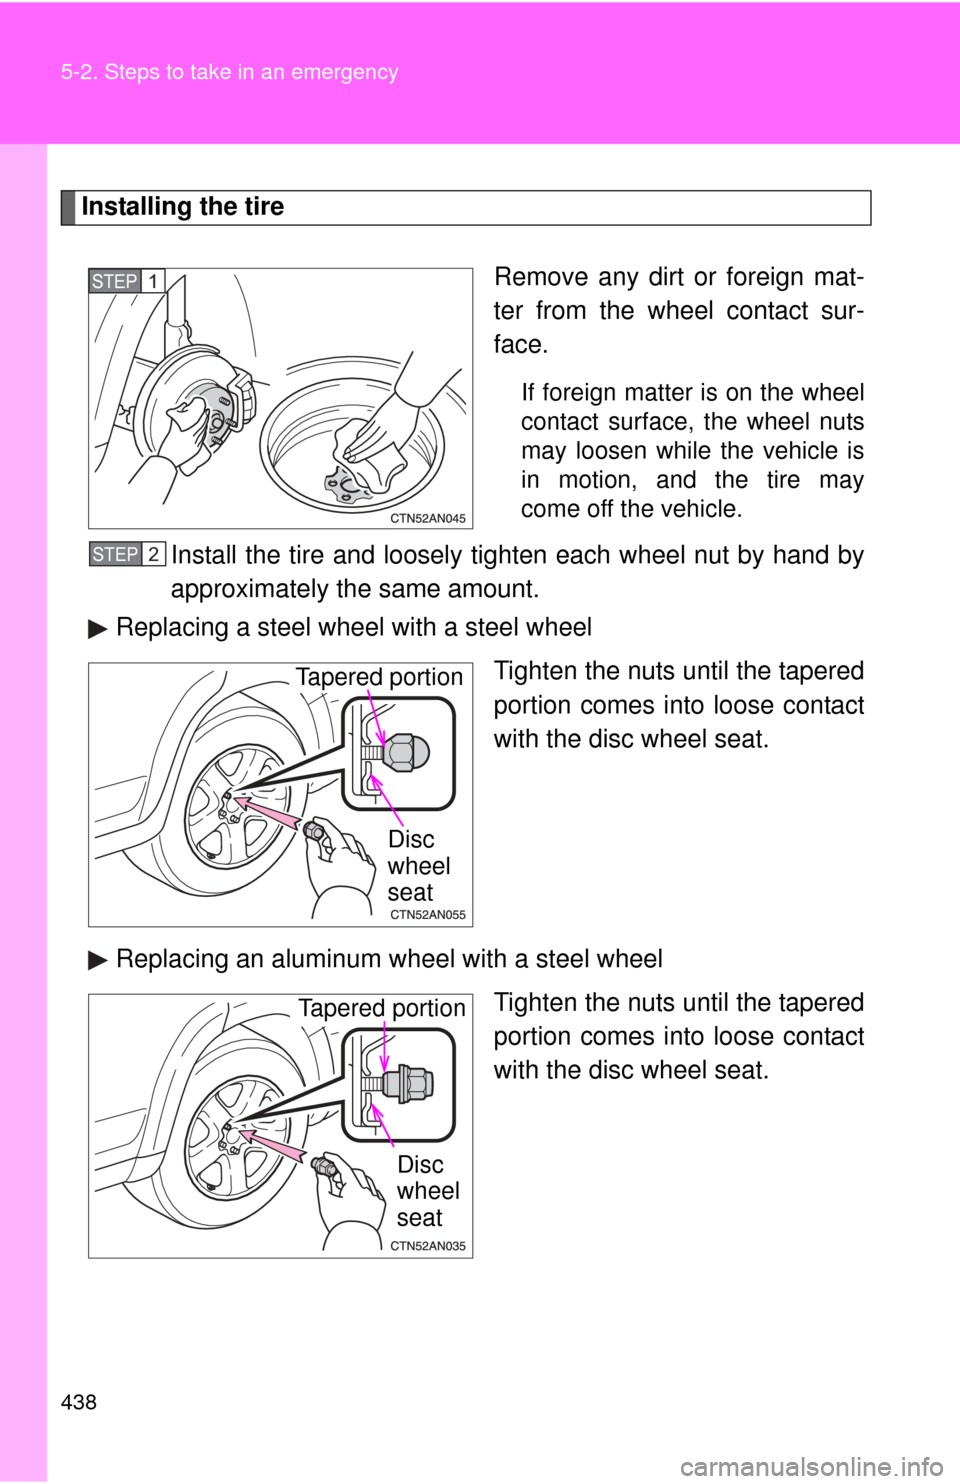
Installing the tireRemove any dirt or foreign mat-
ter from the wheel contact sur-
face.
If foreign matter is on the wheel
contact surface, the wheel nuts
may loosen while the vehicle is
in motion, and the tire may
come off the vehicle.
Install the tire and loosely tighten each wheel nut by hand by
approximately the same amount.
Replacing a steel wheel with a steel wheel
Tighten the nuts until the tapered
portion comes into loose contact
with the disc wheel seat.
Replacing an aluminum wheel with a steel wheel Tighten the nuts until the tapered
portion comes into loose contact
with the disc wheel seat.
STEP 1
STEP 2
Tapered portion
Disc
wheel
seat
Tapered portion Disc
wheel
seat
Page 440 of 513
5
When trouble arises
439
5-2. Steps to take in an emergency
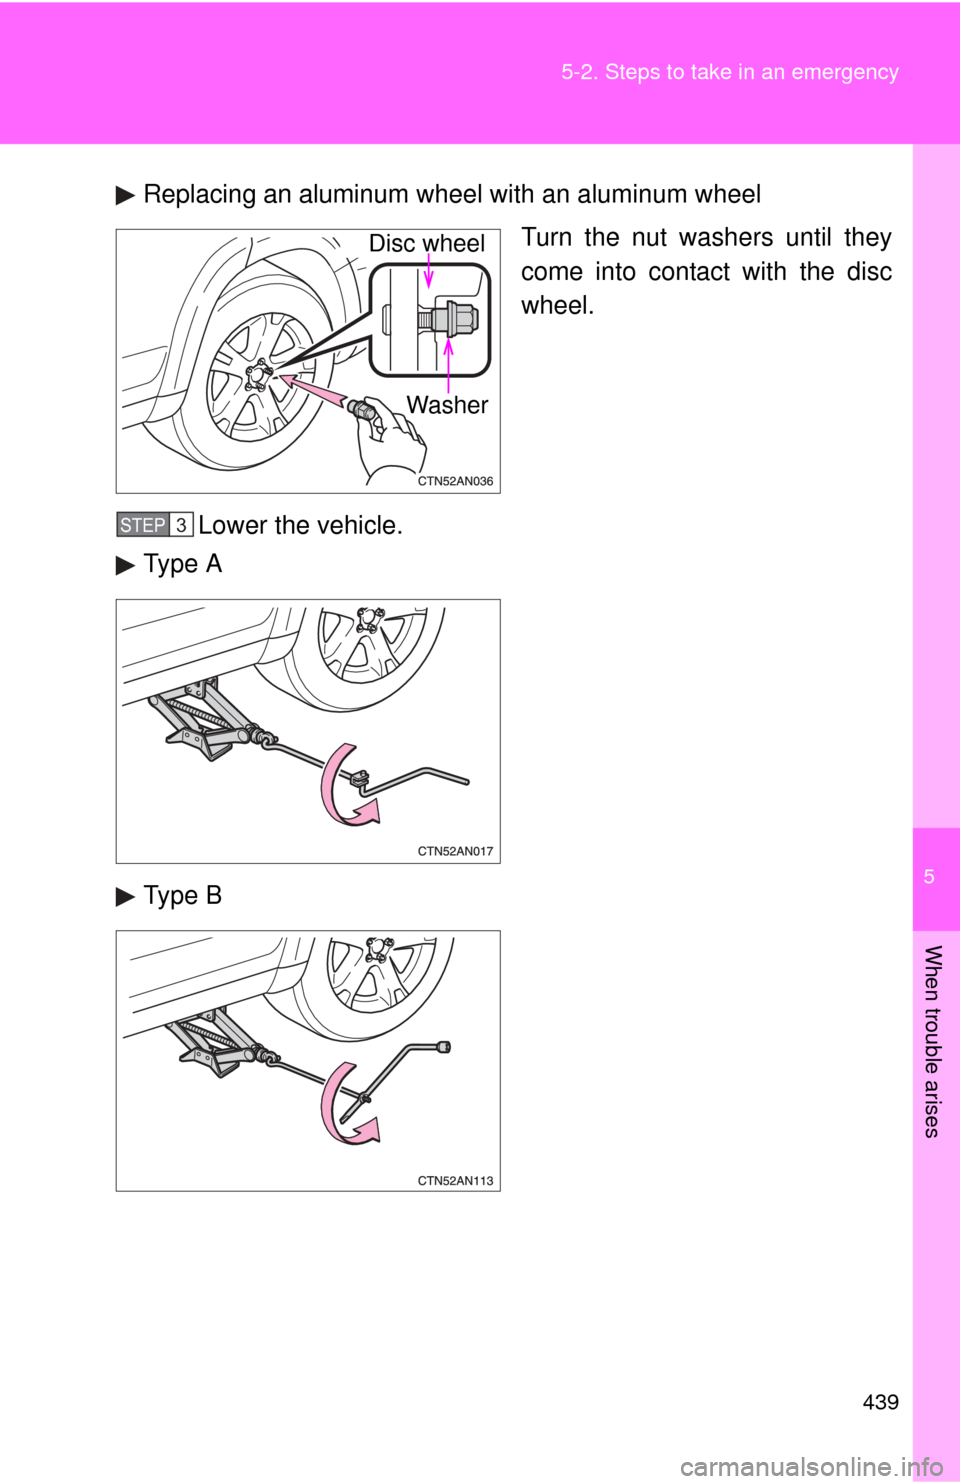
Replacing an aluminum wheel with an aluminum wheel
Turn the nut washers until they
come into contact with the disc
wheel.
Lower the vehicle.
Type A
Type B
Disc wheel
Washer
STEP 3
Trending: spare tire location, child restraint, Smart key, Eyelet, glove box, wiper blades, radio antenna
