light TOYOTA RAV4 2019 Accessories, Audio & Navigation (in English)
[x] Cancel search | Manufacturer: TOYOTA, Model Year: 2019, Model line: RAV4, Model: TOYOTA RAV4 2019Pages: 244, PDF Size: 6.8 MB
Page 28 of 244
282-1. Basic information before operation
gestures.
●Flick operations may not be per-
formed smoothly at high altitudes.
●If the system does not respond to
touching a screen button, move
your finger away from the screen
and then touch it again.
●Dimmed screen buttons cannot be
operated.
●The displayed image may become
darker and moving images may
be slightly distorted when the
screen is cold.
●In extremely cold conditions, the
screen may not be displayed and
the data input by a user may be
deleted. Also, the screen buttons
may be harder than usual to
depress.
●When you look at the screen
through polarized material such as
polarized sunglasses, the screen
may be dark and hard to see. If
so, look at the scr een from differ-
ent angles, adjust the screen set-
tings on the display settings
screen or take off your sun-
glasses.
●When is displayed on the
screen, select to return to the
previous screen.
The operable areas of the
capacitive touch screen buttons
use capacitive touch sensors
and may not operate properly in
the following situations:
If the screen is dirty or wet
If a source of strong electro-
magnetic waves is brought
near the screen
If a glove is worn during oper-
ation
If the screen is touched by a
fingernail
If a stylus is used to operate
the buttons
If your palm touches the oper-
able area of another button
during operation
If a button is touched quickly
If the operable part of a
capacitive touch screen but-
ton is touched by or covered
with a metal object, such as
Touch screen operation
This system is operated
mainly by the buttons on
the screen. (Referred to as
screen buttons in this man-
ual.)
When a screen button is
touched, a beep sounds. (To
set the beep sound: P.56)
NOTICE
●To prevent damaging the
screen, lightly touch the screen
buttons with your finger.
●Do not use objec ts other than
your finger to touch the screen.
●Wipe off fingerprints using a
glass cleaning cloth. Do not use
chemical cleaners to clean the
screen, as they may damage
the touch screen.
Capacitive touch screen
buttons
Page 34 of 244
342-1. Basic information before operation
ton.
Select to turn day mode
on/off. (P.34)
Select to adjust the screen
display. ( P.34)
Select to adjust the camera
display.
●When the screen is viewed
through polarized sunglasses, a
rainbow pattern may appear on
the screen due to optical charac-
teristics of the scr een. If this is dis-
turbing, please operate the screen
without polarized sunglasses.
Depending on the position of the
headlight switch, the screen
changes to day or night mode.
This feature is available when
the headlight is switched on.
1 Select “Day Mode”.
●If the screen is set to day mode
with the headlight switch turned
on, this condition is memorized
even with the engine
The contrast and brightness of
the screen can be adjusted
according to the brightness of
your surroundings.
1 Select “General” or “Cam-
era”.
2 Select the desired item.
“Display (General)” screen
only: Select “<” or “>” to select
the desired display.
• “Contrast”
“+”: Select to strengthen the con-
trast of the screen.
“-”: Select to weaken the contrast of
the screen.
• “Brightness”
“+”: Select to brighten the screen.
“-”: Select to darken the screen.
Changing between day
and night mode
Adjusting the con-
trast/brightness
B
C
D
Page 54 of 244
542-2. Connectivity settings
If you are experiencing difficulties with Apple CarPlay, check the fol-
lowing table.
Troubleshooting
SymptomSolution
An Apple CarPlay connec-
tion cannot be estab-
lished.
Check if the device supports Apple CarPlay.
Check if Apple CarPlay is enabled on the con-
nected device.
For details, refer to
https://www.apple.com/ios/carplay/
.
Check if “Apple CarPlay” on the general set-
tings screen is set to on. ( P.56)
Check if the Lightning cable being used is certi-
fied by Apple Inc., and i f it is securely con-
nected to the devic e and USB port.
When the iPhone is c onnected using a USB
hub, etc., an Apple CarPlay connection may not
be established. Connect the lightning cable to
USB the port directly.
After checking all of the above, try to establish
an Apple CarPlay connection. ( P. 5 2 )
When an Apple CarPlay
connection is established
and a video is being
played, the video is not
displayed, but audio is
output through the sys-
tem.
As the system is not designed to play video
through Apple CarPlay, this is not a malfunc-
tion.
Although an Apple Car-
Play connection is estab-
lished, audio is not output
through the system.
The system may muted or the volume may be
low. Increase the system volume.
Page 55 of 244
552-2. Connectivity settings
2
Basic function
The Apple CarPlay screen
has artifacts and/or audio
from Apple CarPlay has
noise.
Check if the Lightning cable being used to con-
nect the device to the system is damaged.
To check if the Lightning cable is damaged
internally, connect the device to another sys-
tem, such as a PC, and check if the device is
recognized by the conn ected system. (The
device should begin charging when connected.)
After checking all of the above, try to establish
an Apple CarPlay connection. ( P. 5 2 )
The map display of the
Apple CarPlay Maps app
cannot be enlarged or
contracted with pinch
multi-touch gestures.
As the Apple CarPlay Maps app is not compati-
ble with pinch multi-touch gestures, this is not a
malfunction.
SymptomSolution
Page 56 of 244
562-3. Other settings
2-3.Other settings
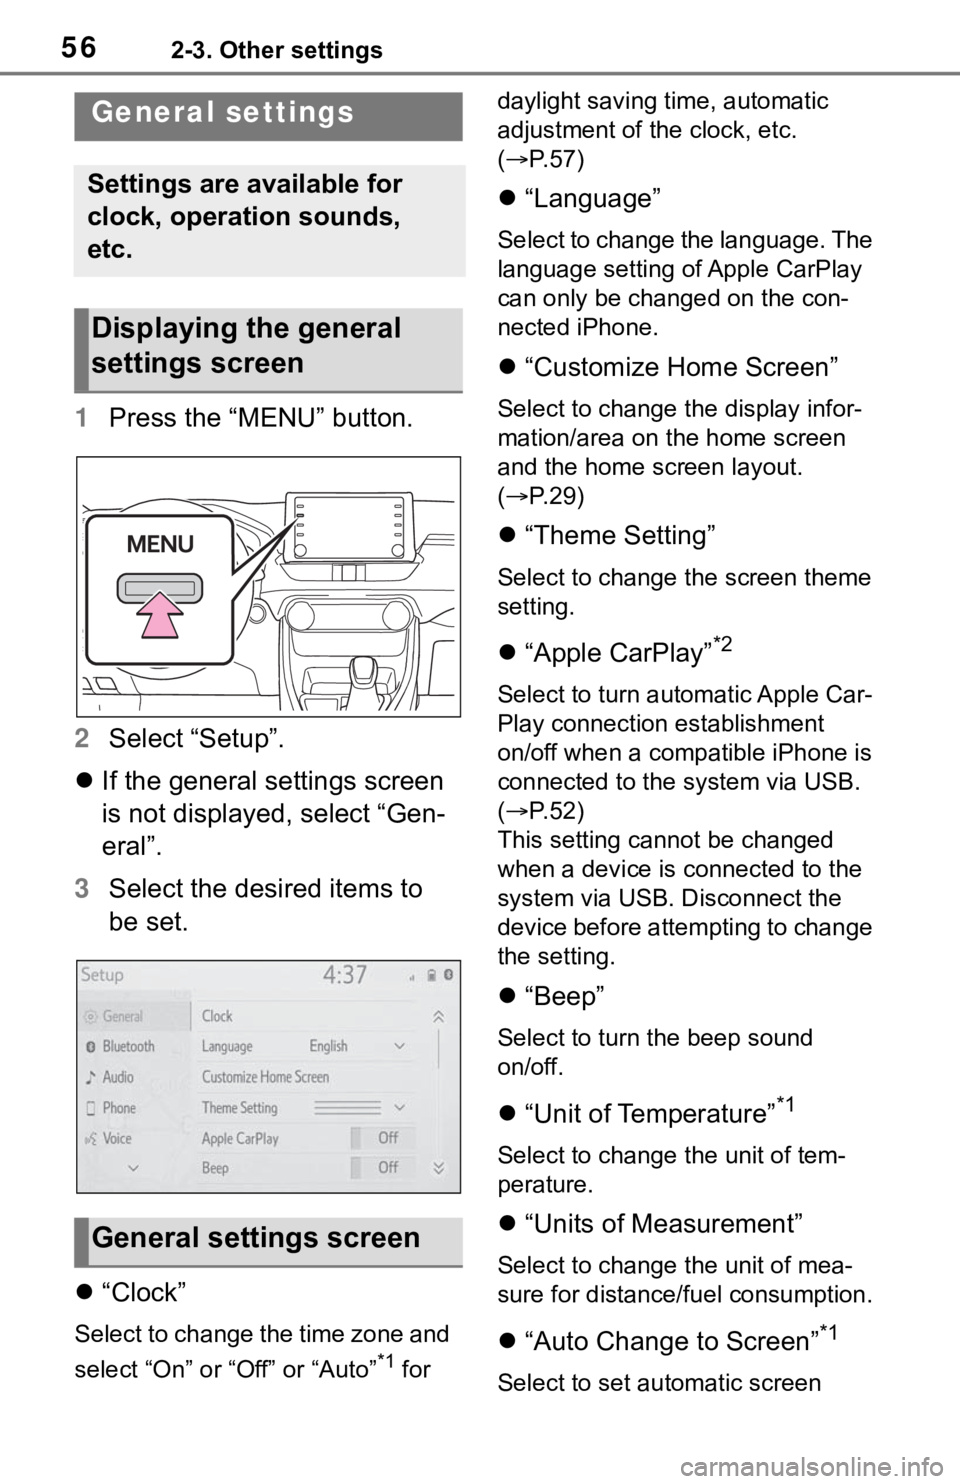
1Press the “MENU” button.
2 Select “Setup”.
If the general settings screen
is not displayed, select “Gen-
eral”.
3 Select the desired items to
be set.
“Clock”
Select to change the time zone and
select “On” or “Off” or “Auto”
*1 for daylight saving time, automatic
adjustment of the clock, etc.
(
P. 5 7 )
“Language”
Select to change the language. The
language setting of Apple CarPlay
can only be chan ged on the con-
nected iPhone.
“Customize Home Screen”
Select to change the display infor-
mation/area on the home screen
and the home screen layout.
( P. 2 9 )
“Theme Setting”
Select to change the screen theme
setting.
“Apple CarPlay”*2
Select to turn automatic Apple Car-
Play connection establishment
on/off when a compatible iPhone is
connected to the system via USB.
( P. 5 2 )
This setting cann ot be changed
when a device is connected to the
system via USB. Disconnect the
device before attempting to change
the setting.
“Beep”
Select to turn the beep sound
on/off.
“Unit of Temperature”*1
Select to change the unit of tem-
perature.
“Units of Measurement”
Select to change the unit of mea-
sure for distance/fuel consumption.
“Auto Change to Screen”*1
Select to set automatic screen
General settings
Settings are available for
clock, operation sounds,
etc.
Displaying the general
settings screen
General settings screen
Page 57 of 244
572-3. Other settings
2
Basic function
changes from the audio control
screen to the home screen to
on/off. When set to on, the screen
will automatically return to the
home screen from the audio control
screen after 20 seconds.
“Keyboard Layout”
Select to change the keyboard lay-
out.
“Delete Keyboard History”
Select to delete the keyboard his-
tory.
“Memorize Keyboard History”
Select to set the memorize key-
board history on/off.
“Animation”
Select to turn the a nimations on/off.
“Driver Setting”
Select to change the driver set-
tings. ( P. 5 8 )
“Delete Personal Data”
Select to delete personal data.
( P.59)
“Software Update”
Select to update software versions.
For details, contact your Toyota
dealer.
“Software Update Setting”*2, 3
Select to set software update set-
ting. ( P. 5 9 )
“Gracenote Database
Update”
Select to update Gracenote® data-
base versions. For details, contact
your Toyota dealer.
“Software Information”
Select to display the software infor- mation. Notices
related to third
party software used in this product
are enlisted. (This includes instruc-
tions for obtaining such software,
where applicable.)
“SW Sensitivity Level”
Select to change the capacitive
touch screen button sensitivity to 1
(low), 2 (medium), or 3 (high).
*1: Entune Premium Audio only
*2: This function is not made avail- able in some countries or areas.
*3: Vehicles equipped with DCM
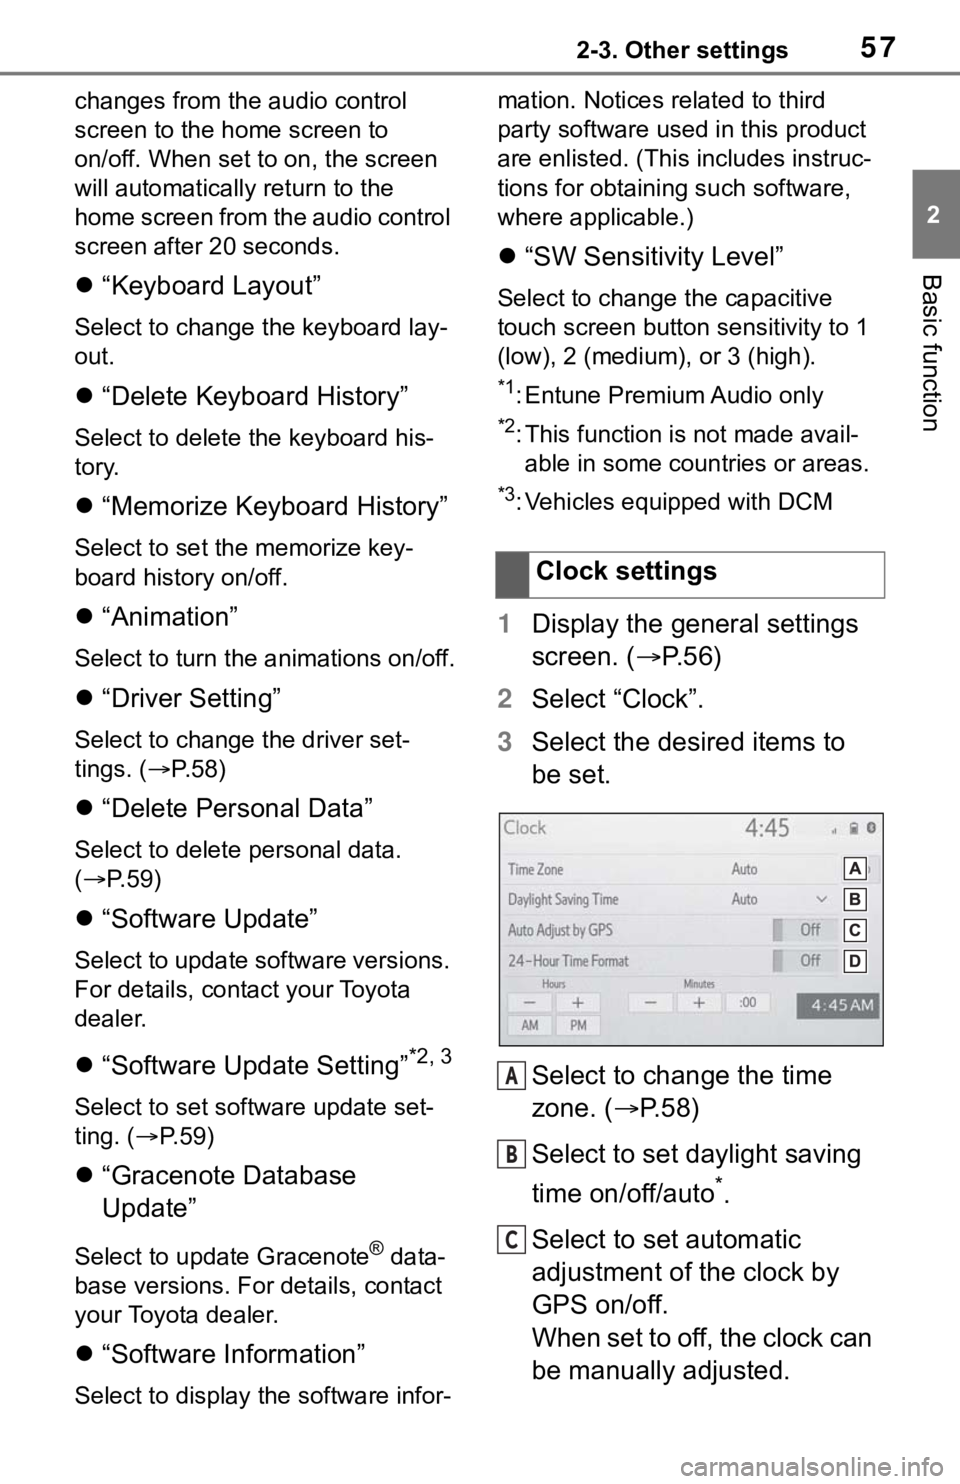
1 Display the general settings
screen. ( P. 5 6 )
2 Select “Clock”.
3 Select the desired items to
be set.
Select to change the time
zone. ( P.58)
Select to set daylight saving
time on/off/auto
*.
Select to set automatic
adjustment of the clock by
GPS on/off.
When set to off, the clock can
be manually adjusted. Clock settings
A
B
C
Page 147 of 244
1474-6. Tips for operating the audio/visual system
4
Audio/visual system
Station interference: When a
reflected signal and a signal
received directly from a radio
station are very nearly the same
frequency, they can interfere
with each other, making it diffi-
cult to hear the broadcast.
Static: AM is easily affected by
external sources of electrical
noise, such as high tension
power lines, lightening or electri-
cal motors. This results in static.
■SiriusXM
Cargo loaded on the roof lug-
gage carrier, especially metal
objects, may adversely affect
the reception of SiriusXM Sat-
ellite Radio.
Alternation or modifications
carried out without appropri-
ate authorization may invali-
date the user’s right to
operate the equipment.
■Certification
Use of the Made for Apple
badge means that an acces-
sory has been designed to
connect specifically to the
Apple product(s) identified in
the badge, and has been cer-
tified by the developer to meet
Apple performance stan-
dards. Apple is not responsi-
ble for the operation of this
device or its compliance with
safety and regulatory stan-
dards. Please note that the
use of this accessory with an
Apple product may affect
wireless performance.
iPhone, iPod, iPod classic,
iPod nano, iPod touch, and
Lightning are trademarks of
Apple Inc., registered in the
U.S. and other countries.
■Compatible models
The following iPod nano
®, iPod
touch
® and iPhone® devices
can be used with this system.
Made for
• iPhone 7
• iPhone 7 Plus
• iPhone SE
• iPhone 6s
• iPhone 6s Plus
• iPhone 6
iPod